Learn how to configure and use Protected View so you can inspect suspicious documents before working on them.
Learn how to make Microsoft Word remember your decision concerning a document’s trustworthiness so that you won’t need to make the same decision again later.
Learn how to designate a folder as a trusted location so that you can work more easily with documents that contain active content.
ALICE works at the head office of Northwind Traders, a large company with dozens of smaller branch locations around the country. Her job is to develop sales proposals for customers and involves working with business documents she often needs to download from different branch offices of the company, from the company’s Microsoft SharePoint team sites located in a private cloud hosted at the company’s data center, and occasionally from the Internet. Both customers and partners often send her documents via email as well.
Alice uses Microsoft Office applications like Word and Microsoft Outlook for performing many of her job-related tasks. The company recently upgraded all of its PCs at the head office from Office 2003 to the newer Office 2010 platform. Although Alice was happy using Office 2003, management informed everyone that with the rising danger of viruses and other malware infecting the company network through maliciously crafted Word documents, Microsoft Excel spreadsheets, and Microsoft PowerPoint presentations, the company has decided to move everyone at the head office to Office 2010 because of its enhanced security and privacy capabilities. Alice therefore must ensure that she is familiar with those security and privacy features of Office 2010 that may affect how she does her work.
On the other hand, the company is also trying to cut costs, especially at the numerous branch offices, where the number of employees often changes and there is no full-time IT administrator on the premises. So, instead of deploying Office 2010 at these locations, the company has decided to use subscriptions to Office 365 instead so that employees at these offices can use the Office Web Apps to work with documents stored on team sites hosted by Microsoft SharePoint Online. The company thus currently uses a hybrid cloud solution consisting of its own private cloud mainly for the head office, and the public cloud service SharePoint Online for use by its branch offices. Eventually, Northwind hopes to settle on one approach or the other (either private or public cloud), but like many companies today, it’s constantly in transition.
Alice also travels from time to time in the performance of her job. When she visits the company’s branch locations, she often uses one of their PCs to catch up on her work using Word Web App, so she also needs to be familiar with the security and privacy features available in Word Web App through Office 365.
Let’s look over Alice’s shoulder and watch today as she does her job . . .
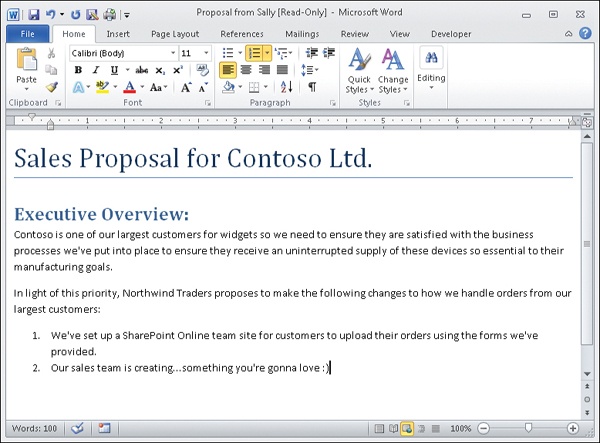
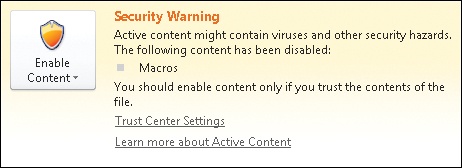
Sally has just emailed Alice a copy of a sales proposal she’s been working on. Alice uses Outlook to download Sally’s message from the company mail server. When she tries to open the Word document attached to Sally’s message, she sees this:
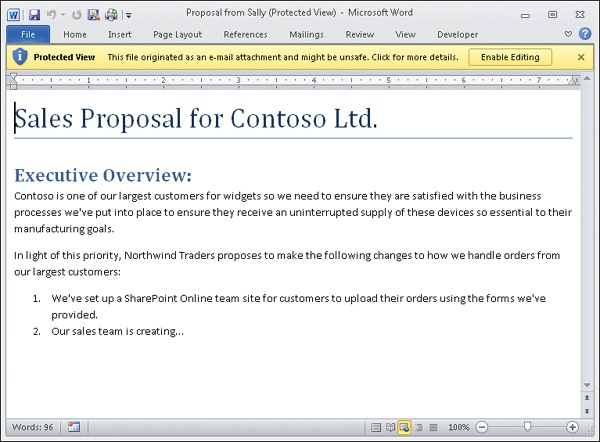
Being in heads-down busy mode, Alice momentarily ignores the yellow message bar at the top of the document and tries to begin working on finishing the proposal. But when she tries to type text into the document, nothing happens. Then she notices that each time she tries to enter text, a message appears in the Status bar at the bottom of the document as shown:
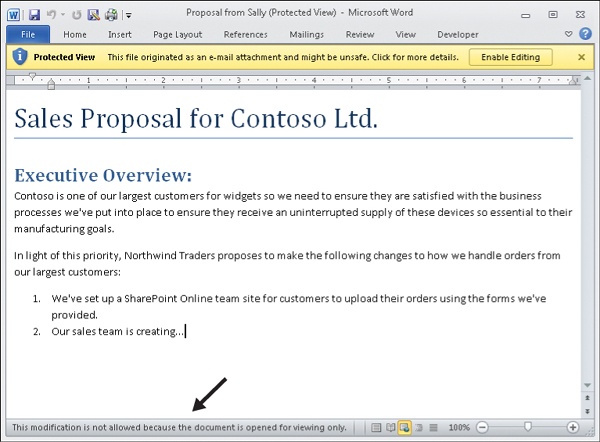
This finally has Alice’s attention. Clearly, the Word document attached to Sally’s email can only be viewed, not modified. The reason this is happening is because Word documents attached to email messages in Outlook have some hidden data associated with them. This hidden data is called the file’s zone information, and it is added by something called the Attachment Execution Services (AES) to indicate that the file came from an untrusted source.
When Word 2010 determines that the document you are trying to open comes from an untrusted source, the program automatically opens the document in Protected View. A common metaphor used to describe Protected View is the sandbox. When children are playing in a sandbox, they can safely build castles and destroy them without any impact on the real world around them. In other words, sandboxes are “safe” environments where kids can play with no problems. Protected View is similar to this because it provides a safe environment where you can view Word documents without worrying about any dangerous content they might contain.
Dangerous content? What kind of dangerous content can Word documents contain? And how often is this a problem? Is it really something that office workers like Alice should worry about?
Absolutely! In 1999, a virus called Melissa emerged and was spread through infected Word documents. When a user opened an infected document attached to an email message, the virus automatically used Outlook to send copies of the document to the first 50 contacts in the user’s address book. Once the 50 recipients opened the attached document, the virus replicated itself again, resulting in 50 x 50 = 2,500 emails, and so on. The result of all this was that Internet email systems around the world were quickly overwhelmed and crashed by the flood of messages created by the virus. Since then, numerous other attempts have been made by malicious hackers to use Word documents, Excel spreadsheets, and other Office files to attack corporate networks.
That’s one reason why it’s so important to be able to understand and properly use the security features of Word and other Office programs. Malicious hackers know that users are often the weakest link in the chain as far as corporate security goes. That’s why infected attachments often have alluring file names like ILOVEYOU or seem to have come from a trusted source, like a newsletter service. After all, who wouldn’t want to open a file like that?
What kind of dangerous content can a Word document contain? Here are a few examples of potentially dangerous content you should be aware of:
Hyperlinks that lead users to malicious websites
Active content such as ActiveX controls, macros created with Microsoft Visual Basic for Applications (VBA), and other forms of executable content.
Data connections (more common in Excel spreadsheets)
Note that such types of content aren’t dangerous per se; it’s only when they are maliciously crafted that problems can occur. A maliciously crafted document can even contain executable code that can infect your computer if you simply open the document.
The yellow message bar alerts Alice that Sally’s proposal has been opened in Protected View. When a document has been opened in Protected View, any malicious content it contains will not execute. For example, if the document contains a macro, the macro will not run.
Once the proposal has been opened in Protected View, Alice can scroll through the document to see what’s in it. Protected View thus provides a safe read-only environment that allows Alice to inspect the contents of the document. This can be helpful in determining whether the document comes from a legitimate source that can be trusted.
What else can Alice do with a document opened in Protected View? She can copy text from the document and paste it into other programs. This may be useful in situations where there is significant doubt concerning the trustworthiness of the document, because it allows you to extract useful content from the document while leaving the document itself safely in the sandbox.
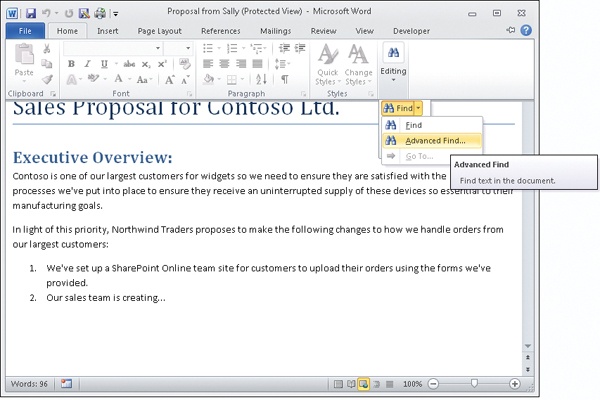
Alice also can search for text within the document. To do this, she clicks the Home tab on the ribbon and notices that although most of the controls on the ribbon are unavailable (dimmed), the Editing control is available and allows her to select Find or Advanced Find, as shown here:
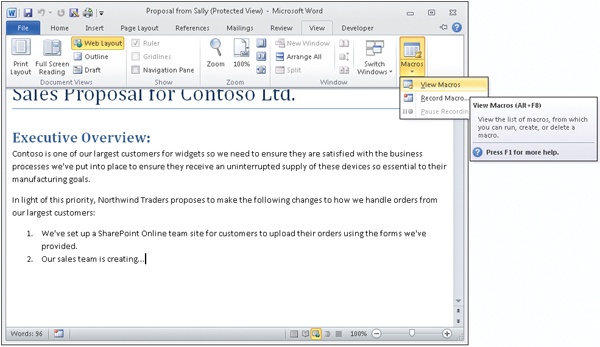
Some of the controls on the View tab on the ribbon are also available. For example, Alice can display a list of macros contained within the document, which may help her evaluate the trustworthiness of the document:
Five-Minute Exercise
Attach a document to a new message in Outlook and send it to yourself. Once you receive the message, open the attachment in Word. With the document now open in Protected View, explore the ribbon to discover which Word features work in Protected View and which don’t.
After exploring which ribbon controls are available in Protected View, Alice decides to save the document before going any further. She clicks Save on the Quick Access Toolbar at the upper-left corner of the Word window, and this dialog box appears in response:
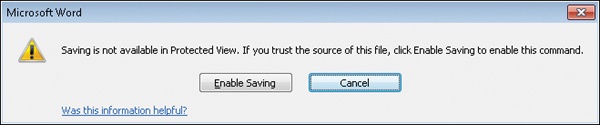
Protected View doesn’t allow you to save documents. The reason is that if the document contains malicious content, you don’t want it on your hard drive. Alice then tries to print the document, but this action fails as well, with the following message displayed:
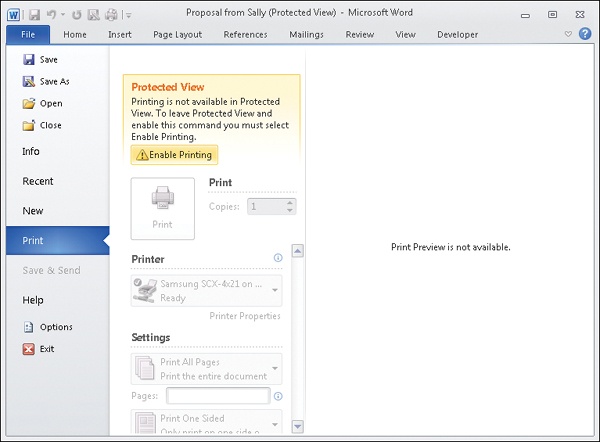
The message displayed above in Backstage View (accessed on the File tab on the ribbon) indicates that you have to leave the sandbox if you want to print the document. The reason for this has to do with how Windows must process documents in order to print them. To minimize the chance of malicious content within a document being executed during the print process, printing functionality is disabled in Protected View.
Tip
Another way to stay safe when you receive a suspicious document attached to an email is not to open the attachment at all in Word. Instead, simply preview the attachment in Outlook, because macros won’t run by default unless they have been specifically enabled in the previewer (this behavior is configurable by your administrator).
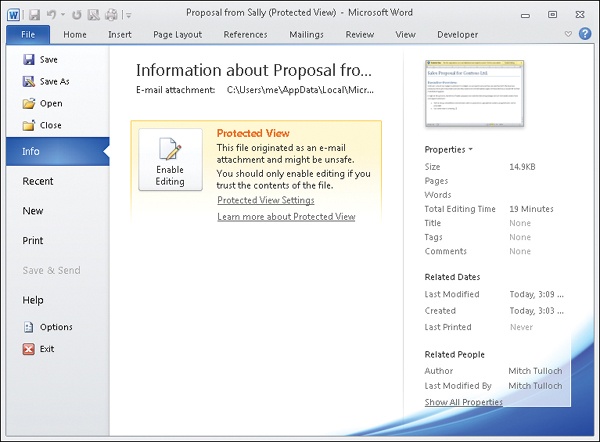
Alice decides to explore Protected View further, so she selects the Info option in Backstage View and clicks the link that says Protected View Settings, as follows:
Doing this opens the Trust Center with the Protected View settings displayed, as shown on the following page:
Tip
If the document you opened in Word is not opened in Protected View, you still can get to the settings for configuring Protected View by clicking File on the ribbon, clicking Options, selecting Trust Center in the Word Options dialog box, clicking Trust Center Settings to open the Trust Center, and selecting Protected View.
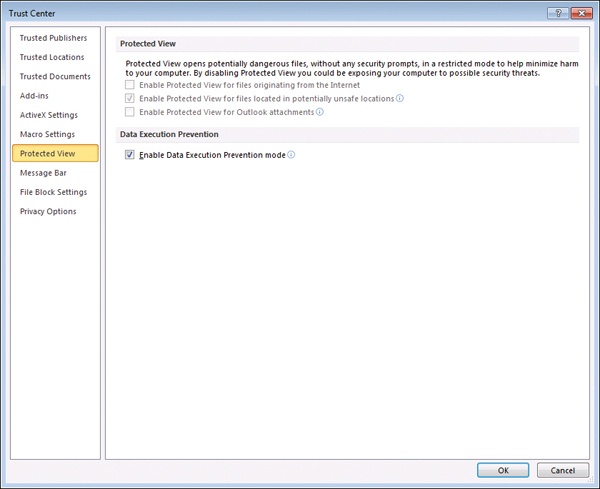
Alice wonders why some of the settings for configuring Protected View are unavailable (dimmed), so she calls the help desk. The answer she gets from the staff is that the dimmed settings have been configured by IT and are enforced for all Office users using Group Policy. Alice wonders for a moment whether she should try to circumvent these policies that IT has put in place. What do you think? If you’re not sure, refer back to Chapter 1 and you’ll find the answer there.
If Alice were working in an environment where these settings were not enforced by policies that IT put in place, or if her computer were an unmanaged computer (belonging to a workgroup instead of a domain), then she would be able to configure each of the Protected View settings shown above. By default, all three of these settings are enabled when not governed by policy, and best practice is generally to leave them all enabled. Table 2-1 explains what each of these settings means and provides some insight into when you might consider disabling them.
Table 2-1. Settings for Configuring the Behavior of Protected View in Word 2010
Recommendations | |
|---|---|
Enable Protected View For Files Originating From The Internet | Documents that you download from the Internet will open automatically in Protected View. Because a lot of malware is floating around on the Internet, it’s usually best to leave this setting enabled. If you choose to (or are allowed to) download documents only from trusted websites, then you could consider disabling this setting. If you do so, however, make sure that the antivirus software on your computer is up to date, just in case. And if you’re sure a downloaded document can be trusted, you also can remove the “from the Internet” part from a downloaded document manually by opening the document’s properties in Windows Explorer and clicking Unblock. |
Enable Protected View For Files Located In Potentially Unsafe Locations | Certain folders, such as where Windows stores downloaded programs and the Temporary Internet Files folder used by Windows Internet Explorer, are considered potentially unsafe locations. As a result, when the user tries to open a document stored in these locations, the document opens in Protected View. Also, your administrator can designate additional folders, either on your computer or on the network, as potentially unsafe locations. If you frequently access documents stored in a specific folder or network share and find that they always open in Protected View, and if you consider this an unnecessary inconvenience, you might consider asking your administrator to remove the folder/share from the list of potentially unsafe locations determined by Group Policy. |
Enable Protected View For Outlook Attachments | Documents attached to email messages you receive via Outlook and try to open in Word are opened automatically in Protected View. Because email can sometimes be spoofed, a message that you think you’ve received from a colleague may actually have originated from someone with malicious intent. And sometimes a colleague might accidentally send or forward you a document that they think is harmless but is in fact maliciously crafted. Because of this, it’s a good idea to always leave this setting enabled. If you are not using Outlook as your email client, you could consider disabling this setting, but there is no real benefit gained from doing so. |
Five-Minute Exercise
Besides Word, two other Office 2010 programs (Excel and PowerPoint) also use Protected View. How are the Protected View settings in the Trust Center for these two applications similar to those for Word? How are they different?
See Also
If you’re interested in learning more about how Microsoft ensures the security of its Office 365 offerings, you can read the “Security in Office 365” white paper available from the Microsoft Download Center at http://www.microsoft.com/download/en/details.aspx?id=26552.
Alice feels confident that the proposal from Sally that she has open in Protected View can be trusted, so she decides to exit Protected View so she can continue to work on the proposal. There are several ways she can do this:
She can click Enable Editing on the yellow message bar above the document.
She can click Enable Saving if she had just tried saving the document to her hard drive.
She can click Enable Printing if she had just tried printing the document.
Regardless of the method Alice chooses, once the document exits Protected View, she can edit it, save it, or print it as needed:
This raises a question, however: How can Alice be sure the document that Sally sent her can be trusted? There’s no hard and fast answer to this, but here are some guidelines that may help you decide whether to enable editing for a document opened in Protected View:
You trust the individual(s) who created and/or sent you the document, and you know that they have up-to-date antivirus software on their computers.
You also have up-to-date antivirus software on your computer and, if necessary, you have run an antivirus check against the document manually.
You’ve scrolled through the document and nothing appears strange or out of place in it. You’ve also used the View tab on the ribbon to see if the document contains any macros and there are none present.
You have your fingers crossed.
If all of the above are true (well, may be the last one isn’t strictly necessary), you probably can go ahead and enable editing for the document—unless, of course, management has provided you with different instructions in the corporate security policy concerning documents that open in Protected View. For example, management might decree that “Users must immediately notify the help desk when a document they receive opens in Protected View, and they must not enable editing for the document unless advised to do so by the help desk.” Remember, when in doubt, follow the rules.
Trying to open a document attached to an Outlook email you received isn’t the only scenario that will trigger Word to open a document in Protected View. For example, someone later gave Alice a USB flash drive containing some older Word 2003 documents; that is, they were .doc files as opposed to the newer .docx file format that Word 2007 and Word 2010 use by default. When Alice tried to open one of these older .doc files in Word, the following red message bar was displayed:
Clicking this message bar opens Backstage View, where the following is displayed:
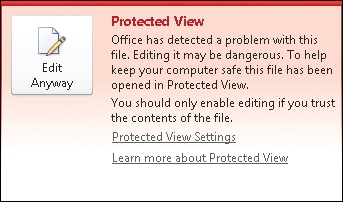
Should Alice click Edit Anyway and exit Protected View so she can edit the document? Generally, the answer in this kind of situation should be “no.” That’s because what’s likely happened here is that the older .doc file failed what is known as Office File Validation, which means that the structure of the document doesn’t conform to the standard rules for the .doc file format. This could be because the document accidentally became corrupted somehow, and Word might be able to repair it if you tried to open it. But it also could be because the document has been maliciously tampered with; for example, someone may have inserted hidden executable content within it that can wreak havoc on your computer, or even the entire corporate network. So, in general, when you see this kind of red message bar, you should avoid exiting Protected View and contact the help desk staff instead so they can investigate further. At best, you might use copy and paste to copy content from the corrupt document into a new document so that you can use the content in the corrupt document if needed.
In some environments, when you try to open a .doc file that fails validation, instead of seeing the red message bar, you see a dialog box like this:
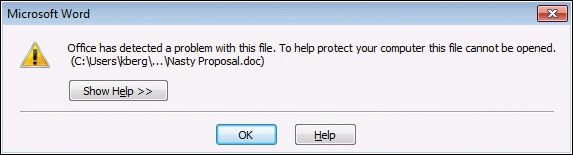
This occurs when your administrator has configured Group Policy to prevent users from opening files that fail validation even in Protected View. The administrator has likely done this because of security concerns, so you shouldn’t try to find a way to circumvent this control.
If you download a document from a website on the Internet and then try to open the document in Word, it may open in Protected View and display a message bar like this:
If for some reason your administrator has disabled the “Enable Protected View for files originating from the Internet” policy described earlier, then this won’t occur. Instead, the downloaded document will open normally in Word and can be edited immediately.
If a document opens in Protected View and you decide to exit Protected View so that you can edit the document, this may not be the end of the matter as far as security goes. For example, when Alice enabled editing for Sally’s proposal, the document exited Protected View and then could be edited. But if Sally’s proposal also happened to contain some macros (and your administrator has configured macro security accordingly), then Alice might have seen a second yellow message bar like this:
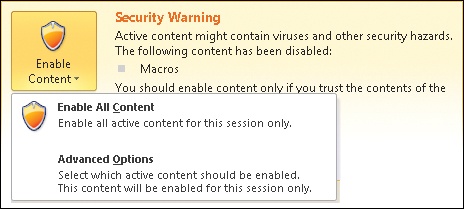
Although the document now can be edited by Alice, any macros in it will not execute unless she enables macro functionality in the document. Alice can do this in two ways. First, she can simply click Enable Content in the above message bar to enable all macros within the document. Second, she can click the File tab on the ribbon to display Backstage View, which shows the following:
Clicking Enable Content displays two options, allowing Alice either to enable all active content in the document or to enable only selected active content:
If Alice chooses the second option, Word displays an additional dialog box that offers further options for dealing with macros in the document, as shown on the following page:
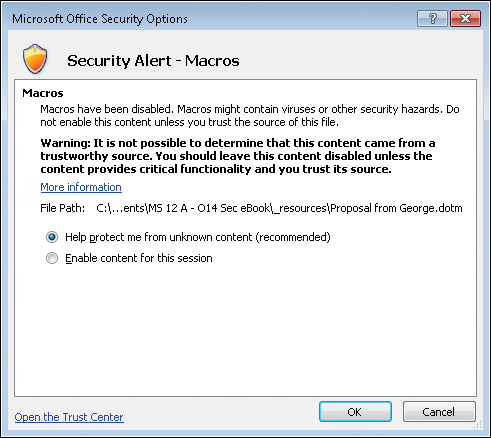
Similar message bars, Backstage options, and dialog boxes are displayed if the document contains other types of active content, such as add-ins or ActiveX controls.
If Alice decides to enable active content in the document, Word considers her action to be a “trust decision” and saves a record of her decision in the registry on her computer. This way, the next time Alice attempts to open the same document, Word “remembers” that Alice previously decided to trust the active content in the document and automatically enables macro functionality in the document. In other words, Alice only sees the above security warning once if she decides to click Enable Content on the yellow message bar. If she decides not to click Enable Content, then no trust decision has been made on her part, and the next time she attempts to open the document, Word once again displays the security warning. Note that the Advanced Options for enabling active content enable such content only for the current session—that is, until the document is closed.
This feature of the Office 2010 applications Word, Excel, PowerPoint, Microsoft Access, and Microsoft Visio is known as Trusted Documents, and it can be configured from the Trust Center as shown on the next page (provided your administrator hasn’t used Group Policy to block you from changing these settings):

Table 2-2 explains what each of these settings means and explains how you might want to configure them (if your administrator allows this).
Table 2-2. Settings for Configuring the Behavior of Trusted Documents in Word 2010
Setting | Recommendations |
|---|---|
Allow Documents On A Network To Be Trusted | Trust decisions will be remembered for documents stored on network shares. This setting is enabled by default unless overridden by policy. If the administrator has configured access control permissions properly for the shared folder, and if you trust the other users who have access to this share, you could consider leaving this setting enabled if policy doesn’t prevent you from doing so. If you disable this setting, the yellow message bar will be displayed whenever the user attempts to open a document stored in the shared folder. |
Trust decisions will not be remembered. The result is that the yellow message bar is displayed each time the user attempts to open the document. This setting is disabled by default unless overridden by policy. If you are concerned about the possibility of unanticipated active content being present in documents you work with, you could consider enabling this setting. Doing this will cause the yellow message bar to be displayed each time the user attempts to open any document. However, this approach tends to be ineffective from a security standpoint because eventually users get accustomed to just clicking Enable Editing whenever they see a yellow message bar, without even bothering to read the message bar. | |
Clear All Trusted Documents So They Are No Longer Trusted | Clicking this button clears all trust decisions the user previously made from the registry. You could consider doing this when you are finished with a big project and ready to start another. The reason is that only a limited number of trust decisions can be remembered, so clearing the list of Trusted Documents makes room for new trust decisions to be remembered. |
Another aspect of trust in Office 2010 applications is the feature known as Trusted Locations. This feature is available in Word, Excel, PowerPoint, Access, Visio, and Microsoft InfoPath. Users can specify trusted locations on a per-application basis from within the Trust Center, whereas administrators can use Group Policy do this and also specify trusted locations on a global basis for all supported Office applications.
A trusted location is basically a folder designated in such a way that any documents it contains are trusted. In other words, if you use Word to open a document stored in a trusted location, the document is opened for editing and all active content in it is enabled. Clearly, trusted locations are powerful and shouldn’t be abused. You must make sure that only appropriate content (content you believe is trustworthy) is stored in such locations.
Trusted locations can be either folders on your hard drive or shared folders on the network. By default, shared folders on the network cannot be trusted unless the user selects the Allow Trusted Locations On My Network (Not Recommended) checkbox, as shown below. Also by default, only certain folders used by Word are configured as trusted locations, specifically the default startup location for Word and some folders where templates are stored:
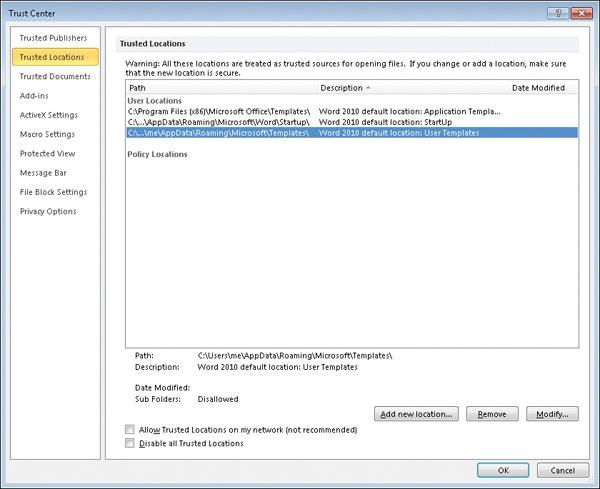
Let’s say that Alice decides to add a new trusted location, namely her Documents folder and any subfolders of this folder. She takes this step so that any documents she has saved in her Documents folder or its subfolders will open for editing automatically, with all active content enabled. Because Alice is careful what documents she saves in her Documents folder, she thinks this is an appropriate action for her to take. To do this, Alice clicks Add New Location in the Trusted Locations panel of the Trust Center shown above. Doing this opens a dialog box that lets her specify the folder she wants to designate as a trusted location and whether to include subfolders in her trust decision, as shown on the next page:
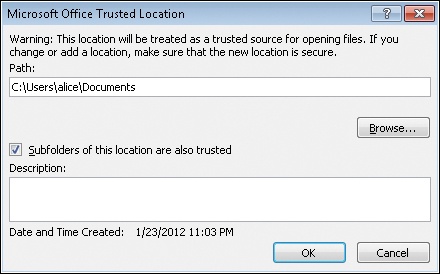
As with all security options in Office 2010 programs, users may be blocked from changing these settings if the administrator of the network has used Group Policy to enforce a desired configuration of settings.
Protected View provides a safe “sandbox” environment that lets you read, search, and even copy and paste from documents while preventing you from saving or printing them or executing any active content within them.
Trusted Documents allows users’ decisions concerning the trustworthiness of a document to be remembered so that next time they open the document, any active content within it execute automatically.
Trusted Locations enables the user to designate a specific folder on the computer’s hard drive or on a network file server as containing only trusted content.
Users can use the Trust Center to configure how Protected View, Trusted Documents, and Trusted Locations works on their computer. Administrators can override users’ Trust Center settings and enforce a different set of settings using Group Policy.
Only certain Office 2010 applications have the Protected View, Trusted Documents, and Trusted Locations features. The Office Web Apps included with Office 365 do not currently have these features.