Get Ready, Get Set to Present
Your moment has arrived—the Big Day. You’ve polished your slideshow to a high shine, and you’re ready to roll. Giving a successful talk, though, involves more than just standing up and holding forth. You need to be able to focus on your message and your audience: the last thing you need is to be distracted by glitches in either your equipment or your presentation itself. “Be prepared” is more than just a motto—when it comes to presentations, preparation spells the difference between fab and flop. Give yourself plenty of time—a day at least—to prepare your presentation and gear for primetime.
Note: This e-book assumes that you know the basics of creating a Keynote slideshow and that you have a slideshow ready to share with the world. If you need the full story on creating slideshows, check out Creating Keynote Slideshows: The Mini Missing Manual or iWork: The Missing Manual.
Presentation Setting and Gear
If you’re lucky, you have complete control over every aspect of your presentation—including the choice of room, computer, projector, and all the other technical bits and pieces required. More often, though, you’ll be stuck using others’ equipment; plugging your laptop into a video projector at a conference; or just showing up with your presentation on a CD and running it on someone else’s computer. When the equipment isn’t your own, you have to be more flexible—and often improvise.
Get a Room
Environment matters, and where you speak affects not only your audience’s experience that day but also the lasting image that they have of you going forward.
If you’re in charge of choosing the venue, think classy. Hotels and conference centers might seem like the most natural choices, but before you go there, look around for less obvious options. Libraries, museums, and universities often have stunning lecture halls available on the cheap.
Wherever you wind up, do your best to find a room for your presentation that’s exactly the right size. If you’re not sure, err on the side of too small. If the room is too large, the place will feel empty, sapping energy from your show and giving the presentation a slack feeling. Given the choice, it’s much better to pack ‘em in, standing room only.
If you’re presenting to more than 10 or 15 people, aim for a room with a high ceiling so there’s plenty of room for a big screen hanging well above everyone’s heads. Otherwise, you can’t guarantee that everyone will have a clear view of your slides.
Finally, find out if your room comes with audio gear and a projector, if you need them. When you’re speaking to more than a handful of people, you’ll want speakers and a microphone to make sure they can hear all your perfectly selected pearls.
The Mighty Dongle
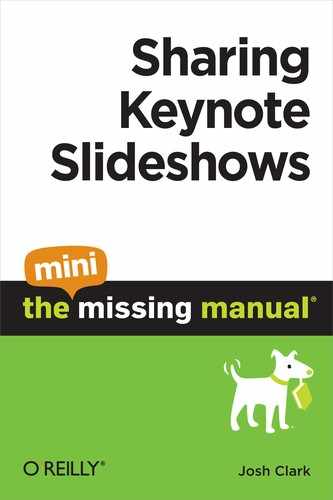
When you’re giving a presentation from your own laptop, be sure that someone has the right dongle, the cable that connects your Mac to the projector (see Figure 1-1). There’s nothing worse than discovering that your presentation is locked inside your computer with no way of getting onto the big screen. The dongle is your slideshow’s only means of escape.
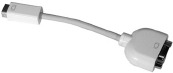
Figure 1-1: Make sure you have the right dongle for the job. This crucial cable connects your Mac to the projector.
This can get confusing, because there are several possible combinations of plugs—you need just the right one to fit both your Mac and the projector. Even if you bring a dongle with you, in other words, there’s no guarantee that it’ll fit the projector. If you give talks frequently, your best protection is to buy and carry three types of dongles (about $30 each), one for each of these projector inputs:
- S-video and composite video. Apple offers a video adapter that combines outputs for both of these types; you’ll also need a cable to connect the adapter to the projector.
- VGA. This is a particularly popular input for projectors specifically designed for computer presentations. Apple’s VGA adapter connects directly to the projector.
- DVI. Apple’s DVI adapter also goes straight into the projector. DVI connections generally give you better image quality than VGA.
Each of those dongles plugs into the projector. On the other end, though, you have to make sure that it fits your laptop, and that varies depending on what kind you’re using. The current editions of the MacBook, MacBook Pro, and MacBook Air laptops all require Mini DisplayPort dongles. Previous editions offered DVI or mini-DVI ports.
Of course, to most of us, all of these video inputs and outputs are just so much alphabet soup. If you’re buying a dongle and none of this makes any sense, bring your Mac into your local Apple Store or electronics store so they can help you figure out what type of connector you need.
Projectors
Depending on the size of your audience, the type of room you’re in, and the size of your budget, you can show your Keynote presentations right on your laptop, on an external monitor, or with a video projector. If you’re presenting to a group of any size, though, a projector is almost always your best bet. The projector market is booming, fueled by the home-theater movement and by computerized presenters like you. Consequently, prices are falling and new models are coming out all the time, so there’s a bewildering array of projectors to choose from. Prices start at about $400, but plan on at least $700 as a minimum price for a bright, high-resolution projector.
Tip: If you’re not familiar with video projectors and you’re considering dropping $1,000 or more on one, find a store where you can compare the models you’re interested in under lighting conditions similar to the ones you’ll use it in. Get a head start on your comparison shopping by visiting sites like www.projectorcentral.com, where you can read reviews and buyer guides, and post projector-related questions.
Choosing a projector
When you go shopping, it pays to know the lingo. There are two basic types of video projectors: LCD (liquid crystal display) and DLP (digital light processing). Most of the time, though, the projector type is less important than its key specifications. After you figure out your budget and how large and heavy a projector you’re willing to carry around, consider these important criteria:
- Resolution. The resolution is the number of pixels the projector can display, and should match your computer’s video output. Most projectors are designated XGA (1024×768 pixels), but you’ll also find SVGA (800×600 pixels), 720p (1280×720 pixels), and SXGA (1280×1024 pixels). More pixels give you a sharper image and—surprise, surprise—cost more. All modern Mac laptops can output any of these resolutions, but some projectors go even higher; check your laptop’s technical specs if you’re going for lots of pixels to be sure your machine can handle it. If you plan to use your projector exclusively for Keynote presentations, you won’t gain much from higher resolutions unless you happen to lean heavily on high-definition video and huge mega-pixel pictures. If that’s the case, though, especially if you plan to show HDTV video, you’ll definitely benefit from higher resolution (at least 720p).
- Brightness. Just like slide or movie projectors, video projectors produce an image on the screen by projecting it with a very bright light. The intensity of that light is measured in ANSI lumens. Methods of measuring lumens vary from manufacturer to manufacturer, so consider these specifications ballpark figures only. Less than 1,000 lumens is fine when projecting on smaller screens in dark rooms, but it’s too dim on larger screens or under brighter lighting conditions. 1,500 lumens is a good minimum for rooms with some light; kick it up to at least 2,000 lumens for rooms with bright light. For large rooms, though, you’ll need to bump it up even more: Go for 3,000 lumens to be sure groups of up to 200 can read your slides.
- Weight. If you plan to carry your projector around to your presentations, you’ll want a lightweight, portable one. These portables weigh in around three to eight pounds and are often smaller than most laptops.
Renting projectors
If you don’t find yourself giving Keynote presentations at the drop of a hat, you may be better off renting a projector. When you rent, you can take advantage of the newest technology, get a projector that suits that particular presentation space, and let somebody else worry about repairs and expensive bulb replacement.
Look in the Yellow Pages under Audio-Visual Equipment to find a local outlet. And if you don’t have a local AV house, you can rent equipment by mail (or at least, by UPS). If you’re renting the room where you’re doing your talk, the hotel or conference center probably has projectors, too, but usually at a premium price. It might be worth shopping around before you lock in.
Projection screens
An often-overlooked element of projection quality is the screen. A poor screen—or wall—can make even the best projector’s image look terrible. There are as many different kinds of screens as there are projectors, starting at about $100 for rollup screens. Any screen is better than a wall—although you can get good results in a darkened room from a carefully prepared and painted wall. You might find that a wall is a reasonable option in a conference room, where walls are often smooth and painted pure, matte white.
Projection screens come in a wide range of surfaces, which provide varying amounts of gain, enhanced brightness attained by directing the light from the projector back to the audience instead of letting it scatter in all directions. High-gain screens have a lower viewing angle. In other words, they reflect more light to viewers closer to the centerline of the screen. A matte white screen—or a flat, white wall—provides the widest viewing angle and the least gain.
Remote Controls
The trouble with running a presentation from your laptop is that you have to run the presentation, well, from your laptop. Your computer tethers you to the podium, tying you to a fixed spot on the stage. Several remote-control options let you escape the lectern and roam the stage, flipping through your slides with a flick of
your hand.
Keynote Remote for iPhone or iPod Touch
What’s the price of freedom? Just 99 cents if you already own an iPhone or iPod Touch. For a buck, Apple’s Keynote Remote program puts a miniature view of your slideshow’s presenter display on your iPhone, as shown in Figure 1-2, complete with speaker notes or a preview of upcoming slides. You can click and swipe through your slides right from the touch screen. For details on setting up and using Keynote Remote, see “Calling up the keyboard cheat sheet”.
Note: Keynote Remote uses a WiFi network to make your iPhone or iPod talk to your computer; make sure your presentation room has a sturdy network signal, or you could wind up stranded mid-stage without a connection. The fail-safe fix for this is to set up your own wireless network on your Mac. You’ll find all the details in “Linking your iPhone to your computer”.
Don’t feel left out if you don’t have an iPhone or iPod. Apple and other manufacturers also sell other remote-control devices—many of them simple clickers that are much smaller than an iPhone. Small size and simple operation means you can even run through your slides from your pocket.
The Apple Remote
Apple’s slender wisp of a remote control (Figure 1-3) is marketed for controlling movies and music in Front Row, iTunes, or even iPods, but it works for Keynote presentations, too. These little wonders used to come with every MacBook laptop, but you now have to order them separately.

Other Remote Controls
Most remote controls (although not the Apple Remote) use RF radio waves to communicate with a receiver plugged into your laptop’s USB port. That means there’s no need to point the remote at your laptop (as you would with a TV remote that communicates using infrared beams). But pointing still comes in handy: When you want to point something out on one of your slides, some remotes have a built-in laser pointer, so you don’t have to fumble with more than one device.
Some remotes can also function as a mouse, or control your iTunes and DVD playback. However, when you’re in the midst of the presentation, you may find that simpler is better—and the only buttons you really need are forward and backward. The winner of the simplicity competition is Satechi’s RF Wireless Laser Pointer, sporting only forward and back buttons and a laser pointer (www.satechi.com). The popular Keyspan Presentation Remote (Figure 1-4) adds a mouse controller to the mix (www.keyspan.com).

Tip: Don’t look now, but you might already own a remote control for your computer—albeit one with lots of buttons: your cell phone. Salling Clicker is software that lets you use certain phones to control your computer with a Bluetooth or WiFi connection. This $24 piece of software is all you need to turn your phone into a remote control for Keynote and many other programs. Learn more at www.salling.com.
Setting Up the Presentation
First things first, you have to get both Keynote and your computer ready for the big show. The specific backstage preparations depend on exactly how and where you’ll display the slideshow. For most presentations, you’re the one in the spotlight, driving the slideshow as you speak in person to your audience—a class, a board of directors, or a room of fez-topped conventioneers, for example.
Preparing and playing a live slideshow is where this chapter begins, but in “Creating Self-Playing Slideshows”, you’ll also learn how to set up your slideshow to play on autopilot or let your viewers navigate it themselves by clicking onscreen buttons. No matter which of these methods you use, however, your first stop should be Keynote’s display settings to choose your slideshow preferences and set up the presenter display.
Setting Slideshow Preferences
Some of Keynote’s preferences apply only when you play the slideshow, so be sure to review them before show time. Choose Keynote➝Preferences, and click the Slideshow button. Keynote presents you with a hodgepodge menu consisting of options affecting a range of presentation aspects, from how and where your slides should be projected to when your pointer should be allowed onscreen. Figure 1-5 shows a reliable, standard selection for live presentations, and the following list runs down your options.

- Scale slides up to fit display. Turn on this checkbox in order to make your slide image as large as possible, filling the available height without leaving any black border. You usually want this checkbox turned on, although it means that your slides may lose some of their image quality. An even better option is to make sure that your display’s resolution matches the size of your slideshow.
- Exit presentation after last slide. When you turn on this checkbox, Keynote returns to its editing mode when you advance past the last slide in your slideshow. For a live presentation, it’s a good idea to turn this checkbox off, to keep the last slide in your presentation onscreen even if you accidentally click the mouse or press the space bar. This is like putting a visual padlock on your slideshow so that you don’t accidentally slip out to your desktop. This prevents the dramatic finale of your presentation from being ruined by a view of the Keynote editing window, your cluttered icons, or the desktop picture of your wife at the Halloween party (really, you’re the only one who ever finds it funny). When you’re ready to exit the slideshow, just press the Escape (Esc) key.
- Reduce Cube transitions to avoid clipping; Reduce Flip transitions to avoid clipping. Turn on these two checkboxes in order to slightly reduce the size of Keynote’s animations during the Cube and Flip transitions. These preferences only matter, of course, if you actually use the Cube and Flip transitions in your slideshow—and even then, the effect is extremely subtle. These animations actually extend beyond the normal slide boundaries, using some of the slide border to display the transition. If you turn on the first checkbox to scale your slides up to fit the display, then you should turn on both of these checkboxes as well.
- Allow Exposé, Dashboard and others to use the screen. This option lets you use Mac OS X’s Exposé and Dashboard features during your slideshow, but at the expense of some video performance. Unless you specifically plan to use these features during your presentation, it’s a good idea to leave this option off.
- Show pointer only on slides with hyperlinks or movies. Choose this standard setting to keep the pointer hidden from view except when you actually need it—to click a hyperlink or control a movie’s display.
- Show pointer when the mouse moves. If you choose this option instead, you can make the arrow cursor visible any time you move the mouse. This option is useful if you want to point things out on your slides during the show. But since the merest touch of the mouse makes the pointer appear, this also means that clicking your mouse to advance slides will often make the pointer appear; if you turn this option on, use the space bar, the right arrow key, or a remote control to advance slides instead of clicking the mouse.
Tip: When playing your slideshow, you can also show or hide the cursor by pressing the C key.
- Show playback controls when pointer is over a movie. Turn this option on to get complete access to a movie’s playback controls.
- Present on primary display. The last two radio buttons determine which screen displays your slideshow if you have a second display connected to your computer (for example, a video projector connected to a laptop) and you’ve set your computer up for dual display. Dual display means that the two screens display different action—usually the slideshow on the audience screen and a special presenter view on a screen that only you can see. You’ll learn more about these technical display details in “Using the presenter display during the presentation”; for now, choose this option only if you really want to view your presentation on the Mac’s primary display (the secondary display is usually the best choice.
- Present on secondary display. This is the typical choice
when you’re presenting your slideshow on a second display
or projector. - Open Display Preferences. Click this button to open your Mac’s System Preferences Display pane in order to set your display resolutions, color depth, and—if you’re using two displays—the screen arrangement (see “Using the presenter display during the presentation”).
Setting Up the Presenter Display
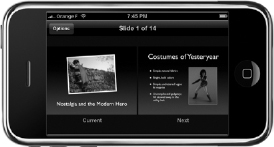
When you really want your presentation to look effortless—when you want to be sure you hit every point and anticipate every transition—Keynote has a solution: Cheat. Your favorite presentation software gives you a crib sheet called the presenter display, where you can sneak a look at your notes, monitor how much time you have left, and preview upcoming slides. In order to use this for-your-eyes-only control panel during your presentation, you display your presentation on two screens—a big screen for your audience and another screen (often your laptop) for your cheat-sheet presenter display. But even when you don’t have a second screen for the presentation itself, the presenter display can be useful before you give your talk, while you rehearse.
Choose Play➝Rehearse Slideshow, and Keynote reveals the presenter display, shown in Figure 1-6. When you are in fact rehearsing, you can use this screen to practice and time your presentation and make sure that your presenter notes.
Playing a slideshow from the presenter display
From the presenter view, you can play and control the slideshow just as you would when you view the normal slideshow. You’ll learn all the down-and-dirty details about playing slideshows in “Set Up the Remote Control”, but here’s the gist to get you started:
- Advance to the next slide by clicking the mouse or by pressing any of these keys: the space bar, Return, right arrow, or down arrow.
- Go back to the previous slide by pressing the left arrow or up arrow.
- Exit the slideshow and return to edit mode by pressing Escape (Esc).
- Press R to reset the timer.
To jump to a different part of your slideshow, use the presenter display’s slide switcher. Open the switcher by moving the mouse to the top of the presenter display, and a menu slides down. Click the Slides icon, and Keynote reveals a strip of slide thumbnails across the top of the screen. Use the scroll bar to browse the slides, and double-click a thumbnail to make it the current slide.
Tip: For the fastest trip to and through the slide switcher, use the keyboard. Press the equal sign (=), the plus sign (+), or hyphen (–) to bring up the slide switcher. Use the right- or left-arrow key to move forward or back through the thumbnails, or press the up- or down-arrow key to move to the first or last slide. When the slide you want to go to is highlighted, press Return to make it the current slide.
Customizing the presenter display
Figure 1-6 shows Keynote’s standard view of the presenter display, featuring the current slide, the next slide, the current time, and the elapsed time since you moved off the title slide. You can resize and reposition every item on the screen, and add additional info, too. To customize the presenter display, point the cursor at the top of the screen and a four-icon menu drops down from the edge. Click the Options button, and choose Customize Presenter Display. Keynote lays down a yellow-striped construction strip across the top of the screen and opens the Customize Presenter Display window, a palette of options for showing or hiding the various cockpit controls in the presenter display (Figure 1-7).

Tip: You can also get to this view directly from edit mode by choosing Play➝Customize Presenter Display, or by clicking the Customize Presenter Display button in the Presenter Display panel of Keynote➝Preferences.
Drag any of the display elements to a new spot on the page, and resize them by dragging the resize handle in their lower-right corners. You can even overlap these windows if you have a small screen; click an overlapped window to bring it to the front.
Add or remove information to your presenter display by turning options on or off in the Customize Presenter Display window:
- Current Slide shows the slide that your audience sees, including the current state of the slide’s builds if it has them.
- Build Markers. When the current slide has builds, this option shows you bullets below the slide to indicate how many builds remain on the slide. As you advance through each build, Keynote dims the corresponding bullet to show you it’s been played, leaving the bullets for remaining bullets aglow.
- Next Slide shows a preview of the next slide.
- Ready to Advance Indicator. When your slide has builds, Keynote doesn’t show their complete animations on the presenter display. Instead, it takes you directly to the end state of the build’s animation. To you, it looks like the animation has already completed as soon as you click ahead, even when your audience is still watching the build. For long-lasting builds, this can be inconvenient, because you can’t see when the animation is done. The “ready to advance” indicator takes care of this by showing a red bar across the top of the presenter display while Keynote is still building; it turns to green when Keynote is waiting for your signal to move along to the next build.
- Notes. Shows the presenter notes for each slide. To scroll through these notes, press the U (up) or D (down) key, or use the scroll bar on the right side of the presenter notes pane.
Note: Whatever you choose for the Notes option, your sticky-note comments are always visible on the slide previews in the presenter display, if they were visible before you started the slideshow (View➝Show Comments). In no case, though, are your comments visible in the audience view.
- Clock shows the current time.
- Timer shows either the time remaining or the elapsed time. The timer starts ticking as soon as you move off the first slide. For the time-remaining option, set the time from which to count down in the Time Remaining field.
If you want to go back to Keynote’s stock arrangement after you’ve made changes, click Use Defaults. When you’re happy with your presenter display arrangement, click Done in the Customize Presenter Display window.
Using the presenter display during the presentation
Now that you’ve got your presenter display just so, all that remains is to tell Keynote that you actually want to use it during your presentation. You’ll need a second display, of course, and you’ll also have to set up your Mac for dual display, which you’ll learn to do in the next section. From there, go to Keynote➝Preferences, and click the Presenter Display button. Turn on the “Use alternate display to view presenter information” checkbox. This tells Keynote to show the presenter display on your second screen—or, more specifically, the screen that you didn’t pick in Slideshow Preferences. If you chose to display the slideshow on the secondary display, in other words, turning on this option will show the presenter view on the primary screen (your laptop, for example).
Using the edit view during the presentation
If you’re giving a presentation in which you plan to jump around from slide to slide in different parts of the slideshow, consider using a different kind of presenter display: the Keynote editing window. In the Presenter Display Preferences, turn off the checkbox marked “Use alternate display to view presenter information”. Choose View➝Light Box to cram as many thumbnails as possible into the slide navigator. If you use the Notes field (View➝Show Presenter Notes), enlarge it so you can see as much of the notes as you need to during the talk. With this view on your presenter screen, you can jump to any slide during the presentation by clicking its thumbnail in the navigator.
Connecting a Second Display
The easiest way to present a Keynote slideshow is right on your computer’s screen—something you’ve probably been doing all along as you create a slideshow—by clicking the Play button in the toolbar to view your work in progress. If your audience is very small—two or three people—this method can work well. If you have your presentation on a laptop, you can take it to your audience and be ready to present at a moment’s notice—perfect for the road-warrior salesman or college recruiter. When your audience is larger, though, it’s time to connect your computer to a large monitor or video projector.
Your first decision is about what you’d like to show on the two screens. You’ve got two options here:
- Mirror your computer’s screen to the second screen so that you and your audience see exactly the same thing.
- Set up a dual display so that you can show your audience the slideshow on the big screen while you use the presenter display on your computer. This setup is how the pros roll. (Apple also calls this “extended desktop.”)
Note: Not all Macs have the video horsepower to manage a dual display. MacBook, MacBook Pro, and MacBook Air laptops can all do it and so can their ancestor, the G4 PowerBook. However, some older Macs, like the iBook and iMacs before the Intel models, can only mirror your computer’s screen.
Once you know how you’d like to set up your display, you’re ready to hook it up:
1. Attach the second display or projector to your computer, using the cable adapter—nicknamed a dongle—if you need it. See “The Mighty Dongle” for more details.
2. Choose Keynote➝Preferences, click the Slideshow button, and then click Open Display Preferences (or choose A➝System Preferences, and then click Displays).
3. Click the Arrangement tab in the Preferences window.
If you don’t see an Arrangement tab, that means that your Mac can’t detect the external monitor. Make sure that the monitor is turned on and plugged into your Mac, and then click the Detect Displays button in the Displays tab.
4. If you’re setting up your slideshow for mirroring, turn on the Mirror Displays option (your Mac typically switches to this mode automatically when you plug in an external display), and skip ahead to step 6.
5. If you’re setting up your slideshow for dual display, position the screen images to control how your computer’s desktop spans the two displays.
Setting the arrangement of the two displays isn’t too important for Keynote presentations. Its purpose is mainly for people who are lucky enough to have two monitors that they can use to create a larger desktop—or virtual monitor—on which to work. When you’re setting up the typical Keynote dual display arrangement, it’s most important to set the primary display (the one with the menu bar that you see) and the secondary display (the one your audience views). Drag the menu bar from one screen image to the other to make either display primary—usually, you’ll want to make your computer screen the primary screen.
6. Click the Display tab.
Two Display windows appear, one for each of your displays. Select a display resolution from the Resolutions list, and a color depth from the Colors pop-up menu for each display.
If you’re using mirroring—either because your computer doesn’t support dual display mode, or because you prefer to see exactly the same thing your audience sees—use the same resolution and color depth for each display. For best results when you use screen spanning, your Keynote slide size should be the same as the screen resolution for the display you’ll be using for the slideshow presentation.
Most video projectors use either 800×600 or 1024×768 pixels resolution—which match the standard sizes for most Keynote themes. Set your display resolution to match your projector’s resolution. If you created your Keynote slideshow at a lower or higher resolution, Keynote can scale the slideshow up or down to fill the screen. Keynote scales down automatically if the slides are larger than the screen. Use Keynote’s Slideshow Preferences (see “Setting Slideshow Preferences”) to scale up to fill the screen if the slides are smaller than the screen.
Note: If you don’t get an image on your second display when you plug it in—or if the display doesn’t sync with your computer, resulting in a squashed, stretched, or unstable image—first try restarting the display. If that doesn’t work, leave the display connected and restart the computer to bring it into synchronization.
When you’re set up for dual display, Keynote gives you a quick way to swap displays when you’re playing your slideshow: Press the letter X on your keyboard, and the two displays switch roles—the one showing your slides now gets the presenter display and vice versa. You can also make this switch from the presenter display’s toolbar by clicking the Options button and choosing Swap Displays. For more on the presenter display, see “Setting Up the Presenter Display”.
Connecting Your Audio Output
If your slideshow contains sound and you’re presenting to a group of people instead of just a single viewer, you need some kind of sound amplification. Many video projectors have a built-in amplifier and speaker that can work in a pinch for a small group. In most cases, however, you need something with a little more oomph and a lot more fidelity. Depending on the size of your presentation space, your amplification system could be a set of tiny external computer speakers, a public address system capable of filling Yankee Stadium, or anything in between.
Connect your computer’s audio output jack to the amplifier’s input. The type of cable you need to link the two depends on the input connections on the speakers, amplifier, or PA system. The computer’s end of the cable requires a 1/8 inch stereo miniplug (the kind on your iPod headphones, for example). The amplifier end probably requires the same miniplug or a pair of RCA plugs (those are the red and white plugs you often find plugged into the back of stereos). It’s good to have one of each of these cables in your bag.
Choose A➝System Preferences, click Sound, and then click the Output tab. Adjust the Output volume slider to about 80 percent and play part of your slideshow that contains audio. Use the volume control on the amplifier or PA system to adjust the sound to a comfortable level.
If you’re lucky enough to have sound professionals in charge of your audio setup, they’ll take care of the connections and be able to adjust the volume during the presentation. If you’re on your own, then either you or a helper should be able to adjust the volume during the show, in case people in the back can’t hear, or you notice those in the front stuffing Kleenex in their ears.
Set Up the Remote Control
If you plan to use Keynote Remote to drive your slideshow with your iPhone or iPod Touch, you first need to link your iPhone to the computer running Keynote. Take a minute to do that in advance of your talk, and make sure it actually works—before your audience begins to arrive. Likewise, make sure you have the iPhone display set the way you want it—if you plan to refer to presenter notes during your talk, set it to portrait display mode; otherwise, use landscape. Finally, be sure that your iPhone is charged so that it doesn’t wink out in the middle of your presentation. See “Calling up the keyboard cheat sheet” for complete details about setting up and using Keynote Remote.
If you’re using a different remote control, the same idea holds: Make sure the thing works. Turn it on, and click through a few slides just to be sure.