In this chapter, we’ll look at some of the more advanced aspects you might want to consider in your SignalR implementation.
It is very common to find scenarios in which we want SignalR services to be consumed only by users who have been authenticated by the system. This affects how we build our applications, because at every possible entry point to the server, we have to check that the requestor is authorized to access, and from the client side we also have to make the credentials reach the other end.
SignalR does not include any mechanism to authenticate clients, because this is something that depends on the application and the platform. For example, in a web application, authentication will normally be performed using a credential entry form or using third parties (such as Google, Facebook, Live ID, and so on) to which this responsibility is delegated. In a desktop application, authentication perhaps will have been delegated to Active Directory Domain Services (AD DS) for the company.
What we do have in SignalR are tools to know which user is accessing these resources—basically, by examining the information available in the request—and to determine whether the user has permission to do so.
As we know, in all the methods of the PersistentConnection class that allow us to take control when an important event takes place (connection, disconnection, data arrival, and so on) we have an IRequest type parameter available that allows us to obtain information from the request, where, among other things, we can get the authenticated user.
Therefore, a possibility when controlling access to specific functions within a persistent connection would be to query this information and act accordingly.
protected override Task OnReceived(IRequest request,
                                   string connectionId, string data)
{
   if (request.User==null || !request.User.Identity.IsAuthenticated)
       throw new NotAuthorizedException();
    ...
}
When this code is common to all operations relative to the PersistentConnection class that we are implementing, it is recommended that we override the AuthorizeRequest method that will be invoked by SignalR before passing control to the other events. This method receives a parameter of the IRequest type with information about the incoming request and returns a simple Boolean indicating whether access is allowed or not:
protected override bool AuthorizeRequest(IRequest request)
{
   return (request.User!=null &&
           request.User.Identity.IsAuthenticated);
}
Obviously, the access criteria can be more complex—for example, requiring the checking of other information included in the request, access times, role membership, or whatever we need for our application.
In this case, we can control access to specific actions or complete hubs by using a mechanism that is similar to the one we already have in other ASP.NET technologies: the Authorize attribute.
A hub method decorated with this attribute causes it to be accessible only to users authenticated in the application:
[Authorize]
public Task SecureBroadcast(string message)
{
    return Clients.All.Message(message);
}
Likewise, if we want to apply this control to all methods of the hub, we just have to apply it at class level:
[Authorize]
public class SecureEchoHub : Hub
{
...
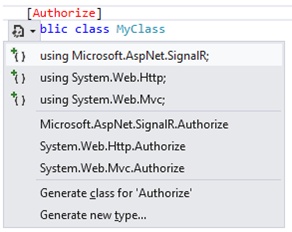
}It is very important to take into account that this is a different attribute than the one we use in Web API or in ASP.NET MVC, so we must be careful not to include incorrect namespaces when we are using it. If we apply the Web API [Authorize] attribute (defined in System.Web.Http) on a hub, it will simply not take effect. In Figure 9-1, we can see that when [Authorize] is included, Visual Studio suggests the inclusion of three different namespaces, where attributes with this name are defined.
If we want this check to be performed on all the hubs of our application, we can set it globally during system initialization:
// Inserts an AuthorizeModule in the pipeline
GlobalHost.HubPipeline.RequireAuthentication();
When decorating our actions or hubs, we can be more explicit and not leave it at a mere check of user authentication status. The following code shows how to allow access to the method to specific users of the system:
[Authorize(Users="fmercury,mjackson,fsinatra")]
public void Sing(string song)
{
    // ...
}
We also have the ability to restrict it to certain application roles:
[Authorize(Roles= "greatsingers")]
public void Sing(string song)
{
    // ...
}
Unlike its Web API and MVC counterparts, the SignalR Authorize attribute has an additional parameter that makes sense only when applied at hub level:
[Authorize(RequireOutgoing=false, Roles="admin")]
public class SecureEchoHub : Hub
{
    ...
    public Task SecureBroadcast(string message)
    {
        return Clients.All.Message(message);
    }
}
In the preceding example, only authenticated users belonging to the “admin” role can invoke hub methods such as SecureBroadcast(), but by setting the RequireOutgoing parameter to false, we are indicating that no authorization is required to connect to the hub and receive messages sent from it. Therefore, thanks to this mechanism, we can have hubs to which anonymous clients connect in “passive mode” only to receive messages, whereas other privileged users would be able to invoke their methods.
We can also extend the Authorize attribute to implement our own authorization logic. For example, the following attribute is used to allow passage to users whose name contains the character “a”:
public class OnlyIfUsernameContainsAAttribute: AuthorizeAttribute
{
    protected override bool UserAuthorized(IPrincipal user)
    {
       return base.UserAuthorized(user)
              && user.Identity.Name.ToLowerInvariant().Contains("a");
    }
}
// Usage in a Hub method:
[OnlyIfUsernameContainsA]
public void DoSomething()
{
    ...
}
Or we could ensure that the connection is made using SSL, as in the following example:
public class OnlySslAttribute: AuthorizeAttribute
{
    public override bool AuthorizeHubConnection(
                HubDescriptor hubDescriptor, IRequest request)
    {
        return request.Url.Scheme == "https"
             && base.AuthorizeHubConnection(hubDescriptor, request);
    }
}We have seen how to protect access to persistent connections or to methods and hubs on the server side using diverse techniques, but basically, all of them rely on the assumption that the execution context will contain information about the connected user. That is, we assume that some component previously executed in the pipeline will have correctly set the User property of the context of the request, that information such as User.Identity.Name or User.Identity.IsAuthenticated will be available, and that we will be able to determine their role membership with the familiar User.IsInRole() method.
Although at first it might seem as though the SignalR framework itself is the one in charge of establishing identity in its requests to ensure that information about the active user reaches the application, this is not the case; the ones that do this dirty work are found further down the technology stack—see Figure 9-2—at OWIN middleware level.

This way, these modules are completely reusable across projects and systems. For example, the module responsible for managing authorization through cookies is the same one for SignalR and Web API, Nancy, or FubuMVC. In fact, the implementation of authentication and authorization management middleware modules is not even found in the SignalR project, but in Katana.
Currently, the Katana project includes the following modules, although more are expected to come in the future:
Microsoft.Owin.Security.ActiveDirectory. Implements authentication based on AD DS—either on-premise or on Windows Azure—integrated into the OWIN pipeline.
Microsoft.Owin.Security.Cookies. Implements cookie-based authentication, similar to standard ASP.NET mechanisms and authentication via forms.
Microsoft.Owin.Security.Facebook. Implements the Facebook OAuth authentication process in the pipeline.
Microsoft.Owin.Security.Google. Implements Google authentication based on OpenID.
Microsoft.Owin.Security.Jwt. Middleware that allows you to protect and validate JSON Web Tokens.
Microsoft.Owin.Security.MicrosoftAccount. Middleware specifically designed to support authentication with Microsoft (Windows Live) accounts.
Microsoft.Owin.Security.OAuth. Enables an application to support any standard OAuth 2.0 workflow, both on the client side and the server.
Microsoft.Owin.Security.Twitter. Allows supporting the Twitter OAuth 2.0 authentication protocol on an OWIN pipeline.
When we are in a pure web environment, the way authentication information reaches the server side and our hubs is quite straightforward, because we are normally in the same application.
For example, if we are using traditional cookie-based security and have accessed a page to log in to the website, those same cookies that it sends us upon successful authentication and which keep our session open on the server will travel in all requests to it, including those made by SignalR to open the virtual connection.
The Microsoft.Owin.Security.Cookies middleware, in charge of managing this security mechanism, will capture the requests, verify that they contain the authentication token, and set the user information obtained from said user in the context of the requests. From there, the request will continue to rise through the various modules, and when it reaches SignalR, the user information will be available and ready to be used.
However, when it comes to clients that are external to the server runtime environment, such as .NET generic clients or WinRT applications, we need to use other alternatives based on the mechanisms that SignalR client libraries offer to append information to requests, such as cookies or HTTP headers, to send data about the user. Obviously, in this case, the server side should implement the corresponding code to obtain this information and convert it to processable authentication information. For example, the following code adds an authentication token to the connection in the form of a cookie:
var connection = new HubConnection("http://localhost:3421");
string token = GetAuthToken();   // Gets an auth token
                                 // from anywhere
// Attach the token to the connection
connection.CookieContainer = new CookieContainer();
connection.CookieContainer.Add(new Cookie("Token", token));
After we have generated the token and attached the cookie with it to the connection to the hub, all requests made in that context will be accompanied by said cookie.
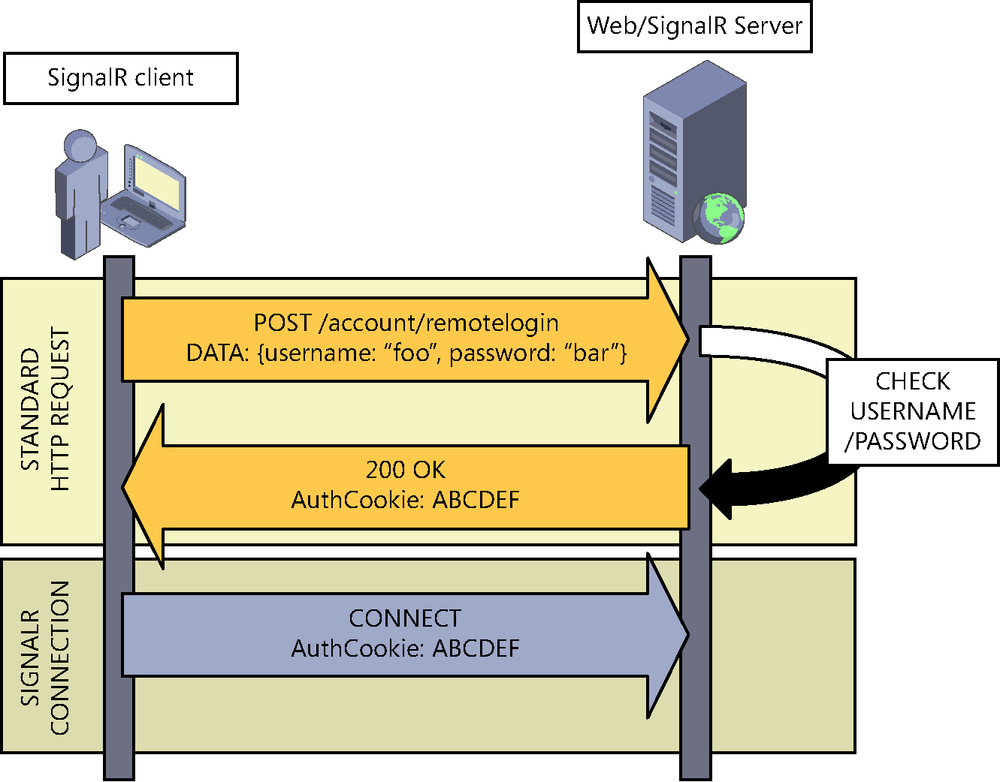
In fact, a frequently implemented technique is to get the token via a previous call to the server, which returns it in a cookie. When we obtain the cookie, we would use it for the SignalR connections, as shown in Figure 9-3.
Applying this technique is quite simple, because all we need is the web service that we would invoke from the client side. This web service would check whether the supplied credentials are valid and, if so, return the cookie proving that the user was authenticated successfully.
Now we will see an example implementation of this authentication based on the cookie-based security module of the Katana project: Microsoft.Owin.Security.Cookies. Thus, the first thing we would have to do is install the package containing the module on our server:
PM> install-package Microsoft.Owin.Security.Cookies
Next we would include it in the OWIN process flow during application startup:
public class Startup
{
    public void Configuration(IAppBuilder app)
    {
        ...
        var options = new CookieAuthenticationOptions()
        {
            CookieName = "Token"
        };
        app.UseCookieAuthentication(options);
        ...
    }
}
The UseCookieAuthentication() extender enters the middleware into the OWIN pipeline, supplying it a configuration object, which, in this case, we use only to tell the module the name of the cookie where it must enter the authentication information. This name is important because we will need to recover the information from the client side.
At this point, our system is ready both to generate authentication cookies and to process them in every call, modifying the user of the request context based on the information in the token. Now we are going to implement the web service that will receive the user’s credentials and, based on them, return the corresponding cookie:
public class CustomLoginMiddleware : OwinMiddleware
{
    public CustomLoginMiddleware(OwinMiddleware next)
        : base(next)
    {
    }
    public override async Task Invoke(IOwinContext context)
    {
        var path = context.Request.Path.Value.ToLower();
        if (context.Request.Method == "POST"
            && path.EndsWith("/account/remotelogin"))
        {
            var form = await context.Request.ReadFormAsync();
            var userName = form["username"];
            var password = form["password"];
            if (validate(userName, password))
            {
                var identity = new ClaimsIdentity(
                    CookieAuthenticationDefaults.AuthenticationType
                );
                identity.AddClaim(
                    new Claim(ClaimTypes.Name, userName)
                );
                identity.AddClaim(
                    new Claim(ClaimTypes.Role, "user")
                );
                context.Authentication.SignIn(identity);
                context.Response.StatusCode = 200;
                context.Response.ReasonPhrase = "Authorized";
            }
            else
            {
                context.Response.StatusCode = 401;
                context.Response.ReasonPhrase = "Unauthorized";
            }
            return;
        }
        await Next.Invoke(context);
    }
    private bool validate(string username, string password)
    {
        return true; // Just for brevity
    }
}
As usual in custom middleware modules, the class inherits from OwinMiddleware, which basically imposes the following two obligations on us:
To create a constructor that takes as a parameter the next middleware module available in the pipeline, and which we must invoke if we want to continue the process of the request.
To create the asynchronous method
Invoke()with the processing logic of the request. This method takes request context information as an argument and can terminate the application process by managing the output directly (as it happens inside the mainifblock) or can continue executing the pipeline by invoking the next middleware module available.
Inside the module, the only thing that is done is the checking of the validity of the credentials (it is very simplified in this case) and, if they are valid, invoking the Authentication.SignIn() method of the context, supplying it a ClaimsIdentity object with user information, generating the cookie that will accompany the response to the request.
This module would be installed on the startup code and also in the pipeline. We already include the complete code of the Configuration() method, where you can see the SignalR mapping at the end:
public class Startup
{
    public void Configuration(IAppBuilder app)
    {
        var options = new CookieAuthenticationOptions()
        {
            CookieName = "Token"
        };
        app.UseCookieAuthentication(options);
        app.Use<CustomLoginMiddleware>();
        app.MapSignalR();
    }
}
After we have done this, our server will be able to respond to POST requests directed to the URL /account/remotelogin. Let’s now see how we can invoke this service from the client side to get the cookie and attach it to the SignalR connection.
First, let’s look at a possible implementation of a method that takes as arguments the URL of the authentication service and the credentials and that is used to obtain and return the value of the cookie called “Token” (note that this name is the one that we previously set on the server side):
private static async Task<Cookie> GetAuthCookie(
          string loginUrl, string user, string pass)
{
    var postData = string.Format(
                            "username={0}&password={1}",
                             user, pass
    );
    var httpHandler = new HttpClientHandler();
    httpHandler.CookieContainer = new CookieContainer();
    using (var httpClient = new HttpClient(httpHandler))
    {
        var response = await httpClient.PostAsync(
            loginUrl,
            new StringContent(postData, Encoding.UTF8,
                      "application/x-www-form-urlencoded"
            )
        );
        var cookies = httpHandler.CookieContainer
                                 .GetCookies(new Uri(loginUrl));
        return cookies["Token"];
    }
}
With appropriate adaptations, this method could be consumed from any type of .NET system. The following example demonstrates its use from a console application that acts as a SignalR client. In the code, you can see how the cookie is obtained with the authentication token from the server and is attached to the hub connection:
var host = "http://localhost:5432";
var loginUrl = "/account/remotelogin";
var authCookie = GetAuthCookie(loginUrl, username, password).Result;
if (authCookie == null)
{
    Console.WriteLine("Impossible to get the auth token.");
    return;
}
var connection = new HubConnection(host);
connection.CookieContainer = new CookieContainer();
connection.CookieContainer.Add(authCookie);
var proxy = connection.CreateHubProxy("EchoHub");
...
connection.Start().Wait();
proxy.Invoke("SendPrivateMessage", "Hi, I'm authenticated!");
...
The same authentication middleware, being ultimately a service, can also be invoked from a web client—for example, by an AJAX call in JavaScript, or even (with some modifications in the component) as a destination for a login form. The following code shows how to deliver the cookie to the client by using AJAX. All subsequent requests to the service will include this cookie:
$("#login").click(function () {
    var u = $("#username").val();
    var p = $("#password").val();
    $.post("/account/login", { username: u, password: p })
        .done(function () {
            // The auth cookie will be attached
            // to the following request so I'll be authenticated
            location.href = "/chat/index";
        });
    return true;
});Internally, SignalR is designed in a completely modular form, where each component has its particular mission and clear-cut responsibilities, fitting with the other elements as if they were pieces of a jigsaw puzzle. One of the main advantages of its architecture is that it is designed for extensibility. Almost any element of the framework can be removed and easily replaced by another that fits in its place, making it possible to achieve great customization of the internal behavior of the framework itself. This is because SignalR components are quite decoupled from each other thanks to the intensive use of interfaces when creating references between classes, and to the application of design patterns such as Service Locator and Dependency Injection[38].
Thus, when a SignalR component needs to use another one, instead of referring to it directly, it usually does it through the abstractions that the interfaces allow so that both components are not bound by rigid links and so that they can maintain a high degree of independence from each other. In fact, the only thing that a component knows about another one is its interface—the contract defining its operations. This is precisely one of the secrets of customizing SignalR’s internal behaviors: if we want to modify a component, we just need to know what interfaces it presents to its consumers, create a class that implements them, and replace the piece in the jigsaw puzzle.
At the time of replacing the piece, the Dependency Resolver comes on stage. This is a component included in SignalR and, indeed, in other products such as Web API or ASP.NET MVC, and it acts as a “parts supplier” for the other framework components. Its mission is simple: to provide instances of classes that implement a particular interface.
When SignalR needs to instantiate a component of the framework that implements a particular interface, it does not do it directly. Instead, it calls the Dependency Resolver to see whether it can provide an instance. If the Dependency Resolver can indeed provide an instance, it will return it to the requestor so that the latter can use it for the purpose intended. Otherwise, the Dependency Resolver will execute the default logic, which usually consists in instantiating a class defined by default. Normally, to maintain low cohesion between components, the requestor will ask the Dependency Resolver for an instance that implements a particular interface, although specific classes can also be requested.
Note that, when obtaining instances using an external component rather than creating them when needed, we are reversing the normal execution flow of a program. This technique is often called Inversion of Control, or IoC.
Let’s look at an example. The following piece of code is the initialization method of the SignalR PersistentConnection class:
public virtual void Initialize(IDependencyResolver resolver)
{
    ... // Code omitted
    MessageBus = resolver.Resolve<IMessageBus>();
    JsonSerializer = resolver.Resolve<JsonSerializer>();
    TraceManager = resolver.Resolve<ITraceManager>();
    Counters = resolver.Resolve<IPerformanceCounterManager>();
    AckHandler = resolver.Resolve<IAckHandler>();
    ProtectedData = resolver.Resolve<IProtectedData>();
    UserIdProvider = resolver.Resolve<IUserIdProvider>();
    ... // Code omitted
}
As you can see, the method receives an instance that implements the IDependencyResolver interface. Basically, it is a reference to the dependency resolution component that will be in charge of providing us with all the objects that this persistent connection needs: a messaging bus, a JSON serializer, a trace manager, and so on. These are the dependencies of PersistentConnection—the components that it depends on to be able to perform the task entrusted to it. Certainly, the creators of SignalR could have instantiated these objects directly from the Initialize() method, but then the PersistentConnection class would be strongly coupled with them and the framework would be less flexible.
In the code, you can see that, for every dependency, the Resolve() method of the Dependency Resolver[39] is invoked. Basically, we are asking it (for example, in one case) something like, “Hey, have you got an instance of something that implements the IMessageBus interface?” And it will respond with a valid instance capable of complying with the contract imposed by the requested interface.
We can find the Dependency Resolver used by the system in the GlobalHost.DependencyResolver property. GlobalHost is a publicly accessible static object that contains configuration information of the SignalR application. Its DependencyResolver property, of the IDependencyResolver type, contains, by default, an object of the DefaultDependencyResolver class, which is the basic implementation of this component. Of course, we can (and shall!) replace this component with another one that allows us to take control over this dependency resolution process.
For example, we might be curious to observe the requests that are made to the Dependency Resolver internally during the normal execution of a SignalR application. To query it easily, we can create a class inheriting from DefaultDependencyResolver like this:
public class MyDependencyResolver : DefaultDependencyResolver
{
    public override object GetService(Type serviceType)
    {
        var result = base.GetService(serviceType);
        var msg = string.Format(
             "*** Requested type {0}, provided: {1}",
             serviceType.Name,
             result == null ? "null" : result.GetType().Name
        );
        Debug.WriteLine(msg);
        return result;
    }
    public override IEnumerable<object> GetServices(Type serviceType)
    {
        var results = base.GetServices(serviceType);
        var msg = string.Format(
             "*** Requested type {0}, provided: {1}",
             serviceType.Name,
             string.Join(",",
                         results.Select(o => o.GetType().Name))
        );
        Debug.WriteLine(msg);
        return results;
    }
}
As we can guess, the GetService() method is invoked by the components when they need a single instance that implements an interface, while GetServices() is used when the result can be more than one instance.
Now we will set our MyDependencyResolver class at application startup as a dependency resolution component of the system, something that we can do by setting the Resolver property in the configuration of the hub or persistent connection:
public class Startup
{
    public void Configuration(IAppBuilder app)
    {
        app.MapSignalR(new HubConfiguration() {
            Resolver = new MyDependencyResolver()
        });
    }
}
In this case, we would be modifying the Dependency Resolver exclusively for the hubs in our system. If we wanted to make a global modification, we would simply replace the instance in GlobalHost.DependencyResolver at system initialization:
public class Startup
{
    public void Configuration(IAppBuilder app)
    {
        GlobalHost.DependencyResolver = new MyDependencyResolver();
        ... // Other initialization code
    }
}
The result obtained by the debug output when executing a SignalR application that uses a persistent connection is the following (duplicates removed):
*** Requested type ITraceManager, provided: TraceManager
*** Requested type IPerformanceCounterManager, provided: PerformanceCounterManager
*** Requested type MyEchoConnection, provided: null
*** Requested type IStringMinifier, provided: StringMinifier
*** Requested type IConfigurationManager, provided: DefaultConfigurationManager
*** Requested type IMessageBus, provided: MessageBus
*** Requested type JsonSerializer, provided: JsonSerializer
*** Requested type IAckHandler, provided: AckHandler
*** Requested type IProtectedData, provided: DataProtectionProviderProtectedData
*** Requested type ITransportManager, provided: TransportManager
*** Requested type IServerIdManager, provided: ServerIdManager
*** Requested type IServerCommandHandler, provided: ServerCommandHandler
*** Requested type ITransportHeartbeat, provided: TransportHeartbeat
When we display the trace, this time executing an application that uses a hub, we obtain the following result. We can see that many components are the same as in the previous case, but the use of hubs means that other different ones also come into play:
*** Requested type ITraceManager, provided: TraceManager
*** Requested type IPerformanceCounterManager, provided: PerformanceCounterManager
*** Requested type IHubDescriptorProvider, provided: ReflectedHubDescriptorProvider
*** Requested type IMethodDescriptorProvider, provided: ReflectedMethodDescriptorProvider
*** Requested type IHubActivator, provided: DefaultHubActivator
*** Requested type IHubManager, provided: DefaultHubManager
*** Requested type IJavaScriptMinifier, provided: null
*** Requested type IJavaScriptProxyGenerator, provided: DefaultJavaScriptProxyGenerator
*** Requested type IParameterResolver, provided: DefaultParameterResolver
*** Requested type IHubRequestParser, provided: HubRequestParser
*** Requested type JsonSerializer, provided: JsonSerializer
*** Requested type IHubPipelineInvoker, provided: HubPipeline
*** Requested type IStringMinifier, provided: StringMinifier
*** Requested type IConfigurationManager, provided: DefaultConfigurationManager
*** Requested type IMessageBus, provided: MessageBus
*** Requested type IAckHandler, provided: AckHandler
*** Requested type IProtectedData, provided: DataProtectionProviderProtectedData
*** Requested type ITransportManager, provided: TransportManager
*** Requested type IServerIdManager, provided: ServerIdManager
*** Requested type IServerCommandHandler, provided: ServerCommandHandler
*** Requested type IAssemblyLocator, provided: EnumerableOfAssemblyLocator
*** Requested type ITransportHeartbeat, provided: TransportHeartbeat
*** Requested type MyEchoHub, provided: null
Both cases clearly show which pieces are requested throughout the execution of the applications and with which specific classes they are answered. However, a question arises: how does the Dependency Resolver know the specific class with which it must respond to a request?
To resolve dependencies, the Dependency Resolver keeps an internal register where requested data types are mapped to actions for obtaining instances of them. That is, during application startup, associations are stored in the register of the Dependency Resolver in the form “when you are requesting an object that implements the interface I, execute the action A, which will return an instance of that type to you.” At code level, this is accomplished in a similar way to the following example:
GlobalHost.DependencyResolver.Register(
  typeof(IExample),          // Type requested
   () => new ExampleClass()  // Action returning an object of this type
);
To be able to associate more than one specific instance to the registered type, the Register() method has an overload that also allows us to specify a set of actions for obtaining instances so that they can be obtained later by calling the GetServices() method.
Let’s look at a practical example. The following code registers the IJavaScriptProxyGenerator interface in the system’s Dependency Resolver. This interface must implement the component that generates the dynamic proxy of hubs. The interface is then associated to a custom builder class that enters some comments into the file footer:
// Initialization code
GlobalHost.DependencyResolver.Register(
    typeof(IJavaScriptProxyGenerator),
    () => new CustomProxyGenerator()
);
// Custom generator
public class CustomProxyGenerator: IJavaScriptProxyGenerator
{
    private DefaultJavaScriptProxyGenerator _generator;
    public CustomProxyGenerator()
    {
        _generator = new DefaultJavaScriptProxyGenerator(
             GlobalHost.DependencyResolver
        );
    }
    public new string GenerateProxy(string serviceUrl)
    {
        var proxy = _generator.GenerateProxy(serviceUrl);
        proxy += "

"
                 +"// Please don't use this code from the dark side";
        return proxy;
    }
}
When we want the instance returned from the Dependency Resolver to be the same for all requests made to it, we can implement this at register level in the form of a singleton object with lazy initialization using the Lazy<T> type available in the .NET Framework:
var generator = new Lazy<CustomProxyGenerator>(
                      () => new CustomProxyGenerator()
                );
GlobalHost.DependencyResolver.Register(
    typeof(IJavaScriptProxyGenerator),
    () => generator.Value
);
The lists that we saw earlier with the calls made to the Dependency Resolver requesting components can serve as a guide to know which parts of the framework can be replaced simply by modifying the register in the way that we have already seen.
Another example: when we looked at hubs, we remarked that the minimization and compaction of the dynamically generated proxy did not come implemented out of the box, but it had been structurally provided for. This can also be seen in the list of calls to GetService() from the Dependency Resolver that we looked at earlier. There is a request for an IJavaScriptMinifier object, and a null value is returned, so SignalR assumes that the proxy will not be minimized.
Again, we can modify the register so that it will return an object in whose Minify() method it will receive a script in the form of a character string, and it must return the result of the minimization process. Thus, if we install the AjaxMin package with NuGet, we could automatically minimize the generated proxy as follows:
// Initialization code
var minifier = new Lazy<MyJavascriptMinifier>(
                    () => new MyJavascriptMinifier()
               );
GlobalHost.DependencyResolver.Register(
    typeof(IJavaScriptMinifier),
    () => minifier.Value
);
// Custom minifier
public class MyJavascriptMinifier : IJavaScriptMinifier
{
    public string Minify(string source)
    {
        return new Minifier().MinifyJavaScript(source);
    }
}
Dependency Injection (DI) is a design pattern that describes a set of techniques whose purpose is to achieve less cohesion between the components of our applications. Although it shares objectives with the Service Locator—the pattern implemented by the SignalR Dependency Resolver—it uses a different approach regarding the way in which each component obtains the dependencies—other components—that it needs to operate.
Thus, whereas the Service Locator advocates an active schema—that is, it is the component itself that uses the Dependency Resolver to request from it the required dependencies—with Dependency Injection, these dependencies are satisfied externally, even achieving total decoupling from the Dependency Resolver, while favoring the creation of classes with very explicit dependencies at code level. In practice, this means that our classes will be cleaner, simpler, more independent, reusable, easily testable with unit testing, and highly maintainable.
Let’s look at it with a piece of code. As you can see, the following hub is strongly coupled to other components of the system:
public class CustomerHub: Hub
{
    ...
    public void Create(Customer customer)
    {
        var repo = new CustomerRepository();
        repo.Save(customer);
        var mailer = new MailManager();
        mailer.Send(customer.Email, "Welcome!");
    }
}
The code suggests that, to operate, the CustomerHub class needs the services provided by another two classes, CustomerRepository and MailManager. That is, in the code that we observe, CustomerHub has these two dependencies and is strongly coupled to them. Because they are being instantiated directly, there would be no way to change the classes used without modifying this code and all the points in the system where the same thing is done.
Using interfaces and the Dependency Resolver would improve this situation, because instead of directly creating the instances, we could request them from this component:
public class CustomerHub: Hub
{
    IDependencyResolver resolver = GlobalHost.DependencyResolver;
    ...
    public void Create(Customer customer)
    {
        var repo = resolver.Resolve<ICustomerRepository>();
        repo.Save(customer);
        var mailer = resolver.Resolve<IMailManager>();
        mailer.Send(customer.Email, "Welcome!");
    }
}
In the body of the method, there would no longer be any reference to the specific classes on which we depend—only to the interfaces or contracts with which they must comply. Thus, the Dependency Resolver will be in charge of providing them.
However, there are still the following problems with this code:
First, we have introduced a dependency to the Service Locator used—in this case, the SignalR Dependency Resolver. This limits the possibilities for use and makes the classes less reusable.
Second, the code of
Create(), whose main objective should be to store aCustomerobject in the repository and send it a welcome email, has too much noise due to the pipework—obtaining dependencies—that it is forced to do.Third, there is an additional, more subtle problem that has been carried on from the start: the dependencies of the class are neither clear nor explicit. Although there are tools to show class dependencies, even graphically, the ideal situation would be that the simple quick view of a component would give us a clear idea of what other elements it needs to function. However, in this case, we would have to review the whole class to see at what points we are using the Dependency Resolver.
Dependency Injection can help with this last point. Although there are several ways to use this principle, the most popular one is to make our classes receive the components they need—their dependencies—as parameters of their constructor, and always using abstractions provided by interfaces.
Applying this concept to the preceding example, our portion of the hub would be as follows:
public class CustomerHub : Hub
{
    private ICustomerRepository _customerRepository;
    private IMailManager _mailManager;
    public CustomerHub(ICustomerRepository customerRepository,
                       IMailManager mailManager)
    {
        _customerRepository = customerRepository;
        _mailManager = mailManager;
    }
    public void Create(Customer customer)
    {
        _customerRepository.Save(customer);
        _mailManager.Send(customer.Email, "Welcome!");
    }
    ...
}
Note that the size of the Create() method has decreased significantly, because now it has to focus only on performing its principal task. In addition, we need only a quick look at the constructor method of the class to know that it depends on two components, and although we do not know exactly which ones they are, we do know what contracts they are required to fulfill.
Above all, we have completely decoupled our hub from the other components, with the advantages that that entails.
If we tried to connect to a hub such as the preceding one, we would get at best a 500 error indicating that there is no constructor without parameters for the hub. This is only natural, because for all this to work, we need someone to supply the dependencies to the hub constructor. Who better than the Dependency Resolver to take care of that?
Remember that a few pages ago we were checking the calls that were internally made to the Dependency Resolver, and when we obtained the ones corresponding to the execution of a hub, we could see that SignalR asked the Dependency Resolver for an instance of the hub class, but a null value was returned:
...
*** Requested type IServerCommandHandler, provided: ServerCommandHandler
*** Requested type IAssemblyLocator, provided: EnumerableOfAssemblyLocator
*** Requested type ITransportHeartbeat, provided: TransportHeartbeat
*** Requested type CustomerHub, provided: null
All that we would need would be to register in the Dependency Resolver an association between the data type requested (CustomerHub) and the action that would create the instance. This action is the point from which the constructor would be invoked, supplying it the required dependencies.
The code to enter in the application startup would be the following:
GlobalHost.DependencyResolver.Register(
    typeof(CustomerHub),
    () => new CustomerHub(
                new CustomerRepository(),
                new MailManager()
          )
);
This way, every time SignalR needs a CustomerHub type object—which will happen on every call or client interaction—it will request it from the Dependency Resolver, which will execute the lambda function and return the created instance.
If we work with persistent connections instead of hubs, we can get exactly the same result by applying the same techniques. These objects, of types descending from PersistentConnection, are also requested from the Dependency Resolver, so we can capture that moment and supply an object with the dependencies already satisfied:
// Configuration:
GlobalHost.DependencyResolver.Register(
    typeof(MyConnection),
    () => new MyConnection(
                new MyDependency()
          )
);
// Persistent Connection
public class MyConnection: PersistentConnection
{
    private IMyDependency _dependency;
    public MyConnection(IMyDependency dependency)
    {
        _dependency = dependency;
    }
    ...
}
However, the latter case is not quite recommended, and we must be very careful with its use, because the life of a PersistentConnection can be long (depending on the transport used, the instance could even be active throughout the whole time the user is connected), and if we create dependencies that use valuable resources, these might be unavailable for other uses. In these cases, it is better to opt for a close control of the lifetime of such dependencies—for example, by obtaining them through the Service Locator and delimiting their use with a using block to ensure their release when they are no longer needed.
Sometimes dependencies use external resources that have to be released. For example, a hub could use an Entity Framework data context to persist information in the database, and we should always ensure that both it and (hence) the underlying connection it uses have been closed and released.
Currently, SignalR provides no mechanism to automatically release dependencies (or, for example, those that implement IDisposable), so developers are responsible for ensuring that this happens. Generally, a good place to do this is in the implementation of the Dispose() method of hubs:
public class CustomerHub : Hub
{
    ...
    protected override void Dispose(bool disposing)
    {
        if (disposing)
        {
            _customerRepository.Dispose();
            _mailManager.Dispose();
        }
    }
}
It would be necessary to do this at least with direct dependencies of the hub that implement IDisposable. If these depend in turn on other components, the latter could be released here or from their respective Dispose() methods. In any case, it is also a task that must be performed with extreme caution, because there might be components shared between instances whose early release could cause problems.
With the techniques seen before, we now know how to inject dependencies in hubs by simply changing the content of the Dependency Resolver register, although this task can be really laborious if we have complex dependency graphs. For example, if our hub depends on an instance that implements the IService interface, the specific class to be used needs an instance of IRepository, and in turn this instance requires an IDataStore object. We can find ourselves with quite convoluted registers, because we have to manage these relationships ourselves:
GlobalHost.DependencyResolver.Register(
    typeof (MyHub),
    () => new MyHub(new MyService(new MyRepository(new MyDataStore())))
);
A concept that frequently appears hand-in-hand with Dependency Injection is that of Inversion of Control containers (IoC containers). These are components specializing in managing instances, life cycles, and dependencies between objects, something like Dependency Resolvers on steroids. Not only can they act as powerful Service Locators, but they also tend to be much more flexible when registering services, specifying instantiation modes (for example, deciding which objects will be created as singletons and which will be instantiated upon request), and solving dependencies between components automatically.
Going back to our previous example, where we had a dependency graph, if we were to request an instance of MyHub from the IoC container, the latter would be able to analyze its constructor and determine that it needs an instance of IService. Thanks to its register, it would know that IService must be resolved to the MyService class, but also that the latter, in turn, requires an IRepository object in its constructor, so it would check its register again to see what class would satisfy the dependency, and so on until completing the dependency graph.
Obviously, this way of managing dependencies is much more convenient and productive than doing it manually.
There are many IoC containers on the market, although we could point out Unity, Ninject, Autofac, StructureMap, or Windsor Castle, and others, for their great popularity. Virtually all are open source products, basically very similar in concept and operation, and even quite similar to the operation of the Dependency Resolver that we have previously seen:
Application startup is used to register in the container associations between requested types and returned types, the way they are obtained, and other aspects.
At run time, when an instance of some type is needed by the application, the container is called to obtain it.
IoC containers are normally integrated with SignalR through the standard mechanism of dependency resolution, because this is the point already established for obtaining component instances. Usually, the default Dependency Resolver is replaced with a custom one, which uses an IoC container in the backstage to obtain the dependencies making use of the latter’s power.
Now we will see how to use dependency injection with two of these containers: Unity and Ninject. The dependency graph that we will use is the following:
Broadcaster <requires> IMessageFormatter
MessageFormatter <implements> IMessageFormatter <requires> IClock
The Broadcaster hub requires in its constructor an instance of IMessageFormatter, which materializes in the MessageFormatter class and whose constructor, in turn, requires an instance of IClock. In all cases, the interfaces are a true reflection of the signature of the classes, so we will omit their code for the sake of brevity.
public class Broadcaster: Hub
{
    private IMessageFormatter _formatter;
    public Broadcaster(IMessageFormatter formatter)
    {
        _formatter = formatter;
    }
    public Task Broadcast(string message)
    {
        var formattedMsg = _formatter.Format(message);
        return Clients.All.Message(formattedMsg);
    }
}
public class MessageFormatter : IMessageFormatter
{
    private IClock _clock;
    public MessageFormatter(IClock clock)
    {
        _clock = clock;
    }
    public string Format(string message)
    {
        return _clock.GetCurrentDateTime() + " > " + message;
    }
}
public class Clock : IClock
{
    public string GetCurrentDateTime()
    {
        return DateTime.Now.ToString("F");
    }
}Unity[40] is a powerful IoC container promoted by Microsoft Patterns & Practices. Like others, it can be installed very easily on our SignalR application via NuGet:
PM> Install-package Unity
Now we will create a Dependency Resolver inheriting from the class that SignalR provides: DefaultDependencyResolver. We take control in the methods used to obtain instances (GetService and GetServices), and we enter logic to search first in the IoC container and then, if appropriate, in the default register:
public class UnityDependencyResolver : DefaultDependencyResolver
{
    private UnityContainer _container;
    public UnityDependencyResolver(UnityContainer container)
    {
        _container = container;
    }
    public override object GetService(Type serviceType)
    {
        if (_container.IsRegistered(serviceType))
        {
            return _container.Resolve(serviceType);
        }
        return base.GetService(serviceType);
    }
    public override IEnumerable<object> GetServices(Type serviceType)
    {
        return _container.ResolveAll(serviceType)
            .Concat(base.GetServices(serviceType));
    }
}
We can now set this component as a dependency resolution mechanism for the application, sending an instance in the initial configuration object. Note that to instantiate it we need to have created a Unity container, which we will also use to register the components that the IoC container will be in charge of creating:
public void Configuration(IAppBuilder app)
{
    var container = new UnityContainer();
    container.RegisterType<IClock, Clock>();
    container.RegisterType<IMessageFormatter, MessageFormatter>();
    container.RegisterType<Broadcaster>();
    app.MapSignalR(new HubConfiguration()
         {
              Resolver = new UnityDependencyResolver(container)
         });
}
Note
Although in this example we are including the container configuration code directly on the Configuration() method, it would be much more appropriate to move all operations relating to the IoC to an independent class and, for example, enter them into an IocConfig.Setup() method, which would be invoked from this point.
In this case, the instances that will be created for all components through Unity will be single-use. Whenever a component is requested, a new instance of it will be created. If for any reason, such as performance, we want a specific component to be managed in singleton mode, we can specify this at the moment of registration. For example, the instances of IClock in our previous example could be the same for the entire application, so the register could be as follows:
container.RegisterType<IClock, Clock>(
              new ContainerControlledLifetimeManager()
);
Thus, all calls made to the container requesting IClock type components will be answered with the same instance of Clock.
For more information about using Unity, you can review the official product documentation available at http://msdn.microsoft.com/en-us/library/dn170416.aspx.
Besides having a great name, Ninject is a powerful open source IoC container, created with simplicity and ease of use in mind from the beginning. Installation on a project, as usual, can be performed through NuGet:
PM> Install-package Ninject
As we did before with Unity, the next step is to create our Dependency Resolver to replace the one provided by SignalR by default:
public class NinjectDependencyResolver : DefaultDependencyResolver
{
    private IKernel _kernel;
    public NinjectDependencyResolver(IKernel kernel)
    {
        _kernel = kernel;
    }
    public override object GetService(Type serviceType)
    {
        return _kernel.TryGet(serviceType)
               ?? base.GetService(serviceType);
    }
    public override IEnumerable<object> GetServices(Type serviceType)
    {
        return _kernel.GetAll(serviceType)
            .Concat(base.GetServices(serviceType));
    }
}
As you can see, it is almost identical to the one we had with Unity, the main difference perhaps being that in Ninject dialect the container is called a “kernel.” The creation and initialization of the kernel is also done during application startup:
public void Configuration(IAppBuilder app)
{
    var kernel = new StandardKernel();
    kernel.Bind<IClock>().To<Clock>().InSingletonScope();
    kernel.Bind<IMessageFormatter>().To<MessageFormatter>();
    app.MapSignalR(new HubConfiguration()
                {
                    Resolver = new NinjectDependencyResolver(kernel)
                });
}
The code speaks for itself. IClock instances will be resolved as singletons at application level, whereas IMessageFormatter objects will be instantiated for each request. Moreover, in this case, it is not necessary to register the hub because, by default, when asked for a specific class, Ninject will be in charge of automatically creating instances of it without needing prior registration.
For more information about the use of this component, you can review the official product documentation available at http://www.ninject.org/learn.html.
The full extent of unit testing is beyond the scope of this book, but we will do a quick overview of it for those readers who are not yet acquainted with it so that they can at least get an idea of what we will be looking at in the following pages.
Basically, unit tests are small pieces of code whose mission is to ensure the proper functioning of other parts of the code. In a periodical and automated way, they ensure that each component works as we expected it to work when it was implemented, so they add great robustness and maintainability to our applications.
For example, if in the future someone decides to implement new features, we could detect with unit tests whether the changes introduced have unwanted side effects on existing components. Or, if we need to modify the implementation of one of those components, unit testing would allow us to see whether everything still works as before after applying the changes. In large and complex applications, with a long life and where many developers participate, unit testing provides invaluable safety and soundness.
Let’s look at a quick example. Imagine the following method, which returns a number based on another one that we send to it as an argument, applying an algorithm that an expert in the domain of our application has given us:
public int GetNumber(int a)
{
    if (a > 10) return a*10;
    if (a < 5) return -a;
    return a*2;
}
If this method were to be used from hundreds of points of our application, any change in its logic could have a great impact on our system. Therefore, we would want to implement unit tests to ensure throughout the life of our software that this method will always do what all the components that consume it expect it to do.
The following code shows unit tests performed on the preceding code. Note that these are simple methods that use the code tested, sending it different arguments and checking that it reacts as expected. The tests are written using the framework integrated in all Visual Studio editions[41], and they cover all possible paths that can be followed in the execution of the function (100 percent coverage of the code to be checked):
[TestClass]
public class DomainGetNumberTests
{
    [TestMethod]
    public void GetNumber_Returns_10xA_if_A_is_greater_than_10()
    {
        // Arrange
        var domain = new Domain();
        var value = 12;
        var expected = 120;
        // Act
        var result = domain.GetNumber(value);
        // Assert
        Assert.AreEqual(expected, result);
    }
    [TestMethod]
    public void GetNumber_Returns_Minus_A_if_A_is_less_than_5()
    {
        // Arrange
        var domain = new Domain();
        var value = 4;
        var expected = -4;
        // Act
        var result = domain.GetNumber(value);
        // Assert
        Assert.AreEqual(expected, result);
    }
    [TestMethod]
    public void GetNumber_Returns_2xA_If_A_Is_In_Range_5_To_10()
    {
        // Arrange
        var domain = new Domain();
        var value = 5;
        var expected = 10;
        // Act
        var result = domain.GetNumber(value);
        // Assert
        Assert.AreEqual(expected, result);
    }
}
The classes containing tests are marked with the [TestClass] attribute, and test methods are decorated using [TestMethod]. Each one tests a different aspect of the component, and they often have long and very descriptive names. For example, in the preceding code we see three different tests, one for each of the possible paths that execution could take in the method that we are testing.
Obviously, they could be more exhaustive and check more values in each case, but these tests could be a good starting point.
Unit tests are typically created as independent projects, exclusively entrusted with this task. Thus, we will not mix the code of the original project with its testing code.
Another detail that can be observed in the preceding code is that its implementation follows the structure “AAA” (Arrange, Act, Assert), which refers to the encoding preparations, the execution of the test itself, and the verification of the results.
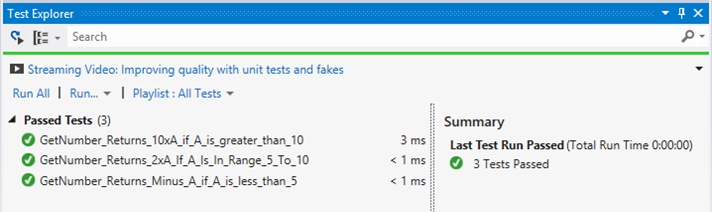
When running tests from Visual Studio, we obtain a satisfactory result, as shown in Figure 9-4. We can perform these tests manually at any time or automate them within the build process of the application.
Now let’s imagine that, due to a new need of our application, a developer tweaks the method, slightly modifying its behavior in this way:
public int GetNumber(int a)
{
    if (a > 10)
        return a * 10;
    if (a < 5)
        return -a;
    return a * 5;  // Changed!
}
If we have configured Visual Studio to do so, when the project was built, unit tests would be executed and compilation would fail because one of these tests would not be passed—the one which ensured that for inputs between 5 and 10 the return should be the argument multiplied by two. See Figure 9-5.
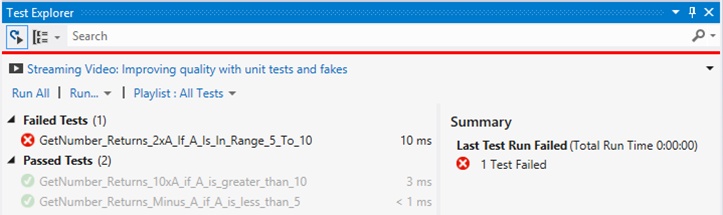
At this point, the developer who made the change might realize that her small modification can affect many more points than she had previously estimated, and so rethink it or explore other alternatives. This is the security that unit tests provide: if anything changes from what we had expected at the time of building, the alarms go off.
One of the advantages of unit tests, which often turns into a problem, is that they must check a single component of the system (hence the “unit” in the name), and this is more complicated if the code to be tested uses external dependencies—that is, other components.
Consider the following code, which in the previous case we could check in a very direct way. If any test failed, we knew exactly where we needed to correct it. However, this time, a unit test failure could be either due to an incorrect implementation of the GetNumber() method or to an error in the Calculator class—or, in turn, in a dependence of the latter:
public int GetNumber(int a)
{
    var calc = new Calculator();
    if (a > 10)
        return calc.Multiply(a, 10);
    if (a < 5)
        return calc.Multiply(a, -1);
    return calc.Multiply(a, 2);
}
The preceding test would be performing a check on not only the GetNumber() method but also its dependencies. Such tests are called “integration tests” because they test how the individual components are integrated with each other, and they are usually a step taken after unit tests are performed.
Therefore, to perform correct unit tests, we should ideally not use dependencies or, if we need to, at least not have coupling as strong as the one shown in the preceding example, where the Calculator object was instantiated directly from the method tested. Forget coupling; that was more like welding.
We have already discussed the techniques that we use to decouple components, so we will not go over them again. Just keep in mind that to perform unit tests easily, low cohesion will always be a great ally. Thus, applying these techniques, we could have implemented our component without any coupling:
public class Domain
{
    private ICalculator _calculator;
    public Domain(ICalculator calculator)
    {
        _calculator = calculator;
    }
    public int GetNumber(int a)
    {
        if (a > 10)
            return _calculator.Multiply(a, 10);
        if (a < 5)
            return _calculator.Multiply(a, -1);
        return _calculator.Multiply(a, 2);
    }
}
When freed from the instance of Calculator, what we use is an abstraction that isolates us from the specific implementation of the calculator that we are going to use. From unit tests, we can properly supply appropriately prepared dependencies to help us check the operation of the GetNumber() method exclusively, which is what the test is about, without having the result affected by the operation of Calculator, as was previously the case.
To supply these dependencies, mock objects are often used—minimal implementations of the contracts, whose behavior is defined by the tests themselves. That is, they are classes that will implement the interfaces required by the components to be tested, but their code will be exclusively dedicated to facilitate testing. Sometimes, we will find empty implementations; at other times they will emulate production environments (for example, a database emulated in memory for testing). We might find partial implementations oriented only to the test being performed, and sometimes we will predefine the behavior of classes dynamically.
There are frameworks designed exclusively to create and prepare the behavior of these mock objects, such as Moq, Rhino Mocks, Fakes, JustMock, FakeItEasy, TypeMock, and others. Moq is, by far, the one most used for its simplicity and power.
The best way to understand how to work with these tools is to look at some code. The following method uses Moq to dynamically create an object that implements the ICalculator interface and to set the behavior that we want for its Multiply() method. Note that this is about configuring only the behavior that we need to pass the tests that we will perform on the GetNumber() method. It is also not necessary (nor desirable!) to replicate the logic of the original method in this configuration; we simply need to make it so that the desired result is obtained for given input arguments:
using Moq; // Requires NuGet package "Moq"
...
[TestMethod]
public void GetNumber_Returns_10xA_if_A_is_greater_than_10()
{
    // Arrange
    var mock = new Mock<ICalculator>();
    mock.Setup(c => c.Multiply(It.IsAny<int>(), It.IsAny<int>()))
        .Returns((int a, int b) => a * b);
    var fakeCalculator = mock.Object;
    var domain = new Domain(fakeCalculator);
    var value = 12;
    var expected = 120;
    // Act
    var result = domain.GetNumber(value);
    // Assert
    Assert.AreEqual(expected, result);
}
When configuring the mock object, we indicate that the result for calls to the Multiply() method using any integers as inputs will be the product of both. We could have also set results for specific inputs, or even ranges of inputs, and defined constant returns or returns with any value.
This mock object created and configured with Moq is injected into the constructor of the Domain class instance, so it will be the calculator used internally from its GetNumber() method. Thus, because we are controlling the behavior of dependencies with this test, we can ensure that if something goes wrong, it will mean that the GetNumber() method is the one that is incorrectly implemented.
Moq, like the other frameworks, has a good set of tools to configure the behavior of these mock objects as well as to check that they have been properly used. For example, the following code allows ensuring at the end of the test that the Multiply() method of the dependency has been called exactly once when invoking domain.GetNumber():
using Moq;
...
// Act
var result = domain.GetNumber(value);
// Assert
Assert.AreEqual(expected, result);
mock.Verify(
        calc => calc.Multiply(It.IsAny<int>(), It.IsAny<int>()),
        Times.Once()
);
In the Moq project wiki[42], you can view the syntax for setting up mock objects as well as many examples of their use. It is highly recommended reading for beginners in the use of this framework.
Hubs are normal classes and, as such, they can be instantiated and fed with the dependencies they need, so we can decouple them from the remaining components of our application very easily and therefore subject them to unit tests without too much trouble with the techniques and tools that we have been looking at.
Furthermore, SignalR was designed from the outset with decoupling, dependency injection, and unit testing in mind, so it will facilitate performing unit testing of our applications. Virtually all communication that we can have between a hub and the components of the framework is done using abstractions (interfaces) that allow their replacement by mock objects that make unit testing easier.
For example, look at the following code of a hub, where we can see several interactions with the platform. The first one is to get the value of the header variable "Host", the second one is to get the connection identifier, and the third one is to send an information message to all connected clients:
public class Broadcaster: Hub
{
    ...
    public override Task OnConnected()
    {
        var host = Context.Headers["host"];
        var id = Context.ConnectionId;
        var message = "New connection " + id + " at " + host;
        return Clients.All.Message(message);
    }
}
Thanks to the abstractions used by the SignalR hub class and the magic of mocking frameworks such as Moq, we can create a complete dependency infrastructure whose behavior will be set up in advance so that we can focus on checking that in this method the Message method is invoked in all connected clients, sending them the exact message that we expect.
The verification code for the OnConnected() method of the hub would be as follows. Below we will go over it step by step:
[TestMethod]
public void On_Connected_sends_a_broadcast_with_a_specific_message()
{
    // 1) ARRANGE
    var hub = new Broadcaster();
    var connId = "1234";
    var host = "myhost";
    var expectedMessage = "New connection "+connId+" at "+host;
    // 1.a) Set up headers
    var mockRequest = new Mock<IRequest>();
    var mockHeaders = new Mock<INameValueCollection>();
    mockHeaders.Setup(h => h["host"]).Returns(host);
    mockRequest.Setup(r => r.Headers).Returns(mockHeaders.Object);
    // 1.b) Set up context & connection id
    hub.Context = new HubCallerContext(mockRequest.Object, connId);
    // 1.c) Set up capture of client method call
    var clientMethodInvoked = false;
    var messageSent = "";
    dynamic all = new ExpandoObject();
    all.Message = new Func<string, Task>((string message) =>
    {
        clientMethodInvoked = true;
        messageSent = message;
        return Task.FromResult(true);
    });
    var mockClients = new Mock<IHubCallerConnectionContext>();
    mockClients.Setup(c => c.All).Returns((ExpandoObject)all);
    hub.Clients = mockClients.Object;
    // 2) ACT
    hub.OnConnected().Wait();
    // 3) ASSERT
    Assert.IsTrue(clientMethodInvoked, "No client methods invoked.");
    Assert.AreEqual(expectedMessage, messageSent);
}
Note how, little by little, we are creating the scaffolding needed to execute the method to be tested, to ensure that it can retrieve the information from its environment, and to capture the calls to the client side:
We first create the instance of the hub on which we will perform our tests. If its constructor received dependencies as parameters, we supply them to it at this point too. Next, we create variables to store environment values that we will use later, and we already define the message that we hope will be sent to all connected clients.
We prepare the request headers to be read from the hub. A mock object is created that implements the
IRequestinterface, and we configure itsHeadersproperty so that a query for the"host"key returns the value that we want.Because the method to be checked needs to obtain the connection identifier, we create a
HubCallerContextobject to which we supply the aforementionedIRequestinterface, as well as a connection identifier representing the client whose call we will simulate. This object is entered into theContextproperty of the hub, from which it will be possible to access theConnectionId.We create a dynamic object called
all, in which we implement theMessage()method to simulate the invocation to the client side. Inside it, we simply set values in local variables indicating that this method was invoked from the hub. Next, we replace theClientsobject of the hub with a new mock object whoseAllproperty is set with theallobject that we created earlier. Thus, whenClients.All.Message()is called from the hub, the method that will really be invoked will be the one implemented in the lambda.
We invoke the
OnConnected()method. Because it returns a background task represented by aTask, we wait for it to end.We check the value of the variables where we have stored the marks indicating that the method was invoked correctly and with the desired values.
Because preparing this entire infrastructure is sometimes rather tedious, it is often included in helper methods so that all tests can quickly obtain an instance of the hub to be checked, but already configured and ready for us to focus directly on implementing the various tests:
[TestClass]
public class BroadcasterTests
{
    // Helper method
    private Broadcaster GetConfiguredHub()
    {
        var hub = new Broadcaster();
        var connId = "1234";
        var host = "myhost";
        // Set up headers
        var mockRequest = new Mock<IRequest>();
        var mockHeaders = new Mock<INameValueCollection>();
        mockHeaders.Setup(h => h["host"]).Returns(host);
        mockRequest.Setup(r => r.Headers)
                   .Returns(mockHeaders.Object);
        // Set up user
        var identity = new GenericPrincipal(
              new GenericIdentity("jmaguilar"), new[] { "admin" });
        mockRequest.Setup(r => r.User).Returns(identity);
        // Set up context & connection id
        hub.Context = new HubCallerContext(mockRequest.Object,
                                           connId);
        return hub;
    }
    [TestMethod]
    public void Test1()
    {
        // Arrange
        var hub = GetConfiguredHub();
        ...// Test hub
    }
    [TestMethod]
    public void Test2()
    {
        // Arrange
        var hub = GetConfiguredHub();
        ... // Test hub
    }
}
Let’s look at one more example to show how to resolve other common scenarios when performing this type of testing. The hub method to be tested will be the following:
[Authorize]
public Task PrivateMessage(string destConnectionId, string text)
{
    var sender = Context.User.Identity.Name;
    var message = new Message() { Sender = sender, Text = text };
    return Clients.Client(destConnectionId).PrivateMessage(message);
}
In this case, we will first need to inject information about the active user into the instance of the hub. To do this, we preset the request context so that when its User property is accessed, a generic identity is returned. The code is similar to the example that we have recently seen:
var mockRequest = new Mock<IRequest>();
var identity = new GenericPrincipal(
        new GenericIdentity("jmaguilar"), new[] { "admin" });
mockRequest.Setup(r => r.User).Returns(identity);
...
// Set up context & connection id
hub.Context = new HubCallerContext(mockRequest.Object, connId);
...
We must also capture the call to the PrivateMessage method of the dynamic object returned by the call to Clients.Client(connectionId), which can be achieved in very much the same way as we did earlier:
[TestMethod]
public void PrivateMessage_Sends_A_Private_Mesage()
{
    // Arrange
    var hub = GetConfiguredHub();
    var destinationId = "666";
    var user = hub.Context.User.Identity.Name;
    var text = "Hi there!";
    var mockClients = new Mock<IHubCallerConnectionContext>();
    Message messageSent = null;
    dynamic client = new ExpandoObject();
    client.PrivateMessage = new Func<Message, Task>((Message data) =>
                                {
                                   messageSent = data;
                                   return Task.FromResult(true);
                                });
    mockClients.Setup(c => c.Client(destinationId))
               .Returns((ExpandoObject)client);
    hub.Clients = mockClients.Object;
    // Act
    hub.PrivateMessage(destinationId, text).Wait();
    // Assert
    Assert.IsNotNull(messageSent, "Message not sent");
    Assert.AreEqual(user, messageSent.Sender);
    Assert.AreEqual(text, messageSent.Text);
}
Another possibility that we have for capturing calls to client-side methods is to use a mock interface with the operations that are allowed and to configure a callback function on the call, to retrieve the information sent. The main section of the setup code would be as follows:
...
var mockClients = new Mock<IHubCallerConnectionContext>();
var mockClientOperations = new Mock<IClientOperations>();
mockClientOperations
    .Setup(c => c.PrivateMessage(It.IsAny<Message>()))
    .Returns(Task.FromResult(true))
    .Callback<Message>(msg =>
                        {
                            messageSent = msg;
                        });
mockClients.Setup(c => c.Client(destinationId))
           .Returns(mockClientOperations.Object);
hub.Clients = mockClients.Object;
...
The definition of the interface, used only to configure the behavior of the PrivateMessage() method with Moq, would be as follows:
public interface IClientOperations
{
    Task PrivateMessage(Message msg);
}We have seen that performing unit tests on hubs need not be especially complicated if we master a mocking framework, which, incidentally, is absolutely recommended. If the class has been built without rigid dependencies, we will always find a way to perform isolated tests on the aspects that we want. The SignalR architecture itself also makes it very easy for us, because we work on abstractions of components that can be easily replaced with other ones.
With persistent connections, things change a bit, because SignalR does not offer so much flexibility anymore. From its base, testing this type of component is a little more difficult because the custom code is implemented on protected methods inherited from their parent class, PersistentConnection. Thus, any attempt to invoke one of the overridable methods such as OnReceived or OnConnected from the outside—for example, from a unit test—will generate a compilation error because they are not visible from outside the base class or its descendants:
// Arrange
var connection = new MyConnection();
...
// Act
connection.OnReceived(mockRequest.Object, connId, data); // Error
...
The solution to this problem is really simple: we just need to create in the test project a new class inherited from the connection that we want to test and create public methods in it that function as “bridges” to the methods of the base class. We would do the tests on these new methods because they would be visible from the test classes:
public class MyTestableConnection : MyConnection
{
    public new Task OnReceived(IRequest request,
                                string connectionId, string data)
    {
        return base.OnReceived(request, connectionId, data);
    }
}
Note that, in the constructor of this new class, we would also have to include the dependencies that the original persistent connection requires, if any.
However, when this obstacle is overcome, as soon as we begin testing the code, we will see that there are members that we would like to replace so as to take control in tests, but there is no way to do it. Perhaps the most evident case is found in the Connection property that we use from persistent connections to make direct submissions or broadcasts to clients; its setter is private, and it is set internally in the class. The process is unable to be intercepted or altered from any point.
Therefore, the recommendation regarding unit testing on this type of component is to remove as much code as possible from the methods to be tested (OnConnected, OnReceived, and so on), especially code related to Connection or other non-replaceable components, taking them to points where we can control them, using dependencies, inheritance or any other mechanism that can provide alternative implementations.
To illustrate these problems and how to solve them, we are going to implement some tests on the following persistent connection. Note that we have omitted all references to the Connection property of PersistentConnection, and to make submissions, we are using a custom abstraction, which we have named IConnectionWrapper, whose code we will look at later on:
public class EchoConnection : PersistentConnection
{
    private IConnectionWrapper _connection;
    public EchoConnection()
    {
        _connection = new ConnectionWrapper(this);
    }
    public EchoConnection(IConnectionWrapper connection)
    {
        _connection = connection;
    }
    protected override Task OnConnected(IRequest request,
                                        string connectionId)
    {
        var newConnMsg = "New connection " + connectionId + "!";
        return _connection.Send(connectionId, "Howdy!")
                            .ContinueWith(_ =>
                                _connection.Broadcast(newConnMsg)
                            );
    }
}
That is, we are replacing the references to this.Connection, rigid and difficult to control from unit tests, with others with no coupling whatsoever. We also define two constructors: the first one will be the one normally used at run time, whereas the second one is prepared to be able to inject the dependencies from the tests.
The abstractions that we have used are the following:
public interface IConnectionWrapper
{
    Task Send(string connectionId, object value);
    Task Broadcast(object value, params string[] exclude);
}
public class ConnectionWrapper: IConnectionWrapper
{
    private PersistentConnection _connection;
    public ConnectionWrapper(PersistentConnection connection)
    {
        _connection = connection;
    }
    public Task Send(string connectionId, object value)
    {
        return _connection.Connection.Send(connectionId, value);
    }
    public Task Broadcast(object value, params string[] exclude)
    {
        return _connection.Connection.Broadcast(value, exclude);
    }
}
From the testing project, we cannot use the EchoConnection class directly because its members have protected visibility, so we must now create the wrapper that will serve as a gateway to said class:
public class TestableEchoConnection : EchoConnection
{
    public TestableEchoConnection(IConnectionWrapper connWrapper)
        : base(connWrapper) { }
    public new Task OnReceived(IRequest req, string id, string data)
    {
        return base.OnReceived(req, id, data);
    }
    public new Task OnConnected(IRequest req, string id)
    {
        return base.OnConnected(req, id);
    }
}
Now we can finally implement our unit test, where we verify that when the OnConnected method of the persistent connection is invoked, a submission using Send() and another one using Broadcast() are made:
[TestMethod]
public void On_Connected_Sends_Private_And_Broadcast_Messages()
{
    // Arrange
    var mockConnection = new Mock<IConnectionWrapper>();
    mockConnection
        .Setup(c => c.Send(It.IsAny<string>(), It.IsAny<object>()))
        .Returns(Task.FromResult(true))
        .Verifiable();
    mockConnection
        .Setup(c => c.Broadcast(It.IsAny<object>()))
        .Returns(Task.FromResult(true))
        .Verifiable();
    var echo = new TestableEchoConnection(mockConnection.Object);
    var myConnId = "1234";
    var mockRequest = new Mock<IRequest>();
    //Act
    echo.OnConnected(mockRequest.Object, myConnId).Wait();
    // Assert
    mockConnection.Verify(); // Verify expectations
}SignalR comes with an out-of-the-box mechanism that is very similar to Web API delegating handlers, or even to the middleware components proposed by OWIN, enabling us to enter small software modules into the execution pipeline of hubs, allowing interception tasks to be performed, as well as pre-processing and post-processing of the messages that enter and exit them.
These modules are classes that implement the IHubPipelineModule interface. They are added to the pipeline at application startup using the AddModule() method of the HubPipeline property present in the GlobalHost global object. Internally, what is done is the storing of the module in a stack:
GlobalHost.HubPipeline.AddModule(new MyModule());
Note
It is important that this register is made before the pipeline of the hub is executed for the first time.
The IHubPipelineModule interface is defined in the Microsoft.AspNet.SignalR.Hubs namespace as follows:
public interface IHubPipelineModule
{
    Func<IHubIncomingInvokerContext, Task<object>> BuildIncoming(
           Func<IHubIncomingInvokerContext, Task<object>> invoke
    );
    Func<IHubOutgoingInvokerContext, Task> BuildOutgoing(
           Func<IHubOutgoingInvokerContext, Task> send
    );
    Func<IHub, Task> BuildConnect(Func<IHub, Task> connect);
    Func<IHub, Task> BuildReconnect(Func<IHub, Task> reconnect);
    Func<IHub, Task> BuildDisconnect(Func<IHub, Task> disconnect);
    Func<HubDescriptor, IRequest, bool> BuildAuthorizeConnect(
        Func<HubDescriptor, IRequest, bool> authorizeConnect
    );
    Func<HubDescriptor, IRequest, IList<string>, IList<string>>
       BuildRejoiningGroups(
             Func<HubDescriptor, IRequest, IList<string>,
             IList<string>> rejoiningGroups
    );
  }
Although it might look rather cryptic, the underlying concept is quite simple. Note that there is a method in the interface that represents each of the main events that occur throughout the lifetime of a hub: connections, disconnections, message sending, and so on. The mission of these methods is to serve as factories, returning delegates to functions to be executed when these events occur. These methods will be invoked by the framework only once to obtain said delegates.
The first time that a connection to a hub is made, the HubPipeline inner class is instantiated. This class is in charge of iterating the modules registered during setup several times, invoking all the methods defined in the interface and composing a chain of calls with the return obtained from each of them.
When an event such as a new user connection occurs, the chain of functions obtained in the preceding operation is executed, giving each module the option to enter logic before or after the process, or even to short-circuit it.
The following code shows an implementation of the BuildOutgoing() method, which composes the function to be executed when a client method is executed from the server. Note that, in this case, our function displays messages before and after continuing the invocation chain, executing the function that it takes as an argument:
public class LoggerModule: IHubPipelineModule
{
    ...
    public Func<IHubOutgoingInvokerContext, Task>
       BuildOutgoing(Func<IHubOutgoingInvokerContext, Task> send)
    {
        return async context =>
            {
                var invocation = context.Invocation;
                Debug.WriteLine(string.Format(
                      "Invoking client method '{0}' with args:",
                      invocation.Method
                ));
                foreach (var arg in invocation.Args)
                {
                    Debug.WriteLine(string.Format(
                               "   ({0}): {1}",
                               arg.GetType().Name,
                               arg.ToString()
                    ));
                }
                await send(context);
                Debug.WriteLine(string.Format(
                    "Client method '{0}' invoked",
                    context.Invocation.Method
                ));
            };
    }
}
Thus, as long as we have entered this module into the pipeline, we would see the following result through the debug window of Visual Studio when client-side methods are invoked from the hubs:
// Hub code
Clients.All.Message("Hi, everybody!");
Clients.All.Sum(3,5);
// Output result:
Invoking client method 'Message' with args:
   (String): Hi, everybody!
Client method 'Message' invoked
Invoking client method 'Sum' with args:
   (Int32): 3
   (Int32): 5
Client method 'Sum' invoked
Note
Because the current implementation of the module register is a stack, modules will be executed in reverse order to their insertion into the pipeline.
To simplify the implementation of modules, SignalR developers have created the base class HubPipeline, on which we can build them much more efficiently and with a more intelligible code. This abstract class provides a default implementation for the methods defined in the IHubPipeline contract. In said implementation, it calls overridable methods that allow us to take control before and after the principal events of the hub take place. All that we have to do is create a descendant class and override the methods that we need:
OnAfterConnectOnAfterDisconnectOnAfterIncomingOnAfterOutgoingOnAfterReconnectOnBeforeAuthorizeConnectOnBeforeConnectOnBeforeDisconnectOnBeforeIncomingOnBeforeOutgoingOnBeforeReconnectOnIncomingError
All OnBefore methods return a Boolean value. If the value returned is true, execution of the pipeline modules will continue, whereas if it is false, execution will be cancelled at that point.
To further clarify all these concepts, we will implement a simple example. The aim of this development will be to have an attribute, which we will call OnlyOn, which will allow us to specify which days of the week the methods of a hub are accessible, as follows:
public class Broadcaster: Hub
{
    ...
    [OnlyOn(Weekday.Friday | Weekday.Saturday | Weekday.Sunday)]
    public Task WeekendMessage(string message)
    {
       return Clients.All.Message(message + ". Let's party!");
    }
}
The days of the week are created as an enumeration of flags so that they can be combined with each other as in the preceding code:
[Flags]
public enum Weekday
{
    Sunday = 1, Monday = 2, Tuesday = 4, Wednesday = 8,
    Thursday = 16, Friday = 32, Saturday = 64
}
The code of the OnlyOn attribute is as follows:
[AttributeUsage(AttributeTargets.Method, AllowMultiple = false)]
public class OnlyOnAttribute : Attribute
{
    private Weekday _weekdays;
    public OnlyOnAttribute(Weekday weekdays)
    {
        _weekdays = weekdays;
    }
    public Weekday Weekdays
    {
        get { return _weekdays; }
    }
}
So far, it is a normal attribute, and the fact that it is used to decorate a method of the hub does not indicate that it will be taken into account during its execution. This is the time to harness the power of modules in the pipeline to bring it to life. We will take control before executing the method of the hub, we will look for its potential [OnlyOn] attribute, and if it is found, we will compare the days of permitted access with the current day, returning false if they do not match:
public class WeekdayControlModule : HubPipelineModule
{
    protected override bool OnBeforeIncoming(
                  IHubIncomingInvokerContext context)
    {
        var onlyAttr = context.MethodDescriptor
                              .Attributes.OfType<OnlyOnAttribute>()
                              .FirstOrDefault();
        if (onlyAttr != null)
        {
            var today = DateTime.Today.DayOfWeek;
            var match = onlyAttr.Weekdays
                        & (Weekday)(1 << (int)today);
            return match != 0;;
        }
        return true;
    }
}
Finally, we have only to add the module to the pipeline:
GlobalHost.HubPipeline.AddModule(new WeekdayControlModule());
In many scenarios, we will need SignalR to work side by side with other development technologies in an integrated way. Now we will see some possible integrations with popular frameworks, both at client and server level.
When we studied the possibilities that existed for communicating other threads with the clients connected to a SignalR service, we anticipated the possibility of having a service façade to act as a gateway between external systems and hubs or persistent connections of our application, as shown in Figure 9-6.
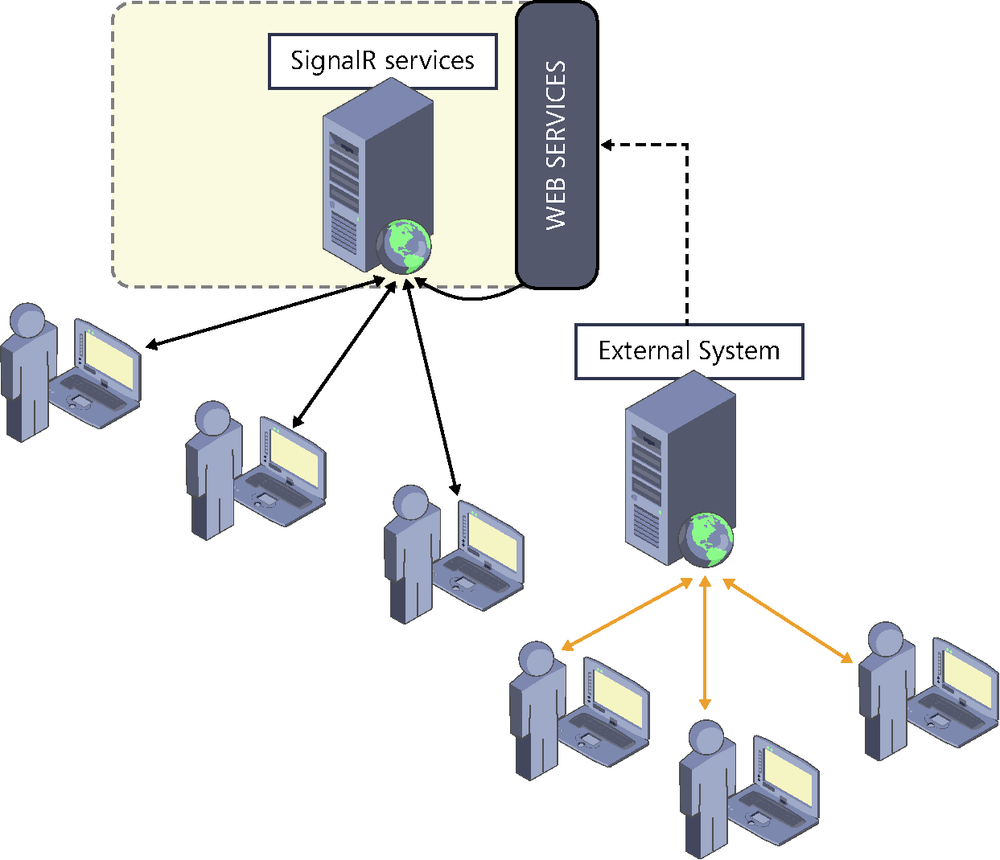
This possibility can come in handy when we have external systems from which we need to send messages to a SignalR application for the latter to process them and, where applicable, inform the connected users in real time. For example, we could have a SignalR-based instant messaging service for corporate users, and we could have other applications of the company, such as its ERP or CRM system, send notifications of interest through said service in real time.
Such external systems, which could be created in any language or technology, would send their notifications to the messaging service by using an RPC mechanism toward a façade located on the SignalR application. From this façade, the messages could be sent to the users concerned, using the techniques already seen to access hubs or persistent connections from other threads.
There are several technologies with which we could write a similar facade, from traditional SOAP/XML-based Web Services to the latest Web API framework. Due to the latter’s popularity and growing usage trend, we will dedicate this section to it.
From Web API actions, it is very easy to access the clients connected to a SignalR service. We have already seen how to achieve it by using the ConnectionManager property of the GlobalHost object, through which we can obtain the context of a hub or persistent connection and send messages to its connected clients or manage its groups:
var ctx = GlobalHost.ConnectionManager.GetHubContext<Chat>();
ctx.Clients.All.SendMessage("The system is shutting down now!");
This possibility alone would allow us to obtain a reasonable integration of SignalR in our Web API–based services, but we still have other options to achieve it in a more efficient and productive way. For example, it would be quite easy to create a base controller for Web API specifically designed to facilitate access to hubs. Such a controller could be like the following:
using System.Web.Http;
using Microsoft.AspNet.SignalR;
using Microsoft.AspNet.SignalR.Hubs;
public abstract class ApiHubController<T> : ApiController
    where T : Hub
{
    protected IHubConnectionContext Clients { get; private set; }
    protected IGroupManager Groups { get; private set; }
    protected ApiHubController()
    {
        var ctx = GlobalHost.ConnectionManager.GetHubContext<T>();
        Clients = ctx.Clients;
        Groups = ctx.Groups;
    }
}
As you can see in the preceding code, we are defining the ApiHubController class with a generic type parameter T, where T is a Hub of SignalR. As it inherits from ApiController, we can safely use this class as a base for our Web API controllers, as follows:
public class MyChatController: ApiHubController<Chat>
{
    // Actions
}
The implementation of our Web API controllers will be the same as always. The only difference is that, when accessing the hub, the base class offers shortcuts to its features via controller properties instead of doing so via GlobalHost.ConnectionManager. These properties are as follows:
Clients, of theIHubConnectionContexttype, which allows us to access the recipient pickers and send them messages.public class ChatController: ApiHubController<Chat> { ... public async Task<bool> PostMessage(string message) { await Clients.All.SendMessage(message); var user = User.Identity.Name; var ok = await _chatStorage.Save(user, message); return ok; } }Groups, of theIGroupManagertype, which allows us to add or eliminate connections of a group.public async Task<bool> AddToGroup(string connId, string groupName) { await Groups.Add(connId, groupName); var ok = await Clients.Group(groupName).SendMessage(message); return ok; }
In the source code repository of the Web API framework on CodePlex, we can find a project called System.Web.Http.SignalR[43] with an implementation of base controllers that is conceptually similar to the one we have seen in this section, only broader.
Obviously, we could use the same technique to create Web API controllers oriented to facilitating the use of persistent connections instead of hubs. It could be very similar to the one previously shown:
using System.Web.Http;
using Microsoft.AspNet.SignalR;
public abstract class ApiConnectionController<T> : ApiController
       where T : PersistentConnection
{
    protected IConnectionGroupManager Groups { get; private set; }
    protected IConnection Connection { get; private set; }
    protected ApiConnectionController()
    {
        var ctx = GlobalHost.ConnectionManager.GetConnectionContext<T>();
        Connection = ctx.Connection;
        Groups = ctx.Groups;
    }
}
ASP.NET MVC, the popular framework for creating web applications, does not have any component or adapter for integration with SignalR to facilitate the use of hubs or persistent connections.
Thus, basic integration with MVC controllers should be achieved by obtaining the context of the persistent connection or hub at the point from which we want to invoke their functions:
public class HomeController: Controller
{
    public async Task<ActionResult> ShutDown()
    {
        var ctx = GlobalHost.ConnectionManager.GetHubContext<Chat>();
        await ctx.Clients.All.SendMessage("System shutting down!");
        return RedirectToAction("ClientsNotified");
    }
}
However, we could also easily achieve a similar result to the one previously obtained with Web API if we use the same idea to create controller classes specific for using hubs or persistent connections from the MVC framework. The following could be an example:
using System.Web.Mvc;
using Microsoft.AspNet.SignalR;
using Microsoft.AspNet.SignalR.Hubs;
public abstract class HubController<T> : Controller
    where T : Hub
{
    protected IHubConnectionContext Clients { get; private set; }
    protected IGroupManager Groups { get; private set; }
    protected HubController()
    {
        var ctx = GlobalHost.ConnectionManager.GetHubContext<T>();
        Clients = ctx.Clients;
        Groups = ctx.Groups;
    }
}
Notice that the only difference with the Web API controller is that, in this case, we inherit from System.Web.Mvc.Controller. Thus, we could easily use it as a base for our MVC controllers:
public class ChatController : HubController<EchoHub>
{
    ...
    [HttpPost]
    public async Task<ActionResult> Broadcast(string message)
    {
        await Clients.All.Message(message);
        return Json(new {success = true});
    }
}Now, on the client side, we are going to see how we could integrate a SignalR client with Knockout[44], the open source framework based on the popular presentation layer design pattern MVVM[45].
In this framework, there is a complete separation between the presentation elements, the logic that is responsible for managing presentation, and the data it uses. Thus, we will define the interface on the one hand (basically an HTML template with some special features) and the View-Model object on the other hand (which contains the data that feed said template and the logic to manage interactions).
For example, the following code could correspond to the markup of a page that uses Knockout to show a small text submission form and a list of messages received just below. Note that there is no reference to SignalR, only the Knockout binding system’s own attributes that indicate different aspects of the behavior and display of the elements of the interface:
...
<h1>Knockout Broadcaster</h1>
<div>
    <input type="text" data-bind="value: text, enable: ready" />
    <button data-bind="click: send, enable: ready">Send</button>
</div>
<p data-bind="visible: !ready()">Connecting...</p>
<ul data-bind="foreach: messages, visible: ready">
    <li data-bind="text: $data"></li>
</ul>
...
At run time, when connected to SignalR (we will see how to do this later on), the result displayed on screen would look like what you see in Figure 9-7.
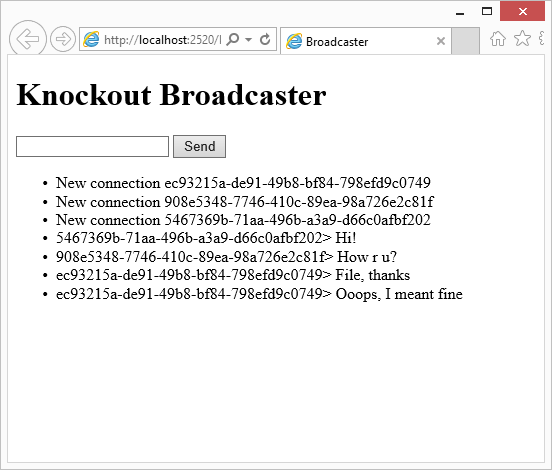
In the preceding HTML code, we see the attributes that indicate binding rules of each element of interest with members of the View-Model object, which in Knockout are always called data-bind. One step at a time:
The
<input>tag bindings indicate that the value of this text box will be backed by a field namedtextin the View-Model object. In addition, the field will be enabled depending on the content of thereadyfield of the same object: if it isfalse, the text box will appear disabled, and if not, it will be enabled. In the following listing, we will initializereadyasfalse, and it will becometrueafter we have managed to connect to SignalR.The button will also be enabled depending on the
readyfield of the View-Model, and clicking it will invoke thesend()method available in the same object.Next we have a static message (“Connecting…”) that will be visible only while
readyisfalse.Finally, we have a visible list whose contents depend on an array called
messagesavailable in the View-Model.
The binding system uses observables in both directions. Thanks to the Knockout dependency management system, if any property of the View-Model changes, the interface will be automatically updated according to the binding rules set, and the same applies in the opposite direction: any update to the data entry fields will be immediately reflected in the properties of the View-Model.
The following code could be the View-Model class for the preceding example. It could be found in a separate script file referenced from the page or on the page itself:
var BroadcasterViewModel = function (hub) {
    var self = this;
    self.ready = ko.observable(false);
    self.text = ko.observable("");
    self.send = function () {
        if (self.ready()) {
            hub.server.broadcast(self.text()).done(function() {
                self.text("");
            });
        }
    };
    self.messages = ko.observableArray();
    self.start = function() {
        $.connection.hub.start().done(function() {
            self.ready(true);
        });
    };
    hub.client.message = function(msg) {
        self.messages.push(msg);
    };
};
The class constructor takes as an argument a reference to the hub on which it will act, and as we can see, the members who were referenced from the bindings are defined on the object itself. The properties are set and queried using ko.observable()[46] objects, which are the ones that provide automatic dependency management. For example, the ready property is initially set to false, and it is set to true only when the connection to the hub is completed, whereupon all controls depending on it will automatically update their states, enabling and showing themselves.
The methods are declared directly on the class, and they can use the internal properties to perform their tasks.
The code that would initialize the page would be the one shown in the following example. All that we would need to do in this case is to instantiate the View-Model and supply it the hub on which it will operate, tell Knockout that it must use this instance as a reference for the bindings, and finally, invoke the method that we have prepared in the View-Model to start the connection to the Hub:
$(function () {
   var vm = new BroadcasterViewModel($.connection.broadcaster);
   ko.applyBindings(vm);
   vm.start(); // Starts the connection
});
Finally, the hub on which we have been working is shown here:
public class Broadcaster: Hub
{
    public override Task OnConnected()
    {
        return Clients.All
                 .Message("New connection " + Context.ConnectionId);
    }
    public Task Broadcast(string message)
    {
        return Clients.All
                 .Message(Context.ConnectionId +"> " + message);
    }
}Of course, we can also easily integrate a SignalR client into applications built with AngularJS[47], the popular SPA[48] framework based on the MVC pattern.
In AngularJS, views are also defined independently of the other components, and as we saw with Knockout, attributes (directives, in Angular slang) are used to specify the behavior of DOM elements. The following HTML code shows the view portion of an application similar to the one we saw in the preceding section:
<body ng-app="angularDemo" ng-controller="BroadcasterController"
                           ng-init="start()">
    <h1>AngularJS Broadcaster</h1>
    <div>
        <input type="text" ng-model="text" ng-disabled="!ready" />
        <button ng-click="send()" ng-disabled="!ready">Send</button>
    </div>
    <p ng-hide="ready">Connecting...</p>
    <ul ng-show="ready">
        <li ng-repeat="msg in messages">{{msg}}</li>
    </ul>
</body>
In the <body> tag, we are specifying the name of the application (“angularDemo”), the name of the controller class (BroadcasterController), and the latter’s method to be executed when the application starts. We will use this moment to start the connection to SignalR, as we will see later on.
Next we encounter the following:
The
<input>tag, where we specify that it will be bound to thetextproperty of the controller class and that it will be disabled when itsreadyproperty, which indicates whether we have established a connection to SignalR, becomestrue.The button will be disabled in the same way as the text box, and clicking it will cause the execution of the
send()method of the controller class.Next, we encounter the message “Connecting…”, which will be visible only while the connection has not been made.
Finally, there is a list of messages. All the elements of the
messagesproperty—of the array type and defined in the controller class—will appear on this list.
Note that, despite the differences in syntax, the concepts are very similar to those seen with Knockout. To get a graphical idea, the running result of the AngularJS application that we are building would be what’s shown in Figure 9-8.
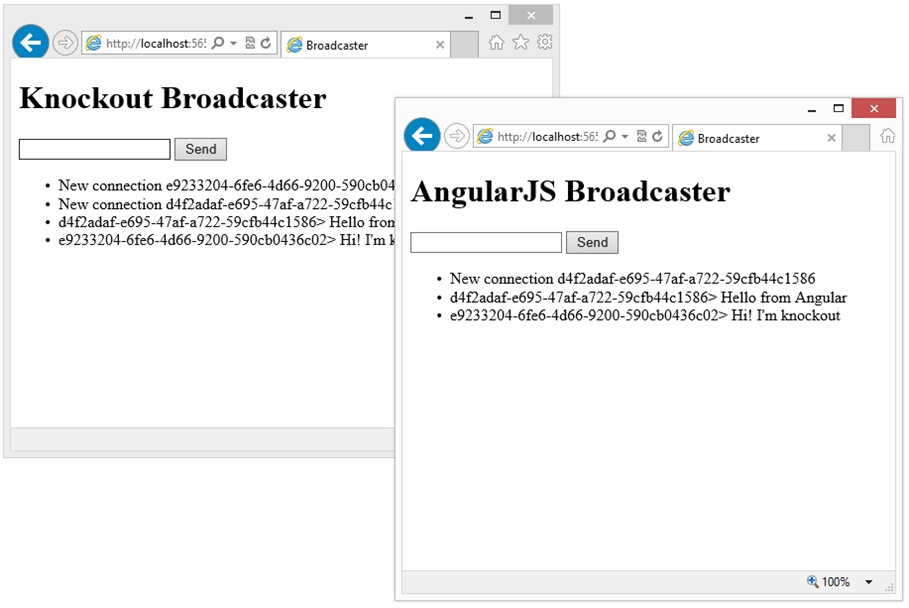
We will now look at the code of the controller class. This class is created automatically by AngularJS—its name is stated in the markup code—and in its constructor, it receives an argument called $scope that references the instance of the model class that is used and on which we must define the properties and methods that we need to use from our application. We have previously referenced the following properties and methods: ready, text, messages, send(), and start():
function BroadcasterController($scope, hub) {
    $scope.ready = false;
    $scope.text = "";
    $scope.messages = [];
    $scope.send = function () {
        if ($scope.ready) {
            hub.broadcast($scope.text);
            $scope.text = "";
        }
    };
    $scope.start = function () {
        hub.start(function () {
            $scope.$apply(function () {
                $scope.ready = true;
            });
        });
    };
    hub.messageReceived(function (msg) {
        $scope.$apply(function () {
            $scope.messages.push(msg);
        });
    });
}
An important aspect to keep in mind when programming on AngularJS is that changes in the properties of the controller that do not come directly from events or actions managed by this framework will not be detected automatically, so the user interface will not be updated at times. In our example, this happens when we receive data from the SignalR server (implemented in the callback defined in hub.messageReceived) or when we are notified that the connection was successful. In both cases, we must use $scope.$apply() to inform Angular that changes occurred and to force its evaluation to refresh the user interface when necessary.
However, AngularJS is equipped with a magnificent out-of-the-box dependency injection system that makes it quite easy to implement controllers decoupled from the other components, allowing us to create better structured applications that are simpler and easier to maintain, as well as allowing us to perform unit tests on these classes.
In fact, you can see in the preceding code that there are no direct references to $.connection nor to any of its elements, because a service class is received as a dependency and it implements the functionalities that we need from the hub. Thus, from a unit test, we could instantiate the controller class and supply it mock objects, useful to check in an isolated manner that the operation of this component is correct.
The service class is defined as follows on the main module of the application. The name “hub” with which we created the class is used by Angular to perform automatic dependency injection; when it finds a parameter in the controller class with that name, it will search to see whether there is a factory for it in the module and use the value returned by it:
angular.module('angularDemo', [])
    .factory('hub', function () {
        return {
            start: function (successCallback) {
                $.connection.hub.start().done(successCallback);
            },
            broadcast: function (msg) {
                $.connection.broadcaster.server.broadcast(msg);
            },
            messageReceived: function (callback) {
                $.connection.broadcaster.client.message = callback;
            }
        };
    });
In this class are the three features that we need from the SignalR client for this application and that are used from the controller class: start(), to start the connection; broadcast(), to send a message to the server; and messageReceived(), which allows defining the callback to receive messages.
[38] Dependency Injection & Service Locator: http://martinfowler.com/articles/injection.html
[39] Actually, Resolve() is an extender of the IDependencyResolver interface, which uses its GetService() method internally to obtain the instances.
[41] There are other testing frameworks, such as XUnit, NUnit, or MbUnit, which even have total integration with Visual Studio. Although they are different in some details, all the concepts that we will see here can be applied to any of them.
[42] Moq wiki: http://code.google.com/p/moq/wiki/QuickStart
[43] Source code of System.Web.Http.Signalr on CodePlex: https://aspnetwebstack.codeplex.com/SourceControl/latest#src/System.Web.Http.SignalR/
[44] Knockout official website: http://knockoutjs.com/
[45] Model-View-ViewModel
[46] ko is the principal object of Knockout. As a simplistic parallelism, ko is to Knockout as $ is to jQuery.
[47] AngularJS official website: http://angularjs.org/
[48] Single Page Applications