
Chapter 7: Writing an iOS Consumer App
After trying out the shared code on Android, the next step will be doing the same for iOS. Spoiler alert—it won't be exactly as seamless as on Android, and we'll need to make some adaptations to the shared code. For this reason, I believe this chapter should offer a good insight into what extra work is actually needed for making Kotlin Multiplatform (KMP) shared code work on iOS and how seamless it can be with the current tech stack on Swift. This chapter will follow a similar structure to Chapter 6, Writing the Android Consumer App, and in it, we will explore the following topics:
- Setting up the iOS app
- Tying the iOS app together with the shared code
- Implementing the UI on iOS
Technical requirements
You can find the code files present in this chapter on GitHub, at https://github.com/PacktPublishing/Simplifying-Application-Development-with-Kotlin-Multiplatform-Mobile.
Setting up the iOS app
The heavy lifting is done for us by the Kotlin Multiplatform Mobile (KMM) plugin we discussed in Chapter 4, Introducing the KMM Learning Project.
If you open the iosApp.xcodeproj file in the iosApp module with Xcode and open the Build Phases tab for the iosApp target, under the Run Script phase, you should be able to see the following command:
./gradlew :shared:embedAndSignAppleFrameworkForXcode
This is an integrational task that, as the name suggests, embeds and signs a generated Apple framework from the shared code. This task is visible only from Xcode and can't be used from the command-line interface (CLI). The task is illustrated in the following screenshot and you can read more about it at https://blog.jetbrains.com/kotlin/2021/07/multiplatform-gradle-plugin-improved-for-connecting-kmm-modules/:

Figure 7.1 – embedAndSignAppleFrameworkForXcode build phase in Xcode
After you delete the Greeting from the ContentView, you should be able to build the project with the shared.framework included.
Also, if you import the shared module, you should be able to see the public API that we defined for the shared code—for example, FetchBreedsUseCase, as illustrated in the following screenshot:

Figure 7.2 – Autocomplete for shared code framework
Note that in production apps, you might not go down on the same pathway for distributing the shared code to iOS; we'll talk about this more in Chapter 8, Exploring Tips and Best Practices, and Chapter 9, Integrating KMM into Existing Android and iOS Apps.
Now that we have the shared code near at hand, we are able to put it to the test and create a Dogify app for iOS on top of it.
Tying the iOS app together with the shared code
If you try to subscribe to the breeds stream from the BreedsRepository repository, you'll see that you can't really initialize this repository from the iOS code. This is because we've made a mistake—we don't really want to deal with Koin from Swift, so we could just migrate to a similar injection pattern that we've used for the use cases, as illustrated in the following code snippet:
class BreedsRepository: KoinComponent {
private val remoteSource: BreedsRemoteSource by
inject()
private val localSource: BreedsLocalSource by inject()
Now, if you try to call some of our use cases, you can see that you can call suspend functions, as illustrated in the following screenshot, and you'll get back a CompletionHandler, since Kotlin 1.4:

Figure 7.3 – Calling suspend functions from Swift
Now, there are a couple of concerns about using this approach, as outlined here:
- Collecting Kotlin Flows and running suspend functions from Android is pretty straightforward because Android provides handy extensions for tying CoroutineScopes to the life cycle of the components, a good example being viewModelScope, which we've used to launch suspend functions and collect Flows. Unfortunately, there is no way to specify a CoroutineScope when running suspend functions from Swift.
- When launching a coroutine in Kotlin, it returns a Job, which you can cancel manually. Since this is also not available in Swift, you can't really cancel a running job from your Swift code.
I believe these are the cases when the power of KMP surfaces versus cross-platform solutions: you're not driven into a corner as you can just go back to the Kotlin world, handle Kotlin specific things there, and expose an API that can be called from Swift.
You can get creative with the way you handle this, but generally, you would perform the following steps:
- Create a Native version of your suspend function, as follows:
suspend operator fun invoke(): List<Breed> =
breedsRepository.fetch()
val nativeScope = YourScope()
// You could keep a Job reference also in this case
fun invokeNative(
onSuccess: (breeds: List<Breed>) -> Unit,
onError: (error: Throwable) -> Unit
) {
try {
nativeScope.launch {
onSuccess(invoke())
}
} catch (e: Throwable) {
onError(e)
}
}
- Expose to Swift a way to cancel the running operation, like this:
fun onCancel(){
nativeScope.cancel()
}
This example is just a simplified solution, and many questions could arise, depending on your architecture and preference, such as the following: Do you handle scopes? If so, how do you handle them? Do you leave it to the shared code, or do you handle individual jobs instead? We'll talk more about this topic in Chapter 8, Exploring Tips and Best Practices.
One thing is pretty clear: with the current solution for consuming suspend functions and Kotlin flows, you will likely end up writing a lot of boilerplate code. This is where code-generation tools come into the picture. Luckily, there are libraries that can help us out with this, such as the following ones:
We'll be using the latter for Dogify.
To set up the rickclephas/KMP-NativeCoroutines library, you need to perform the following steps:
- Apply the id("com.rickclephas.kmp.nativecoroutines") version "0.4.2" plugin in your shared module's build.gradle.kts file.
- Install CocoaPods by doing the following:
- Open up a terminal in the iosApp module directory.
- Install CocoaPods if you don't have it already by running the following command: sudo gem install cocoapods.
- Run pod init to initialize the Podfile, then pod install.
- Reopen the project, but instead of iosApp.xcodeproj, use iosApp.xcworkspace.
- (Optional) We also need to update the KMM plugin run configuration similarly, as otherwise, it'll not find our installed pods. To do this, go to Edit Configurations… (on the iosApp dropdown next to Play), as illustrated in the following screenshot:

Figure 7.4 – Edit Configurations… location
- Update iosApp.xcodeproj to iosApp.xcworkspace similar to step IV. You also need to select the Xcode project scheme to be iosApp, as illustrated in the following screenshot (you'll probably need to wait a couple of seconds until it loads):
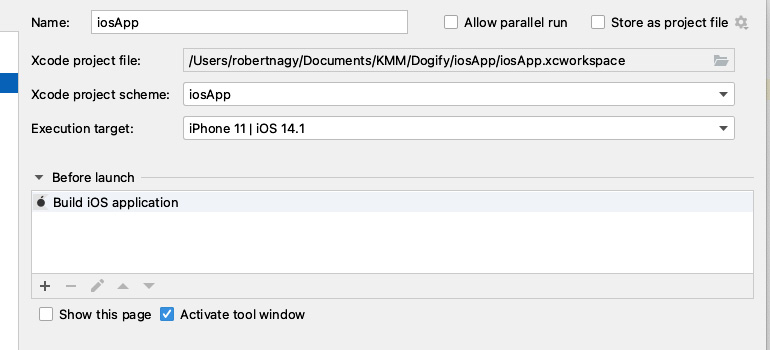
Figure 7.5 – Selecting .xcworkspace instead of .xcodeproj
- Add pod 'KMPNativeCoroutinesRxSwift' to the Podfile, then run pod install.
You'll probably run into an issue, as Xcode won't find the KMPNativeCoroutinesCombine module when trying to import it. If you go to Build Settings | Framework Search Paths, you'll see that there is only one value: $(SRCROOT)/../shared/build/xcodeframeworks/$(CONFIGURATION)/$(SDK_NAME), which seems to be the result of the KMM plugin's new project wizard. It's not clear why and how the plugin's configuration breaks the CocoaPods settings, but adding the pod's path explicitly using "${PODS_CONFIGURATION_BUILD_DIR}" with a recursive search should fix the problem.
Now that we have the library set up, we can focus on tying the shared code to our iOS app. We'll also experience the two most common threading issues, as outlined next, and see how we can fix them:
- Accessing non-shared/mutable state from another thread
- Mutating state that is frozen/immutable
First, let's mirror the MainViewModel from Android, but now, we're going to use the Combine pattern to publish the state.
- Create a MainViewModel Swift class that extends ObservableObject and try to consume the shared module, with the help of the KMPNativeCoroutinesRxSwift library.
So, for the use cases that expose suspend functions, we'll be using the createSingle() helper, while for the Kotlin Flow stream of Breeds, we will be using the createObservable() method. Here's an example to illustrate this:
createObservable(for:
BreedsRepository.init().breedsNative)
.subscribe(onNext : { value in
print("Received value: (value)")
}, onError: { error in
print("Received error: (error)")
}, onCompleted: {
print("Observable completed")
}, onDisposed: {
print("Observable disposed")
})
createSingle(for:
getBreeds.invokeNative()).subscribe(onSuccess: {
value in
print("Received value: (value)")
}, onFailure: { error in
print("Received error: (error)")
}, onDisposed: {
print("Single disposed")
})
- We also need to initialize Koin, which we'll do in the init() method of ContentView, as follows:
struct ContentView: View {
private let viewModel: MainViewModel
init() {
KoinModuleKt.doInitKoin()
viewModel = MainViewModel.init()
}
If you run the project now, you'll get the following error:
illegal attempt to access non-shared
org.koin.core.context.GlobalContext
.KoinInstanceHolder@28557e8 from other thread
If you check our use cases and the BreedsRepository repository, you'll see that we're using by inject() to inject our dependencies. This is a lazy injection method that will only get triggered when we're actually running the Native GET request from another coroutine scope. To fix this, we have essentially two options, as follows:
- Make the Koin GlobalContext shareable between threads, which requires freezing, and then requires making sure we're not mutating it.
- Don't use lazy injection.
Since the second option is much simpler and it's not a big drawback, we'll be using that approach instead. So, we'll need to replace by inject() with = get() in all of our use cases and in the BreedsRepository repository as well.
Note
KMP-NativeCoroutines by default uses a coroutine scope with Dispatchers.Default when creating native() suspend functions. If you want other functionality, you can override it and specify your own coroutine scope. We'll not do this in order to keep things simple.
If you run the app again, you will get another exception again with a long stack trace that starts with this:
illegal attempt to access non-shared
org.koin.core.context.GlobalContext
.KoinInstanceHolder@28557e8 from other thread
If you scroll down, you'll see the root cause, as follows:
Caused by:
kotlin.native.concurrent.InvalidMutabilityException:
mutation attempt of frozen
com.nagyrobi144.dogify.api.BreedsApi@2901a8
And you can see that the mutation happens for our HttpClient in KtorApi. Essentially, the problem is similar to the previous one—we're initializing the HttpClient in one thread and capturing it in another thread.
In this case, to fix this issue, we'll make the HttpClient both a singleton and shareable between threads, as follows:
- We'll move the HttpClient construction from KtorApi and make it a @SharedImmutable, as follows:
private val jsonConfiguration get() = Json {
prettyPrint = true
ignoreUnknownKeys = true
}
@SharedImmutable
private val httpClient = HttpClient {
install(JsonFeature) {
serializer =
KotlinxSerializer(jsonConfiguration)
}
install(Logging) {
logger = Logger.SIMPLE
level = LogLevel.ALL
}
}
- We'll reference this httpClient from our KtorApi, as follows:
val client = httpClient
You can probably do this in a much nicer way, but the main thing is to make the HttpClient a singleton and shareable across threads. We've written the code in such a way that it requires as few code changes as possible so that it's easier to follow.
Now, if you run the app again, I'm sorry, but you'll hit another exception, as we can see here:
failed with exception:
kotlin.native.concurrent.InvalidMutabilityException:
mutation attempt of frozen kotlin.collections.HashMap
You can see that the HTTP request has run, and we've even got a response, so the issue probably occurred during parsing. After the due diligence of checking if anyone else has a similar issue with kotlinx-serialization, we can find a workaround—we need to use it in our JavaScript Object Notation (JSON) configuration, as follows:
useAlternativeNames = false
Note that the preceding code is fixed in kotlinx-serialization v1.2.2. Until the current concurrency model is updated, you'll likely see similar issues—in some cases, in your own code, and in other cases, in third parties. We'll talk more about how to handle similar issues in Chapter 8, Exploring Tips and Best Practices.
Now that we've adapted our shared code to iOS, we're all set to consume the shared code and create a proper UI for it.
To implement the ViewModel, proceed as follows:
- Add the dependencies on the shared module, as follows:
private let repository = BreedsRepository.init()
private let getBreeds = GetBreedsUseCase.init()
private let fetchBreeds = FetchBreedsUseCase.init()
private let onToggleFavouriteState =
ToggleFavouriteStateUseCase.init()
- Then, define the state we'll publish to the UI, as follows:
@Published
private(set) var state = State.LOADING
@Published
var shouldFilterFavourites = false
@Published
private(set) var filteredBreeds: [Breed] = []
@Published
private var breeds: [Breed] = []
- Now, let's create actions that we'll be exposing to the UI. We'll start with a getData action for getting the data, as follows:
func getData(){
state = State.LOADING
createSingle(for:
getBreeds.invokeNative())
.subscribe(onSuccess: { _ in
DispatchQueue.main.async {
self.state = State.NORMAL
}
}, onFailure: { error in
DispatchQueue.main.async {
self.state = State.ERROR
}
}).disposed(by: disposeBag)
}
- Then, we'll create a similar fetchData function for refreshing the data, as follows:
func fetchData() {
state = State.LOADING
createSingle(for:
fetchBreeds.invokeNative())
.subscribe(onSuccess: { _ in
DispatchQueue.main.async {
self.state = State.NORMAL
}
}, onFailure: { error in
DispatchQueue.main.async {
self.state = State.ERROR
}
}).disposed(by: disposeBag)
}
- Next, we'll create an action for marking or unmarking a favorite breed, as follows:
func onFavouriteTapped(breed: Breed){
createSingle(for:
onToggleFavouriteState.invokeNative(breed:
breed)).subscribe(onFailure: { error in
// We're going to just ignore
}).disposed(by: disposeBag)
}
} catch (e: Exception) {
_events.emit(Event.Error)
}
}
}
As you've seen in the previous code snippets, we're using the following code to make sure we aren't updating the state from a background thread:
DispatchQueue.main.async {
}
Also, we're using DisposeBag to dispose of the running RxSwift Singles.
- We also need to subscribe to the breeds stream of the BreedsRepository repository, as follows:
init() {
createObservable(for:
repository.breedsNative)
.subscribe(onNext: { breeds in
DispatchQueue.main.async {
self.breeds = breeds
}
}).disposed(by: disposeBag)
- Then, we tie the list of breeds to the flag, representing whether or not the users want to filter their favorite breeds, like so:
$breeds.combineLatest($shouldFilterFavourites, {
breeds, shouldFilterFavourites -> [Breed] in
var result: [Breed] = []
if(shouldFilterFavourites){
result.append(contentsOf:
breeds.filter{ $0.isFavourite })
} else {
result.append(contentsOf: breeds)
}
if(result.isEmpty){
self.state = State.EMPTY
} else {
self.state = State.NORMAL
}
return result
}).assign(to: &$filteredBreeds)
To make sure we have data when MainViewModel is initialized, we'll also start getting the data by simply calling the getData() function.
Now that our MainViewModel is in place, we can prepare the UI as the last step.
Implementing the UI on iOS
We're going to leverage SwiftUI to build the UI for our iOS app, and we'll basically mirror the declarative UI in Jetpack Compose from Android.
We'll also use Kingfisher to load the images, so let's start with the following steps:
- Update the Podfile by adding pod 'Kingfisher' then running pod install.
- Next, update the ContentView, as follows:
@ObservedObject private var viewModel: MainViewModel
init() {
KoinModuleKt.doInitKoin()
viewModel = MainViewModel.init()
}
var body: some View {
VStack{
Toggle("Filter favourites", isOn:
$viewModel.shouldFilterFavourites)
.padding(16)
Button("Refresh breeds", action: {
viewModel.fetchData()} )
.frame(alignment: .center)
.padding(.bottom, 16)
ZStack{
switch viewModel.state {
case MainViewModel.State.LOADING:
ProgressView()
.frame(alignment:.center)
case MainViewModel.State.NORMAL:
BreedsGridUIView(breeds:
viewModel.filteredBreeds,
onFavouriteTapped:
viewModel.onFavouriteTapped)
case MainViewModel.State.EMPTY:
Text("Ooops looks like there are
no breeds")
.frame(alignment: .center)
.font(.headline)
case MainViewModel.State.ERROR:
Text("Ooops something went
wrong...")
.frame(alignment: .center)
.font(.headline)
}
}
}
}
We're basically handling the state coming from our MainViewModel and showing the appropriate UI elements based on the state.
- Next, we'll need to implement the BreedsGridUIView, which basically sets up the Grid only. This is achieved with the following code:
struct BreedsGridUIView: View {
var breeds: Array<Breed>
var onFavouriteTapped: (Breed) -> Void = {_ in }
var body: some View {
let columns = [
GridItem(.flexible(minimum: 128, maximum:
256), spacing: 16),
GridItem(.flexible(minimum: 128, maximum:
256), spacing: 16)
]
ScrollView{
LazyVGrid(columns: columns, spacing: 16){
ForEach(breeds, id: .name){ breed in
BreedUIView(breed: breed,
onFavouriteTapped: onFavouriteTapped)
}
}.padding(.horizontal, 16)
}
}
}
- The last step is to show the actual breed in the grid, with an action for marking it as a favorite. Here's the code you'll need:
struct BreedUIView: View {
var breed: Breed
var onFavouriteTapped: (Breed) -> Void = {_ in }
var body: some View {
VStack{
KFImage(URL(string: breed.imageUrl))
.resizable()
.scaledToFit()
.cornerRadius(16)
HStack{
Text(breed.name)
.padding(16)
Spacer()
Button(action: { onFavouriteTapped(breed)
}, label: {
if(breed.isFavourite){
Image(systemName: "heart.fill")
.resizable()
.aspectRatio(1, contentMode: .fit)
.frame(width: 24)
} else {
Image(systemName: "heart")
.resizable()
.aspectRatio(1, contentMode: .fit)
.frame(width: 24)
}
}).padding(16)
}
}
}
}
And that's it—we have created a UI for iOS on top of the shared code that we've written in Kotlin.
Summary
In this chapter, we've fixed four issues related to the Kotlin/Native concurrency model. Next, we adapted the Kotlin code to the Native world and the iOS app. We also consumed the shared code in iOS and created a UI for the iOS app in SwiftUI.
The main purpose of this chapter was to provide a glimpse into how you can consume shared code implemented in KMP and how to approach the challenges of making your code work in the Native world.
In the following chapter, we will look at how you can write tests for your shared code.