Shooting Portraits Outdoors
The Perfect Time, Setup, and Settings
Photographing a sports portrait on location can produce stunning images. The combination of the athlete, the field or arena, and the natural light can add a real sense of the sport to the image. Photographing on location also presents some real challenges to overcome, such as the changing direction, intensity, and color of the light, as well as distracting backgrounds and uncooperative weather.
Shooting Time
The best time to photograph this type of portrait is during the golden hour, that is, the first light in the morning or the last light in the evening. This is not always possible, and there are things you can do when shooting during the middle of the day:
• Use a Diffuser. Using a diffuser turns direct sunlight into a more diffused light source. This softens the light and creates more even light on the subject. You can then add more light exactly where you want it.
• Bounce the Light. Using a reflector bounces the sunlight onto the subject. This takes the small, hard sun and makes it a larger, softer light. A gold or gold/white reflector will also add warmth to the subject.
• Use the Natural Shade. This is probably the best solution when shooting in direct sunlight. Look for the shaded side of a building or a tree and position your subject there. You can then bounce light to illuminate the subject or add some fill light with a flash.
If you start to shoot during the final light of the day, you can also try some of the techniques about shooting indoors shown in the next chapter.
Setup
When photographing portraits outdoors in great evening light, you still need to add some of your own light to fill in the shadows and control the exposure of the photograph.
Here is the setup for the chapter opener shot. I was photographing on location at a park and set up two lights, one on either side of the subject. The main light was a small flash off to the left, and the fill light was a flash fired through a softbox. This gave me the harder light on camera left and some fill on camera right, producing the dramatic look I was after.
For portraits taken in the evening, the concept is to use the natural light as a backdrop and underexpose the scene so the colors are more vibrant, then add light from the flash to fill in and illuminate the subject. I set the exposure on the camera to render the background the way I want it; then I add light from the flash(es) to the subject. To do this, I set the flashes to Manual mode and dial in the power settings myself. The flashes are then triggered by a radio trigger.
Note
It is also possible to use the Nikon Creative Lighting System to do this. The master controls the slave flashes and sets them to Manual output. For more on the Nikon CLS, see the FuelBook, An Introduction to the Nikon Creative Lighting System.
.
Taking the Portrait
To take the photo for the next image, I had to move quickly as the light was changing rapidly. We only had a few minutes until all the light was out of the sky, and the opportunity would be lost. I positioned the player and composed the shot, shooting at a low angle so I could get the sky in the frame. I then did the following to set the exposure:
1. I set the camera to Matrix Metering as I wanted the whole frame to be used when measuring the light.
2. I set the camera to Aperture Priority mode and set the aperture to f/6.3 to get a deep depth of field.
3. With the focus point on the player, I then took a photo and made a mental note of the shutter speed picked by the camera.
4. I changed the exposure mode from Aperture Priority to Manual mode.
5. I changed the shutter speed by one stop to underexpose the image.
6. I took another photo and looked on the back of the camera to see if the background was how I wanted it. If it was still too light, I could increase the shutter speed. If it was too dark, I could decrease the shutter speed.
7. I turned on the flash and the radio triggers.
8. I set the flash to 1/4 power and took a photo. If the subject was too bright, I could reduce the flash power; if the subject was too dark, I could increase the flash power.
9. I took the portraits and adjusted the shutter speed to change the way the background looked as the daylight diminished.
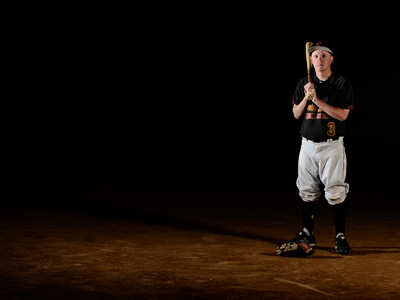
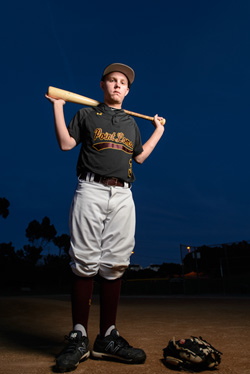
This portrait was taken just after the sun set, creating those great colors in the sky. A single flash was used very close to the camera on the right side. The flash was shot through a softbox at 1/8 power, which was enough to illuminate the baseball player.
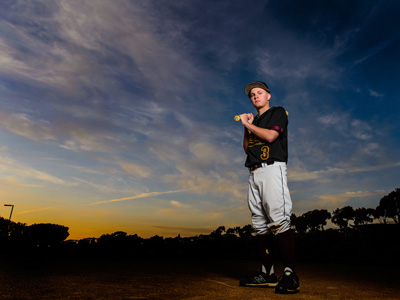
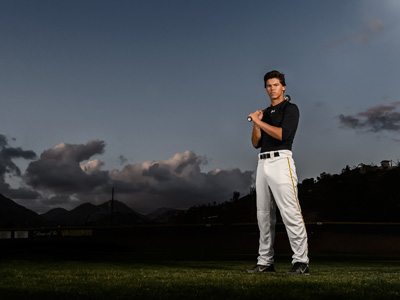
The same technique can be used even when the sun has set. Instead of packing it in, I reduced the shutter speed down to 1/6 second and used the flash to freeze the action. This created a deep blue sky behind the subject.
This image was photographed at 1/6 second to create the deep blue background after the sun set and 1/8 power on the flash shot through the umbrella to illuminate the player.
On a different night and with a different baseball player, the same technique was used to first set the background, then illuminate the player.
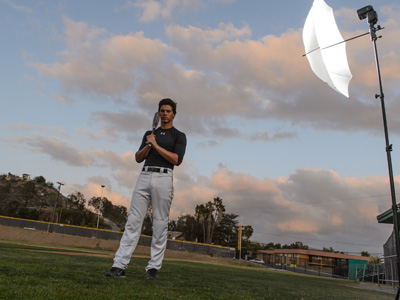
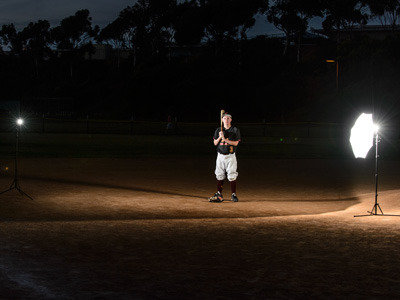
Here is the setup showing the position of the camera and the light.
The same technique can be used with just about any sport. In the next image, it was used on a deck overlooking a neighborhood with the light set to camera right and placed up high so the light fell off and didn’t illuminate the feet as much as the hands and face. The shutter was left open long enough for the light from the background to show through.
This image was photographed at 1/15 second to allow the ambient light to be recorded; then the subject was illuminated using a single flash and an umbrella.
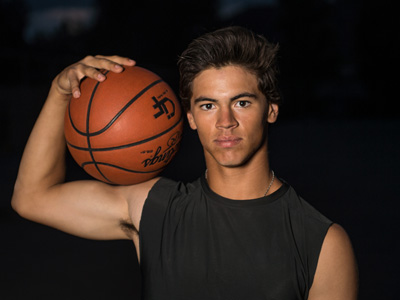
I photographed the basketball player using one light set just off to camera left. The flash was fired through a small umbrella, and I controlled the quality of the light simply by changing the distance of the light to the subject.