
Chapter 1. Getting Started
I’m a bona fide weekend extremist. I’ve done some pretty crazy things on a mountain bike, by layman’s standards, and I love to kayak. I’ve been in serious trouble exactly once. I was on a river called the Piedra that I’d never run before, with new equipment and new techniques in my head. In kayaking, simplicity and speed are life, but I was tentative and slow. Instead of attacking the river, it attacked me, and I swam through three distinct class IV rapids, and was very lucky to emerge unscathed.
Note
Spring is the most popular of a new breed of so-called lightweight con-tainers. When you add all of the supporting frame-works, Spring is fairly hefty, but “lightweight” refers to all of the crud that usually accompanies code that you put into the container.
Building Two Classes with a Dependency
Many teachers and consultants write about dependencies like mayonnaise that’s been left out in the sun too long, but if your application is to do anything interesting at all, it must have dependencies. The trick is to identify important dependencies, and deal with them in the right way. The way that you manage them will determine whether your application is easy to maintain, extend, and test. In this book, we’ll do a mountain bike reservation system. A sports shop could use such a system for bike rentals. We’ll start small, with all of the dependencies hardwired, to make sure that our infrastructure works. Then, we’ll loosen the coupling with Spring, and progressively add persistence, a web-based presentation layer, declarative transactions, and other services.
For me, Spring style development is iterative. The first couple of labs are all about ramping up our infrastructure slowly. The first example will make sure that we have a working Java environment, and it will start to build our core model. Each of the first few examples ramp up one small part of your environment, making it easy to troubleshoot anything that might go wrong.
How do I do that?
Start with two classes in a
single directory. One’s
a mountain bike, and the other is a registry that holds bikes. Call
it a façade. You’ll add bikes to the
store within the façade constructor, and then print them
all out using a third primitive class. (All of the classes shown in
the book reside in a single package,
com.springbook, unless otherwise specified.)
Example 1-1 shows the bike.
public class Bike {
    private String manufacturer;
    private String model;
    private int frame;
    private String serialNo;
    private double weight;
    private String status;

    public Bike(String manufacturer, String model, int frame,
                String serialNo, double weight, String status) {

        this.manufacturer = manufacturer;
        this.model = model;
        this.frame = frame;
        this.serialNo = serialNo;
        this.weight = weight;
        this.status = status;
    }

    public String toString( ) {
        return "Bike : " +
                "manufacturer -- " + manufacturer +
                "
: model -- " + model +
                "
: frame -- " + frame +
                "
: serialNo -- " + serialNo +
                "
: weight -- " + weight +
                "
: status -- " + status +
                ".
";
    }

    public String getManufacturer( ) { return manufacturer; }

    public void setManufacturer(String manufacturer) {
        this.manufacturer = manufacturer;
    }

    public String getModel( ) { return model; }

    public void setModel(String model) { this.model = model; }

    public int getFrame( ) { return frame; }

    public void setFrame(int frame) { this.frame = frame; }

    public String getSerialNo( ) { return serialNo; }

    public void setSerialNo(String serialNo) { this.serialNo = serialNo; }

    public double getWeight( ) { return weight; }

    public void setWeight(double weight) { this.weight = weight; }

    public String getStatus( ) { return status; }

    public void setStatus(String status) { this.status = status; }
}
Example 1-2 is the façade.
import java.util.*;
public class RentABike {

    private String storeName;
    final List bikes = new ArrayList( );

    public RentABike(String storeName) {
        this.storeName = storeName;
        bikes.add(new Bike("Shimano", "Roadmaster", 20, "11111", 15,
                           "Fair"));
        bikes.add(new Bike("Cannondale", "F2000 XTR", 18, "22222",12,
                           "Excellent"));
        bikes.add(new Bike("Trek","6000", 19, "33333", 12.4,
                           "Fair"));
    }

    public String toString( ) { return "RentABike: " + storeName; }

    public List getBikes( ) { return bikes; }

    public Bike getBike(String serialNo) {
        Iterator iter = bikes.iterator( );
        while(iter.hasNext( )) {
            Bike bike = (Bike)iter.next( );
            if(serialNo.equals(bike.getSerialNo( ))) return bike;
        }
        return null;
    }
}
Finally, Example 1-3 is the view.
import java.util.*;
public class CommandLineView {
    private RentABike rentaBike;
    public CommandLineView( ) {rentaBike = new RentABike("Bruce's Bikes"); }

    public void printAllBikes( ) {
        System.out.println(rentaBike.toString( ));
        Iterator iter = rentaBike.getBikes( ).iterator( );
        while(iter.hasNext( )) {
            Bike bike = (Bike)iter.next( );
            System.out.println(bike.toString( ));
        }
    }

    public static final void main(String[] args) {
        CommandLineView clv = new CommandLineView( );
        clv.printAllBikes( );
    }
}
Next, you’ll compile the application, like this:
C:RentABikeAppsrc> javac -d ../out *.java
Your output directory now contains the compiled class files.
Directory of C:RentABikeAppout

07/28/2004  10:12 AM    <DIR>          .
07/28/2004  10:12 AM    <DIR>          ..
07/28/2004  10:10 AM             1,753 Bike.class
07/28/2004  10:10 AM             1,431 RentABike.class
07/28/2004  10:10 AM               940 CommandLineView.class
Run the application like this:
C:RentABikeAppout> java CommandLineView

RentABike: Bruce's Bikes
Bike : manufacturer -- Shimano
: model -- Roadmaster
: frame -- 20
: serialNo -- 11111
: weight -- 15.0
: status -- Fair.

Bike : manufacturer -- Cannondale
: model -- F2000 XTR
: frame -- 18
: serialNo -- 22222
: weight -- 12.0
: status -- Excellent.

Bike : manufacturer -- Trek
: model -- 6000
: frame -- 19
: serialNo -- 33333
: weight -- 12.4
: status -- Fair.
What just happened?
Nothing good. The current design is simple, but it’s also hardwired. You can immediately see several problems:
The façade layer (
RentABike) statically creates the bikes in the store, so whenever any new bike comes in (yeah!) or a customer totals one on the mountain (boo!), you’ve got a code change.This model will also be difficult to test, because the set of bikes is fixed.
The user interface and the façade are tightly coupled. You see a hardcoded dependency between the façade layer and the user interface.
Note
The fundamental design pattern in Spring, and all other lightweight containers, is based on the idea of loosening coupling between dependencies.
The code base is not organized, and the build is not automated.
But we’re willing to take some short cuts to get the Java base working, and the underpinnings of the application under way. We’ll decouple and automate in the next example.
What about...
...rolling up the whole burrito all at once? You might decide to install Spring, Hibernate, Java, Ant, and JUnit all at the same time. It’s been my experience that if you control one variable at a time, you actually save time, especially as you’re establishing your foundation. Once you’ve got all of your tools installed and working, then you can collect many of these steps into one.
Using Dependency Injection
When I begin to build any application, it’s usually tightly coupled. That’s okay. I can always refactor it later. In this example, I’ll structure the application so that it will work with Spring when I add it. I introduce an interface to the façade layer, so that I can have a façade layer that implements several different strategies.
The first step to learning Spring is the dependency injection pattern. It’s not complicated, but it’s the central concept. It’s different enough from the typical way that most people code that you’ll want to get it down quickly.
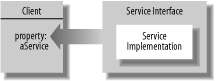
Figure 1-1 shows a client and server prepared for
dependency injection. A client uses another
class that we’ll
call a service. The client has a property that
accepts a service. The service is wrapped in an interface. The client
can’t see the implementation of the service. But
this code is not yet loosely coupled: you still have to create the
service somewhere. With dependency
injection, a third-party, called
the assembler or container,
creates both the client and service, and then sets the value of
aService (which is a reference to an instance of
Service) to satisfy the dependency.
Note
Many see dependency injection for the first time and wonder, “What’s the big deal? " After working with it some, they come to understand that this simple change can dramatically improve their code and ease future maintenance.
You probably already code this way in spots. You’ll see how powerful this programming model can be when you use it in a framework that applies it in a consistent way across your application. Code made of decoupled components is easier to test, maintain, and understand.
How do I do that?
You don’t have to use a lightweight container to use this design pattern. To decouple with dependency injection, there are three steps:
The first step is to extract the interface. We’ll
rename the RentABike file, class definition, and
constructor to ArrayListRentABike (Example 1-4), and create an interface (Example 1-5).
import java.util.*;

public class ArrayListRentABike implements RentABike {
    private String storeName;
    final List bikes = new ArrayList( );

    public ArrayListRentABike( ) { initBikes( ); }

    public ArrayListRentABike(String storeName) {
        this.storeName = storeName;
        initBikes( );
}

public void initBikes( ) {
    bikes.add(new Bike("Shimano", "Roadmaster", 20, "11111", 15, "Fair"));
    bikes.add(new Bike("Cannondale", "F2000 XTR", 18, "22222", 12, "Excellent"));
    bikes.add(new Bike("Trek", "6000", 19, "33333", 12.4, "Fair"));
}

public String toString( ) { return "RentABike: " + storeName; }

public List getBikes( ) { return bikes; }

public Bike getBike(String serialNo) {
    Iterator iter = bikes.iterator( );
    while(iter.hasNext( )) {
        Bike bike = (Bike)iter.next( );
        if(serialNo.equals(bike.getSerialNo( ))) return bike;
    }
        return null;
    }
}import java.util.*;
interface RentABike {
List getBikes( );
Bike getBike(String serialNo);
}Next, Example 1-6 gives the view. Note that
we’ve extracted the methods that print out the bikes
to the command line. We also add a property to the view, which uses
the RentABike interface.
import java.util.*;
public class CommandLineView {
    private RentABike rentaBike;
    public CommandLineView( ) { }

    public void setRentaBike(RentABike rentaBike) {
        this.rentaBike = rentaBike;
    }

    public RentABike getRentaBike( ) { return this.rentaBike;}

    public void printAllBikes( ) {
        System.out.println(rentaBike.toString( ));
        Iterator iter = rentaBike.getBikes( ).iterator( );
        while(iter.hasNext( )) {
            Bike bike = (Bike)iter.next( );
            System.out.println(bike.toString( ));
        }
    }
}
Finally, we have an assembler that creates each object, and sets the property (Example 1-7).
public class RentABikeAssembler {
    public static final void main(String[] args) {
        CommandLineView clv = new CommandLineView( );
        RentABike rentaBike = new ArrayListRentABike("Bruce's Bikes");
        clv.setRentaBike(rentaBike);
        clv.printAllBikes( );
    }
}
Next, you’ll compile the application like this:
Note
You can see the dependency injection happening here. Third-party code—custom code in this case—creates both objects, and injects the value of RentABike into the view.
C:RentABikeAppsrc> javac -d ../out *.java
Your output directory now contains the compiled class files.
Directory of C:RentABikeAppout

07/28/2004  10:12 AM    <DIR>          .
07/28/2004  10:12 AM    <DIR>          ..
07/28/2004  10:50 AM             1,475 ArrayListRentABike.class
07/28/2004  10:50 AM             1,753 Bike.class
07/28/2004  10:50 AM               186 RentABike.class
07/28/2004  10:50 AM               495 RentABikeAssembler.class
07/28/2004  10:50 AM               944 CommandLineView.class
Run the application like this:
C:RentABikeAppout>java RentABikeAssembler

RentABike: Bruce's Bikes
Bike : manufacturer -- Shimano
: model -- Roadmaster
: frame -- 20
: serialNo -- 11111
: weight -- 15.0
: status -- Fair.

Bike : manufacturer -- Cannondale
: model -- F2000 XTR
: frame -- 18
: serialNo -- 22222
: weight -- 12.0
: status -- Excellent.

Bike : manufacturer -- Trek
: model -- 6000
: frame -- 19
: serialNo -- 33333
: weight -- 12.4
: status -- Fair.
What just happened?
You just saw an example of dependency injection, outside of a lightweight container. The lightweight container community makes a whole lot of noise, but the ideas behind the movement are simple. Program using interfaces, and let a third party inject the dependency instead of setting it yourself.
You’re going to eventually replace the assembler with Spring. When that happens, Spring will actually fire the constructors for our objects and set the dependencies. But first, you’ll need to give this build a little attention.
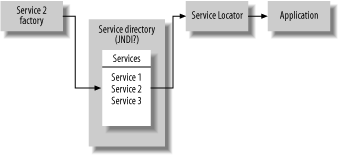
What about...
...service locators, or factory objects? Of course, dependency injection is not the only way to manage dependencies. In fact, it’s not the only good way. J2EE users tend to use service locators. Using that pattern (shown in Figure 1-2), you take a dependency, wrap it in an interface, register it in a dictionary, and then look it up using a helper class called a locator. It’s not a bad approach.
The dependency injection strategy lets you pick a consistent approach, and separate the dependency completely from your application. You’ll see how this approach will help you test, and help you build applications that are easy to customize and configure.
In fact, earlier lightweight containers, like Avalon, used this approach. Most modern containers provide dependency lookup, but prefer other types of dependency resolution.
Automating the Example
It’s time for a little housekeeping. To go much further, you need to automate. You probably already use Ant. It’s a standardized way to organize all of the tasks that you need to build your application. If you don’t already use it, you need to.
Ant has become ubiquitous. In order to work with Java tools, you need to be able to speak the language. We’re not going to provide yet another justification for Ant in this chapter, since you’ve probably read enough of them already.
How do I do that?
You’ll need to download an Ant distribution. You may as well use the one that comes with Spring (http://springframework.org/ ). To run all of the examples for this book, you’ll want to get Spring version 1.1, or later. Follow all of the directions for your platform.
Next, you’ll organize the directory structure in a way that’s friendly for web applications and Spring. I recommend that you use the organization that you’ll find with the Spring sample applications, so that you’ll have a working example. These are the directories that you’ll use:
- src
This directory has the home for all of the source code in your application. As usual, you’ll want the directory structure to mirror your package structure.
- test
This directory has the home for all of your unit tests. We’ll talk more about JUnit in the last lab.
- db
This directory has the home for all database specific scripts, configuration, and code. Some of these will be configuration files, some will help set up a database with the correct schema, and some will help initialize the database with test data, if necessary. If you support multiple databases, each will have its own directory under db.
- war
The war file is the typical deployable unit for the web application. If you’re using a J2EE web container or a servlet container like Tomcat, the
web.xmlconfiguration file will go here. Spring’s configuration files will also go here. We’ll talk more about Spring’s configuration files as we layer on additional labs.
To start with, place the source files like this:
RentABike.java goes in src, in the correct package hierarchy.
ArrayListRentABike goes in src, with RentABike.
Bike goes in src, with RentABike.
CommandLineView goes in src, with RentABike.
Finally, you’ll need an Ant build script, which we’ll place in the root folder of our project. Example 1-8 is the one that we’ll use to start with.
<?xml version="1.0"?>
<project name="RentABike" default="compile" basedir=".">

    <property name="src.dir" value="src"/>
    <property name="test.dir" value="test"/>
    <property name="war.dir" value="war"/>
    <property name="class.dir" value="${war.dir}/classes"/>

    <target name="init">
        <mkdir dir="${class.dir}"/>
    </target>

    <target name="compile" depends="init"
            description="Compiles all source code">
        <javac srcdir="${src.dir}"
               destdir="${class.dir}"
        />
    </target>

    <target name="clean" description="Erases contents of classes dir">
        <delete dir="${class.dir}"/>
    </target>

</project>
To run a build, switch to the directory called
C:RentABikeApp> and type:
[1]C:RentABikeApp>ant
Buildfile: build.xml

init:
    [mkdir] Created dir: C:RentABikeAppwarWEB-INFclasses

compile:
    [javac] Compiling 5 source files to C:RentABikeAppwarWEB-INFclasses

BUILD SUCCESSFUL
Total time: 2 seconds
What just happened?
Note
That’s what I call automation. We’ve reduced the total keystrokes that you’ll need to build the project to four.
Ant built the system in one automated step. That’s not such a big deal now, but it will be increasingly important as the build steps get more sophisticated. You’ll want the system to run unit tests, add any precompilation steps such as JDO’s byte code enhancement in Chapter 5, or copy configuration files to the appropriate place. You can also have special tasks to initialize a database or deploy our war file to an application server.
What about...
...the fact that some integrated development environments don’t need Ant at all? If you want to work with these without Ant, you’ll need to make sure that:
Note
Actually, we’re developing this application in the IDE called IDEA, made by JetBrains. We find that it has the best refactoring support out there. Take heart. We also test the Ant version of each lab.
You structure the code in the same directories that we do, so that packages will line up correctly.
You make sure that your IDE can reach all of the .lib files that we tell you to use.
In future chapters, you’ll need to worry about how to deploy and run a web application, and how to run JUnit.
From here on out, we’ll tell you when you need to add a new directory, execute the application, or make a new library available. We won’t tell you how. We assume you know how to use your own IDE, or Ant directly.
Injecting Dependencies with Spring
You’re almost through with the setup for Spring.
It’s time to download it and put it into action. In
this lab, you’ll replace the
RentABikeAssembler object with Spring.
When I started using Spring instead of J2EE, it changed my life. I got more productive. My code got easier for me to write, and easier for my customers to understand. Since it was simpler, it often executed faster. It was also infinitely easier to refactor. In fact, I wrote a book about the value of lightweight frameworks like Spring, called Better, Faster, Lighter Java (O’Reilly).
How do I do that?
You’ll first have to download Spring. Go get it at http://www.springframework.org. That will point you to sourceforge, where you’ll get the best version for your platform. We used Version 1.1. You will need to add a new folder to your project, warWEB-INFlib, and put the Spring libraries there (everything in the dist folder of your Spring distribution).
Moving a well-designed plain-ordinary-Java-object (POJO) application to Spring is straightforward. It only takes three steps:
Refactor your code to take advantage of dependency injection. Model objects are beans, and services are aspects. Usually, you’ll only have beans.
Remove the code that instantiates the objects and sets dependencies.
Build a configuration file describing your beans and aspects.
Access your code through Spring.
Since our individual parts are already built to take advantage of dependency injection, moving to Spring is an easy exercise. We simply replace our assembler with a Spring version, and provide a configuration file which will go in the warWEB-INF folder.
Example 1-9 shows the configuration file.
<?xml version="1.0" encoding="UTF-8"?>
<!DOCTYPE beans PUBLIC "-//SPRING//DTD BEAN//EN"
"http://www.springframework.org/dtd/spring-beans.dtd">

<beans>

    <bean id="rentaBike" class="ArrayListRentABike">
        <property name="storeName"><value>"Bruce's Bikes"</value></property>
    </bean>

    <bean id="commandLineView" class="CommandLineView">
        <property name="rentaBike"><ref bean="rentaBike"/></property>
    </bean>

</beans>
And Example 1-10 is the new assembler that replaced
the old RentABikeAssembler.
import org.springframework.context.support.ClassPathXmlApplicationContext;

public class RentABikeAssembler {
    public static final void main(String[] args) {
        ClassPathXmlApplicationContext ctx = new
           ClassPathXmlApplicationContext("RentABikeApp-context.xml");
        CommandLineView clv =
           (CommandLineView)ctx.getBean("commandLineView");
        clv.printAllBikes( );
    }
}
What just happened?
You may be scratching your head and wondering what the big deal is all about. These tiny improvements in architecture will have profound implications throughout the lifecycle of this application. You’ll see the benefits almost immediately. I won’t harp on them here. Instead, let’s talk about what’s happening under the covers.
What about...
...Pico, Hive Mind, and Avalon? These are all lightweight containers. Each of them has strengths and weaknesses. Neither Avalon nor Hive Mind have the critical mass that you’ll want out of a container, especially if you want services that interoperate. Right now, Spring and Pico have the most market share. People tend to use Pico if they want a standalone container, but Spring has the most comprehensive support for additional services, such as declarative transactions and a rich persistence strategy.
Writing a Test
We’ll finish each chapter with a test. In fact, if you’re a true believer in test-driven development, you should code your test cases first. Many of you bought this book because Spring can improve the testability of your applications. In fact, improving testability was one of the fundamental drivers of Spring’s architecture from the beginning.
Automating your tests gives you more confidence that your code will work right, and will keep working right as you make changes. In fact, our managers are all reading the same books that say that it’s expensive to keep large testing organizations in place. We’ve got to pick up the slack. There’s no effective way to do that without automation. There’s a big problem, though. Many of our current development architectures, like EJB and Struts, do not support testing very well. They’re expensive to load, and hard to mock.
Spring changes all of that. Each object can run outside of the container. Further, since the container itself is so light, the startup cost is negligible. That’s a huge win for you, if you want to test. Finally, Spring encourages designs with very loose coupling between components.
How do I do that?
Think of a unit test as another client of your application. The test makes assertions about what should be true should the application be working correctly. For example, if you add an object to a list, the size should increase by one. Then, you can run the test standalone while you’re building a new feature or debugging an old one. You can also run the tests as part of the overall build. If the tests fail, then the build fails.
Each test case is a subclass of TestCase. In Example 1-11, the test will be a client of the façade.
public class RentABikeTest extends TestCase{

    private RentABike rentaBike;

    public void setUp( ) {
        rentaBike = new ArrayListRentABike("Bruce's Bikes");
    }

    public void testGetName( ) {
        assertEquals("Bruce's Bikes", rentaBike.getStoreName( ));
    }

    public void testGetBike( ) {
        Bike bike = rentaBike.getBike("11111");
        assertNotNull(bike);
        assertEquals("Shimano", bike.getManufacturer( ));
    }

    public void testGetBikes( ) {
        List bikes = rentaBike.getBikes( );
        assertNotNull(bikes);
        assertEquals(3, bikes.size( ));
    }
}
Next, you’ll need to modify Ant to run the tests. Example 1-12 gives the additional task to compile the test (note that you’ll have to modify PATH_TO_JUNIT to be appropriate for your environment).
<property name="test.class.dir" value="${test.dir}/classes"/>
<path id="bikestore.class.path">
     <fileset dir="${spring.dir}/dist">
          <include name="*.jar"/>
     </fileset>
     <pathelement location="${spring.dir}/lib/jakarta-commons
            /commons-logging.jar"/>
     <pathelement location="${spring.dir}/lib/log4j/log4j-1.2.8.jar"/>
     <pathelement location="${spring.dir}/lib/j2ee/servlet.jar"/>
     <dirset dir="${basedir}"/>
     <dirset dir="${class.dir}"/>
</path>
<path id="junit.class.path">
     <path refid="bikestore.class.path"/>
     <pathelement location="PATH_TO_JUNIT"/>
</path>
<target name="compile.test" depends="init"
            description="Compiles all unit test source">
        <javac srcdir="${test.dir}"
               destdir="${test.class.dir}"
               classpathref="junit.class.path"/>
</target>
Example 1-13 is the task to run the tests.
<target name="test" depends="compile.test, compile"
            description="Runs the unit tests">
        <junit printsummary="withOutAndErr" haltonfailure="no"
               haltonerror="no" fork="yes">
            <classpath refid="junit.class.path"/>
            <formatter type="xml" usefile="true" />
            <batchtest todir="${test.dir}">
                <fileset dir="${test.class.dir}">
                    <include name="*Test.*"/>
                </fileset>
            </batchtest>
        </junit>
    </target>
Here’s the result of the test:
Buildfile: build.xml

init:

compile:

compile.test:

test:
    [junit] Running RentABikeTest
    [junit] Tests run: 3, Failures: 0, Errors: 0, Time elapsed: 0.36 sec

BUILD SUCCESSFUL
Total time: 2 seconds
What just happened?
Ant just built the entire application, including the tests. Then, Ant ran the tests. All succeeded. If a test case had failed, then you’d have to make it pass before the build could be successful. In this way, you catch small errors before they become larger ones.
In the next chapter, we’ll really start to exercise Spring. We’ll build a true user interface for this application using Spring’s WebMVC. We’ll also show you how to integrate existing user interface components into Spring.