
Chapter 2. Building a User Interface
I was hauling down a trail called Emma Long, and came up to a four-foot drop. In a split second, I had to make the decision of whether to jump the ledge, try to ride down it, or stop and get off my bike. I once read that in Austin, Texas, there are more broken mountain bike frames than any other place, per capita. Though I’ve never confirmed it, I believe it, because there are so many rocky trails with ledges that are small enough to handle sometimes with a cheap bike, but also big enough to snap the frame. Web-based user interface development is similar. It’s easy to get started down that trail with a bike that’s not quite up to the task. Often, it’s the framework and organization of the code that’s just behind the user interface that presents the biggest problem. In this chapter, you’ll learn how Spring can help. We’ll focus on Spring’s Web MVC framework, but in the next chapter, we’ll also show you how to integrate alternative frameworks, and even use rich clients.
Setting Up Tomcat
In this first example, you’ll learn how to build a simple user interface with Tomcat with Spring’s Web MVC framework. You’ll add a couple of screens to add bikes to the inventory of rental bikes. Then, we’ll add a hardwired JSP that will let you add a new bike to the database.
Note
Spring doesn’t force you to use a full application server. Actually, you don’t even have to build web-based applications. The requirement for Tomcat is really a requirement for some servlet container, purely because this application (not Spring) requires it.
Spring doesn’t give you a servlet container. Instead, it just gives you a set of services that make it easier to build web applications.
Most projects simply don’t need a full-blown J2EE container. One of the best things about Spring is that you can deploy it, in production, without paying for an application server, or the hardware that you’d need to run one. Tomcat will manage your servlets, provide an easy architecture for managing deployments, and let you manage its threading model.
How do I do that?
First, you’ll go to http://jakarta.apache.org/tomcat. There, you’ll find Apache Tomcat 5.0.27, which is the version that we’re using for all of our examples. If you want to use something else, that’s okay. You’ll just need some type of servlet container that supports:
JSP Version 1.2 or higher
Servlet Version 2.3 or higher
Next, you’ll modify the façade to the
RentABike, so that you can do simple
create/read/update/delete (CRUD) methods. Example 2-1 gives the new façade.
public interface RentABike {
    List getBikes( );
    Bike getBike(String serialNo);
    void saveBike(Bike bike);
    void deleteBike(Bike bike);
    void setStoreName(String name);
    String getStoreName( );
}
And you’ll want to access that through a simple user interface. For now, you’ll hardwire the façade to a simple JSP. We’ll do one simple JSP right now, that outputs a list of all the bikes in the store (Example 2-2). Notice that from here on out, we’ve moved our code into a package, com.springbook. The source files for the domain classes should move into the srccomspringbook folder as well. Here’s the hardwired JSP.
<%@ page import="com.springbook.*"%><% RentABike store = new ArrayListRentABike("Bruce's Bikes"); %><html> <head> <title> <%= store.getStoreName( ) %> </title> </head> <body> <h1><%= store.getStoreName( ) %></h1> <table border="1" cellspacing="2" cellpadding="2"> <tr style="font-weight:bold"> <td>Manufacturer</td><td>Model</td><td>Status</td> </tr> <% for(int i=0;i<store.getBikes( ).size( );i++) { %> <% Bike bike = (Bike)store.getBikes( ).get(i); %> <tr> <td><%= bike.getManufacturer( ) %></td> <td><%= bike.getModel( ) %></td> <td><%= bike.getStatus( ) %></td> </tr> <% } %> </table> </body> </html>
Next, you’ll want to configure the application. With
J2EE servlets, that happens in the web.xml file.
At this point, the web.xml file is simplicity
itself. In fact, you could even leave it out for now, but for the
sake of completeness, go ahead and add it. Example 2-3 shows the web.xml, which
you’ll put in a directory called
war/WEB-INF, off of your main project directory.
<!DOCTYPE web-app
   PUBLIC  "-//Sun Microsystems, Inc.//DTD Web Application 2.2//EN"
   "http://java.sun.com/j2ee/dtds/web-app_2_2.dtd">
<web-app>
</web-app>
You’ll need to change Ant’s
build.xml to add a deploy step. This step packages
everything that Tomcat will need to run your application, including
JSPs, Java classes, the servlet configuration in
web.xml, and the Spring context. Example 2-4 gives the additions to the Ant script.
<property name="webapp.dir" value="C:/tomcat/webapps/bikestore"/>
<target name="deploy" depends="compile"
        description="Copies the contents of web-app to destination dir">
   <copy todir="${webapp.dir}">
      <fileset dir="${war.dir}"/>
   </copy>
</target>
Finally, you’ll build and deploy, as in Example 2-5.
buildfile: build.xml

init:
    [mkdir] Created dir: C:RentABikeAppwarWEB-INFclasses
    [mkdir] Created dir: C:RentABikeApp	estclasses

compile:
    [javac] Compiling 9 source files to C:RentABikeAppwarWEB-INFclasses

deploy:
     [copy] Copying 9 files to C:@ToolsApache Software FoundationTomcat
5.0webappsikestore

BUILD SUCCESSFUL
Total time: 2 seconds
What just happened?
You just walked through the build and deploy cycle for Tomcat, which is:
Write the code for your application.
Configure it through
web.xmlPackage it in a .war file
Note
Actually, the package step at this point is optional. You don’t have to build a war; you can leave the files exploded. Most developers will eventually choose to do so.
Deploy it in Tomcat
Run it
The browser makes a request to Tomcat, which then routes the request to a JSP. The first time that you run the application, Tomcat compiles the JSP into a servlet, and executes it. The JSP returns a result in the form of HTML, via HTTP, to the browser.
Of course, most J2EE applications have long since moved on to architectures like EJB that require much more than Tomcat. That’s unfortunate, because many applications run just fine in a basic servlet container.
In fact, I’ve seen a resurgence of applications that put the full J2EE on the back burner, and choose to run simple containers. In my classes, I regularly ask how many people are using EJB, a full J2EE server without EJB, or a servlet container. The numbers of people choosing Tomcat, or something similar, is growing rapidly. Everything old is new again.
Building a View with Web MVC
In this example, you’ll build a
simple web-based user interface with
Spring’s Web MVC framework. You’ll
use the code that you’ve accumulated for
RentABike for the business logic,
you’ll use Spring to help you organize and configure
the application, and you’ll deploy it on Tomcat.
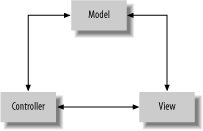
If you’ve done this for any length of time, you probably recognize that you’re barreling down a trail that will break your frame if you’re not careful. This simple application is not the ideal structure for a web application. Changes in the application will trickle through the view, and changes in the view will require significant updates to your models. Experience has shown that it’s better to have a model, view, and controller layer, with a variation of the model/view/controller (MVC) design pattern called model2, shown in Figure 2-1. This is the design that you’ll be using in Spring’s Web MVC, or most other MVC frameworks.
How do I do that?
Like Struts, Web MVC lets you build applications with three distinct layers: the model, view, and controller. You’ll also need to configure what you’ve done. Since you’ve already developed the model with the business logic (you’ll specify the façade as your model), you’re free to first concentrate on the view.
The JSPs
For now,
the view will be a thin JSP layer that
lets you pick a bike from a list, then remove or edit it.
You’ll use another screen to add or edit bike
information. We aren’t focusing on formatting, since
we’re primarily interested in
Spring’s role. You’ll use standard
JSTL (available at http://java.sun.com/products/jsp/jstl/, or
packaged with Spring). Add standard.jar,
jstl.jar, c.tld and
fmt.tld to your
warWEB-INFlib folder. You’ll
link them through an include.jsp page
which contains just the following two lines:
<%@ taglib prefix="c" uri="http://java.sun.com/jstl/core" %>
<%@ taglib prefix="fmt" uri="http://java.sun.com/jstl/fmt" %>
<%@ page import="com.springbook.*"%>
<%@ include file="include.jsp" %>
<html>
<head>
<title>
<c:out value="${rentaBike.storeName}"/>
</title>
</head>
<body>
<h1><c:out value="${rentaBike.storeName}"/></h1>
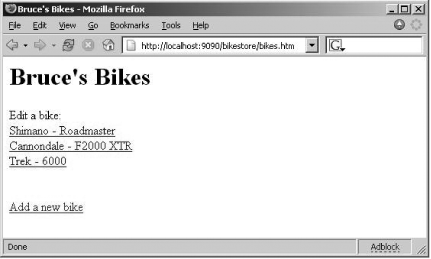
Edit a bike: <br/>
<c:forEach items="${rentaBike.bikes}" var="bike">
<a href="editBike.bikes?bikeSerialNo=<c:out
value="${bike.serialNo}"/>">
<c:out value="${bike.manufacturer}"/> -
<c:out value="${bike.model}"/><br/>
</c:forEach>
<br/><br/>
<a href="newBike.bikes">Add a new bike</a>
</body>
</html>This page will have a reference to an instance of
RentABike to query for values. The JSTL tags
<c:out> and
<c:forEach> are used to query the properties
of the RentABike implementation.
Example 2-7 is the JSP that adds a new entry or edits an old one.
<%@ page import="com.springbook.*"%>
<%@ include file="include.jsp" %>
<html>
   <head>
      <title>
         Edit Bike
      </title>
   </head>
   <body>
      <h1>Edit Bike</h1>
      <form method="POST" action="submitBike.bikes">
         <table border="1" cellspacing="2" cellpadding="2">
            <tr>
               <td align="right">Manufacturer:</td>
               <td>
                  <input type="text" name="manufacturer"
                     value="<c:out value="${bike.manufacturer}"/>">
               </td>
            </tr>
            <tr>
               <td align="right">Model:</td>
               <td>
                  <input type="text" name="model"
                      value="<c:out value="${bike.model}"/>">
               </td>
            </tr>
            <tr>
               <td align="right">Frame:</td>
               <td>
                  <input type="text" name="frame"
                      value="<c:out value="${bike.frame}"/>">
               </td>
            </tr>
            <tr>
               <td align="right">Serial Number:</td>
               <td>
                  <input type="text" name="serialno"
                    value="<c:out value="${bike.serialNo}"/>">
               </td>
            </tr>
            <tr>
               <td align="right">Weight:</td>
               <td>
                  <input type="text" name="weight"
                      value="<c:out value="${bike.weight}"/>">
               </td>
            </tr>
            <tr>
               <td align="right">Status:</td>
               <td>
                  <input type="text" name="status"
                      value="<c:out value="${bike.status}"/>">
               </td>
            </tr>
         </table>
         <input type="submit" value="Submit">
      </form>
   </body>
</html>
Once again, you can use the standard <c:out>
JSTL tags to output properties from an object, this time a
Bike. If the Bike reference is
empty, the tags will output the empty string, not throw an exception,
which is precisely what you want. This way, if the page receives a
Bike to edit, the fields will be filled in
appropriately, and if it is used to add a new
bike, then the fields will be empty when rendered.
The controllers
For Web MVC, you’ll have one controller for every screen. Each controller will return a model and view combination. It’s customary to use a façade layer as your model. First, Example 2-8 gives the controller that lets you choose a bike.
package com.springbook;
import org.springframework.web.servlet.mvc.Controller;
import org.springframework.web.servlet.ModelAndView;
import javax.servlet.http.HttpServletResponse;
import javax.servlet.http.HttpServletRequest;

public class BikesController implements Controller {
    private RentABike facade;
    public RentABike getFacade( ) { return facade;}

    public void setFacade(RentABike facade) { this.facade = facade; }

    public ModelAndView handleRequest(HttpServletRequest request,
           HttpServletResponse response) throws Exception {

        return new ModelAndView("bikes.jsp", "rentaBike", facade);
    }
}
This controller merely forwards the user to the
bikes.jsp page and hands a reference to the
RentABike implementation provided by Spring.
Next, Example 2-9 shows the controller that lets you add or edit a bike.
Note
This class looks like it uses a servlet interface. It doesn’t. Unlike controllers from Struts, Spring controllers implement an interface. This design makes it easer test with a technique called mocking.
package com.springbook;
import org.springframework.web.servlet.mvc.Controller;
import org.springframework.web.servlet.ModelAndView;
import javax.servlet.http.HttpServletRequest;
import javax.servlet.http.HttpServletResponse;

public class EditBikeController implements Controller {
    private RentABike facade;

    public RentABike getFacade( ) { return facade; }

    public void setFacade(RentABike facade) { this.facade = facade; }

    public ModelAndView handleRequest(HttpServletRequest request,
           HttpServletResponse response) throws Exception {

        if(request.getParameter("bikeSerialNo") == null) {
            System.out.println("bikeSerialNo was null");
            return new ModelAndView("editBike.jsp");
        } else {
            System.out.println("bikeSerialNo == " +
                  request.getParameter("bikeSerialNo"));
            Bike bike =
                  facade.getBike(request.getParameter("bikeSerialNo"));
            return new ModelAndView("editBike.jsp", "bike", bike);
        }
    }
}
This controller checks the inbound request to see if it contains a
parameter called bikeSerialNo. If such a parameter
exists, then it represents a request to edit an existing bike and as
such, an implementation of RentABike will be used
to fetch the appropriate bike, which will then be handed off to
editBike.jsp. Conversely, if the parameter does
not exist, then this request is to create a new bike, and all the
fields on bikes.jsp will remain blank.
Finally, Example 2-10 gives the controller that lets you submit the new or updated bike.
package com.springbook;
import org.springframework.web.servlet.mvc.Controller;
import org.springframework.web.servlet.ModelAndView;
import javax.servlet.http.HttpServletRequest;
import javax.servlet.http.HttpServletResponse;

public class SubmitBikeController implements Controller {
    private RentABike facade;

    public RentABike getFacade( ) { return facade; }

    public void setFacade(RentABike facade) { this.facade = facade; }

    public ModelAndView handleRequest(HttpServletRequest request,
        HttpServletResponse response) throws Exception {

        Bike bike = new Bike(request.getParameter("manufacturer"),
            request.getParameter("model"),
            Integer.parseInt(request.getParameter("frame")),
            request.getParameter("serialNo"),
            Double.parseDouble(request.getParameter("weight")),
            request.getParameter("status"));
        facade.saveBike(bike);
        return new ModelAndView("bikes.jsp", "rentaBike", facade);
    }
}
This final controller takes the inbound parameters from the request
to create an instance of Bike with the appropriate
values and then save it to the RentABike. The user
is then returned to the original bikes.jsp
page, where the list of bikes will reflect the new
state of the database.
The context
Within the context, you’ll wire together the model,
façade, and UI. You’ll want to specify
the controller and view objects. You’ll also need to
configure a special object, called a dispatcher, within the
configuration. First, you’ll need to register the
top-level dispatcher and your new taglibs with Tomcat in
web.xml (Example 2-11).
<!DOCTYPE web-app
PUBLIC "-//Sun Microsystems, Inc.//DTD Web Application 2.2//EN"
"http://java.sun.com/j2ee/dtds/web-app_2_2.dtd">
<web-app>
<taglib>
    <taglib-uri>http://java.sun.com/jstl/core</taglib-uri>
    <taglib-location>/WEB-INF/lib/c.tld</taglib-location>
</taglib>
<servlet>
    <servlet-name>rentaBikeApp</servlet-name>
    <servlet-class>
           org.springframework.web.servlet.DispatcherServlet
    </servlet-class>
    <load-on-startup>1</load-on-startup>
</servlet>
<servlet-mapping>
    <servlet-name>rentaBikeApp</servlet-name>
    <url-pattern>*.bikes</url-pattern>
</servlet-mapping>
</web-app>
Notice also that you have now defined a new URL suffix
(.bikes) for use with the application. Any URL
ending with .bikes will be passed in to the
rentaBikeApp servlet.
Next, build a Spring context in
warWEB-INF called
rentaBikeApp-servlet.xml, which has your
controllers and views in it. Later, you’ll add forms
and validation as well, but we’ll quit here for now
(Example 2-12).
<beans>
    <bean id="rentaBike" class="com.springbook.ArrayListRentABike">
        <property name="storeName"><value>Bruce's Bikes</value></property>
    </bean>

    <bean id="bikesController" class="com.springbook.BikesController">
        <property name="facade"><ref bean="rentaBike"/></property>
    </bean>

    <bean id="editBikeController" class="com.springbook.EditBikeController">
         <property name="facade"><ref bean="rentaBike"/></property>
    </bean>

    <bean id="submitBikeController" class="com.springbook.SubmitBikeController">
         <property name="facade"><ref bean="rentaBike"/></property>
    </bean>

    <bean id="urlMapping"
        <property name="mappings">
            <props>
                <prop key="/bikes.bikes">bikesController</prop>
                <prop key="/editBike.bikes">editBikeController</prop>
                <prop key="/newBike.bikes">editBikeController</prop>
                <prop key="/submitBike.bikes">submitBikeController</prop>
            </props>
        </property>
    </bean>
</beans>
Your Ant build.xml already has everything that you
need, so you’re ready to build, deploy, and run your
application. Simply fire off your deploy task again.
Finally, open up your browser and navigate to the virtual directory where you set up the application (for example, http://localhost:8080/bikes.bikes). You’ll see the main page in Figure 2-2.
What just happened?
Though the application does not look or act much differently, you’ve improved the structure dramatically. You’ve decoupled the model from the view, so that the JSP no longer knows about the underlying structure of the application. It does not need to make an explicit call to Spring to get the application context. You’ll also find that it’s easier to make enhancements to add form handling and validation logic. Finally, you’ll see that the new structure is much easier to test. In fact, you’ll be able to call the controller directly from a test case, outside of Tomcat, and verify that the structure and content of the returned model is correct.
Enhancing the Web Application
The code that you’ve seen so far begins to provide much needed organization with distinct models, views, and controllers. In this section, we’ll add validation logic, a resolver, and input forms.
These enhancements will add better organization to your code and save you time and effort. Like many MVC frameworks, these classic enhancements make it easier to handle the classic flow of control that you generally get with web applications:
- Resolvers
As your application grows, you’ll want to refer to each page with a logical name rather than a full path. The resolver manages the details, like the extension and the path, letting you specify these details in your configuration.
- Form
These input JSPs make it easy to manage user input, providing easy place holders for data, and a work flow for forms submission. Forms are separated into the view, and controller. The physical view can utilize a special Spring tag library to bind form fields to POJO properties.
- Validators
These beans work with input forms to make it easy to handle business validation. They have no dependencies on Spring’s Web MVC—you need only implement an interface—so it’s easy to package your validation with your business logic.
These simple enhancements let you manage the flow of control in a manner that’s consistent and organized. It also lets you keep code in a consistent place, and keep coupling to a bare minimum.
How do I do that?
We’re going to code our enhancements in two distinct
steps. First, we’ll configure the resolver. To do
that, we’re going to need to change the
configuration in the rentaBikeApp-Servlet.xml by
adding the following element (Example 2-13).
<bean id="viewResolver"
class="org.springframework.web.servlet.view.InternalResourceViewResolver">
   <property name="viewClass">
      <value>org.springframework.web.servlet.view.JstlView</value>
   </property>
   <property name="suffix"><value>.jsp</value></property>
</bean>
You can also add a prefix in addition to a suffix—for instance, if you store your JSPs in a subfolder or alternate path.
You’ll also change the controller. This
controller’s purpose is to handle form submission.
In the previous lab, this controller used the
HttpServletRequest's parameters to access the form
values, but now, it will use a POJO (Example 2-14).
public class SubmitBikeController extends SimpleFormController {
    private RentABike facade;

    public RentABike getFacade( ) { return facade; }

    public void setFacade(RentABike facade) { this.facade = facade; }

    public ModelAndView onSubmit(Object command)
            throws ServletException{

        Bike bike = (Bike)command;
        facade.saveBike(bike);
        return new ModelAndView(new RedirectView(getSuccessView( )),
           "rentaBike", facade);
    }

    protected Object formBackingObject(HttpServletRequest request)
           throws Exception {

        Bike bike = new Bike( );
        if(request.getParameter("bikeSerialNo") != null)
           bike = facade.getBike(request.getParameter("bikeSerialNo"));
        return bike;
    }
}
The controller now has an onSubmit method
instead of handleRequest.
onSubmit takes the POJO that holds the form field
values instead of a raw HttpServletRequest. The
other method,
formBackingObject, allows you to initialize the
POJO that will be bound to the form fields on the first request to
the form.
You also need to code an input form. The form in Example 2-15 is going to make use of some new Spring-specific tags imported from the Spring taglib, which ships with the rest of the framework.
<%@ page import="com.springbook.*"%>
<%@ include file="include.jsp" %>
<%@ taglib prefix="spring" uri="/spring" %>
<html>
<head>
<title>
Edit Bike
</title>
</head>
<body>
<h1>Edit Bike</h1>
<form method="POST">
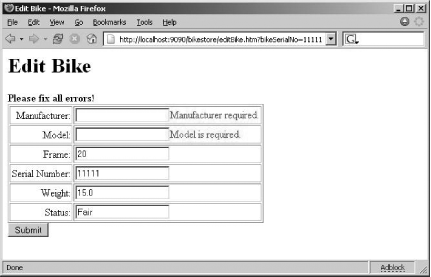
<spring:hasBindErrors name="bike">
<b>Please fix all errors!</b>
</spring:hasBindErrors>
<table border="1" cellspacing="2" cellpadding="2">
<tr>
<td align="right">Manufacturer:</td>
<td>
<spring:bind path="bike.manufacturer">
<input type="text" name="manufacturer" value="<c:out
value="${status.value}"/>">
<font color="red"><c:out
value="${status.errorMessage}"/></font>
</spring:bind>
</td>
</tr>
<tr>
<td align="right">Model:</td>
<td>
<spring:bind path="bike.model">
<input type="text" name="model" value="<c:out
value="${status.value}"/>">
<font color="red"><c:out
value="${status.errorMessage}"/></font>
</spring:bind>
</td>
</tr>
<tr>
<td align="right">Frame:</td>
<td>
<spring:bind path="bike.frame">
<input type="text" name="frame" value="<c:out
value="${status.value}"/>">
<font color="red"><c:out
value="${status.errorMessage}"/></font>
</spring:bind>
</td>
</tr>
<tr>
<td align="right">Serial Number:</td>
<td>
<spring:bind path="bike.serialNo">
<input type="text" name="serialNo" value="<c:out
value="${status.value}"/>">
<font color="red"><c:out
value="${status.errorMessage}"/></font>
</spring:bind>
</td>
</tr>
<tr>
<td align="right">Weight:</td>
<td>
<spring:bind path="bike.weight">
<input type="text" name="weight" value="<c:out
value="${status.value}"/>">
<font color="red"><c:out
value="${status.errorMessage}"/></font>
</spring:bind>
</td>
</tr>
<tr>
<td align="right">Status:</td>
<td>
<spring:bind path="bike.status">
<input type="text" name="status" value="<c:out
value="${status.value}"/>">
<font color="red"><c:out
value="${status.errorMessage}"/></font>
</spring:bind>
</td>
</tr>
</table>
<input type="submit" value="Submit">
</form>
</body>
</html>See how you surround the form input fields with the
<spring:bind> tags. This allows Spring to
automap the values of the input fields to our POJO command object,
and later, allows it to show error messages if the validation fails.
At the top of the page, you can use the
<spring:hasBindErrors> tag (passing in our
command object) to display an error summary if there are validation
errors.
You’ll want Spring to validate the form, so add a specific validator (Example 2-16). You can package it with a business object. The controller will apply the correct work flow, including calling the validation.
public class BikeValidator implements Validator {
    public boolean supports(Class aClass) {
        return aClass.equals(Bike.class);
    }

    public void validate(Object o, Errors errors) {
        Bike bike = (Bike)o;
        if(bike == null) {
            errors.rejectValue("manufacturer", "Error!",
                  null, "Value required.");
        } else {
            if(bike.getManufacturer( ) == null ||
                  "".equals(bike.getManufacturer( )))

                  errors.rejectValue("manufacturer", "Value not present.",
                         null, "Manufacturer required.");

           if(bike.getModel( ) == null || "".equals(bike.getModel( )))
                errors.rejectValue("model", "Value not present.", null,
                   "Model is required.");
        }

    }
}
Next, modify the context as in (Example 2-17); also, in the urlMapping, point /editBike.bikes to editBikeForm instead of editBikeController.
    <bean id="bikeValidator" class="com.springbook.BikeValidator"/>
    <bean id="editBikeForm" class="com.springbook.SubmitBikeController">
        <property name="sessionForm"><value>true</value></property>
        <property name="commandName"><value>bike</value></property>
        <property name="commandClass">
           <value>com.springbook.Bike</value>
         </property>
        <property name="validator"><ref bean="bikeValidator"/></property>
        <property name="formView"><value>editBike</value></property>
        <property name="successView"><value>bikes.bikes</value></property>
        <property name="facade">
            <ref bean="rentaBike"/>
        </property>
    </bean>
Next, you’ll need to add the CRUD functionality to ArrayListRentABike that you specified earlier in the RentABike interface.
package com.springbook;
import java.util.*;

public class ArrayListRentABike implements RentABike {
    private String storeName;
    final List bikes = new ArrayList( );

    public void setStoreName(String name) {
        this.storeName = name;
    }

    public String getStoreName( ) {
        return storeName;
    }

    private void initBikes( ) {
        bikes.add(new Bike("Shimano", "Roadmaster", 20, "11111", 15, "Fair"));
        bikes.add(new Bike("Cannondale", "F2000 XTR", 18, "22222", 12,
            "Excellent"));
        bikes.add(new Bike("Trek", "6000", 19, "33333", 12.4, "Fair"));
    }

    public ArrayListRentABike( ) {
        initBikes( );
    }

    public ArrayListRentABike(String storeName) {
        this.storeName = storeName;
        initBikes( );
    }

    public String toString( ) { return "com.springbook.RentABike: " + storeName; }

    public List getBikes( ) { return bikes; }

    public Bike getBike(String serialNo) {
        Iterator iter = bikes.iterator( );
        while(iter.hasNext( )) {
            Bike bike = (Bike)iter.next( );
            if(serialNo.equals(bike.getSerialNo( ))) return bike;
        }
        return null;
    }

    public void saveBike(Bike bike) {
        deleteIfContains(bike);
        bikes.add(bike);
    }
    public void deleteBike(Bike bike) {
        deleteIfContains(bike);
    }

    private void deleteIfContains(Bike bike) {
        Iterator iter = bikes.iterator( );
        while(iter.hasNext( )) {
            Bike comp = (Bike)iter.next( );
            if(comp.getManufacturer( ).equals(bike.getManufacturer( )) &&
                comp.getModel( ).equals(bike.getModel( ))) {
                bikes.remove(comp);
                return;
            }
        }
    }
}
Finally, you’ll need to add the Spring taglib to the web.xml file so that your new JSP tags will work.
<taglib>
    <taglib-uri>/spring</taglib-uri>
    <taglib-location>/WEB-INF/lib/spring.tld</taglib-location>
</taglib>
Go ahead and build and deploy the changed application. Figure 2-3 shows a view of what happens when you don’t enter the Manufacturer or Model for a bike.
What just happened?
Within the Spring configuration file, you specified the details for a view resolver. This component decouples the view from the technology that you use to render it. In this case, the resolver lets you refer to a JSP by name, instead of through a filename.
In the previous simpler example, the control was straightforward. An HTTP request triggered a controller, which then loaded another form. This application is slightly more advanced, because Spring’s forms let you provide a more sophisticated workflow, and one that’s more appropriate for basic input form submission and validation. In this case, you set up and configured an input form, with custom JSP tags, and then submitted it. The Post will trigger the dispatcher, as before, and then fire the command, invoke the validator, and then return the form view if errors existed, or the success view if there were no errors. If you’re familiar with the Jakarta Struts project, this flow will be familiar to you.
Running a Test
Now that you’ve implemented a few simple views, it’s time to do a test. We’ll simply do a lightweight request, outside of the servlet container.
Part of the beauty of Web MVC is that it’s much easier to test. We’ll show you a couple of simple test cases that exercise the core of the user interface pretty well.
How do I do that?
In this case, you’re simply going to invoke the
controller, and make sure that you get the appropriate model back.
First, you can code a simple JUnit test case that invokes the
BikesController (Example 2-20).
public class ControllerTest extends TestCase {

    private ApplicationContext ctx;

    public void setUp( ) throws Exception {
        ctx = new FileSystemXmlApplicationContext(
           "war/WEB-INF/rentaBikeApp-servlet.xml");
    }

    public void testBikesController( ) throws Exception {
        BikesController controller = (BikesController)
           ctx.getBean("bikesController");
        ModelAndView mav = controller.handleRequest(null, null);
        RentABike store = (RentABike) mav.getModel( ).get("rentaBike");
        assertNotNull(store);
        assertTrue(store.getBikes( ).size( ) == 3);
    }
}
You have to load up the configuration file in order to test that
Spring is loading the beans correctly. Spring provides the
FileSystemXmlApplicationContext class to load the
context configuration explicitly.
Next, we’ll want to test the validator to make sure it catches errors appropriately (Example 2-21).
public void testBikeValidator( ) throws Exception {
        BikeValidator v = (BikeValidator) ctx.getBean("bikeValidator");
        Bike bike = new Bike("test", "test", 1, "test", 2.00, "test");
        Errors errs = new BindException(bike, "bike");
        v.validate(bike, errs);
        assertFalse(errs.hasErrors( ));
        bike = new Bike( );
        errs = new BindException(bike, "bike");
        v.validate(bike, errs);
        assertTrue(errs.hasErrors( ));
    }
What just happened?
Instead of running the test case in the container, you simply fired the controller and tested the output. Since you didn’t have to test the full user interface in context, you had to do much less work to make the test case go, and you could get a basic level of testing behind you. In the next chapter, you’ll see how to integrate other user interface strategies into Spring.