
To get our bank site going, we need to start lettings customers open bank accounts. This is a feature only visible to customers.
- First, we need to update the main page, so when Alice the customer logs in, she has the option to open a bank account. We can do this by altering the
indexfunction inSpringBankViewto offer options driven by the user's credentials.@cherrypy.expose def index(self, message=""): results = """ <h1>Welcome to SpringBank!</h1> <p> %s <p> """ % message if "ROLE_CUSTOMER" in SCH.getContext().authentication.granted_auths: results += """ <h2>Customer Options</h2> <ul> <li><a href="openAccount">Open Account</a></li> </ul> """ results += """ <a href="logout">Logout</a href> """ return results @cherrypy.expose def openAccount(self, account="", desc=""): if account != "" and desc != "": self.controller.open_account(account, desc) raise cherrypy.HTTPRedirect("/?message=Account created successfully") return """ <form method="POST" action=""> <table> <tr> <td>Account Name</td> <td><input type="text" name="account"/><td> </tr> <tr> <td>Description</td> <td><input type="text" name="desc"/><td> </tr> </table> <input type="submit"/> </form> <a href="/">Cancel</a> """To make this work, we needed to alter one of our
importstatements:from springpython.security.context import SecurityContextHolder as SCH
Basically, the index function now checks the user's
granted_auths, and if they haveROLE_CUSTOMER, they are shown the customer options. The first option provided is a link that invokes theopenAccountfunction. As seen below, if Alice logs in, she now sees this extra option.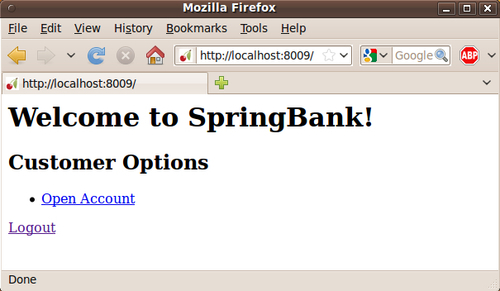
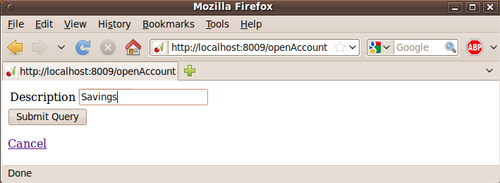
Clicking on the link takes the user to a page where they can fi ll out the details required to request a new account.
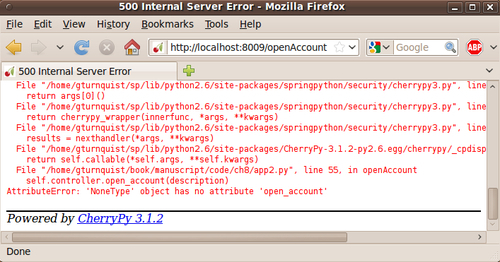
When the page is submitted, the information gets fed to the controller. There is one big problem with this piece of code: there is no controller! If you click the button, it will generate an error, indicating we need to fi ll in the supporting functionality.
- Now let's create a controller that will process requests such as opening new bank accounts.
class SpringBankController(object):
def __init__(self, factory):
self.factory = factory
self.dt = DatabaseTemplate(self.factory)
def open_account(self, account, desc):
self.dt.execute("""
INSERT INTO account
(account, description, balance)
VALUES
(?, ?, 0.0)""", (account, desc))
This controller has one business function:
open_account. It utilizes aDatabaseTemplateto manage this. As you can see, we have coded it to initialize new accounts with a balance of $0.00. It is also designed to depend on dependency injection to supply it the necessary connection factory. - Let's wire up the controller from our IoC configuration by injecting it with a connection factory.
@Object
def controller(self):
return SpringBankController(self.factory())
@Object
def view(self):
view = SpringBankView()
view.auth_provider = self.auth_provider()
view.filter = self.auth_processing_filter()
view.http_context_filter = self.httpSessionContextIntegrationFilter()
view.controller = self.controller()
return view
@Object
def factory(self):
factory = MySQLConnectionFactory()
factory.username = "springbank"
factory.password = "springbank"
factory.hostname = "localhost"
factory.db = "springbank"
return factory
Here we have the new
controllerobject as well as thefactoryobject, which allows ourcontrollerto access the database. We have slightly revised theviewobject so that it gets injected with a copy of thecontroller. - Adjust
SpringBankViewso that a controller can be injected.class SpringBankView(object): def __init__(self): self.filter = None self.auth_provider = None self.http_context_filter = None self.controller = None
Now our
SpringBankViewhas a handle on the controller, arming it to make database calls as needed. However, one piece is missing. We need to set up a database. - We can initialize a MySQL database with the following script.
DROP DATABASE IF EXISTS springbank;
CREATE DATABASE springbank;
GRANT ALL ON springbank.* TO springbank@localhost IDENTIFIED BY 'springbank';
USE springbank;
CREATE TABLE account (
id INT(4) UNSIGNED NOT NULL AUTO_INCREMENT PRIMARY KEY,
description VARCHAR(30),
balance DECIMAL(10,2)
);

If we run that using MySQL's root account, it should set up our account table.
- Now let's try to create that bank account.
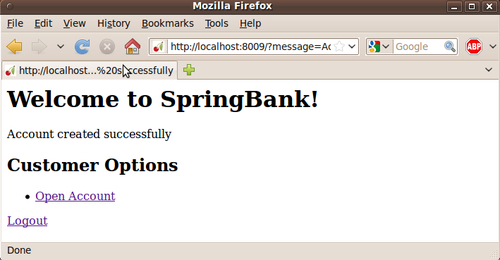
Success! If you look closely at the revised version of SpringBankView's index method, you will notice an optional message parameter. This lets us push through a status message while redirecting the user to the front page after completing any operation. In our situation, we have created a bank account with $0.00 balance.
We don't yet see existing bank accounts listed, but you can still examine the database from the command line to verify our operation worked.
