Chapter 6: Going to Production
Thanks to the work you've done in the previous chapters, our proof of concept journaling application is now code-complete. We were able to get it running on our laptops and generate production-ready bundles.
It's now time to actually deploy our application so that it can be accessed by others.
There are of course many, many ways to deploy apps, and your infrastructure can be as simple or as complex as you'd like. In this chapter, we'll explore a few options that are ideal for JAMstack applications such as ours (where JAM stands for JavaScript, APIs, and Markup), and we'll finally deploy our code using one of them.
In this chapter, we will cover the following topics:
- Learning about some of the ways Svelte apps (and JAMstack apps in general) can be deployed
- Deploying our application to an object storage service, Azure Storage, and enabling a Content Delivery Network (CDN)
- Setting up Continuous Integration and Continuous Delivery (CI/CD) with GitHub Actions
- Learning how to use the Azure portal to manage and destroy the resources we've created
This chapter requires a complete application, as with the one we built at the end of the last chapter. You can also find the complete code in this book's repository on GitHub (https://bit.ly/sveltebook) in the ch5-tests folder.
Options to deploy your Svelte apps
At the end of Chapter 5, Single-Page Applications with Svelte, our application was running locally on our laptops with the npm run dev command. Additionally, we were able to generate production-ready bundles with npm run build and start a local server from them. To make our application accessible to others, however, we need to deploy it to a cloud service.
Applications can be deployed to the cloud in a variety of ways. Cloud providers such as Microsoft Azure, Amazon Web Services (AWS), and Google Cloud offer a wide range of services that can be used to host applications, and you can architect very simple or very complex solutions depending on your needs.
The range of choice is especially large for JAMstack applications; because they are just static bundles, they can be served in dozens of ways.
As mentioned in the introduction to this book, one of the advantages of JAMstack applications is that they can be hosted by object storage services such as Azure Storage, AWS Simple Storage Service (S3), and Google Cloud Storage. When paired with a CDN, this architecture allows an efficient distribution of our frontend application to clients worldwide.
Static web apps can be cached very efficiently by the edge nodes of the CDN, so your app will be replicated worldwide and your users will access it from a location that is geographically close to them. As far as performance and availability go, this is as close to the gold standard as you can get. Additionally, a solution such as this is usually very inexpensive to operate.
We'll spend the rest of the chapter covering how to deploy your Svelte application to a solution based on object storage services, leveraging Microsoft Azure as the cloud platform.
Alternative services
In addition to our chosen solution, there are many other ways you can architect your infrastructure to deliver a JAMstack application. Some offer additional flexibility, such as the ability to offer the necessary back-end support for apps that leverage the HTML5 History API routing on the client side (as discussed in Chapter 5, Single-Page Applications with Svelte).
An incomplete list of alternative services includes the following:
- Serving the static files through a traditional web server running in a Virtual Machine (VM) or a container (also on platforms such as Kubernetes). For example, you could deploy an instance of nginx or another web server and set up a virtual host to serve your static files. The official documentation for nginx has extensive guidance on how to do this: https://docs.nginx.com/nginx/admin-guide/web-server/serving-static-content/.
With the proper configuration, you could also enable support for synthetic routes and enable usage of the HTML5 History API.
This solution allows the greatest flexibility. You could deploy your app on a VM or container running on an infrastructure you're already operating, alongside back-end services. You can also control every aspect of the application and infrastructure, including redirects, networking, firewalls, and so on.
The downsides include the overhead of creating and maintaining VMs and/or containers. Depending on your availability needs, you might also need to maintain replicas of your application, keep them synchronized, and set up load balancers.
- To reduce some management overhead while still maintaining at least a degree of control, you can look into Platform-as-a-Service (PaaS) solutions. These are services in which a cloud provider manages the underlying infrastructure and VMs for you, and you can deploy your applications on top of that. They are not specific to JAMstack applications, and they support a variety of back-end stacks too.
There is a really wide range of options in this category, including platforms that allow you to run Docker containers (so that you can package your static web app together with a web server such as nginx and create a Docker container image), such as Azure Kubernetes Service (AKS), Azure Container Instances, and Azure Web App for Containers; Amazon Elastic Container Service (ECS), Amazon Elastic Kubernetes Service (EKS), and AWS Fargate; Google Cloud's Google Kubernetes Engine (GKE), and Google Cloud's Google App Engine flexible environment.
Other cloud providers offer similar services, either for individual containers or on a container orchestration platform such as Kubernetes. You still maintain a high level of control but are also required to maintain and "patch" your web server and base operating system inside the Docker container image.
Cloud providers also offer application platforms that support multiple stacks, including—of course—static web apps. Examples include Azure Web Apps, AWS Elastic Beanstalk, and Google App Engine. Services such as Heroku can be placed in this category as well. They offer less control over your app and infrastructure but they maintain the web server for you, so you don't need to patch anything.
- Lastly, in the last few years and months, a number of services have emerged that are specifically designed for JAMstack application hosting. The best examples in this category are Netlify and Azure Static Web Apps.
These are developer-centric services that allow only static web applications to be hosted and offer features that are specifically optimized for them, including redirects (needed for supporting client-side routing with the HTML5 History API). They differentiate themselves by offering integration with serverless platforms for adding server-side code, and they offer a built-in CI/CD platform.
GitHub Pages can be put in this category too, although it's currently more limited in its capabilities. As long as your app's source code is on a public repository, however, this is available for free.
Deploying to object storage
In this section, we'll be deploying our Svelte application to an object storage service. We'll be using Microsoft Azure—and, specifically, Azure Storage—for hosting the application, and Azure CDN for serving it globally.
The architecture looks like this:
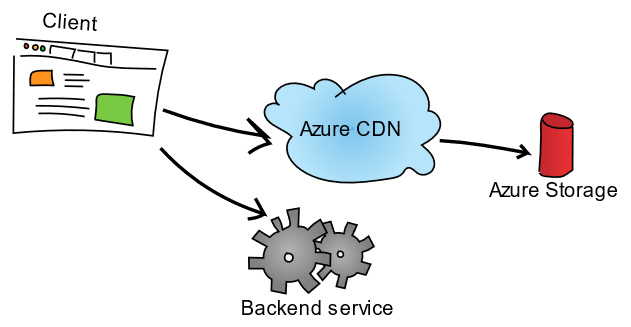
Figure 6.1 – Architecture diagram for the application
Creating an Azure account
If you don't have one already, you need to create an Azure account at https://azure.com/free.
You can create an Azure account by signing in using a Microsoft account (formerly known as a Windows Live ID) or a GitHub account.
Creating an account is free and should take just a few minutes. You will also be enrolled in a trial period with a certain amount of free credits that you can use within the first month. Additionally, for the first year, you can enjoy certain services for free: as of the time of writing, this includes 5 GB of storage in Azure Storage and 15 GB of bandwidth per month, which you'll be able to take advantage of.
Even after the free trial is over, your total Azure bill for hosting the solution should be really small.
Azure Storage costs depend on the amount of data you are storing, and it's billed at a few cents per GB per month. Static web apps per se are very small, normally in the order of a few KBs or MBs, but your storage needs might increase if you're serving a lot of large files, including videos or attachments.
As for the bandwidth, that depends on the amount of traffic your app gets and whether you're serving large files to users. On Azure, you pay for egress traffic only (that is, from Azure to your users, not the other way around), and it's billed at a few cents per GB used.
If you'd like to estimate your Azure costs, you can do so with the Azure pricing calculator, found at https://azure.com/calculator.
Authenticating with the Azure CLI
After you've created your account, you can manage your Azure resources in a variety of ways, including using the Azure portal and command-line tools. In this chapter, we'll primarily use command-line tools.
The Azure CLI works on Windows, macOS, and Linux. You can find installation instructions here: https://aka.ms/installcli.
After you've installed the Azure CLI, you can authenticate yourself by running the following command:
az login
This will automatically open your web browser pointing to the authentication page, where you can sign in with your Azure account.
Using Azure Cloud Shell
An alternative to installing the Azure CLI is to leverage Azure Cloud Shell, which offers access to the CLI within the web browser.
Azure Cloud Shell is available at https://shell.azure.com/. Sign in with your Azure account, then launch a Bash shell, as illustrated in the following screenshot:

Fig 6.2 – Azure Cloud Shell
Using Azure Cloud Shell, you don't need to run the az login command to authenticate yourself again.
Using Cloud Shell in Visual Studio Code
Azure Cloud Shell is also available within Visual studio Code. After installing the "Azure Account" extension (https://aka.ms/vscode-azure-account), open the command palette (Ctrl + Shift + P; on macOS: Command + Shift + P) and type > Azure: Open Bash in Cloud Shell.
Creating the storage account
Now that we're ready to use Azure, we need to create the first of the two resources: an Azure storage account.
Azure Blob Storage is an object storage service where we can store files of every kind, either private or publicly accessible.
To start, we need to create a resource group, which is just a logical grouping unit for Azure resources. In the following code snippet, you might need to tweak the parameters in bold:
az group create --name Svelte-App --location eastus2
The --name parameter is the name of the resource group, and you can choose any name you'd like. The --location option is the name of the Azure region you want to use (you can find a full list with az account list-locations). Because our app will be served through a CDN, the choice of region to use is relatively less relevant. In fact, after the first user in each geographic location has requested your app, all other requests are cached by the CDN edge nodes.
Next, let's create an Azure storage account (again, parameters that you might need to tweak are in bold), as follows:
az storage account create
--name sveltejournal
--resource-group Svelte-App
--location eastus2
--sku Standard_LRS
--kind StorageV2
The important options here are the following ones:
- --name is the name of the storage account. This has to be globally unique, so you'll need to choose a name that's unique to your app and deployment.
- --resource-group is the name of the resource group we created earlier.
- --location is again the name of the Azure region you want to use.
Lastly, we need to enable static website hosting, as follows:
az storage blob service-properties update
--static-website
--account-name sveltejournal
--404-document 404.html
--index-document index.html
--account-name is the name of the storage account that you created. The last two options are for defining the name of the files to show in case of a 404 error (page not found) and an index file (note that the app we created did not have a page for 404 errors).
Uploading files to your Azure storage account
Now that the storage account is created and configured, we can upload our app into a special storage container called $web, which was created automatically by the previous command.
There are multiple ways to upload files to a container inside Azure Storage.
If you're using the Azure CLI in your local machine, go to the folder where you have your Svelte app, and then run the following command. Make sure that you've bundled your app for production first, with npm run build! Once again, parameters that need to be tweaked are in bold in the following code snippet:
az storage blob upload-batch
--source public
--account-name sveltejournal
--destination '$web'
The arguments are listed as follows:
- --source is the path to the file or directory to upload; in this case, we're telling the CLI to upload all files in the public directory, which contains our compiled app.
- --account-name is the name of the storage account.
- --destination is the name of the container, which has to be $web for static web apps (don't forget to add single quotes around it so that the shell won't try to expand that as a variable).
There are other methods to upload or manage files inside Azure Storage. Here are a few popular options:
- Azure Storage Explorer, a cross-platform graphical application: https://azure.microsoft.com/features/storage-explorer/
- AzCopy CLI utility: https://aka.ms/azcopy
- Azure Storage extension for Visual Studio Code: https://aka.ms/vscode-azure-storage
Browsing the app from Azure Storage
In order to view a static website hosted in Azure Storage, we need to first retrieve its URL using this command:
az storage account show
--name sveltejournal
--resource-group Svelte-App
--query "primaryEndpoints.web" --output tsv
By now, you should be familiar with the --name and --resource-group parameters. The other parameters ask the command to print just the endpoint for the website.
The result will be something similar to this:
https://sveltejournal.z20.web.core.windows.net/
Here, sveltejournal is the name of your storage account, and z20 is an internal identifier: both will be different in your case. The URL always ends in web.core.windows.net.
This URL isn't pretty. While it is possible to map a custom domain to a static web app in Azure Storage, it has some limitations (most importantly, no support for HTTPS). Because we'll be setting up a CDN in front of our app, we will map the custom domain to the CDN instead.
Adding the CDN
Adding the CDN via Azure CDN requires the following two commands to be run:
az cdn profile create
--location eastus2
--name Svelte-App-CDN
--resource-group Svelte-App
--sku Standard_Microsoft
az cdn endpoint create
--profile-name Svelte-App-CDN
--resource-group Svelte-App
--name sveltejournalcdn
--origin sveltejournal.z20.web.core.windows.net
--origin-host-header sveltejournal.z20.web.core.windows.net
--enable-compression
As before, the parameters that need to be tweaked are in bold. They are the following:
- The location of the profile (--location in the first command): The CDN is global, but its metadata and configuration must be placed in a specific Azure region.
- The name of the profile (--name in the first command and --profile-name in the second) is a friendly name for our CDN profile.
- The resource group we created earlier (--resource-group).
- The name of the CDN endpoint (--name in the second command); this has to be globally unique, so choose one for your app and deployment.
- Lastly, we need to set the URL of the static web app in Azure Storage (sveltejournal.z20.web.core.windows.net in the example) for both the --origin and --origin-host-header flags in the second command.
If everything goes well, your CDN profile and endpoints will be created. Wait a few minutes, then you should be able to see your app running at the following address:
https://sveltejournalcdn.azureedge.net/
Here, sveltejournalcdn is the name of the CDN endpoint (the --name flag for the second command shown previously).
Mapping a custom domain
Most likely, you'll want to map a custom domain to your CDN endpoint so that your users can visit a URL such as www.example.com. Azure CDN supports custom domains and generates TLS certificates for them as well. This is a two-step process.
Mapping the DNS records
The first step is to update your Domain Name System (DNS) zone to create a CNAME record that points to your CDN endpoint.
The exact steps required to perform this operation depend on your domain registrar and/or your DNS service provider. We won't be able to provide instructions for all of them, so I recommend that you consult your provider's documentation for how to do this.
Generally speaking, you will map a sub-domain (such as journal.italypaleale.me) by creating a CNAME record for it that points to your CDN endpoint's hostname. In the preceding example, this is sveltejournalcdn.azureedge.net. You can choose any Time-To-Live (TTL) you want for your CNAME record, depending on your needs.
For example, when using Azure DNS as a DNS service, you could create the following record:
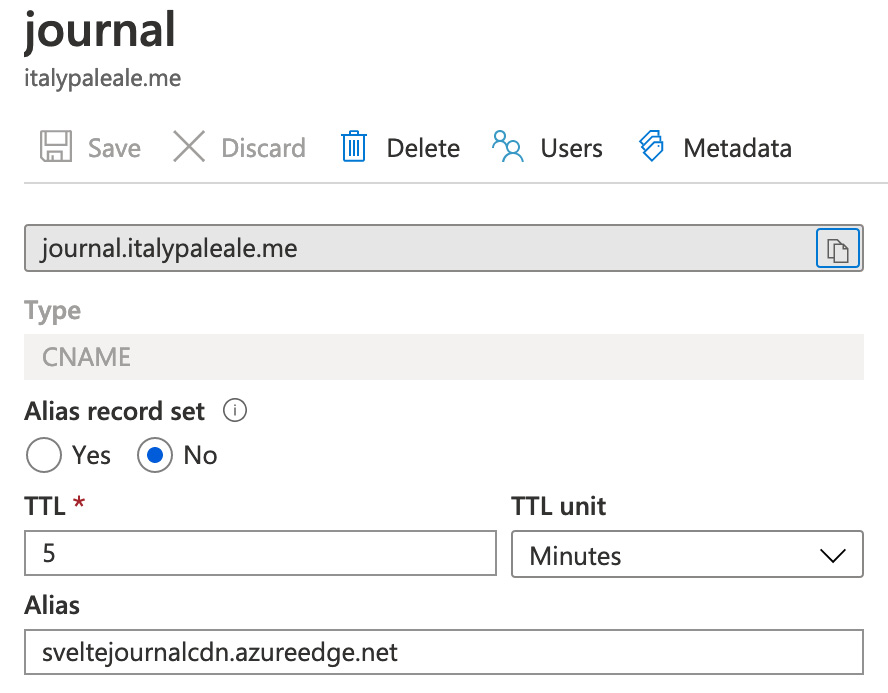
Fig 6.3 – Example of creating a CNAME record for "journal.italypaleale.me" in Azure DNS
CNAME records and root domains
Per the DNS specifications, CNAME records can only be set on sub-domains. That is, while you can set a CNAME record on www.example.com and journal.example.com, you cannot set it on example.com (also called the "root domain").
If you want your CDN endpoint to be reachable on a root domain (and, by extension, your Svelte app), you need to use a DNS provider that supports "CNAME flattening,", sometimes called "ALIAS records." This is an advanced feature that is not available in all DNS providers.
If your DNS provider does not support that, you can consider switching to another service that does, such as Azure DNS: https://docs.microsoft.com/en-us/azure/dns/dns-alias.
Adding the domain to the CDN endpoint
The second—and last—step requires the configuration of your Azure CDN endpoint to accept your custom domain. This is done with the following two commands, to add the custom domain and enable HTTPS on it:
az cdn custom-domain create
--hostname journal.italypaleale.me
--endpoint-name sveltejournalcdn
--profile-name Svelte-App-CDN
--resource-group Svelte-App
--name sveltejournalcdn
az cdn custom-domain enable-https
--endpoint-name sveltejournalcdn
--profile-name Svelte-App-CDN
--resource-group Svelte-App
--name sveltejournalcdn
Most parameters are familiar. Pay attention to the name of the custom domain to add, which is the value for the --hostname flag in the first command and the value for --name in the second command.
Adding the custom domain and enabling HTTPS will take a few minutes. After this is done, you will be able to see the Svelte app running at your custom domain, as illustrated in the following screenshot:
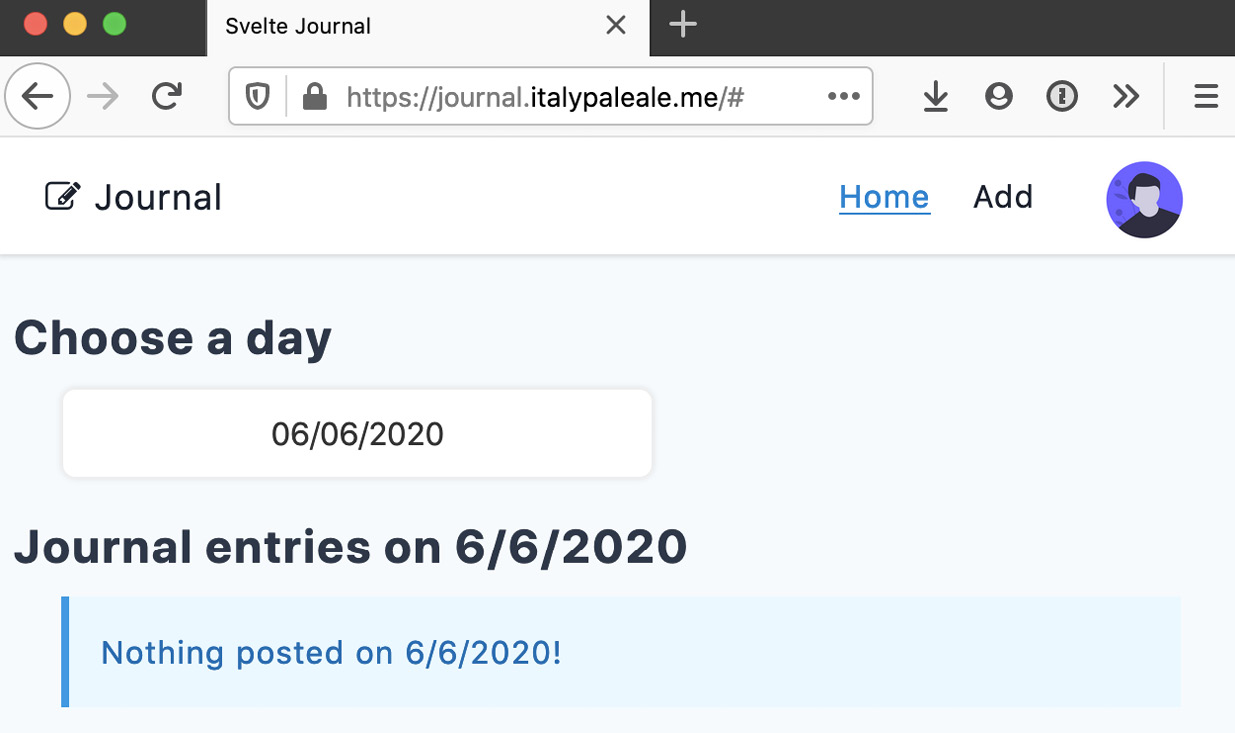
Fig 6.4 – Our app running on a CDN with a custom domain
The back-end service
If you tried navigating to your web app after one of the last steps (after it was deployed to Azure Storage, or after creating the CDN endpoint, or after adding the custom domain), you would have instantly been redirected to your back-end service to authenticate, running on your laptop. If the app wasn't running on your laptop, you would have seen an Unable to connect or Can't reach this page error in your browser (if a friend of yours tried it on their laptop, they'd have received the same error).
This is happening because, despite our app being deployed to the cloud, it's still configured to connect to the back-end API server on localhost.
I waited so long in this chapter to write about the back-end service precisely so that you could experience this: it is an excellent demonstration of a behavior that is unique to JAMstack apps. In traditional client-server applications, the web application frontend retrieves data stored in the web server; with a JAMstack app, the client can fetch data from any routable address.
Taking another look at Figure 6.1, depicting the architecture of the solution; you can see that the client is the one making connections to the back-end service. When the API service is running on your laptop and listening on localhost:4343, then your browser (and your web app) can request data from it. The back-end could be anywhere, and as long as your browser has a route to it, then you can fetch data from it.
Deploying the back-end service to the cloud
If you do want to make the back-end service public, you will need to deploy it somewhere.
A discussion on the different options to deploy a server-side application written in Go is outside of the scope of this book. If you want something quick, you can deploy it to Azure Web App for Containers. This is a platform service for running applications that are pre-packaged in Docker containers.
You can spin up the back-end app using the following commands, and then wait a few minutes for the deployment to complete:
az appservice plan create
--name Svelte-Backend-AppServicePlan
--resource-group Svelte-App
--is-linux
--location eastus2
--sku B1
az webapp create
--name sveltejournalbackend
--resource-group Svelte-App
--plan Svelte-Backend-AppServicePlan
--deployment-container-image-name italypaleale/sveltebook
The preceding two commands create an App Service plan (a sort of managed web server) with the SKU "Basic 1" (the smallest one), and then create an application on top of that from the italypaleale/sveltebook container image from Docker Hub (the same one I recommended in Chapter 2, Scaffolding Your Svelte Project, as an option to run the app locally).
After the deployment is done, you can reach your app at the following address:
https://sveltejournalbackend.azurewebsites.net
Here, sveltejournalbackend is the value of the app's name: the --name flag in the preceding second command, which once again needs to be globally unique.
Important security notice
As mentioned in Chapter 2, Scaffolding Your Svelte Project, the API back-end service that we wrote was designed to be used as a companion for the development of our PoC app, but it should not be used for real, production solutions as is. To start, it neither offers the ability to register users nor to change the password for the default svelte user. By deploying the back-end to the cloud at a publicly accessible endpoint, you are open to abuse from people reading what you wrote and even writing their own content. Use this for testing only, and remember to shut it down at the end! (See the last section of this chapter for how to do this.)
Changing the configuration of the frontend
As mentioned, the frontend application is configured to communicate with a back-end application running on http://localhost:4343.
To point it to the app we deployed on Azure Web Apps, we need to change the content of the .env file we created in Chapter 3, Building Reactive Svelte Components, replacing all instances of http://localhost:4343 with the endpoint of our back-end running in the cloud. For example, see the following file, with changes in bold (remember to also set a custom Universally Unique Identifier (UUID) for AUTH_CLIENT_ID, as we did in Chapter 3, Building Reactive Svelte Components):
.env
AUTH_CLIENT_ID=00000000-0000-0000-0000-000000000000
API_URL=https://sveltejournalbackend.azurewebsites.net
AUTH_JWKS_URL=https://sveltejournalbackend.azurewebsites.net/jwks
AUTH_URL=https://sveltejournalbackend.azurewebsites.net/ authorize?client_id={clientId}&response_type=id_ token&redirect_uri={appUrl}&scope=openid%20 profile&nonce={nonce}&response_mode=fragment
AUTH_ISSUER=http://svelte-poc-server
KEY_STORAGE_PREFIX=svelte-demo
After making the preceding change, rebuild the static web app with npm run build, and then re-deploy it to Azure Storage, as you did earlier in the chapter, with the az storage blob upload-batch command or using apps like Azure Storage Explorer.
If you access your app through the CDN, you might need to purge the CDN's cache too, with this command (this can take up to 10 minutes):
az cdn endpoint purge
--profile-name Svelte-App-CDN
--resource-group Svelte-App
--name sveltejournalcdn
--content-paths '/*'
At this stage, our application is deployed to a cloud service and is running, and it's available to anyone in the world. This is a very important milestone already, and we could safely stop our work here.
For those who decide to follow along for the next bit, we will look at how to use DevOps practices such as CI/CD to automate the deployment steps, giving us more deployment agility and reducing the risk of errors by using automation.
Continuous Integration/Continuous Delivery
CI/CD are two very important aspects of DevOps. They consist of automatically building and running tests when a code change is committed to source control, and then automatically deploying the application (often to test environments before going into production).
We can enable full CI/CD for our Svelte application too, using a platform that runs our tests and automatically deploys to Azure Storage every time we make a code change.
We will use GitHub Actions as our CI/CD platform. This is built into the GitHub platform, and it's free for public repositories.
Putting our app's code on GitHub
We've reached this point without ever putting our app's code into any source control. Before we can run any CI/CD jobs, our app's code needs to be added to a Git repository and pushed to GitHub.
Installing Git
If you don't have Git installed already, follow these instructions, depending on your operating system:
- Windows: Download Git from the official website and install it: https://git-scm.com/download (if you're using the Windows Subsystem for Linux (WSL), follow the Linux instructions that follow).
- macOS: Git may already be preinstalled—for example, if you've installed Xcode or the Xcode Tools. If you don't have it, you can either download the official binary from https://git-scm.com/download or install it from Homebrew with brew install git.
- Linux: Git comes preinstalled in many Linux distributions. If it's not already installed in your system, you can fetch it from your distribution's repositories, with commands shown here: https://git-scm.com/download/linux.
After that, you need to set up Git by setting your username (your real name or a nickname) and an email address, as follows:
git config --global user.name "Your name here"
git config --global user.email "[email protected]"
Initializing a Git repository
The first step is to initialize a Git repository in your project's folder.
Using the terminal, run the following command:
git init
If you're using Visual Studio Code, you can also initialize the Git repository by opening the command palette (Ctrl + Shift + P, or Command + Shift + P on macOS) and typing > Git: Initialize repository.
Before we make our first commit, we need to create a .gitignore file (note the dot at the beginning) to exclude certain files from being committed into the repository. It's standard practice not to commit the node_modules folder (where NPM puts all installed modules), the compiled files (all files in the public folder except index.html), or any other documents used for debug or development.
You can find a .gitignore file in this book's GitHub repository (https://bit.ly/sveltebook-ch6) in the ch6 folder. Copy it into your project's folder using the same name.
After that, we can make a commit importing all the existing code. Using the command line, run the following code:
git add "*" ".*"
git commit -m "First import"
Here, "First import" is the commit message, and it can be anything you'd like.
Using Visual Studio Code, you can do that from the SOURCE CONTROL tab (the third one from the top). First, click on the + next to CHANGES to stage all changes (hover your mouse over that row to make the button appear). This is illustrated in the following screenshot:

Fig 6.5 – The SOURCE CONTROL tab in Visual Studio Code
Write a commit message (for example, First import), then click on the checkmark above the message box to create the commit.
Pushing the code to GitHub
Next, we need to publish our repository on GitHub.
To start, you'll need a GitHub account if you don't have one already. You can get one for free at https://github.com/.
After signing in, create a new repository. In the top-right corner, you can click on the + symbol and then select New repository, as illustrated in the following screenshot:

Fig 6.6 – The New repository link to create a new repository on GitHub
Give your repository a name, add an optional description, then leave all other options as default and click on Create repository, as follows:

Fig 6.7 – Creating a new repository
The page that appears after you've created your repository already gives you the commands to run for the next step in the section titled …or push an existing repository from the command line. When choosing to use SSH, they look similar to these (the text in bold will be different for you):
git remote add origin [email protected]:ItalyPaleAle/svelte- journal.git
git push -u origin master
If this is your first time pushing to GitHub, you'll have to authenticate yourself. There are two ways to do that, as follows:
- Using SSH: You will first need to set up a SSH key, as per this documentation: https://bit.ly/github-auth-ssh.
- Using HTTPS and a Personal Access Token (PAT): Instructions to set this up are here: https://bit.ly/github-auth-https. (Note that you won't be able to use your GitHub account password; you need to use a PAT instead.)
After this is done, your code will be pushed to the GitHub repository, as illustrated in the following screenshot:

Fig 6.8 – Code pushed to GitHub
Creating a GitHub action to deploy the app
Lastly, we need to enable CI/CD by creating an action that automatically builds and deploys the app to Azure Storage on every commit to the master branch.
As mentioned, Actions is a CI/CD (and repository automation) platform that's built into GitHub itself, and it's free for public repositories (such as open source projects). Actions are defined using YAML files inside the .github/workflows folder (note the dot at the beginning of the folder's name).
Getting a service principal to authenticate with Azure
Our CI/CD pipeline will connect to our Azure environment to deploy the application in the Azure Storage account and to automatically purge the CDN. For the pipeline to do that, it needs to be authenticated.
In the Azure world, automation tools authenticate with an Azure subscription using a service principal. You can generate one with this command (no need to change anything in it):
az ad sp create-for-rbac
--name "Svelte-GitHub-Action"
--role Contributor
--sdk-auth
This will output a JSON document similar to this (output was truncated for clarity):
{
"clientId": "…",
"clientSecret": "…",
"subscriptionId": "…",
"tenantId": "…",
"activeDirectoryEndpointUrl": "https://login.microsoftonline. com",
"resourceManagerEndpointUrl": "https://management.azure. com/",
…
}
Copy the entire JSON fragment, which we'll use in a moment. Note that it contains tokens that can be used to create and manage every single Azure resource in your subscription, so treat this like a password!
Setting up the secret in GitHub
After copying the preceding JSON fragment, go to the Settings page of your GitHub repository and select the Secrets tab.
Create a new secret named AZURE_CREDENTIALS and paste the JSON document as the value, then save the changes, as illustrated in the following screenshot:

Fig 6.9 – Adding the AZURE_CREDENTIALS secret
Creating the action YAML workflow
Lastly, we are ready to build our Action. This will build, test (running the tests defined in Chapter 5, Single-Page Applications with Svelte), and deploy our application. Additionally, it will automatically trigger a purge of the CDN cache.
We need to create a file called .github/workflows/build-and-deploy.yaml. This is a fairly long document, so copy and paste it from this book's GitHub repository (from the ch6 folder) into your own project, at the same path.
There are a few values that need to be set at the beginning of this file:
.github/workflows/build-and-deploy.yaml (fragment)
env:
RESOURCE_GROUP: 'Svelte-App'
STORAGE_ACCOUNT_NAME: 'sveltejournal'
CDN_PROFILE_NAME: 'Svelte-App-CDN'
CDN_ENDPOINT: 'sveltejournalcdn'
At the beginning of the file, we are defining a few environmental variables for our action, which you'll need to update based on the names of your Azure resources. The preceding values reflect the ones used in this chapter's samples. The environmental variables are listed as follows:
- RESOURCE_GROUP is the name of the resource group that contains our Azure CDN.
- STORAGE_ACCOUNT_NAME is the name of the Azure Storage account containing our app.
- CDN_PROFILE_NAME is the name of the Azure CDN profile.
- CDN_ENDPOINT is the name of the Azure CDN endpoint.
The rest of the file contains the various tasks that the pipeline needs to run, which you can read from in the document directly.
Working with GitHub Actions
The full documentation on creating GitHub actions is available here: https://help.github.com/en/actions.
After you have created the file, commit it (with git add .github/* && git commit -m"Adding Action" or by using the SOURCE CONTROL tools in Visual Studio Code), then push the changes to GitHub (git push or the equivalent command in Visual Studio Code).
As soon as the file is added to GitHub, the action will be triggered automatically, and it will run again on every commit on the master branch, re-building, re-testing, and re-deploying your application, automatically!
Tests failing because of chromedriver
If your action fails because tests fail, first check to make sure that the version of the chromedriver dependency in the package.json file is updated. Refer to the test setup in Chapter 5, Single-Page Applications with Svelte, for details.
If you don't plan to use tests, you can remove the test script from the package.json file.
Making a code change
Now that we've set up CI/CD, we can test that by making a code change to get the app automatically updated.
For example, we could try changing the title shown in the navbar. In the src/components/Navbar.svelte file, change this line:
src/components/Navbar.svelte (fragment: before)
<i class="fa fa-pencil-square-o" aria-hidden="true"></i> Journal
The preceding line should be changed to this:
src/components/Navbar.svelte (fragment: after)
<span class="text-blue-800"><i class="fa fa-smile-o" aria-hidden="true"></i> My happy journal</span>
Commit the code change and push it to GitHub.
In the Actions tab for your GitHub repository, you will see the pipeline being triggered immediately and you can follow its progress, as in the next screenshot:

Fig 6.10 – The action ran successfully
After the pipeline is completed successfully, wait a few minutes for the CDN to finish purging (can take up to 10 minutes). Then, refresh your app to see the new header, as shown in the following screenshot:
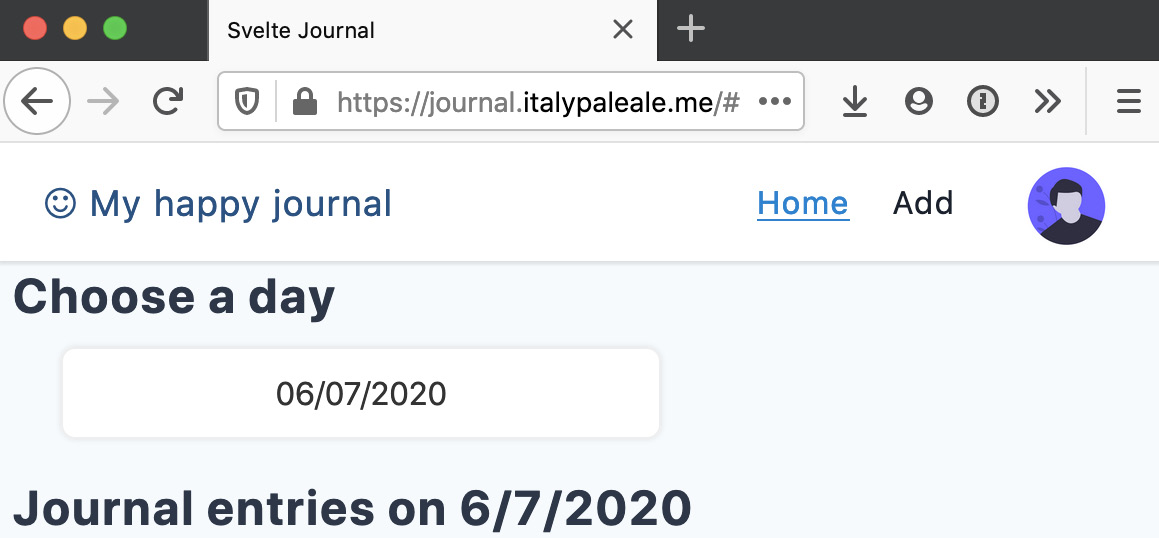
Fig 6.11 – The app's header was updated by the pipeline
Managing and destroying your resources
As a very last step, we should look at how to manage (and destroy) all the Azure resources we've created.
You can access the Azure portal at https://portal.azure.com, then sign in with your account.
From the sidebar on the left, choose Resource groups to list all of the resources, including the one we've created earlier, as shown below:

Fig 6.12 – The Resource groups view in the Azure portal
Clicking on the Svelte-App resource group (or whatever you've named it) will show all the resources, like in this screenshot:
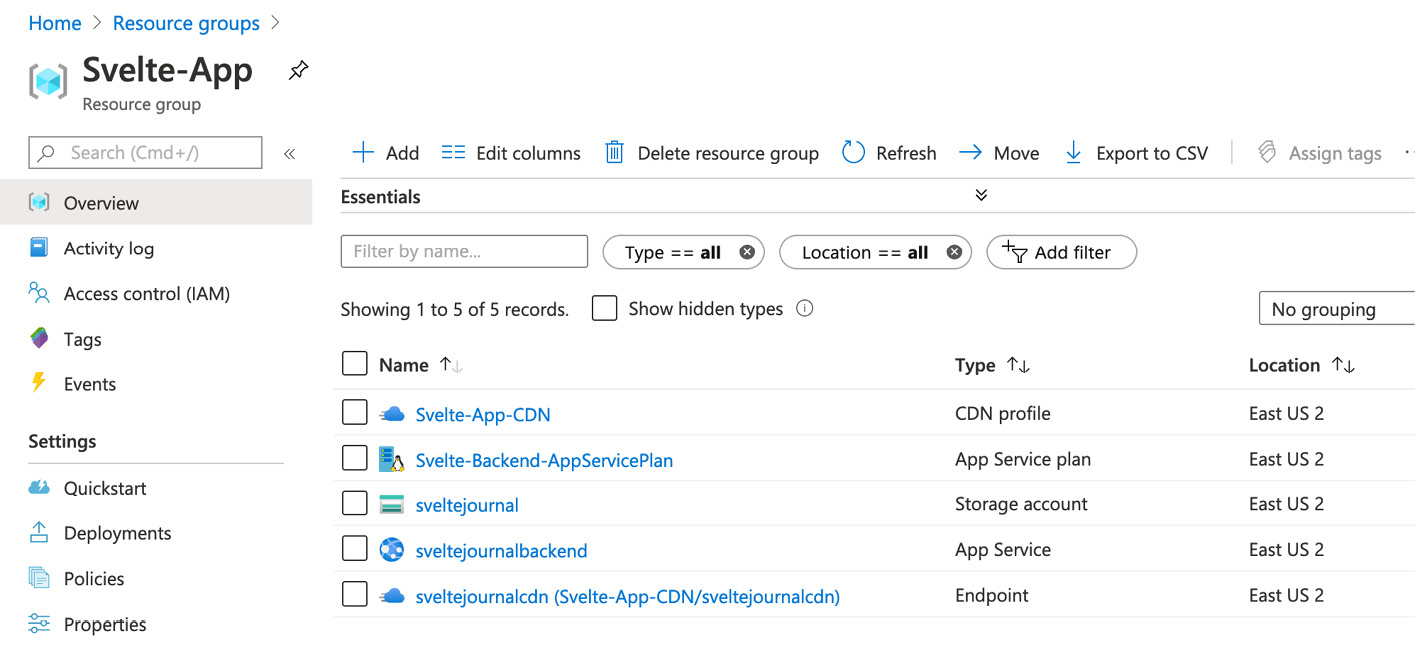
Fig 6.13 – View resources in the resource group
From there, you can manage all the resources we've created, including the storage account, the CDN, and the web app.
Additionally, you can shut down all your resources by pressing on the Delete resource group button at the top of the list. This will ensure that you won't be billed for unused resources anymore.
Summary
In this chapter, we've taken our application and brought it to production, deploying it to the cloud so that others can access it.
After exploring a variety of options to deploy JAMstack apps, we've learned how to use Azure Storage (an object storage service part of Microsoft Azure) for hosting and serving our app, and we've put a CDN in front of it to make our app load faster for all users worldwide.
We've also gone one step further and enabled CI/CD for our Svelte application, using GitHub and GitHub Actions. Now, our app is automatically built, tested, and deployed every time we make a code change.
This chapter concludes our work on building a PoC application with Svelte 3. In the next short chapter, we'll look at a list of resources for you to continue learning.