
Build Your Photo Library
Photographers tend to focus on the visual, letting more mundane details like organization and storage (and sometimes even paying bills or remembering to eat) drift to the periphery. We want to edit and share our photos, not manage them.
One of the main appeals of a tool like Lightroom CC is the capability to keep all of your photos in a single location—rather than in multiple folders and apps scattered across a hard drive–so you’ll always know where to find them. And since Lightroom CC synchronizes everything with Creative Cloud, your library is the same on all of your devices that run a version of Lightroom.
Import Photos
The first step is to add photos to your library. (Lightroom CC also imports video clips, but they can only be viewed, not edited. The steps for importing video are the same as photos.)
To import new files:
- Click the Add Photos
 button on the left side of the screen. If you have more than one source connected to the computer, such as a camera or memory card, choose one from the Connected Devices list (Figure 1).

Figure 1: Add photos from the hard disk or connected devices. In this case, “Untitled” is a memory card. When no other devices or cards are attached, clicking the Add Photos button brings up the standard Open dialog. Navigate to the folder on your hard disk that contains your photos and click Review for Import.
- When the Review for Import window appears, all of the photos are selected by default (Figure 2). To choose just a subset of them, disable the Select All checkbox and click the thumbnail’s selection button (which adds a check mark) for the ones you want to import.

Figure 2: Choose which photos to import. - You can optionally assign the incoming photos to an album. From the Add to Album menu at the top of the window, select a target album. Or, choose New and type a name to create a new album.
- Click the Add Number Photos button to begin copying the image files to your disk. When that’s complete, the imported photos appear in the main grid. At this point, you see only the new images, not your entire library. See Organize Your Photos for more on working with your library.
If you’re wondering just where on your hard disk the image files end up, jump ahead to Manage Storage on Disk.
Getting a Jump on Keywords
You’re eager to start reviewing and editing your just-imported photos, I know. But let me suggest a short pause—a couple of minutes, max—that will pay off later. Add keywords to your images right after they’re imported.
In my book Take Control of Your Digital Photos, I advocate assigning keywords and other metadata in the Lightroom Classic Import window and to get that out of the way up front. But those features aren’t in Lightroom CC. So the next best thing is to do it immediately after your photos have been imported, when they’re hanging out in the Recently Added screen.
You’ll learn more in Rate and Tag Your Photos, but here’s the condensed version:
- As soon as the import has finished, choose Edit > Select All, or press Command-A (Mac) or Control-A (Windows).
- View the Keywords panel: click the Keywords
 button, choose View > Keywords, or press K.
 - Type any terms that apply to the entire selection into the Keywords field. You can enter them individually by pressing Return/Enter after each one, or add a bunch by separating them with commas. The keywords are applied to all of the selected images.
With that out of the way, you can jump to organizing and editing your new images.
Working with Raw+JPEG Photos
Many cameras offer a Raw+JPEG shooting mode, which creates two images for each exposure: the raw file that contains the most data, and a JPEG file that has the camera’s default edits already applied. Years ago, I got into the habit of shooting Raw+JPEG because, at the time, iOS apps didn’t recognize raw files; if I wanted to edit an image on my iPad, I needed to create a high-resolution JPEG that offered more editing flexibility than the default JPEG the camera creates for viewing on its LCD. While that’s no longer a problem, I still sometimes use this mode, because my current camera (a Fujifilm X-T1) transfers only JPEG images via its built-in Wi-Fi radio to my phone or tablet.
However, Lightroom CC, in its current form, does not handle Raw+JPEG photos intelligently.
In most photo software, the two images are viewed as a single shot, or you’re given an option to import one or the other. But Lightroom CC sees the pairs as individual photos, which means importing a memory card’s worth of images creates visual duplicates of every picture. Not only does that occupy more disk space, but it also requires more bandwidth to transfer the files to Creative Cloud. Unfortunately, the Import window doesn’t reveal which thumbnail belongs to which version; you have to move the mouse pointer over one and wait for a tooltip to appear that identifies the filename.
Once I have the files in Lightroom CC, I don’t need the JPEG versions, since the raw versions give me more latitude when editing. So, my workaround is to do this:
- Before importing, click the Sync
 button and then click Pause Syncing.
 - Import all the photos, including the duplicates, as described earlier.
- In the Search field, type
JPGto view all images that end with that filename extension. - Select all the files that appear, and choose Edit > Delete Number Photos.
- In the warning dialog that appears, click Delete Number Photos.
- With the JPEGs gone, click the Sync button again and then click Resume Syncing.
Now, only the raw files are uploaded to Creative Cloud and shared with your other devices.
Automatically Add Mobile Photos
Most photographers these days use two cameras: a “traditional” digital camera, such as a DSLR or mirrorless model, plus the camera built into a smartphone or tablet. With the Lightroom CC mobile app installed on your iOS or Android device, you can automatically have your mobile photos added to your library:
- At the main Lightroom Mobile screen, tap the Lr icon to view the app’s settings.
- Tap General.
- Enable the Auto Add Photos option (Figure 3). Optionally, enable Auto Add Videos.
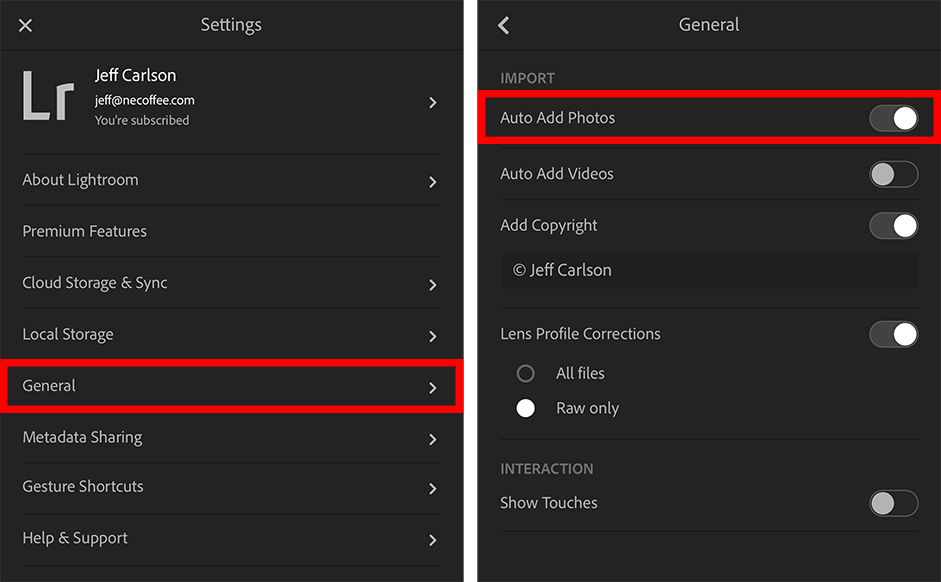
Figure 3: Set Lightroom Mobile to automatically import images from the device’s built-in photo storage. - Exit Settings.
Any subsequent photos you capture using the device’s camera app are automatically added to your library. It doesn’t retroactively add earlier photos, however—those you need to add manually by importing them from the camera’s photo storage. Photos you take using Lightroom’s camera feature are, of course, added to the library.
Sync Photos
As soon as you start importing photos, Lightroom CC begins uploading them to Creative Cloud (provided you’re connected to the Internet, of course). You don’t need to take any extra steps, or choose which albums to sync, or anything like that. It just happens in the background, as long as Lightroom CC is running.
That doesn’t mean syncing is entirely hands-off, though. It’s good to know how it works and what your options are.
How Sync Works
Looking at Lightroom sync from a top-level view, the process is fairly simple: your photos are imported into Lightroom CC on a computer and then uploaded to Creative Cloud, where they’re made available to your other devices.
Okay, it’s not that simple, but it is close. The sticking point, which becomes an issue in just a small number of cases, concerns which type of files are uploaded—the originals or Smart Previews, files saved as a DNG (digital negative) that are compressed at a lower resolution so they occupy less storage and transfer quickly.
Figure 4 illustrates how the sync process works.

In this example, photos are imported from the camera or memory card into Lightroom CC. From there, the original image files (JPEG or raw files) are uploaded to Creative Cloud.
When you open Lightroom on a mobile device, it pulls down Smart Previews of the images. Editing a Smart Preview is just like editing the original file; on a phone or tablet, in fact, you usually can’t tell the difference. The actual adjustments made in any copy of Lightroom are sent to Creative Cloud as small text instructions—the equivalent of, “Set Exposure to +1.5 and Contrast to +0.9”—and distributed to the other devices.
When Working with Smart Previews Is a Bad Idea
An exception to this workflow is if you import photos directly to Lightroom Classic. Classic syncs only the collections (albums) you choose, not the entire library. Also, Classic uploads only Smart Previews to Creative Cloud; this means that if you later edit those photos in Lightroom CC, you’ll be working with those DNG files, not the originals as you would be if you’d uploaded them in Lightroom CC.
In most cases, this isn’t an issue. Edits, as I said, are sent as small text instructions. But you’ll hit a snag if you’re working in Lightroom CC and send an image to Photoshop for editing. Consider this scenario:
Let’s say you need to remove an object from a photo, and Lightroom CC’s Healing Brush isn’t doing the trick. Photoshop’s healing tools are better, so you choose File > Edit in Photoshop. Since Lightroom CC has only the low-resolution Smart Preview version of the image, that file is opened in Photoshop. You make the adjustment, save it, and the edited version appears in Lightroom CC—but that version is now a lower-resolution version, which may not be acceptable if you’re planning to print it or display it large.
Granted, that’s a very specific set of circumstances, but knowing the architecture of Lightroom syncing will help you make the right decision. If you’re planning to use Lightroom Classic in tandem with Lightroom CC, don’t miss Work with Lightroom Classic.
Syncing Files Imported into Lightroom Mobile
It’s also possible to import your images directly into Lightroom Mobile on a phone or tablet. In that case, the originals are stored on the mobile device and uploaded to Creative Cloud. Smart Previews are sent to Lightroom CC; however, as soon as you edit one, the original file is downloaded and stored on your local disk.
Check Sync Status and Pause Syncing
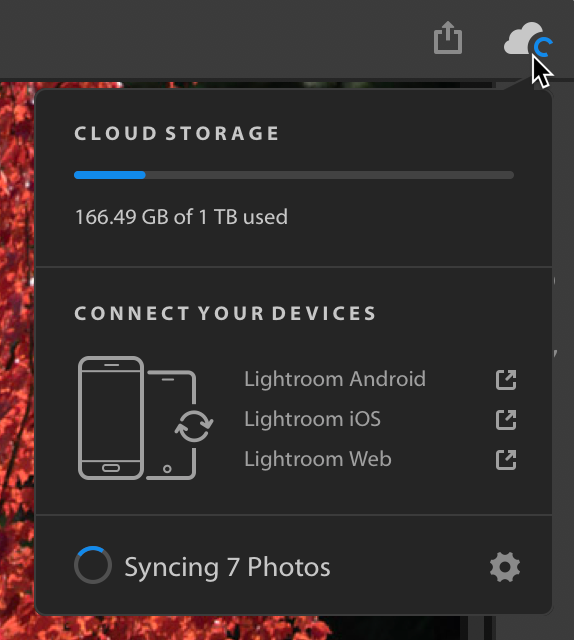
To check the sync status in Lightroom CC, click the Sync ![]() button at the top-right corner (Figure 5). It reveals whether any photos are being synced and how much cloud storage you’ve used.
button at the top-right corner (Figure 5). It reveals whether any photos are being synced and how much cloud storage you’ve used.
Is Lightroom hogging your bandwidth? You can temporarily turn off syncing using the same panel by positioning the mouse pointer over the sync status at the bottom and clicking the Pause Syncing button that appears (Figure 6).

The Info panel tells you the sync status of a photo and what type of file is stored locally. Click the Info ![]() button, or press the I key, and check the Sync Status area at the bottom (Figure 7). It not only reveals whether the photo is synced with Creative Cloud, it indicates which type of file is stored locally and in the cloud.
button, or press the I key, and check the Sync Status area at the bottom (Figure 7). It not only reveals whether the photo is synced with Creative Cloud, it indicates which type of file is stored locally and in the cloud.

When you view your photos in the Square Grid mode, you can also click the Sync button at the bottom-right corner of an image to view the sync status.
How to Fix Sync Issues
One downside to syncing is that so much of it depends on what’s happening on Adobe’s side of things. If something isn’t working, it’s not always easy to identify what that is.
Sometimes, individual photos get stuck in transit. One option is to sign in using your Adobe ID at lightroom.adobe.com and look for an image with a missing thumbnail and an alert graphic (Figure 8).
To solve the problem, try one of these options:
- First, make sure you have a copy of the photo on one of your devices. Then, select that image and click the Delete button that appears in the toolbar. That clears it out of the queue so you can try adding it again.
- If you’re also syncing with Lightroom Classic, go to the application’s preferences and click the Lightroom CC heading. At the bottom of the window, expand the Sync Activity list; if you see an image there that won’t go away, click its link to view it in Lightroom for Web and delete it as just described.
If you see an error that says “Some Photos Invalid” when you click the Sync ![]() button, the solution, again, is to delete the problematic images and then re-import them. In Lightroom CC, there’s a secret method of identifying those shots:
button, the solution, again, is to delete the problematic images and then re-import them. In Lightroom CC, there’s a secret method of identifying those shots:
- In the My Photos panel, click All Photos.
- Click the Square Grid
 button.
 - Hold Option/Alt and click the Sync button. Lightroom CC displays only the photos it’s attempting to sync.
- Choose Edit > Select All.
- Apply a star rating or a flag to the images.
If that doesn’t help, delete the images (making sure you have the originals on hand) and import them into Lightroom CC again.