
Keep Personal Data Private
As we’ve seen, security and privacy have a complex relationship, but improving your Mac’s security can often increase your privacy—and in fact, keeping your data private is one of the most important reasons to take security measures. Some of the steps that lead to greater privacy don’t involve security in the strictest sense, but they’re no less important just because they fall on one side of that conceptual line. This chapter explores a grab bag that contains four of those topics.
First, I look at the implications of sharing a Mac with other people who each have an individual login account. To what extent do separate accounts keep each person’s data safe, and how do file ownership and permission settings affect your privacy?
Next, I look into sandboxing, a technique Apple uses to keep apps’ virtual hands to themselves and away from your data without your explicit and specific consent in a few different contexts, as well as blocking unwanted access to your audio and video inputs and protecting certain folders.
Then, I explain how to configure macOS’s built-in privacy settings, which allow or prevent apps from determining your location, using accessibility settings to grab keystrokes, and more.
I take what appears to be a slight detour, but arguably isn’t, into Advanced Data Protection for iCloud, an option new as of December 2022 that adds end-to-end encryption onto most kinds of data you sync among devices. It’s a new layer of protection for data stored on your Macs and other hardware.
After this, passwords are the subject: Apple stores passwords across macOS in different ways, and you should know where they are and how they’re protected.
Finally, I address Lockdown Mode, an extreme protective measure Apple intends for users at greatest risk. Are you one? Does it help? Read on.
Keep Data Safe from Other Local Users
If you’re the only person who ever uses your Mac, there’s nothing to see here—skip ahead to Deter Invasion via Sandboxing. Otherwise, you should know a few things about what sorts of access other people may have to your data.
First, if everyone uses the Mac via a single account—without having to log in and enter a separate username and password—all bets are off. Whatever’s available to you is available to everyone else. I’m not a fan of that arrangement. Ideally, every human who uses your Mac should have a unique username and password. (I might make exceptions for kids too young to type their own passwords. See Configure Accounts & Groups Securely for details.)
But let’s say each person does have a separate account and password, and each one diligently logs out (or shuts down the Mac) after every session before the next person logs in. Then what?
macOS, as a variety of Unix, relies on the properties of ownership and permissions for each file. To oversimplify a bit, each file and folder has a designated owner—usually one of the individual account holders or the system itself—and a set of attributes assigned to it that specify who can access it, modify it, delete it, or execute it, in the case of files. (Apple adds a number of Mac-specific attributes on top of that.)
But there are owners and there are owners. macOS Standard accounts owners can access files, apps, and folders in all public places, like the system-wide Applications folder, but they can modify and add items only in specific locations: their own home folder (/Users/username) and the Shared folder in the main /Users directory. No other standard user can view files in any other users’ home folders, except the default Public folder, which is read-only and has a Drop Box item (not Dropbox, the service) that other users can drag items into, but then not see afterwards (write-only). For day-to-day segregation of one person’s data from another, this system provides a reasonable barrier.
An administrator can assign additional access to all non-system files and folders by changing ownership to a user, creating a group and providing group read/write access to a folder, or changing permissions to make things readable and modifiable by anyone with an account.
But that reveals the weakness, no? An administrator has “root” access, which is the top-level permission holder in Unix. Anyone with an administrator account and working knowledge of the Unix command line can access everyone else’s files by opening the Terminal app (in /Applications/Utilities), entering sudo -s, and supplying the administrator account’s password.
They can also restart in recovery mode, and use Terminal there to avoid any safeguards or monitoring tools that might be installed in macOS. With an M-series Mac, an administrator can share the entire Mac as a volume on another Mac via macOS Recovery, too.
Standard users also have some options to get around the protections that should prevent them from seeing other files:
Filching your password: Anyone who knows or can guess your login password can log in as you and access all your files. Of course, you have a terrific password that you’ve kept completely safe from everyone else, right? Fine, but there are still other problems.
Attach your Mac’s startup drive to another Mac as an external drive: If you start up your Mac from an external drive someone could attach that drive to another Mac to which they have administrator permissions and access all the files on it. If it’s protected with FileVault, they only have to have an account enabled for FileVault on the original Mac and know the password. While other users’ files appear locked when the Mac’s drive is mounted, they can be copied over and unlocked by entering an administrator account password on the destination Mac.
Connect your Mac to another Mac: Target Disk Mode (Intel Macs) or Mac Sharing Mode (M-series Macs) lets you mount one Mac as a volume on another Mac via the same port with a male-to-male Thunderbolt 3 or 4 cable. On Intel-based Macs, no administrator permission is required, and it works the same as if it were an external drive, in the previous bullet item. However, you can disable the use of Target Disk Mode in Intel-based Macs by setting a unique firmware password that no one else has access to: see Firmware Password (Intel Macs).
On an M-series Mac, Mac Sharing Mode turns a Mac into a file-sharing volume, instead of appearing as an externally connected drive. This is functionally equivalent to, but less risky than, Target Disk Mode. You can connect an M-series Mac to another Mac of any vintage via a male-to-male cable intended for USB with Type-A or USB-C plugs, or Thunderbolt 3 or 4.
In addition, someone who has access to backups of your files on mounted or unencrypted volumes or drives can likely access all of them without file ownership and permission getting in the way.
For all these reasons, the only safe assumption is that anyone else who has an account on your Mac or physical access to it could conceivably access your files. Although your data is fairly safe from casual access by nontechnical users, you should not think of ownership and permissions as a significant roadblock.
Moral of the story: Don’t give other people’s accounts administrator access if you don’t trust them and you can prevent giving them such privileges.
If you can’t, another option is to use encrypted disk images or volumes in which you keep the password to yourself. You can use the Finder to encrypt volumes and Disk Utility to create encrypted disk images; see Encrypt External Drives. Unmount these disks when they’re not in use.
Deter Invasion via Sandboxing
Apple offers an additional security feature called sandboxing, which appears in a couple of different ways: one dates back to the 10.7.5 release of Lion; a second started in Mojave; and a third in Catalina. Apple rarely uses the term in end-user materials, though they employ the concept all over.
The basic idea of a sandbox is that an app has restrictions that define where it can read and write data, as well as the kinds of inputs and outputs it can monitor or make sure. It has to “keep its sand in the sandbox”: it can’t see or touch files anywhere outside its designated space, or listen to mics, view video, or capture keystrokes without explicit permission that you give it when prompted or that you configure to allow.
The intention is to prevent buggy, corrupted, or malicious apps from messing with data and files from other apps or macOS itself. It has the additional benefit of limiting legitimate software from accessing personal information and inputs that you don’t think it needs to.
Let’s look at the three kinds of sandboxing offered in macOS, starting with the oldest, which affects apps as a whole.
App Sandboxing
Available since 10.7.5 Lion, macOS’s app sandboxing restricts the kind of behavior apps can engage in outside their bounds—particularly their own set of data and caches.
Suppose you visit a rogue website in Safari that attempts to execute some dastardly code through an exploit someone has discovered in JavaScript, the popular programming language that powers web apps. Because Safari runs in a sandbox, that malicious code can’t affect other files: it can’t read your contacts, delete system files, add a startup item, or do any other mischief outside the browser window without your permission.
Apps downloaded from the Mac App Store must be sandboxed (with some exceptions for older apps). In addition, Apple apps included with macOS are sandboxed, and so are many third-party apps available directly from their developers. (That’s usually because they also offer the apps in the App Store and don’t want to create two entirely different versions.)
But nothing in the design of macOS (at least, not yet) prevents you as a user from running a non-sandboxed app if you want to. Unless you get an app from the App Store or the developer tells you the app is sandboxed you have no easy way to know.
Sandboxed apps can read and write files in non-default places if you agree to let them do so. You’re prompted when you try to access a new location, and have to give simple permission: a click, not a password. That’s then remembered by macOS from then on. (Under certain rare circumstances, you might have to reauthorize an app.)
You can’t turn off sandboxing or adjust its settings. All you can really do is be alert—if an app asks for access to a folder you don’t think it should be using, that’s because the folder isn’t currently within its sandbox. Think carefully before saying yes—if it’s unexpected, the app could be trying to do something it shouldn’t.
A/V Input Sandboxing
Since Mojave, macOS asks you questions when an app or other software tries to use audio input or video cameras for the first time.
This was added to prevent potential snooping by malicious software, by having a deeply wired system opt-in requirement. It’s one thing for a malware developer to hack into your camera through software that runs with user-level permissions; it’s another for them to subvert the system and block the warning.
Apps don’t have to do anything special to request access. If it hasn’t been granted access, the first time an app attempts to use a camera, mic, or other audio input, macOS prompts you to approve it or not (Figure 45).

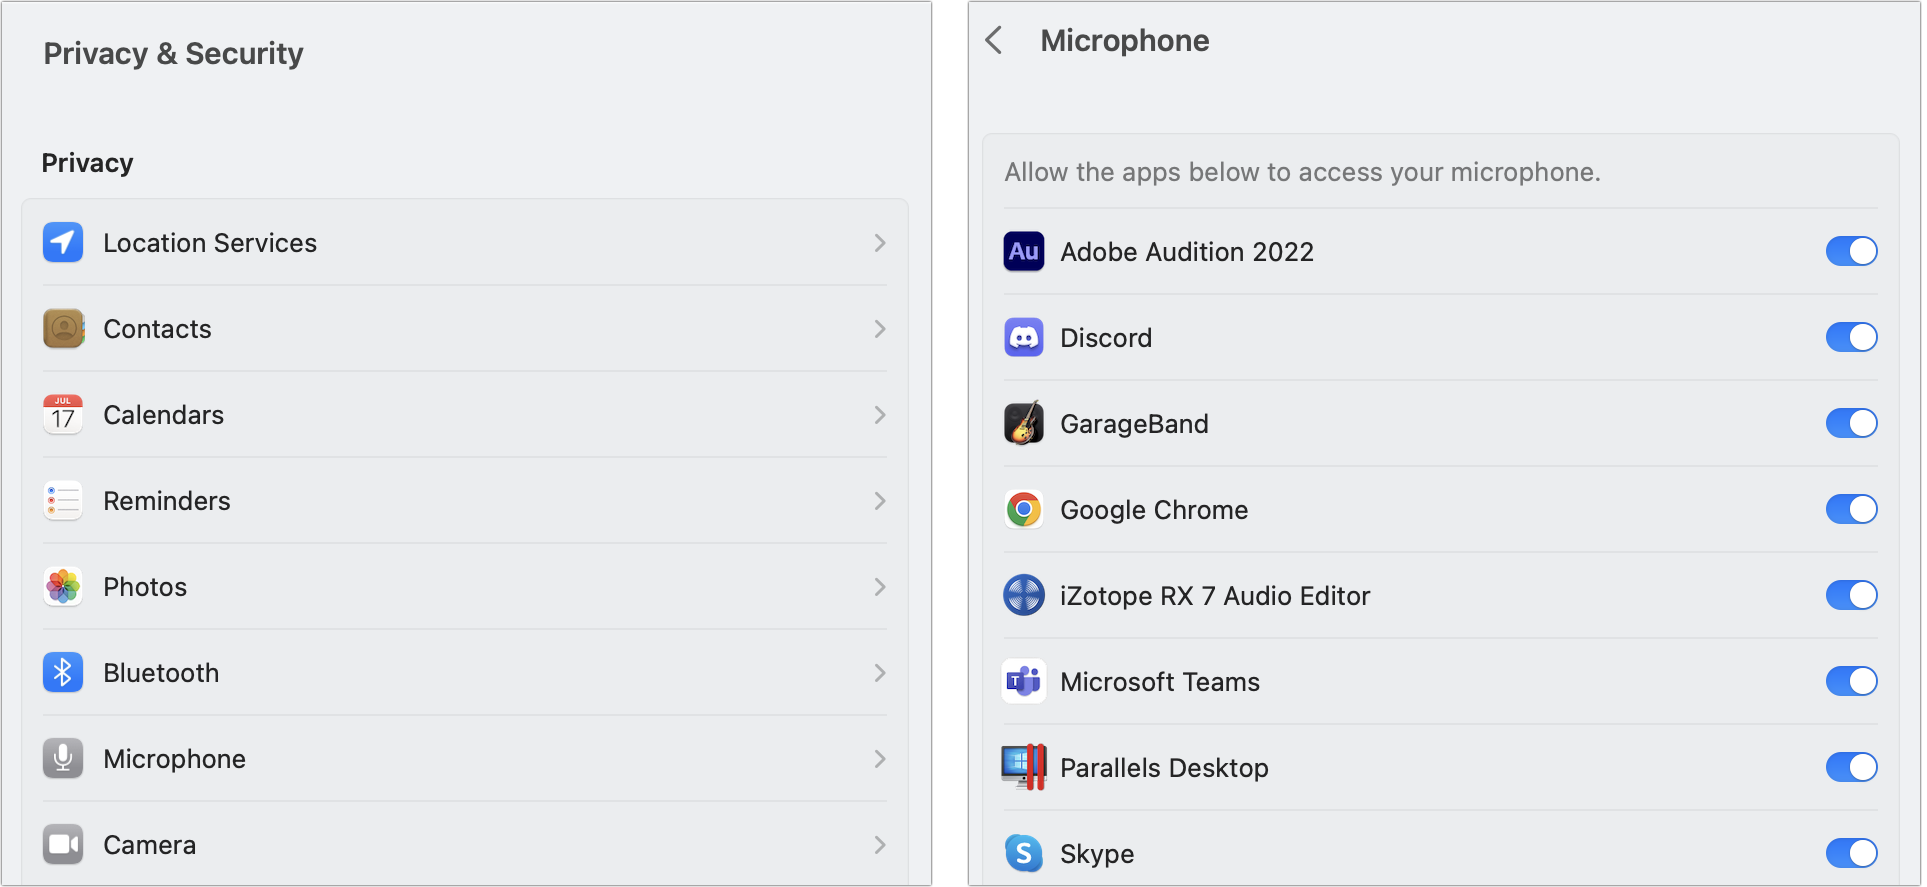
Once approved, you can manage access for apps and other components via System Preferences > Security & Privacy > Privacy in Monterey and earlier (Figure 46) or System Settings > Privacy & Security in Ventura (Figure 47). In some cases, deselecting an item may result in a prompt that lets you choose to quit and restart the app you changed settings for, or offer Later as the other option.

Apps may respond differently if you deselect mic or camera permission. For instance, I tested two popular videoconferencing software packages, WebEx from Cisco and Zoom. Cisco’s app didn’t notice that I’d disabled A/V inputs; they simply weren’t available. Zoom was sneakier and asked me to re-enable them (Figure 48).

Enhanced Folder Sandboxing
In addition to app-based and A/V input sandboxing discussed above and personal-data privacy controls discussed just below, Apple added a form of sandboxing for all apps for a new set of folders starting in Catalina.
These locations include:
The Desktop, Documents, and Downloads folders in your account
Your iCloud Drive access
Cloud storage from third parties that appears via Finder-accessible folders, like Dropbox and Google Drive
Network volumes and removable volumes, each as a separate category of permission
The idea is that all these locations could be suspect for an arbitrary app to need to read at all, much less write to, without your explicit knowledge and permission. This can also help subvert ransomware, which often wants to access these sorts of locations where import files are stored.
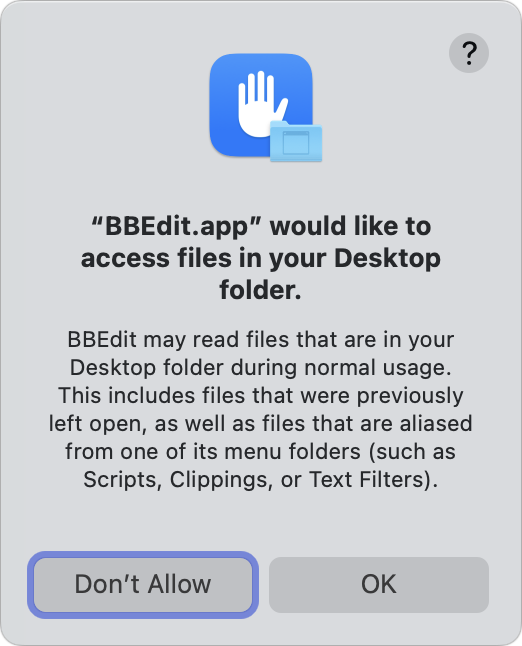
Whenever an app first tries to access items in any of these locations, macOS prompts you to ensure you want to allow it (Figure 49).
As with mic and camera input, you can view and revoke permissions in System Preferences > Security & Privacy > Privacy (Monterey and earlier) or System Settings > Privacy & Security (Ventura): select Files and Folders and scroll to find the app (Figure 50).
Configure Your Mac’s Privacy Settings
There’s yet one more category of privacy-related controls you should know about, and we’ve seen a glimpse of them before. System Preferences > Security & Privacy > Privacy (Monterey and earlier) or System Settings > Privacy & Security (Ventura) described above also manages a bunch of other elements of your privacy that relates to the security of your data—and of your person.
In each case, the settings list apps that need permissions. If you’ve already granted permission, the app’s item is checked (Monterey or earlier) or enabled (Ventura). If you haven’t yet approved permission or you’ve turned it off, the item is unchecked or disabled. Many apps on install or launch that require access to privacy features either trigger a macOS prompt or bring up a own dialog explaining required permissions, particularly with Accessibility and Full Disk Access.
If you deny permission to an app in the Privacy tab or section and then try to use the app again, it may prompt you as to the lack of access and ask you to modify settings (Figure 51).

Because there’s not a lot to explain about each one, let’s take a brief pass through the ones to pay attention to in the following list:
Location Services: Select Enable Location Services to allow apps and macOS to use location services generally. This lets macOS determine your physical location using information about nearby Wi-Fi networks (Figure 52). Deselect to avoid providing any location information, but that will disable certain features you may want, such as Find My Mac. Deselect individual apps and services for granular control.

Figure 52: Location services can be enabled or disabled systemwide, as well as for specific apps. (Monterey shown here.) The last item listed under Location Services, System Services, affects macOS itself. Click Details and then enable or disable Location-Specific Suggestions to control whether your location is available for searches (and thus to Apple). Apple also tracks Significant Locations, places it notices you’ve spent a lot of times—you can disable that without causing any particular loss of other features.
Contacts, Calendars, Reminders, Photos, Media & Apple Music: Some apps want access to the data in your Contacts, Calendars, and Reminders apps, as well as media in your Photos and Music libraries (including Apple Music if you have a subscription), for particular uses. For example, Pages might use your contacts when printing envelopes or labels, and LaunchBar wants access to your calendar so you can use it to create new events. Some apps want to access your stored Photos to show a browser that lets you insert those images or videos directly within the app. But some apps may ask for access without an apparent good reason, and if you aren’t sure it’s necessary, disable the app’s access.
Speech Recognition, Accessibility, Input Monitoring, Screen Recording, and Full Disk Access: Some apps need expansive permission that could impair your privacy and security if there’s a malicious party behind it. Take extra care with these; people at heightened risk shouldn’t allow any app to use any of these settings without severe vetting for a specific purpose. Here’s what apps want to use these comprehensive approvals for:
An app can ask macOS to perform speech recognition if permitted, which sends input to Apple for processing and back to your Mac. That could be misused by an app that effectively listens to you in the background and then sends an AI-generated transcript to the villains who created it.
Accessibility gets used by apps that alter keyboard shortcuts, run scripts, or send commands to other apps. Utilities such as Keyboard Maestro and TextExpander would otherwise be useless.
Input Monitoring allows access to keyboard, mouse, and trackpad actions, whether the app is the foreground app or not. Wacom relies on this for its tablets to work. Keystroke capture tools are blocked by this.
Screen Recording does what it says on the tin, and has a surprising array of uses, because some apps need to monitor a very particular thing happening on screen. On my laptop, BetterTouchTool (an input gesture enhancer), Default Folder X (an open/save dialog enhancer), and ScreenFlow (an actual intentional screen recorder) all have access. Default Folder X’s creator explains why—a good idea!
Full Disk Access lets an app also do exactly what it says, required for cloning and backup software, like Backblaze and Carbon Copy Cloner, sync software like Dropbox, and anything that needs access to view things beyond sandboxed folders. Of course, this is a significant hole for an exploit to make use of.
HomeKit and Bluetooth: Two hardware-related privacy items let apps tap into data from HomeKit devices (potentially revealing your video feed, whether your security system is turned on, and whether you’re at home to ne’er-do-wells) and ones that use Bluetooth (which could leak exercise, location, and audio data).
User Availability/Focus: Apple can provide details about whether you have Do Not Disturb (Catalina and Big Sur) or a Focus mode (Monterey and Ventura) enabled, which may reveal more about your current activities than you want.
Automation: Automation lets apps send events to control other apps, including ones that control the system or Finder. A lot of apps make use of events to coordinate what they do or interact with other apps. Permission is granted to apps for specific other apps or System Events as a whole. Apple warns that an app that can use events of another app can access “documents and data in those apps,” too.
Apple Advertising: While this a privacy-specific feature, it’s worth calling out that Apple lets you disable certain kinds of tracking ads, and discover what apps would be using that information.
Analytics & Improvements: macOS can automatically send diagnostic and usage data to Apple and/or third-party developers to help them track down the causes of crashes and other bugs you may encounter. This information is anonymous and doesn’t contain personal information. You can select Share Mac Analytics, which passes along data for Apple’s apps and services; with that checked, you can add Share with App Developers, which does the same for third-party developers. iCloud gets its own separate permission, as you might consider it more personal or invasive than your macOS information. Finally, after a kerfuffle about bad disclosure and data retention, Apple added a way to opt out of Siri and Dictation data collection: disable the option to tell Apple not to “store and review audio” of your interactions on this Mac.
In addition to those preferences, I want to call your attention to three other places in macOS with significant privacy settings:
Spotlight: Go to System Preferences > Spotlight > Privacy (Monterey and earlier) or System Settings > Siri & Spotlight and click Spotlight Privacy (Ventura) to exclude any folder or volume from Spotlight indexing by dragging it into the tab. You might do this if, for example, you have private files that might show up when another user of your Mac is performing a Spotlight search. To prevent your location information and address being sent to Apple and their partners, go to System Preferences > Spotlight > Search Results (Monterey and earlier) or System Settings > Siri & Spotlight (Ventura) and uncheck Siri Suggestions.
Extensions: Extensions let apps enhance their capabilities in interesting ways, including adding destinations to the Share Menu. Some utilities that need to modify the behavior of the Finder (Dropbox, Adobe Creative Cloud) and other apps can also do so by way of extensions. But because an extension could conceivably access personal data within an app, you can disable any you’re unsure about by going to System Preferences > Extensions (Monterey and earlier) or System Settings > Privacy & Security > Extensions, selecting a category, and disabling the extension (Figure 53).
Safari: In Safari > Preferences > Privacy, disable Website Tracking by selecting “Prevent cross-site tracking.” Apple used to have more options here, but now enables them by default. This last checkbox is in place because you may need to disable it to use certain outdated websites—including some banking sites, remarkably—that assemble resources form multiple places, and appear like unwanted tracking to Safari. Uncheck only long enough to use the site, then reenable.

Enable Advanced Data Protection
In early December 2022, Apple announced and then deployed Advanced Data Protection (ADP), an option you can turn on for iCloud from your Mac, iPhone, or iPad that enables end-to-end encryption (E2EE) on nearly all the data for which Apple hadn’t already done so. (See Share Carefully via Cloud Services for a full definition of E2EE.)
You can see a full list of the items that are encrypted at rest (on servers using keys Apple possesses) and those with E2EE enabled in iCloud at Apple’s website both with and without ADP enabled. Without ADP, these items remain encrypted at rest only: iCloud backups, Find My (Devices and People), iCloud Drive, Messages in iCloud, Notes, Photos, Reminders, Siri Shortcuts, Voice Memos, and Wallet passes. Enabling ADP adds E2EE to all of them.
I recommend enabling ADP if you qualify, as it provides a strong additional layer of protection to the private data that you might consider is “local” if you never access it via iCloud.com.
ADP has many requirements:
All your devices must have a minimum operating system version: macOS 13.1 Ventura, iOS 16.2, iPadOS 16.2, tvOS 16.2, watchOS 9.2, and—yes—HomePod 16.2.
Your iCloud account must have two-factor authentication enabled. (See my book Take Control of Your Apple ID if you need help upgrading your account.)
All your devices must have passcodes.
At least one form of account recovery has to be enabled: either iCloud Data Recovery with one or more active contacts or a Recovery Key. (Also see Take Control of Your Apple ID for help on setting those up.)
Enable ADP
Start by going to the ADP setting section: System Settings (macOS)/Settings (iOS/iPadOS) > Account Name > iCloud > Advanced Data Protection. Tap Turn On Advanced Data Protection or click Turn On.
If all your devices aren’t up to date, you’re told which ones require a newer version of their operating system (Figure 54). You can opt to either complete upgrades or remove devices with older operating systems from your account in System Settings > Account Name by selecting a device and then clicking Remove from Account and following prompts.
Apple now lets you turn on ADP:
Apple warns you that “you will be responsible for your data recovery.” You have to click the Review Recovery Methods options.
If you have a Recovery Key, you must enter it and click Next.
With the Recovery Key accepted, enter your device passcode when prompted.
Finally you’re told “Advanced data Protection is On.” Click Done.
You should also receive email to your iCloud.com address that tells you ADP was enabled.
Access ADP-Protected Data via iCloud
With ADP enabled, all your data except email, contacts, and calendar entries is encrypted by keys held on your devices. That would appear to count iCloud.com access out. But Apple has a workaround. They allow temporary access using in-browser encryption.
Here’s how to unlock temporary access:
Visit icloud.com in a browser and log in.
Apple shows a banner that explains that ADP is on and how to proceed (Figure 55).
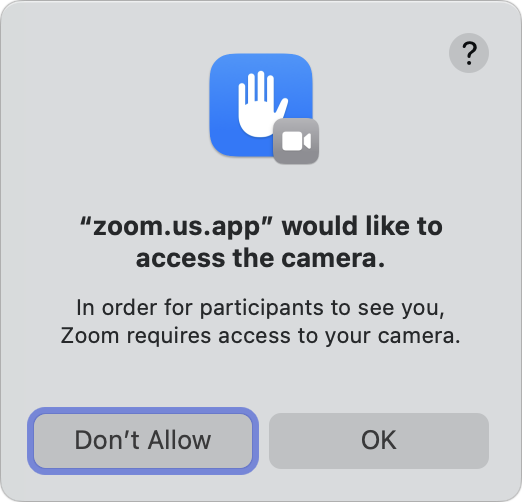
Figure 55: Apple provides an explanation of the steps you need to take to access iCloud-synced data. Select an app, such as Photos.
Apple sends an access requested to trusted devices.
On a trusted device, click Allow Access (Figure 56).
On your trusted devices, a banner appears alerting you that you’ve enabled temporary access.
Data remains accessible for an hour from each request. Each additional data type you want to access may require another permission request and approval unless requested shortly after a previous request.
You can disable ADP and normal iCloud access in all operating systems that support ADP via Settings (iOS/iPadOS)/System Settings (macOS) > Account Name > iCloud. Here you can disable Access iCloud Data on the Web.
Disable ADP
Disabling ADP is straightforward. Go to Settings (iOS/iPadOS)/System Settings (macOS) > Account Name > iCloud > Advanced Data Protection. Tap Turn Off Advanced Data Protection or click Turn Off. Follow prompts to agree that you understand you’re removing E2EE protection from many kinds of your synced and stored data.
Protect Your Secrets
The topic of passwords is huge, and while it has an impact on security, it’s too broad a topic to dig into in this book. However, there’s a key aspect of security related to passwords: how you secure them.
Macs can store and sync passwords in a lot of different ways, each of which comes with different risk profiles. Let’s look briefly at how macOS and third-party apps store passwords, and the gold standard for syncing them among devices without increasing the likelihood that they could be accessed—even by the company storing them for you.
Starting in Ventura and iOS 16/iPadOS 16, Apple added passkeys, a more secure method of logging into a website without leaking secrets and while offering phishing resistance. Passkeys may be used at websites that support industry-standard WebAuthn logins in lieu of passwords, though they serve the same function. Apple integrated passkeys into its overall password-management and fill-in approach.
In early 2023, Apple also added direct support for hardware encryption keys to protect Apple ID logins. These hardware encryption keys incorporate industry standards, making them compatible across mobile devices and desktop computers, as well as working with websites and native support built into operating systems. The underlying standards are very similar to passkeys, in fact. If you enable using a hardware key for your Apple ID or use it with websites on your Mac (or iPhone or iPad), you will connect via USB on a Mac (or via USB or Lightning, or by tapping using NFC, on an iPhone or iPad).
Where Do Your Secrets Reside?
On a Mac, the central repository of all macOS-related passwords is the Keychain, a database accessible by users via the Keychain Access app, including ones to connect to a Wi-Fi network and much else. It’s also a place that third-party apps are allowed to store passwords through Apple’s framework. (You can read more about the Keychain and Keychain Access in Keychain Security.)
You can also store passwords and passkeys for websites and apps in macOS:
In Catalina and Big Sur, you manage these passwords via Safari using Safari > Preferences> Passwords.
In Monterey, Apple elevated Passwords to its own preference pane in System Preferences.
In Ventura, find these entries in System Settings > Passwords.
Even further, you can enable iCloud Keychain, which syncs all your account-specific passwords and website logins across all the devices you own that are also logged in to the same iCloud account and have iCloud Keychain enabled.
Other browsers have their own password-storage systems for local storage and for syncing, such as Google Chrome, which can sync across all your apps linked to the same Google count and makes passwords available through a web-based password manager, too, about which I have things to say below.
Third-party password managers are a boon for many people, because they can be used easily anywhere, not just in Safari (for non-Safari or multi-browser users), and can store a range of information beyond simple passwords or login credentials.
Hardware security keys are obviously physical items you need to exercise distinct precautions around. Their contents are one-way vaults, much like the Secure Enclave in Macs and other Apple hardware, and can’t be backed up. Make sure you have safeguards in place to avoid losing or damaging them, and to ensure they’re not stolen. Treat them like a stack of $100 bills.
How Your Secrets Are Secured
It’s important to know how password vaults manage the encryption and security of your data, but it can also be a bottomless well of detail. In the following entries, I explain from a top-level view how Apple manages these aspects for the macOS Keychain and iCloud Keychain, how other well-designed password managers do the same, and Google’s shortcomings in that regard.
Keychain Security for Local Passwords and Passkeys
In macOS, passwords and passkeys are stored in the Keychain, which can be unlocked by your account password in the Keychain Access app, and is unlocked for system-wide usage when you log in.
However, locally stored Keychain entries are backed up by full-disk encryption on all T2 and M-series-equipped Macs and with FileVault enabled on preceding models. FileVault when enabled on any Mac adds startup protection.
Keychain data on its own never leaves your machine, and when backed up, the associated files are encrypted.
Your device password is the only real weak point, because data is secured on your device and with optional or included encryption as strongly as is feasible.
iCloud Keychain Security for Synced Data
iCloud relies on endpoint security with locally stored encryption keys that never leave your macOS, iOS, or iPadOS hardware. Data is encrypted in transit and the strongly encrypted data when synced or stored in iCloud is useless without these device-based keys, which are stored in the Secure Enclave on any hardware that has one.
With two-factor authentication (2FA) enabled on your iCloud account—more or less mandatory these days—it’s effectively impossible for someone in most circumstances to gain access to your synced and stored iCloud Keychain. They would need all three of the following:
Your iCloud password
Either, with standard code-based 2FA:
Access to one of your trusted devices that they had the passcode or password for or could otherwise unlock to receive a 2FA token, or a trusted phone number (or hijack a phone number)
The device password for one of your other Apple devices that’s already synced. When you add a new device to iCloud Keychain syncing, Apple has you to prove yourself by entering the password for existing device in your set.
Or, with an Apple ID locked to hardware encryption keys for 2FA:
- Access to one of the two or more hardware encryption keys associated with your Apple ID account.
However, there’s a distinct flaw in the above, as documented by two Wall Street Journal reporters. If someone can obtain your iPhone and its passcode—through shoulder surfing of you entering it and a snatch-and-run, or through drugging you or coercion of assault or battery—they can use the phone to trigger a reset of your Apple ID password.
With the unlocked device, they can access your stored passwords in iCloud Keychain. With a reset Apple ID password, they can remove your other trusted devices, add ones of their own by logging in to the Apple ID account on their hardware, and lock you out of your account—possibly forever.
Even with a hardware encryption key, seemingly the gold standard of security, Apple unfortunately lets anyone who can unlock a device remove all hardware security keys via Settings (iOS/iPadOS) or System Settings (macOS), reverting to code-based 2FA sent to devices—like the one they have unlocked and available.
Apple hasn’t added additional safeguards since the Journal’s story came out. The only way to protect against this attack is to enable Face ID or Touch ID and only use it in public settings unless you are absolutely sure you can’t be observed, so no one can glimpse you entering your device passcode.
There’s no way to 100% prevent being drugged at a bar or restaurant or being mugged, however, meaning Apple has to make that vector for Apple ID resetting no longer valid.
A Well-Designed Third-Party Password Manager
The system I described just above for iCloud is the same one that’s been implemented by 1Password.
It’s a zero-knowledge security model for syncing across the cloud, in which the parties handling data can’t actually see the secrets and have no access to keys. As you add devices to cloud syncing, you have to prove you have other devices and secrets first. This is true for both companies’ access to your data stores via their websites: all encryption happens locally in the browser, none is ever sent to the companies, and each login session requires proof of certain elevated secrets no one could intercept.
1Password can also sync files blind, where the storage vaults are encrypted and stored on Dropbox or synced locally over Wi-Fi or other means. In that case, the master password for the vault is all that’s known, but it’s never transmitted in any way.
Google’s Weak Model
As a major online company, one that runs a lot of sync services, and one that has set high bars for strong security, I have to note that Google’s password-sync service across Chrome, its websites, Android, and other devices falls short.
Instead of requiring endpoint device security or additional non-transmitted secrets to ensure that data is never easily available, you can log in to a Google account via a web app, enter the account’s password (and validate with 2FA, if you have that enabled), and view passwords.
Unfortunately, it means that Google stores your passwords in the same way that, say, Apple can store your Notes entries. While Google may encrypt passwords at rest and in transit, they are not uniquely and strongly encrypted with a password or device-based encryption that only a user possesses. For that, I say give Google a…pass. Word? (With ADP enabled, by the way, even Notes are stored more securely than Google passwords!)
Deploy Lockdown Mode
For those at a high risk of being directly and individually targeted by spyware—you’re a journalist, politician, human-rights advocate, or political activist—Lockdown Mode should be on your radar.
Governments, criminals, and industrial espionage agents typically deploy spyware against uniquely identified, high-value targets. Spyware, which largely relies on Zero-Day Exploits, can be deployed as easily as texting someone a message, even if the message is never read.
With spyware installed, a remote operator may be able to exfiltrate (remotely copy off your device) all your data, access your microphone or camera without tipping you off, intercept messages sent by secure apps directly on your device, prevent messages from being sent or reaching you, plant evidence, and much more.
Apple considers spyware a significant violation of personal privacy. While in some countries there are legal methods within those countries to deploy spyware, it’s often used in contravention to national laws within countries and for national-security or human-rights violation purposes against citizens or residents living in other countries from the spyware deployers.
Apple has sued companies engaged in developing spyware and selling licenses to it, and funded researchers who try to uncover the use of this kind of software and protect against it. But that wasn’t enough for them: in July 2022, Apple announced it would add Lockdown Mode to iOS 16/iPadOS 16 and Ventura, a sort of super-firewall to resist known pathways for exploits by those who find themselves targets.
With Lockdown Mode engaged in any of those operating systems, your device will block most kinds of rich incoming media and metadata. For instance, Messages will receive and display only text and images, and disable link previews. In Safari, Apple turns off some browser-based operations that allow sophisticated code to run for web apps. (You can add exceptions and then manage those exceptions, too.)
Lockdown Mode also blocks incoming communications and invitations from people with whom you haven’t previously initiated contact. That is, if someone called you via FaceTime and you spoke with them, they will be unable to call you with Lockdown Mode on. If you called them in the past, however, they’ll be able to.
Apple also blocks installation of configuration profiles, often used as a way to shunt network traffic off for interception and bypass security rules; and a device can’t be enrolled in mobile device management (MDM), used commonly in organizations to manage device: MDM allows remote configuration and overriding user settings.
If you are one of those targets or just want to try out this new technology, it’s simple to use. Here’s how:
Go to System Settings > Privacy & Security and click Turn On next to the Lockdown Mode label (Figure 57).
Enter your administrator password.
At the warning screen, click Turn On & Restart (Figure 58). (Click Cancel to exit).

Figure 57: Apple offers detailed information in System Settings about Lockdown Mode and a link for more information.
After your Mac restarts and you log in, you will likely notice few differences. I found that the Wi-Fi connection took longer to establish, and some apps (like Evernote) didn’t make a connection initially. After a few minutes, macOS settled down, and apps worked as expected.

When you’re browsing in Safari, a Lockdown Enabled banner appears at the top of every page (Figure 59). If you want to add a given site to the list of ones excluded from Lockdown strictures, Control-click/right-click in the Location bar and choose Settings for site name. Uncheck Enable Lockdown Mode (Figure 60). You’re prompted to confirm your choice with an explanation of what that means. The banner on that page now reads Lockdown Off in red type.


You can configure which websites are excluded from Lockdown Mode in Safari > Settings > Websites > Lockdown Mode (Figure 61). In this context, On means that the site is excluded, while Off means you have now disabled the exclusion.
Outside of Safari, you’ll notice the difference when you attempt to perform an action that’s not permitted in Lockdown Mode. For instance, try to install a profile or view a file attachment in Messages, and macOS displays descriptive error messages (Figure 62).

To disable Lockdown Mode, follow the steps above and click Turn Off. You may be asked to authenticate via Touch ID or using a password, and then confirm you want to Turn Off & Restart. Your Mac restarts as normal and has full functionality re-enabled.