You can use your iPad's Mail app to send email and read email from friends, family, and colleagues. Your iPad makes it very easy for you to check email when you are on the go, supplying you with many of the same mail features you enjoy on your Mac or Windows computer. In this chapter, you learn how to set up an email account on your iPad as well as how to manage multiple email accounts and features.
The Mail app on your iPad is a scaled down but very capable version of the email program you enjoy on the Mac OS X and Windows operating systems. The Mail app has been optimized for your iPad, providing you with features and settings that make it very convenient to use while you travel. You can configure your email to access accounts already set on your computer and even create accounts on the iPad itself.

Connect with Email Services
Out of the box, the iPad recognizes five email services: Microsoft Exchange, MobileMe, Google Gmail, Yahoo Mail, and AOL. All you need to set up one of these accounts is the address and the account password. One of the most effective ways to use email on your iPad is to set up the Mail app to use an email account that you already use on your home computer. Syncing your iPad with your home computer enables you to check your email while traveling.

You can also set up an account that is different from the five email services your iPad recognizes. Your iPad also supports various email protocols, such as POP (Post Office Protocol) and IMAP (Internet Message Access Protocol). If you want to configure one of these protocols, you can ask your network administrator or email service provider what type of email account you currently have. This option takes considerably more work on your part, as opposed to simply syncing your Gmail or Yahoo account.

Specify the Default Email Account
Your iPad is capable of accessing multiple email accounts. You can specify which email account the Mail app opens when you tap the Mail app on the Home screen. If you have a primary email account to where most of your important messages are sent, you can set this account as your default email for quick access.

Switch, Disable, and Delete Accounts
After you have specified an email account as the default, you can easily switch it to another account if needed. You can conserve your iPad's battery life by checking fewer email accounts. You can achieve this by temporarily disabling an account or by deleting an account. If one of your email accounts has become less relevant, you should consider deleting that account.
One way to access email on your iPad is to set up the Mail app to connect to an email account that is already set up on your home computer. The iPad recognizes five email services with a minimal amount of interaction on your behalf: Microsoft Exchange, MobileMe, Google Gmail, Yahoo Mail, and AOL. Adding an email account enables you to check your most important email accounts while on the road.
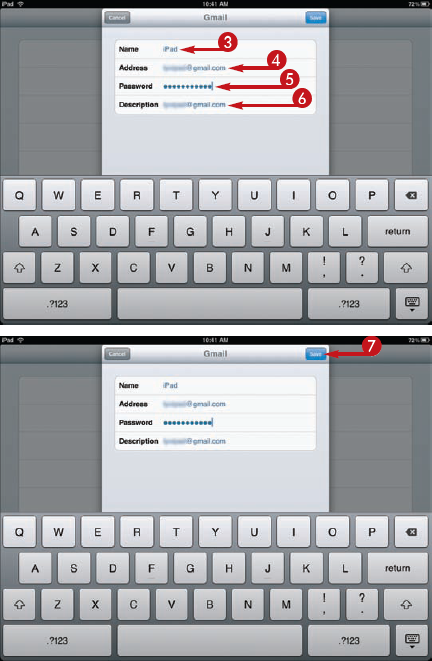
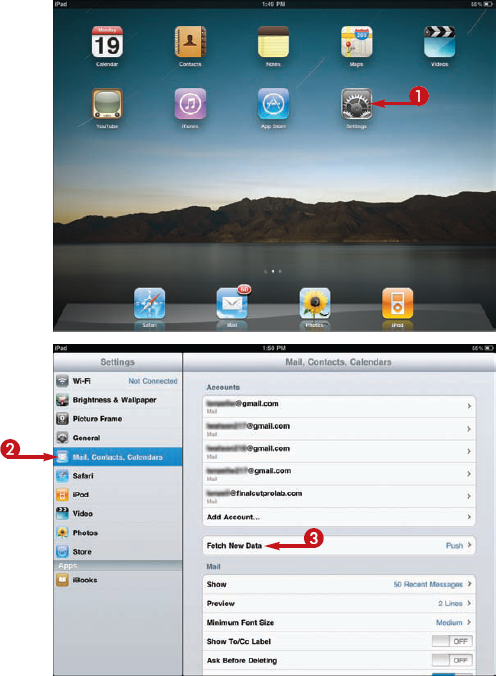
Add an Email Account for the First Time

Tip
How do I add another email account after I have set up the first one?
You can add a second email account by following these steps:


Your iPad displays the Mail, Contacts, Calendars screen.


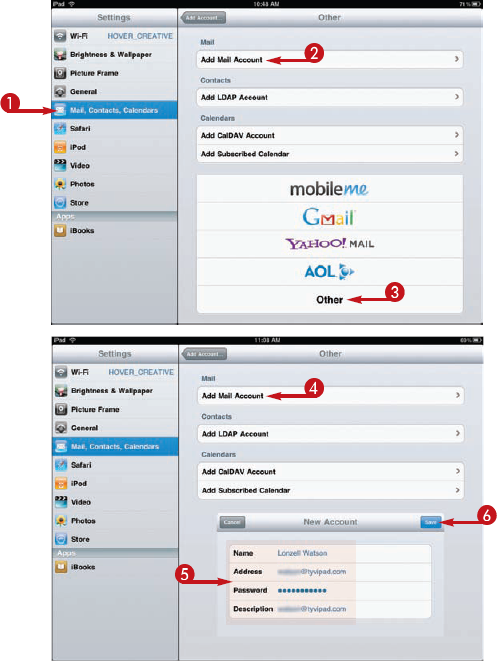
You may find it necessary to create an email account that exists only on your iPad — perhaps for an iPad mailing list. Your iPad Mail app supports both the Post Office Protocol (POP) and Internet Message Access Protocol (IMAP) email account types. These types of accounts are what you receive through your ISP, such as Comcast or RoadRunner. You will need specific information for the new account, including the host name of the incoming and outgoing mail servers, to create a new email account on your iPad.

Create a New Email Account
Your iPad displays the Mail, Contacts, Calendars screen.


Note
If your service provider requires a username and password, type those too.

Your iPad verifies the account information and then returns you to the Mail Settings screen. The new account is added to the Accounts list.

Tip
Which is the most popular account type?
POP is the most common. Incoming messages for an email account are temporarily stored on the provider's mail server. Typically, when you connect to the POP server, the email downloads to your device and is then removed from the server. By default, your iPad actually saves a copy on the server. IMAP works with your email messages only on the server. You will need to manage the contents of the server so you do not fill your storage quota. Once you fill your quota, you will no longer be able to receive new mail until space has been freed.

What are the benefits of having your email stored only on the server?
When your email is stored on the server, you have the benefit of accessing those emails from multiple devices.

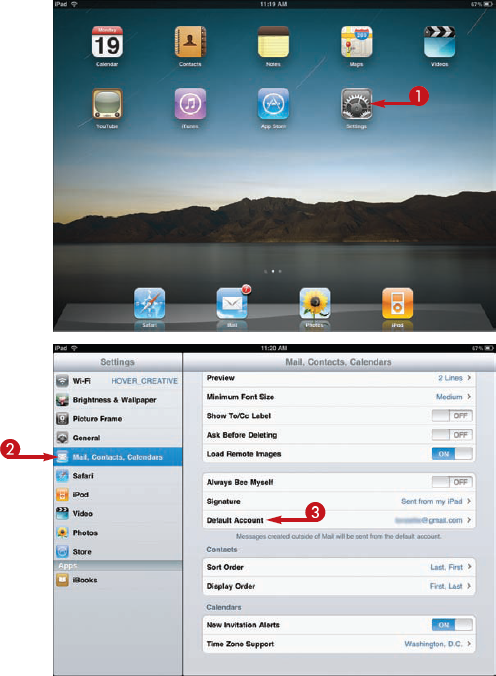
Once you have set up multiple email accounts, your iPad will specify one as the default. You can specify a different account as the default mail account for your iPad to open when you tap the Mail app on the Home screen. Specifying a default email gives you quick access to your primary email.

Specify the Default Email Account

Tip
How does the Mail app choose the default email account once you have more than one?
The Mail app specifies the first email account that you created on the iPad as the default email account. When you create an email message from other iPad apps, such as Photos or Safari, or by tapping the email address in Contacts, it is sent by using the default email account.

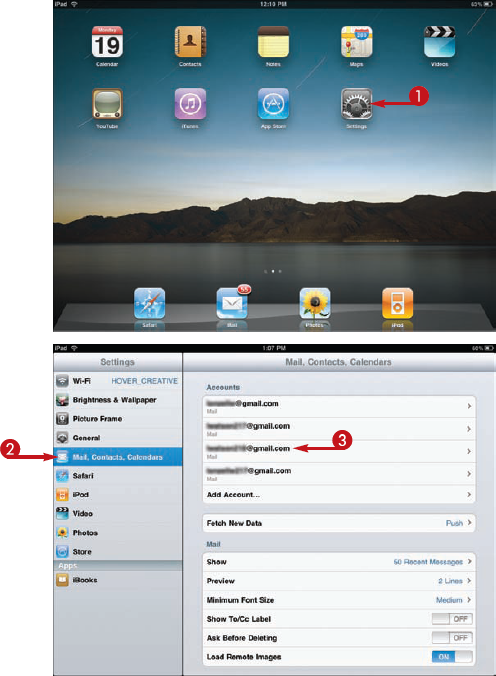
When you tap the Mail app on the Home screen, you are usually taken to the Inbox of the default email account. You can also switch from the current account to view the contents of the Inbox for your other iPad mail accounts. The ability to switch between accounts enables you to monitor the activities of multiple accounts.

Switch to Another Email Account


Tip
If I change the settings for one of my email accounts on my iPad, will it change the settings on my computer when I sync?
No. Your email account settings can only be synced from your computer to your iPad, not the other way around. This enables you to customize your email settings for an email account on your iPad without changing email account settings on your computer.
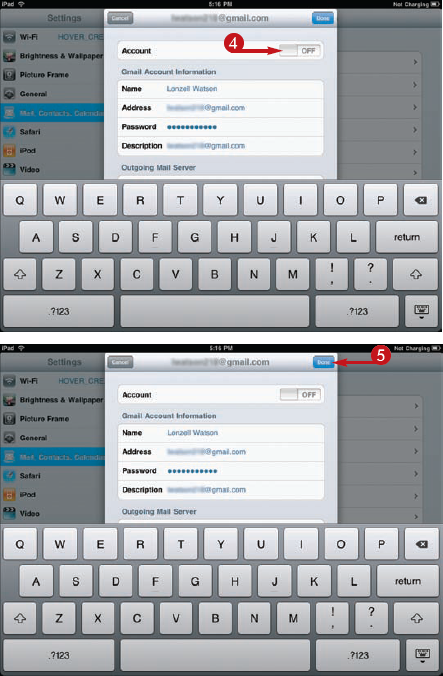
The Mail app on the iPad continuously checks for new emails for the accounts you have created. This repeated checking for email can more or less drain your battery power. You can temporarily disable an email address to conserve more of your battery power.

Disable an Email Account
The Settings screen appears.
The Mail, Contacts, Calendars screen appears.
The account's settings appear.
The account has now been disabled.
The email account is disabled.
Tip
Are there other ways I can save battery power other than disabling an email account?
There are many, but in regard to email, you can do a few things in particular. Accounts such as Microsoft Exchange, MobileMe, and Yahoo are referred to as push accounts. This means that when new messages are available, they are pushed/delivered to your iPad. This can eat your battery power, so consider turning off Push in the Mail settings. You can also check fewer email accounts by deleting an account.

If you are experiencing problems sending email from your POP account, try changing the outgoing server port to solve the issue. You can contact your ISP prior to specifying another port to make sure it is not blocking the port to which you want to switch.
Use a Different Server Port


Tip
What if I still experience outgoing email problems?
Check to see if all your settings are accurate. If you are still experiencing problems, call your ISP to verify if your account is set up correctly in the Mail app. Your ISP also can alert you to any policy conflicts that may be preventing you from sending email from a specific account.

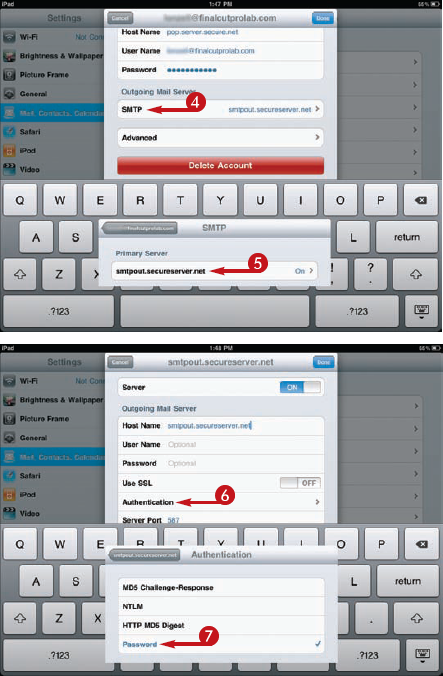
Authentication is a safety measure used to confirm that you are indeed the sender of the email and not a spammer. If your ISP requires authentication for outgoing mail, you can set up your email account to provide the appropriate credentials. The specification of a username and password is a common type of authentication.
Configure Authentication for Outgoing Mail

Tip
How many ISPs require authentication?
Many ISPs now require SMTP (Simple Mail Transfer Protocol) authentication for outgoing mail because of problems with junk email. You can check with your ISP to see if this applies to your service.

By default, the Mail app manually checks for new email messages whenever you tell it to. This is done by simply checking the Inbox for an account or by tapping the Refresh button (
Automatically Check for New Emails

Tip
Should I keep my iPad set to automatically check mail?
To conserve battery power, you should consider returning your iPad back to manually checking for new messages. You could also configure your iPad to check for new emails less frequently by choosing Every 30 minutes or Hourly. If you find the use of battery life miniscule, by all means, continue to have your iPad check for messages at regular intervals.

Your iPad makes it easy for you to email a link to a cool website to friends, family, or colleagues. With just a few taps in the Safari app, you can share what you find with others.

Email a Link to a Webpage
The Safari app opens.
Note
You can also perform a search with the Search field to navigate to the site you want to email.
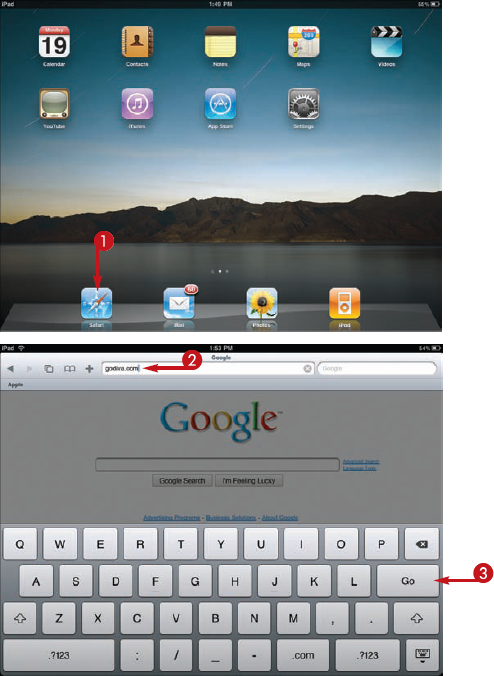
Safari takes you to the website.
Note
If you performed a search, the search results appear, from which you can tap to open the desired webpage.
A dialog box with several options opens.
A new email message opens.
Note
An email address must be listed for the contact if you choose someone from your Contacts list as a recipient.
Note
You can edit the message if you need to.
The message is sent to the recipient.

Tip
Are there other ways to email links to websites?
Yes. But some of them are not as streamlined as choosing the Mail Link to this Page option found in Safari. You can copy the URL of the webpage and then open the Mail app and paste the URL into a new message. Some websites are equipped with an option similar to the Mail Link to this Page option that can be found somewhere on the webpage. The mail option in Safari is a quick fix.
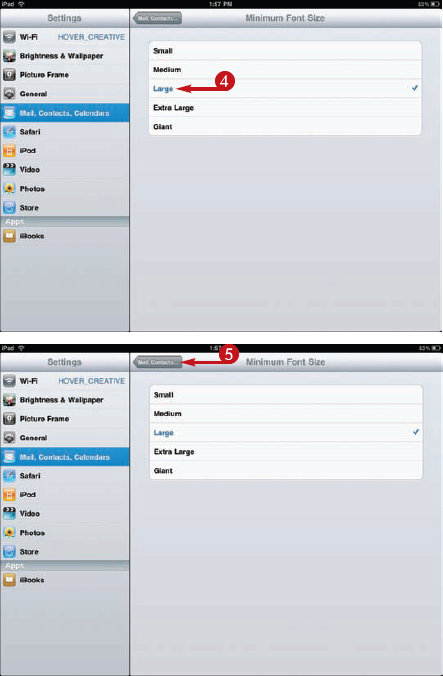
Your iPad makes it easy for you to change the font size for emails. You can set a minimum font size for emails, making them easier to read. If an email uses a larger font size than you specify, the font remains as is. If the font is smaller, your iPad scales up the font size accordingly.

Set Message Font Size

Tip
What can I do if I have trouble seeing an app on my iPad?
The iPad is equipped with a Zoom feature, which allows you to zoom into any app. You can use the Zoom feature to magnify the entire screen up to five times the normal size for increased readability. This feature works on the Home, Unlock, and Spotlight screens. You can also magnify apps that you purchase from the App Store. By default, the Zoom feature is disabled. To enable it, you will need to configure the triple-click function.

The Mail app enables you to customize your own email signature, the same as you would in the default mail program on your Mac. Creating a custom signature enables you to add your own personal touch to the bottom of outgoing email messages in the form of a block of text displaying your contact information or a short quote.

Create a Custom iPad Signature
The Settings screen appears.

The Mail, Contacts, Calendars screen appears.
The Signature screen appears along with the on-screen keyboard.
Note
An email signature can be as short as one word, such as "Cheers," to a complete quote. Short is best.
The Mail app saves your signature and uses it for all outgoing email messages.

Tip
Can I return to the original signature?
The Mail app does not provide a way to cancel your edit and return to the original signature itself, but you can always write in "Sent from my iPad" yourself. Consider adding a personal line of your own and then place "Sent from my iPad" underneath it so the recipient knows the message originated from your iPad.

You can disable images in the emails that you receive for faster load times and, more importantly, to help protect your privacy. If an image sent to you in an email is not attached to the actual email but kept on a remote server, your email will have to connect to the server to download the image. In the case of junk mail, this can open you up to "web bugs." Essentially, when you download the image from a remote server, the sender can find out personal information about you that could be used for marketing purposes.

Disable Remote Message Images


Tip
What exactly is a web bug?
A web bug is a reference embedded into HTML-formatted emails to images that reside on a remote server. When you open the email and image, Mail downloads the image by using an address for the remote server. In doing this, some marketers can learn information about you and track your surfing habits across the Internet. Websites can also contain web bugs.