
Chapter 13
Troubleshooting Your MacBook

To keep your MacBook running well, you need to perform basic maintenance, such as emptying the Trash, updating macOS and your apps with the latest fixes, and backing up your files. You may also need to troubleshoot your MacBook, solving problems such as corrupt preferences files, disk permission errors, or drive failure.
Reclaim Space by Emptying the Trash
Keep Your MacBook Current with Updates
Control Checking for Software Updates
Troubleshoot Corrupt Preference Files
Run First Aid from Within macOS
Using the macOS Help System
macOS has a built-in help system that enables you to solve problems that you encounter when using your MacBook and its software. You can launch the help system from the menu bar of the Finder. You can then either browse or search to find the information you need.
Most apps that run on macOS include help files. In such apps, you can use the Help menu at the right end of the menu bar to browse or search the help files.
Using the macOS Help System

![]() Click anywhere on the desktop.
Click anywhere on the desktop.
The Finder becomes active.
![]() Click Help.
Click Help.
The Help menu opens.
![]() Click Mac Help.
Click Mac Help.

The Mac Help window opens.
![]() You can click Browse topics to display a sidebar on the left of the window containing a navigable hierarchy of help topics.
You can click Browse topics to display a sidebar on the left of the window containing a navigable hierarchy of help topics.
![]() Click the Search box.
Click the Search box.
![]() Start typing a question or some keywords.
Start typing a question or some keywords.
![]() Search results appear in the Suggestions list as you type.
Search results appear in the Suggestions list as you type.
![]() Click the appropriate search result.
Click the appropriate search result.

The Mac Help window shows a list of topics related to your search terms.
![]() Click the topic you want to view.
Click the topic you want to view.

Mac Help displays the topic.
![]() Click a link to open another topic, an app or utility, or a web page.
Click a link to open another topic, an app or utility, or a web page.
![]() Click Back (
Click Back (![]() ) to return to the previous screen you viewed.
) to return to the previous screen you viewed.
![]() When you finish using Help, click Close (
When you finish using Help, click Close (![]() ).
).
The Mac Help window closes.
Reclaim Space by Emptying the Trash
In macOS, the Trash is a receptacle for files you delete from your MacBook’s drives. Any file you place in the Trash remains there until you empty the Trash, or until the Trash runs out of space for files and automatically deletes the earliest files it contains; until then, you can recover the file from the Trash. You can reclaim drive space by emptying the Trash manually.
Reclaim Space by Emptying the Trash

Empty the Trash
![]() Click Trash (
Click Trash (![]() ) on the Dock.
) on the Dock.
Note: If the Trash icon on the Dock is the empty Trash can (![]() ), the Trash is already empty.
), the Trash is already empty.
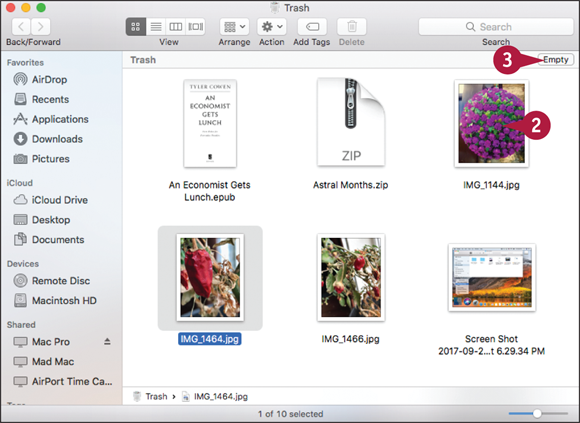
![]() Look through the files and folders in the Trash to make sure it contains nothing you want to keep.
Look through the files and folders in the Trash to make sure it contains nothing you want to keep.
To quickly view the contents of a file, use Quick Look. Click the file, and then press ![]() .
.
Note: You cannot open a file while it is in the Trash. If you want to open a file, you must remove it from the Trash.
![]() Click Empty.
Click Empty.

A dialog opens to confirm that you want to permanently erase the items in the Trash.
Note: You can turn off the confirmation of deleting files. Click Finder and then click Preferences. Click Advanced and then click Show warning before emptying the Trash (![]() changes to
changes to ![]() ).
).
![]() Click Empty Trash.
Click Empty Trash.
macOS empties the Trash and then closes the Finder window.

Restore a File or Folder to Its Previous Location
![]() In the Trash folder, click the file or folder.
In the Trash folder, click the file or folder.
![]() Click Action (
Click Action (![]() ).
).
![]() Click Put Back.
Click Put Back.
Note: You can also press ![]() + click an item and click Put Back on the contextual menu.
+ click an item and click Put Back on the contextual menu.
macOS restores the file or folder to its previous location.
Note: To move a file from the Trash to another folder, drag the file to that folder. For example, you can drag a file to the desktop.
Keep Your MacBook Current with Updates
You can use the App Store app built into macOS to check for updates to your MacBook, its operating system, and your App Store apps. When the App Store app finds updates, you can choose which to install.
Your MacBook must be connected to the Internet when you check for updates and download them. You can install most updates when your MacBook is either online or offline. Some updates require restarting your MacBook.
Keep Your MacBook Current with Updates

![]() macOS may display an Updates Available dialog prompting you to install updates. You can click Updates Available to go to the Updates tab in the App Store app, click Install to install the updates immediately, or click Later to install the updates later.
macOS may display an Updates Available dialog prompting you to install updates. You can click Updates Available to go to the Updates tab in the App Store app, click Install to install the updates immediately, or click Later to install the updates later.
![]() A badge on the App Store icon indicates the number of updates available.
A badge on the App Store icon indicates the number of updates available.
![]() Click App Store (
Click App Store (![]() ) on the Dock.
) on the Dock.
Note: You can also open the App Store app by clicking Apple (![]() ) and then clicking App Store.
) and then clicking App Store.

The App Store app opens.
![]() Click Updates.
Click Updates.
The Updates pane appears.
App Store automatically checks for updates.
If updates are available, the Updates Available list shows the details.
Note: If the message No Updates Available appears, go to step 5.
![]() You can install an individual update by clicking Update. If the update requires a restart, click Restart.
You can install an individual update by clicking Update. If the update requires a restart, click Restart.
![]() You can click More to display full details of an update.
You can click More to display full details of an update.
![]() To install all the updates, click Update All.
To install all the updates, click Update All.

Note: You can set the App Store app to install updates or remind you later. Click ![]() next to Update All and then click Try in an Hour, Try Tonight, or Remind Me Tomorrow, as needed.
next to Update All and then click Try in an Hour, Try Tonight, or Remind Me Tomorrow, as needed.
Note: If installing the updates requires a restart, App Store displays a dialog. Click Restart to restart now. Alternatively, click Later and then click Install in an Hour, Install Tonight, or Remind Me Tomorrow.
![]() macOS installs the updates, restarting your MacBook if necessary.
macOS installs the updates, restarting your MacBook if necessary.

![]() The App Store app checks for updates and displays the result of the check.
The App Store app checks for updates and displays the result of the check.
Note: If App Store finds further updates, click Update All to install them.
![]() Click Close (
Click Close (![]() ).
).
The App Store app closes.
Control Checking for Software Updates
The App Store app enables you to easily check for software updates available through the App Store. These include updates for macOS itself, the apps that Apple releases, and third-party apps sold through the App Store. To keep your MacBook running smoothly and protect it from both online and offline threats, you should apply software updates when they become available.
You can configure the App Store app to check automatically for updates on a schedule. You can also check for updates manually.
Control Checking for Software Updates

![]() Click System Preferences (
Click System Preferences (![]() ) on the Dock.
) on the Dock.
Note: You can also open System Preferences by clicking Apple (![]() ) on the menu bar and then clicking System Preferences.
) on the menu bar and then clicking System Preferences.
The System Preferences window opens.
![]() Click App Store (
Click App Store (![]() ).
).

The App Store preferences pane appears.
![]() Click Automatically check for updates (
Click Automatically check for updates (![]() changes to
changes to ![]() ).
).
![]() Click Download newly available updates in the background (
Click Download newly available updates in the background (![]() changes to
changes to ![]() ) if you want to download updates.
) if you want to download updates.
Note: Downloading updates in the background is usually helpful, because you can then install the updates quickly.
![]() Click Install app updates (
Click Install app updates (![]() changes to
changes to ![]() ) if you want to install app updates automatically.
) if you want to install app updates automatically.

![]() Click Install macOS updates (
Click Install macOS updates (![]() changes to
changes to ![]() ) if you want to install operating system updates automatically.
) if you want to install operating system updates automatically.
![]() Click Install system data files and security updates (
Click Install system data files and security updates (![]() changes to
changes to ![]() ).
).
![]() Click Automatically download apps purchased on other Macs (
Click Automatically download apps purchased on other Macs (![]() changes to
changes to ![]() ) if you want to automatically add apps you buy on other Macs using the same Apple ID to your MacBook.
) if you want to automatically add apps you buy on other Macs using the same Apple ID to your MacBook.

![]() You can click Check Now to check for updates.
You can click Check Now to check for updates.
![]() Click Purchases and In-app Purchases (
Click Purchases and In-app Purchases (![]() ) and then click Always Require or Require After 15 Minutes, as needed.
) and then click Always Require or Require After 15 Minutes, as needed.
Note: For security, choose Always Require for both Purchases and In-app Purchases and Free Downloads.
![]() Click Free Downloads (
Click Free Downloads (![]() ) and then click Require Password or Save Password, as needed.
) and then click Require Password or Save Password, as needed.
![]() Click Close (
Click Close (![]() ).
).
System Preferences closes.
Back Up Your Files
To enable you to keep your valuable files safe, macOS includes an automatic backup application called Time Machine. Time Machine automatically saves copies of your files to an external drive or an AirPort Time Capsule. You can choose what drive to use, how frequently to back up your files, and what folders to include.
To protect your data, you must back up your files. Time Machine is the most convenient choice because it takes only a few minutes to set up and thereafter runs automatically.
Back Up Your Files

![]() If you will use an external drive for Time Machine, connect the drive to your MacBook.
If you will use an external drive for Time Machine, connect the drive to your MacBook.
![]() Press
Press ![]() + click System Preferences (
+ click System Preferences (![]() ) on the Dock.
) on the Dock.
The contextual menu appears.
![]() Click Time Machine.
Click Time Machine.
The System Preferences window opens, showing the Time Machine preferences pane.
![]() Click Back Up Automatically (
Click Back Up Automatically (![]() changes to
changes to ![]() ).
).

The Select Disk dialog opens.
![]() Click the drive or AirPort Time Capsule you want to use for backup.
Click the drive or AirPort Time Capsule you want to use for backup.
![]() You can click Encrypt backups (
You can click Encrypt backups (![]() changes to
changes to ![]() ) to encrypt your backups.
) to encrypt your backups.
![]() Click Use Disk.
Click Use Disk.
The Select Disk dialog closes.
![]() You can click Show Time Machine in menu bar (
You can click Show Time Machine in menu bar (![]() changes to
changes to ![]() ) to give yourself easy access to Time Machine.
) to give yourself easy access to Time Machine.
![]() Click Options.
Click Options.

The Options dialog opens.
![]() Click Back up while on battery power (
Click Back up while on battery power (![]() changes to
changes to ![]() ) if you want your MacBook to perform backups even when it is running on battery power.
) if you want your MacBook to perform backups even when it is running on battery power.
![]() Click Notify after old backups are deleted (
Click Notify after old backups are deleted (![]() changes to
changes to ![]() ) if you want notifications of deletions.
) if you want notifications of deletions.
![]() Click Add (
Click Add (![]() ).
).

A dialog opens.
![]() Select each drive or folder you want to exclude from backup.
Select each drive or folder you want to exclude from backup.
![]() Click Exclude.
Click Exclude.
The dialog closes, and Time Machine adds the items to the Exclude These Items from Backups dialog.
![]() Click Save.
Click Save.
The Options dialog closes.
![]() Click Close (
Click Close (![]() ).
).
The System Preferences window closes.
Recover Files from Backup
The Time Machine feature enables you to easily recover files from your backups. So when you delete a file by accident, or discover that a file has become corrupted, you can recover the file from backup by opening Time Machine. You can recover either the latest copy of the file or an earlier copy.
If you still have the current copy of the file that you recover, you can choose whether to overwrite that copy or keep it. Time Machine refers to this copy as the “original” file.
Recover Files from Backup

Note: This section shows you how to recover files using the Finder. To recover old data within Contacts, Calendar, or Mail, open the appropriate app and make it active before giving the Enter Time Machine command.
![]() Click Time Machine (
Click Time Machine (![]() ) on the menu bar.
) on the menu bar.
The Time Machine menu opens.
![]() Click Enter Time Machine.
Click Enter Time Machine.
Note: If the Time Machine status icon does not appear on the menu bar, click Launchpad (![]() ) on the Dock, and then click Time Machine (
) on the Dock, and then click Time Machine (![]() ) on the Launchpad screen.
) on the Launchpad screen.

Time Machine opens.
![]() The front window shows your MacBook’s drive or drives in their current state.
The front window shows your MacBook’s drive or drives in their current state.
![]() Backups of the selected drive or folder appear in the windows behind it, newest at the front.
Backups of the selected drive or folder appear in the windows behind it, newest at the front.
![]() The timeline on the right shows how far back in time the available backups go.
The timeline on the right shows how far back in time the available backups go.
![]() Click the date or time from which you want to recover the files or folders.
Click the date or time from which you want to recover the files or folders.

Time Machine brings the backup you chose to the front.
![]() Select the item or items you want to restore.
Select the item or items you want to restore.
![]() Click Restore.
Click Restore.

Time Machine disappears.
If restoring a file will overwrite the current version, the Copy dialog opens.
![]() Choose how to handle the file conflict:
Choose how to handle the file conflict:
![]() Click Replace to replace the current file with the older file.
Click Replace to replace the current file with the older file.
![]() Click Keep Original to keep the current file.
Click Keep Original to keep the current file.
![]() Click Keep Both to keep both versions of the file. Time Machine adds “(Original)” to the name of the current version.
Click Keep Both to keep both versions of the file. Time Machine adds “(Original)” to the name of the current version.
Recover When macOS Crashes
Normally, macOS runs stably and smoothly, but sometimes the operating system may suffer a crash. Crashes can occur for various reasons, including power fluctuations, bad memory modules, an app that has been corrupted, or problems with disk permissions.
Your MacBook may detect that the crash has occurred and display an informational message, but in other cases the MacBook’s screen may simply freeze and continue displaying the same information. Normally, you can recover from a crash by turning off your MacBook’s power and then turning it on again.
Recover When macOS Crashes

Recover from the Screen Freezing
![]() If the pointer shows the “wait” cursor that looks like a spinning beach ball, wait a couple of minutes to see if macOS can recover from the problem. If the pointer has disappeared, go straight to step 2.
If the pointer shows the “wait” cursor that looks like a spinning beach ball, wait a couple of minutes to see if macOS can recover from the problem. If the pointer has disappeared, go straight to step 2.
![]() To verify that your MacBook is not responding, press keys on the keyboard or move your fingers on the trackpad.
To verify that your MacBook is not responding, press keys on the keyboard or move your fingers on the trackpad.

![]() Press and hold
Press and hold ![]() +
+ ![]() and press the MacBook’s power button.
and press the MacBook’s power button.
![]() If the MacBook does not respond to that key combination, press and hold the MacBook’s power button for about 4 seconds.
If the MacBook does not respond to that key combination, press and hold the MacBook’s power button for about 4 seconds.
The MacBook turns off.
![]() Wait at least 8 seconds, and then press the power button once to restart the MacBook.
Wait at least 8 seconds, and then press the power button once to restart the MacBook.

Recover from a Detected Crash
When your MacBook detects a macOS crash, it dims the screen and displays a message in the center.
![]() Read the message for information.
Read the message for information.
![]() Press and hold the MacBook’s power button for about 4 seconds.
Press and hold the MacBook’s power button for about 4 seconds.
The MacBook turns off.
![]() Wait at least 8 seconds, and then press the power button once to restart the MacBook.
Wait at least 8 seconds, and then press the power button once to restart the MacBook.

Note: Depending on how your MacBook is configured, macOS may log you in automatically or display the Login dialog.
The login screen appears.
![]() Click your username, and then log in to your account as normal.
Click your username, and then log in to your account as normal.
Troubleshoot Corrupt Preference Files
macOS and many apps enable you to set preferences to customize the way they run. Each app stores its configuration in a special file called a preference file. Sometimes a preference file becomes corrupted, which may prevent the app from running properly or cause it to crash.
To fix the problem, you delete the preference file. This forces the app to create a new preference file from scratch with default settings. When the app is running properly again, you can choose your custom settings again.
Troubleshoot Corrupt Preference Files

![]() Quit the problem app if it is running. Click the app’s menu, such as the Contacts menu for the Contacts app, and then click the Quit command, such as Quit Contacts.
Quit the problem app if it is running. Click the app’s menu, such as the Contacts menu for the Contacts app, and then click the Quit command, such as Quit Contacts.
Note: If you cannot quit the app by using its Quit command, force quit it. Press ![]() + click the app’s Dock icon and click Force Quit on the contextual menu.
+ click the app’s Dock icon and click Force Quit on the contextual menu.
![]() Click an open space on the desktop.
Click an open space on the desktop.

The Finder becomes active.
![]() Click Go.
Click Go.
The Go menu opens.
![]() Press and hold
Press and hold ![]() .
.
The Library item appears on the Go menu.
Note: macOS hides the Library item on the Go menu until you press ![]() .
.
![]() Click Library.
Click Library.

The contents of the Library folder appear.
![]() Click Preferences.
Click Preferences.
The contents of the Preferences folder appear.
![]() Click the preference file for the problem application. See the tip for help on identifying the file.
Click the preference file for the problem application. See the tip for help on identifying the file.
Note: If the application has two or more preference files, move them all to the Trash.
![]() Click Action (
Click Action (![]() ).
).
The Action menu opens.
![]() Click Move to Trash.
Click Move to Trash.
macOS moves the file to the Trash.
![]() Click Close (
Click Close (![]() ).
).

The Finder window closes.
![]() Start the application. Continuing the example, click Contacts (
Start the application. Continuing the example, click Contacts (![]() ) on the Dock.
) on the Dock.
The application creates a new preference file containing default settings.
![]() Set preferences in the application. In most applications, click the application’s menu and click Preferences to open the Preferences window.
Set preferences in the application. In most applications, click the application’s menu and click Preferences to open the Preferences window.
The application saves your preferences in the new preference file.
Run First Aid from Within macOS
macOS includes automatic tools for fixing minor problems that may occur as your MacBook runs. Normally, the operating system resolves these problems in the background without your involvement.
However, sometimes your MacBook may exhibit disk problems that these automatic tools cannot fix. In such cases, you can run the First Aid tool from within macOS to try to resolve the issue.
Run First Aid from Within macOS

![]() Click Launchpad (
Click Launchpad (![]() ) on the Dock.
) on the Dock.
The Launchpad screen appears.
![]() Press
Press ![]() .
.
Launchpad displays only those items that include a word starting with D.
![]() Click Disk Utility.
Click Disk Utility.

Disk Utility opens.
![]() Click your MacBook’s drive.
Click your MacBook’s drive.
The controls for manipulating the drive appear.
![]() Click First Aid.
Click First Aid.
The Would You Like to Run First Aid? dialog opens.
![]() Click Run.
Click Run.
Note: If the First Aid Needs to Temporarily Lock the Boot Volume dialog opens, click Continue. Locking the boot volume may prevent apps from responding normally during the First Aid operation.

![]() Disk Utility searches for problems and resolves any that it can resolve. The process may take several minutes. If possible, avoid using your MacBook during the scan.
Disk Utility searches for problems and resolves any that it can resolve. The process may take several minutes. If possible, avoid using your MacBook during the scan.
![]() Click Show Details if you want to see details of the repairs.
Click Show Details if you want to see details of the repairs.

Disk Utility informs you when the First Aid process is complete.
![]() Click Done.
Click Done.
The dialog closes.
![]() Click Close (
Click Close (![]() ).
).
Disk Utility closes.
Run First Aid from macOS Utilities
If your MacBook will not start, you may be able to fix the problem by running First Aid. To do so, you start your MacBook from the recovery partition, which contains tools called macOS Utilities for recovering from problems. macOS Utilities enables you to launch the Disk Utility tool from outside macOS when the operating system is not working.
Run First Aid from macOS Utilities

![]() Start your MacBook by pressing the power button.
Start your MacBook by pressing the power button.
Note: If your MacBook is running, restart it by clicking Apple (![]() ) and then pressing
) and then pressing ![]() + clicking Restart.
+ clicking Restart.
![]() At the startup chime, press and hold
At the startup chime, press and hold ![]() +
+ ![]() until the Apple logo appears.
until the Apple logo appears.
Your MacBook starts from the recovery partition.
The macOS Utilities screen appears.
![]() Click Disk Utility.
Click Disk Utility.
![]() Click Continue.
Click Continue.

The Disk Utility window opens.
![]() Click your MacBook’s internal drive.
Click your MacBook’s internal drive.
The controls for manipulating the drive appear.
![]() Click First Aid.
Click First Aid.
The Would You Like to Run First Aid? dialog opens.
![]() Click Run.
Click Run.

Disk Utility analyzes the drive and repairs problems, displaying its progress as it does so.
Disk Utility informs you when the First Aid process is complete.
![]() Click Done.
Click Done.

The dialog closes.
![]() Click Disk Utility.
Click Disk Utility.
The Disk Utility menu opens.
![]() Click Quit Disk Utility.
Click Quit Disk Utility.
Disk Utility closes, and the Install macOS dialog opens.
![]() Click macOS Utilities.
Click macOS Utilities.
The macOS Utilities menu opens.
![]() Click Quit macOS Utilities.
Click Quit macOS Utilities.
A confirmation dialog opens.
![]() Click Restart.
Click Restart.
Your MacBook restarts into macOS from the internal drive.
Reinstall macOS to Solve Severe Problems
If your MacBook suffers severe software damage, macOS may not be able to run. When this happens, you can fix the problem by reinstalling macOS. You may also need to reinstall macOS if your MacBook runs but crashes frequently and you are not able to restore stability by repairing the permissions or repairing the disk.
macOS normally includes a recovery partition that enables you to begin reinstalling the operating system. Once connected to the Internet, your MacBook can then download the files it needs from Apple’s servers and complete the reinstallation.
Reinstall macOS to Solve Severe Problems

![]() Press the power button.
Press the power button.
![]() At the startup chime, press and hold
At the startup chime, press and hold ![]() +
+ ![]() until the Apple logo appears.
until the Apple logo appears.
Your MacBook starts from the recovery partition.
Note: If your MacBook does not have a recovery partition, you may be able to use the Internet Recovery feature to download the files required for starting recovery. Follow the prompts to connect to a Wi-Fi network and download the files.
The macOS Utilities screen appears.
![]() Click Reinstall macOS.
Click Reinstall macOS.
![]() Click Continue.
Click Continue.

The Install macOS screen appears.
![]() Click Continue.
Click Continue.
The Software License Agreement screen appears.
![]() Click Agree.
Click Agree.
A confirmation dialog opens.
![]() Click Agree.
Click Agree.

The screen for selecting the installation disk appears.
![]() If a disk is grayed out, you cannot select it.
If a disk is grayed out, you cannot select it.
![]() Click the disk.
Click the disk.
![]() Click Install.
Click Install.
Note: If the Sign In to Download from the App Store dialog opens, type your Apple ID and your password, and then click Sign In.

Install macOS begins downloading the components it needs to install macOS.
![]() After the reinstallation finishes and your MacBook restarts, log in. You can then access your files as before.
After the reinstallation finishes and your MacBook restarts, log in. You can then access your files as before.