
Chapter 7
Working with Images
Whether you load your images from a digital camera or a scanner, download them from the Internet, or draw them yourself, Windows 8 comes with a number of useful tools for working with those images. In this chapter you learn how to view your images, import images from a scanner or camera, fix photo problems, and print images.
Import Images from a Digital Camera
Rotate and Straighten an Image
Open the Pictures Library
Before you can work with your images, you need to view them on your computer. You do that by opening the Windows 8 Pictures library, which is a special folder designed specifically for storing images.
This section assumes you already have some images on your computer. If you do not yet have any images to view, see the sections later in this chapter that show you how to scan images and import images from a digital camera.
Open the Pictures Library
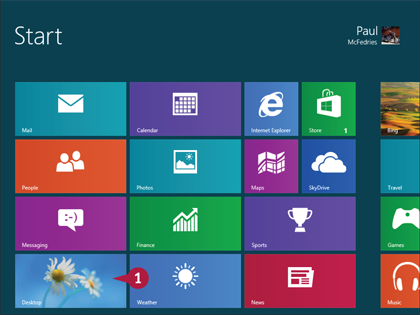
![]() On the Start screen, click Desktop.
On the Start screen, click Desktop.
![]() Click File Explorer.
Click File Explorer.
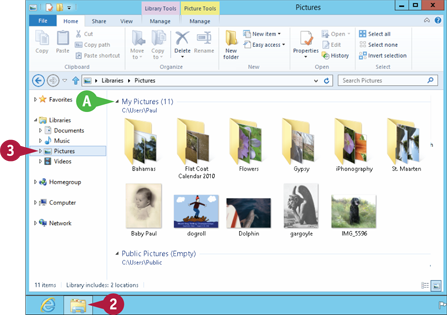
![]() Click Pictures.
Click Pictures.
A The Pictures library appears.
Preview an Image
Although Windows 8 displays a small version of each image in the Pictures library, you can take a closer look at a particular image by previewing it.
You can preview any image file using the Preview pane in the Pictures library. The Preview pane, which when active appears on the right side of the window, displays a larger version of the image so that you can see its details. You can also use the Preview pane to preview images stored in subfolders — folders stored within the main Pictures library.
Preview an Image
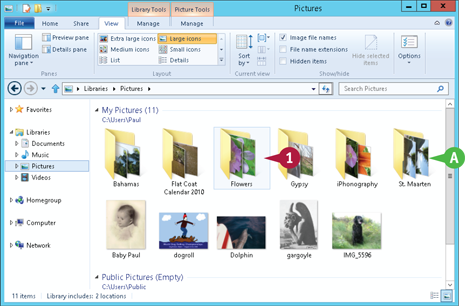
![]() If the image you want to preview is located inside a subfolder, double-click that subfolder.
If the image you want to preview is located inside a subfolder, double-click that subfolder.
A Subfolders are shown in the Pictures library with a yellow folder icon, each of which also displays a couple of images stored in the folder.
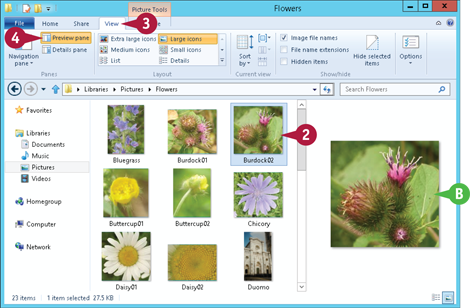
![]() Click the image file you want to preview.
Click the image file you want to preview.
![]() Click the View tab.
Click the View tab.
![]() Click Preview pane.
Click Preview pane.
B Windows 8 opens the Preview pane and displays a larger version of the image.
View Your Images
If you want to look at several images, Windows 8 offers a couple of tools that you can use to navigate backward and forward through the images in the Pictures library.
By default, Windows 8 comes with the Windows Photo Viewer. Alternatively, you can install Photo Gallery and use it to view your images. See Chapter 2 to learn how to install Photo Gallery.
You can also use either program to zoom in and out of an image and to run an image slide show.
View Your Images
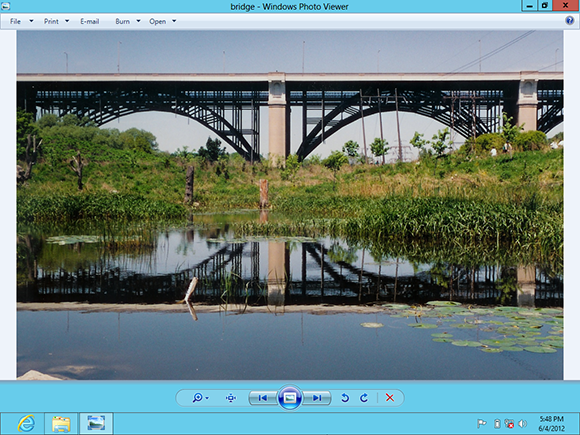
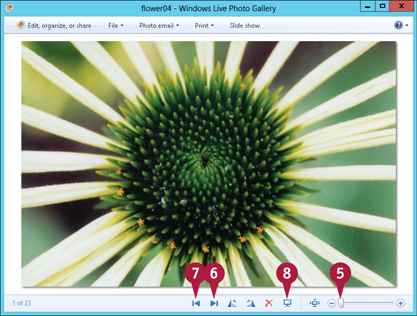
View Images Using Windows Photo Viewer
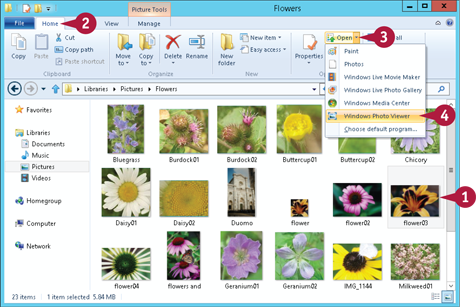
![]() Click the image.
Click the image.
![]() Click the Home tab.
Click the Home tab.
![]() Click the Open
Click the Open ![]() .
.
![]() Click Windows Photo Viewer.
Click Windows Photo Viewer.
Note: If you see a notification telling you there are new programs that can open this type of file, you can ignore the message.
The image opens in Windows Photo Viewer.
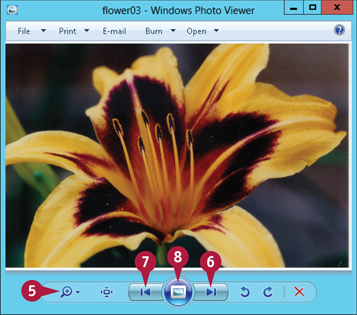
![]() To get a closer look at the image, click the magnifying glass and then click and drag the slider up.
To get a closer look at the image, click the magnifying glass and then click and drag the slider up.
![]() To view the next image in the folder, click the Next button (
To view the next image in the folder, click the Next button (![]() ).
).
![]() To view the previous image in the folder, click the Previous button (
To view the previous image in the folder, click the Previous button (![]() ).
).
![]() To start a slide show of all the images in the folder, click the Play Slide Show button (
To start a slide show of all the images in the folder, click the Play Slide Show button (![]() ).
).
Note: To stop the slide show, press ![]() .
.
View Images Using Photo Gallery
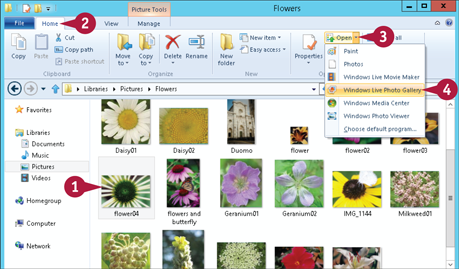
![]() Click the image.
Click the image.
![]() Click the Home tab.
Click the Home tab.
![]() Click the Open
Click the Open ![]() .
.
![]() Click Photo Gallery.
Click Photo Gallery.
The image opens in Photo Gallery.
![]() To see more of the image, click and drag the slider to the right.
To see more of the image, click and drag the slider to the right.
![]() To view the next image in the folder, click the Next button (
To view the next image in the folder, click the Next button (![]() ).
).
![]() To view the previous image in the folder, click the Previous button (
To view the previous image in the folder, click the Previous button (![]() ).
).
![]() To start a slide show of all the images in the folder, click the Play Slide Show button (
To start a slide show of all the images in the folder, click the Play Slide Show button (![]() ).
).
Note: To stop the slide show, press ![]() .
.
TIP
Is there a way I can view my pictures without using the Photo Gallery Viewer?
Yes, you can change the Picture folder’s view to display large thumbnails — scaled-down versions of the actual images:
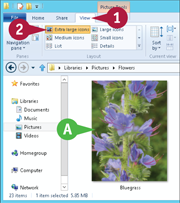
![]() Click the View tab.
Click the View tab.
![]() Click Extra large icons.
Click Extra large icons.
A Windows 8 displays the images as thumbnails.
Scan an Image
You can create a digital copy of a photo or other image by using a document scanner, or the scanner component of an all-in-one printer. The scanner copies the image to your computer, where you can then store it as a file on your hard drive.
You can use a scanned image in many ways. For example, you can scan a photo to e-mail to friends or publish on a web page. You can also scan a logo or other image to use in a document.
Scan an Image
![]() Turn on your scanner or all-in-one printer and position a photo or other image on the scanner bed.
Turn on your scanner or all-in-one printer and position a photo or other image on the scanner bed.
![]() On the Start screen, press
On the Start screen, press ![]() +
+![]() .
.
The Settings search pane appears.
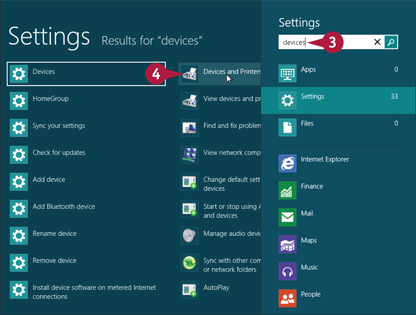
![]() Type devices.
Type devices.
![]() Click Devices and Printers.
Click Devices and Printers.
The Devices and Printers window appears.
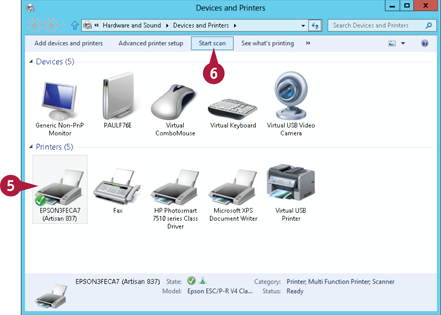
![]() Click the device you want to use to perform the scan.
Click the device you want to use to perform the scan.
![]() Click Start scan.
Click Start scan.
The New Scan dialog box appears.
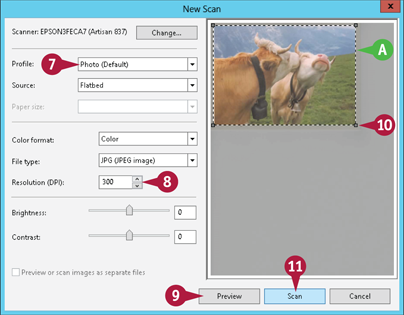
![]() Click the Profile
Click the Profile ![]() and then click Photo.
and then click Photo.
![]() Click the Resolution
Click the Resolution ![]() to specify the scan resolution.
to specify the scan resolution.
Note: The higher the resolution, the sharper the image, but the larger the resulting file.
![]() Click Preview.
Click Preview.
A A preview of the scan appears here.
![]() Click and drag the edges of the dashed rectangle to set the scan area.
Click and drag the edges of the dashed rectangle to set the scan area.
![]() Click Scan.
Click Scan.
Windows 8 scans the image.
The Import Pictures and Videos dialog box appears.
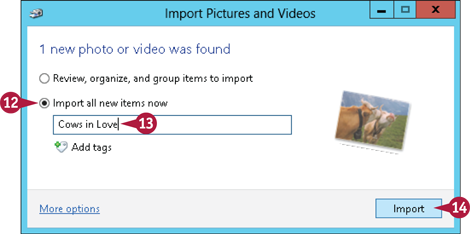
![]() Click Import all new items now (
Click Import all new items now (![]() changes to
changes to ![]() ).
).
![]() Type a word or phrase that describes the scan.
Type a word or phrase that describes the scan.
![]() Click Import.
Click Import.
Windows 8 imports the image to your computer.
Import Images from a Digital Camera
You can import photos from a digital camera and save them on your computer. If your camera stores the photos on a memory card, you can also use a memory card reader attached to your computer to upload the digital photos from the removable drive that Windows 8 sets up after you insert the card.
To perform the import directly from your digital camera, you need a cable to connect your camera to your PC. Most digital cameras come with a USB cable.
Once you have the digital photos on your system, you can view, make repairs to, or print the images.
Import Images from a Digital Camera
![]() Plug in your camera or memory storage card reader.
Plug in your camera or memory storage card reader.
A notification appears.
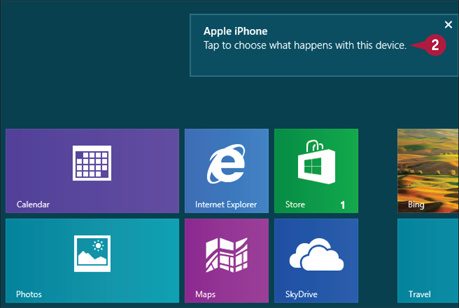
![]() Click the notification.
Click the notification.
Windows 8 displays a list of actions you can perform.
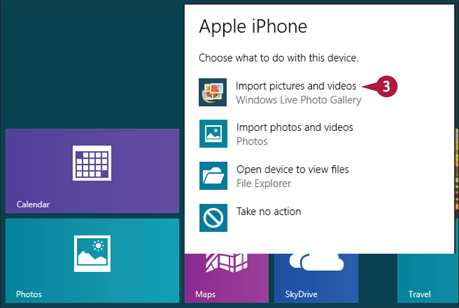
![]() Click Import pictures and videos.
Click Import pictures and videos.
Note: You see the Import option only if you have Photo Gallery installed. Otherwise, click Open device to view files, double-click your camera, and then keep double-clicking folders until you see your images. You can then copy the images to your Pictures library.
The Import Photos and Videos dialog box appears.
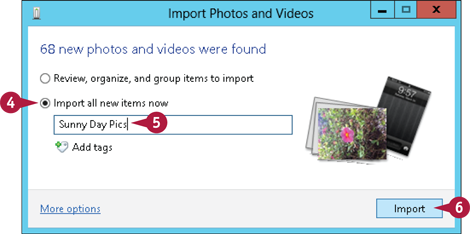
![]() Click Import all new items now (
Click Import all new items now (![]() changes to
changes to ![]() ).
).
![]() Type a word or phrase that describes the photos.
Type a word or phrase that describes the photos.
![]() Click Import.
Click Import.
Windows 8 begins importing the digital photos.
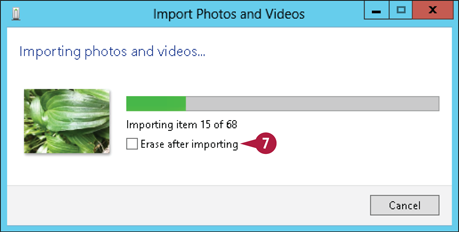
![]() To have Windows 8 erase the photos from the camera or card, click Erase after importing (
To have Windows 8 erase the photos from the camera or card, click Erase after importing (![]() changes to
changes to ![]() ).
).
When the import is complete, Photo Gallery appears and displays the imported photos.
TIPS
What do I do if I want to import only some of the photos on my camera?
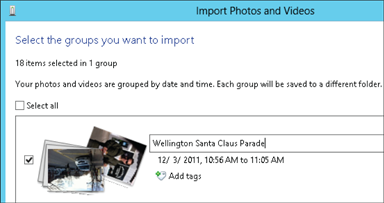
In the Import Photos and Videos dialog box, click Review, organize, and group items to import (![]() changes to
changes to ![]() ) and then click Next. Click the check box beside a group of photos you want to import (
) and then click Next. Click the check box beside a group of photos you want to import (![]() changes to
changes to ![]() ), type a name for the group, and then click Import.
), type a name for the group, and then click Import.
How do I view the imported photos?
If you have closed Picture Gallery, note that Windows 8 stores the imported digital photos in the Pictures library. It creates a new subfolder, the name of which is whatever word or phrase you type in the Import Photos and Videos dialog box. To view the photos, click the Photos app, click Pictures library, and then click the subfolder that holds your imported photos.
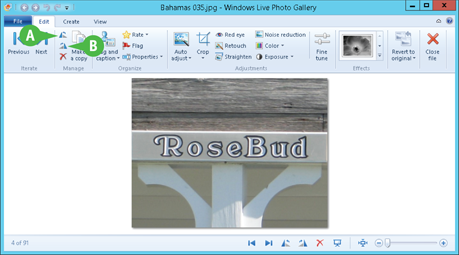
Repair a Digital Image
You can use Photo Gallery to improve the look of digital photos and other images. When you open an image in Photo Gallery, the ribbon offers a number of tools for repairing various image attributes.
The image window enables you to reduce the image noise problems, which are small flaws in the image. Photo Gallery also offers a set of tools that automatically adjust your image. Using the image window, you can automatically adjust an image’s brightness, contrast, color temperature, tint, and saturation. See Chapter 2 to learn how to download and install Photo Gallery.
Repair a Digital Image

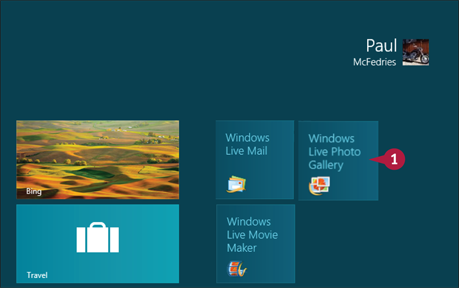
![]() Click Photo Gallery.
Click Photo Gallery.
Photo Gallery appears.
Note: The first time you run the program, it asks if you want to use the program to open certain file types. Click Yes.
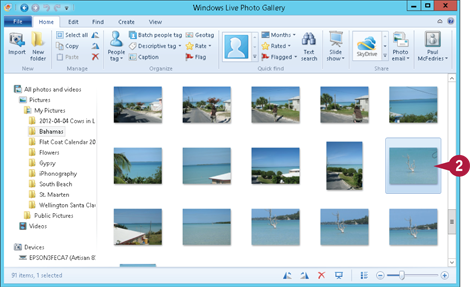
![]() Double-click the image you want to repair.
Double-click the image you want to repair.
Photo Gallery opens the image and displays the Edit tab.
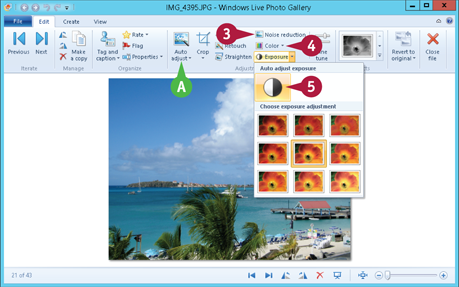
![]() To fix small flaws, click Noise reduction.
To fix small flaws, click Noise reduction.
![]() To fix the colors, click Color and then click Auto adjust color.
To fix the colors, click Color and then click Auto adjust color.
![]() To fix the exposure, click Exposure and then click Auto adjust exposure.
To fix the exposure, click Exposure and then click Auto adjust exposure.
A To adjust all these properties at once, click Auto adjust.
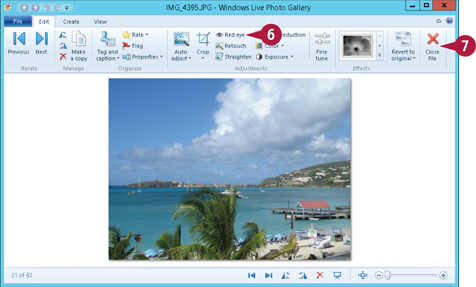
![]() To remove red eye from a photo, click Red eye and then drag a rectangle around the red eye.
To remove red eye from a photo, click Red eye and then drag a rectangle around the red eye.
![]() When you are done, click Close file.
When you are done, click Close file.
Photo Gallery applies the repairs.
TIP
I do not like the repairs I made to my image. Can I get the original image back?
Yes, you can. Photo Gallery always keeps a backup copy of the original image, just in case. To undo all your changes and get the original image back, double-click the image to open it. In the image window’s Edit tab, click Revert to original (or press ![]() +
+![]() ), and then click Revert.
), and then click Revert.
Crop an Image
If you have an image containing elements that you do not want or need to see, you can often cut out those elements. This is called cropping, and you can do this with Photo Gallery.
When you crop a photo, you specify a rectangular area of the photo that you want to keep. Photo Gallery discards everything outside the rectangle.
Cropping is a useful skill to have because it can help give focus to the true subject of a photo. Cropping is also useful for removing extraneous elements that appear on or near the edges of a photo.
Crop an Image
![]() Click Photo Gallery.
Click Photo Gallery.
Photo Gallery appears.
![]() Double-click the image you want to repair.
Double-click the image you want to repair.
Photo Gallery opens the image and displays the Edit tab.
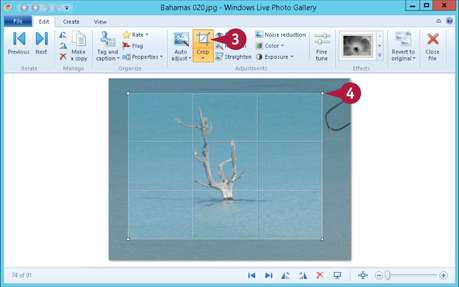
![]() Click the top half of the Crop button.
Click the top half of the Crop button.
Photo Gallery displays a cropping rectangle on the photo.
![]() Click and drag a corner or side to define the area you want to keep.
Click and drag a corner or side to define the area you want to keep.
Note: Remember that Photo Gallery keeps the area inside the rectangle.
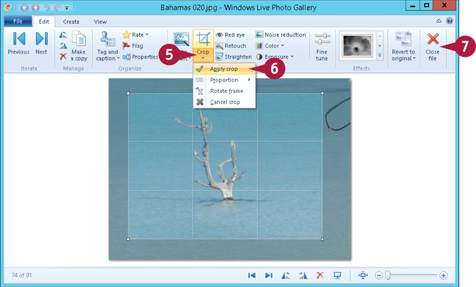
![]() Click the bottom half of the Crop button.
Click the bottom half of the Crop button.
![]() Click Apply crop.
Click Apply crop.
![]() Click Close file.
Click Close file.
Photo Gallery closes the image.
TIP
Is there a quick way to crop a photo to a certain size?
Yes, Photo Gallery enables you to specify a specific ratio, such as 4 × 6 or 5 × 7. Follow these steps:
![]() Repeat steps 1 and 2 to open the image.
Repeat steps 1 and 2 to open the image.
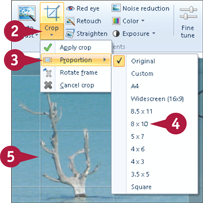
![]() Click the bottom half of the Crop button.
Click the bottom half of the Crop button.
![]() Click Proportion.
Click Proportion.
![]() Click the ratio you want to use.
Click the ratio you want to use.
![]() To maintain the size, drag the inside of the crop rectangle rather than the corners or sides.
To maintain the size, drag the inside of the crop rectangle rather than the corners or sides.
![]() Click Close file.
Click Close file.
Photo Gallery exits edit mode.
Rotate and Straighten an Image
You can rotate and straighten a photo using Photo Gallery.
Depending on how you held your camera when you took a shot, the resulting photo might show the subject sideways or upside down. To fix this problem, you can use Photo Gallery to rotate the photo so that the subject appears right-side up. You can rotate a photo either clockwise or counterclockwise.
Despite your best efforts, you might end up with a photo that is not quite level. To fix this problem, you can use Photo Gallery to nudge the photo clockwise or counterclockwise so that the subject appears straight.
Rotate and Straighten an Image
Open the Image for Editing

![]() Click Photo Gallery.
Click Photo Gallery.
Photo Gallery appears.
![]() Double-click the image you want to repair.
Double-click the image you want to repair.
Photo Gallery opens the image and displays the Edit tab.
Rotate the Image
![]() Rotate the image in the direction you want:
Rotate the image in the direction you want:
A Click Rotate left (![]() ) to rotate the image counterclockwise.
) to rotate the image counterclockwise.
B Click Rotate right (![]() ) to rotate the image clockwise.
) to rotate the image clockwise.
Straighten the Image
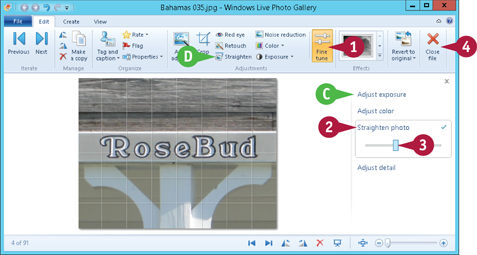
![]() Click Fine tune.
Click Fine tune.
C Photo Gallery displays extra repair tools.
![]() Click Straighten photo.
Click Straighten photo.
![]() Drag the slider bar (
Drag the slider bar (![]() ) left or right to adjust the angle of the image.
) left or right to adjust the angle of the image.
D You can also click Straighten to have Photo Gallery straighten the image automatically.
![]() Click Close file.
Click Close file.
Print an Image
You can print an image from the Pictures library, or from any subfolder in the Pictures library. When you activate the Print command, the Print Pictures dialog box appears. You can use this dialog box to choose a printer and a layout, and to send the image to the printer.
You can print a single image or multiple images. If you work with multiple images, you can print them individually or print two or more images per sheet.
Print an Image
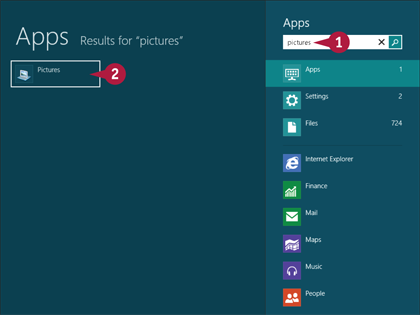
![]() On the Start screen, type pictures.
On the Start screen, type pictures.
![]() Click Pictures.
Click Pictures.
Windows 8 displays the Pictures library.
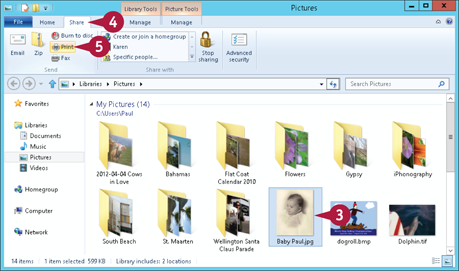
![]() Click the image or images you want to print.
Click the image or images you want to print.
Note: To select multiple images, press and hold ![]() and click each image.
and click each image.
![]() Click the Share tab.
Click the Share tab.
![]() Click Print.
Click Print.
The Print Pictures dialog box appears.
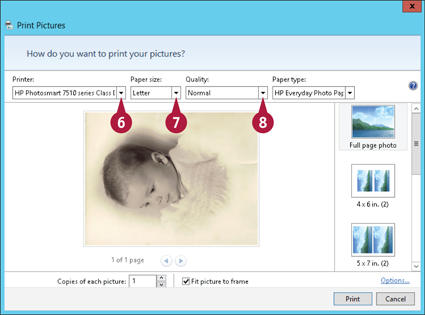
![]() If you use more than one printer with your computer, click
If you use more than one printer with your computer, click ![]() and click the printer you want to use.
and click the printer you want to use.
![]() Click
Click ![]() and click the size of paper you are using.
and click the size of paper you are using.
![]() Click
Click ![]() and click the printout quality you prefer.
and click the printout quality you prefer.
Note: Print quality is measured in dots per inch (dpi). The higher the dpi value, the better the print quality.

![]() Click the layout you want to use for the printed image.
Click the layout you want to use for the printed image.
![]() Click
Click ![]() to select the number of copies you want.
to select the number of copies you want.
A Windows 8 displays a preview of the printout.
![]() Click Print.
Click Print.
Windows 8 sends your image or images to the printer.