
Chapter 5. Terraform Tips and Tricks: Loops, If-Statements, Deployment, and Gotchas
Terraform is a declarative language. As discussed in Chapter 1, IaC in a declarative language tends to provide a more accurate view of what’s actually deployed than a procedural language, so it’s easier to reason about and makes it easier to keep the codebase small. However, certain types of tasks are more difficult in a declarative language.
For example, because declarative languages typically don’t have for-loops, how do you repeat a piece of logic—such as creating multiple similar resources—without copy and paste? And if the declarative language doesn’t support if-statements, how can you conditionally configure resources, such as creating a Terraform module that can create certain resources for some users of that module but not for others? Finally, how do you express an inherently procedural idea, such as a zero-downtime deployment, in a declarative language?
Fortunately, Terraform provides a few primitives—namely, the count meta-parameter, for_each and for
expressions, a life cycle block called create_before_destroy, a ternary operator, plus a large number of
functions—that allow you to do certain types of loops, if-statements, and zero-downtime deployments. Here are
the topics I’ll cover in this chapter:
- Loops
- Conditionals
- Zero-downtime deployment
- Terraform gotchas
Example Code
As a reminder, you can find all of the code examples in the book at: https://github.com/brikis98/terraform-up-and-running-code.
Loops
Terraform offers several different looping constructs, each intended to be used in a slightly different scenario:
-
countparameter, to loop over resources -
for_eachexpressions, to loop over resources and inline blocks within a resource -
forexpressions, to loop over lists and maps -
forstring directive, to loop over lists and maps within a string
Let’s go through these one at a time.
Loops with the count Parameter
In Chapter 2, you created an AWS Identity and Access Management (IAM) user by clicking around the AWS console. Now that you have this user, you can create and manage all future IAM users with Terraform. Consider the following Terraform code, which should live in live/global/iam/main.tf:
provider"aws"{region="us-east-2"}resource"aws_iam_user" "example"{name="neo"}
This code uses the aws_iam_user resource to create a single new IAM user. What if you want to create three IAM
users? In a general-purpose programming language, you’d probably use a for-loop:
# This is just pseudo code. It won't actually work in Terraform.for (i=0;i<3;i++){resource"aws_iam_user" "example"{name="neo"}}
Terraform does not have for-loops or other traditional procedural logic built into the language, so this syntax
will not work. However, every Terraform resource has a meta-parameter you can use called count. count is Terraform’s
oldest, simplest, and most limited iteration construct: all it does is define how many copies of the resource to
create. Here’s how you use count to create three IAM users:
resource"aws_iam_user" "example"{count=3name="neo"}
One problem with this code is that all three IAM users would have the same name, which would cause an error, since
usernames must be unique. If you had access to a standard for-loop, you might use the index in the for-loop, i, to
give each user a unique name:
# This is just pseudo code. It won't actually work in Terraform.for (i=0;i<3;i++){resource"aws_iam_user" "example"{name="neo.${i}"}}
To accomplish the same thing in Terraform, you can use count.index to get the index of each “iteration” in the
“loop”:
resource"aws_iam_user" "example"{count=3name="neo.${count.index}"}
If you run the plan command on the preceding code, you will see that Terraform wants to create three IAM users, each with a different name ("neo", "morpheus", "trinity"):
Terraform will perform the following actions:

  # aws_iam_user.example[0] will be created
  + resource "aws_iam_user" "example" {
      + arn           = (known after apply)
      + force_destroy = false
      + id            = (known after apply)
      + name          = "neo.0"
      + path          = "/"
      + unique_id     = (known after apply)
    }

  # aws_iam_user.example[1] will be created
  + resource "aws_iam_user" "example" {
      + arn           = (known after apply)
      + force_destroy = false
      + id            = (known after apply)
      + name          = "neo.1"
      + path          = "/"
      + unique_id     = (known after apply)
    }

  # aws_iam_user.example[2] will be created
  + resource "aws_iam_user" "example" {
      + arn           = (known after apply)
      + force_destroy = false
      + id            = (known after apply)
      + name          = "neo.2"
      + path          = "/"
      + unique_id     = (known after apply)
    }

Plan: 3 to add, 0 to change, 0 to destroy.
Of course, a username like "neo.0" isn’t particularly usable. If you combine count.index with some
built-in functions from Terraform, you can customize each “iteration” of the “loop” even more.
For example, you could define all of the IAM usernames you want in an input variable in live/global/iam/variables.tf:
variable"user_names"{description="Create IAM users with these names"type=list(string)default=["neo", "trinity", "morpheus"]}
If you were using a general-purpose programming language with loops and arrays, you would configure each IAM user to
use a different name by looking up index i in the array var.user_names:
# This is just pseudo code. It won't actually work in Terraform.for (i=0;i<3;i++){resource"aws_iam_user" "example"{name=vars.user_names[i]}}
In Terraform, you can accomplish the same thing by using count along with:
- Array lookup syntax
-
The syntax for looking up members of an array in Terraform is similar to most other programming languages:
ARRAY[<INDEX>]For example, here’s how you would look up the element at index 1 of
var.user_names:var.user_names[1] - The
lengthfunction -
Terraform has a built-in function called
lengththat has the following syntax:length(<ARRAY>)As you can probably guess, the
lengthfunction returns the number of items in the givenARRAY. It also works with strings and maps.
Putting these together, you get the following:
resource"aws_iam_user" "example"{count=length(var.user_names)name=var.user_names[count.index]}
Now when you run the plan command, you’ll see that Terraform wants to create three IAM users, each with a unique
name:
Terraform will perform the following actions:

  # aws_iam_user.example[0] will be created
  + resource "aws_iam_user" "example" {
      + arn           = (known after apply)
      + force_destroy = false
      + id            = (known after apply)
      + name          = "neo"
      + path          = "/"
      + unique_id     = (known after apply)
    }

  # aws_iam_user.example[1] will be created
  + resource "aws_iam_user" "example" {
      + arn           = (known after apply)
      + force_destroy = false
      + id            = (known after apply)
      + name          = "trinity"
      + path          = "/"
      + unique_id     = (known after apply)
    }

  # aws_iam_user.example[2] will be created
  + resource "aws_iam_user" "example" {
      + arn           = (known after apply)
      + force_destroy = false
      + id            = (known after apply)
      + name          = "morpheus"
      + path          = "/"
      + unique_id     = (known after apply)
    }

Plan: 3 to add, 0 to change, 0 to destroy.
Note that after you’ve used count on a resource, it becomes an array of resources rather than just one resource.
Because aws_iam_user.example is now an array of IAM users, instead of using the standard syntax to read an attribute
from that resource (<PROVIDER>_<TYPE>.<NAME>.<ATTRIBUTE>), you must specify which IAM user you’re interested in by
specifying its index in the array using the same array lookup syntax:
<PROVIDER>_<TYPE>.<NAME>[INDEX].ATTRIBUTE
For example, if you want to provide the Amazon Resource Name (ARN) of one of the IAM users as an output variable, you would need to do the following:
output"neo_arn"{value=aws_iam_user.example[0].arndescription="The ARN for user Neo"}
If you want the ARNs of all of the IAM users, you need to use a splat expression, “*”, instead of
the index:
output"all_arns"{value=aws_iam_user.example[*].arndescription="The ARNs for all users"}
When you run the apply command, the neo_arn output will contain just the ARN for Neo, whereas the all_arns output
will contain the list of all ARNs:
$ terraform apply

(...)

Apply complete! Resources: 3 added, 0 changed, 0 destroyed.

Outputs:

neo_arn = arn:aws:iam::123456789012:user/neo
all_arns = [
  "arn:aws:iam::123456789012:user/neo",
  "arn:aws:iam::123456789012:user/trinity",
  "arn:aws:iam::123456789012:user/morpheus",
]
Unfortunately, count has two limitations that significantly reduce its usefulness. First, although you can use count
to loop over an entire resource, you can’t use count within a resource to loop over inline blocks. An
inline block is an argument you set within a resource of the format:
resource"xxx" "yyy"{<NAME>{[CONFIG...]}}
where NAME is the name of the inline block (e.g., tag) and CONFIG consists of one or more arguments that are
specific to that inline block (e.g., key and value). For example, consider how tags are set in the
aws_autoscaling_group resource:
resource"aws_autoscaling_group" "example"{launch_configuration=aws_launch_configuration.example.namevpc_zone_identifier=data.aws_subnet_ids.default.idstarget_group_arns=[aws_lb_target_group.asg.arn]health_check_type="ELB"min_size=var.min_sizemax_size=var.max_sizetag{key="Name"value=var.cluster_namepropagate_at_launch=true}}
Each tag requires you to create a new inline block with values for key, value, and propagate_at_launch. The
preceding code hardcodes a single tag, but you might want to allow users to pass in custom tags. You might be tempted to
try to use the count parameter to loop over these tags and generate dynamic inline tag blocks, but unfortunately,
using count within an inline block is not supported.
The second limitation with count is what happens when you try to change it. Consider the list of IAM users you
created earlier:
variable"user_names"{description="Create IAM users with these names"type=list(string)default=["neo", "trinity", "morpheus"]}
Imagine that you removed "trinity" from this list. What happens when you run terraform plan?
$ terraform plan

(...)

Terraform will perform the following actions:

  # aws_iam_user.example[1] will be updated in-place
  ~ resource "aws_iam_user" "example" {
        id            = "trinity"
      ~ name          = "trinity" -> "morpheus"
    }

  # aws_iam_user.example[2] will be destroyed
  - resource "aws_iam_user" "example" {
      - id            = "morpheus" -> null
      - name          = "morpheus" -> null
    }

Plan: 0 to add, 1 to change, 1 to destroy.
Wait a second, that’s probably not what you were expecting! Instead of just deleting the "trinity" IAM user, the
plan output is indicating that Terraform wants to rename the "trinity" IAM user to "morpheus" and delete the
original "morpheus" user. What’s going on?
When you use the count parameter on a resource, that resource becomes a list or array of resources. Unfortunately,
the way Terraform identifies each resource within the array is by its position (index) in that array. That is, after
running apply the first time with three user names, Terraform’s internal representation of these IAM users looks
something like this:
aws_iam_user.example[0]: neo
aws_iam_user.example[1]: trinity
aws_iam_user.example[2]: morpheus
When you remove an item from the middle of an array, all the items after it shift back by one, so after running plan
with just two bucket names, Terraform’s internal representation will look something like this:
aws_iam_user.example[0]: neo
aws_iam_user.example[1]: morpheus
Notice how morpheus has moved from index 2 to index 1. Because it sees the index as a resource’s identity, to
Terraform, this change roughly translates to “rename the bucket at index 1 to morpheus and delete the bucket at index
2.” In other words, every time you use count to create a list of resources, if you remove an item from the middle of
the list, Terraform will delete every resource after that item and then recreate those resources again from scratch.
Ouch. The end result, of course, is exactly what you requested (i.e., two IAM users named morpheus and neo), but
deleting and modifying resources is probably not how you want to get there.
To solve these two limitations, Terraform 0.12 introduced for_each expressions.
Loops with for_each Expressions
The for_each expression allows you to loop over lists, sets, and maps to create either (a) multiple copies of an
entire resource, or (b) multiple copies of an inline block within a resource. Let’s first walk through how to use
for_each to create multiple copies of a resource. The syntax looks like this:
resource"<PROVIDER>_<TYPE>" "<NAME>"{for_each=<COLLECTION>[CONFIG...]}
where PROVIDER is the name of a provider (e.g., aws), TYPE is the type of resource to create in that provider
(e.g., instance), NAME is an identifier that you can use throughout the Terraform code to refer to this
resource (e.g., my_instance), COLLECTION is a set or map to loop over (lists are not supported when using
for_each on a resource) and CONFIG consists of one or more arguments that are specific to that resource. Within
CONFIG, you can use each.key and each.value to access the key and value of the current item in COLLECTION.
For example, here’s how you can create the same three IAM users using for_each:
resource"aws_iam_user" "example"{for_each=toset(var.user_names)name=each.value}
Note the use of toset to convert the var.user_names list into a set. This is because for_each supports sets and maps only when
used on a resource. When for_each loops over this set, it makes each user name available in each.value. The
user name will also be available in each.key, though you typically use each.key only with maps of key/value pairs.
Once you’ve used for_each on a resource, it becomes a map of resources, rather than just one resource (or an array of
resources as with count). To see what that means, remove the original all_arns and neo_arn output variables, and
add a new all_users output variable:
output"all_users"{value=aws_iam_user.example}
Here’s what happens when you run terraform apply:
$ terraform apply

(...)

Apply complete! Resources: 3 added, 0 changed, 0 destroyed.

Outputs:

all_users = {
  "morpheus" = {
    "arn" = "arn:aws:iam::123456789012:user/morpheus"
    "force_destroy" = false
    "id" = "morpheus"
    "name" = "morpheus"
    "path" = "/"
    "tags" = {}
  }
  "neo" = {
    "arn" = "arn:aws:iam::123456789012:user/neo"
    "force_destroy" = false
    "id" = "neo"
    "name" = "neo"
    "path" = "/"
    "tags" = {}
  }
  "trinity" = {
    "arn" = "arn:aws:iam::123456789012:user/trinity"
    "force_destroy" = false
    "id" = "trinity"
    "name" = "trinity"
    "path" = "/"
    "tags" = {}
  }
}
You can see that Terraform created three IAM users and that the all_users output variable contains a map where the
keys are the keys in for_each (in this case, the user names) and the values are all the outputs for that resource. If
you want to bring back the all_arns output variable, you’d need to do a little extra work to extract those ARNs
using the values built-in function (which returns just the values from a map) and a splat expression:
output"all_arns"{value=values(aws_iam_user.example)[*].arn}
This gives you the expected output:
$ terraform apply

(...)

Apply complete! Resources: 0 added, 0 changed, 0 destroyed.

Outputs:

all_arns = [
  "arn:aws:iam::123456789012:user/morpheus",
  "arn:aws:iam::123456789012:user/neo",
  "arn:aws:iam::123456789012:user/trinity",
]
The fact that you now have a map of resources with for_each rather than an array of resources as with count is a big
deal, because it allows you to remove items from the middle of a collection safely. For example, if you again remove
"trinity" from the middle of the var.user_names list and run terraform plan, here’s what you’ll see:
$ terraform plan

Terraform will perform the following actions:

  # aws_iam_user.example["trinity"] will be destroyed
  - resource "aws_iam_user" "example" {
      - arn           = "arn:aws:iam::123456789012:user/trinity" -> null
      - name          = "trinity" -> null
    }

Plan: 0 to add, 0 to change, 1 to destroy.
That’s more like it! You’re now deleting solely the exact resource you want, without shifting all of the other ones around.
This is why you should almost always prefer to use for_each instead of count to create multiple copies of a
resource.
Let’s now turn our attention to another advantage of for_each: it’s ability to create multiple inline blocks within a
resource. For example, you can use for_each to dynamically generate tag inline blocks for the ASG in the
webserver-cluster module. First, to allow users to specify custom tags, add a new map input variable called
custom_tags in modules/services/webserver-cluster/variables.tf:
variable"custom_tags"{description="Custom tags to set on the Instances in the ASG"type=map(string)default={}}
Next, set some custom tags in the production environment, in live/prod/services/webserver-cluster/main.tf, as follows:
module"webserver_cluster"{source="../../../../modules/services/webserver-cluster"cluster_name="webservers-prod"db_remote_state_bucket="(YOUR_BUCKET_NAME)"db_remote_state_key="prod/data-stores/mysql/terraform.tfstate"instance_type="m4.large"min_size=2max_size=10custom_tags={Owner="team-foo"DeployedBy="terraform"}}
The preceding code sets a couple of useful tags: the Owner specifies which team owns this ASG and the DeployedBy
tag specifies that this infrastructure was deployed using Terraform (indicating that this infrastructure shouldn’t be
modified manually, as discussed in “Valid Plans Can Fail”). It’s typically a good idea to come up with a tagging
standard for your team and create Terraform modules that enforce this standard as code.
Now that you’ve specified your tags, how do you actually set them on the aws_autoscaling_group resource? What you
need is a for-loop over var.custom_tags, similar to the following pseudocode:
resource"aws_autoscaling_group" "example"{launch_configuration=aws_launch_configuration.example.namevpc_zone_identifier=data.aws_subnet_ids.default.idstarget_group_arns=[aws_lb_target_group.asg.arn]health_check_type="ELB"min_size=var.min_sizemax_size=var.max_sizetag{key="Name"value=var.cluster_namepropagate_at_launch=true}# This is just pseudo code. It won't actually work in Terraform.for(taginvar.custom_tags){tag{key=tag.keyvalue=tag.valuepropagate_at_launch=true}}}
The preceding pseudocode won’t work, but a for_each expression will. The syntax for using for_each to dynamically
generate inline blocks looks like this:
dynamic"<VAR_NAME>"{for_each=<COLLECTION>content{[CONFIG...]}}
where VAR_NAME is the name to use for the variable that will store the value of each “iteration” (instead of each),
COLLECTION is a list or map to iterate over, and the content block is what to generate from each iteration.
You can use <VAR_NAME>.key and <VAR_NAME>.value within the content block to access the key and value,
respectively, of the current item in the COLLECTION. Note that when you’re using for_each with a list, the key
will be the index and the value will be the item in the list at that index, and when using for_each with a map,
the key and value will be one of the key-value pairs in the map.
Putting this all together, here is how you can dynamically generate tag blocks using for_each in the
aws_autoscaling_group resource:
resource"aws_autoscaling_group" "example"{launch_configuration=aws_launch_configuration.example.namevpc_zone_identifier=data.aws_subnet_ids.default.idstarget_group_arns=[aws_lb_target_group.asg.arn]health_check_type="ELB"min_size=var.min_sizemax_size=var.max_sizetag{key="Name"value=var.cluster_namepropagate_at_launch=true}dynamic"tag"{for_each=var.custom_tagscontent{key=tag.keyvalue=tag.valuepropagate_at_launch=true}}}
If you run terraform apply now, you should see a plan that looks something like this:
$ terraform apply

Terraform will perform the following actions:

  # aws_autoscaling_group.example will be updated in-place
  ~ resource "aws_autoscaling_group" "example" {
        (...)

        tag {
            key                 = "Name"
            propagate_at_launch = true
            value               = "webservers-prod"
        }
      + tag {
          + key                 = "Owner"
          + propagate_at_launch = true
          + value               = "team-foo"
        }
      + tag {
          + key                 = "DeployedBy"
          + propagate_at_launch = true
          + value               = "terraform"
        }
    }

Plan: 0 to add, 1 to change, 0 to destroy.

Do you want to perform these actions?
  Terraform will perform the actions described above.
  Only 'yes' will be accepted to approve.

  Enter a value:
Type yes to deploy the changes, and you should see your new tags show up in the EC2 web console, as shown in
Figure 5-1.

Figure 5-1. Dynamic Auto Scaling Group tags
Loops with for Expressions
You’ve now seen how to loop over resources and inline blocks, but what if you need a loop to generate a single value? Let’s take a brief aside to look at some examples unrelated to the web server cluster. Imagine that you wrote some Terraform code that took in a list of names:
variable"names"{description="A list of names"type=list(string)default=["neo", "trinity", "morpheus"]}
How could you convert all of these names to uppercase? In a general-purpose programming language such as Python, you could write the following for-loop:
names=["neo","trinity","morpheus"]upper_case_names=[]fornameinnames:upper_case_names.append(name.upper())upper_case_names# Prints out: ['NEO', 'TRINITY', 'MORPHEUS']
Python offers another way to write the exact same code in one line using a syntax known as a list comprehension:
names=["neo","trinity","morpheus"]upper_case_names=[name.upper()fornameinnames]upper_case_names# Prints out: ['NEO', 'TRINITY', 'MORPHEUS']
Python also allows you to filter the resulting list by specifying a condition:
names=["neo","trinity","morpheus"]short_upper_case_names=[name.upper()fornameinnamesiflen(name)<5]short_upper_case_names# Prints out: ['NEO']
Terraform offers similar functionality in the form of a for expression (not to be confused with the for_each
expression you saw in the previous section). The basic syntax of a for expression is:
[for<ITEM>in<LIST>:<OUTPUT>]
where LIST is a list to loop over, ITEM is the local variable name to assign to each item in LIST, and
OUTPUT is an expression that transforms ITEM in some way. For example, here is the Terraform code to convert the
list of names in var.names to uppercase:
variable"names"{description="A list of names"type=list(string)default=["neo", "trinity", "morpheus"]}output"upper_names"{value=[fornameinvar.names:upper(name)]}
If you run terraform apply on this code, you get the following output:
$ terraform apply

Apply complete! Resources: 0 added, 0 changed, 0 destroyed.

Outputs:

upper_names = [
  "NEO",
  "TRINITY",
  "MORPHEUS",
]
Just as with Python’s list comprehensions, you can filter the resulting list by specifying a condition:
variable"names"{description="A list of names"type=list(string)default=["neo", "trinity", "morpheus"]}output"short_upper_names"{value=[fornameinvar.names:upper(name)iflength(name)<5]}
Running terraform apply on this code gives you this:
short_upper_names = [
  "NEO",
]
Terraform’s for expression also allows you to loop over a map using the following syntax:
[for<KEY>,<VALUE>in<MAP>:<OUTPUT>]
Here, MAP is a map to loop over, KEY and VALUE are the local variable names to assign to each key-value pair in
MAP, and OUTPUT is an expression that transforms KEY and VALUE in some way. Here’s an example:
variable"hero_thousand_faces"{description="map"type=map(string)default={neo="hero"trinity="love interest"morpheus="mentor"}}output"bios"{value=[forname,roleinvar.hero_thousand_faces:"${name} is the ${role}"]}
When you run terraform apply on this code, you get the following:
map_example = [
  "morpheus is the mentor",
  "neo is the hero",
  "trinity is the love interest",
]
You can also use for expressions to output a map rather than a list using the following syntax:
# Loop over a list and output a map{for <ITEM> in <LIST> : <OUTPUT_KEY>=><OUTPUT_VALUE>}# Loop over a map and output a map{for <KEY>, <VALUE> in <MAP> : <OUTPUT_KEY>=><OUTPUT_VALUE>}
The only differences are that (a) you wrap the expression in curly braces rather than square brackets, and (b) rather than outputting a single value each iteration, you output a key and value, separated by an arrow. For example, here is how you can transform a map to make all the keys and values uppercase:
variable"hero_thousand_faces"{description="map"type=map(string)default={neo="hero"trinity="love interest"morpheus="mentor"}}output"upper_roles"{value={for name, role in var.hero_thousand_faces : upper(name)=>upper(role)}}
Here’s the output from running this code:
upper_roles = {
  "MORPHEUS" = "MENTOR"
  "NEO" = "HERO"
  "TRINITY" = "LOVE INTEREST"
}
Loops with the for String Directive
Earlier in the book, you learned about string interpolations, which allow you to reference Terraform code within strings:
"Hello, ${var.name}"String directives allow you to use control statements (e.g., for-loops and if-statements) within strings using a
syntax similar to string interpolations, but instead of a dollar sign and curly braces (${…}), you use
a percent sign and curly braces (%{…}).
Terraform supports two types of string directives: for-loops and conditionals. In this section, we’ll go over for-loops; we’ll come back to conditionals later in the chapter. The for string directive uses the following syntax:
%{for<ITEM>in<COLLECTION>}<BODY>%{endfor}
where COLLECTION is a list or map to loop over, ITEM is the local variable name to assign to each item in
COLLECTION, and BODY is what to render each iteration (which can reference ITEM). Here’s an example:
variable"names"{description="Names to render"type=list(string)default=["neo", "trinity", "morpheus"]}output"for_directive"{value=<<EOF%{fornameinvar.names}${name}%{endfor}EOF}
When you run terraform apply, you get the following output:
$ terraform apply

Apply complete! Resources: 0 added, 0 changed, 0 destroyed.

Outputs:

for_directive =
  neo

  trinity

  morpheus
Notice all of the extra newlines. You can use a strip marker (~) in your string directive to consume all of the
whitespace (spaces and newlines) either before the string directive (if the marker appears at the beginning of the
string directive) or after (if the marker appears at the end of the string directive):
output"for_directive_strip_marker"{value=<<EOF%{~fornameinvar.names}${name}%{~endfor}EOF}
This updated version gives you the following output:
for_directive_strip_marker =
  neo
  trinity
  morpheus
Conditionals
Just as Terraform offers several different ways to do loops, there are also several different ways to do conditionals, each intended to be used in a slightly different scenario:
countparameter-
Used for conditional resources
for_eachandforexpressions-
Used for conditional resources and inline blocks within a resource
ifstring directive-
Used for conditionals within a string
Let’s go through each of these, one at a time.
Conditionals with the count Parameter
The count parameter you saw earlier lets you do a basic loop.
If you’re clever, you can use the same mechanism to do a basic conditional. Let’s begin by looking at if-statements in
the next section and then move on to if-else statements in the section thereafter.
If-statements with the count parameter
In Chapter 4, you created a Terraform module that could be used as a “blueprint” for
deploying web server clusters. The module created an Auto Scaling Group (ASG),
Application Load Balancer (ALB), security groups, and a number of other resources. One thing the module did not
create was the scheduled action.
Because you want to scale the cluster out only in production, you defined the aws_autoscaling_schedule resources
directly in the production configurations under live/prod/services/webserver-cluster/main.tf. Is there a way you
could define the aws_autoscaling_schedule resources in the webserver-cluster module and conditionally create them
for some users of the module and not create them for others?
Let’s give it a shot. The first step is to add a Boolean input variable in modules/services/webserver-cluster/variables.tf that you can use to specify whether the module should enable auto scaling:
variable"enable_autoscaling"{description="If set to true, enable auto scaling"type=bool}
Now, if you had a general-purpose programming language, you could use this input variable in an if-statement:
# This is just pseudo code. It won't actually work in Terraform.ifvar.enable_autoscaling{resource"aws_autoscaling_schedule" "scale_out_during_business_hours"{scheduled_action_name="${var.cluster_name}-scale-out-during-business-hours"min_size=2max_size=10desired_capacity=10recurrence="0 9 * * *"autoscaling_group_name=aws_autoscaling_group.example.name}resource"aws_autoscaling_schedule" "scale_in_at_night"{scheduled_action_name="${var.cluster_name}-scale-in-at-night"min_size=2max_size=10desired_capacity=2recurrence="0 17 * * *"autoscaling_group_name=aws_autoscaling_group.example.name}}
Terraform doesn’t support if-statements, so this code won’t work.
However, you can accomplish the same thing by using the count parameter and taking advantage of two properties:
-
If you set
countto 1 on a resource, you get one copy of that resource; if you setcountto 0, that resource is not created at all. -
Terraform supports conditional expressions of the format
<CONDITION> ? <TRUE_VAL> : <FALSE_VAL>. This ternary syntax, which may be familiar to you from other programming languages, will evaluate the Boolean logic inCONDITION, and if the result istrue, it will returnTRUE_VAL, and if the result isfalse, it’ll returnFALSE_VAL.
Putting these two ideas together, you can update the webserver-cluster module as follows:
resource"aws_autoscaling_schedule" "scale_out_during_business_hours"{count=var.enable_autoscaling?1:0scheduled_action_name="${var.cluster_name}-scale-out-during-business-hours"min_size=2max_size=10desired_capacity=10recurrence="0 9 * * *"autoscaling_group_name=aws_autoscaling_group.example.name}resource"aws_autoscaling_schedule" "scale_in_at_night"{count=var.enable_autoscaling?1:0scheduled_action_name="${var.cluster_name}-scale-in-at-night"min_size=2max_size=10desired_capacity=2recurrence="0 17 * * *"autoscaling_group_name=aws_autoscaling_group.example.name}
If var.enable_autoscaling is true, the count parameter for each of the aws_autoscaling_schedule resources will
be set to 1, so one of each will be created. If var.enable_autoscaling is false, the count parameter for each of
the aws_autoscaling_schedule resources will be set to 0, so neither one will be created. This is exactly the
conditional logic you want!
You can now update the usage of this module in staging (in live/stage/services/webserver-cluster/main.tf) to disable auto scaling by setting enable_autoscaling to false:
module"webserver_cluster"{source="../../../../modules/services/webserver-cluster"cluster_name="webservers-stage"db_remote_state_bucket="(YOUR_BUCKET_NAME)"db_remote_state_key="stage/data-stores/mysql/terraform.tfstate"instance_type="t2.micro"min_size=2max_size=2enable_autoscaling=false}
Similarly, you can update the usage of this module in production (in live/prod/services/webserver-cluster/main.tf) to enable auto scaling by setting enable_autoscaling to true (make sure to also remove the custom
aws_autoscaling_schedule resources that were in the production environment from
Chapter 4):
module"webserver_cluster"{source="../../../../modules/services/webserver-cluster"cluster_name="webservers-prod"db_remote_state_bucket="(YOUR_BUCKET_NAME)"db_remote_state_key="prod/data-stores/mysql/terraform.tfstate"instance_type="m4.large"min_size=2max_size=10enable_autoscaling=truecustom_tags={Owner="team-foo"DeployedBy="terraform"}}
This approach works well if the user passes an explicit Boolean value to your module, but what do you do if the Boolean is the result of a more complicated comparison, such as string equality? Let’s go through a more complicated example.
Imagine that as part of the webserver-cluster module, you wanted to create a set of CloudWatch alarms.
You can configure a CloudWatch alarm to notify you via a variety of mechanisms (e.g., email, text message) if a
specific metric exceeds a predefined threshold. For example, here is how you could use the
aws_cloudwatch_metric_alarm resource in
modules/services/webserver-cluster/main.tf to create an alarm that goes off if the average
CPU utilization in the cluster is more than 90% during a 5-minute period:
resource"aws_cloudwatch_metric_alarm" "high_cpu_utilization"{alarm_name="${var.cluster_name}-high-cpu-utilization"namespace="AWS/EC2"metric_name="CPUUtilization"dimensions={AutoScalingGroupName=aws_autoscaling_group.example.name}comparison_operator="GreaterThanThreshold"evaluation_periods=1period=300statistic="Average"threshold=90unit="Percent"}
This works fine for a CPU Utilization alarm, but what if you want to add another alarm that goes off when CPU credits are low?1 Here is a CloudWatch alarm that goes off if your web server cluster is almost out of CPU credits:
resource"aws_cloudwatch_metric_alarm" "low_cpu_credit_balance"{alarm_name="${var.cluster_name}-low-cpu-credit-balance"namespace="AWS/EC2"metric_name="CPUCreditBalance"dimensions={AutoScalingGroupName=aws_autoscaling_group.example.name}comparison_operator="LessThanThreshold"evaluation_periods=1period=300statistic="Minimum"threshold=10unit="Count"}
The catch is that CPU credits apply only to tXXX Instances (e.g., t2.micro, t2.medium, etc.). Larger instance types (e.g., m4.large) don’t use CPU credits and don’t report a CPUCreditBalance metric, so if you create such an alarm for those instances, the alarm will always be stuck in the INSUFFICIENT_DATA state. Is there a way to create an alarm only if var.instance_type starts with the letter “t”?
You could add a new Boolean input variable called var.is_t2_instance, but that would be redundant with
var.instance_type, and you’d most likely forget to update one when updating the other. A better alternative is to use a
conditional:
resource"aws_cloudwatch_metric_alarm" "low_cpu_credit_balance"{count=format("%.1s", var.instance_type)=="t"?1:0alarm_name="${var.cluster_name}-low-cpu-credit-balance"namespace="AWS/EC2"metric_name="CPUCreditBalance"dimensions={AutoScalingGroupName=aws_autoscaling_group.example.name}comparison_operator="LessThanThreshold"evaluation_periods=1period=300statistic="Minimum"threshold=10unit="Count"}
The alarm code is the same as before, except for the relatively complicated count parameter:
count=format("%.1s", var.instance_type)=="t"?1:0
This code uses the format function to extract just the first character from var.instance_type. If that
character is a “t” (e.g., t2.micro), it sets the count to 1; otherwise, it sets the count to 0. This way, the alarm
is created only for instance types that actually have a CPUCreditBalance metric.
If-else-statements with the count parameter
Now that you know how to do an if-statement, what about an if-else-statement?
Earlier in this chapter, you created several IAM users with read-only access to EC2. Imagine that you wanted to give one of these users, neo, access to CloudWatch, as well, but to allow the person applying the Terraform configurations to decide whether neo is assigned only read access or both read and write access. This is a slightly contrived example, but it makes it easy to demonstrate a simple type of if-else-statement, in which all that matters is that one of the if or else branches is executed, and the rest of the Terraform code doesn’t need to know which one.
Here is an IAM policy that allows read-only access to CloudWatch:
resource"aws_iam_policy" "cloudwatch_read_only"{name="cloudwatch-read-only"policy=data.aws_iam_policy_document.cloudwatch_read_only.json}data"aws_iam_policy_document" "cloudwatch_read_only"{statement{effect="Allow"actions=["cloudwatch:Describe*","cloudwatch:Get*","cloudwatch:List*"]resources=["*"]}}
And here is an IAM policy that allows full (read and write) access to CloudWatch:
resource"aws_iam_policy" "cloudwatch_full_access"{name="cloudwatch-full-access"policy=data.aws_iam_policy_document.cloudwatch_full_access.json}data"aws_iam_policy_document" "cloudwatch_full_access"{statement{effect="Allow"actions=["cloudwatch:*"]resources=["*"]}}
The goal is to attach one of these IAM policies to neo, based on the value of a new input variable called
give_neo_cloudwatch_full_access:
variable"give_neo_cloudwatch_full_access"{description="If true, neo gets full access to CloudWatch"type=bool}
If you were using a general-purpose programming language, you might write an if-else-statement that looks like this:
# This is just pseudo code. It won't actually work in Terraform.ifvar.give_neo_cloudwatch_full_access{resource"aws_iam_user_policy_attachment" "neo_cloudwatch_full_access"{user=aws_iam_user.example[0].namepolicy_arn=aws_iam_policy.cloudwatch_full_access.arn}}else{resource"aws_iam_user_policy_attachment" "neo_cloudwatch_read_only"{user=aws_iam_user.example[0].namepolicy_arn=aws_iam_policy.cloudwatch_read_only.arn}}
To do this in Terraform,
you can use the count parameter and a conditional expression on each of the resources:
resource"aws_iam_user_policy_attachment" "neo_cloudwatch_full_access"{count=var.give_neo_cloudwatch_full_access?1:0user=aws_iam_user.example[0].namepolicy_arn=aws_iam_policy.cloudwatch_full_access.arn}resource"aws_iam_user_policy_attachment" "neo_cloudwatch_read_only"{count=var.give_neo_cloudwatch_full_access?0:1user=aws_iam_user.example[0].namepolicy_arn=aws_iam_policy.cloudwatch_read_only.arn}
This code contains two aws_iam_user_policy_attachment resources.
The first one, which attaches the CloudWatch full access permissions, has a conditional expression that will evaluate
to 1 if var.give_neo_cloudwatch_full_access is true, and 0 otherwise (this is the if-clause). The second one,
which attaches the CloudWatch read-only permissions, has a conditional expression that does the exact opposite,
evaluating to 0 if var.give_neo_cloudwatch_full_access is true, and 1 otherwise (this is the else-clause).
This approach works well if your Terraform code doesn’t need to know which of the if or else clauses actually is
executed. But what if you need to access some output attribute on the resource that comes out of the if or else clause?
For example, what if you wanted to offer two different User Data scripts in the webserver-cluster module and allow
users to pick which one is executed? Currently, the webserver-cluster module pulls in the user-data.sh script
via a template_file data source:
data"template_file" "user_data"{template=file("${path.module}/user-data.sh")vars={server_port=var.server_portdb_address=data.terraform_remote_state.db.outputs.addressdb_port=data.terraform_remote_state.db.outputs.port}}
The current user-data.sh script looks like this:
#!/bin/bashcat > index.html<<EOF<h1>Hello, World</h1><p>DB address: ${db_address}</p><p>DB port: ${db_port}</p>EOFnohup busybox httpd -f -p${server_port}&
Now, imagine that you wanted to allow some of your web server clusters to use this alternative, shorter script, called user-data-new.sh:
#!/bin/bashecho"Hello, World, v2"> index.html nohup busybox httpd -f -p${server_port}&
To use this script, you need a new template_file data source:
data"template_file" "user_data_new"{template=file("${path.module}/user-data-new.sh")vars={server_port=var.server_port}}
The question is, how can you allow the user of the webserver-cluster module to pick from one of these User Data
scripts? As a first step, you could add a new Boolean input variable in modules/services/webserver-cluster/variables.tf:
variable"enable_new_user_data"{description="If set to true, use the new User Data script"type=bool}
If you were using a general-purpose programming language, you could add an if-else-statement to the launch
configuration to pick between the two User Data template_file options as follows:
# This is just pseudo code. It won't actually work in Terraform.resource"aws_launch_configuration" "example"{image_id="ami-0c55b159cbfafe1f0"instance_type=var.instance_typesecurity_groups=[aws_security_group.instance.id]ifvar.enable_new_user_data{user_data=data.template_file.user_data_new.rendered}else{user_data=data.template_file.user_data.rendered}}
To make this work with real Terraform code, you first need to use the if-else-statement trick from earlier to ensure
that only one of the template_file data sources is actually created:
data"template_file" "user_data"{count=var.enable_new_user_data?0:1template=file("${path.module}/user-data.sh")vars={server_port=var.server_portdb_address=data.terraform_remote_state.db.outputs.addressdb_port=data.terraform_remote_state.db.outputs.port}}data"template_file" "user_data_new"{count=var.enable_new_user_data?1:0template=file("${path.module}/user-data-new.sh")vars={server_port=var.server_port}}
If var.enable_new_user_data is true, data.template_file.user_data_new will be created and
data.template_file.user_data will not; if it’s false, it’ll be the other way around. All you need to do now is to
set the user_data parameter of the aws_launch_configuration resource to the template_file that actually exists.
To do this, you can use another conditional expression:
resource"aws_launch_configuration" "example"{image_id="ami-0c55b159cbfafe1f0"instance_type=var.instance_typesecurity_groups=[aws_security_group.instance.id]user_data=(length(data.template_file.user_data[*])>0?data.template_file.user_data[0].rendered:data.template_file.user_data_new[0].rendered)# Required when using a launch configuration with an auto scaling group.# https://www.terraform.io/docs/providers/aws/r/launch_configuration.htmllifecycle{create_before_destroy=true}}
Let’s break the large value for the user_data parameter down. First, take a look at the Boolean condition being
evaluated:
length(data.template_file.user_data[*])>0
Note that the two template_file data sources are both arrays, as they both use the count parameter, so you need to
use array syntax with them. However, as one of these arrays will be of length 1 and the other of length 0, you can’t
directly access a specific index (e.g., data.template_file.user_data[0]), because that array might be empty. The solution is
to use a splat expression, which will always return an array (albeit possibly an empty one), and to check the length of that array.
Using that array’s length, we then pick from one of the following expressions:
?data.template_file.user_data[0].rendered:data.template_file.user_data_new[0].rendered
Terraform does lazy evaluation for conditional results, so the true value will be evaluated only if the condition was
true and the false value will be evaluated if the condition was false. That makes it safe to look up index 0 on
user_data and user_data_new because we know that only the one with the nonempty array will actually be evaluated.
You can now try out the new User Data script in the staging environment by setting the enable_new_user_data parameter
to true in live/stage/services/webserver-cluster/main.tf:
module"webserver_cluster"{source="../../../../modules/services/webserver-cluster"cluster_name="webservers-stage"db_remote_state_bucket="(YOUR_BUCKET_NAME)"db_remote_state_key="stage/data-stores/mysql/terraform.tfstate"instance_type="t2.micro"min_size=2max_size=2enable_autoscaling=falseenable_new_user_data=true}
In the production environment, you can stick with the old version of the script by setting enable_new_user_data to
false in live/prod/services/webserver-cluster/main.tf:
module"webserver_cluster"{source="../../../../modules/services/webserver-cluster"cluster_name="webservers-prod"db_remote_state_bucket="(YOUR_BUCKET_NAME)"db_remote_state_key="prod/data-stores/mysql/terraform.tfstate"instance_type="m4.large"min_size=2max_size=10enable_autoscaling=trueenable_new_user_data=falsecustom_tags={Owner="team-foo"DeployedBy="terraform"}}
Using count and built-in functions to simulate if-else-statements is a bit of a hack, but it’s one that works
fairly well, and as you can see from the code, it allows you to conceal lots of complexity from your users so
that they get to work with a clean and simple API.
Conditionals with for_each and for Expressions
Now that you understand how to do conditional logic with resources using the count parameter, you can probably guess
that you can use a similar strategy to do conditional logic by using a for_each expression. If you pass a for_each
expression an empty collection, it will produce 0 resources or 0 inline blocks; if you pass it a nonempty collection,
it will create one or more resources or inline blocks. The only question is how can you conditionally decide if the
collection should be empty or not?
The answer is to combine the for_each expression with the for expression. For example, recall the way the
webserver-cluster module in modules/services/webserver-cluster/main.tf sets tags:
dynamic"tag"{for_each=var.custom_tagscontent{key=tag.keyvalue=tag.valuepropagate_at_launch=true}}
If var.custom_tags is empty, the for_each expression will have nothing to loop over, so no tags will be set. In
other words, you already have some conditional logic here. But you can go even further, by combining the for_each
expression with a for expression as follows:
dynamic"tag"{for_each={forkey,valueinvar.custom_tags:key=>upper(value)if key !="Name"}content{key=tag.keyvalue=tag.valuepropagate_at_launch=true}}
The nested for expression loops over var.custom_tags, converts each value to uppercase (e.g., perhaps for
consistency), and uses a conditional in the for expression to filter out any key set to Name because the module
already sets its own Name tag. By filtering values in the for expression, you can implement arbitrary conditional
logic.
Note that even though you should almost always prefer for_each over count for creating multiple copies of a resource,
when it comes to conditional logic, setting count to 0 or 1 tends to be simpler than setting for_each to an empty
or non-empty collection. Therefore, you may want to use count to conditionally create resources, but use for_each for
all other types of loops and conditionals.
Conditionals with the if String Directive
Earlier in the chapter, you used the for string directive to do loops within a string. Let’s now look at a second
type of string directive, which has the following form:
%{if<CONDITION>}<TRUEVAL>%{endif}
where CONDITION is any expression that evaluates to a boolean and TRUEVAL is the expression to render if CONDITION
evaluates to true. You can optionally include an else clause as follows:
%{if<CONDITION>}<TRUEVAL>%{else}<FALSEVAL>%{endif}
where FALSEVAL is the expression to render if CONDITION evaluates to false. Here’s an example:
variable"name"{description="A name to render"type=string}output"if_else_directive"{value="Hello, %{ if var.name !="" }${var.name}%{ else }(unnamed)%{ endif }"}
If you run terraform apply, setting the name variable to World, you’ll see the following:
$ terraform apply -var name="World"

Apply complete! Resources: 0 added, 0 changed, 0 destroyed.

Outputs:

if_else_directive = Hello, World
If you run terraform apply with name set to an empty string, you instead get this:
$ terraform apply -var name=""

Apply complete! Resources: 0 added, 0 changed, 0 destroyed.

Outputs:

if_else_directive = Hello, (unnamed)
Zero-Downtime Deployment
Now that your module has a clean and simple API for deploying a web server cluster, an important question to ask is how do you update that cluster? That is, when you make changes to your code, how do you deploy a new Amazon Machine Image (AMI) across the cluster? And how do you do it without causing downtime for your users?
The first step is to expose the AMI as an input variable in modules/services/webserver-cluster/variables.tf. In real-world examples, this is all you would need because the actual web server code would be defined in the AMI. However, in the simplified examples in this book, all of the web server code is actually in the User Data script, and the AMI is just a vanilla Ubuntu image. Switching to a different version of Ubuntu won’t make for much of a demonstration, so in addition to the new AMI input variable you can also add an input variable to control the text the User Data script returns from its one-liner HTTP server:
variable"ami"{description="The AMI to run in the cluster"default="ami-0c55b159cbfafe1f0"type=string}variable"server_text"{description="The text the web server should return"default="Hello, World"type=string}
Earlier in the chapter, to practice with if-else-statements, you created two User Data scripts. Let’s consolidate that
back down to one to keep things simple. First, in modules/services/webserver-cluster/variables.tf, remove the
enable_new_user_data input variable. Second, in modules/services/webserver-cluster/main.tf, remove the
template_file resource called user_data_new. Third, in the same file, update the other template_file resource,
called user_data, to no longer use the enable_new_user_data input variable, and to add the new server_text input
variable to its vars block:
data"template_file" "user_data"{template=file("${path.module}/user-data.sh")vars={server_port=var.server_portdb_address=data.terraform_remote_state.db.outputs.addressdb_port=data.terraform_remote_state.db.outputs.portserver_text=var.server_text}}
Now you need to update the modules/services/webserver-cluster/user-data.sh Bash script to use this server_text
variable in the <h1> tag it returns:
#!/bin/bashcat > index.html<<EOF<h1>${server_text}</h1><p>DB address: ${db_address}</p><p>DB port: ${db_port}</p>EOFnohup busybox httpd -f -p${server_port}&
Finally, find the launch configuration in modules/services/webserver-cluster/main.tf, set its user_data parameter
to the remaining template_file (the one called user_data), and set its ami parameter to the new ami input
variable:
resource"aws_launch_configuration" "example"{image_id=var.amiinstance_type=var.instance_typesecurity_groups=[aws_security_group.instance.id]user_data=data.template_file.user_data.rendered# Required when using a launch configuration with an auto scaling group.# https://www.terraform.io/docs/providers/aws/r/launch_configuration.htmllifecycle{create_before_destroy=true}}
Now, in the staging environment, in live/stage/services/webserver-cluster/main.tf, you can set the new ami and
server_text parameters and remove the enable_new_user_data parameter:
module"webserver_cluster"{source="../../../../modules/services/webserver-cluster"ami="ami-0c55b159cbfafe1f0"server_text="New server text"cluster_name="webservers-stage"db_remote_state_bucket="(YOUR_BUCKET_NAME)"db_remote_state_key="stage/data-stores/mysql/terraform.tfstate"instance_type="t2.micro"min_size=2max_size=2enable_autoscaling=false}
This code uses the same Ubuntu AMI, but changes the server_text to a new value. If you run the plan command,
you should see something like the following:
Terraform will perform the following actions:

  # module.webserver_cluster.aws_autoscaling_group.ex will be updated in-place
  ~ resource "aws_autoscaling_group" "example" {
        id                        = "webservers-stage-terraform-20190516"
      ~ launch_configuration      = "terraform-20190516" -> (known after apply)
        (...)
    }

  # module.webserver_cluster.aws_launch_configuration.ex must be replaced
+/- resource "aws_launch_configuration" "example" {
      ~ id                          = "terraform-20190516" -> (known after apply)
        image_id                    = "ami-0c55b159cbfafe1f0"
        instance_type               = "t2.micro"
      ~ name                        = "terraform-20190516" -> (known after apply)
      ~ user_data                   = "bd7c0a6" -> "4919a13" # forces replacement
        (...)
    }

Plan: 1 to add, 1 to change, 1 to destroy.
As you can see, Terraform wants to make two changes: first, replace the old launch configuration with a new one that
has the updated user_data; and second, modify the Auto Scaling Group in place to reference the new launch
configuration. The
problem is that merely referencing the new launch configuration will have no effect until the ASG
launches new EC2 Instances. So how do you instruct the ASG to deploy new Instances?
One option is to destroy the ASG (e.g., by running terraform destroy) and then recreate it (e.g., by running
terraform apply). The problem is that after you delete the old ASG, your users will experience downtime until the
new ASG comes up. What you want to do instead is a zero-downtime deployment. The way to accomplish that is to create
the replacement ASG first and then destroy the original one.
As it turns out, the create_before_destroy life cycle setting you first saw in
Chapter 2 does exactly this.
Here’s how you can take advantage of this life cycle setting to get a zero-downtime deployment:2
-
Configure the
nameparameter of the ASG to depend directly on the name of the launch configuration. Each time the launch configuration changes (which it will when you update the AMI or User Data), its name changes, and therefore the ASG’s name will change, which forces Terraform to replace the ASG. -
Set the
create_before_destroyparameter of the ASG totrue, so that each time Terraform tries to replace it, it will create the replacement ASG before destroying the original. -
Set the
min_elb_capacityparameter of the ASG to themin_sizeof the cluster so that Terraform will wait for at least that many servers from the new ASG to pass health checks in the ALB before it will begin destroying the original ASG.
Here is what the updated aws_autoscaling_group resource should look like in
modules/services/webserver-cluster/main.tf:
resource"aws_autoscaling_group" "example"{# Explicitly depend on the launch configuration's name so each time it's# replaced, this ASG is also replacedname="${var.cluster_name}-${aws_launch_configuration.example.name}"launch_configuration=aws_launch_configuration.example.namevpc_zone_identifier=data.aws_subnet_ids.default.idstarget_group_arns=[aws_lb_target_group.asg.arn]health_check_type="ELB"min_size=var.min_sizemax_size=var.max_size# Wait for at least this many instances to pass health checks before# considering the ASG deployment completemin_elb_capacity=var.min_size# When replacing this ASG, create the replacement first, and only delete the# original afterlifecycle{create_before_destroy=true}tag{key="Name"value=var.cluster_namepropagate_at_launch=true}dynamic"tag"{for_each={forkey,valueinvar.custom_tags:key=>upper(value)if key !="Name"}content{key=tag.keyvalue=tag.valuepropagate_at_launch=true}}}
If you rerun the plan command, you’ll now see something that looks like the following:
Terraform will perform the following actions:

  # module.webserver_cluster.aws_autoscaling_group.example must be replaced
+/- resource "aws_autoscaling_group" "example" {
      ~ id     = "example-2019" -> (known after apply)
      ~ name   = "example-2019" -> (known after apply) # forces replacement
        (...)
    }

  # module.webserver_cluster.aws_launch_configuration.example must be replaced
+/- resource "aws_launch_configuration" "example" {
      ~ id              = "terraform-2019" -> (known after apply)
        image_id        = "ami-0c55b159cbfafe1f0"
        instance_type   = "t2.micro"
      ~ name            = "terraform-2019" -> (known after apply)
      ~ user_data       = "bd7c0a" -> "4919a" # forces replacement
        (...)
    }

    (...)

Plan: 2 to add, 2 to change, 2 to destroy.
The key thing to notice is that the aws_autoscaling_group resource now says forces replacement next to its name
parameter, which means that Terraform will replace it with a new ASG running your new AMI or User Data.
Run the apply command to kick off the deployment, and while it runs, consider how the process works.
You start with your original ASG running, say, v1 of your code (Figure 5-2).

Figure 5-2. Initially, you have the original ASG running v1 of your code
You make an update to some aspect of the launch configuration, such as switching to an AMI that contains v2 of your
code, and run the apply command. This forces Terraform to begin deploying a new ASG with v2 of your code (Figure 5-3).
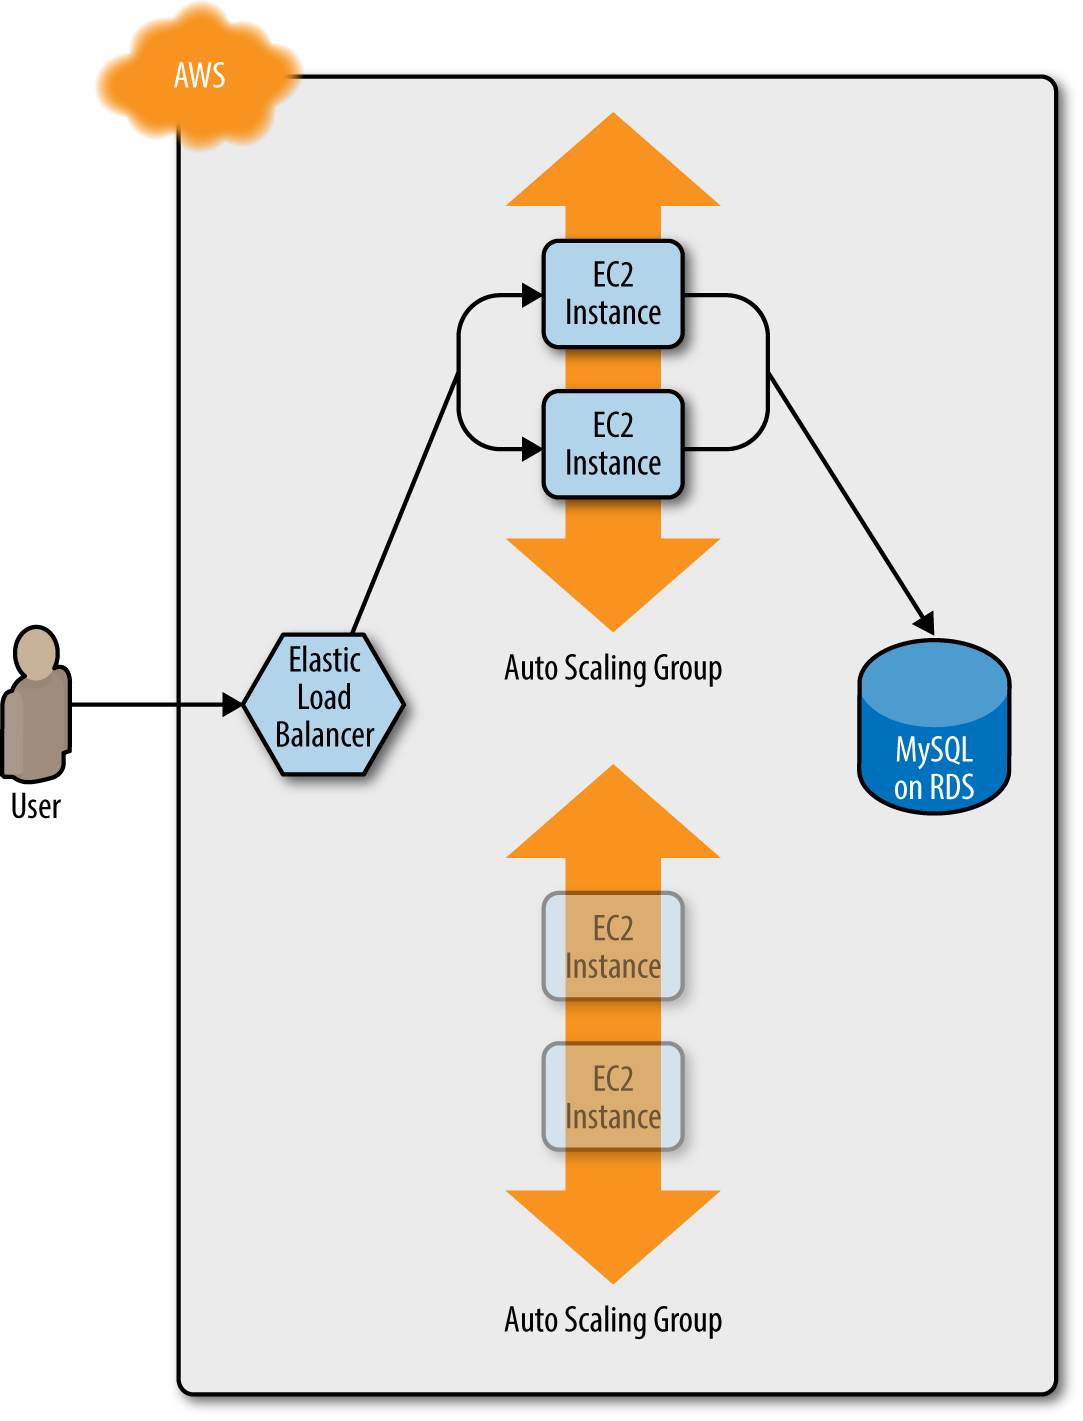
Figure 5-3. Terraform begins deploying the new ASG with v2 of your code
After a minute or two, the servers in the new ASG have booted, connected to the database, registered in the ALB, and started to pass health checks. At this point, both the v1 and v2 versions of your app will be running simultaneously; and which one users see depends on where the ALB happens to route them (Figure 5-4).

Figure 5-4. The servers in the new ASG boot up, connect to the DB, register in the ALB, and begin serving traffic
After min_elb_capacity servers from the v2 ASG cluster have registered in the ALB, Terraform will begin to undeploy
the old ASG, first by deregistering the servers in that ASG from the ALB, and then by shutting them down (Figure 5-5).
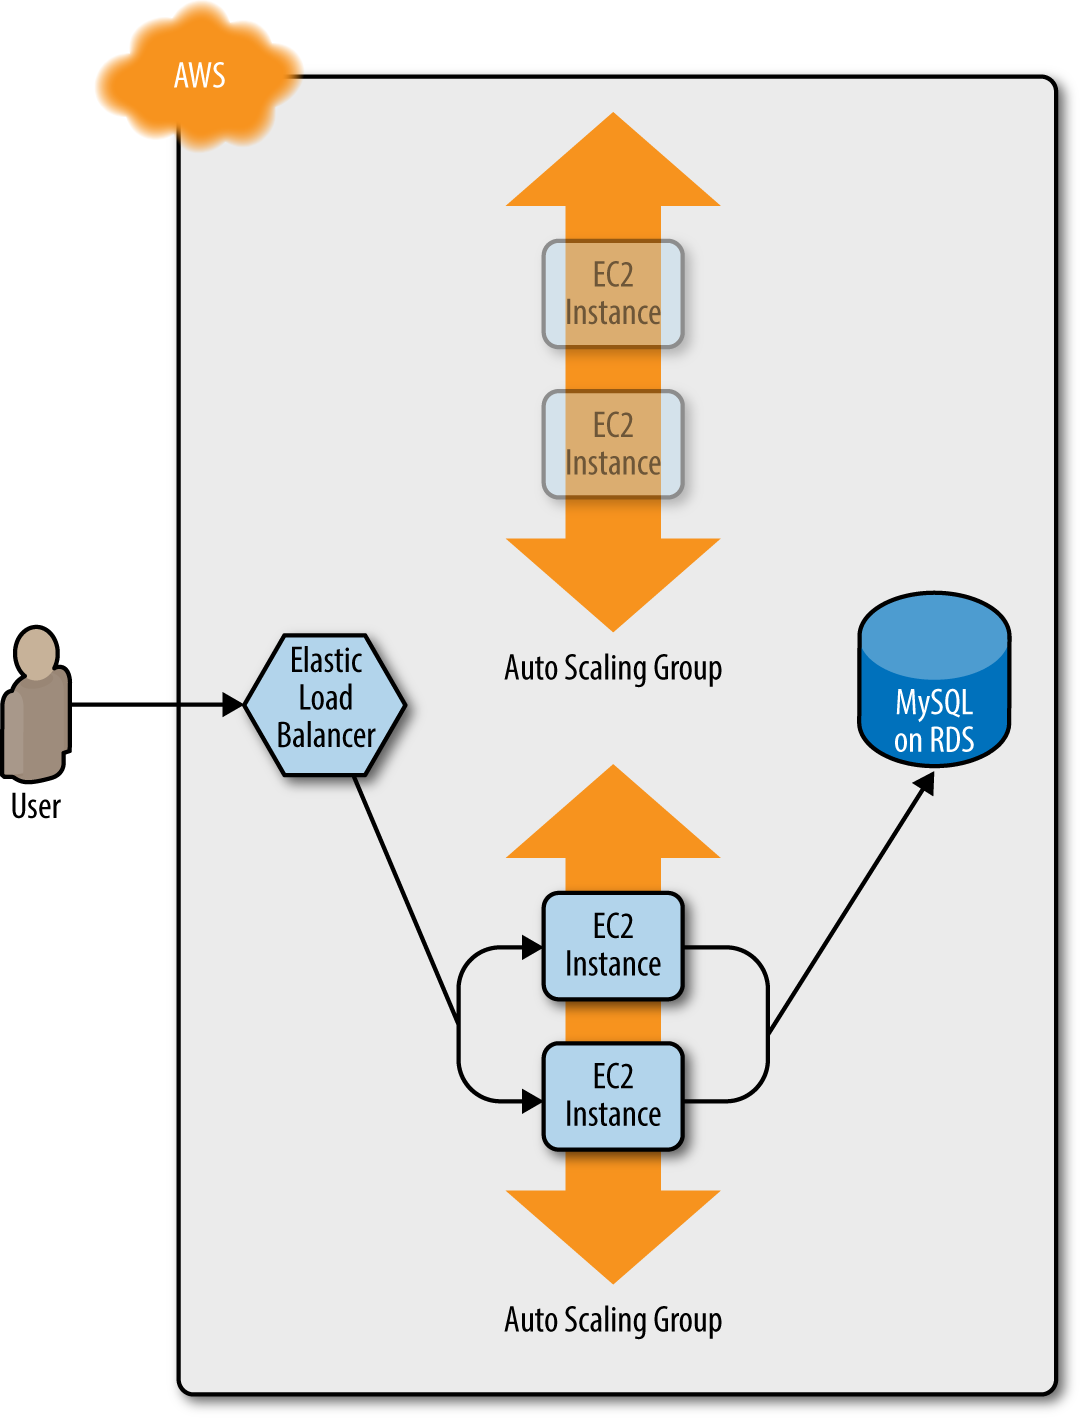
Figure 5-5. The servers in the old ASG begin to shut down
After a minute or two, the old ASG will be gone, and you will be left with just v2 of your app running in the new ASG (Figure 5-6).
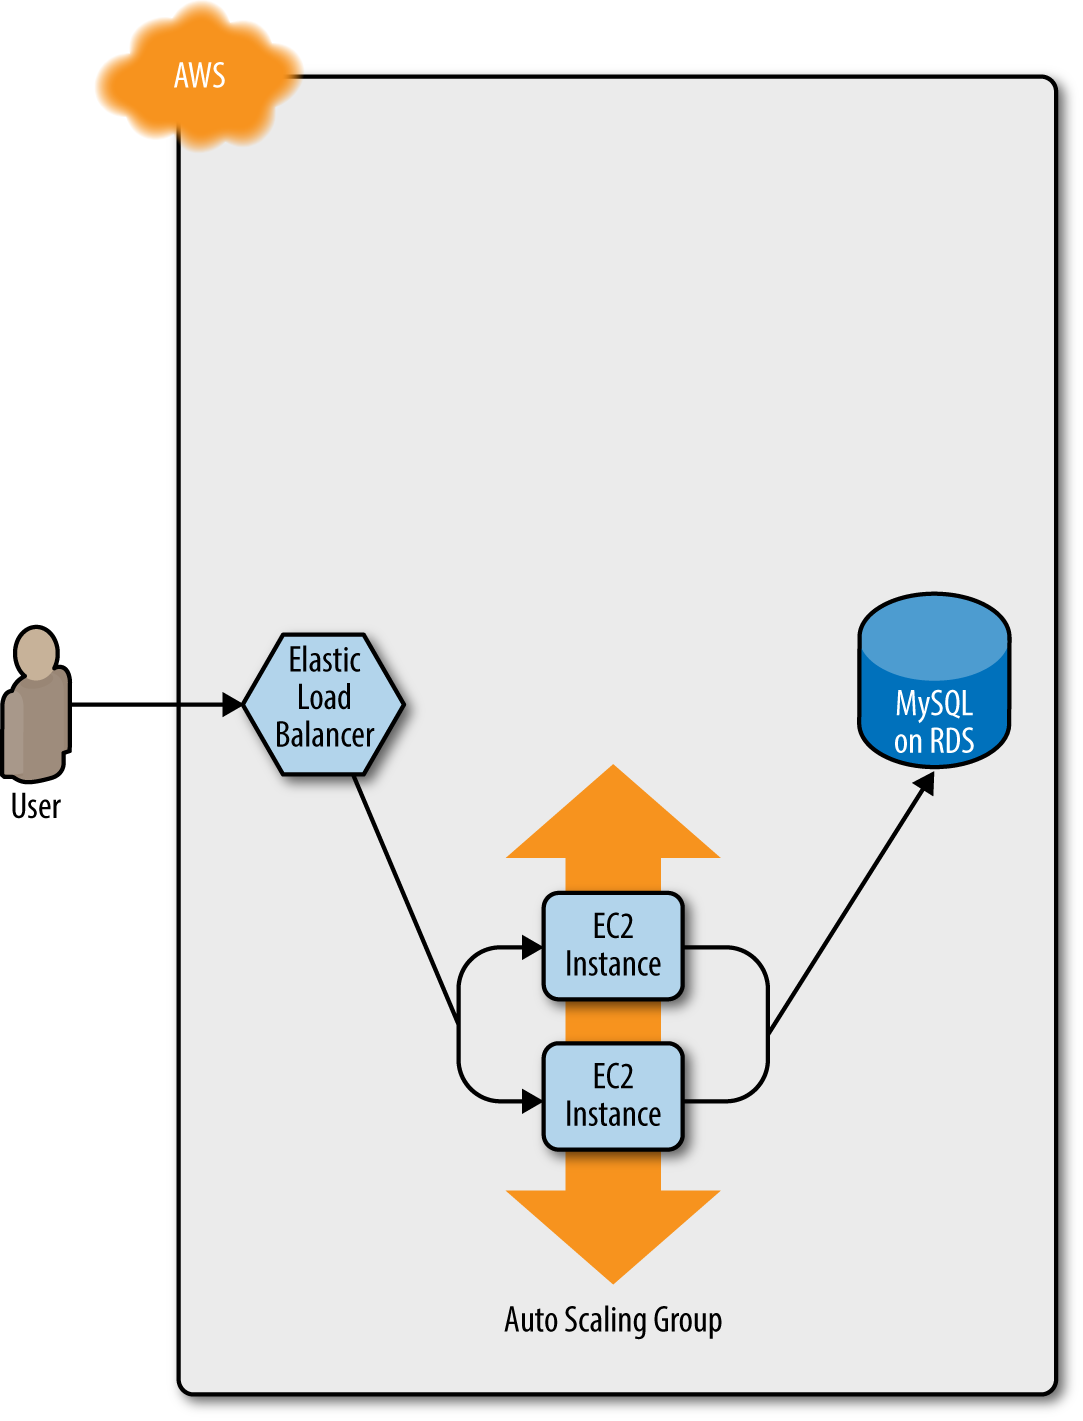
Figure 5-6. Now, only the new ASG remains, which is running v2 of your code
During this entire process, there are always servers running and handling requests from the ALB, so there is no downtime. Open the ALB URL in your browser and you should see something like Figure 5-7.
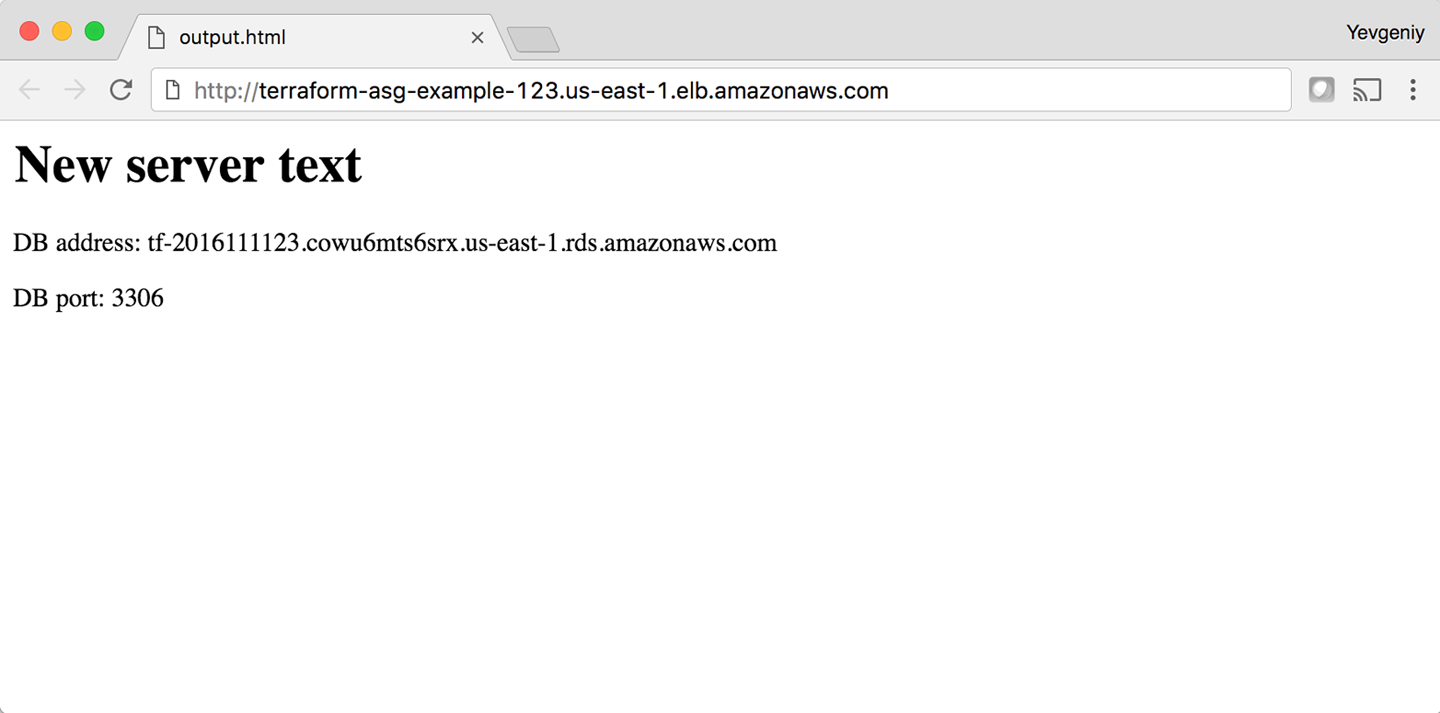
Figure 5-7. The new code is now deployed
Success! The new server text has deployed. As a fun experiment, make another change to the server_text parameter—for example, update it to say “foo bar”—and run the apply command. In a separate terminal tab, if you’re on
Linux/Unix/OS X, you can use a Bash one-liner to run curl in a loop, hitting your ALB once per second, and allowing you to see the zero-downtime deployment in action:
$ while true; do curl http://<load_balancer_url>; sleep 1; done
For the first minute or so, you should see the same response: New server text. Then, you’ll begin seeing it
alternate between New server text and foo bar. This means the new Instances have registered in the ALB and
passed health checks. After another minute, the New server text message will disappear, and you’ll see only foo bar, which
means the old ASG has been shut down. The output will look something like this (for clarity, I’m listing only the
contents of the <h1> tags):
New server text
New server text
New server text
New server text
New server text
New server text
foo bar
New server text
foo bar
New server text
foo bar
New server text
foo bar
New server text
foo bar
New server text
foo bar
foo bar
foo bar
foo bar
foo bar
foo bar
As an added bonus, if something went wrong during the deployment, Terraform will automatically roll back. For example,
if there were a bug in v2 of your app and it failed to boot, the Instances in the new ASG will not register with
the ALB. Terraform will wait up to wait_for_capacity_timeout (default is 10 minutes) for min_elb_capacity servers
of the v2 ASG to register in the ALB, after which it considers the deployment a failure, deletes the v2 ASG, and
exits with an error (meanwhile, v1 of your app continues to run just fine in the original ASG).
Terraform Gotchas
After going through all these tips and tricks, it’s worth taking a step back and pointing out a few gotchas, including those related to the loop, if-statement, and deployment techniques, as well as those related to more general problems that affect Terraform as a whole:
-
countandfor_eachhave limitations -
Zero-downtime deployment has limitations
-
Valid plans can fail
-
Refactoring can be tricky
-
Eventual consistency is consistent…eventually
count and for_each Have Limitations
In the examples in this chapter, you made extensive use of the count parameter and for_each expressions in loops and
if-statements. This works well, but there are two important limitations that you need to be aware of:
-
You cannot reference any resource outputs in
countorfor_each. -
You cannot use
countorfor_eachwithin amoduleconfiguration.
Let’s dig into these one at a time.
You cannot reference any resource outputs in count or for_each
Imagine that you want to deploy multiple EC2 Instances, and for some reason you didn’t want to use an ASG. The code might look like this:
resource"aws_instance" "example_1"{count=3ami="ami-0c55b159cbfafe1f0"instance_type="t2.micro"}
Because count is being set to a hardcoded value, this code will work without issues, and when you run apply, it will
create three EC2 Instances. Now, what if you want to deploy one EC2 Instance per Availability Zone (AZ) in the current
AWS region? You could update your code
to fetch the list of AZs using the aws_availability_zones data
source and use the count parameter and array lookups
to “loop” over each AZ and create an EC2 Instance in it:
resource"aws_instance" "example_2"{count=length(data.aws_availability_zones.all.names)availability_zone=data.aws_availability_zones.all.names[count.index]ami="ami-0c55b159cbfafe1f0"instance_type="t2.micro"}data"aws_availability_zones" "all"{}
Again, this code works just fine, since count can reference data sources without problems. However, what happens if
the number of instances you need to create depend on the output of some resource? The easiest way to experiment
with this is to use the random_integer resource, which, as you can probably guess from the name, returns a random
integer:
resource"random_integer" "num_instances"{min=1max=3}
This code generates a random integer between 1 and 3. Let’s see what happens if you try to use the result output from
this resource in the count parameter of your aws_instance resource:
resource"aws_instance" "example_3"{count=random_integer.num_instances.resultami="ami-0c55b159cbfafe1f0"instance_type="t2.micro"}
If you run terraform plan on this code, you’ll get the following error:
Error: Invalid count argument

  on main.tf line 30, in resource "aws_instance" "example_3":
  30:   count         = random_integer.num_instances.result

The "count" value depends on resource attributes that cannot be determined
until apply, so Terraform cannot predict how many instances will be created.
To work around this, use the -target argument to first apply only the
resources that the count depends on.
Terraform requires that it can compute count and for_each during the plan phase, before any resources are
created or modified. This means that count and for_each can reference hardcoded values, variables, data sources, and
even lists of resources (so long as the length of the list can be determined during plan), but not computed resource
outputs.
You cannot use count or for_each within a module configuration
Something that you might be tempted to try is to use the count parameter within a module configuration:
module"count_example"{source="../../../../modules/services/webserver-cluster"count=3cluster_name="terraform-up-and-running-example"server_port=8080instance_type="t2.micro"}
This code tries to use the count parameter on a module to create three copies of the webserver-cluster resources. Or,
you might sometimes be tempted to try to set count to 0 on a module as a way to optionally include it or not based
on some Boolean condition. Although the code looks perfectly reasonable, if you run terraform plan, you’ll get the
following error:
Error: Reserved argument name in module block

  on main.tf line 13, in module "count_example":
  13:   count = 3

The name "count" is reserved for use in a future version of Terraform.
Unfortunately, as of Terraform 0.12.6, using count or for_each on module is not supported. According to the
Terraform 0.12 release notes,
this is something HashiCorp plans to add in the future, so depending on when you’re reading this book, it might already
be available. Check the Terraform CHANGELOG to find
out.
Zero-Downtime Deployment Has Limitations
Using create_before_destroy with an ASG is a great technique for zero-downtime deployment, but there is one
limitation: it doesn’t work with auto scaling policies. Or, to be more accurate, it resets your ASG size back to its
min_size after each deployment, which can be a problem if you had used auto scaling policies to increase the number of running servers.
For example, the webserver-cluster module includes a couple of aws_autoscaling_schedule resources that increase the number of servers in the cluster from 2 to 10 at 9 a.m. If you ran a deployment at, say, 11 a.m., the replacement ASG would boot up with only 2 servers, rather than 10, and it would stay that way until 9 a.m. the next day.
There are several possible workarounds, including:
-
Change the
recurrenceparameter on theaws_autoscaling_schedulefrom0 9 * * *, which means “run at 9 a.m.” to something like0-59 9-17 * * *, which means “run every minute from 9 a.m. to 5 p.m.” If the ASG already has 10 servers, rerunning this auto scaling policy will have no effect, which is just fine; but if the ASG was just deployed, running this policy ensures that the ASG won’t be around for more than a minute before the number of Instances is increased to 10. This approach is a bit of a hack, and the big jump from 10 servers to 2 servers back to 10 servers can still cause issues for your users. -
Create a custom script that uses the AWS API to figure out how many servers are running in the ASG, call this script using an
externaldata source (see “External data source”), and set thedesired_capacityparameter of the ASG to the value returned by this script. That way, whenever a new ASG is launched, it’ll always start with the capacity set to the same value as the ASG it is replacing. The downside is that using custom scripts makes your Terraform code less portable and more difficult to maintain.
Ideally, Terraform would have first-class support for zero-downtime deployment, but as of May 2019, the HashiCorp team has stated that it has no short-term plans to add this functionality (see https://github.com/hashicorp/terraform/issues/1552 for details).
Valid Plans Can Fail
Sometimes, you run the plan command and it shows you a perfectly valid-looking plan, but when you run apply, you’ll
get an error. For example, try to add an aws_iam_user resource with the exact same name you used for the IAM user
you created manually in Chapter 2:
resource"aws_iam_user" "existing_user"{# You should change this to the username of an IAM user that already# exists so you can practice using the terraform import commandname="yevgeniy.brikman"}
If you now run the plan command, Terraform will show you a plan that looks reasonable:
Terraform will perform the following actions:

  # aws_iam_user.existing_user will be created
  + resource "aws_iam_user" "existing_user" {
      + arn           = (known after apply)
      + force_destroy = false
      + id            = (known after apply)
      + name          = "yevgeniy.brikman"
      + path          = "/"
      + unique_id     = (known after apply)
    }

Plan: 1 to add, 0 to change, 0 to destroy.
If you run the apply command, you’ll get the following error:
Error: Error creating IAM User yevgeniy.brikman: EntityAlreadyExists:
User with name yevgeniy.brikman already exists.

  on main.tf line 10, in resource "aws_iam_user" "existing_user":
  10: resource "aws_iam_user" "existing_user" {
The problem, of course, is that an IAM user with that name already exists. This can happen not only with IAM users, but almost any resource. Perhaps someone created that resource manually or via CLI commands, but either way, some identifier is the same, and that leads to a conflict. There are many variations on this error, and Terraform newbies are often caught off guard by them.
The key realization is that terraform plan looks only at resources in its Terraform state file. If you create
resources out of band—such as by manually clicking around the AWS console—they will not be in
Terraform’s state file, and, therefore, Terraform will not take them into account when you run the plan command. As
a result, a valid-looking plan will still fail.
There are two main lessons to take away from this:
- After you start using Terraform, you should only use Terraform
-
When a part of your infrastructure is managed by Terraform, you should never manually make changes to it. Otherwise, you not only set yourself up for weird Terraform errors, but you also void many of the benefits of using infrastructure as code in the first place, given that the code will no longer be an accurate representation of your infrastructure.
- If you have existing infrastructure, use the
importcommand -
If you created infrastructure before you started using Terraform, you can use the
terraform importcommand to add that infrastructure to Terraform’s state file, so that Terraform is aware of and can manage that infrastructure. Theimportcommand takes two arguments. The first argument is the “address” of the resource in your Terraform configuration files. This makes use of the same syntax as resource references, such as<PROVIDER>_<TYPE>.<NAME>(e.g.,aws_iam_user.existing_user). The second argument is a resource-specific ID that identifies the resource to import. For example, the ID for anaws_iam_userresource is the name of the user (e.g., yevgeniy.brikman) and the ID for anaws_instanceis the EC2 Instance ID (e.g., i-190e22e5). The documentation at the bottom of the page for each resource typically specifies how to import it.For example, here is the
importcommand that you can use to sync theaws_iam_useryou just added in your Terraform configurations with the IAM user you created back in Chapter 2 (obviously, you should replace “yevgeniy.brikman” with your own username in this command):$ terraform import aws_iam_user.existing_user yevgeniy.brikman
Terraform will use the AWS API to find your IAM user and create an association in its state file between that user and the
aws_iam_user.existing_userresource in your Terraform configurations. From then on, when you run theplancommand, Terraform will know that an IAM user already exists and not try to create it again.Note that if you have a lot of existing resources that you want to import into Terraform, writing the Terraform code for them from scratch and importing them one at a time can be painful, so you might want to look into a tool such as Terraforming, which can import both code and state from an AWS account automatically.
Refactoring Can Be Tricky
A common programming practice is refactoring, in which you restructure the internal details of an existing piece of code without changing its external behavior. The goal is to improve the readability, maintainability, and general hygiene of the code. Refactoring is an essential coding practice that you should do regularly. However, when it comes to Terraform, or any infrastructure as code tool, you have to be careful about what defines the “external behavior” of a piece of code, or you will run into unexpected problems.
For example, a common refactoring practice is to rename a variable or a function to give it a clearer name. Many IDEs even have built-in support for refactoring and can automatically rename the variable or function for you, across the entire codebase. Although such a renaming is something you might do without thinking twice in a general-purpose programming language, you need to be very careful in how you do it in Terraform, or it could lead to an outage.
For example, the webserver-cluster module has an input variable named cluster_name:
variable"cluster_name"{description="The name to use for all the cluster resources"type=string}
Perhaps you start using this module for deploying microservices and, initially, you set your microservice’s name to
foo. Later on, you decide that you want to rename the service to bar. This might seem like a trivial change, but it can
actually cause an outage.
That’s because the webserver-cluster module uses the cluster_name variable in a number of resources, including the
name parameters of two security groups and the ALB:
resource"aws_lb" "example"{name=var.cluster_nameload_balancer_type="application"subnets=data.aws_subnet_ids.default.idssecurity_groups=[aws_security_group.alb.id]}
If you change the name parameter of certain resources,
Terraform will delete the old version of the resource and create a new version to replace it. If the resource you are deleting happens to
be an ALB, there will be nothing to route traffic to your web server cluster until the new ALB boots up. Similarly, if
the resource you are deleting happens to be a security group, your servers will reject all network traffic until the
new security group is created.
Another refactor that you might be tempted to do is to change a Terraform identifier. For example, consider the
aws_security_group resource in the webserver-cluster module:
resource"aws_security_group" "instance"{# (...)}
The identifier for this resource is called instance. Perhaps you were doing a refactor and you thought it would be
clearer to change this name to cluster_instance:
resource"aws_security_group" "cluster_instance"{# (...)}
What’s the result? Yup, you guessed it: downtime.
Terraform associates each resource identifier with an identifier from the cloud provider, such as associating an
iam_user resource with an AWS IAM User ID or an aws_instance resource with an AWS EC2 Instance ID. If you change
the resource identifier, such as changing the aws_security_group identifier from instance to cluster_instance, as far as Terraform knows, you deleted the old resource and have added a completely new one. As a result, if you
apply these changes, Terraform will delete the old security group and create a new one, and in the time period in
between, your servers will reject all network traffic.
There are four main lessons that you should take away from this discussion:
- Always use the plan command
-
You can catch all of these gotchas by running the
plancommand, carefully scanning the output, and noticing that Terraform plans to delete a resource that you probably don’t want deleted. - Create before destroy
-
If you do want to replace a resource, think carefully about whether its replacement should be created before you delete the original. If so, you might be able to use
create_before_destroyto make that happen. Alternatively, you can also accomplish the same effect through two manual steps: first, add the new resource to your configurations and run theapplycommand; second, remove the old resource from your configurations and run theapplycommand again. - Changing identifiers requires changing state
-
If you want to change the identifier associated with a resource (e.g., rename an
aws_security_groupfrominstancetocluster_instance) without accidentally deleting and recreating that resource, you’ll need to update the Terraform state accordingly. You should never update Terraform state files by hand—instead, use theterraform statecommands to do it for you. In particular, when renaming identifiers, you’ll need to run theterraform state mvcommand, which has the following syntax:terraform state mv <ORIGINAL_REFERENCE> <NEW_REFERENCE>
where
ORIGINAL_REFERENCEis the reference expression to the resource as it is now andNEW_REFERENCEis the new location you want to move it to. For example, if you’re renaming anaws_security_groupgroup frominstancetocluster_instance, you’ll want to run the following:$ terraform state mv aws_security_group.instance aws_security_group.cluster_instance
This instructs Terraform that the state that used to be associated with
aws_security_group.instanceshould now be associated withaws_security_group.cluster_instance. If you rename an identifier, and run this command, you’ll know you did it right if the subsequentterraform planshows no changes. - Some parameters are immutable
-
The parameters of many resources are immutable, so if you change them, Terraform will delete the old resource and create a new one to replace it. The documentation for each resource often specifies what happens if you change a parameter, so get used to checking the documentation. And, once again, make sure to always use the
plancommand and consider whether you should use acreate_before_destroystrategy.
Eventual Consistency Is Consistent…Eventually
The APIs for some cloud providers, such as AWS, are asynchronous and eventually consistent. Asynchronous means that the API might send a response immediately, without waiting for the requested action to complete. Eventually consistent means that it takes time for a change to propagate throughout the entire system, so for some period of time, you might get inconsistent responses depending on which data store replica happens to respond to your API calls.
For example, suppose that you make an API call to AWS asking it to create an EC2 Instance. The API will return a “success” (i.e., 201 Created) response more or less instantly, without waiting for the EC2 Instance creation to complete. If you tried to connect to that EC2 Instance immediately, you’d most likely fail because AWS is still provisioning it or the Instance hasn’t booted yet. Moreover, if you made another API call to fetch information about that EC2 Instance, you might get an error in return (i.e., 404 Not Found). That’s because the information about that EC2 Instance might still be propagating throughout AWS, and it will take a few seconds before it’s available everywhere.
In short, whenever you use an asynchronous and eventually consistent API, you are supposed to wait and retry for a while until that action has completed and propagated. Unfortunately, the AWS SDK does not provide good tools for doing this, and Terraform used to be plagued with a number of bugs similar to #6813:
$ terraform apply
aws_subnet.private-persistence.2: InvalidSubnetID.NotFound:
The subnet ID 'subnet-xxxxxxx' does not exist
That is, you create a resource (e.g., a subnet) and then try to look up some data about that resource (e.g., the ID
of the newly created subnet), and Terraform can’t find it. Most of these bugs (including #6813) have been fixed, but
they still crop up from time to time, especially when Terraform adds support for a new type of resource. These bugs are
annoying, but fortunately most of them are harmless. If you just rerun terraform apply, everything
will work fine, because by the time you rerun it, the information has propagated throughout the system.
Conclusion
Although Terraform is a declarative language, it includes a large number of tools, such as variables and modules,
which you saw in Chapter 4, and count, for_each, for,
create_before_destroy, and built-in
functions, which you saw at in this chapter, that give the language a surprising amount of flexibility and expressive
power. There are many permutations of the if-statement tricks shown in this chapter, so spend some time browsing the
functions documentation and let your inner hacker
go wild. OK, maybe not too wild, as someone still needs to maintain your code, but just wild enough that you can create
clean, beautiful APIs for your modules.
Let’s now move on to Chapter 6, where I’ll go over how create not just clean and beautiful modules, but also production-grade modules—the kind of modules you could bet your company on.
1 You can learn about CPU credits on the EC2 website.
2 Credit for this technique goes to Paul Hinze.