
How do you share the same instance of an object between SwiftUI views without injecting it through all their common ancestors in the view hierarchy?
By using @EnvironmentObject to access it from the environment, the context in which all the views live.
In this chapter, you’ll learn how to share business logic components between views with @EnvironmentObject in a testable way.
Our app is getting closer to being fully functional. To get there, we need to build the UI and business logic to let customers select dishes and make their orders.
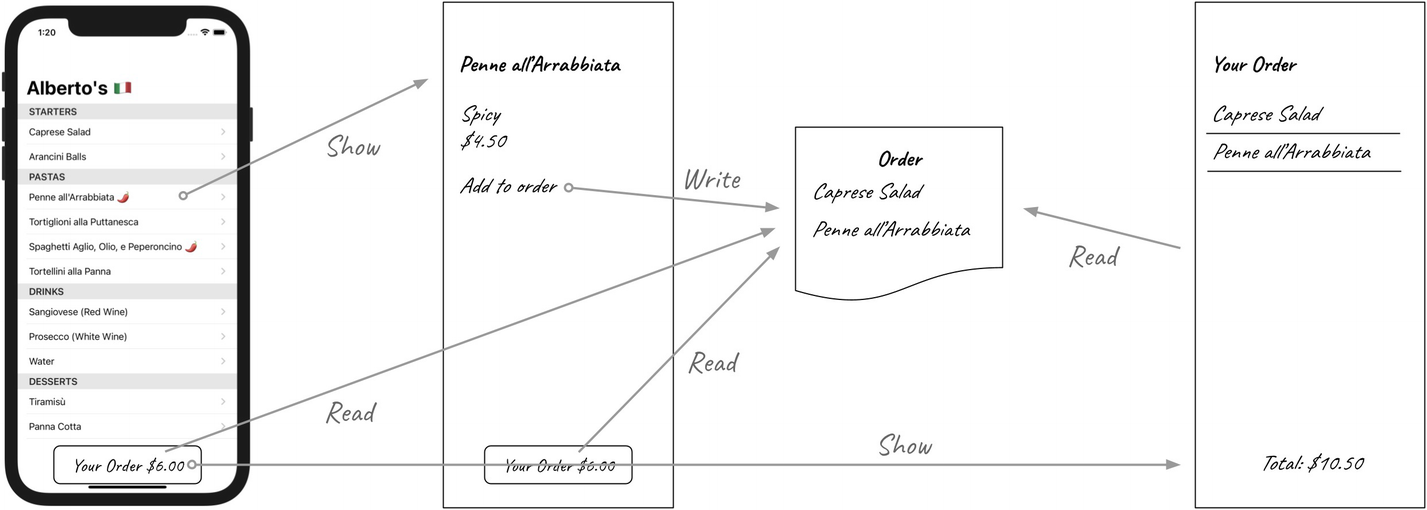
The ordering flow
A detail screen for each menu item, including its price, and a button to add it to the order
A screen showing the order summary and a button to submit it
An object to hold and update the order model
Let’s start from the object in charge of providing an interface and coordinating updates to the order, which we shall call OrderController.
The implementation details of OrderController are not interesting for this chapter, only its interface. I’ll leave building it with TDD as an exercise for you. You can find a version in the source code that comes with this book.
You’ll find the initial version of MenuItemDetail, OrderButton, and OrderDetail views and their ViewModels in this chapter’s companion source code.
To access the same order, the views need to interact with the same instance of OrderController. MenuItemDetail.ViewModel will use OrderController to add or remove its item to or from the order, OrderButton.ViewModel to show the total amount, and OrderDetail.ViewModel to read and show the items in the order. We need a way to share the same reference between all these components.
One option could be defining a static instance in the global namespace or as a sharedInstance property on the OrderController type itself. It would solve the problem of sharing the same value across multiple objects, but how could we write tests for it?
The behavior depends on the state of the Order held by OrderController: if all the tests modify the same shared instance, the way a test leaves the order will affect the next test’s result. The tests lose their isolation and become dependent on each other. When the operation a test performs changes the result of another test, the suite becomes brittle and hard to work with.
To test each ViewModel in isolation, we need to use a different OrderController instance in each.
As we’ve already discussed, Dependency Injection is the technique of providing an object or a method with all its dependencies without requiring it to create them in its implementation.
By injecting the OrderController dependency into each ViewModel, we’ll be able to test them in isolation. We can then use the @EnvironmentObject property wrapper that SwiftUI provides to access a shared instance of OrderController when instantiating the ViewModels.
Let’s see how this works in practice by working on adding and removing the order to and from the new menu item screen.
How Dependency Injection Keeps Each Test Isolated
Notice how I used a default value for the OrderController parameter. A default value saves us from updating the view to pass the correct value to its ViewModel: extra work that would only delay the feedback cycle. It’s better to stay focused on the ViewModel, make it work properly, and only then move on updating the view.
I also added a comment prefixed with "TODO" to note the compromise made by using the default value.
TODO comments are a way to leave reminders in the codebase. You can use a script or a tool like SwiftLint to add a Build Phase Run Script step that generates warnings for each TODO comment , so you won’t forget about them.
TODOs are great to leave yourself quick notes while in the TDD flow, but you should address all of them before considering your work finished. Avoid opening pull requests against your main branch that have TODOs in them. If you can’t take care of a TODO because it’s out of scope or you are waiting on something else, then move it to your project management system: leftover TODO warnings create extra noise in the codebase that could hide new genuine warnings.
If you now run the tests for MenuItemDetail.ViewModel using the Ctrl Option Cmd U keyboard shortcut, you’ll see they pass.
Dependency Injection vs. Directly Accessing Shared Instances
How is using Dependency Injection better than having a shared OrderController and accessing it within the ViewModel implementation? Because with the latter each test would update the same Order, coupling the result of a test to work done by those before it.
Update MenuItemDetail.ViewModel to access the shared instance instead of the parameter from its init by replacing any self.orderController occurrence access with OrderController.shared. Next, update the assertions for the button action behavior to check the value from the shared instance. Now run the tests and notice how they fail.
You can work around those failures by adding setUp and tearDown calls that restore OrderController.shared to a clean state before each test. Another option is to order the tests so that the way one updates OrderController leaves it in the state the next one expects. Both alternatives require extra work and make the test setup more rigid; using Dependency Injection is a much better option.
Dependency Injection makes your code honest. Shared instances and singletons allow your objects to get hold of and interact with components that their interfaces do not declare. As Miško Hevery puts it, they make your API into a pathological liar. In a codebase where freely reading from the global state is allowed, you cannot trust that the methods you call have no side effects or collaborate only with the dependencies in their signatures unless you inspect their implementation. Reasoning about code becomes challenging because you’re never sure if methods do what they say they do or if there’s more going on under the hood.
TDD nudges you toward using Dependency Injection. Writing your code starting by its tests is easier if you pass all the dependencies instead of accessing them in the implementation. The software design that emerges from the necessity of writing tests first and getting feedback fast has only explicit dependencies and is, therefore, more straightforward to reason about.
The ViewModel implementation is now complete. It’s time to wire it up with the view layer.
Dependency Injection with @EnvironmentObject
MenuItemDetail.ViewModel works in isolation, but, as the TODO comment reminds us, it’s using a dedicated OrderController instance, not a shared one. We need to instantiate MenuItemDetail.ViewModel with a reference to the same OrderController that the rest of the application will use.
MenuList is responsible for creating a MenuItemDetail and its ViewModel when the user selects an item, so it’s up to it to pass an OrderController instance. How can MenuList get a hold of one? We could apply the same reasoning and make the component responsible for creating MenuList give it the OrderController instance it needs for MenuItemDetail. AlbertosApp creates MenuList, and since it’s the top-level element in the view hierarchy, we can make it build and hold the OrderController value to share through the app.
As we’ve already discussed, this approach is not ideal. It might seem alright in the relatively flat view hierarchy of Alberto’s app, but you can see how it’s a slippery slope: the deeper and richer your view hierarchy, the more code you’ll have to write to pass dependencies down through it. On top of that, making MenuList require an OrderController in its init can give the false impression that it needs to use it, while it’s merely passing it along without ever interacting with it.
SwiftUI’s @EnvironmentObject helps growing applications without bloating the view hierarchy with long Dependency Injection chains. Views can use this property wrapper to load an ObservableObject-conforming property value from their environment. We can register objects in the environment with the environmetObject(_:) method in one ancestor of the view accessing it.
@EnvironmentObject lets us cleanly share access to shared objects without having to pass them through each view hierarchy layer. The ViewModels that need to read from or interact with OrderController can request a reference as part of their init parameters. The views that instantiate them can provide the shared instance by fetching it from the environment via @EnvironmentObject.
If you run the app now, you’ll see that the “Add to order” button changes to “Remove from order” when clicked. Once again, we got to a working app on our first attempt, thanks to TDD.
Fatal error: No ObservableObject of type OrderController found. A View.environmentObject(_:) for OrderController may be missing as an ancestor of this view
The Downside of @EnvironmentObject
The crash message we just received is clear on what went wrong: we didn’t call environmentObject(_:) on an ancestor of MenuList. When the SwiftUI runtime tried to access the OrderController property, it didn’t find it and crashed.
The chance of crashing is a downside of using @EnvironmentObject. If you forget to call environmentObject(_:) or if someone accidentally removes an existing call, the app will crash.
In practice, though, it’s unlikely you’ll ship code that doesn’t register a value for each @EnvironmentObject. The kind of crash that comes with it is something you would immediately notice when doing a manual pass of your finished feature.
You could use a different approach to creating ViewModels that passes their dependencies without using @EnvironmentObject. For example, you could use a ViewModel factory object that instantiates and holds all of the dependencies and that the views can use to get a prebuilt ViewModel. This option, though, requires extra work and “fights” against the framework.
@EnvironmentObject is an API too convenient not to use it.
Besides, this kind of crash can only occur as the result of a developer error. As we’ve elaborated in Chapter 10 in the context of force-unwrapping the return value of a URL(string:) call when the string is hardcoded, an early crash in development is an acceptable way to notice a developer error.
You are better off investing in automation and processes to catch missing environmentObject(_:) calls rather than using a different Dependency Injection strategy.
.navigationTitle("Alberto's ![]() ")
")
@EnvironmentObject vs. Directly Accessing Shared Instances
Using @EnvironmentObject looks deceivingly similar to accessing a shared instance in the view’s implementation detail.
The difference is that @EnvironmentObject is constrained to work with SwiftUI views; if you try to access a value via this property wrapper on a type that is not a view, the app will crash. In our Test-Driven Development approach to SwiftUI, views are thin components free from any presentation logic. While it’s true that using @EnvironmentObject lets them access values under the hood, they only use them to initialize their subviews’ ViewModels.
On top of that, remember that we need to explicitly register objects in the environment with environmentObject(_:). If you register all of the shared objects in your App implementation, there will always be a single place where to go and discover everything available in the environment. By contrast, there is no straightforward way to learn how many shared instance properties are available and how many the app actually accesses.
As our application grows, the number of view and business logic components will grow with it. Many small self-contained view components are more comfortable to work with in isolation but also make for a deep and intricate view hierarchy. Manually passing every dependency a view needs to do its job through such hierarchy becomes cumbersome and hard to maintain.
@EnvironmentObject makes providing views their dependency clean and straightforward to maintain, regardless of their depth in the hierarchy.
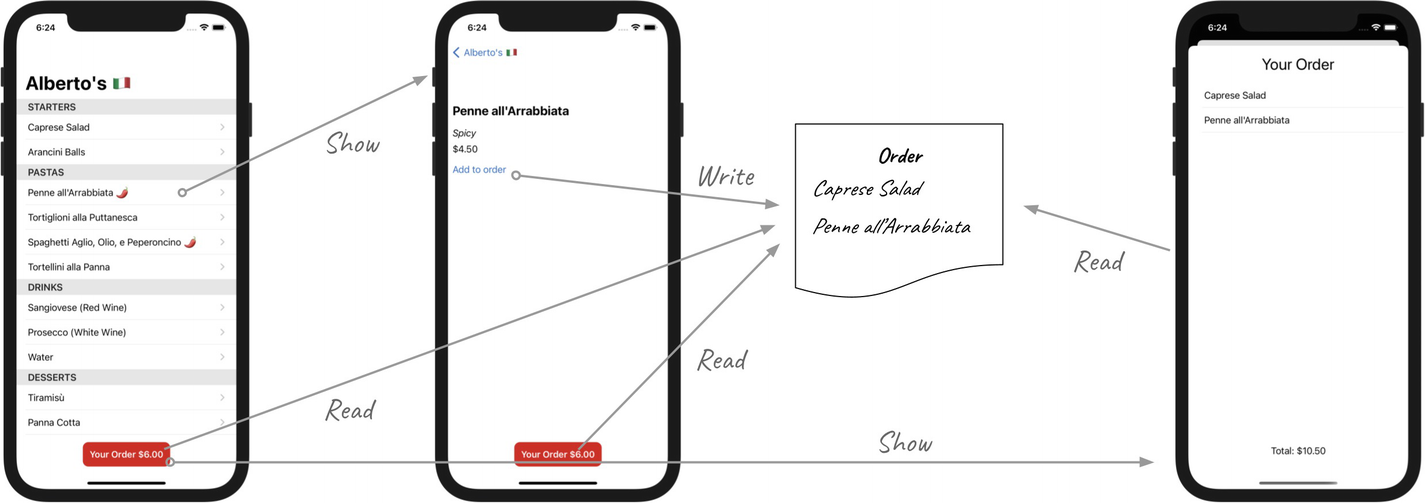
The order flow through the app with the production screens
The process to update the remaining views is similar, so I’ll leave it as an exercise for you. In this chapter, we gave the user a way to compose their order; in the next, we’ll give them a way to pay for it.
Practice Time
Once the order changes state, both OrderButton and OrderDetail should reflect it. OrderButton’s text should be “Your Order” when the customer hasn’t selected anything and “Your Order $ <order total>” when there are items in the order. The list of dishes and the total price summary in OrderDetail should also reflect changes in the order state.
To do that, both ViewModels should expect an OrderController reference and use it to read that information.
Implement that using the @EnvironmentObject injection approach.
Key Takeaways
Use Dependency Injection to share the same object with different components instead of letting them access a shared instance internally. DI makes your code easier to test and reason about by making all of its dependencies explicit.
Use @EnvironmentObject to get a reference to a shared resource in a SwiftUI view. This property wrapper allows you to inject dependencies to components that are deep in the view hierarchy without passing them through all the ancestors.
The view instantiating a child view’s ViewModel can provide it with its dependencies using @EnvironmentObject.