
5
Unit Testing
Imagine working on a project without any automated tests with a few other developers, and everything seems to be working fine in production. Then, a bug has been discovered, and one of the developers fixes this bug. The QA department approves the fix and then is pushed to production. A few days later, another bug is reported in production. After investigation, the developers found out that the new bug was introduced by the fix for the other bug. Does that sound familiar?
One small change in the code base can easily change the behavior of software. A single decimal point change can cause millions of dollars worth of incorrect computations. Imagine handballing all these computation checks to the QA department for manual testing – they would have to run these checks every time something had been updated in the code base. It’s simply inefficient, stressful, and not sustainable.
One of the solutions to this recurring issue is unit testing. Writing unit test programs will help us developers verify whether our own programs are correct or not. By repeatedly running unit tests, we will also be able to catch problems very early during development if we break other existing tests. If we accidentally change the expected behavior of a function, and if we’ve written unit tests properly for this function before, then we can be confident that we will break those tests. This, to me, is amazing. I want to know that if I break something, I won’t push my code for final verification to the QA or testing department until I am confident that I have not compromised any existing sets of unit tests. For large products, this will save the QA or testing department a lot of man-hours, even if there are automated end-to-end and user interface-to-backend tests.
There are different types of tests that we will be discussing in this chapter as well, but the unit tests are the foundations of those other automated test types.
In this chapter, we will be covering the following topics:
- Defining unit tests
- Writing and running unit tests
- Setting up test coverage monitoring
- What are the different types of tests?
- Utilizing dependency injection and mocking on integration tests
Technical requirements
This chapter requires you to have all the containers we have previously built, and PHPStorm IDE configurations that were defined in Chapter 3, Setting Up Our Development Environment Using Docker Containers. You can simply download the development environment setup from GitHub and follow the instructions mentioned in Chapter 3, Setting Up Our Development Environment Using Docker Containers: https://github.com/PacktPublishing/Test-Driven-Development-with-PHP-8/tree/main/Chapter%203.
In this chapter, it’s also required that you understand how to use Object Relational Mappers (ORMs), and the author assumes that you have experience working with MySQL databases.
It is also required for you to be familiar with PSR-11, and the use of service containers. More information about PSR-11 can be found at https://www.php-fig.org/psr/psr-11/.
All the code files related to this chapter can be found at https://github.com/PacktPublishing/Test-Driven-Development-with-PHP-8/tree/main/Chapter%203.
Preparing the development environment for the chapter
First, get the base code for Chapter 5, found at https://github.com/PacktPublishing/Test-Driven-Development-with-PHP-8/tree/main/Chapter%203 or simply run the following command:
curl -Lo phptdd.zip "https://github.com/PacktPublishing/Test-Driven-Development-with-PHP-8/raw/main/Chapter%205/base.zip" && unzip -o phptdd.zip && cd base && ./demoSetup.sh
To run the containers, and execute the commands in this chapter, the reader should be inside the
docker-server-web-1 container.
To run the containers and execute the commands in this chapter, you should be inside the docker-server-web-1 container.
Run the following command to confirm the container name for our web server:
docker ps
To run the containers, run the following command from the /phptdd/docker directory from the repository in your host machine:
docker-compose build && docker-compose up -d
docker exec -it docker_server-web_1 /bin/bash
Once inside the container, run the following commands to install the libraries required through composer:
/var/www/html/symfony# ./setup.sh
Defining unit tests
A unit test is a program that specifically tests a unit of your solution code. Just think of it as a program that tests a function and does not depend on other objects in your project.
For example, if you have a function called calculateTotal($a, $b, $c), then you can write a unit test function for it called testCanCalculateTotal(). This unit test’s job is to verify whether the calculateTotal($a, $b, $c) function is returning the expected result based on the business rules defined by your project’s specification.
In this example, let’s assume that the expected behavior of the calculateTotal function is to get the summation of the three parameters, $a, $b, and $c.
Let’s create an example unit test and solution codes. Create the following file inside our development container:
codebase/symfony/tests/Unit/CalculationTest.php
<?php
namespace AppTestsUnit;
use AppExampleCalculator;
use PHPUnitFrameworkTestCase;
class CalculationTest extends TestCase
{
    public function testCanCalculateTotal()
    {
        // Expected result:
        $expectedTotal = 6;
        // Test data:
        $a = 1;
        $b = 2;
        $c = 3;
        $calculator = new Calculator();
        $total      = $calculator->calculateTotal($a, $b,
            $c);
        $this->assertEquals($expectedTotal, $total);
    }
}
The test class name needs to be suffixed with Test, and it extends the PHPUnitFrameworkTestCase class. By doing so, we are now using the PHPUnit library.
Next, let’s try to run this unit test and see what happens. Run the following command while inside the container. The instructions on how to do all this are in Chapter 3, Setting Up Our Development Environment Using Docker Containers:
/var/www/html/symfony# php bin/phpunit –filter testCanCalculateTotal
The result will be an error:

Figure 5.1 – Fail 1 (class not found)
Our unit test has failed as expected – this is good! You’ll notice that we tried to instantiate a class that does not exist, so let’s now create that class and write the function to do the calculation.
Create the following solution class inside codebase/symfony/src/Example/ directory that we previously created:
codebase/symfony/src/Example/Calculator.php
<?php
namespace AppExample;
class Calculator
{
    public function calculateTotal(int $a, int $b, int $c)
        : int
    {
        return $a + $b - $c;
    }
}
After creating the solution class with the calculateTotal function, let’s try to run the test again by running the following command:
/var/www/html/symfony# php bin/phpunit –filter testCanCalculateTotal
We will get the following failing result:
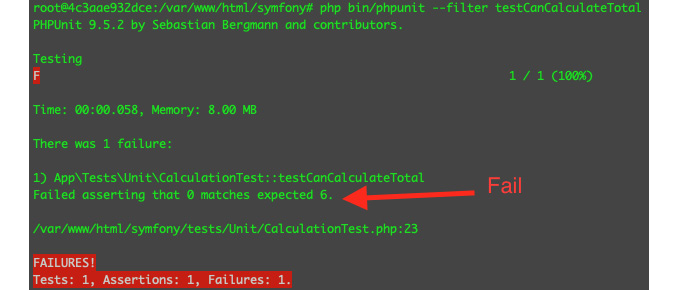
Figure 5.2 – Fail 2 (incorrect result)
PHPUnit will tell us why the test has failed. You’ll notice that it says: Failed asserting that 0 matches expected 6.. Why is that? Well, this is what happened.
In the testCanCalculateTotal unit test, we have declared $expectedTotal to be 6. We then called the calculateTotal function and sent the following arguments: $a = 1, $b = 2, and $c = 3. If the specification you receive instructs you to get the summation of the three parameters within the calculateTotal function, then the expected result is 6.
We then used the assertEquals PHPUnit function, where we told PHPUnit that we were expecting that the expected value would be equal to the calculated value with the following line:
$this->assertEquals($expectedTotal, $total);
Assertions are methods or functions that assert or check whether a condition within a test has been satisfied or not. Like in our example, we used the assertEquals method where we tried to compare $expectedTotal to the actual $total we received from the solution code. There are a lot of different types of PHPUnit assertions, and the documentation can be found here: https://phpunit.readthedocs.io/en/9.5/assertions.html.
The unit test correctly expects the expected result to be 6 – the problem is that in the solution function, we did not follow the expected behavior. We subtracted $c instead of adding it to the summation of $a and $b. If we fix the function to the following, our test should finally pass:
codebase/symfony/src/Example/Calculator.php
public function calculateTotal(int $a, int $b, int $c) : int
{
    return $a + $b + $c;
}
To get the total, we just need to get the sum of the three parameters. Once you update the Calculator.php file, run the following command:
php bin/phpunit --filter testCanCalculateTotal
We should now see the following result:
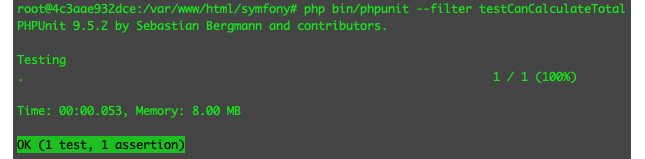
Figure 5.3 – Correct result
Nice! We have finally passed the unit test! The assertEquals function has confirmed that $expectedTotal is now equal to the $total amount returned by the solution codes!
Now, imagine having thousands of these tests. One unintended change in the behavior of the solution codes will cause one or more unit tests to fail. This is very valuable. This will help developers verify the stability of any code change that they implement.
To learn more about PHPUnit, you can visit their documentation page at https://phpunit.readthedocs.io/.
This is one of the most basic examples of the use of a unit test, but we’ll be writing more unit tests and utilizing more PHPUnit features as we continue with the project.
The more tests we have for our solution codes, the better it is for the stability of the solution. Therefore, next, we will look into PHPUnit’s code coverage analysis solution. This will help us get some metrics about how much test coverage we have for our solution.
Test coverage
It’s great having unit tests, but if we only test a few parts of the solution, then there’s more chance of breaking the code base unintentionally. Still, having a few unit tests is better than having no unit tests. I’m not aware of a solid industry standard number or percentage of ideal test code coverage. Some say 80% to 95% test coverage is good, but that depends on the project. I still believe that 50% test coverage is better than 0% test coverage, and every project can be very different. The test coverage can be configured to exclude some parts of the code base as well, so having 100% test coverage does not literally mean 100% of all code in the code base is covered by automated tests. Nonetheless, it’s still good to know how much test coverage we have for our solution. For developers who are just getting started with unit testing, it’s important to point out that having a few tests is better than not writing unit tests at all. Don’t be scared or demotivated if your code coverage report gives you a low number; knowing this will at least give you the data or truth about your test coverage.
To let PHPUnit know that a certain test function tests for a specific solution code, we will be using the @covers annotation. Annotations in PHP are a type of metadata that is added to classes, functions, properties, and so on. In PHP, we declare annotations within documentation blocks.
Declaring annotations
PHP annotations are just like comments – they are used by PHP libraries to get metadata from a function, property, or class in PHP.
Open the CalculationTest.php file and add the following @covers annotation right above the testCanCalculateTotal function:
codebase/symfony/tests/Unit/CalculationTest.php
/**
 * @covers AppExampleCalculator::calculateTotal
 */
public function testCanCalculateTotal()
You’ll notice that we have declared the AppExampleCalculator::calculateTotal class and the calculateTotal method after the @covers annotation. We are basically telling PHPUnit that this specific testCanCalculateTotal test function will cover the method or function inside the AppExampleCalculator class.
Now, run the following CLI commands to run PHPUnit with test coverage:
/var/www/html/symfony# export XDEBUG_MODE=coverage
/var/www/html/symfony# php bin/phpunit --coverage-text --filter CalculationTest
This time around, we added the --coverage-text option. We are telling PHPUnit to output the coverage analysis report back to the terminal window. You will now receive the following result:

Figure 5.4 – First test coverage
Congratulations! You just received your first test coverage report! This means that the calculate method of the Calculation.php class is covered by a unit test. However, in real life, we end up having more functions inside a class. What will happen if we start adding functions to the Calculation.php class? Well, let’s find out.
Adding more functions to the solution class
The CalculationTest class we previously created has a test that covers the calculateTotal function. When we ran the coverage test, we received a 100% test coverage result. If we add more functions to the solution class, we will no longer get a 100% coverage test result. What does that mean though? In practice, that means that some parts of our solution class are not covered by our automated test. It’s not the end of the world, but this will help the developers in a company to identify how much of the system is covered by automated tests. This will affect the business’s confidence level with the updates in the code base, and thus also affect the amount of manual testing that needs to be done, or how confident the business is about releasing new code.
Open the Calculation.php class and add the following method:
codebase/symfony/src/Example/Calculator.php
<?php
namespace AppExample;
class Calculator
{
    public function calculateTotal(int $a, int $b, int $c)
        : int
    {
        return $a + $b + $c;
    }
    public function add(int $a, int $b): int
    {
        return $a + $b;
    }
}
As you can see in the preceding code block, we have added a new function called add. This function simply returns the summation of $a and $b. Since we have no unit test for this new function, let’s see what will happen when we run our test again. Run the following command:
/var/www/html/symfony# php bin/phpunit --coverage-text --filter CalculationTest
After running the preceding command, we’ll notice that something has changed in our test coverage result:

Figure 5.5 – Test coverage has decreased
You will notice that before adding the add function inside the Calculator.php class, we had 100% test coverage. Now, we only have 50% test coverage. Obviously, it’s because we don’t have a unit test responsible for testing the add function. To improve our test coverage, let’s add a unit test for the add function:
codebase/symfony/tests/Unit/CalculationTest.php
<?php
namespace AppTestsUnit;
use AppExampleCalculator;
use PHPUnitFrameworkTestCase;
class CalculationTest extends TestCase
{
    /**
     * @covers AppExampleCalculator::calculateTotal
     */
    public function testCanCalculateTotal()
    {
        // Expected result:
        $expectedTotal = 6;
        // Test data:
        $a = 1;
        $b = 2;
        $c = 3;
        $calculator = new Calculator();
        $total      = $calculator->calculateTotal($a, $b,
            $c);
        $this->assertEquals($expectedTotal, $total);
    }
    /**
     * @covers AppExampleCalculator::add
     */
    public function testCanAddIntegers()
    {
        // Expected Result
        $expectedSum = 7;
        // Test Data
        $a = 2;
        $b = 5;
        $calculator = new Calculator();
        $sum        = $calculator->add($a, $b);
        $this->assertEquals($expectedSum, $sum);
    }
}
In the preceding code block, we’ve added the testCanAddIntegers test function. By using the @covers annotation, we have also declared that this function tests for the add function in the Calculation.php class.
Let’s run the test again and see whether we have improved our test coverage result. Run the following command again:
/var/www/html/symfony# php bin/phpunit --coverage-text --filter CalculationTest
Now, we should see the following result:

Figure 5.6 – Back to 100% test coverage
Nice! Now, we have 100% test coverage again. We have two functions inside the Calculation.php class, and we also have two unit tests that test for each of these functions.
Now, imagine that you’re working with other developers on a project, which is very common. If other developers start refactoring a unit-tested class and start adding functions to that class without adding tests to cover them, when your team runs the coverage test, your team will easily and quickly identify that there are new functions or features in that class not covered by the automated tests.
What if you created a private function inside the Calculation.php class? If you need to test a private method, then you can either indirectly test the private method by testing the method that calls it or use PHP’s reflection feature.
Using PHP’s reflection feature to directly test for private methods
Private methods are not supposed to be accessible to external objects, but they can be tested indirectly as will be explained in the next section. If you really want to try testing for a private method directly, you can use this method. Open the Calculator.php class and add the private getDifference method:
codebase/symfony/src/Example/Calculator.php
<?php
namespace AppExample;
class Calculator
{
    public function calculateTotal(int $a, int $b, int $c)
        : int
    {
        return $a + $b + $c;
    }
    public function add(int $a, int $b): int
    {
        return $a + $b;
    }
    private function getDifference(int $a, int $b): int
    {
        return $a - $b;
    }
}
If you run the test again, you’ll see that your test coverage has decreased again, even if you just added a private method:

Figure 5.7 – No test for private method
Now, we have untested code, which is also going to be tricky to test as it’s a private method. To test this, open the CalculationTest.php test class and add the testCanGetDifference method:
codebase/symfony/tests/Unit/CalculationTest.php
/**
 * @covers AppExampleCalculator::getDifference
 */
public function testCanGetDifference()
{
    // Expected Result
    $expectedDifference = 4;
    // Test Data
    $a = 10;
    $b = 6;
    // Reflection
    $calculatorClass    = new ReflectionClass
        (Calculator::class);
    $privateMethod      = $calculatorClass->getMethod
        ("getDifference");
    $privateMethod->setAccessible(true);
    // Instance
    $calculatorInstance = new Calculator();
    // Call the private method
    $difference = $privateMethod->invokeArgs
        ($calculatorInstance, [$a, $b]);
    $this->assertEquals($expectedDifference, $difference);
}
As with the earlier test methods, we have also annotated this test to signify that it tests for the getDifference method inside the Calculator.php class. Since we are trying to test for a private method that is obviously not accessible if we just instantiate a Calculator object, we need to use PHP’s ReflectionClass. We have manually specified the visibility of the getDifference class and indirectly called the private getDifference method. If we run the test again, we’ll now see the following:

Figure 5.8 – Private method tested
Now, we are back to 100% test coverage, having tested two public methods and one private method – but is this necessary or practical? I personally think that this is not very practical. If I have a private method, I’ll obviously use that private method inside another publicly accessible method. What I’d do is test for that publicly accessible method instead. If the instructions inside a private method are very complex, I don’t think it should be a private method inside a class anyway. It might need its own class, or it might need to be broken down more. I’ve seen a lot of good classes (classes that can do everything) with very complex private methods, and it’s a headache to maintain these types of classes.
Indirectly testing for private methods
If I have a private method, I’d test the public method that uses the private method instead of going through the reflection route. If it gets too complex, I will think of moving this test away from the unit test suite altogether. You can read about integration testing later in this chapter to learn more.
Open the Calculator.php class and replace the content with the following:
codebase/symfony/src/Example/Calculator.php
<?php
namespace AppExample;
class Calculator
{
    public function calculateTotal(int $a, int $b, int $c)
        : int
    {
        return $a + $b + $c;
    }
    public function add(int $a, int $b): int
    {
        return $a + $b;
    }
    public function subtract(int $a, int $b): int
    {
        return $this->getDifference($a, $b);
    }
    private function getDifference(int $a, int $b): int
    {
        return $a - $b;
    }
}
We have retained the private getDifference method, but we have also added a new publicly accessible method called subtract, which, in turn, uses the getDifference method.
Open the CalculationTest.php file and replace the reflection test with the following:
codebase/symfony/tests/Unit/CalculationTest.php
/**
 * @covers AppExampleCalculator::subtract
 * @covers AppExampleCalculator::getDifference
 */
public function testCanSubtractIntegers()
{
    // Expected Result
    $expectedDifference = 4;
    // Test Data
    $a = 10;
    $b = 6;
    $calculator = new Calculator();
    $difference = $calculator->subtract($a, $b);
    $this->assertEquals($expectedDifference, $difference);
}
In the preceding code block, we have deleted the testCanGetDifference test that uses PHP’s ReflectionClass method. It’s up to you whether you want to test manually and individually for your private or protected methods using reflection.
In this new testCanSubtractIntegers method, you will notice that there are now two @covers annotations. We are explicitly declaring that this specific test method will cover both the public subtract method and the private getDifference method.
Run the following command to execute the coverage test again and let’s see whether we still pass the tests:
/var/www/html/symfony# php bin/phpunit --coverage-text --filter CalculationTest
You should see the following 100% coverage result:
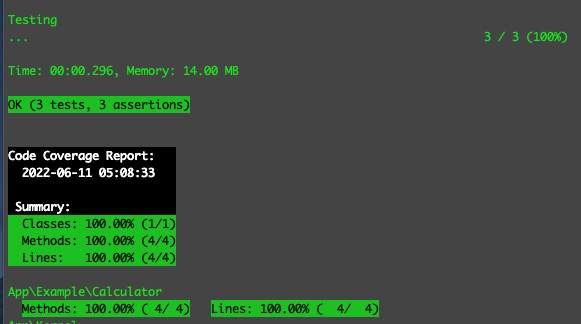
Figure 5.9 – Two methods covered by one test
You’ll notice that the coverage report states that we have tested four methods. Technically speaking, we only have three tests inside our CalculationTest.php test class that are reported by the test result:
OK (3 tests, 3 assertions)
Since we have declared that the testCanSubtractIntegers test will be covering both the subtract and getDifference methods, we are able to get full test coverage for the Calculator.php class:
Methods: 100.00% (4/4)
We were now able to go through running unit tests, using Xdebug to debug with breakpoints and get test coverage results. Next, we will build our own small tools to run tests a little bit easier so that we don’t have to write long commands all the time.
Using shell scripts to run tests
We can use shell scripts to run our tests for us, and by doing so, we can add extra configurations to each script. There are different configurations and commands to run when running PHPUnit tests, and there are different goals or intentions in mind when running unit tests. In this chapter so far, we ran tests to trigger Xdebug and go through codes, and we also used PHPUnit to get a report for our test coverage. To simplify the execution of these tests a bit better, we can build some shell scripts to help us encapsulate the commands and configurations to run the tests.
If you go back to your terminal and try to use Xdebug with a breakpoint, you’ll probably be disappointed. In PHPStorm, put a breakpoint like so in one of the tests:

Figure 5.10 – Adding a breakpoint
After putting a breakpoint inside the CalculationTest.php class on line 16, run the following command:
/var/www/html/symfony# php bin/phpunit --filter CalculationTest
Did you notice anything? Well, the breakpoint did not get called at all. This is because earlier, we specified that we wanted to use Xdebug in coverage mode by running export XDEBUG_MODE=coverage. On the other hand, if we are running the test in debug mode and we want to get the coverage report, then we’ll have to run different commands again. There’s really nothing wrong with this, but if we are going to be developing a lot of codes and running tests repeatedly with different configurations, it can be helpful to use shell scripts instead.
We will create two scripts to trigger PHPUnit and configure our environment:
- runDebug.sh – We’ll use this for debugging
- runCoverage.sh – We’ll use this for test coverage reports
In symfony’s root dir, create the following file:
codebase/symfony/runDebug.sh
#!/bin/bash
export XDEBUG_CONFIG="idekey=PHPSTORM"
export PHP_IDE_CONFIG="serverName=phptdd"
export XDEBUG_MODE="debug"
XDEBUGOPT=
if [ "x$NODEBUG" = "x" ]; then
    XDEBUGOPT="-d xdebug.start_with_request=yes"
fi
php $XDEBUGOPT bin/phpunit --color=always --debug $@
In the preceding script, we are configuring our environment to run a test with Xdebug. This is important during development as it will let us use breakpoints without having to always think about the configurations.
Make sure that the file you created is executable; run the following command to do so:
/var/www/html/symfony# chmod u+x runDebug.sh
Now, we can try using this script to execute our CalculationTest.php class, and see whether our breakpoint in line 16 gets called:
/var/www/html/symfony# ./runDebug.sh
After running the preceding command, go back to PHPStorm and make sure that the breakpoint works:

Figure 5.11 – Using runDebug.sh with Xdebug
Great! By using the ./runDebug.sh script, we can configure our container dynamically and trigger the breakpoint in PHPStorm with Xdebug. Now, if we want to get the test coverage report, we’ll need to run a different script to make things easier.
Create a new file called runCoverage.sh:
codebase/symfony/runCoverage.sh
#!/bin/bash
export XDEBUG_CONFIG="idekey=PHPSTORM"
export PHP_IDE_CONFIG="serverName=phptdd"
export XDEBUG_MODE="coverage"
php bin/phpunit --color=always --coverage-text $@
The preceding script will configure our environment and attach the --coverage-text option so that we can easily get a test coverage report when running this script.
Run the following command:
/var/www/html/symfony# ./runCoverage.sh
Running the ./runCoverage script should now generate the respective Code Coverage Report:

Figure 5.12 – Using the runCoverage.sh script
Great! Now, we can run PHPUnit with different configurations. The last test execution returned a failure because of our previously created ExampleTest.php test class, which we deliberately failed.
You can add your own scripts depending on your needs – after all, we are software developers. We can build tools to make things a little bit easier for ourselves. When running Continuous Integration (CI), we won’t need the ability to debug nor run code coverage reports all the time, so we can also create a script further down the project for CI usage. CI will be discussed in more detail in Chapter 9, Continuous Integration.
We’ve now learned how to write unit tests, and these tests are focused on testing small programs in our solution codes – but what if we need to test a more complex functionality that uses multiple classes? It would be nice if we could segregate those complex tests that depend on external objects or resources. In the next section, we’ll quickly go through the different types of automated tests.
Types of tests
Running PHPUnit tests can be very quick. In my experience, even with tens of thousands of unit tests, it can only take a few minutes to run them completely. This is because they only test small parts or units of the solution.
We can also add tests that will call programs that will interact with external web service APIs or databases. Now, imagine how complex those tests are and how long it would take to execute them. If we combine all the complex tests that use multiple object and unit tests into a single group, it will take a lot of time to run the entire group of tests. I’ve experienced working with a company where there are thousands of tests that are all grouped into a single suite – you run the suite and wait an hour, only to find out there’s one broken unit test. That’s very time-consuming and impractical.

Figure 5.13 – Grouping tests
Identifying what a test does and putting it in the right group or basket of tests can help with organizing the tests. There are different types of tests that we can use as “baskets” or groups for our tests. We can simplify these baskets and divide them into two main types. In PHPUnit, these baskets are called test suites.
Basket 1 – unit tests
We’ve written unit tests earlier in this chapter. If you remember, we created a directory inside the codebase/symfony/tests directory called Unit. This will be our unit test basket. Every test that specifically tests small parts or units of the solution will be put into this directory, and in turn, the namespace is the following: AppTestsUnit.
Open up codebase/symfony/phpunit.xml and you’ll notice that we have declared a testsuite named Unit in the tests/Unit/ directory. We will use test suites to help group and segregate our tests. This will come in handy when we want to isolate the group of tests we want to run:
<testsuites>
    <testsuite name="Project Test Suite">
        <directory>tests</directory>
    </testsuite>
    <testsuite name="Unit">
        <directory>tests/Unit/</directory>
    </testsuite>
</testsuites>
This means that if we want to run the Unit test suite, PHPUnit will find all of the tests inside the tests/Unit/ directory.
To run all the tests inside that unit basket or test suite, run the following command:
/var/www/html/symfony# ./runDebug.sh --testsuite Unit
You’ll get the following result:

Figure 5.14 – Unit test suite
By adding the --testsuite unit option, we ensure that we only run tests inside the AppTestsUnit namespace. This will help us focus our test execution on a specific basket or test suite.
We have covered the first group or basket of tests. We have created a directory called Unit, and this is where we will put all the future unit, or simple, tests. Next, we’ll need to create a separate group or basket to put the more complex tests.
Basket 2 – integration tests
Integration testing aims to test a bigger part of the solution. Instead of testing a small unit of the application, integration tests aim to cover different parts of the solution in a single test.
Imagine testing an object’s method that uses other objects. The success of the test can depend on external factors such as a database connection, an API call, or dependence on other classes that also depend on other classes. It’s like a unit test on a slightly bigger scale.
For example, if you have a class that computes some total and then persists it in the database, you’d want to have a test that checks the computation result that is persisted in the database. This is where integration tests can be very useful.
We previously created a directory for our unit tests – now, let’s create a directory to contain our integration tests.
Create an Integration directory inside the tests directory:
/var/www/html/symfony# mkdir tests/Integration
After creating the Integration directory, we need to let PHPUnit know about this directory. We need to add an Integration test suite and declare the directory path. Open codebase/symfony/phpunit.xml and use the following configuration:
codebase/symfony/phpunit.xml    <php>
        <ini name="display_errors" value="1" />
        <ini name="error_reporting" value="-1" />
        <server name="APP_ENV" value="test" force="true" />
        <server name="SHELL_VERBOSITY" value="-1" />
        <server name="SYMFONY_PHPUNIT_REMOVE" value="" />
        <server name="SYMFONY_PHPUNIT_VERSION" value="9.5" />
        <env name="SYMFONY_DEPRECATIONS_HELPER"
            value="disabled" />
    </php>
    <testsuites>
        <testsuite name="Project Test Suite">
            <directory>tests</directory>
        </testsuite>
        <testsuite name="Unit">
            <directory>tests/Unit/</directory>
        </testsuite>
        <testsuite name="Integration">
            <directory>tests/Integration/</directory>
        </testsuite>
    </testsuites>
    <coverage processUncoveredFiles="true">
        <include>
            <directory suffix=".php">src</directory>
        </include>
    </coverage>
    <listeners>
        <listener class="SymfonyBridgePhpUnit
            SymfonyTestsListener" />
    </listeners>
Now, the Integration test suite has been registered. With this, we can still safely run our unit tests by passing the Unit argument to the --testsuite option when running our tests. To run integration tests, we simply use --testsuite Integration instead:
/var/www/html/symfony# ./runDebug.sh --testsuite Integration
Since we have no tests, running the preceding command will return the following result:

Figure 5.15 – Integration test suite
Now that we have a basket to put all our integration tests into, let’s start writing our first integration test!
We already have a unit-tested class, the Calculate.php class. Now, it would be great if we could use this as a part of our integration test example.
Integration test example
In this section, we will try to do some calculations and then try to store the result in the database. We will create a database called coffee and try to create a program that simply calculates the sum of how many coffee cups we had in a day, and then persist it. After persisting, we need to be able to verify whether the persisted sum is correct.
Installing Doctrine with Symfony 6
Since we are using the Symfony framework, which works well with Doctrine, let’s just use Doctrine to persist and retrieve data from our database. There are a lot of ways to persist and retrieve data from a database, but for this project, we’ll just focus on using Doctrine to simplify our examples so that we can focus on testing rather than reinventing the wheel. Doctrine is an ORM. You can read more about Doctrine at https://www.doctrine-project.org.
Let’s install Doctrine by running the following commands:
/var/www/html/symfony# composer require symfony/orm-pack
/var/www/html/symfony# composer require symfony/maker-bundle --dev
After running the preceding commands, which can take a few minutes, create a local environment file, and save it with the following content:
codebase/symfony/.env.local
DATABASE_URL="mysql://root:mypassword@server-mysql/mydb?serverVersion=8&charset=utf8mb4"
In the preceding line, we are telling Symfony that in our local environment, we’d like to use our MySQL container that we created in Chapter 3, Setting Up Our Development Environment Using Docker Containers.
You can open up the docker-compose.yml file to review the MySQL container details. You can make any further configuration changes there to suit your needs.

Figure 5.16 – MySQL container settings for Doctrine
You can change the database password here, or even change the MySQL version to whichever you need. In the .env.local file, we have specified that we want to use MySQL8, and we also specified that we want to use the server-mysql container, instead of using the IP address of the database server. We also used coffee as our database name.
Next, we will use the Doctrine ORM to create a MySQL database for us. We will then be using this new database for our example integration test.
Doctrine and database
We have configured our environment so that it can connect to the MySQL server container we created, and we have specified the database name we want to use for our example. Now, at this stage, we are ready to create a database for our integration test example. Run the following command:
/var/www/html/symfony# php bin/console doctrine:database:create
By running the preceding command, Doctrine will create a database named coffee for us, using the parameters we provided in the .env.local file.

Figure 5.17 – Creating a new database
Now, we have our own database to play with. If you have a desktop MySQL client, you can connect to the server-mysql container to view the database we just created. If not, to make things look a bit prettier than the unending terminal windows for our automated tests, we have added a PHPMyAdmin container for quick and easy DB access back in Chapter 3, Setting Up Our Development Environment Using Docker Containers.
Open your web browser and go to the following URL: http://127.0.0.1:3333/index.php. You will see the following:

Figure 5.18 – coffee database
Before we write any codes that will utilize the database we just created, first, we need to understand what we want to do with it and create an integration test for it. Next, we’ll create our first failing integration test.
Failing our first integration test
We have a solution to persist information, which is Doctrine and MySQL. We also have a way to calculate the sum of some random integers. Now, let’s put them to use. We want to be able to pass a string name and three integers to represent the number of cups of coffee we consumed, get the sum, and persist it.
Create the following integration test file:
codebase/symfony/tests/Integration/ConsumptionTest.php
<?php
namespace AppTestsIntegrationService;
use PHPUnitFrameworkTestCase;
class ConsumptionServiceTest extends TestCase
{
    public function testCanComputeAndSave()
    {
        $this->fail("--- RED --");
    }
}
We created our first integration test inside the AppTestsIntegration namespace, which, in turn, will be a part of our integration test suite. Run the following command to make sure everything works, and that our test fails as expected:
/var/www/html/symfony# .runDebug.sh --testsuite Integration --filter ConsumptionServiceTest
You should see the failed test, caused by the $this->fail("--- RED --"); line we have created:

Figure 5.19 – First failing integration test
Great! We now have a failing Integration test suite test. Now, all we must do is make it pass.
Let’s try to break down exactly what we want to do, and what we want to test for:
- We want to be able to track how many cups of coffee a person drinks in a day
- We want to have the number of coffee cups consumed in the morning, afternoon, and night
- We want to get the sum and then persist the total, along with the name of the person
- We want to be able to retrieve the persisted record and check whether it’s correct.
Based on the preceding list, we can then update our test with the following:
codebase/symfony/tests/Integration/Service/ConsumptionTest.php
<?php
namespace AppTestsIntegrationService;
use PHPUnitFrameworkTestCase;
class ConsumptionServiceTest extends TestCase
{
    public function testCanComputeAndSave()
    {
        // Given
        $name               = "Damo";
        $morningCoffee      = 2;
        $afternoonCoffee    = 3;
        $eveningCoffee      = 1;
        // Expected Total:
        $expectedTotal = 6;
        // Persist the data
        $service    = new ConsumptionService();
        $persistedId = $service->computeAndSave($name,
        $morningCoffee, $afternoonCoffee, $eveningCoffee);
        // Verify if the data persisted is correct:
        // TODO:
    }
}
As you can see, we have an incomplete test – but for me, this is good. I write a failing test and make sure it fails, but I also try to start writing exactly what I want to test for.
Run the following command to see what happens:
/var/www/html/symfony# ./runDebug.sh --testsuite Integration --filter ConsumptionServiceTest
The test tries to instantiate the ConsumptionService.php class that does not exist. Therefore, you’ll get the following result:

Figure 5.20 – ConsumptionService not found
We deliberately tried to instantiate an object from a class that does not exist, therefore resulting in a test failure. What does this tell us? Remember Test-Driven Development (TDD), where the development of our solution codes was driven by our failing tests? Well, we might want to start writing the solution code, which is the ConsumptionService.php class and the other program it needs to use. We should always fail our test first.
However, before we write the ConsumptionService.php class, let’s create the Doctrine entity needed by the ConsumptionService.php class for our example.
Creating a Doctrine entity
Let’s create an entity class to represent our data. A Doctrine entity is just a simple Plain Old PHP Object (POPO) with some Doctrine-specific annotations that can be mapped to a database table in its most basic usage.
Run the following command to create a Consumption.php class:
/var/www/html/symfony# php bin/console make:entity
After running the preceding command, enter the fields you want to create. For our example, use the following:
New property name: name
Field type: string
Field length: 50
Can this field be null in the database? no
New property name: total
Field type: integer
Can this field be null in the database? no
After the command prompts, you should now see a new entity class file in codebase/symfony/src/Entity/Consumption.php:
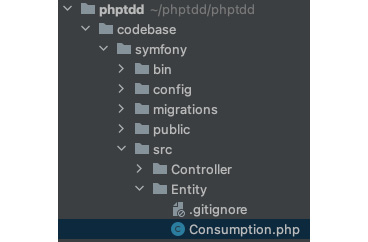
Figure 5.21 – Consumption entity
If you open the file, you’ll see the automatically generated Doctrine entity codes:
<?php
namespace AppEntity;
use AppRepositoryConsumptionRepository;
use DoctrineORMMapping as ORM;
#[ORMEntity(repositoryClass: ConsumptionRepository::class)]
class Consumption
{
    #[ORMId]
    #[ORMGeneratedValue]
    #[ORMColumn(type: 'integer')]
    private $id;
    #[ORMColumn(type: 'string', length: 50)]
    private $name;
    #[ORMColumn(type: 'integer')]
    private $total;
    public function getId(): ?int
    {
        return $this->id;
    }
    public function getName(): ?string
    {
        return $this->name;
    }
    public function setName(string $name): self
    {
        $this->name = $name;
        return $this;
    }
    public function getTotal(): ?int
    {
        return $this->total;
    }
    public function setTotal(int $total): self
    {
        $this->total = $total;
        return $this;
    }
}
In summary, we only have two fields to play with, the name and total fields. That’s going to be perfect for our integration test example.
Next, we’ll need the actual database table that our Doctrine entity is going to represent. We will use Doctrine ORM to run the migration tool so that we can generate the database tables we need.
Creating a Doctrine table for the entity
Now that we have an entity, let’s also create the database table that the Consumption entity represents.
Run the following commands:
/var/www/html/symfony# php bin/console make:migration
/var/www/html/symfony# php bin/console doctrine:migrations:migrate
After running the preceding commands, a new database table should be created for you. If you go back to the PHPMyAdmin page, you’ll see the new consumption table created, based on the Consumption.php entity class:

Figure 5.22 – consumption database table
We now have a database table that will be represented by our Consumption.php entity class. This table will be used to persist our coffee drinkers’ coffee consumption records!
However, when working on a real project, we don’t want to use the main database for running our tests; otherwise, our tests will end up inserting test data into the production database. Next, we’ll create the test database. This database will be specifically used by our integration tests and will mirror the structure of the main database.
Creating a test database
Just like in the previous set of instructions, we’ll also create a database based on some environment configuration – but this time, this is specifically intended to be used by our tests.
Open the .env.test file and add the following line at the end of the file:
DATABASE_URL="mysql://root:mypassword@server-mysql/coffee?serverVersion=8&charset=utf8mb4"
You’ll notice that it’s identical to the value we used for the .env.local file. Notice that we reused coffee as the database name.
Now, run the following command to create the test database:
/var/www/html/symfony# php bin/console doctrine:database:create --env=test
A new database named coffee_test will be created. _test is suffixed to the coffee database name we have specified. Every integration test we run that uses the database will use the coffee_test database to persist and read data.
Next, run the following command so that we can also migrate the Consumption table into our new coffee_test database:
/var/www/html/symfony# php bin/console doctrine:migrations:migrate -n --env=test
At this stage, we’ll have two almost identical databases. The coffee database that’s to be used for the solution, and the coffee_test database that’s to be used for our tests.
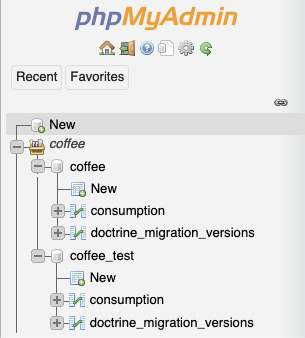
Figure 5.23 – Coffee databases
Now that we have created our databases, and we also have the Doctrine ORM, which will serve as the main tool for communicating with our database from the PHP code base, we will now start building the solution codes to pass our failing integration test.
Putting things together
At this stage, we’re now ready to start building the missing solution code that our ComputationServiceTest.php integration test keeps on complaining about. Remember this message from our failing test?
Error: Class "AppTestsIntegrationServiceConsumptionService" not found
Let’s start fixing that error by following these steps:
- First, open the services.yaml file and update it with the following content:
codebase/symfony/config/services.yaml
# This file is the entry point to configure your own services.
# Files in the packages/ subdirectory configure your dependencies.
# Put parameters here that don't need to change on each machine where the app is deployed
# https://symfony.com/doc/current/best_practices.html#use-parameters-for-application-configuration
parameters:
services:
    # default configuration for services in *this* file
    _defaults:
        autowire: true      # Automatically injects
            dependencies in your services.
        autoconfigure: true # Automatically registers your services as commands, event subscribers, etc.
    # makes classes in src/ available to be used as
        services
    # this creates a service per class whose id is the
        fully-qualified class name
    App:
        resource: '../src/'
        exclude:
            - '../src/DependencyInjection/'
            - '../src/Entity/'
            - '../src/Kernel.php'
    AppServiceConsumptionService:
        public: true
    # add more service definitions when explicit
        configuration is needed
    # please note that last definitions always
        *replace* previous ones
Since we are using Symfony for this example, we will use its PSR-11-compliant service container to create instances of the objects we need. Instead of using the new PHP keyword to create an instance of the ConsumptionService.php class that we are about to write, we’ll use the service container instead.
- Create the following class with the following content:
codebase/symfony/src/Service/ConsumptionService.php
<?php
namespace AppService;
use AppEntityConsumption;
use AppExampleCalculator;
use DoctrinePersistenceManagerRegistry;
class ConsumptionService
{
    /**
     * @var Calculator
     */
    private Calculator $calculator;
    /**
     * @var ManagerRegistry
     */
    private $managerRegistry;
    /**
     * @param ManagerRegistry $doctrine
     * @param Calculator $calculator
     */
    public function __construct(ManagerRegistry $doctrine, Calculator $calculator)
    {
        $this->setManagerRegistry($doctrine);
        $this->setCalculator($calculator);
    }
    /**
     * @param string $name
     * @param int $morning
     * @param int $afternoon
     * @param int $evening
     * @return int
     */
    public function calculateAndSave(string $name, int
        $morning, int $afternoon, int $evening): int
    {
        $entityManager = $this->getManagerRegistry()->
            getManager();
        // Calculate total:
        $sum = $this->getCalculator()->calculateTotal
            ($morning, $afternoon, $evening);
        // Consumption model or entity:
        $consumption = new Consumption();
        $consumption->setName($name);
        $consumption->setTotal($sum);
        // Persist using the Entity Manager:
        $entityManager->persist($consumption);
        $entityManager->flush();
        return $consumption->getId();
    }
    /**
     * @return Calculator
     */
    public function getCalculator(): Calculator
    {
        return $this->calculator;
    }
    /**
     * @param Calculator $calculator
     */
    public function setCalculator(Calculator
        $calculator): void
    {
        $this->calculator = $calculator;
    }
    /**
     * @return ManagerRegistry
     */
    public function getManagerRegistry(): ManagerRegistry
    {
        return $this->managerRegistry;
    }
    /**
     * @param ManagerRegistry $managerRegistry
     */
    public function setManagerRegistry(ManagerRegistry
        $managerRegistry): void
    {
        $this->managerRegistry = $managerRegistry;
    }
}
Let’s quickly go through the things we did in this class before we move back to our integration test class. The ConsumptionService class depends on two objects, ManagerRegistry and CalculationService. The calculateAndSave method will then use these two objects to achieve its goal.
- Now, let’s go back to the ConsumptionServiceTest.php class, and replace its content with the following:
codebase/symfony/tests/Integration/Service/ConsumptionTest.php
<?php
namespace AppTestsIntegrationService;
use AppEntityConsumption;
use AppServiceConsumptionService;
use SymfonyBundleFrameworkBundleTest
    KernelTestCase;
class ConsumptionServiceTest extends KernelTestCase
{
    public function testCanComputeAndSave()
    {
        self::bootKernel();
        // Given
        $name               = "Damo";
        $morningCoffee      = 2;
        $afternoonCoffee    = 3;
        $eveningCoffee      = 1;
        // Expected Total:
        $expectedTotal = 6;
        // Test Step 1: Get the Symfony's service
            container:
        $container = static::getContainer();
        // Test Step 2: Use PSR-11 standards to get an
        instance of our service, pre-injected with the
        EntityManager:
        /** @var ConsumptionService $service */
        $service = $container->get
            (ConsumptionService::class);
        // Test Step 3: Run the method we want to test for:
        $persistedId = $service->calculateAndSave
            ($name, $morningCoffee, $afternoonCoffee,
                $eveningCoffee);
        // Test Step 4: Verify if the data persisted
            data is correct:
        $em             = $service->
            getManagerRegistry()->getManager();
        $recordFromDb   = $em->find
            (Consumption::class, $persistedId);
        $this->assertEquals($expectedTotal,
            $recordFromDb->getTotal());
        $this->assertEquals($name, $recordFromDb->
            getName());
    }
}
I have left comments in the code to explain clearly what we did in the test. Let us understand it in more detail:
- Test step 1: Since we are using Symfony and are extending the KernelTestCase class, we can use the static::getContainer() method to get an instance of Symfony’s service container. We will use this to create an instance of our ConsumptionService instead of manually using the new PHP keyword to instantiate it.
- Test step 2: Since we are using Symfony, we can use its PSR-11-compliant service container. We can use this service container to get instances of classes without having to manually instantiate their dependencies. For example, our ConsumptionService class expects two objects in its constructor. With the service container being configured for auto wiring, the container will automatically instantiate the dependencies declared in the constructor of ConsumptionService. The auto wiring configuration is declared in codebase/symfony/config/services.yaml we have modified earlier in this chapter.
- Test step 3: This is where it all matters! This is the method we are trying to test. We execute the calculateAndSave method. We expect that in this step, the summation of the three integers we provided will be summed up, and then persisted into the database.
- Test step 4: If the calculateAndSave method succeeded in doing its job, then we can test it for real. We will retrieve a hydrated Consumption entity by using the entity manager object inside ConsumptionService. We will read the data stored in the database and compare it to the $expectedTotal and $name values we have declared in the test by using the assertEquals method. If all goes well, then we should now be able to pass the test.
- Now, execute the integration test again by running the following command:
/var/www/html/symfony# ./runDebug.sh --testsuite Integration --filter ConsumptionServiceTest
This time around, we should now be able to pass the test!
root@0cb77fcadb5f:/var/www/html/symfony# ./runDebug.sh --testsuite Integration --filter ConsumptionServiceTest
PHPUnit 9.5.5 by Sebastian Bergmann and contributors.
Testing
.                                                                   1 / 1 (100%)
Time: 00:00.580, Memory: 18.00 MB
OK (1 test, 2 assertions)
root@0cb77fcadb5f:/var/www/html/symfony#
- Great! We finally passed our first integration test! To see the record that we just created in the database, run the following command:
/var/www/html/symfony# php bin/console dbal:run-sql 'SELECT * FROM consumption' --env=test
You should get the following result:

Figure 5.24 – Database result
Success! We were able to create an integration test, create the solution class, and finally pass the integration test!
Why did we use an integration test in the first place?
Open the ConsumptionService.php class and check the constructor method.
In the constructor, we have specified two required parameters. We require a ManagerRegistry instance and a Calculator instance that we ourselves developed earlier in the chapter. These are two objects that our ComputationService.php class depends on. Now, this is exactly why we need an integration test and not a unit test.
When we execute the calculateAndSave method, we will be using business logic that our ConsumptionService does not have. Rather, it depends on other objects to achieve its goal. In contrast with the methods we build unit tests for, those methods do not rely on other objects to do their jobs. That’s the main difference between a unit test and an integration test.
Summary
In this chapter, we defined what unit testing is by writing our own examples. We have gone through building and passing unit tests, as well as writing our own shell scripts to help us execute different automated test configurations to make it easier for us to debug or run test coverages. We’ve gone through what a test coverage report is, and how we can use it.
We’ve written our first integration test and configured our development environment so that we can also use a MySQL database. We’ve created a solution class that will perform the business logic that we need to pass the test, and we are also able to verify that what we persist in the database is what we have intended.
In this chapter, we tried to clearly define what a unit test and an integration test are, how they differ, and why we must separate them into their baskets or test suites.
In the next chapter, we will be talking about Behaviour-Driven Development (BDD). We will understand what it is used for, why we need it, and how it is related to TDD.