Let's start with the list showing the to-do items. This is the most important view controller. It is the first view that a user sees when the app has started.
This controller is also responsible for presenting the input screen that allows the user to add to-do items to the list. In addition, it also presents the detail screen that shows the details of selected to-do items.
We first need to structure the files in the Project Navigator in order to enable seamless navigation between the different files. Select the three model files that we already have (ToDoItem.swift, Location.swift, and ItemManager.swift), and hold down the ctrl key while you click on one of the selected files. Xcode presents a menu similar to what's shown in the following screenshot:

Select New Group from Selection and call it Model. Do the same in the test target with the corresponding test cases.
With an easy-to-navigate project in the Project Navigator, let's return to the TDD workflow. To drive the implementation of ItemListViewController, we need a test case to collect the tests.
Select the ToDoTests group and add Unit Test Case Class. Put in the name ItemListViewControllerTest and click on Next. Click on Create. As demonstrated in the previous chapters, add the import statement @testable import ToDo and remove the two template test methods.
The data will be presented to the user using a table view. We need a test to make sure that ItemListViewController has a table view and that it is set after viewDidLoad(). Add the following code to ItemListViewControllerTests:
func test_TableViewIsNotNilAfterViewDidLoad() {
    let sut = ItemListViewController()
}
The static analyzer complains that ItemListViewController is an unresolved identifier. We have seen this message so often that we already expected this to happen. There is no ItemListViewController yet. Select the ToDo group in the Project Navigator in Xcode, and go to File | New | File.... Create iOS | Source | Cocoa Touch Class, name it ItemListViewController, make it a subclass of UIViewController, and click on Next. Click on Create. Remove the code within the ItemListViewController class so that it looks like the following snippet:
import UIKit

class ItemListViewController: UIViewController {
}
To make writing tests easier, set up the Xcode window as you did earlier, with the test case on the left-hand side and the implementation code in the Assistant Editor on the right-hand side. Run the tests to make sure that we have set up everything correctly.
Add the following code at the end of test_TableView_AfterViewDidLoad_IsNotNil():
sut.loadViewIfNeeded()

XCTAssertNotNil(sut.tableView)
The line sut.loadViewIfNeeded() triggers the call of viewDidLoad(). Never call viewDidLoad() directly.
Again, the static analyzer complains. This is because of Value of type 'ItemListViewController' has no member 'tableView'. To fix this, add the tableView property:
var tableView: UITableView?
Run the test. It should compile but fail. This is because we are not testing whether the property is present, but if the property is set to a value different from nil after viewDidLoad() has been called, and we have not done anything in the implementation to set it to some value.
This is the simplest implementation to make the test pass:
override func viewDidLoad() {
   super.viewDidLoad()

  tableView = UITableView()
}
Run the tests to make sure that all the tests pass.
After following the rules of TDD, we've done enough for now and the code looks clean, so there should be nothing to refactor. At this point, however, we need to make a decision. Do we want to implement the UI using Interface Builder (IB) in Xcode, or do we want to implement it completely in code?
IB has improved a lot over the last few years, and using storyboards can speed up the development of a small app, especially when you are not experienced in building user interfaces in code. In addition to this, you get a preview of what the UI will look like while you are building it. For larger projects, I would recommend that you at least have a look at how UIs are built without IB, because it is often easier to reason and maintain that way.
We will use IB for our project because TDD does not help a lot with UIs, and using IB gives us a clear-cut idea of what to test and what not to, as you would normally test the position and color of your UI elements.
When we created the project for our app, Xcode added a storyboard file, Main.storyboard, for the UI. Open Project Navigator and click on Main.storyboard to open it in IB. You will see something like the following screenshot:

There is already a scene for a view controller in the storyboard, and there is also a ViewController.swift file from the Xcode template of a Single View Application. We won't use it, so let's remove the file and scene. First, select ViewController.swift and press the Delete key. Then, select the View Controller scene in the storyboard and press the Delete key again.
Now we have a clean slate to build the UI. Open the object library by going to View | Utilities | Show Object Library, and drag View Controller onto the storyboard. Change the class in Identity Inspector to ItemListViewController. Add a table view to the View Controller, make it fill up the scene, and add layout constraints to the edges of the super view as follows:

Open ItemListViewController.swift in the Assistant Editor and replace the tableView property with the following snippet:
@IBOutlet var tableView: UITableView!
Now, hold the ctrl key and drag from the table view in the storyboard scene to the tableView property to connect the two. Remove the implementation of viewDidLoad() and run the tests. The test_TableView_AfterViewDidLoad_IsNotNil() test fails because the tableView property is nil after viewDidLoad() is called. The reason for this is that we are not using the storyboard to instantiate the View Controller yet. By calling the ItemListViewController() initializer, we use the simple init() initializer. But we need to use the storyboard to create the Item List View Controller.
Open the storyboard and set Storyboard ID to ItemListViewController in Identity Inspector. Replace test_TableView_AfterViewDidLoad_IsNotNil() with the following code:
func test_TableView_AfterViewDidLoad_IsNotNil() {
  let storyboard = UIStoryboard(name: "Main",
                                bundle: nil)
  let viewController =
    storyboard.instantiateViewController(
      withIdentifier: "ItemListViewController")
  let sut = viewController
    as! ItemListViewController


  sut.loadViewIfNeeded()


  XCTAssertNotNil(sut.tableView)
}
This code first gets a reference to the Main storyboard, and then it instantiates an instance of ItemListViewController from the storyboard. This works because we have set the Storyboard ID.
Run the tests. Now, all the tests pass.
As mentioned previously, we would like to put the data source and delegate of the table view into a separate class. Add the following test to ItemListViewControllerTests to drive the implementation:
func test_LoadingView_SetsTableViewDataSource() {
  let storyboard = UIStoryboard(name: "Main",
                                bundle: nil)
  let viewController =
    storyboard.instantiateViewController(
      withIdentifier: "ItemListViewController")
  let sut = viewController
    as! ItemListViewController


  sut.loadViewIfNeeded()


  XCTAssertTrue(sut.tableView.dataSource is ItemListDataProvider)
}
The assertion makes sure that the data source of the table view is of type ItemListDataProvider. To make the test compilable, we first need to add the ItemListDataProvider class. Select the ToDo group in the Project Navigator, and add an iOS | Source | Cocoa Touch Class called ItemListDataProvider as a subclass of NSObject.
Now the test compiles, but it fails because we need to set an instance of ItemListDataProvider as the data source of the table view. Let's add a property for the data provider to ItemListViewController as follows:
@IBOutlet var dataProvider: ItemListDataProvider!
We will connect the data provider with an element in the storyboard. Doing this has the advantage of the data provider being instantiated when the View Controller is loaded from the storyboard.
Open Main.storyboard and drag an object from the object library into the scene in the Document Outline of the storyboard, as shown in the following screenshot:

In the Identity Inspector, set the class to ItemListDataProvider. Hold down the ctrl key, and drag the Document Outline from the Item List View Controller to the Item List Data Provider, as shown in the following screenshot:
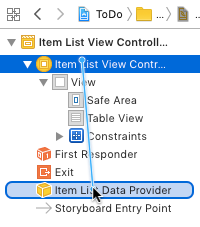
In the appearing pop-up, select dataProvider. This connects the dataProvider property in ItemListViewController to the Item List Data Provider object in the storyboard. Remember that we need to make sure that the data provider is set as the data source of the table view after viewDidLoad() is called. Add the following implementation of viewDidLoad() to ItemListViewController:
override func viewDidLoad() {
  super.viewDidLoad()


  tableView.dataSource = dataProvider
}
The static analyzer complains that ItemListDataProvider does not conform to the UITableViewDataSource protocol. To fix this, open ItemListDataProvider and replace the class implementation with the following code:
class ItemListDataProvider: NSObject, UITableViewDataSource {

  func tableView(_ tableView: UITableView,
                 numberOfRowsInSection section: Int) -> Int {


    return 0
  }


  func tableView(_ tableView: UITableView,
                 cellForRowAt indexPath: IndexPath) -> UITableViewCell {


    return UITableViewCell()
  }
}
Run the tests. All the tests pass, so let's take a look at whether there is something to refactor. In ItemListViewController, dataProvider is of the type ItemListDataSource. This is needed to make the connection between IB and the property. Now that we have the connection, we can replace the type with the UITableViewDataSource protocol:
@IBOutlet var dataProvider: UITableViewDataSource!
With this change, ItemListViewController only knows that dataProvider conforms to the UITableViewDataSource protocol. This means that the two classes are decoupled from each other, and there is a defined interface in the form of the protocol.
Run the tests to make sure that everything still works.
There is more to refactor. We have some code duplication in the test methods. Remove the following code from the test methods:
let storyboard = UIStoryboard(name: "Main",
                              bundle: nil)
let viewController =
  storyboard.instantiateViewController(
    withIdentifier: "ItemListViewController")
let sut = viewController as! ItemListViewController
sut.loadViewIfNeeded()
Add the var sut: ItemListViewController! property to ItemListViewControllerTests, and add the following code to setUp():
let storyboard = UIStoryboard(name: "Main",
                              bundle: nil)
let viewController =
  storyboard.instantiateViewController(
    withIdentifier: "ItemListViewController")
sut = viewController as! ItemListViewController
sut.loadViewIfNeeded()
Run the tests again. Everything should still work.
Next, we need to make sure that the data provider is also the delegate of the table view. Add the following test to ItemListViewControllerTests:
func test_LoadingView_SetsTableViewDelegate() {
  XCTAssertTrue(sut.tableView.delegate is ItemListDataProvider)
}
To make the test pass, add the UITableViewDelegate conformance in the declaration of the dataProvider property, such that it looks like this:
@IBOutlet var dataProvider: (UITableViewDataSource & UITableiewDelegate)!
Add the following line at the end of viewDidLoad():
tableView.delegate = dataProvider
Run the tests. All the tests pass.
The data source and delegate need to be the same instance because otherwise selecting a cell could result in showing the details of a completely different item. Add the following test:
func test_LoadingView_DataSourceEqualDelegate() {
  XCTAssertEqual(sut.tableView.dataSource as? ItemListDataProvider,
                 sut.tableView.delegate as? ItemListDataProvider)
}
Run the tests. All the tests pass. This is already implemented.