Chapter 8. Building the Data Access Layer
Try not! Do, or do not; there is no try.
—Yoda the Jedi Master, The Empire Strikes Back
Most applications need to “do” data. They need somewhere to store all the information for products, customers, purchases, samples, contacts, members, and so on. They also need to retrieve that information for use in the application, and apply changes to that information.
All of this is handled in the application’s data access layer. The data access layer can access data from any source, such as a configuration file, other external file, or database. Because the majority of applications use some type of database, this chapter focuses on building a data access layer to access a relational database.
When you build a data access layer to access a database, the data access layer includes the database to store the data. It includes the queries to retrieve the data from the database and save changes back to the database. And, it includes the data access component that calls the queries and provides the interaction between the database and your business objects.
This chapter describes how to build a database, write queries, and create a database project using the tools within Visual Studio. It covers how to use Visual Studio to manage connection strings. Finally, it details how to build a data access component for accessing the database from your application.
What Does This Chapter Cover?
This chapter demonstrates the following techniques:
- Building a database using Server Explorer
- Creating sample data using the Results Pane
- Building stored procedures using Query Builder
- Managing stored procedures with a Database project
- Handling connection strings using
My.Settings - Calling stored procedures and queries using ADO.NET
- Accessing the data access component from the business objects
Most of the popular database products work well with ADO.NET, the .NET Framework’s data access library, including Microsoft SQL Server, Microsoft Access, Oracle, and MySQL. With ADO.NET, you can handle connection strings, call queries, and build a data access component to access your data using any of these database products.
However, not all the database products support all the Visual Studio database features. For example, using Microsoft Access and the OleDb data provider, you can only view your tables and views from Visual Studio. You cannot update your table structure or queries. Notes throughout this chapter identify which features may or may not be available for your database product.
The examples in this chapter use SQL Server 2005 Express Edition (SQL Server Express). SQL Server Express is a free download from Microsoft.
Note
Although the examples use SQL Server Express, you can use the features in this chapter with any other database product, except as noted.
SQL Server Express
SQL Server Express is a full database management system that you can distribute royalty-free with your application. It can function as a client database server for single-user applications, as a basic shared database server for multiple users, or as a file-based database server. The file-based feature is similar to Microsoft Access. It allows you to deliver the database by simply copying the database file, making the deployment process a breeze.
Note
Using the file-based feature, you must deploy the file on the user’s computer. You cannot put the file on a shared drive, as you could with Microsoft Access. That makes this feature useful for only single-user applications.
The notable differences between SQL Server Express and other editions of SQL Server include the maximum database size (4 GB), the amount of RAM it uses (1 GB), its limit to single-processor systems, and its lack of built-in management tools.
SQL Server Express is fully compatible with other editions of SQL Server. You can create a database with SQL Server Express and use it in any other SQL Server edition. This allows you to use SQL Server Express for your development and testing and then deploy with a higher-end edition of SQL Server. (But since the Developer Edition of SQL Server is so inexpensive, most developers choose it over the Express Edition to get the additional management tools.)
You can have multiple versions of SQL Server installed on one computer. For example, you could have SQL Server 2000, SQL Server 2005, and SQL Server Express all installed on your computer. When each version of SQL Server is installed, it is given a unique name based on the name of the computer on which it was installed. For SQL Server Express, the default name is the computer name with “SQLExpress” appended to it.
Building a Database
Visual Studio provides many ways to store your data. You can write it to a text file, you can serialize it to XML, you can save it as a byte stream, and so on. But by far the most common technique for data storage is to use a database.
This section describes the tools within Visual Studio for building your database.
Defining the Database
The first step in building the database for your application is to create the database itself. If you are using SQL Server, you can create your database using SQL Server management tools or directly from within Visual Studio using Server Explorer.
Note
If you are using a database product other than SQL Server, you can use the database product’s management tools to create the database. For example, if you are using Microsoft Access, it provides its own set of tools to create the database.
To create a SQL Server database using Server Explorer:
- Open Server Explorer (View | Server Explorer).
- Right-click the Data Connections node and select Create New SQL Server Database from the context menu.
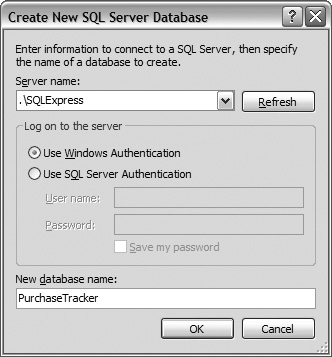
This displays the Create New SQL Server Database dialog. - Select the name of the SQL Server you want to use.
If you have more than one edition of SQL Server installed, the set of SQL Server names are listed for your selection. If you are on a network, any other computers that have a publicly accessible SQL Server installed are also included on the list.
Note
You may not see your SQL Server Express Edition appear in this list. If not, you can type it in as your machine nameSQLExpress or as (local)SQLExpress or just .SQLExpress.
- Define the appropriate information to log into the selected SQL Server.
Note
By default, SQL Server Express is installed with Windows Authentication in place.
- Define the name of the database.
Use standard naming conventions for your database name. One recommended standard is to use the same name as the application name if the purpose of the database is to support only the one application.
The resulting dialog looks similar to Figure 8.1.Figure 8.1 The Create New SQL Server Database dialog allows you to define a new database.
- Click OK.
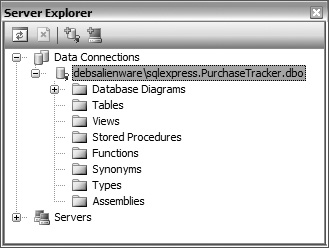
The database is created in the defined SQL Server instance, and a connection to the database is added to Server Explorer, as shown in Figure 8.2.
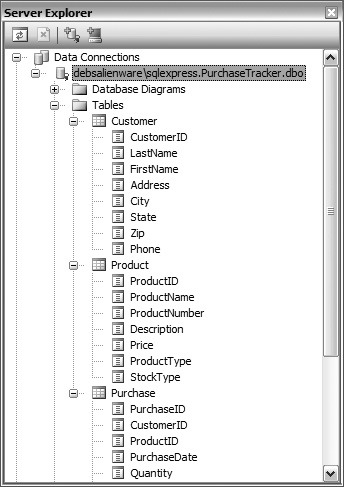
Figure 8.2 Server Explorer lists your data connections. For each data connection, it lists all the tables, views, stored procedures, and other information associated with the database.
Use these steps any time you need to create a new SQL Server database.
Building Along
For the Purchase Tracker sample application:
- Download and install SQL Server Express, or select one of your existing installed SQL Server editions to use for the “Building Along” activities.
Note
Even if you have always used Microsoft Access or MySQL in the past, you may want to give SQL Server Express a try for this sample application. It’s free and easy to download and install.
However, you can continue with the “Building Along” using a product other than SQL Server. You then need to use the database product’s management tools to create the database, and use the information in the next section to connect to the database from Visual Studio.
- Create the database using the steps described in this section.
Name the database PurchaseTracker.
The database appears in Server Explorer similar to Figure 8.2.
Connecting to the Database
Before you can work with a database within Visual Studio, you must define a connection to that database. A connection defines the details that Visual Studio needs to access the database, such as the name of the database product, the name of the database, and security information such as a username and password.
When creating a new database, as described in the preceding section, the connection is created for you. You can view or change the connection information by right-clicking the data connection in Server Explorer and selecting Modify Connection from the context menu.
If you already have an existing database that you want to access from Visual Studio or if you created your database using a database product other than SQL Server, you can connect to it using Server Explorer.
Note
You can connect to any type of database that has a .NET data provider, including Microsoft Access, Oracle, and MySQL.
To connect to an existing database:
1. Click the Connect to Database button on the Server Explorer toolbar, or right-click Data Connections in Server Explorer and select Add Connection from the context menu.
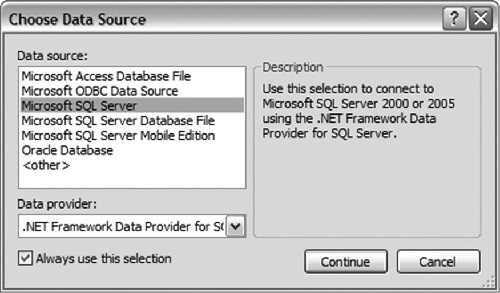
This displays the Choose Data Source dialog, as shown in Figure 8.3.
Figure 8.3 Select the desired type of data source that you want to connect to, along with the appropriate data provider, in the Choose Data Source dialog.
Note
If you have ever previously created a data connection in Visual Studio, you may see the Add Connection dialog first, as shown later in Figure 8.4. Click the Change button on the Add Connection dialog to display this dialog.
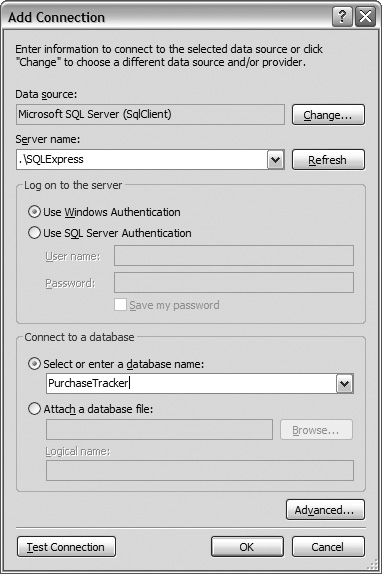
Figure 8.4 The Add Connection dialog allows you to define a connection to a database and then test that connection.
2. Select the type of data source for the connection, select the data provider, and click Continue.
Select Microsoft SQL Server to connect to a SQL Server 2000 or SQL Server 2005 database, either as a client database or as a server database.
Select Microsoft SQL Server Database File to use a file-based database. This allows you to deploy a single file instead of installing a database.
Select Microsoft Access Database File for a Microsoft Access database. The data provider then defaults to the OleDb data provider.
Select Microsoft ODBC Data Source for any other database product that supports an ODBC connection, such as MySQL.
The Add Connection dialog is then displayed.
Note
Depending on the data provider you selected, the Add Connection dialog may request different information than described here.
3. Select the name of the database server you want to connect to.
If you selected a SQL Server data source, and you have more than one edition of SQL Server installed, the set of SQL Server names are listed for your selection. If you are on a network, any other computers that have a publicly accessible version of SQL Server installed are also included in the list.
Note
You may not see your SQL Server Express Edition appear in this list. If not, you can type it in as your machine nameSQLExpress or as (local)SQLExpress or just .SQLExpress.
4. Define the appropriate information to log into the selected database server.
5. Select the database name.
The databases in the selected database server instance are listed in the drop-down.
The resulting dialog appears similar to Figure 8.4.
6. Click Test Connection to test the connection to your database.
7. Click OK.
The connection is then added to Server Explorer, shown in Figure 8.2. If you connect to an existing database, you see all the tables, views, stored procedures, and other database objects for the database in Server Explorer.
Note
By default, you cannot remotely connect to a SQL Server Express database. That means that unless you change the settings, you cannot access a SQL Server Express database that resides on another computer.
To allow for remote connections to a SQL Server Express database, you need to enable TCP/IP for that SQL Server by using the SQL Server Configuration Manager application (Start | All Programs | Microsoft SQL Server 2005 | Configuration Tools | SQL Server Configuration Manager). Expand the SQL Server 2005 Network Configuration node, and click the Protocols node. The protocols then appear in the right pane. Right-click TCP/IP and select Enable to enable it.
Any time you want to work with a database using the Visual Studio tools, you must first have a connection to that database defined in Server Explorer.
Creating a Table
After you create a database, the next step is to create the tables within the database. Or, if you are working with an existing database, you can add tables as needed. A table represents a particular business entity or defines a relationship between business entities.
A table is a set of rows and columns that store the data associated with a particular entity, such as products. A column defines each data element associated with the entity, such as ProductName and Price. A row contains the actual data in each data element for a particular item, so the “Mithril Coat” row has values for ProductName, Price, and so on.
The tables defined in a database appear under the data connection for the database in Server Explorer. The columns in each table appear under the table name. This allows you to view the table and column information directly from Visual Studio.
The process of defining the appropriate set of tables and columns for your application is accomplished during the design phase, as described in Chapter 2, “Designing Software.” Once you know what tables and columns you need, you can create each table and its associated columns. If you are using SQL Server, you can add tables and columns directly from Server Explorer.
Note
If you are using a database product other than SQL Server, you can view the tables and columns from Server Explorer, but you cannot create or modify tables. Use the database product’s management tools to create and modify the tables. For example, if you are using Microsoft Access, it provides its own set of tools.
To create a new SQL Server table:
- Right-click the Tables folder under the data connection in Server Explorer and select Add New Table from the context menu, or select the data connection and select Data | Add New | Table from the main menu bar.
This displays the Table Designer. - Enter the column name, data type, and any other column properties for each column in the table.
Don’t worry about the table keys at this point. They are discussed later in this chapter.
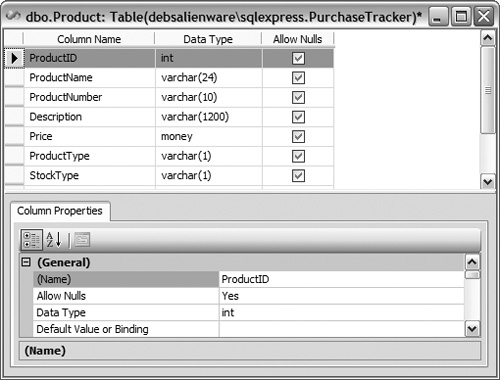
The result appears similar to Figure 8.5.Figure 8.5 The Table Designer allows you to define all the columns in the table.
- Select File | Save from the main menu bar to save the table.
This displays the Choose Name dialog for entry of the table name. - Enter the table name, and click OK.
Use standard naming conventions for your table name. One recommended standard is to use the entity’s singular name, such as Product or Customer.
The table is then added to the database and appears in Server Explorer, as shown in Figure 8.6.
Figure 8.6 The Server Explorer lists each table and each column in the table, making it easy to see the list of columns while working in Visual Studio.
Use the steps in this section any time you need to add a new table or modify columns in a SQL Server database.
Building Along
For the Purchase Tracker sample application:
Note
If you are using a product other than SQL Server, you need to use the database product’s management tools to create the tables. If you created a connection to the database, as described in the preceding section, the new tables appear in Server Explorer.
- Add a Product table to the PurchaseTracker database, and enter all the columns, as shown in Figure 8.5.
The Product table stores basic information on the products available for purchase. - Add a Customer table to the PurchaseTracker database, and enter all the columns, as shown later in Figure 8.7.
The Customer table stores basic information on the customers that purchase products.
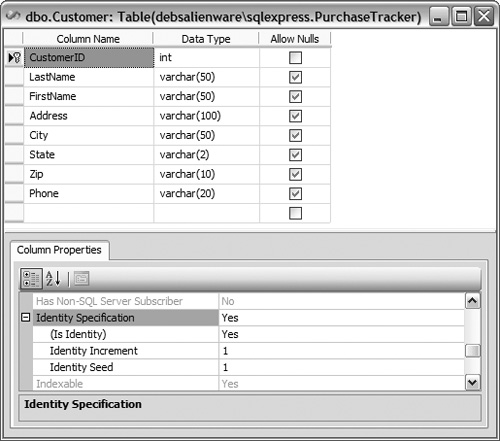
Figure 8.7 Primary keys should be meaningless, non-null values. Use the Identity Specification to allow SQL Server to manage the assignment of unique primary key values to each row in the table.
- Add a Purchase table to the PurchaseTracker database and enter all the columns, as shown in Figure 8.6.
The data type for the PurchaseDate column is datetime. All the other columns have a data type of int.
The Purchase table stores information about each customer’s purchases. The Purchase table includes a column for the CustomerID from the Customer table to define the customer who purchased the product. The Purchase table also includes a column for the ProductID from the Product table to define the product that was purchased.
You can view the new tables with all their columns in Server Explorer, as shown in Figure 8.6.
Defining the Primary Key
A primary key is a unique identifier assigned to each row in a table. It is used to uniquely identify the row and to join related data in different tables to the row. For example, each row in the Product table has an assigned ProductID as the primary key. Each purchase in the Purchase table has a product associated with it, so the ProductID is stored in each Purchase row. This ProductID can be used to find all purchases for a particular product.
It is best to define primary keys that are meaningless—that is, keys that have no intrinsic meaning. For example, the product number (which is a string) should not be the key. If the product number were used as a key, it would take up more space than a numeric key, and it would run the risk of needing correction. If there were 30 different purchases for product LOTR-001, and then management decided to change the abbreviation in the product numbers to be more specific (FOTR, TTT, ROTK), every one of the 30 rows would need to be updated to FOTR-001. And since the primary key cannot be updated, this means creating new rows and copying all of the data. You can avoid these problems by using meaningless keys. (See Chapter 2 for more information on defining keys, including a real-life example of the importance of meaningless keys.)
Note
For non-Lord of the Rings fans, these product number abbreviations are the abbreviations for each of the three Lord of the Rings books/movies.
To prevent these types of problems, define a unique meaningless number for each row to use as the primary key, such as a counter or globally unique identifier (GUID). If you are using SQL Server, you can define the primary key as an Identity column. A column defined as an Identity column is automatically assigned a system-generated sequential value that uniquely identifies the row in the table. In Microsoft Access, this is called an AutoNumber column.
You can set the primary key for a SQL Server table using Server Explorer.
Note
If you are using a database product other than SQL Server, use the database product’s management tools to define the primary key.
To define a primary key for a SQL Server table:
- Double-click on a table in Server Explorer to open the Table Designer for the table.
- Insert a column in the table to be used as the primary key.
Or select an existing column if you already created an ID column for the table.
Use standard naming conventions for your primary key. One recommended standard is to use the table name with a suffix of “ID.” For example, ProductID is the primary key in the Product table. - Ensure that the Allow Nulls checkbox is not checked for the column in the Table Designer.
A primary key field cannot be null. - Select the column in the Table Designer, and open the Identity Specification node on the Column Properties tab (see Figure 8.7).
- Set the Is Identity value to Yes.
When Is Identity is set, SQL Server automatically sets the value for the primary key to a unique value as each row is created in the table. - Right-click the column in the Table Designer, and select Set Primary Key from the context menu, or click the column and select Table Designer | Set Primary Key from the main menu bar.
A key icon is then displayed next to the key column, as shown in Figure 8.7.
Use the techniques described in this section to create a primary key for each SQL Server table in your database.
Building Along
For the Purchase Tracker sample application:
Note
If you are using a product other than SQL Server, you need to use the database product’s management tools to define the primary keys.
- Double-click on the Product table in Server Explorer to open the Table Designer.
- Select the ProductID column.
- Set the information in the Identity Specification node, as described in this section.
- Set the column as the primary key.
- Repeat for the CustomerID in the Customer table and the PurchaseID in the Purchase table.
Each key is then shown with a key icon (see Figure 8.7).
Defining System Columns
Each table in your database contains all of the data for an entity, along with a unique primary key. But you may want to add other columns to each table for system management or audit tracking.
The most common system columns are as follows:
LastUpdateDate defines the date and time that a row was last updated.
LastUpdateUser defines the username (or user ID) of the user who performed the last update.
Note
Some applications also use a RowTimeStamp column. A TimeStamp is a SQL Server data type that SQL Server sets automatically each time a row is updated in the database. The TimeStamp is used during the save operation to ensure that the row was not changed by someone else between the time the row was retrieved and the time it was saved. This provides for concurrency checking. Other database products provide similar data types. See the “Additional Reading” section for references to database books for more information on this topic.
Some applications also define CreateDate and CreateUser columns to provide additional audit information on the date and the user who created the row.
Think about the data that you may need to resolve issues with the database or provide management audit information. Add this information to each table as standard system columns.
Building Along
For the Purchase Tracker sample application:
Note
If you are using a product other than SQL Server, you need to use the database product’s management tools to add the system columns to the tables.
- Double-click on the Product table in Server Explorer to open the Table Designer.
- Add the LastUpdateDate and LastUpdateUser columns, as described in this section.
- Repeat for the Customer and Purchase tables.
To save time, you can copy the two new columns from the Product table and paste them into the Customer and Purchase tables.
The new columns appear in Server Explorer.
Building a Database Diagram
It is sometimes useful to see a pictorial view of your database, or a portion of it. That is the purpose of SQL Server’s database diagram feature.
Note
If you are using a database product other than SQL Server, some of the database product’s management tools provide database diagramming features.
Note
If you are using SQL Server 2000 instead of SQL Server 2005, you cannot add database diagrams from within Visual Studio. You must instead use Enterprise Manager to create your diagrams.
To build a database diagram for a set of SQL Server 2005 tables:
- Right-click the Database Diagrams folder under the data connection in Server Explorer and select Add New Diagram from the context menu, or select the data connection and click Data | Add New | Diagram from the main menu bar.
This displays the Add Table dialog. - Select one or more tables to include in the diagram, and click Add. Then click Close.
The tables are added to the Database Designer. Drag the tables in the Database Designer to lay out the diagram as desired.
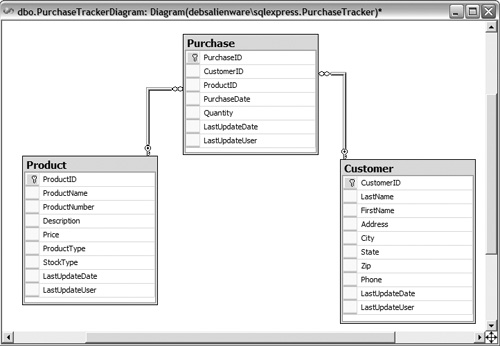
The result appears similar to Figure 8.8.
Figure 8.8 The database diagram for the Purchase Tracker sample application includes tables for customer, product, and purchase information.
Inserting Sample Data
To test your code, you need some sample data in your tables. Use the Results Pane of the Query Builder to enter sample data.
Note
This feature works with most database products, including SQL Server and Microsoft Access.
To enter sample data into a table:
- Right-click the table in Server Explorer and select Show Table Data from the context menu, or click the table and select Data | Show Table Data from the main menu bar.
This displays the Results Pane of the Table Designer. - Type sample data into each column.
Note
If you identified the ID column as an Identity or AutoNumber column, do not enter a value for the ID column. The ID is assigned automatically.
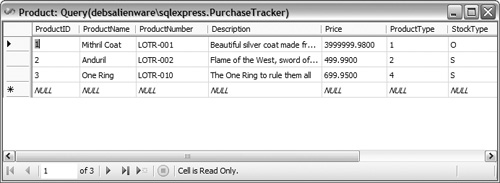
After entry of sample data, the Results Pane appears similar to Figure 8.9.
Figure 8.9 Enter sample data into the Results Pane so that you have data to use for testing.
Use the techniques described in this section to enter sample data into your application. You can also use these techniques to view or edit existing data in the table.
Building Along
For the Purchase Tracker sample application:
- Add sample data to the Product table using the technique described in this section.
The result for the Product table could look something like Figure 8.9. - Repeat for the Customer table.
- Repeat for the Purchase table.
Be sure that the ProductID and CustomerID columns in the Purchase table are valid IDs from the Product and Customer tables.
At this point, you have not yet added code to retrieve values from the tables, so you won’t be able to see your sample data in your application yet.
With the tables created, the columns defined, and the primary keys set, the database is ready for use. By entering sample data, you can more easily test the code that accesses the database.
Building Stored Procedures
A stored procedure is a software routine that is stored in the database and run within the context of the database.
Note
Stored procedures are supported by many database management products, such as SQL Server and Oracle. Microsoft Access has QueryDefs, which are similar in concept to a stored procedure but with a slightly different syntax.
Stored procedures frequently perform CRUD (create, read, update, and delete) operations on data in the database. They can also perform other, more complex data operations, such as increasing the price of every product by 10%. Stored procedures can take input parameters, return tabular or scalar results, and return output parameters.
For example, to retrieve product data for a particular product, you can build a stored procedure that defines the ProductID as an input parameter, retrieves all the columns in the Product table for the defined ProductID, and returns them as a tabular result. To save product data, you can build a stored procedure that takes all the product columns as input parameters and updates them in the database.
You can call stored procedures (or QueryDefs) from your application so that your code does not need to interact directly with the database. This approach is recommended over adding SQL statements directly to your application for the following reasons:
- Code in the stored procedure runs within the context of the database, making the stored procedure more efficient than a SQL statement.
- Structural changes to the database can often be handled by modifying stored procedures, so you don’t have to change your application code.
- Stored procedures can enhance your database’s security, preventing SQL injection attacks.
- Stored procedures can reduce network traffic, especially when the stored procedure needs to work with many rows but return only one value, such as when calculating a total.
- You can reuse stored procedures anywhere in your application or in any application that accesses the database.
Most applications need four basic types of stored procedures:
- Retrieve stored procedures with an ID parameter that retrieves all columns for one row.
- Retrieve stored procedures that retrieve name and ID values of all rows for use in lists, such as a combo box for selecting a customer or product.
- Retrieve stored procedures that retrieve all columns for a set of rows filtered by a parameter for use in grids.
- Save stored procedures for saving any changes made to a row.
This section describes how to create stored procedures.
Creating a Stored Procedure
SQL Server stored procedures are basically a set of Transact-SQL (T-SQL) statements. Writing T-SQL statements may be a little daunting if you have not done it before. This section describes the basics of creating a SQL Server stored procedure. The next section describes how to generate your T-SQL statements using Query Builder.
Note
The rest of this section details how to create SQL Server stored procedures. If you are using a different database management product, you can use that product’s tools to create your stored procedures or QueryDefs.
Note
With SQL Server 2005, you can also write procedures by creating Common Language Runtime (CLR) methods in languages such as Visual Basic or C#. This type of procedure is designed for very specific cases in which T-SQL procedures can’t be used. Generally, they’re designed to replace Extended Stored Procedures written in C++. They are not commonly used for simple data access.
The CLR can also be used to create User-Defined Types, Functions, and Aggregates. But again, these are for very special cases and should not be implemented without a thorough understanding of their impact on security, performance, and your development patterns. For more information on writing CLR stored procedures, see the “Additional Reading” section for references to database books that cover this topic.
To create a SQL Server stored procedure:
1. Right-click the Stored Procedures folder under the data connection in Server Explorer and select Add New Stored Procedure from the context menu, or select the data connection and select Data | Add New | Stored Procedure from the main menu bar. This generates a skeleton of a stored procedure and displays it in the Code Editor:
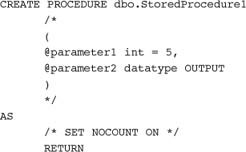
The /* and */ are T-SQL comment markers. Everything between the markers is a comment.
2. Change the name of the stored procedure.
The skeleton code identifies the stored procedure using a standard prefix and a default name:dbo.StoredProcedure1
The dbo prefix is an abbreviation for database owner that qualifies the stored procedure name. The dbo is a predefined user who has implied permissions to perform all activities in the database. Normally you want to retain this prefix.
Change the default stored procedure name using good naming conventions. Some naming conventions define the stored procedure name using the entity name, the operation name, and _sp to define it as a stored procedure. An example is ProductRetrieveByID_sp. Stored procedures must have unique names.
Note
You cannot change the name of the stored procedure after you save it. If you do change the name and save the stored procedure, Visual Studio instead creates a new stored procedure with the new name.
3. Modify the parameter list as needed to pass parameters into or out of the stored procedure.
The at sign (@) denotes a parameter for the stored procedure. Define each parameter, along with its data type, any default value, and whether it is passed in to the procedure or output from the procedure.
It is highly recommended that the parameter names match the associated column names. This makes it easier to write more generalized code. For example, your application can use the field names in a DataSet to automatically build the parameter names for the stored procedure.
If the stored procedure has no parameters, remove this section from the stored procedure.
Also, be sure to remove the comment markers from the parameter list.
4. Write the T-SQL statement(s) for your stored procedure after the AS clause.
See the next section for assistance in building your T-SQL statements.
5. Save the stored procedure just like you save any other code file.
The stored procedure is saved directly into the database.
Note
The stored procedure must be correct before it can be saved, because it is saved directly into the database. If you have an error, you get a dialog that says something like “The operation could not be completed.” Check your column names, table names, and T-SQL syntax to correct the problem.
It is always a good idea to test the stored procedure after you write it. Retrieve, update, and delete stored procedures provide valid results only if you have some data in the database, so be sure to create sample data before you write your stored procedures.
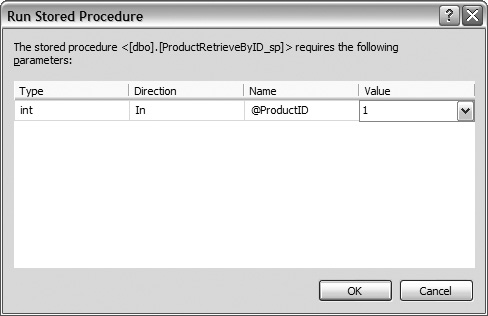
Test the stored procedure by right-clicking anywhere on the stored procedure in the Code Editor and selecting Execute from the context menu. If the stored procedure has parameters, the Run Stored Procedure dialog appears. It allows you to enter test values for your parameter(s), as shown in Figure 8.10.
Figure 8.10 The Run Stored Procedure dialog is displayed only if your stored procedure requires parameters.
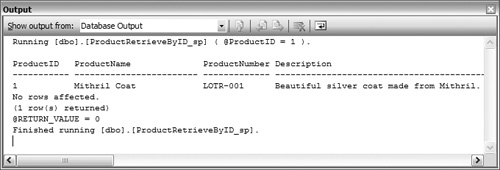
The result of the execution of the stored procedure is displayed in the Output window, as shown in Figure 8.11.
Figure 8.11 If the stored procedure executes successfully, the results are displayed in the Output window. Notice that the columns in the Output window are sized to their maximum size as defined in the table, so you need to scroll to see all of the data.
Follow these steps to create all the stored procedures for your application. If step 4 appears a little daunting, don’t worry. A Query Builder feature is available to help you build your queries, as described in the next section.
Or, if you really want to make quick work of building your stored procedures, you can create a stored procedure generator. Since stored procedures are simple text files, it is easy to read the database and concatenate the appropriate strings to automatically build all your CRUD stored procedures. See the “Additional Reading” section for the reference to a CoDe magazine article that details the steps of building a stored procedure generator.
Building Along
For the Purchase Tracker sample application:
If you are using Microsoft Access, you can create these as QueryDefs instead of stored procedures.
- Create a new stored procedure as described in this section.
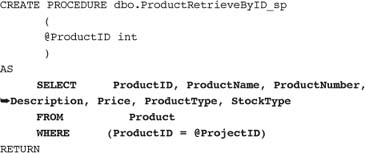
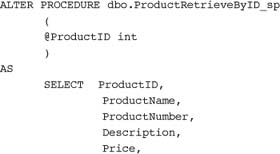
This stored procedure retrieves all the product data for a particular product using the ProductID as a parameter. - Change the name of the stored procedure to dbo.ProductRetrieveByID_sp.
The resulting procedure line is as follows:
CREATE PROCEDURE dbo.ProductRetrieveByID_sp - Pass the ProductID column as a parameter.
The resulting parameter list is as follows: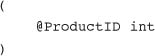
Be sure to remove the comment markers from around the parameter. Don’t worry about the contents of the stored procedure for now; it is created in the next section.
- Save the stored procedure.
- Follow similar steps to create a new stored procedure to retrieve all of the customer data for a particular customer using the CustomerID as a parameter.
Name this stored procedure CustomerRetrieveByID_sp. - Follow similar steps to create a new stored procedure to retrieve all the purchases for a particular customer using the CustomerID as a parameter.
Name this stored procedure PurchaseRetrieveByCustomerID_sp. - Create a new stored procedure to retrieve all products using no parameter.
Name this stored procedure ProductRetrieveList_sp. - Create a new stored procedure to retrieve all customers using no parameter.
Name this stored procedure CustomerRetrieveList_sp.
Be sure to save each of these stored procedures. However, you cannot test them yet because they don’t contain any T-SQL statements.
Each of these five stored procedures and their parameters appear in Server Explorer.
Generating a T-SQL Statement
If you don’t know how to use T-SQL, building T-SQL statements can be challenging. And if you do know how to use T-SQL, building T-SQL statements can be tedious, boring, and error-prone. The Query Builder can help you build your T-SQL statements.
Note
The rest of this section details how to generate SQL Server stored procedures. If you are using a different database management product, you can use that product’s tools to create your stored procedures or QueryDefs.
Query Builder is accessible from within the Code Editor when you’re working with SQL Server stored procedures. Query Builder refers to each T-SQL statement in your stored procedure as a query.
The Query Builder allows you to work with your query in three ways:
- Visually using the Diagram Pane at the top of the window
- Tabularly by entering values in a grid using the Criteria Pane
- Syntactically by building the SQL statements in the SQL Pane
Any change you make to one pane is made to all the panes. For example, if you modify the Diagram Pane, the modification appears in the Criteria and SQL Panes. This allows you to see the T-SQL statement as it is being built. An example query is shown in Figure 8.12.
Figure 8.12 The Query Builder dialog provides features for building the T-SQL statements for your stored procedures. Starting at the top, the window is divided into Diagram, Criteria, SQL, and Results panes.

You can turn any of the panes on or off by right-clicking in the Query Builder, selecting Pane, and then checking/unchecking the pane in the context menu.
To create a T-SQL statement using the Query Builder:
1. Double-click on the stored procedure in Server Explorer to open it in the Code Editor.
2. Right-click in the Code Editor after the AS clause in the stored procedure, and select Insert SQL from the context menu.
The Query Builder first displays the Add Table dialog, shown in Figure 8.13. This dialog allows you to select the database objects to use in your query.
Figure 8.13 Use the Add Table dialog to select the tables for your query.
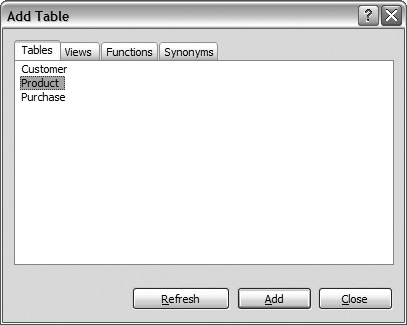
3. Select one or more tables and click Add. When you are finished, click Close.
The Query Builder dialog is displayed (see Figure 8.12).
4. Select the columns to output from your stored procedure by checking the column names in the Diagram Pane, or by checking the Output checkbox for the column in the Criteria Pane, or by typing the list of column names in the SELECT statement in the SQL Pane.
5. Define the parameters to pass into the stored procedure by entering the parameter names in the Filter for the column in the Criteria Pane, or by typing the parameters in the WHERE clause in the SQL Pane.
In T-SQL, parameter names are prefixed with the @ character.
Note
When you reference a stored procedure’s parameter, be sure to prefix it with the @ character, as shown in the Filter clause in Figure 8.12.
6. When you finish building your query, click Execute Query in the Query Builder to test it.
If your query has parameters, the Query Parameters dialog is displayed for entry of test parameters.
The result of the query execution appears in the Results Pane at the bottom of the Query Builder, as shown in Figure 8.12.
7. When the query is complete and tested, click OK.
The Query Builder writes the resulting query into your stored procedure.
The query is inserted in the Code Editor as follows:
To make it easier to work with the columns in your table and for later maintenance, put each column on its own line in the stored procedure, as follows:
Notice that after you save the stored procedure the first time, the CREATE keyword at the beginning of the procedure changes to ALTER. From this point forward, you are altering an existing stored procedure.
Use the Query Builder any time you need to insert a T-SQL statement into a stored procedure.
Building Along
For the Purchase Tracker sample application:
If you are using Microsoft Access, you can use the Microsoft Access management tool to detail each QueryDef.
- Open the ProductRetrieveByID_sp stored procedure in the Code Editor.
- Launch the Query Builder and add the Product table to the query.
The Product table is added to theFROMclause in the SQL statement. - Select Product table columns in the Diagram Pane, as shown in Figure 8.12.
The columns are added to theSELECTclause in the SQL statement. - Add the @ProductID parameter as a filter using the Criteria Pane, as shown in Figure 8.12.
The parameter is added to theWHEREclause in the SQL statement. - Click Execute Query to try out the resulting query.
The result of the query is shown in the Results Pane, as shown in Figure 8.12. Your result may vary if you entered different sample data. - When the query returns the desired result, click OK to write the query to the stored procedure and save the completed stored procedure.
- Follow similar steps to add a T-SQL statement to the CustomerRetrieveByID_sp stored procedure.
Return all Customer table columns using the @CustomerID parameter as the filter. This returns all data for a particular customer. - Follow similar steps to add a T-SQL statement to the PurchaseRetrieveByCustomerID_sp stored procedure.
Return all Purchase table columns using the @CustomerID parameter as the filter. This returns all the purchases for a particular customer. - Follow similar steps to add a T-SQL statement to the ProductRetrieveList_sp stored procedure.
Return only the ProductID and ProductName columns from the Product table using no filter. This returns identification information for all the products. The application uses this stored procedure to display the list of products for user selection. - Follow similar steps to add a T-SQL statement to the CustomerRetrieveList_sp stored procedure.
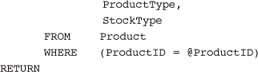
Return only the CustomerID and CustomerName columns from the Customer table using no filter. This returns identification information for all the customers. The application uses this stored procddure to display the list of customers for user selection.
Since there is no CustomerName column in the Customer table, return it using the following syntax:
This defines an additional column in the query results. The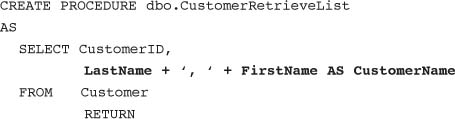
Asclause defines an alias, giving the additional column a name.
Be sure to test and then save each of the updated stored procedures.
Creating a Save Stored Procedure
So far all of the stored procedures created in this chapter have retrieved data from the database. You also need to define stored procedures to save data. The T-SQL statements you need to save data are different for inserts, updates, and deletes, so you need multiple T-SQL statements to perform your save logic.
Note
The rest of this section details how to create SQL Server stored procedures for saving data. If you are using a different database management product, you can use that product’s tools to create your stored procedures or QueryDefs.
There are two primary techniques for creating a save stored procedure:
- Create three separate stored procedures: one to perform updates, one for deletes, and one for inserts.
Note
For auditing purposes, some applications do not allow the users to delete data. Instead, you can add a Status system column to each table, defining whether a row is active or deleted. In that case, you don’t need delete functionality in your stored procedures, because a delete is simply an update of the Status column.
- Create one stored procedure that has separate logic for updates, deletes, and inserts.
The first option has the benefit of writing single-purpose stored procedures. However, if you have many tables, this can lead to a very large number of stored procedures that you have to manage and maintain. The second option keeps all the save logic in one location.
Note
If you are using Microsoft Access, you must create a separate QueryDef for updates, deletes, and inserts, because QueryDefs don’t support branching logic.
To create a single SQL Server save stored procedure:
- Follow the instructions provided earlier in this chapter for creating a stored procedure.
Use good naming conventions for your save stored procedure name. Some naming conventions define the stored procedure name using the entity name, the operation name, and_spto define it as a stored procedure. An example isProductSave_sp. Stored procedures must have unique names. - Add a parameter for each column in the table that can be saved, plus a parameter for RowState.
These parameters are used to pass the changed data to the stored procedure.
If you defined system columns, don’t add a parameter for the LastUpdateDate column, because the stored procedure sets it. This ensures that one standard time zone is used for all database operations.
TheRowStateparameter defines whether the data needs to be inserted, updated, or deleted.
For example, the parameter list to save the data in a Product table is as follows:

- Use
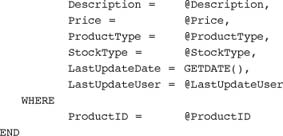
IFT-SQL statements to perform the appropriate logic based on theRowState.
TheRowStateis the object’sEntityState, as described in Chapter 5, “Building the Business Logic Layer.” Be sure to use the same values in theIFstatements as defined in yourEntityStateEnum. - Use the Query Builder to create the T-SQL statement for each
IFstatement.
By default, the Query Builder constructs select queries for data retrieval. You can change the type of query by right-clicking in the Query Builder and selecting Change Type. Change the type to Insert Values for insert, Delete for delete, and Update for update.
A sample T-SQL statement for the insert operation is as follows:
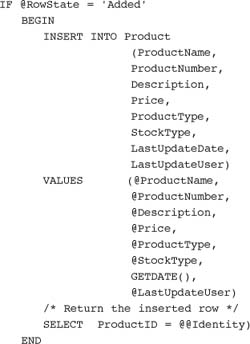
Notice that the ProductID is not inserted into the new row. The ProductID column is an Identity column, so SQL Server automatically assigns a unique value. The LastUpdateDate column is inserted into the new row, even though it was not passed in as a parameter. The GETDATE T-SQL function retrieves the system date, and the result is assigned to the LastUpdateDate column.
The last statement is a SELECT statement that returns the new ProductID. SQL Server automatically assigns the ID when the row is inserted. The result of that assignment is available using the @@Identity value.
A sample T-SQL statement for the update operation is as follows:
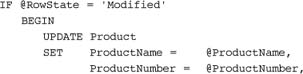
The product values are changed for the row where the ID matches the passed-in ID. Notice that ProductID is not updated because the primary key is not an updatable value.
A sample T-SQL statement for the delete is as follows:
Stored procedures are the recommended mechanism to retrieve data from the database and store data back to the database. You can see by the amount of work that is required to build these that a stored procedure generator can be very useful. See the “Additional Reading” section for more information on a stored procedure generator.
Building Along
For the Purchase Tracker sample application:
Note
If you are using Microsoft Access, you can use the Microsoft Access management tool to create each QueryDef.
- Create a new stored procedure to save Product table data using the techniques and code detailed in this section.
Name the stored procedure ProductSave_sp. - Create a new stored procedure to save Customer table data using the techniques detailed in this section.
Name the stored procedure CustomerSave_sp.
Be sure to test and then save each of these stored procedures.
The new stored procedures appear in Server Explorer.
Using a Database Project
There are several issues with creating stored procedures directly into the database. For one, you are creating the stored procedure directly into the database. There is no versioning. There is no way to go back if you make an inadvertent change. There is no way to check them out, making it possible for two developers to work with the same stored procedure at the same time. And if you have a syntax error, you cannot save until you fix it. The purpose of a database project is to allow you to manage a set of database scripts, such as stored procedure scripts, separately from the database itself. This makes it possible to manage stored procedures just like you manage your other source code files.
A database project is a type of project that you add to your solution. Its only purpose is to manage database scripts. A database script is a set of commands that can be executed against a database. These scripts can include commands for building a table, modifying table columns, creating new stored procedures, updating existing stored procedures, and so on.
Note
The rest of this section details how to create a database project for SQL Server. You cannot use this feature with Microsoft Access databases.
When you want to edit a stored procedure, you instead edit the script for the stored procedure. You can then save the script at any time, even if it has syntax errors. When the stored procedure script is correct, you can run the script to apply the stored procedure change to the database.
To add a database project to your solution:
- Right-click the solution in Server Explorer and select Add | New Project from the context menu, or select File | Add | New Project from the main menu bar.
This displays the New Project dialog. - Navigate to the Other Project Types and select Database.
The set of database project templates are listed in the right pane. - Select the Database Project template.
- Enter the name for the project.
Use standard naming conventions for your project name. - Select the desired location for the project.
The location defaults to the appropriate directory based on the solution location. - Click OK.
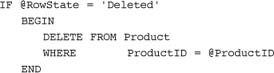
The Add Database Reference dialog appears, as shown in Figure 8.14. This allows you to associate a specific connection with the database project.
Figure 8.14 The Add Database Reference dialog allows you to associate a data connection with a particular Database project.
- Select the desired reference or add a new reference and click OK.
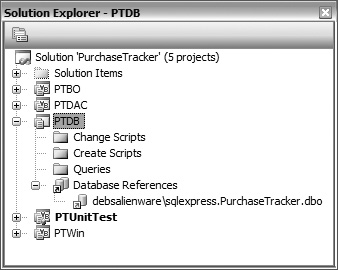
Visual Studio adds the database project to your solution, as shown in Figure 8.15.
Figure 8.15 The Database project appears in Solution Explorer.
Once you have the database project in place, you can generate scripts for all of your existing stored procedures. This creates a code file for each stored procedure.
To generate a script for an existing stored procedure:
- Right-click the stored procedure in Server Explorer and select Generate Create Script to Project from the context menu.
Visual Studio generates the stored procedure script and adds it under the Create Scripts folder in Solution Explorer.
Repeat this step for each stored procedure in your database.
Note
If you have many stored procedures, this may be very tedious. It may be better to use your SQL Server management tools, which provide a feature to create scripts for all of your stored procedures in one step.
If you need to make a change to the stored procedure, edit the script. When the script is correct, apply the change to the database by right-clicking the script and selecting Run from the context menu. The script runs against the database defined as the default database reference in the Database project. The Output window displays any errors that occur when running the script. If the script runs successfully, the stored procedure is updated in the database.
You can create new stored procedures using scripts instead of creating them directly in the database. To create a script, right-click the Create Scripts folder in Solution Explorer, and select Add SQL Script from the context menu.
Using a database project gives you much better control over the stored procedures in your application.
Building Along
For the Purchase Tracker sample application:
Note
If you are using Microsoft Access, you cannot build a database project for your database. Skip this “Building Along.” It does not impact the sample application.
- Create a new database project using the Database Project template, as described in this section.
Name the project PTDB. - Associate the connection to the PurchaseTracker database with this database project.
- Generate a script for each stored procedure in the database, as detailed in this section.
The new project appears in Solution Explorer with the scripts defined under the Create Scripts folder.
Building a Data Access Component
The data access layer defines how your application works with data. This layer includes the database. It includes queries defined as structured query language (SQL) statements, views, or stored procedures. And it includes a data access component that calls these queries to retrieve data or save changes to the data.
The data access component (DAC) contains the code required to access the database. It includes the code that connects to the database, prepares query parameters, calls queries, and returns the results. This code is somewhat complex, but it can be written in a generalized fashion so that one set of code can be used to query any table in the database.
This means that all of your business object classes can call one common DAC to retrieve data from the database and then store any data changes back to the database. This keeps all of the data access code encapsulated in one component.
You can build your DAC to use a vendor-specific data provider, such as Microsoft SQL Server or Oracle. Or you can use a more general data provider, such as ODBC or the newer OleDb, to access databases such as Microsoft Access and MySQL. Or you can use the new DbProviderFactory to build a data access component that can access any of these.
This section provides the steps for building a DAC component that you can use in any application that needs to access a database. It also describes how to call the DAC from the business objects.
Creating the DAC
The key piece of code in the data access layer is the DAC. The DAC is defined as a separate project in the solution because it is independent of any business logic. The DAC is composed of one or more classes that provide access to the database by calling SQL statements, stored procedures, or other queries (such as QueryDefs).
To create the DAC:
- Create a project for the data access layer, as described in Chapter 3, “Building Projects.”
- Open the Project Designer for the DAC Class Library project.
Right-click the project in Solution Explorer and select Properties from the context menu, or select Project | Properties from the main menu bar, or double-click on the My Project folder under the project in Solution Explorer to open the Project Designer. - Select the References tab.
- Ensure that there is a reference to
System.Data, as shown in Figure 8.16. If not, use the Add button to add the reference.
Figure 8.16 The References tab in the Project Designer for the DAC defines the references to the .NET Framework database libraries.
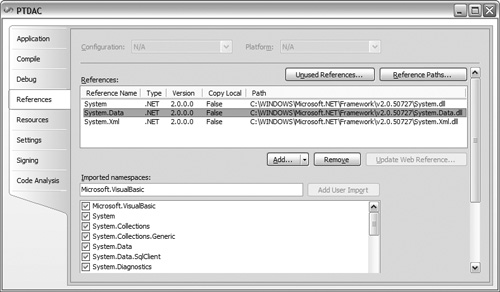
To make the classes in this library easier to use in the code, checkSystem.Datain the Imported Namespaces list, as shown in Figure 8.16.
At this point, decide which data provider you will use in your DAC and import its associated library using the Imported Namespaces list shown in Figure 8.16. The common data providers and their associated libraries are:
- For SQL Server, import the
System.Data.SqlClientnamespace. - For Access using OleDb, import the
System.Data.OleDbnamespace. - For any ODBC data source, import the
System.Data.Odbcnamespace. - To support any data source from any data provider, import the
System.Data.Commonnamespace.
If you select one of the first three options, the code in the DAC is basically the same; only the library names are different. If you select the last option, you need to implement the DbProviderFactory, which is a little more complex and beyond the scope of this book. See the “Additional Reading” section for more information.
Your DAC project is then ready. You can then add all of the code required to access data as described in the next sections.
Building Along
For the Purchase Tracker sample application:
- Visual Studio created a default class for you when you created the data access component Class Library project (PTDAC) in Chapter 3. In Solution Explorer, change the name of this default class from Class1 to DAC.
This is the class that contains all of the data access code. - Add a reference to the
System.Datanamespace, and import both theSystem.DataandSystem.Data.SqlClientnamespaces.
This “Building Along” assumes that you are using SQL Server. If you are using Access, you need to reference the System.Data.OleDb namespace instead of System.Data.SqlClient.
At this point, there is no code in your data access component yet, so there are no new features to try out.
Defining the Connection String
Before the code in your application can access a database, it needs to connect to the database. That is normally done using a connection string. A connection string is a concatenated set of connection parameters that is used by .NET Framework database library methods to connect to the database.
Connection strings are not easy to define. The information in a connection string depends on the type of connection in a rather complex way. The best way to get the correct set of information for your connection string is to use Server Explorer.
To view the correct connection string for your database:
- Open Server Explorer (View | Server Explorer).
- Right-click the data connection and select Modify Connection from the context menu.
This displays the Modify Connection dialog. - Click the Advanced button at the bottom of the dialog.
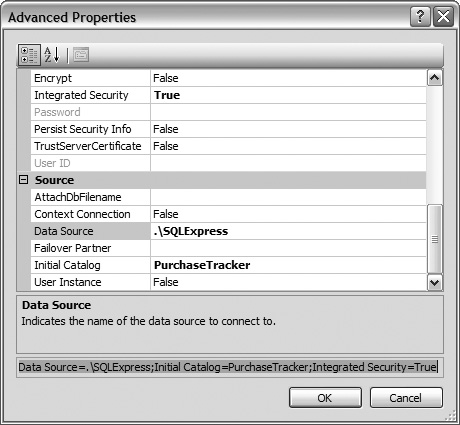
The Advanced Properties dialog displays the valid connection string at the bottom of the dialog, as shown in Figure 8.17.
Figure 8.17 The Advanced Properties dialog for the connection displays the connection string used to connect to the database. You can select and copy it to the Clipboard to ensure that you have a valid connection string.
Note
The connection string for an Access database looks very different. For example:
Provider=Microsoft.Jet.OLEDB.4.0; Data Source=“C:DataPT.MDB”
Once you have a valid connection string, you need to put it somewhere in the application. The easiest place to define the connection string is in the application settings.
Recall from Chapter 4, “Building the User Interface Layer,” that there are two types of application settings: user-scoped and application-scoped. Chapter 4 detailed user-scoped settings to store each form’s last user-defined location and size at runtime. Connection strings use application-scoped settings. Application-scoped settings are associated with the application, so users cannot change them at runtime.
To set the connection string in the application settings:
- Open the Project Designer for the DAC Class Library project.
Right-click the project in Solution Explorer and select Properties from the context menu, or select Project | Properties from the main menu bar, or double-click on the My Project folder under the project in Solution Explorer to open the Project Designer. - Select the Settings tab.
- In the Name column, enter the logical name for the connection string.
- In the Type column, select (Connection string) as the type for the setting.
- In the Scope column, select Application scope.
- Enter the connection string in the Value column. If you copied it from the prior dialog, you can paste it here.
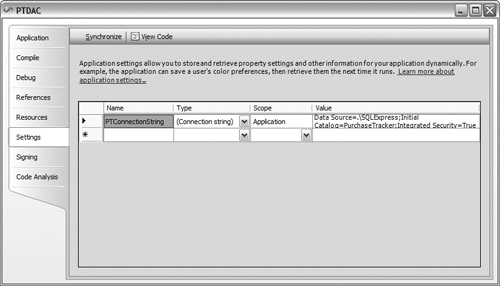
The result is shown in Figure 8.18.
Figure 8.18 Use application settings to define your connection string.
All settings are stored in the app.config file. You can view the settings by opening the app.config file for the project in which you defined the application setting.
Note
Because the app.config file is deployed and viewable, take precautions to avoid revealing sensitive information in the connection string, such as passwords or server paths. Consider using encryption to encrypt the connection string in the app.config file.
Even though Visual Studio allows you to create an app.config file for a Class Library project, the .NET Framework does not provide a configuration file model for class libraries. This means that when you run the application, the app.config file for any class library is ignored. You have to manually copy any settings (including the connection string) from the app.config file defined for any Class Library project into the app.config file for the application, which is defined in the startup Windows Application project.
Note
When you build the application, the app.config file for the startup Windows Application project is renamed with the name of the Windows Application project with a .config extension. This is the only configuration file the application accesses.
The app.config file for your Class Library project may appear to work. This is because the setting you defined in the Project Designer is used as the default.
Using application settings to store the connection string makes it easy for the application to connect to a database. Any code in the DAC can reference the connection using My.Settings.PTConnectionString.
Building Along
For the Purchase Tracker sample application:
- Copy the connection string for the PurchaseTracker database from Server Explorer to the Clipboard, as detailed in this section.
- Create a setting for the connection string in the data access component Class Library project (PTDAC), as detailed in this section.
Name the setting PTConnectionString. - Paste the connection string from the Clipboard to the Value column of the new setting.
- Open the app.config file for the data access component Class Library project (PTDAC). Copy the entire
connectionStringstag, and paste it into the app.config file for the Windows Application project (PTWin).
At this point, there is no code in your data access component yet, so there are no new features to try out.
Calling a Stored Procedure
If you defined stored procedures for your application, the DAC needs a method that calls a stored procedure and returns the results of the procedure.
Note
Although this section refers to “stored procedures,” the code in this section works equally well with QueryDefs.
Looking back at the stored procedures created earlier in this chapter, you see that some stored procedures require parameters, like retrieve stored procedures that retrieve an item by ID, and save stored procedures. Other stored procedures do not require parameters, such as retrieve stored procedures that retrieve all rows from a table. To support this requirement, the DAC method that executes a stored procedure needs two overloads—one with parameters and one without.
But what about the value returned from the DAC method? At this point, you need to decide on the type of object to return from the method. The .NET Framework database library, ADO.NET, provides many choices. Here are the three most common:
DataReader is a read-only, forward-only stream of data from a database. You access each row of data using the Read method of the DataReader.
DataTable is an in-memory cache of data that contains all the selected rows and columns. When calling a stored procedure, the DataTable contains all the information defined by a single SELECT statement.
DataSet is an in-memory cache of data that contains all the rows and columns in multiple selections of data. When calling a stored procedure, the DataSet contains all of the information defined by any number of SELECT statements. The result of each SELECT statement is defined as separate DataTable objects within the DataSet.
Note
Microsoft Access does not support multiple SELECT statements in one QueryDef. You can still use a DataSet, but it always contains only one DataTable.
Your DAC could have a set of methods that provide each of these objects. That gives the business object the option to use whichever object makes the most sense based on the requirements. As an example, this section develops the methods that return a DataTable.
The DAC method to call a stored procedure with parameters is as follows:

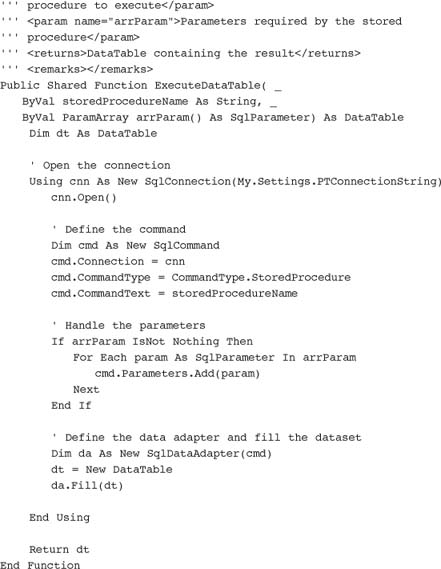
This method is named ExecuteDataTable because it executes a stored procedure and returns a DataTable. Notice that this method is public and shared. This means that any code that references this component can use these methods without creating an instance of the DAC class.
Note
To modify this method to take a SQL string instead of a stored procedure name, modify the storedProcedureName parameter to be SQLString. Then change the CommandType property of the SqlCommand object in the code to be CommandType.Text, and assign the CommandText property to the SQLString parameter.
The ExecuteDataTable method has two parameters. The first is the name of the stored procedure.
The second parameter is a set of SqlParameter objects that specify the parameters to pass to the stored procedure. Notice the ParamArray keyword. This keyword allows the calling code to pass in any number of parameters of the defined type. In this example, the calling code can pass in any number of SqlParameter objects. The .NET runtime inserts each SqlParameter passed in to this method into the arrParam array. (Examples of passing parameters to this method are provided later in this chapter.)
The code begins by defining a new Connection object using the connection string identified in the PTConnectionString setting (described earlier in this chapter). It then uses the Connection object to open the connection to the database. Notice that this code uses the Using statement. When you define the connection in a Using block, the connection is automatically closed and disposed at the end of the block, even if an error occurs.
The code then sets up the SqlCommand object. The SqlCommand object defines the stored procedure or SQL text to execute. The Connection property associates the command with an open connection. The CommandType property defines whether the command is a stored procedure or SQL statement, and the CommandText property defines the stored procedure name or SQL statement text.
If there are any parameters, the code loops through each parameter and adds it to the SqlCommand object’s Parameters collection.
The code then creates a new SqlDataAdapter object for the command and a new DataTable object. Creating the SqlDataAdapter object executes the defined command.
Finally, the code fills the DataTable object using the SqlDataAdapter object’s Fill method and returns the resulting DataTable object.
Note
To modify this method to support a data provider different from SQL Server, change every data type prefixed with “Sql” to instead use the data provider data type, such as “OleDb” or “Odbc.” For example, to work with an Access database using the OleDb provider, change the connection code as follows:
Using cnn As New _
     OleDb Connection(My.Settings.PTConnectionString)
If you want DAC code that can work with any data provider, you need to change the code more significantly. For example, to open an OleDb connection, the required code is as follows:

Dim df As DbProviderFactory = _
   DbProviderFactories.GetFactory(“System.Data.OleDb”)
Using cnn As DbConnection = df.CreateConnection
cnn.ConnectionString = My.Settings.PTConnectionString
cnn.Open()
See the “Additional Reading” section for more information on DbProviderFactory.
To make this ExecuteDataTable method easier to call when there are no stored procedure parameters, create an overloaded method that takes no stored procedure parameters:

This method calls the original method, passing in Nothing as the second parameter.
To make it easy for the business objects to create the set of parameters that are passed to the method, define a Parameter method in the DAC that returns a SQLParameter object given the parameter name and value:
![]()

This method creates a SqlParameter object, assigns the defined name and value to that SqlParameter object, and returns it. Notice that the data type of the second parameter is Object. This allows the code to pass in any type of value, such as strings, integers, and dates.
Note
To modify this method to support a data provider different from SQL Server, change every data type prefixed with “Sql” to instead use the data provider data type, such as “OleDb” or “Odbc.”
Now that the methods are complete, you can call them from the business object classes as described in the next section.
Building Along
For the Purchase Tracker sample application:
- Add the ExecuteDataTable method to the DAC class, as described in this section.
- Add the overloaded ExecuteDataTable method that has no stored procedure parameters to the DAC class, as described in this section.
- Add the Parameter method to the DAC class, as described in this section.
You now have the basics of a data access class. If desired, build a unit test for this class to test it.
Calling the DAC from the Business Objects
The DAC does not do anything until you add code to call it from the business objects. This section details the steps needed to call the DAC from your business object component.
Before you can access the DAC from the business object component, you need a reference between the business object component and the DAC, as detailed in Chapter 3.
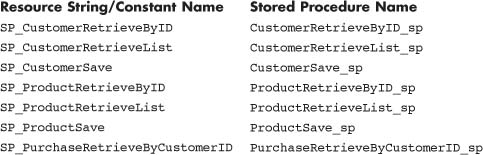
You can then add code in the business object classes to call the DAC methods. For example, the Create method in a ProductList class can call the ProductRetrieveList_sp stored procedure as follows:

It is normally considered inappropriate programming practice to use hard-coded strings in your code, as in this code example. It is better to define the string names of your stored procedures as constants in the associated business object, or as resource strings in the business object Class Library project properties, as described in Chapter 4.
Building Along
For the Purchase Tracker sample application:
- You already have a reference in the business object Class Library project (PTBO) to the DAC Class Library component (PTDAC), as detailed in Chapter 3.
- In the business object Class Library project (PTBO), add a constant to the associated class or resource string to the project properties for each stored procedure name as follows:
- Open the ProductList class in the Code Editor.
- In the Create method, remove the hard-coded data values, and insert a call to the DAC
ExecuteDataTablemethod.
Pass in the appropriate resource string or constant for the stored procedure name:
dt = DAC.ExecuteDataTable( _
My.Resources.SP_ProductRetrieveList) - Open the CustomerList class in the Code Editor.
- In the Create method, remove the hard-coded data values, and insert a call to the DAC
ExecuteDataTablemethod.
Pass in the appropriate resource string or constant for the stored procedure name:
dt = DAC.ExecuteDataTable( _
                        My.Resources.SP_CustomerRetrieveList)
Run the application. It displays your splash screen and then shows the MDI parent form. Select Products | Manage Products to display the ProductWin form. When you drop down the list of products, you now see the products you defined as sample data in your database earlier in this chapter.
Then select Customers | Manage Customers to display the CustomerWin form. When you drop down the list of customers, you now see the customers you defined in your sample data.
List classes, such as ProductList and CustomerList, are easy to implement, because they bind directly to the resulting DataTable. In most cases, however, you need to populate the properties of the business object from the data in the DataTable. This requires a bit more code.
First, define constants in the associated business object or resource strings in the project properties for each column name in the DataTable. This provides type safety when retrieving the column values from the DataTable. For example, the constants for the Product table are as follows:

The constants are defined with the Private modifier so that they can be used within the business object but not outside of it. The “CN_” prefix denotes that it is a column name. This makes it easier to find the column names using Intellisense and ensures that the names don’t collide with the business object’s property names.
You can either type all of these for each business object or use the same techniques defined for the stored procedure generator to generate these constants.
Note
To aid in defining the correct constants or resource strings, you can view the list of column names in each table using Server Explorer.
System fields are in every table. Instead of adding constants for them to each business object, add the constants to the base business object class:
Protected Const CN_LastUpdateUser As String = “LastUpdateUser”
Protected Const CN_RowState As String = “RowState”
The constants are defined with the Protected modifier, so they can be used in any class that inherits from the base business object class.
When the constants (or resource strings) are in place, the business object can call the ExecuteDataTable method to retrieve the DataTable and populate each business object property with its associated column value:
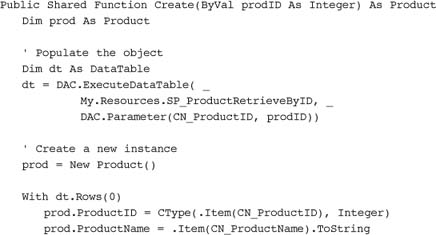
This code begins by calling the DAC’s ExecuteDataTable method, passing it the name of the stored procedure and the ProductID parameter. Notice that the parameter is defined using the Parameter method created earlier in this chapter. The returned DataTable object contains all of the data for product with the defined product ID.
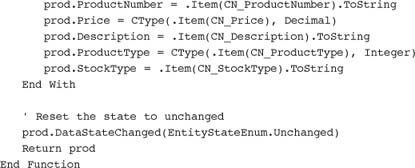
The code then creates a new instance of the Product class and assigns the value from each DataTable object column to the associated Product class property. Since this project has Option Strict On, each column value must be converted to the appropriate data type.
Note
If a column value could be null, take care when using the CType method. Check for a null before converting the column value as follows:
![]()
Each time a property is set, the Property statement setter is called. If the property is set to a different value, the EntityState is changed to Modified. (The Property setter code was detailed in Chapter 5.) So after all the properties are set, this code changes the EntityState back to Unchanged. This ensures that the application tracks the changes to the object that the user makes, not those made when populating the object in the Create method.
The populated Product business object is then returned from this method. Code detailed in Chapter 7, “Binding the User Interface to the Business Objects,” demonstrated how to bind this resulting business object to the user interface so that the user interface displays the values of the business object properties.
In summary, the code to populate a business object from a DataTable is relatively straightforward. Call the DAC to get the DataTable, create the business object, and set the data from each column in the DataTable into a property of the business object. The data binding features take it from here and automatically populate the user interface controls from the business object properties.
Building Along
For the Purchase Tracker sample application:
- Open the base business object class (PTBOBase) in the Code Editor.
- Add constants for the system field column names to the base business object class.
Or define the column names as resource strings. - Open the Product class in the Code Editor.
- Add a constant for each column in the Product table, as detailed in this section.
- In the Create method, remove the hard-coded values, and insert a call to the
ExecuteDataTablemethod in the DAC.
Pass in the appropriate constant or resource string for the stored procedure name and theProductIDparameter:

- In the Create method, add code to populate the business object properties from the DataTable columns, as detailed in this section.
- Open the Customer class in the Code Editor.
- Add a constant for each column in the Customer table.
- In the Create method, remove the hard-coded values, and insert a call to the
ExecuteDataTablemethod. Populate the business object similar to theCreatemethod in theProductclass. - Open the Purchase class in the Code Editor.
- Add a constant for each column in the Purchase table.
Don’t modify theCreatemethod for this class yet. It will be covered in the next section. - If you created unit tests in Chapter 6, “Class Tools and Techniques,” you may need to change them to work with your test data instead of your hard-coded data.
Run the application. It displays your splash screen and then shows the MDI parent form. Select Products | Manage Products to display the ProductWin form. You can pick any entry from the Product drop-down list and see the values for all the properties appear in the form.
Note
Because of how decimal data is stored in the database, the price now has four places to the right of the decimal point. Since you defined the price with a Property statement, you can easily fix this by adjusting the getter for the Price property:
Return Decimal.Round(_Price, 2)
Then select Customers | Manage Customers to display the CustomerWin form. You can pick any entry from the Customer drop-down list and see the values for all the properties appear in the form.
This is so much more exciting than seeing hard-coded data!
Handling Object Collections
So far the business objects have used the DAC to handle two cases: single objects and lists of objects bound to a DataTable. The business object classes that manage a single object, like the Product and Customer classes, call the DAC and pass in the ID of the one item to retrieve. The business object classes that manage a list of objects by binding directly to a DataTable, like the ProductList and CustomerList classes, call the DAC to get the DataTable.
But what about the case where the business object class manages a set of business objects as a generic collection, such as the PurchaseList class? When working with object collections, you have two choices for populating the business object with the retrieved data.
The first option is to retrieve the data for all the objects in the collection with one query. Then loop through the results and create each individual object, passing in a row of data. The object then uses the data in the row to set its properties.
The second option is to retrieve just the keys for the objects in the collection with the query. Then loop through the set of keys and create each individual object, passing in the ID. The object then uses the ID to retrieve its own data and sets its properties from that data.
In most cases, the first option is more efficient, because there is only one call to the database. The second option is more encapsulated, because each object gets its own data.
Because of the efficiency of executing one query instead of one query for each object, this example uses the first option. The code required to retrieve all of the data for a list of objects and to use it to populate the individual objects is as follows:
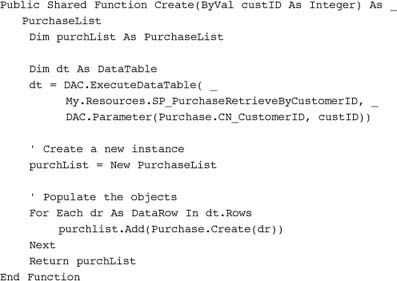
The Create method begins by calling the DAC’s ExecuteDataTable method, passing it the name of the stored procedure and the CustomerID parameter. The returned DataTable object contains all the purchases for the defined customer.
The code then creates a new instance of the PurchaseList class, adds entries to the collection for each row in the DataTable object, and returns the populated PurchaseList.
Notice that the code passes a DataRow object to the Create method of the Purchase class. No Create method in the Purchase class currently takes a DataRow object as a parameter, so you need to add one as follows:
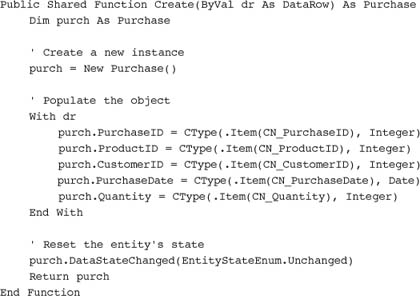
The Create method begins by creating a new instance of the Purchase class. It does not need to access the DAC, because the data is passed in to the method in the DataRow object.
The values of the columns in the DataRow object are then assigned to the Purchase business object properties.
After all the properties are set, this code changes the EntityState back to Unchanged. This ensures that the application tracks the changes to the object that the user makes, not those made when populating the object in the Create method.
The resulting Purchase object is returned from this method.
In summary, you can populate a generic collection of objects using one database query and then create each object from the resulting rows. Or you can use one query to retrieve the set of IDs and then pass the ID to the object’s Create method so that it can retrieve its own data.
Building Along
For the Purchase Tracker sample application:
- Open the PurchaseList class in the Code Editor.
- In the Create method, remove the hard-coded values, and insert a call to the
ExecuteDataTablemethod, as detailed in this section. - Open the Purchase class in the Code Editor.
- Create an overloaded Create method to accept a
DataRowobject as a parameter, as shown in this section.
Run the application. It displays your splash screen and then shows the MDI parent form. Select Purchase Tracker | View Purchases to display the PurchasesWin form. You can select any customer from the list and view the associated purchases. If necessary, add more sample data to your database to fully test this feature.
Saving Data
Unless you are building a read-only application, you also need code to save the properties of the objects back to the database.
To save the properties of a business object, add a Save method that calls the same ExecuteDataTable method in the DAC but passes every property as a parameter. The code in a sample Save method is as follows:
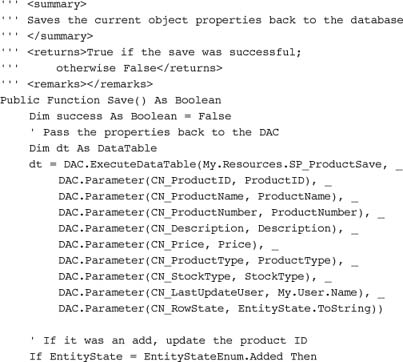
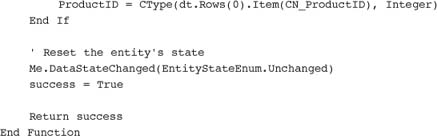
This method begins by calling ExecuteDataTable and passing every property value as a parameter. This assumes that the names of the columns in the table match the names of the parameters in the stored procedures.
The ExecuteDataTable returns a DataTable object, but the only time this method needs to access the returned DataTable object is when a row is added. In that case, SQL Server assigns a new ID value, so the returned ID is reassigned to the associated property.
The EntityState is then reset to Unchanged, because there are no longer any unsaved changes.
You then need to add code in the ProcessSave method of each form to call the business object’s Save method:
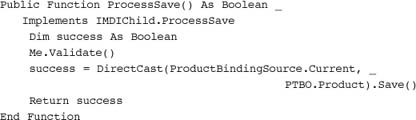
This code first calls the form’s Validate method. Normally, validation for a control occurs when the user leaves the control. Calling the Validate method ensures that the current control is validated, even if the user does not leave the control. See Chapter 7 for more information on validation.
The code then uses the instance of the business object referenced by the Current property of the BindingSource component to call the Save method. The properties for the currently displayed business object are then saved.
Use defensive coding techniques in the ProcessSave function to ensure that it won’t generate an error if there is no current product:
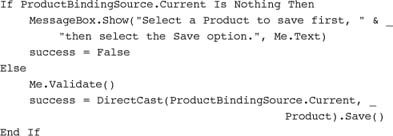
Or use TryCast as follows:
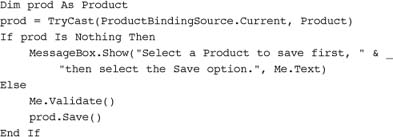
Use similar code whenever you need to save object data.
Note
The additional code required to support adding new items or deleting existing items is not detailed in this chapter. See the “Building Along” section at the end of this chapter for more information.
Building Along
For the Purchase Tracker sample application:
- Open the Product class in the Code Editor.
- Add a Save method, as detailed in this section.
- Open the ProductWin form in the Code Editor.
- Modify the ProcessSave method to call
Validateand then the business objectSavemethod, as defined in this section. - Open the Customer class in the Code Editor.
- Add a Save method.
- Open the CustomerWin form in the Code Editor.
- Implement the IMDIChild interface, as described in Chapter 4.
- Add code to the ProcessSave method to call
Validateand then the business objectSavemethod.
Run the application. At this point, you can view or edit existing customers and products, save changes to customers and products, and view existing purchases for a customer. You have a functional application!
The base form class, base business object class, DAC, Validation class, and other reusable code can be extracted from this application and used as the basis of your reusable application framework.
This book has taken you through the process of building the user interface layer, business object layer, and data access layer. By dividing your application into logical layers, you have an application that is much easier to build and maintain. Enjoy!
Conclusion
What Did This Chapter Cover?
This chapter provided information on using the Visual Studio tools to create a database (or connect to an existing database) and build stored procedures. It then defined how to build a data access component and call that component from business objects.
This chapter covered several real productivity enhancers:
- Using the database tools provided within Visual Studio, you can quickly create, review, or edit your SQL Server database without leaving the comfort of your development environment.
- Using Server Explorer, you can connect to any database, including Microsoft Access, Oracle, and MySQL. You can then see the names of your tables, columns, and stored procedures or queries.
- The Query Builder helps you build the queries in your SQL Server stored procedures, but a stored procedure generator would make you even more productive.
- Using a database project makes it easier to manage your SQL Server stored procedures.
- Your data access component does not need to be as huge or full-featured as the data access block in the Enterprise Library (see the “Additional Reading” section of Chapter 2 for more information on the Enterprise Library). Keep it focused to your application’s needs to stay productive.
- After you build your data access component, you can reuse it in every application you build.
- Adding common code, such as the system column constants, to the base business object class prevents the need to add it to each business object.
- Using a common pattern for the
CreateandSavemethods in your business objects makes building your business objects very quick and easy. Consider writing a code snippet to generate these methods for even greater productivity. - Building an application as a set of encapsulated components divided into logical layers lets you focus on each layer, helping you manage the complexity of your application and making the entire building process more efficient.
Building Along
If you are “building along” with the Purchase Tracker sample application, this chapter added all the code you need for your data access layer.
You can run the Purchase Tracker sample application and view and edit product and customer information and view purchase information.
When building production-level applications, consider enhancing the data access features as follows:
- Implement a New feature to create new products and customers.
The user interface andIMDIChildprogrammatic interface are already set up to support creating new entries, such as products and customers. Add a business object method to handle creating new entries. - Implement a Delete feature to delete a product or customer.
The user interface andIMDIChildprogrammatic interface are already set up to support deleting entries, such as products and customers. Add a business object method to handle the delete. - Implement features to handle concurrency issues.
In a multiuser application, it is possible for two users to modify the same data. You need to add code to handle this situation. One way to handle concurrency is to use a TimeStamp field. See the “Additional Reading” section for references to database books that cover this topic. - Create a stored procedure generator.
One of the most tedious and error-prone tasks is creating all the stored procedures or queries required for your application. Implement a stored procedure generator to save time (see “Additional Reading”). - Implement parameter discovery.
Probably the second-most tedious task in working with the data access layer is defining all the parameters for calling Save stored procedures. It would be better if the DAC could discover the parameters for you. If you are using SQL Server, you can use the following method to discover the parameters from theSqlCommandobject:
SqlCommandBuilder.DeriveParameters(cmd)
If you are not using SQL Server, but you did name the parameters using the same names as the columns, you can discover the parameters yourself. Pass the DataRow into the DAC method, and build the parameters from the column information accessible from the DataRow. - Add more DAC methods.
Add methods to the DAC similar toExecuteDataTablethat instead return a DataSet, DataReader, or any other type of data container that your application may want to use.
You now have an operational application and the beginnings of an application framework!
Additional Reading
Goldstein, Jackie. Microsoft SQL Server 2005 Express Edition Step by Step. Microsoft Press, 2006.
Teach yourself how to get a data-intensive application up and running quickly with SQL Server Express Edition—one step at a time. With this book, you work at your own pace through hands-on, learn-by-doing exercises. Whether you’re new to database programming or new to SQL Server, you’ll learn how, when, and why to use specific features of this simple but powerful database development environment. Each chapter puts you to work, building your knowledge of core capabilities and guiding you as you create actual components and working applications.
Kurata, Deborah. “Building a Stored Procedure Generator.” CoDe magazine, September/October 2005.
Creating basic data access stored procedures is boring, time-consuming work. Relieve the tedium by writing code that writes these stored procedures for you. This article presents all the code you need to build your own stored procedure generator.
MSDN. “Writing Provider Independent Code for .NET Framework Data Providers.” http://msdn2.microsoft.com.
This topic is an overview of building data-provider-independent code using DbProviderFactories. It provides links to more information on this topic. Since things seem to move around on MSDN, it did not seem useful to provide the direct link to this help topic. To quickly find this information, search on the title.
Vaughn, William R. Hitchhiker’s Guide to Visual Studio and SQL Server, Seventh Edition. Addison Wesley, 2006.
This book is designed for the “ordinary” developer who wants to become an expert. It has chapters like “How Does SQL Server Work?” and information that can help developers build smarter, faster, and more robust applications more quickly. It talks about design principles, architecture, and best practices.
Try It!
Here are a few suggestions for trying some of the techniques presented in this chapter:
- Add a SalesRep table to your database using Server Explorer.
- Add sample data to the SalesRep table.
- Add stored procedures to retrieve data from and save data to the SalesRep table.
- Modify the
Createmethod of theSalesRepclass to call the DAC and display your sample data instead of the hard-coded data. - Add a
Savemethod in theSalesRepclass, and call the method from the UI as appropriate.
You can then modify SalesRep data. - If you are up for a challenge, add a method to the DAC that takes a DataRow as a parameter and automatically builds the parameters for the save stored procedures based on data in the DataRow.