PERSPECTIVE BASICS
Optical illusions are a tricky thing. When viewing an optical illusion, your brain works slower than your eyes to trick you into seeing what’s not actually there—often through the use of perspective, color, light, and/or patterns.
In this book, we will explore an area of art that some might not consider an optical illusion; however, I feel that it does fall into this category. I call this technique “a spiral line drawing.” These drawings are not traditional three-dimensional art that jumps out at you, although that does happen in some instances. Rather, the lines merge to create movement and a finished product that looks more complicated than it is.
The process involves drawing straight lines that create curvature, giving the illusion that the lines are curved and/or that curved lines were drawn. The curved lines appear to spiral toward the center in what is sometimes referred to as a “logarithmic spiral.” Each curved line that reaches from one corner of the original shape (for example, a triangle) to the center of the spiral is roughly the same length as one side of the original triangle. The lines work together to create depth, perspective, and an elegant three-dimensional form.
What makes this form so appealing is that the distances between the curves of the spiral increase in geometric progression, similar to what can often be seen in nature. This phenomenon occurs in seashells, galaxies, bands of tropical storms, and many other places. In my opinion, the fact that this pattern happens organically in nature is what makes it so appealing to the viewer. Many artists enjoy creating this soothing pattern for themselves.

TOOLS & TECHNIQUES

I use a few basic tools and drawing techniques to create my spiral drawings.
1 I always draw on 110-lb. card stock. This heavyweight paper is durable and doesn’t crease easily. Also, it can withstand almost any medium without buckling.
2 For subject matter that requires accuracy, I begin my drawings with an HB or a #2 pencil; then I use permanent markers to outline.
3 I do not use a ruler, but you should feel free to do so if you find it helpful!
4 I erase with a kneaded eraser, also known as a putty rubber. Try not to use a hard eraser if you can avoid it. Your paper can handle some erasing, but it’s very important to draw lightly. You can always make a drawing darker, but it’s difficult to go back and erase a mark that was applied using too much pressure.
5 To add color to my drawings, I like to use Crayola® markers. They are affordable, they produce well-defined colors, and you can blend them simply by applying more pressure.

ADDING COLOR
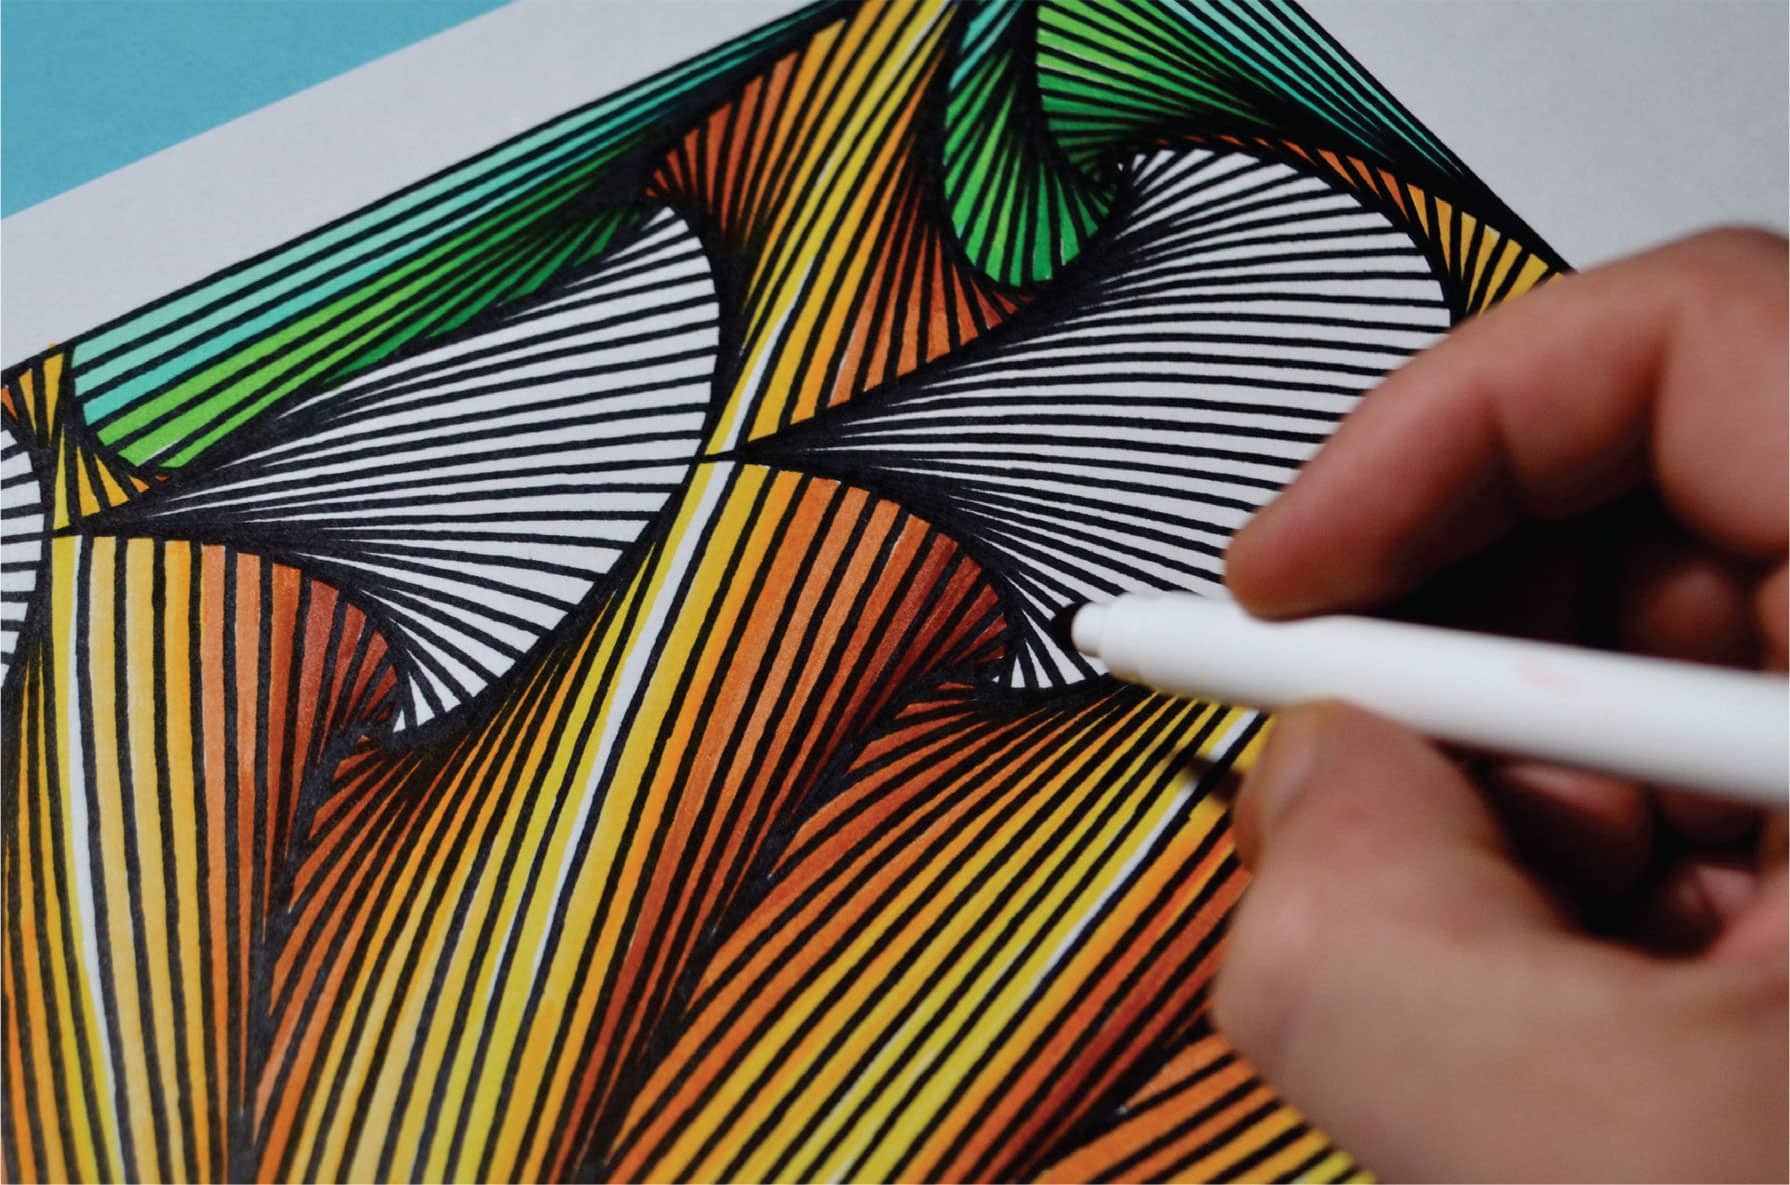
Adding color often makes for the finishing touch in a drawing. Using color on your spiral line drawings does more than that, however. Various coloring techniques can actually be used to further the illusion of a spiral drawing.
1 Coloring can add depth, which enhances the visual perception and helps grab viewers’ attention.
2 For depth and 3-D forms, use darker colors for the inside of the spiral patterns and lighter colors for the outside edges.
3 For an additional effect, leave the outside edges of each inside space white. Just don’t color all the way to the edge. This will really make the image pop!
4 You can use any colors you like in your spiral drawings, but try to stick to the main rules of color theory for the best-looking final image. Use colors that complement or contrast with each other based on their location on the color wheel. You can also choose to go monochromatic for a more sophisticated look. Avoid using jarring colors that will only detract from your spiral drawing.

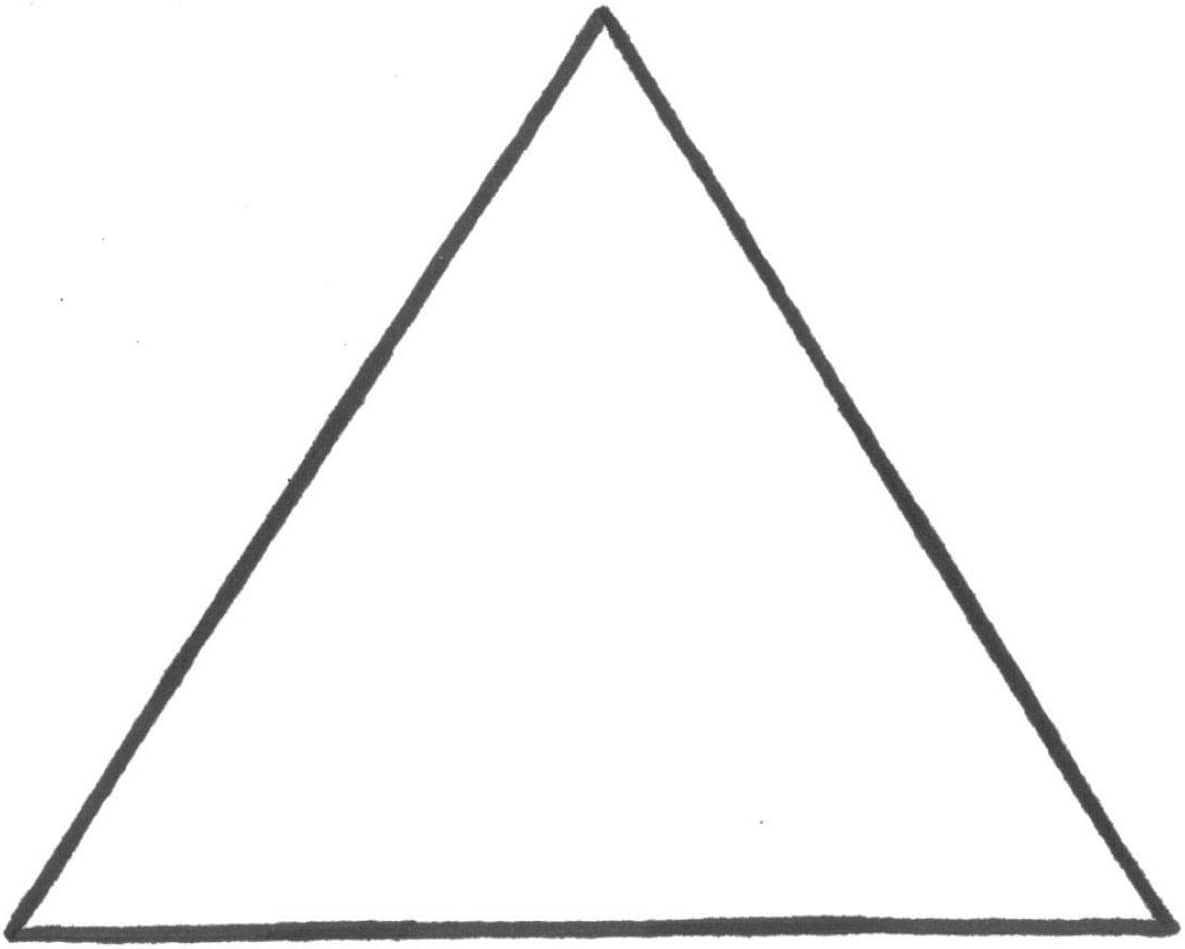
TRIANGLE
STEP ONE
Start by drawing a triangle with three sides of equal length.
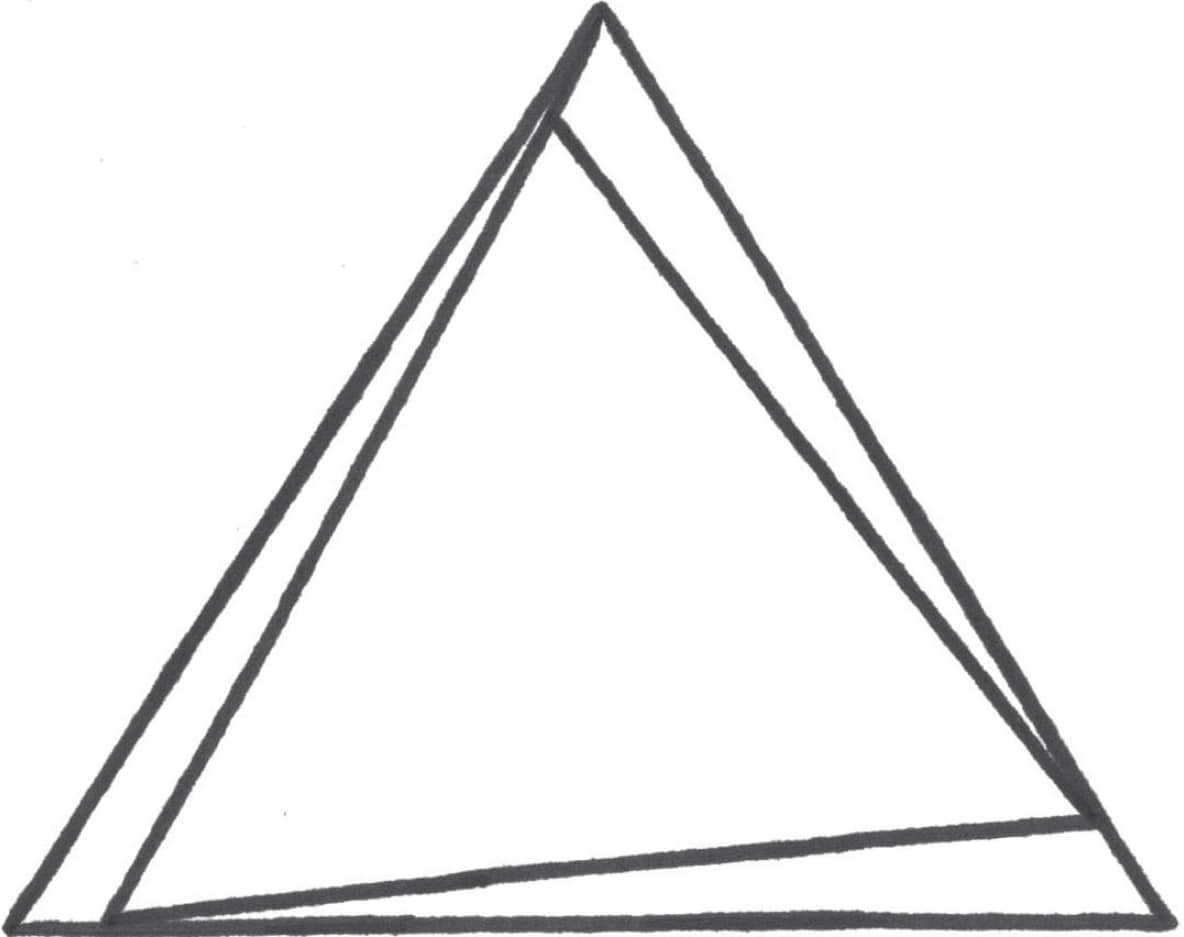
STEP TWO
From the top point of the triangle, draw a diagonal line to the bottom line.

STEP THREE
Repeat step 2 on the other two sides of the triangle.
STEP FOUR
Repeat steps 2 and 3, keeping the spacing between the lines consistent.

STEP FIVE
As you near the center of the triangle, you will see a spiral pattern begin to develop and the lines will appear to curve.
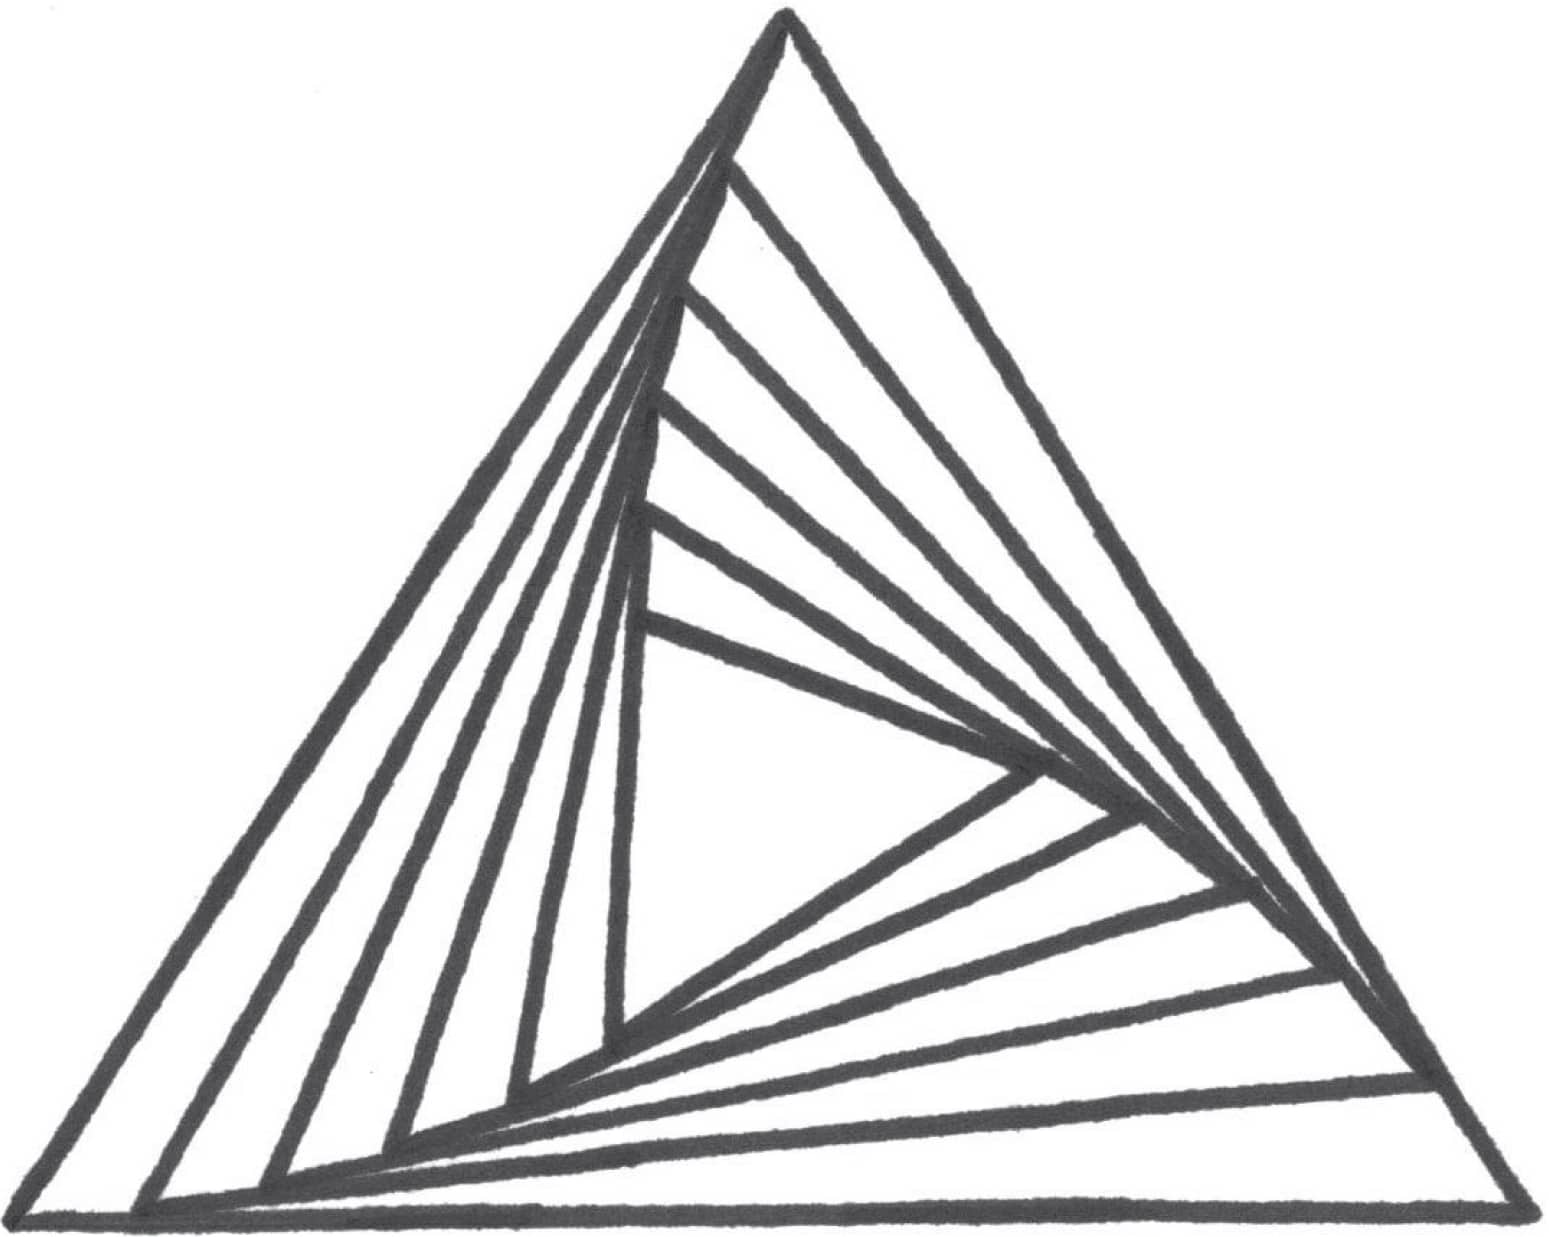
STEP SIX
Fill the center of the triangle to complete the spiral pattern.

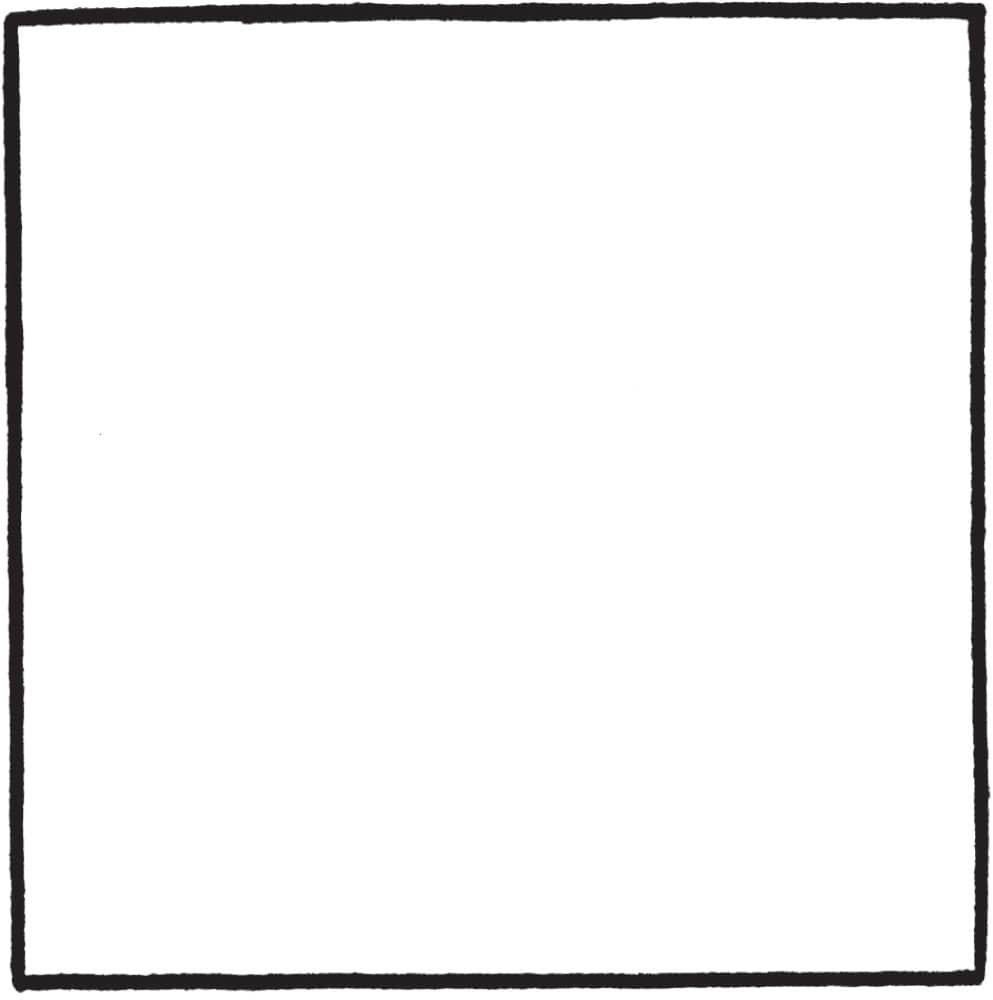
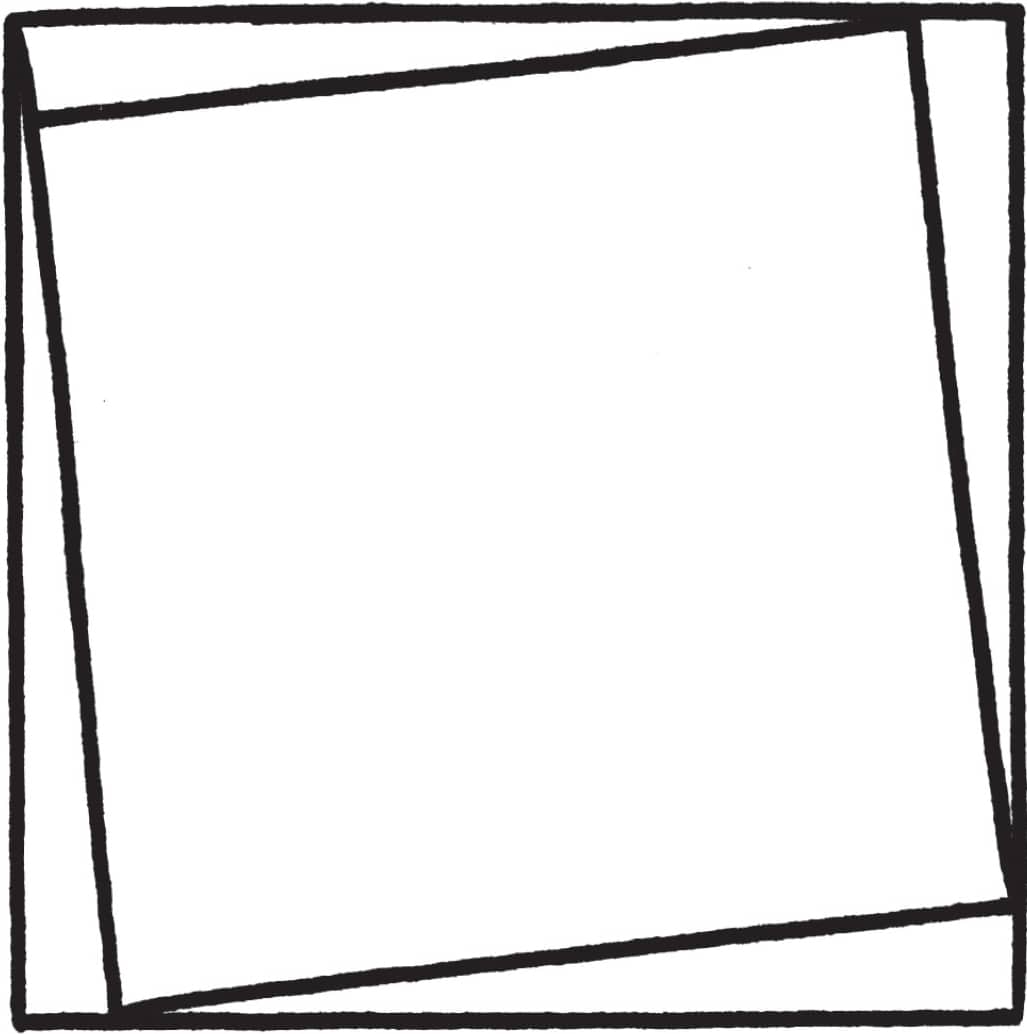
SQUARE
STEP ONE
Draw a square with four equal sides.
STEP TWO
From the top-left corner, draw a diagonal line to the bottom of the square. From there, draw another diagonal line to the right side of the square.

STEP THREE
Repeat step 2 on the other two sides of the square, keeping the spacing between the lines and the edges of the square consistent.
STEP FOUR
Repeat steps 2 and 3 for the inside lines of the square.

STEP FIVE
Continue drawing lines as you see the spiral begin to form.

STEP SIX
As you near the center of the square, the lines will begin to bend—or at least appear to do so.

STEP SEVEN
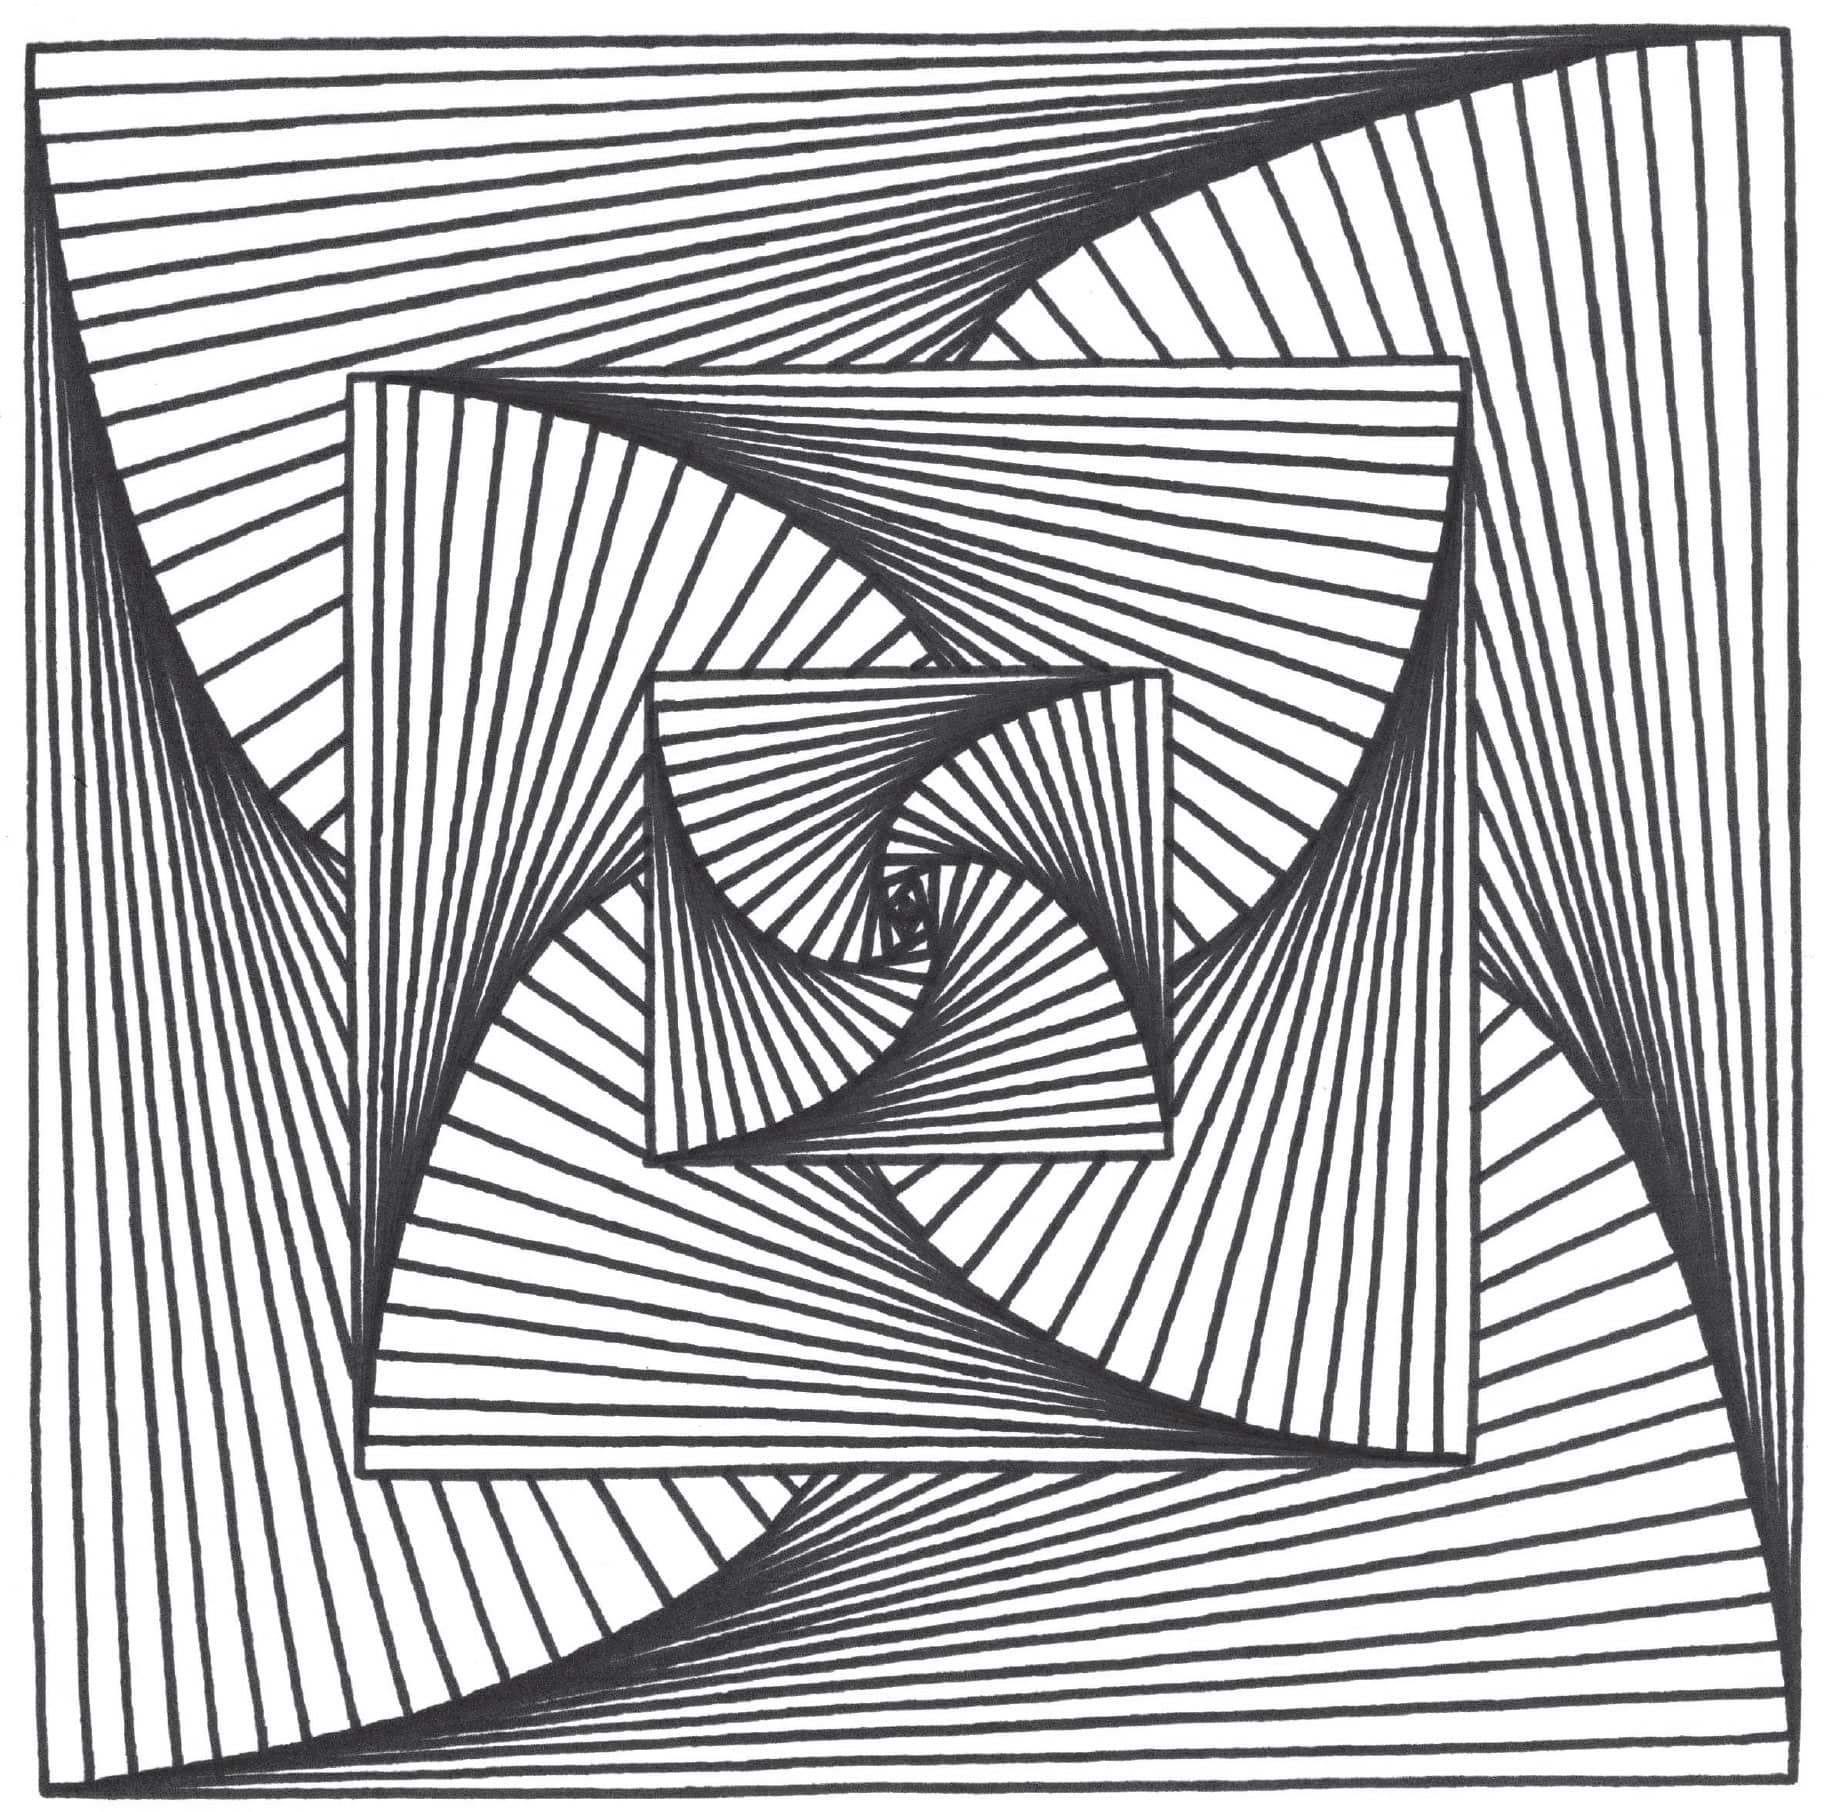
Take a step back and look at your drawing. At first glance, it may appear that there are some curved lines, but in fact, the entire pattern was created using just straight lines!

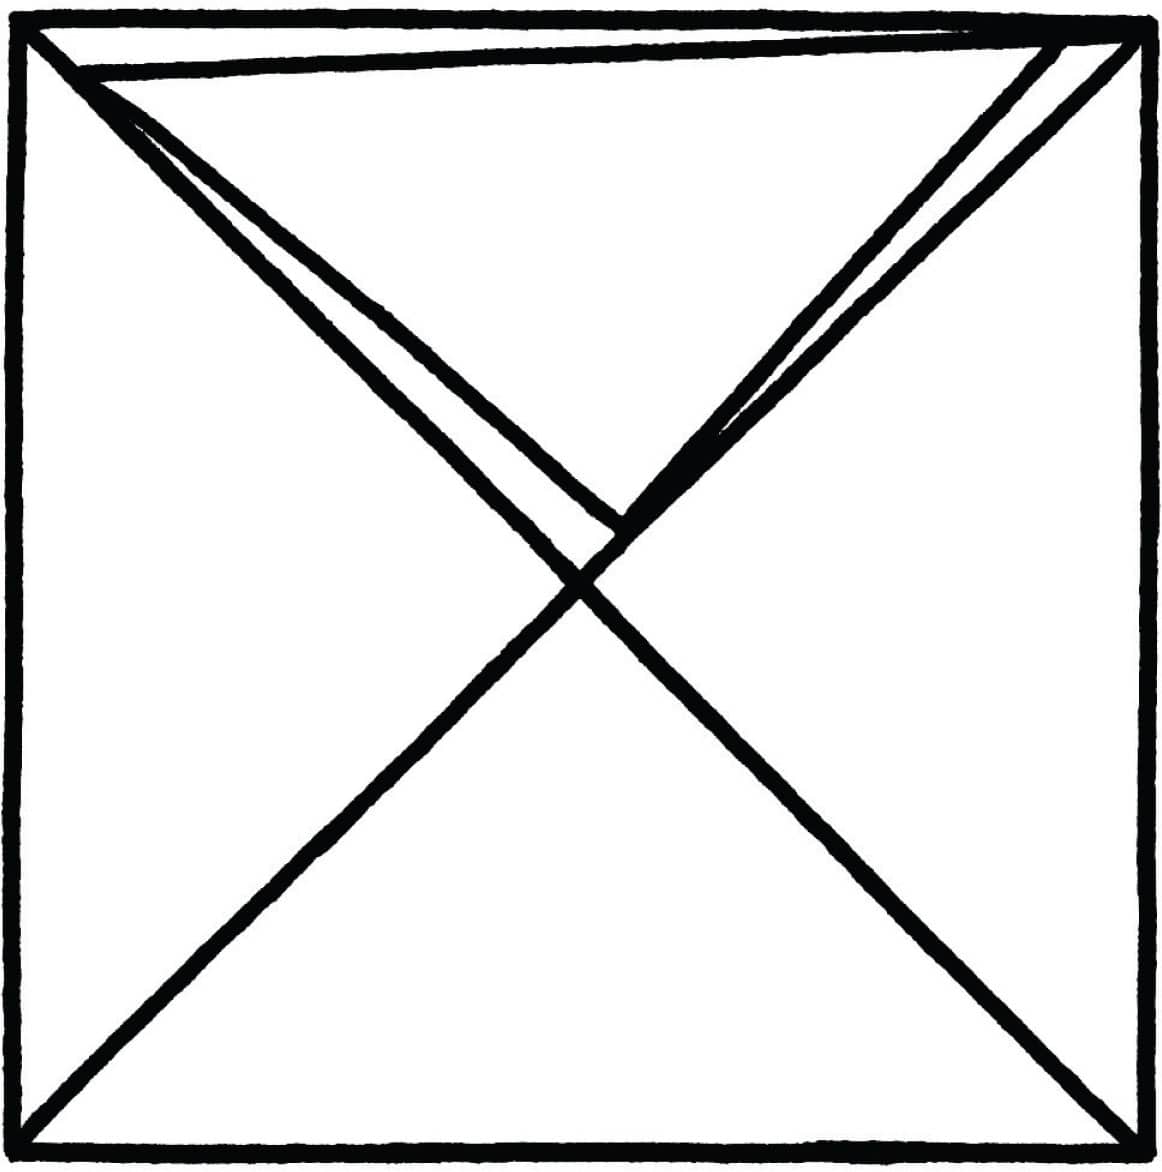
SQUARE PATTERN
STEP ONE
Begin by drawing a square with an “X” through it to create four triangles.

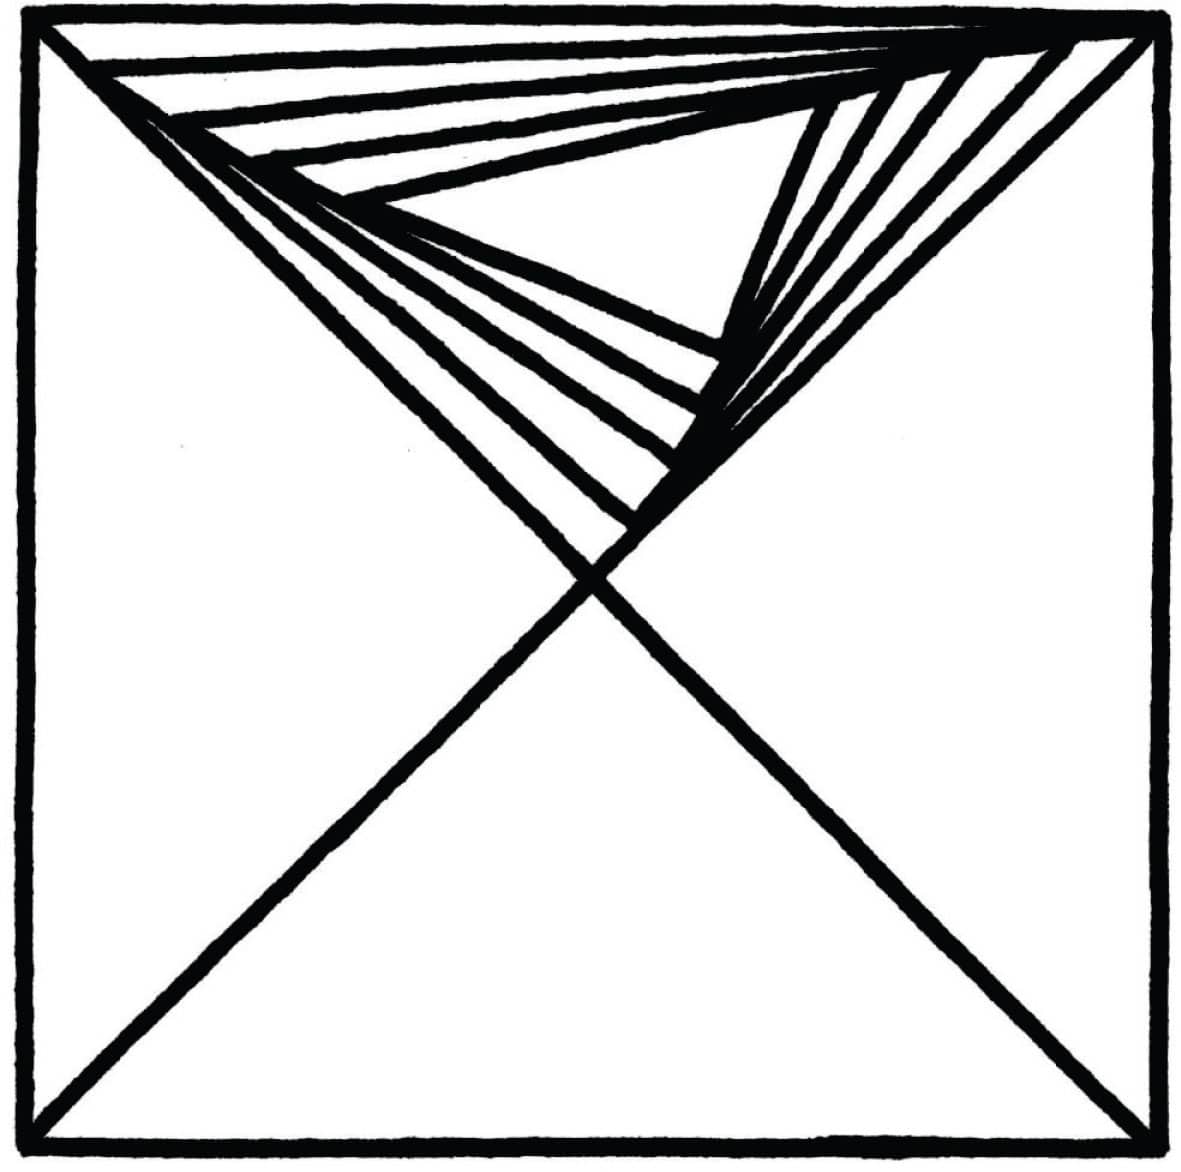
STEP TWO
Draw three diagonal lines inside the top triangle, ensuring that each line starts in a corner and tapers to the opposite side of the triangle.
STEP THREE
Repeat the same process three times, keeping the spacing between each line consistent.
STEP FOUR
Repeat steps 2 and 3 in the next triangle.

STEP FIVE
Now do the same on the opposite side!

STEP SIX
Finally, repeat steps 2 and 3 in the last triangle.

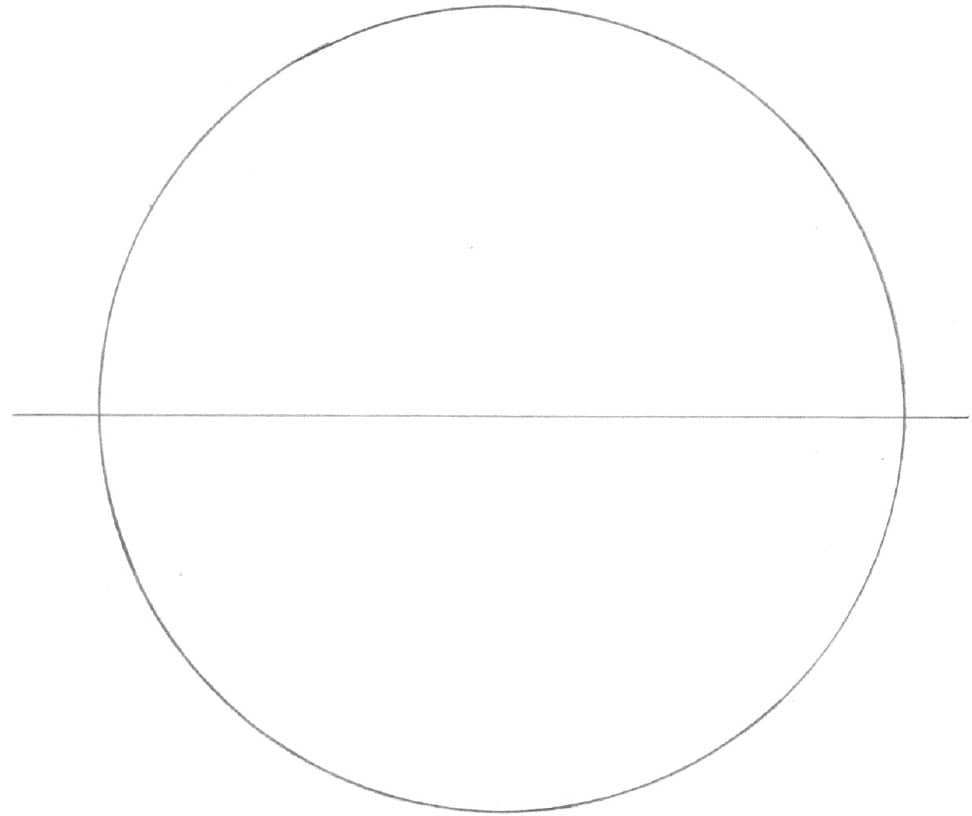
HEXAGON
STEP ONE
Using a compass or a circular object to draw around, lightly sketch a horizontal line and a circle around it with a graphite pencil.
STEP TWO
Use a pen or marker to draw two lines of approximately the same length inside the circle.
To ensure accuracy, you can lightly sketch in pencil first using a protractor. The exterior angle of a hexagon is 60 degrees.
STEP THREE
Mark two dots on the bottom of the circle, and sketch vertical lines from top to bottom.

STEP FOUR
Connect the sides around the circle to create a hexagon.

STEP FIVE
Erase your pencil lines and begin to create your spiral pattern inside the hexagon. Start by drawing lines from the corners, ensuring that the spacing between each line and the outside edge of the hexagon is the same distance all the way around.

STEP SIX
Repeat step 5 inside the lines you just drew.

STEP SEVEN
Keep adding lines as your spiral pattern begins to take shape.

STEP EIGHT
Continue adding lines until you’ve completed the spiral pattern inside the hexagon.

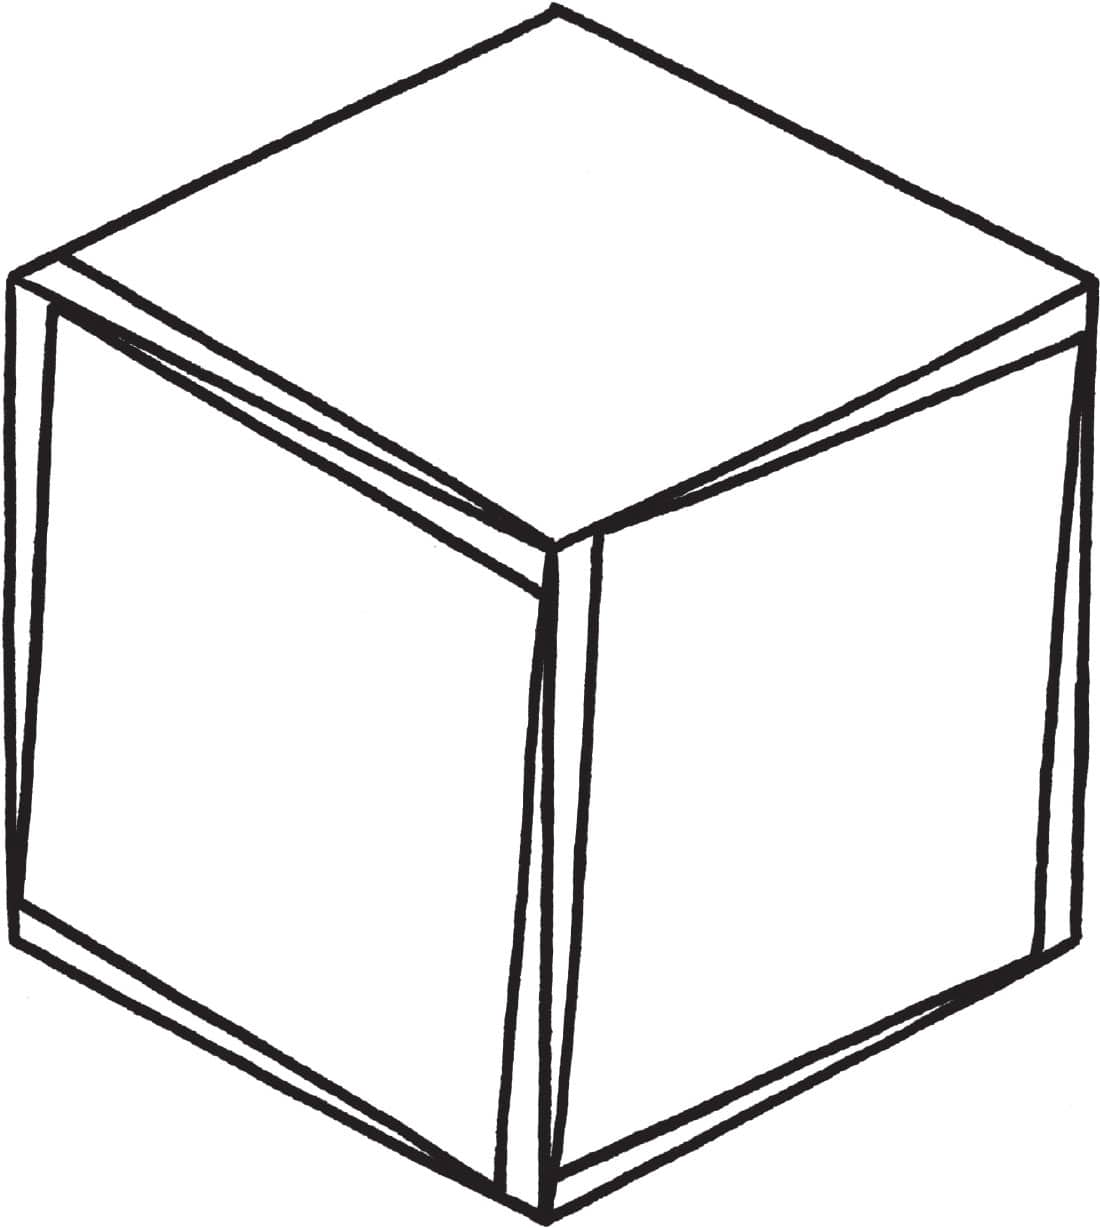
CUBE
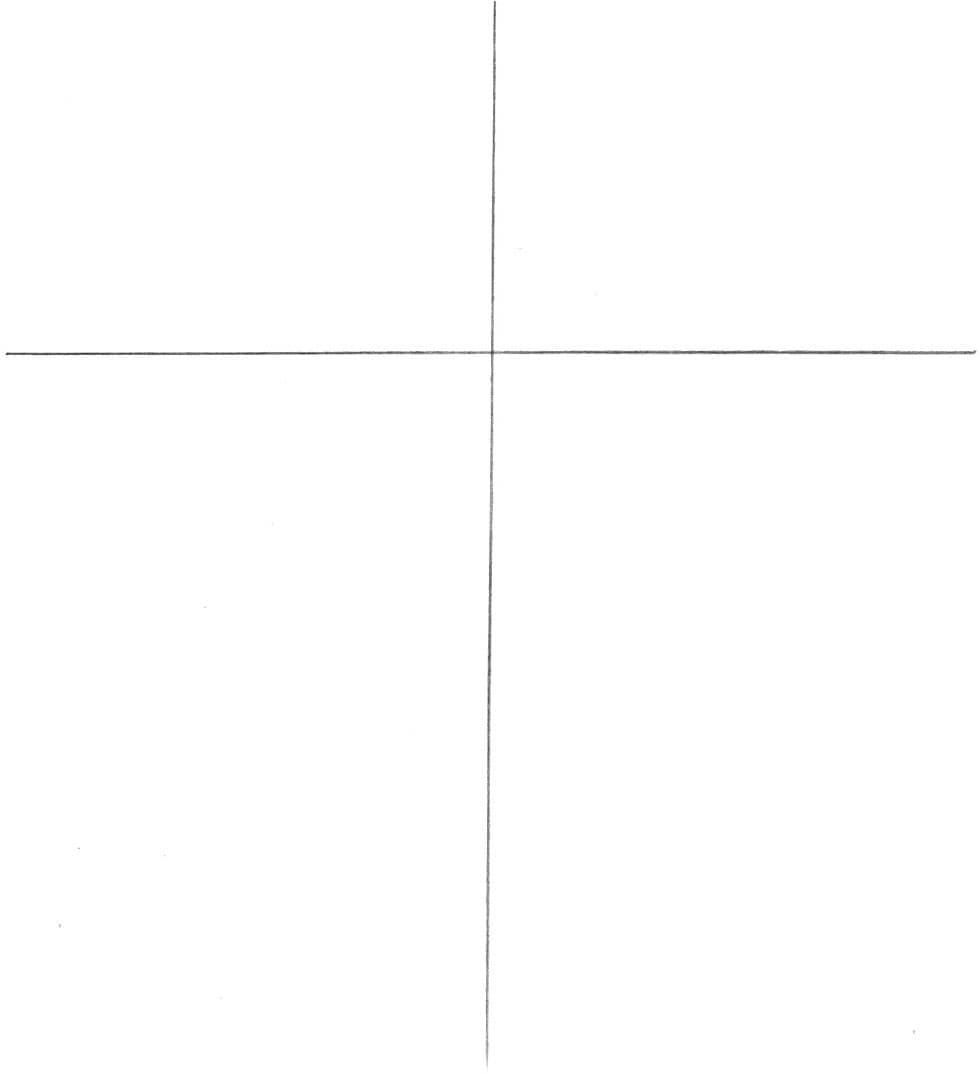
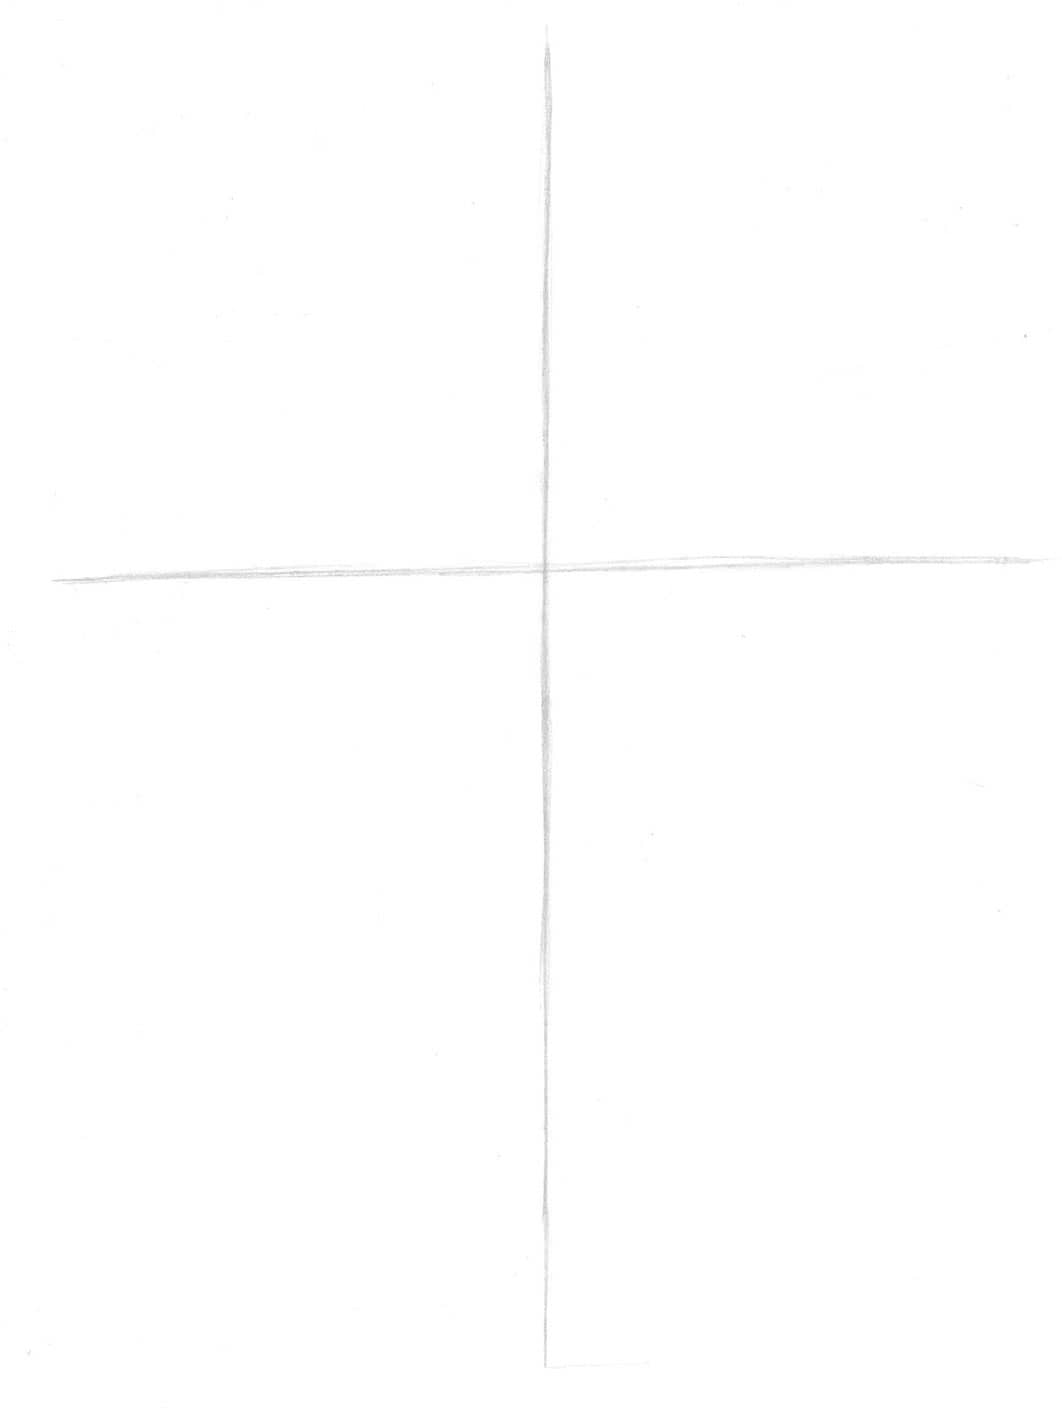
STEP ONE
With a graphite pencil, lightly sketch a vertical line and a horizontal line to create a cross.
STEP TWO
Use a pen to draw diagonal lines on either side of the vertical line, creating a diamond.

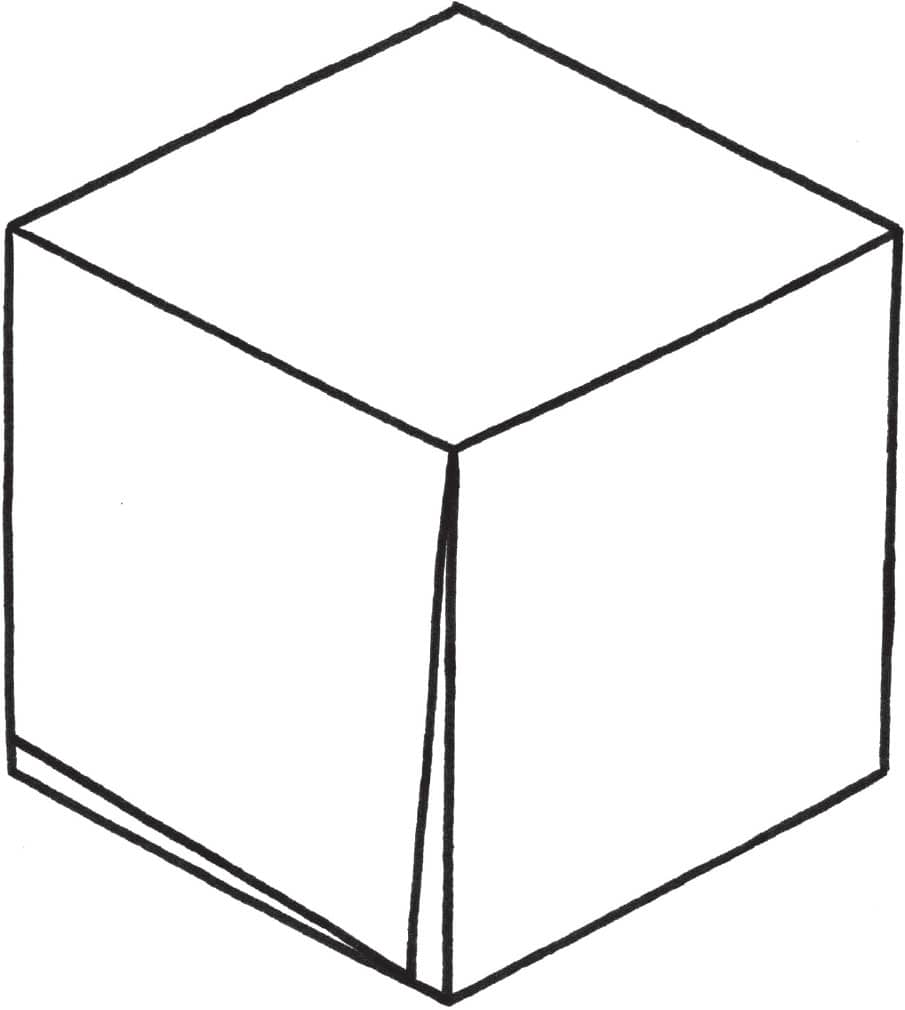
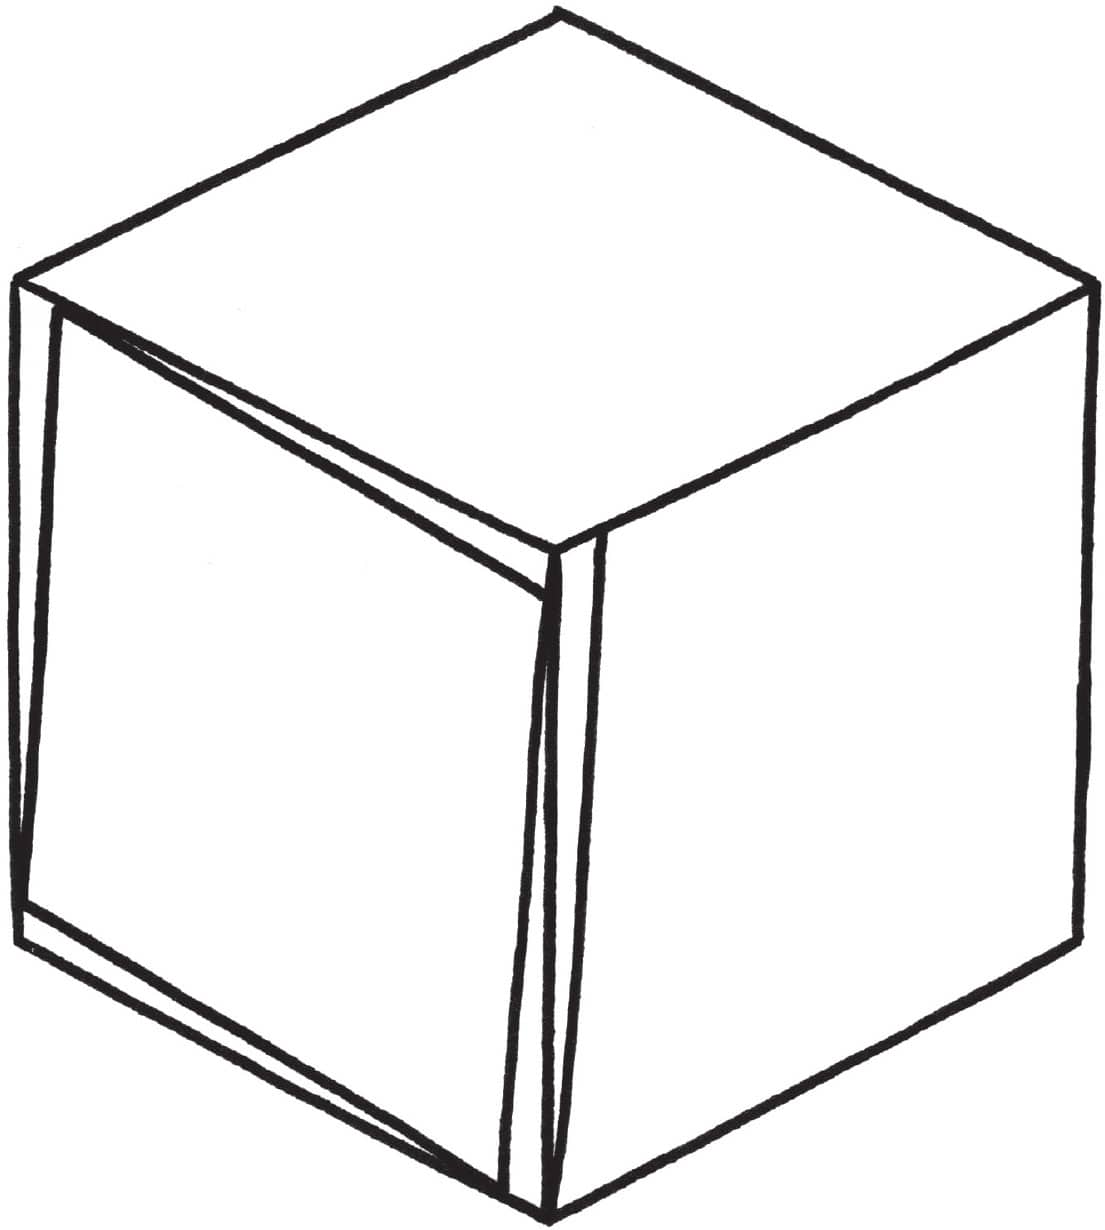
STEP THREE
Draw the sides of the cube. For an accurate drawing, lightly sketch with graphite pencil; then go over your pencil lines with a pen or marker.

STEP FOUR
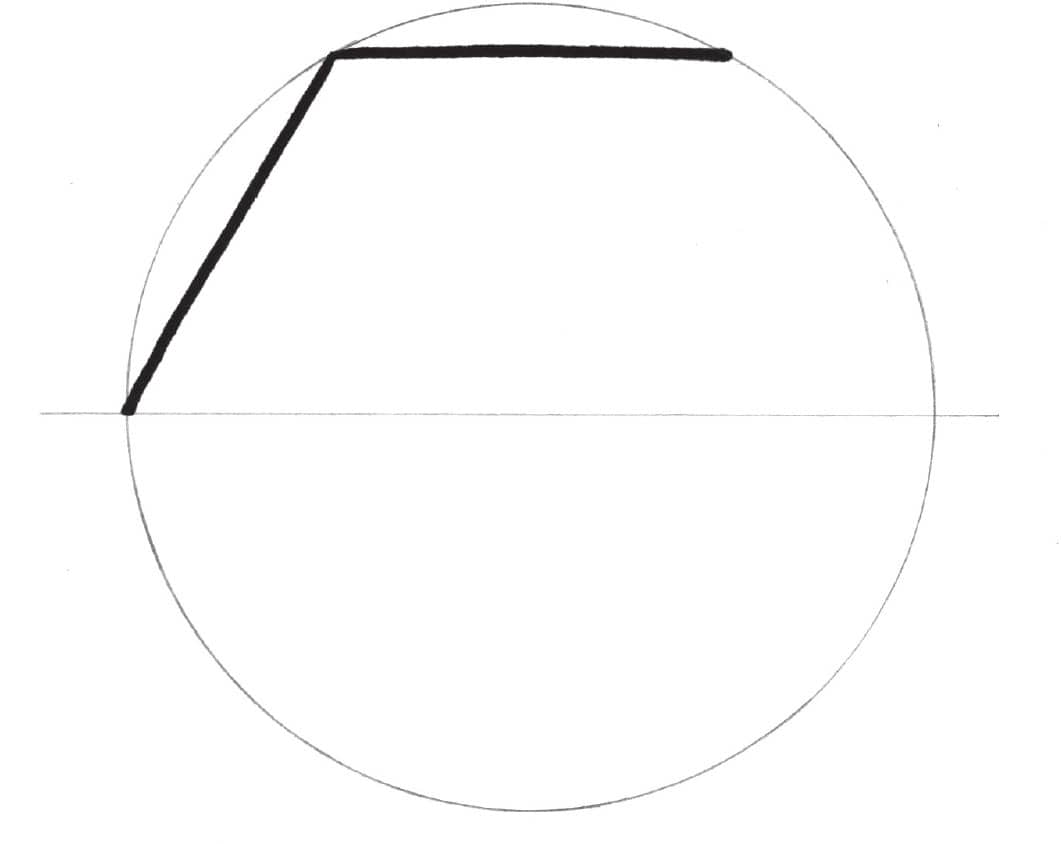
Erase your pencil lines and begin to create the spiral pattern. Draw a diagonal line from the center corner to the bottom of the left side; then draw another diagonal line from there up toward the left side. Keep the spacing between the diagonal lines and the outside of the cube approximately the same.
STEP FIVE
Repeat step 4 for the other two edges; then draw a diagonal line on the opposite side from the bottom-center corner up to the top edge. Again, keep the spacing consistent.
STEP SIX
Repeat the same process along the other two edges and draw a diagonal line from the top side of the cube starting at the center corner and ending at the top-left edge.
STEP SEVEN
Repeat this process again along the remaining three edges on the top side of the cube, and add more diagonal lines to the left side. Follow the same pattern and keep the spacing consistent.

STEP EIGHT
You can now see the spiral beginning to take shape. Keep drawing!

STEP NINE
Once the left side is complete, move on to the right side.

STEP TEN
Repeat the spiral-drawing process on the top side of the cube to finish it.

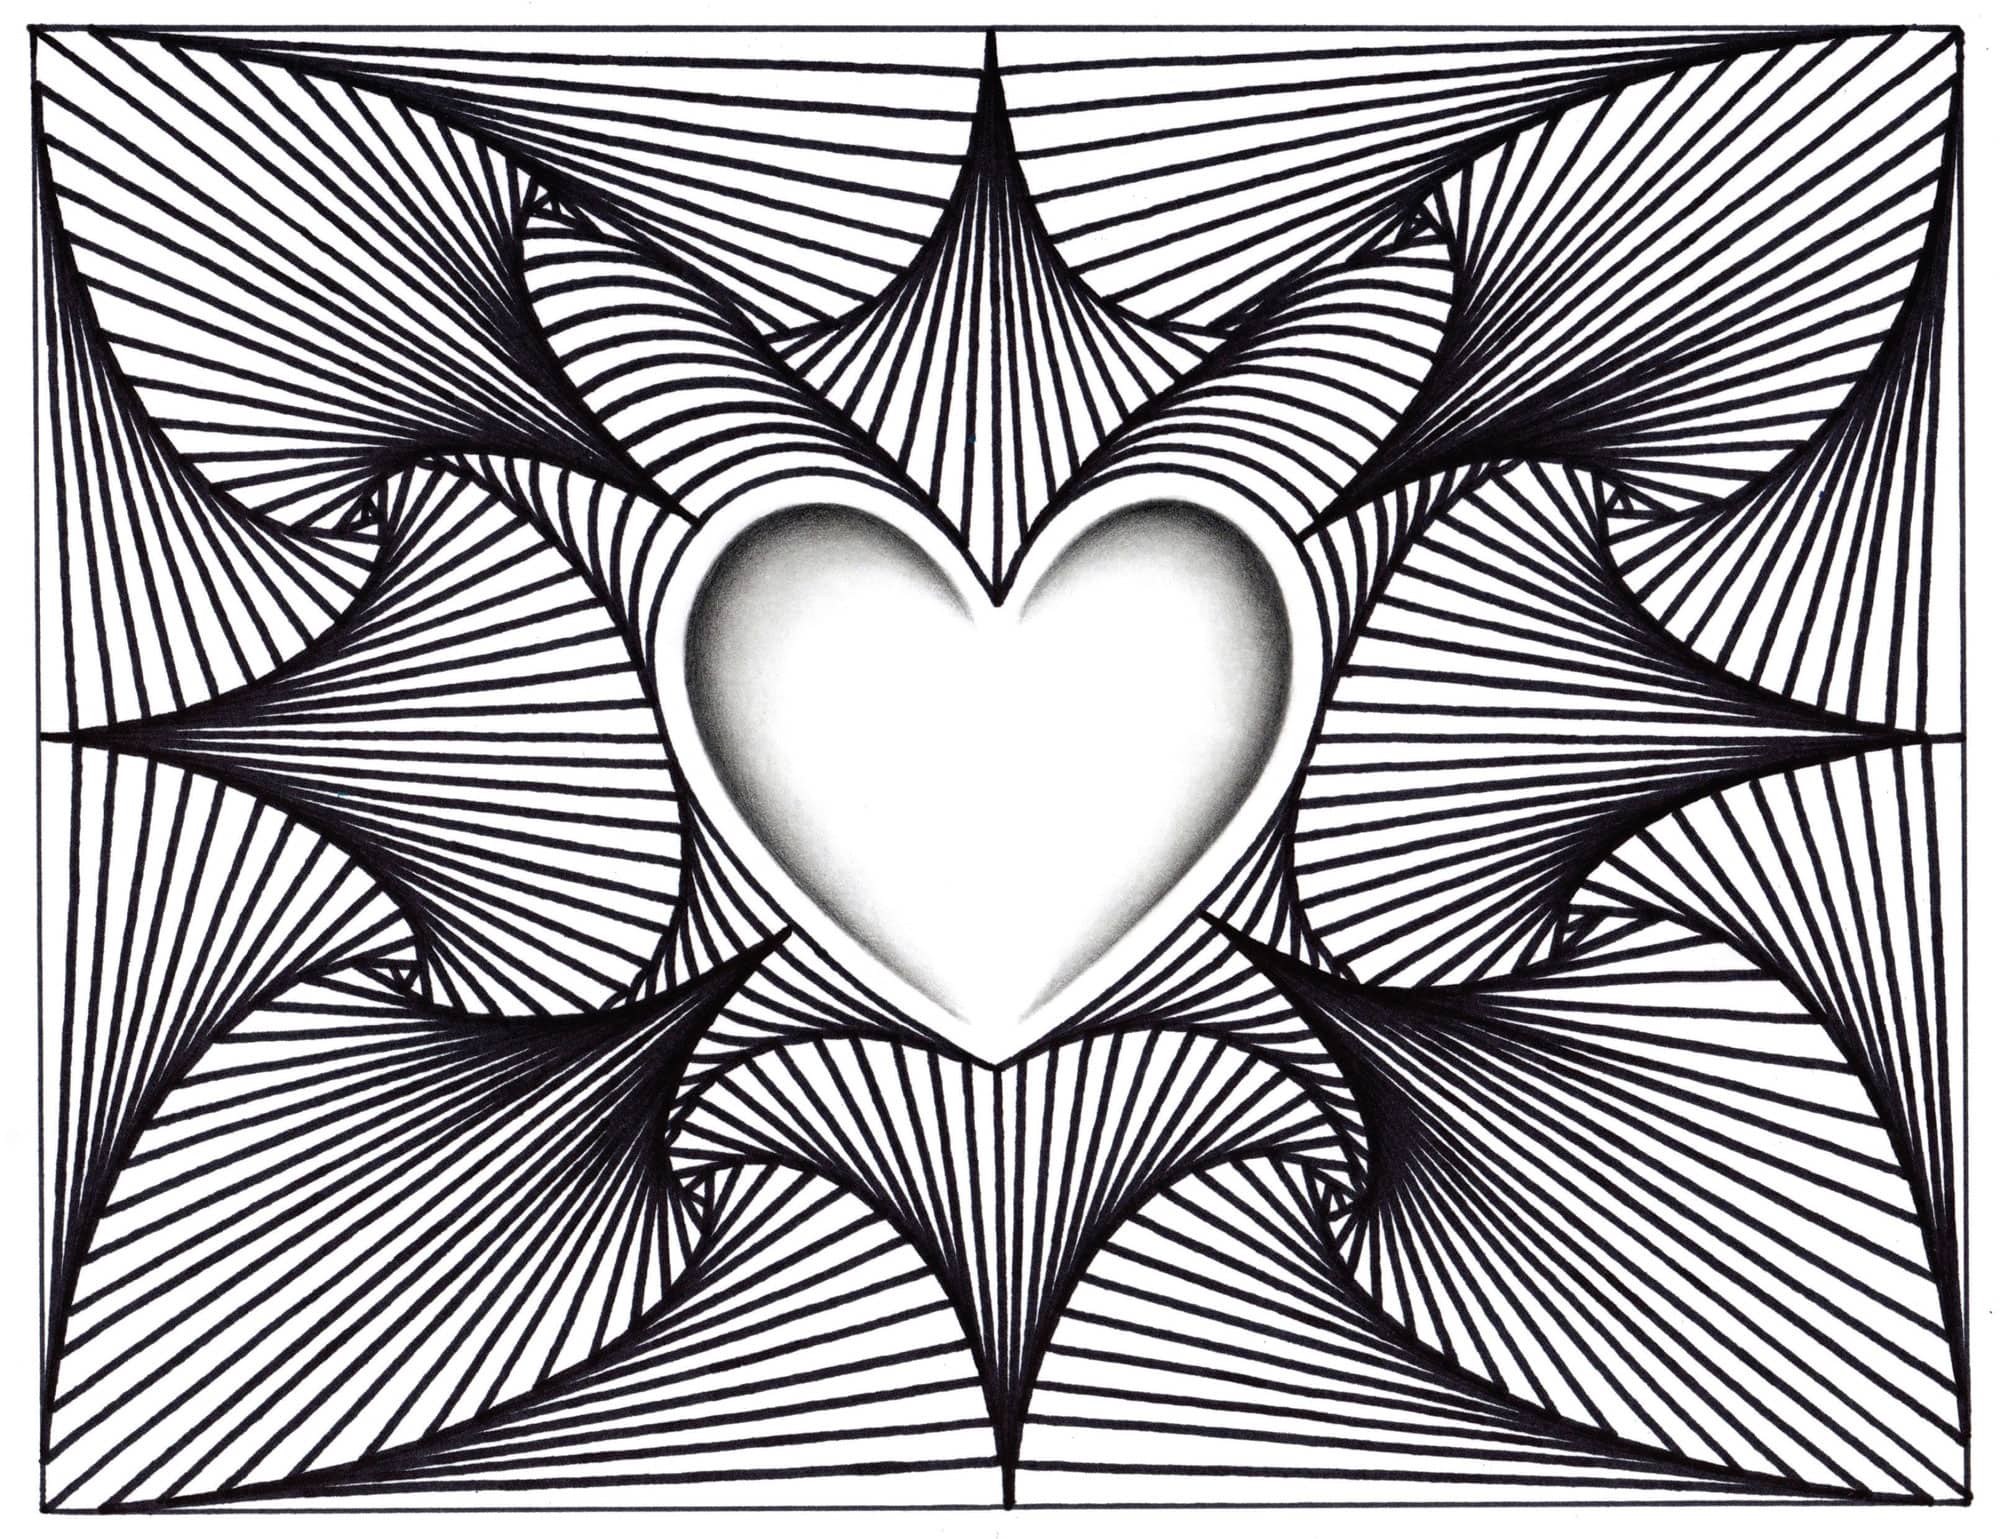
HEART
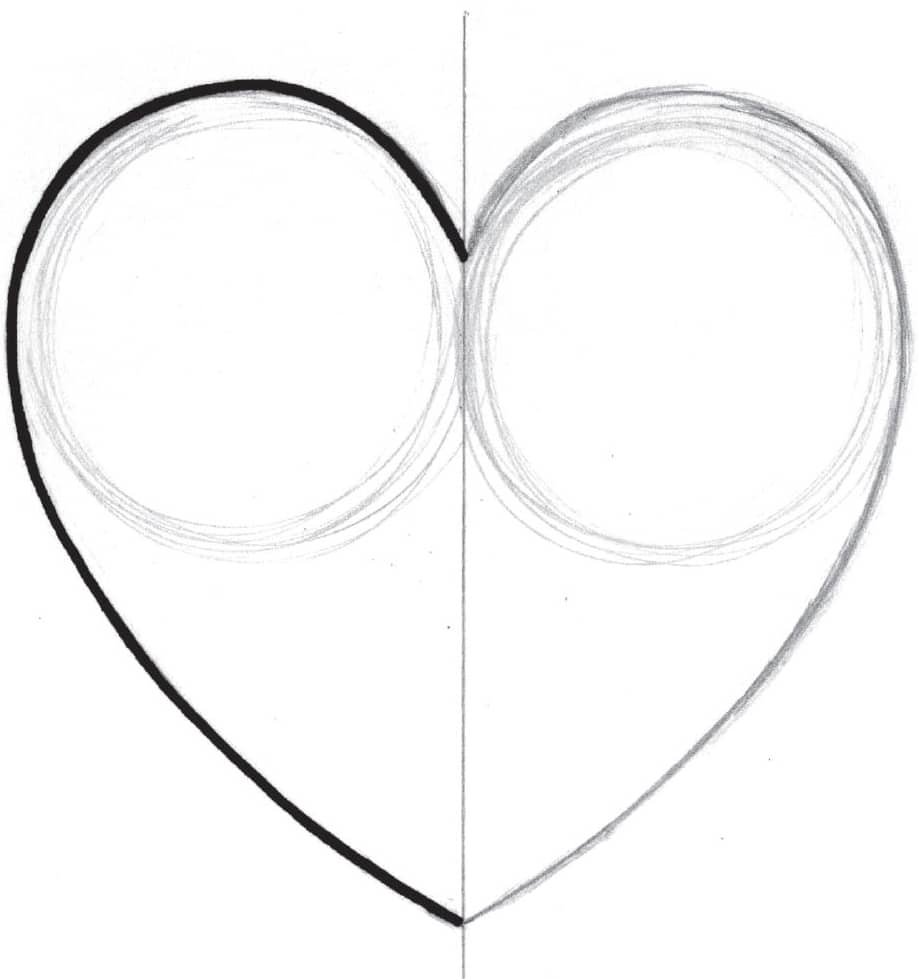
STEP ONE
Lightly sketch a vertical line with a circle on each side. Sketch a curved line on one side; then draw over it with a pen or marker. Sketch another curved line on the other side.
STEP TWO
Draw over the right-side curved line with a pen or marker; then draw over the center line as well. Draw a diagonal line from the center of the heart downward; then draw another line that follows the curve of the left side of the heart to the center line. Draw a curve along the top edge of the heart and repeat this step inside the lines you just drew.
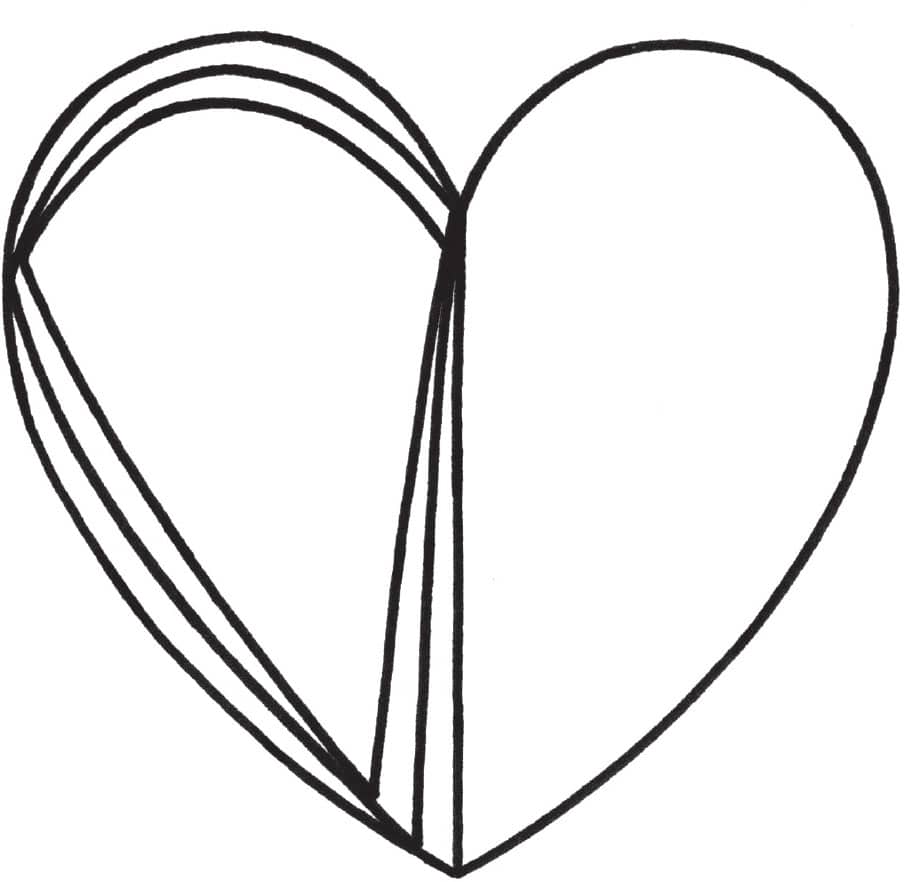
STEP THREE
Continue to add lines inside the heart, keeping the spacing between them consistent. You should now have formed a spiral on the left side of the heart.

STEP FOUR
Repeat steps 2 and 3 on the right side of the heart to complete it.

cross
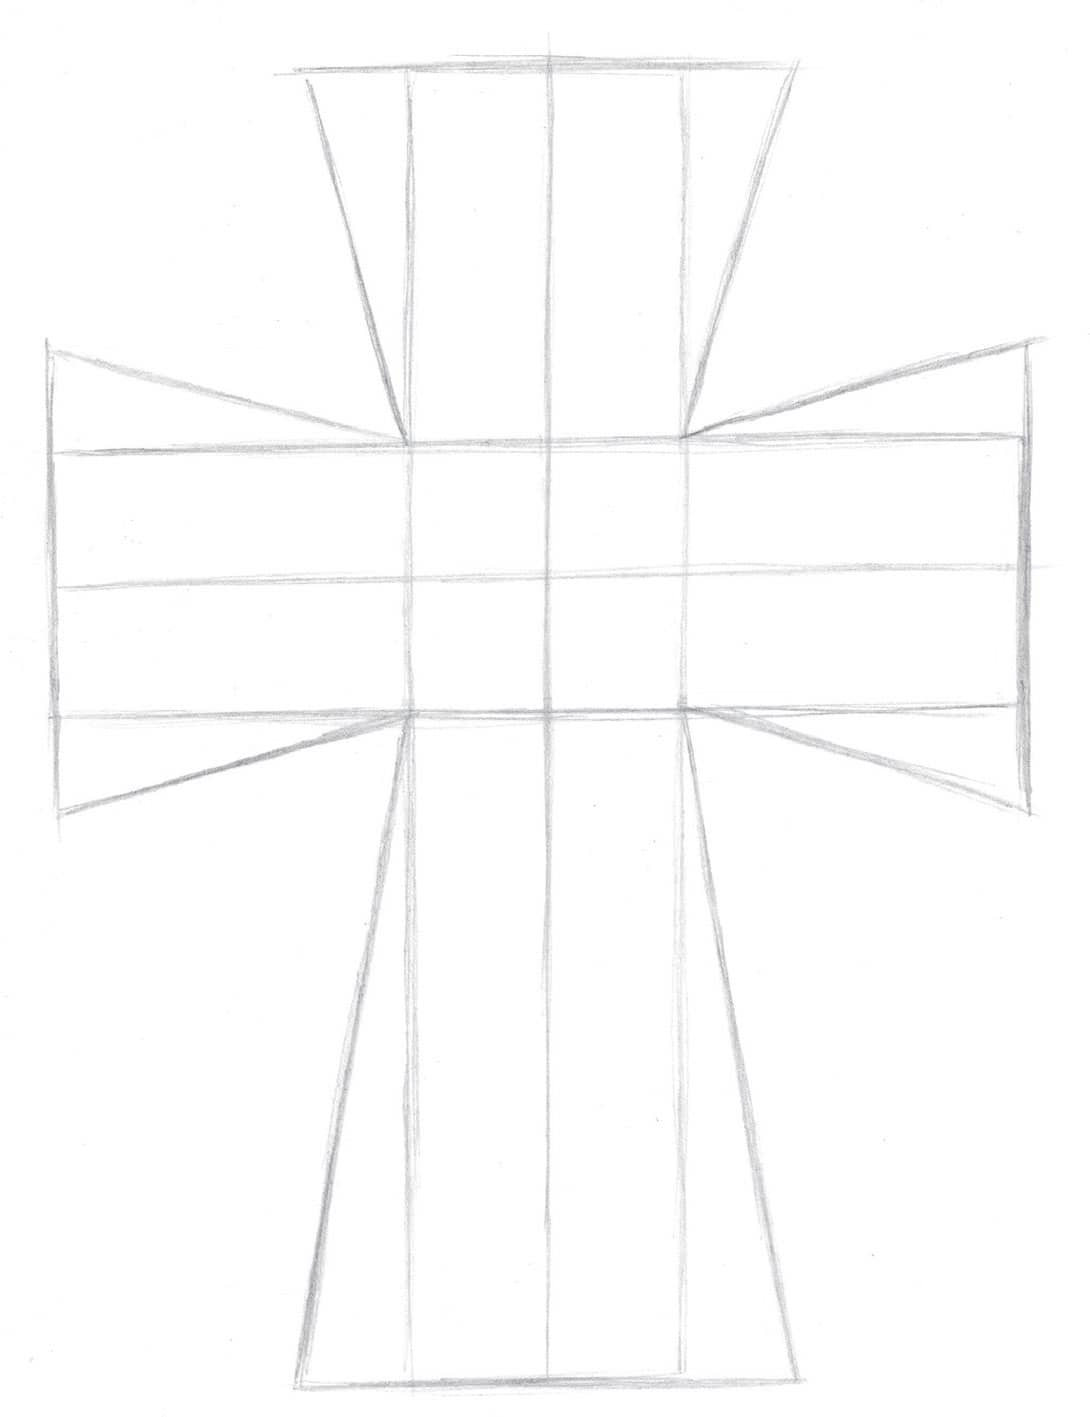
STEP ONE
With a graphite pencil, lightly sketch a cross.
STEP 2
Outline the cross with vertical and horizontal lines, as well as lines on each of the ends.

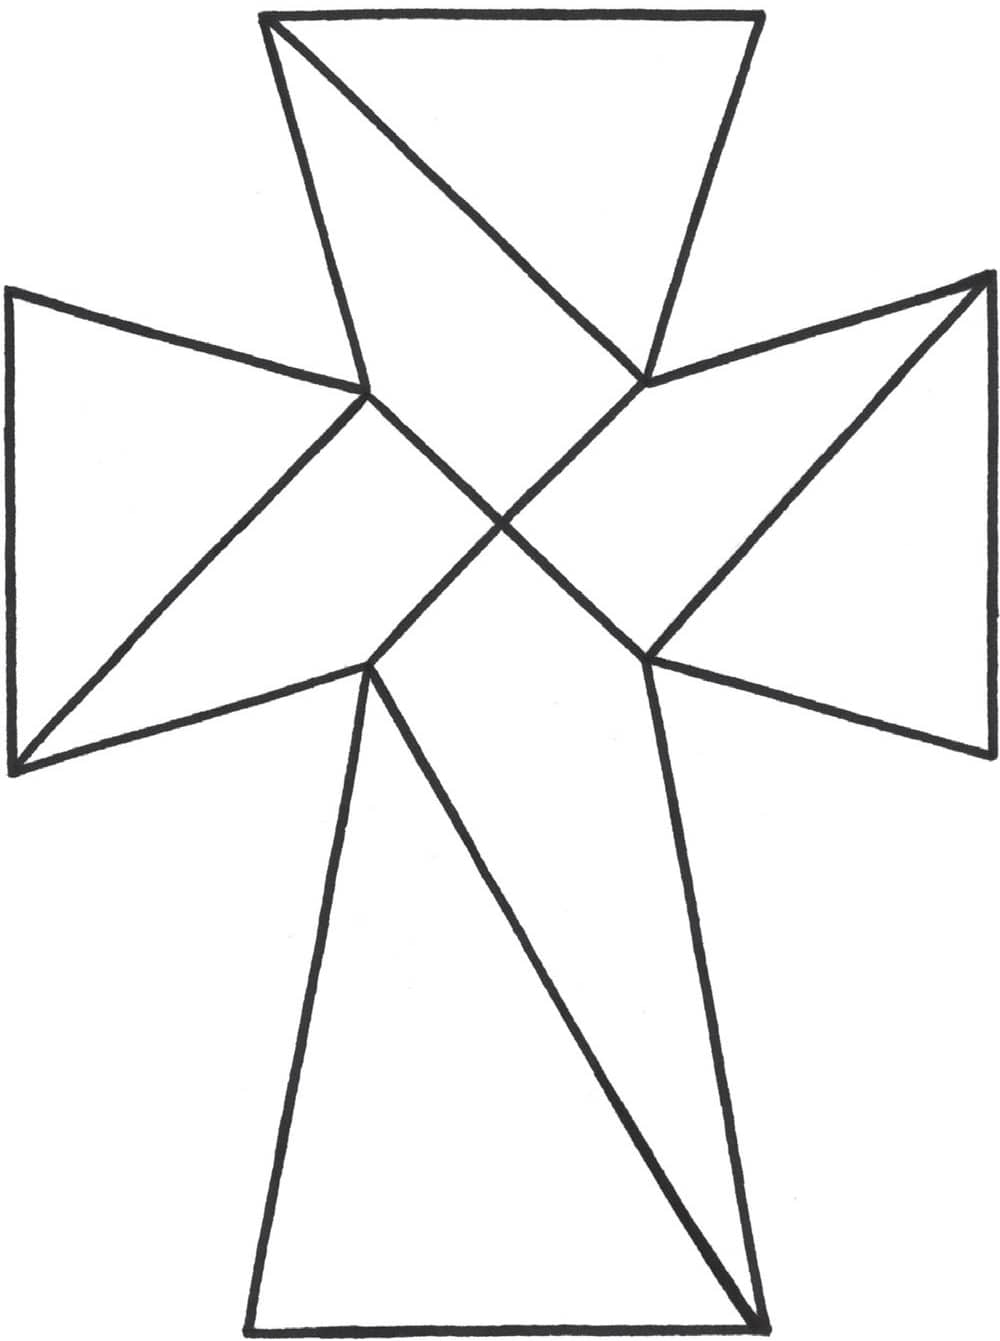
STEP THREE
Draw diagonal lines from the ends of the lines toward the center corners of the cross.
STEP FOUR
Use a darker pencil or pen to trace around the cross, and erase all unwanted pencil marks. Then draw a pattern inside the cross, as shown here.
STEP FIVE
Create the spiral pattern inside the cross, starting with the ends.

STEP SIX
Complete the spiral pattern throughout the rest of the cross.
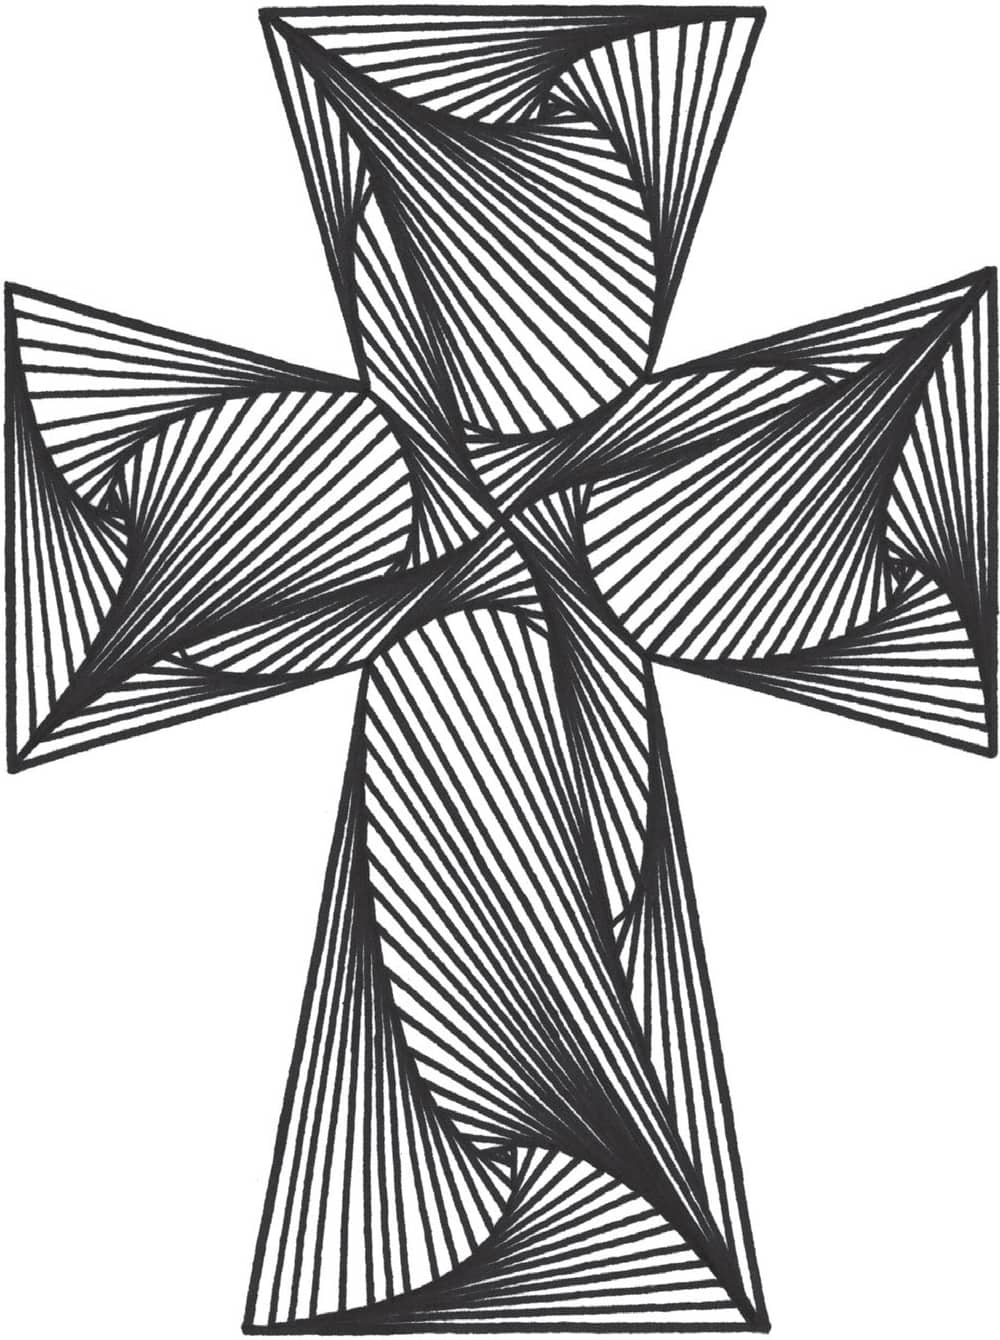

Now add color!
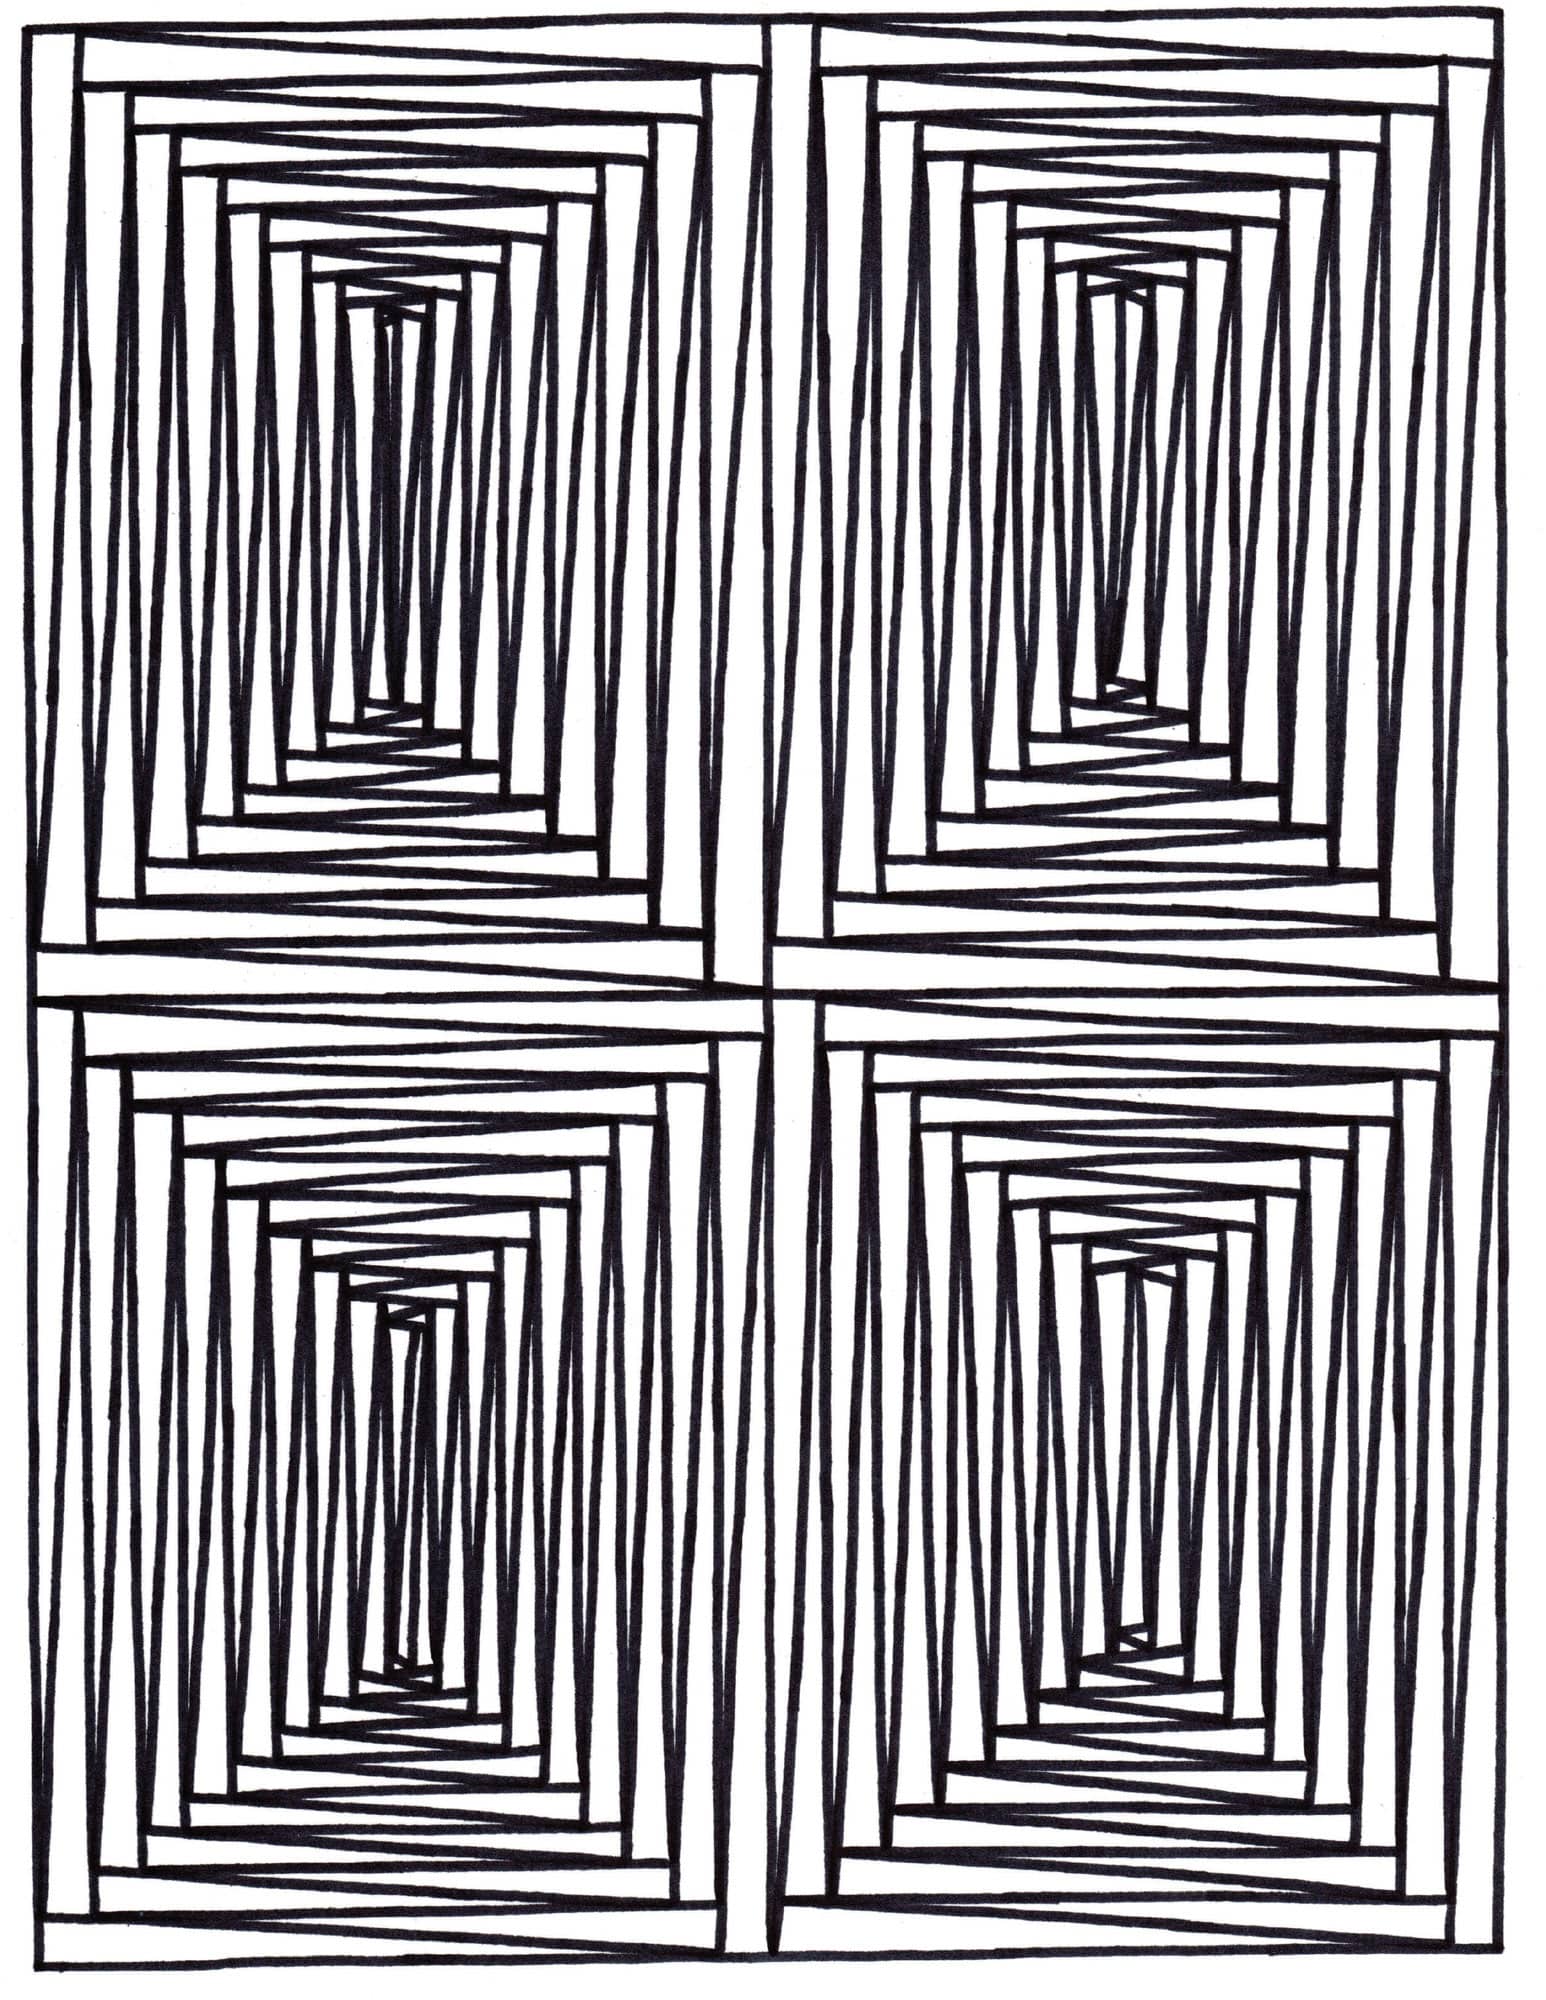
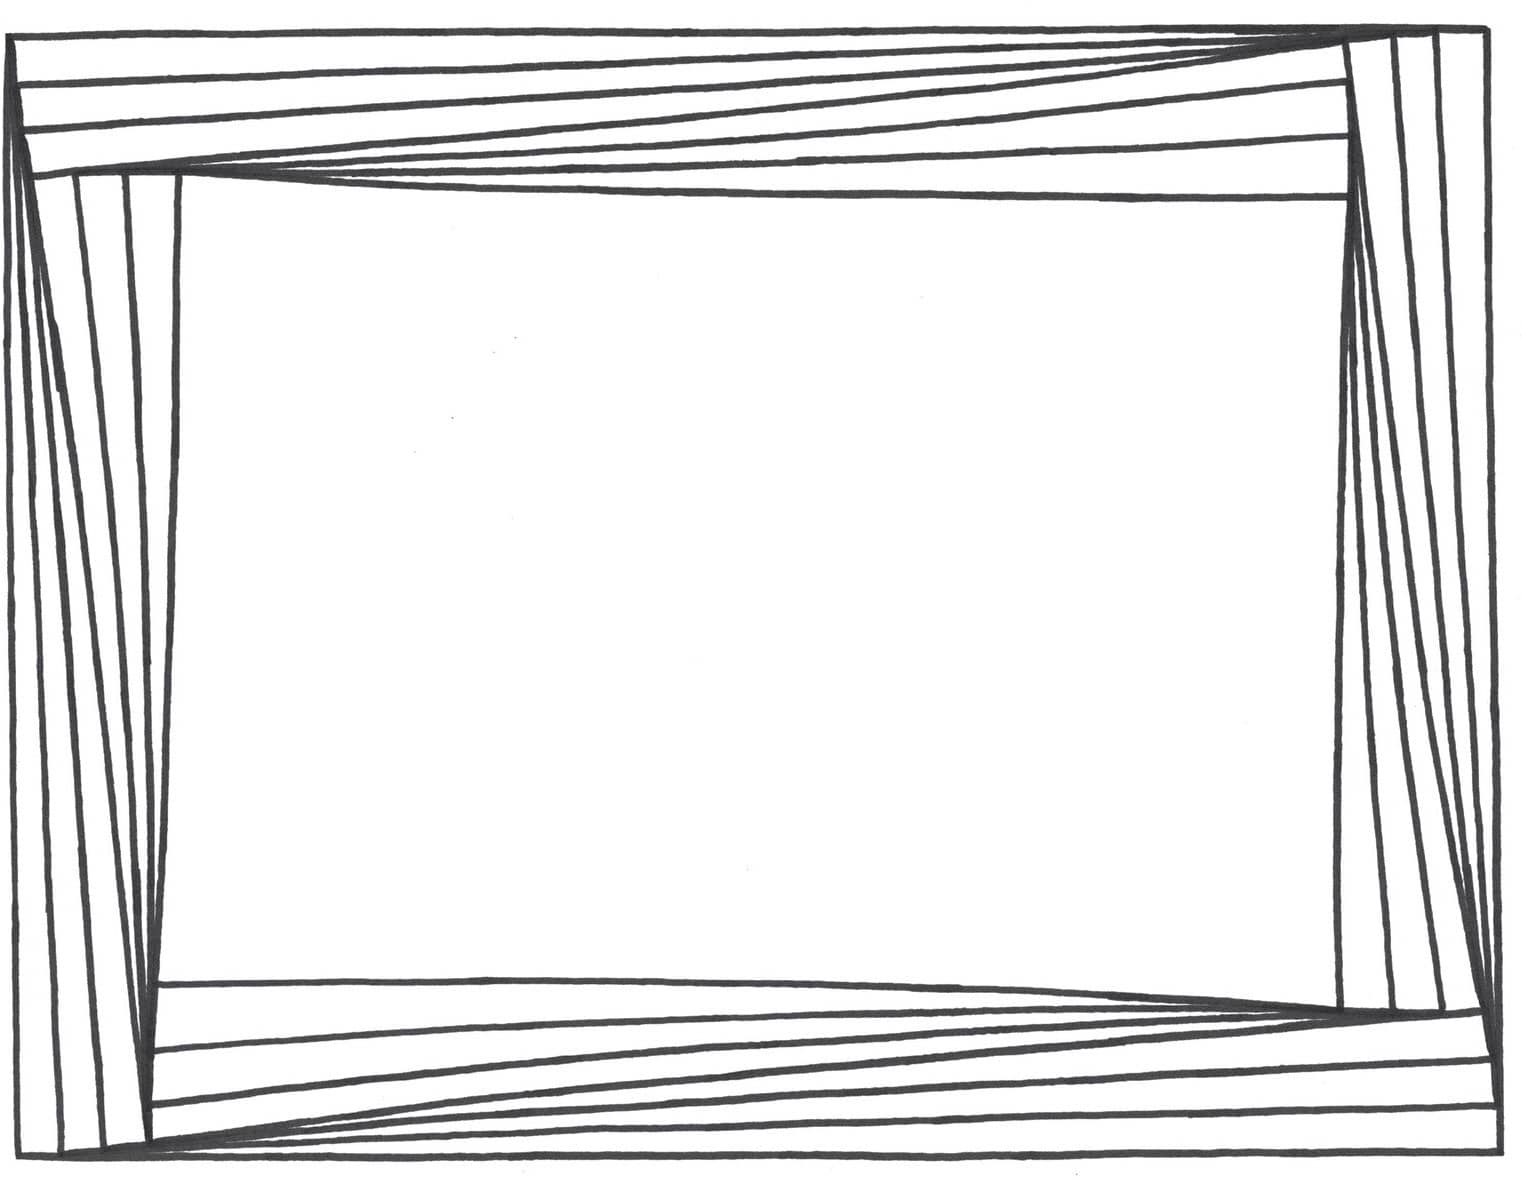
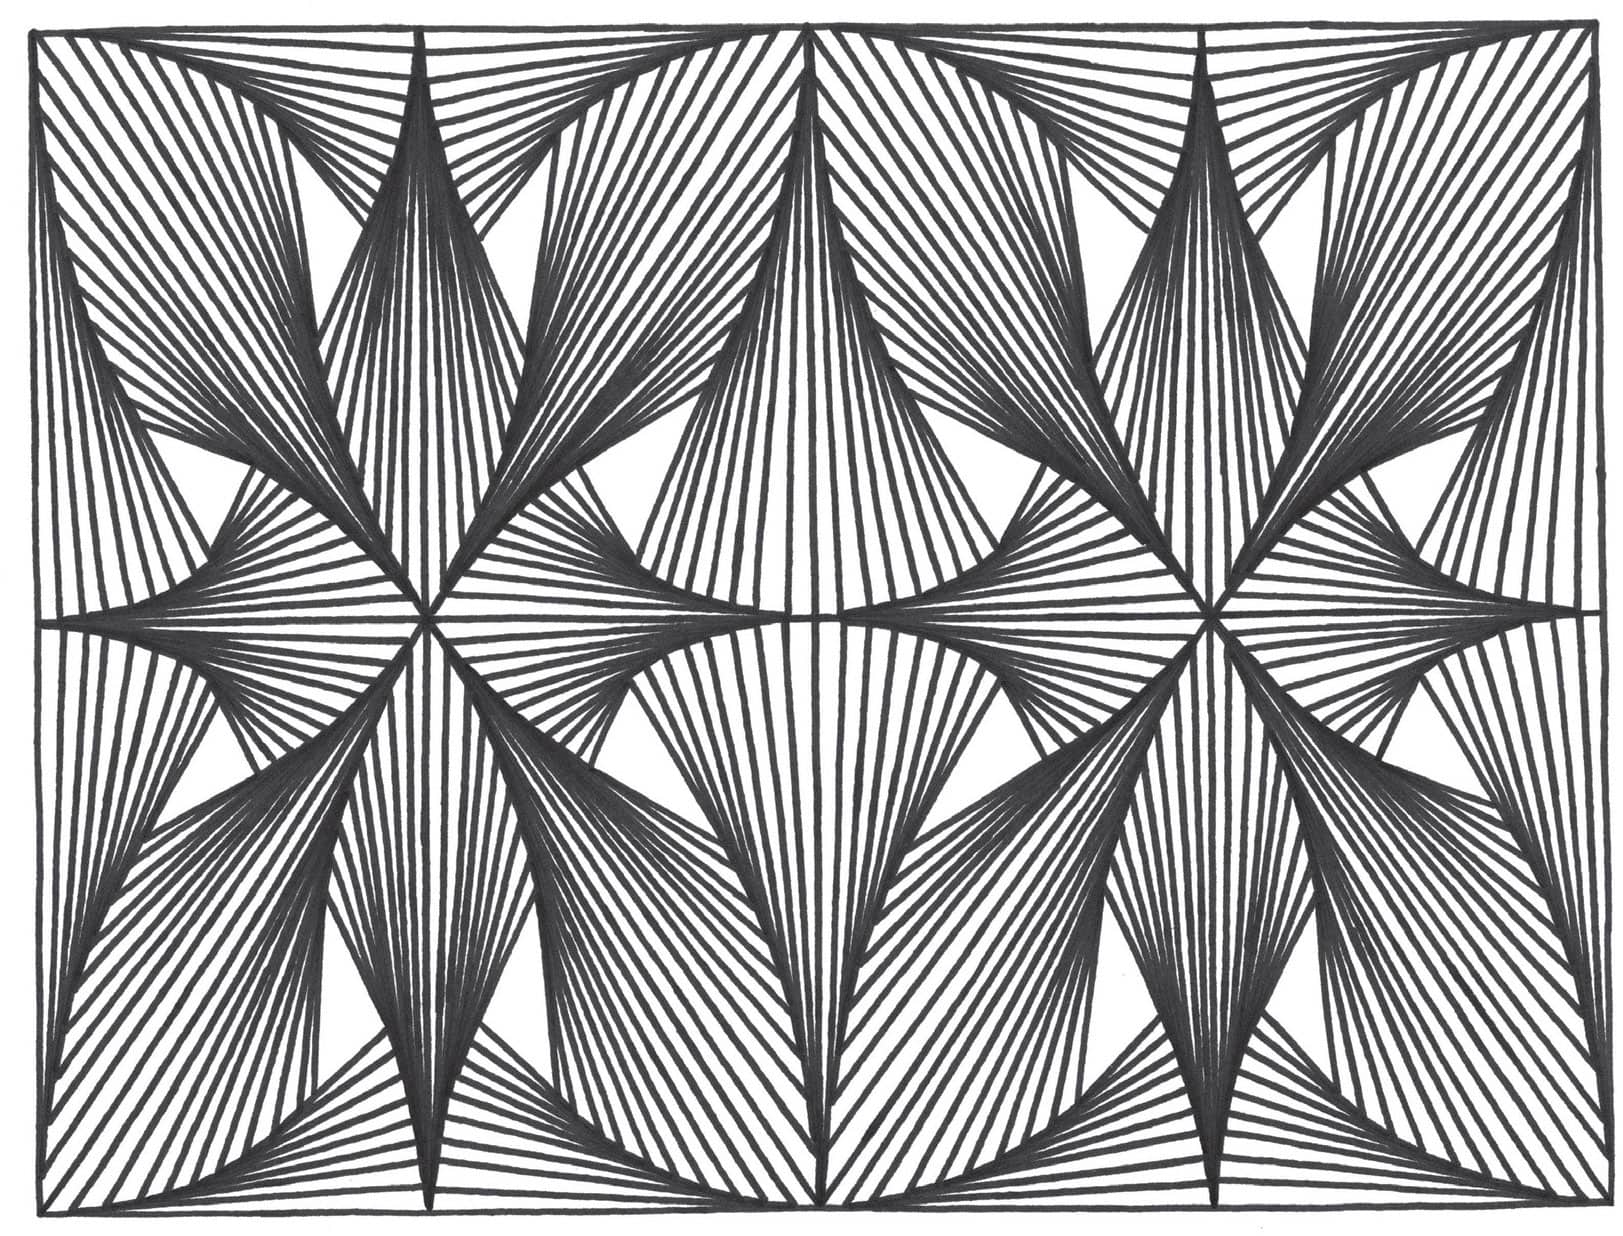
perspective pattern
STEP ONE
Draw a horizontal rectangle.

STEP TWO
Draw three diagonal tapering lines inside each side of the rectangle. Keep the spacing between the lines consistent.

STEP THREE
Draw three more lines on each side inside the lines you just drew but going in the opposite direction.
STEP FOUR
Continue adding lines following the same pattern.

STEP FIVE
You should now begin to see the perspective illusion taking shape.
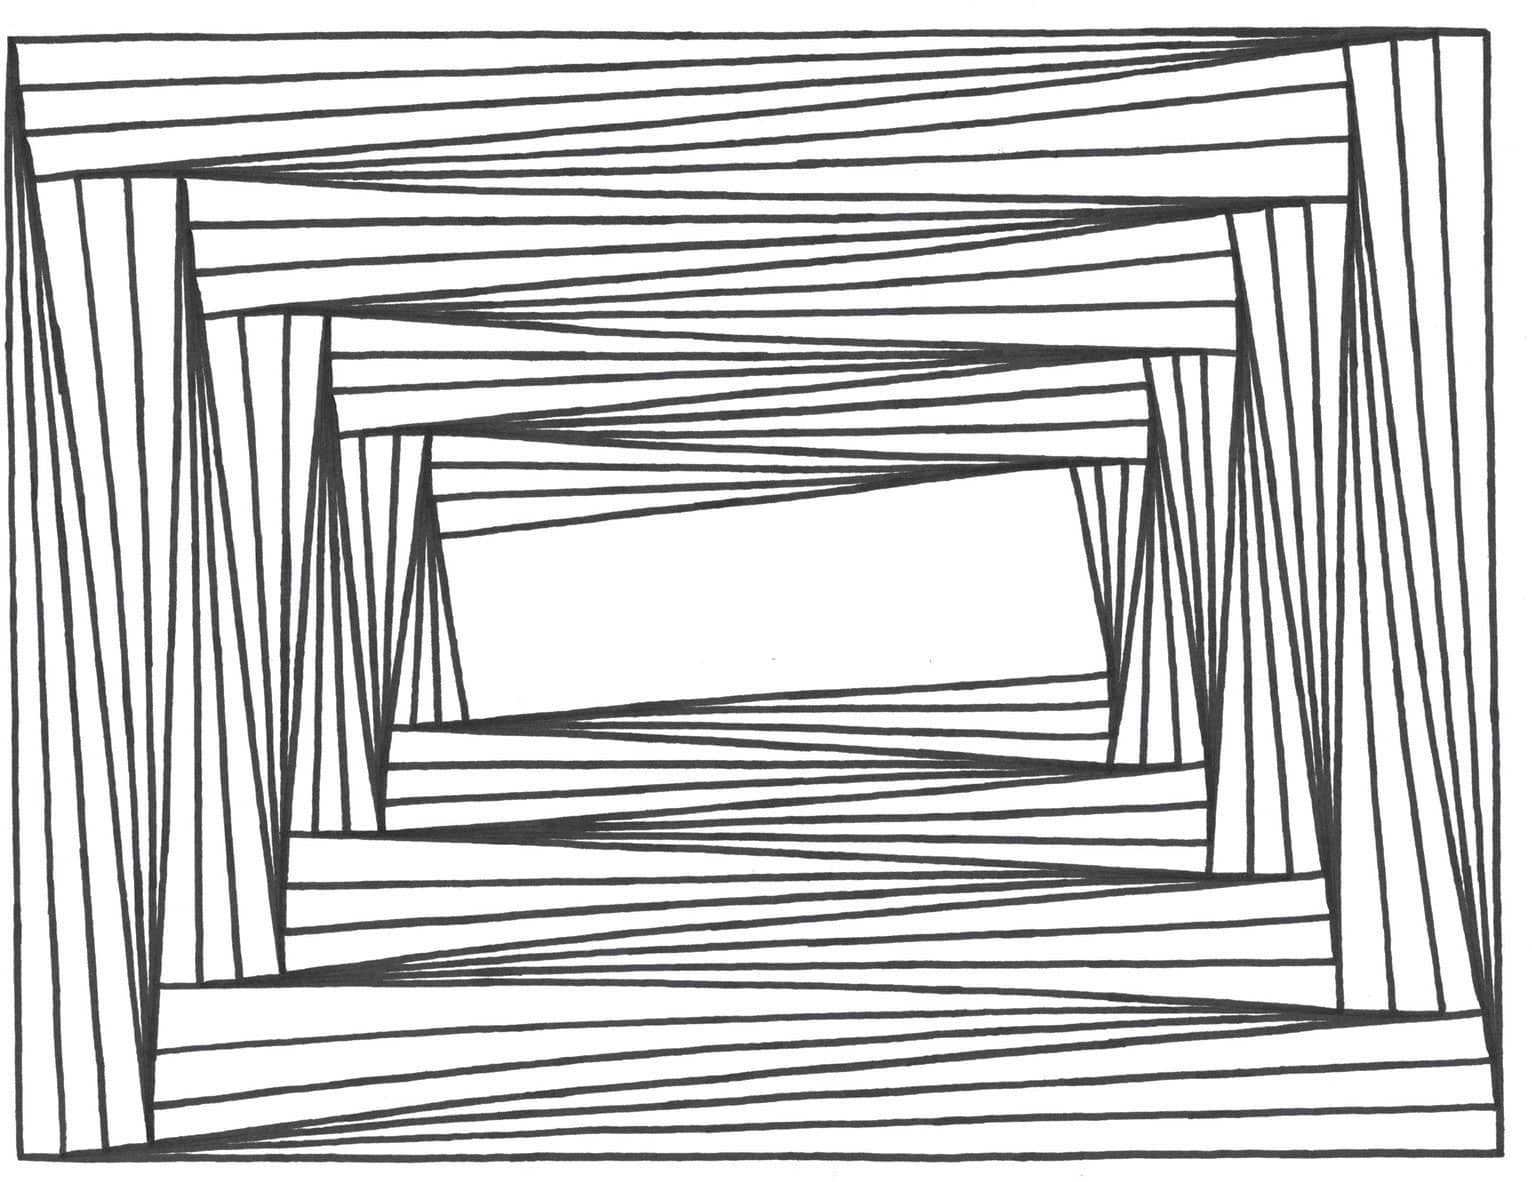
STEP SIX
As you get closer to the center, there may not be room to draw three lines on each side. Don’t worry; just keep adding lines. It will not alter the illusion.

STEP SEVEN
The result is an intricate-looking pattern. Add color if you like!

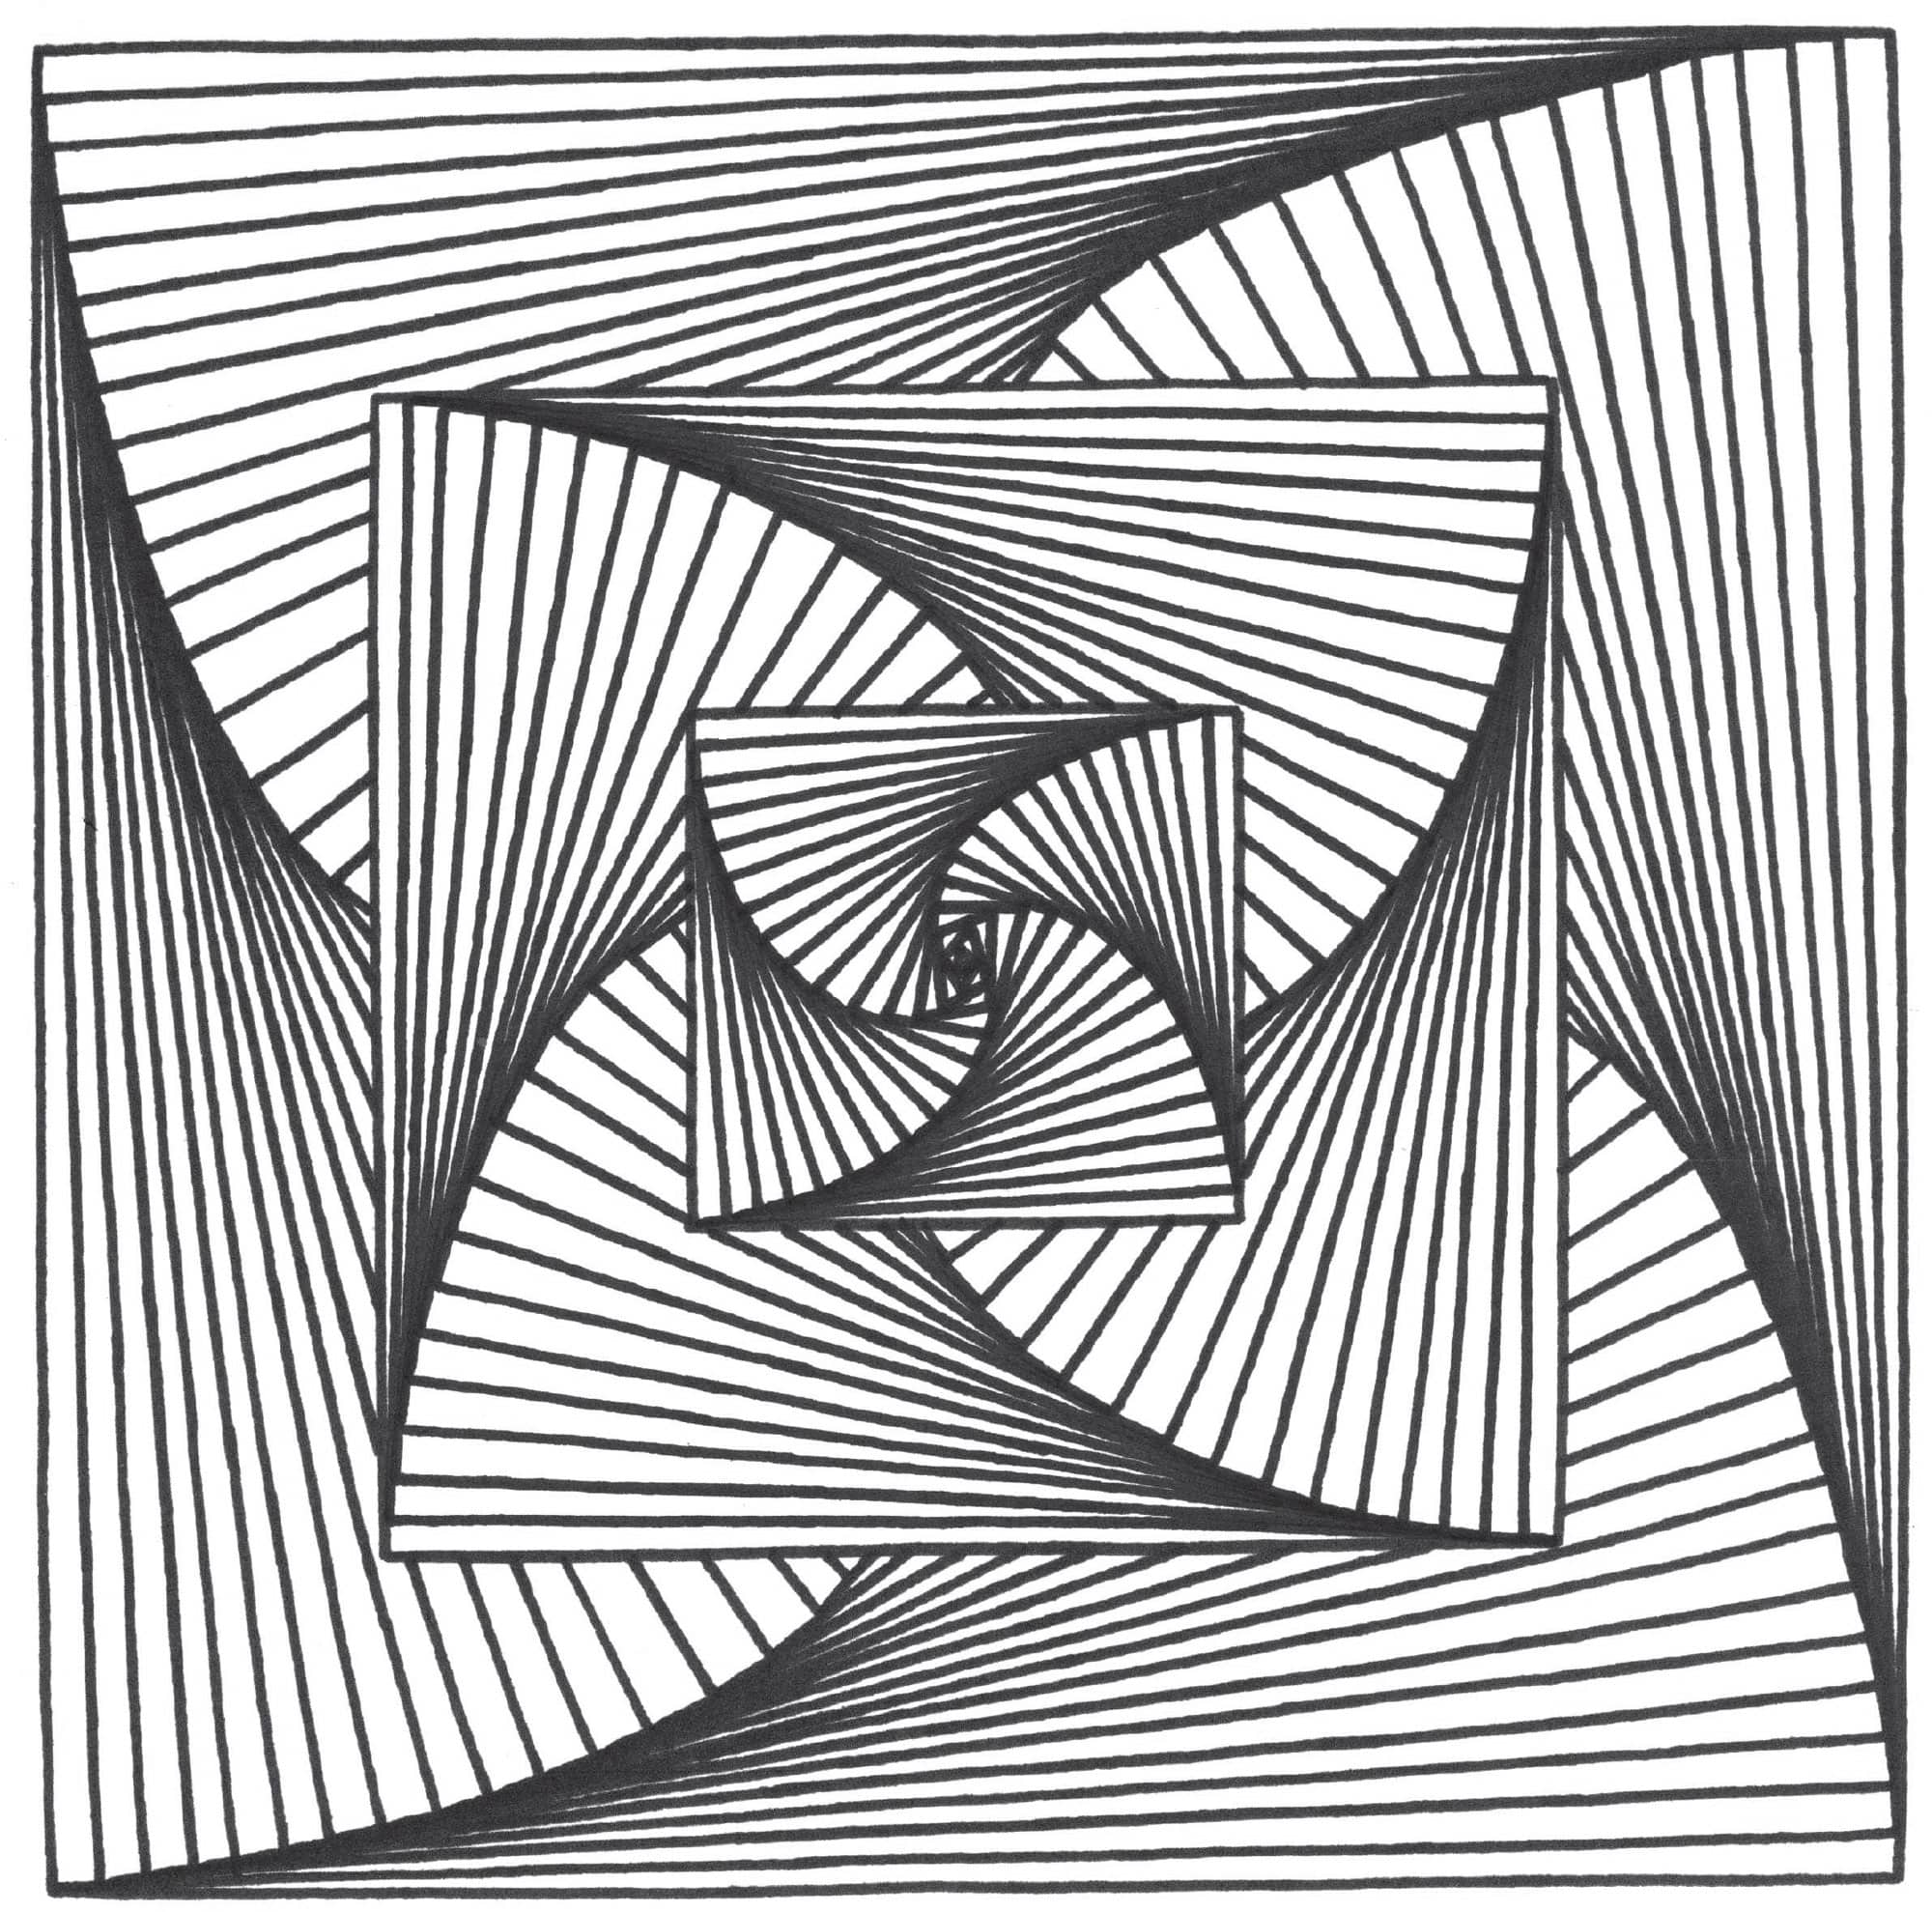
OVERLAPPING SPIRAL PATTERN
STEP ONE
Draw three concentric squares, keeping the spacing between the squares consistent.

STEP TWO
Draw four diagonal tapering lines inside each side of the largest square. Again, keep their spacing consistent.

STEP THREE
Continue creating the spiral pattern. Make sure the lines break around the square.

STEP FOUR
Once you’re done with the outside square, the interior squares should appear to be on top of the spiral pattern!

STEP FIVE
Repeat the spiral-drawing process in the second square, making sure the lines flow in the opposite direction from the previous square.

STEP SIX
Finish the design by drawing a complete spiral pattern inside the center square. Again, make sure the lines flow in the opposite direction from the previous square.
WORMS
STEP ONE
Begin by lightly sketching a square or oblong shape. Then draw two wavy lines from the top-left corner toward the bottom-right corner.
STEP TWO
Draw two more wavy lines from the top-right corner to the bottom-left corner. Make sure one of the worms overlaps the other.

STEP THREE
With a darker pencil or pen, trace over the image and erase all unwanted pencil marks.

STEP FOUR
Draw curves inside one of the worms, ensuring that the curves flow in the same direction as the wavy lines on the outside.

STEP FIVE
Keep drawing curves until the first worm is complete. Now complete the second worm.

STEP SIX
Add a spiral pattern to the space on the left. Make sure the interior lines follow the same direction as the exterior lines.

STEP SEVEN
Keep adding spiral lines to complete the image!


Now add color!
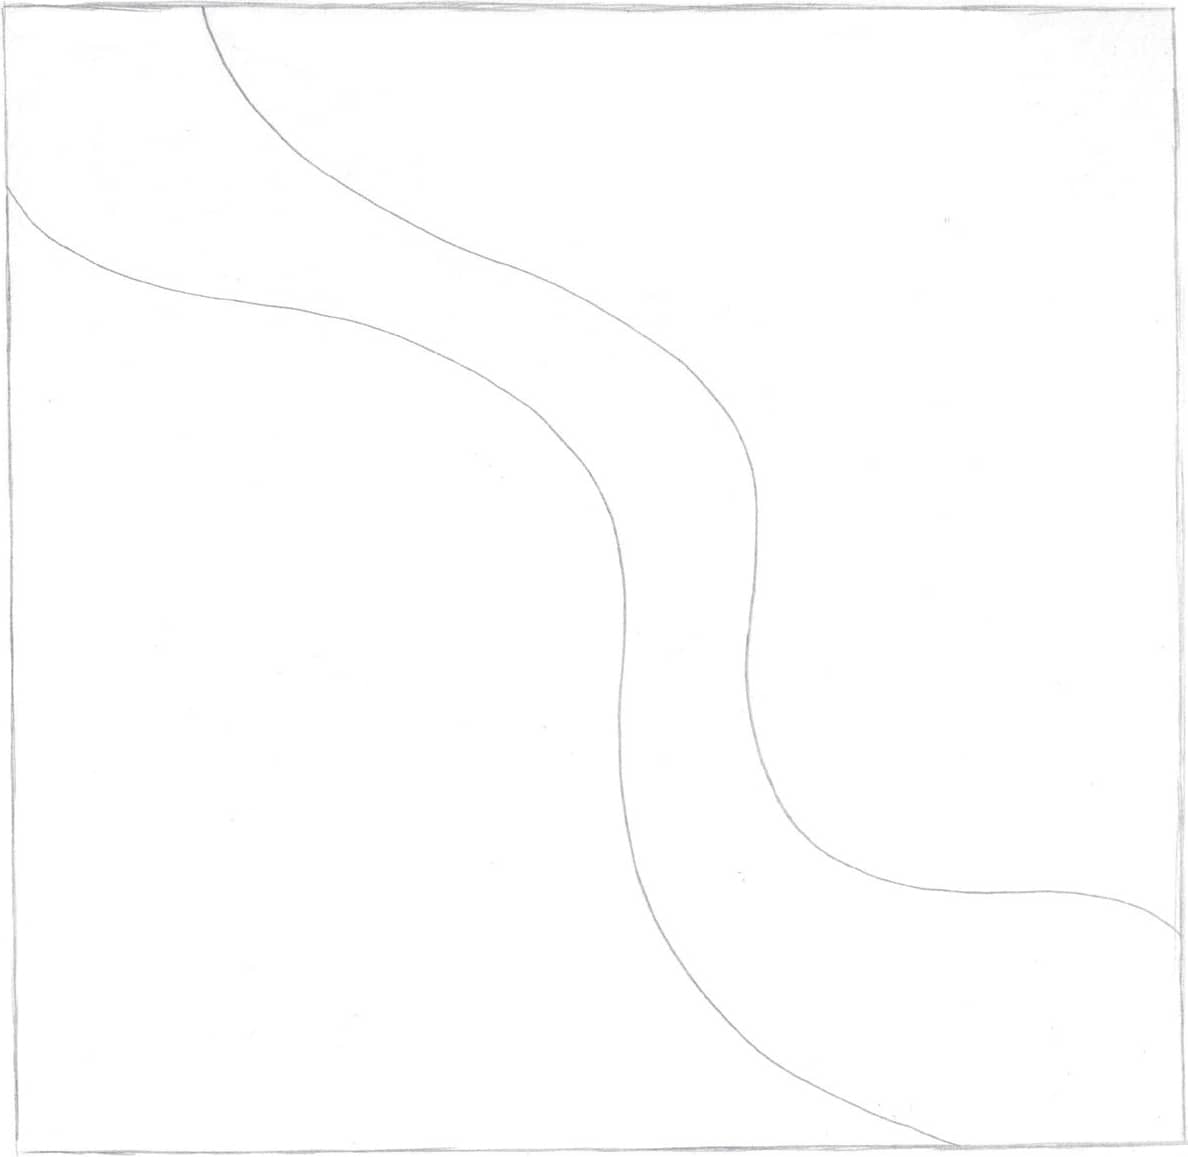
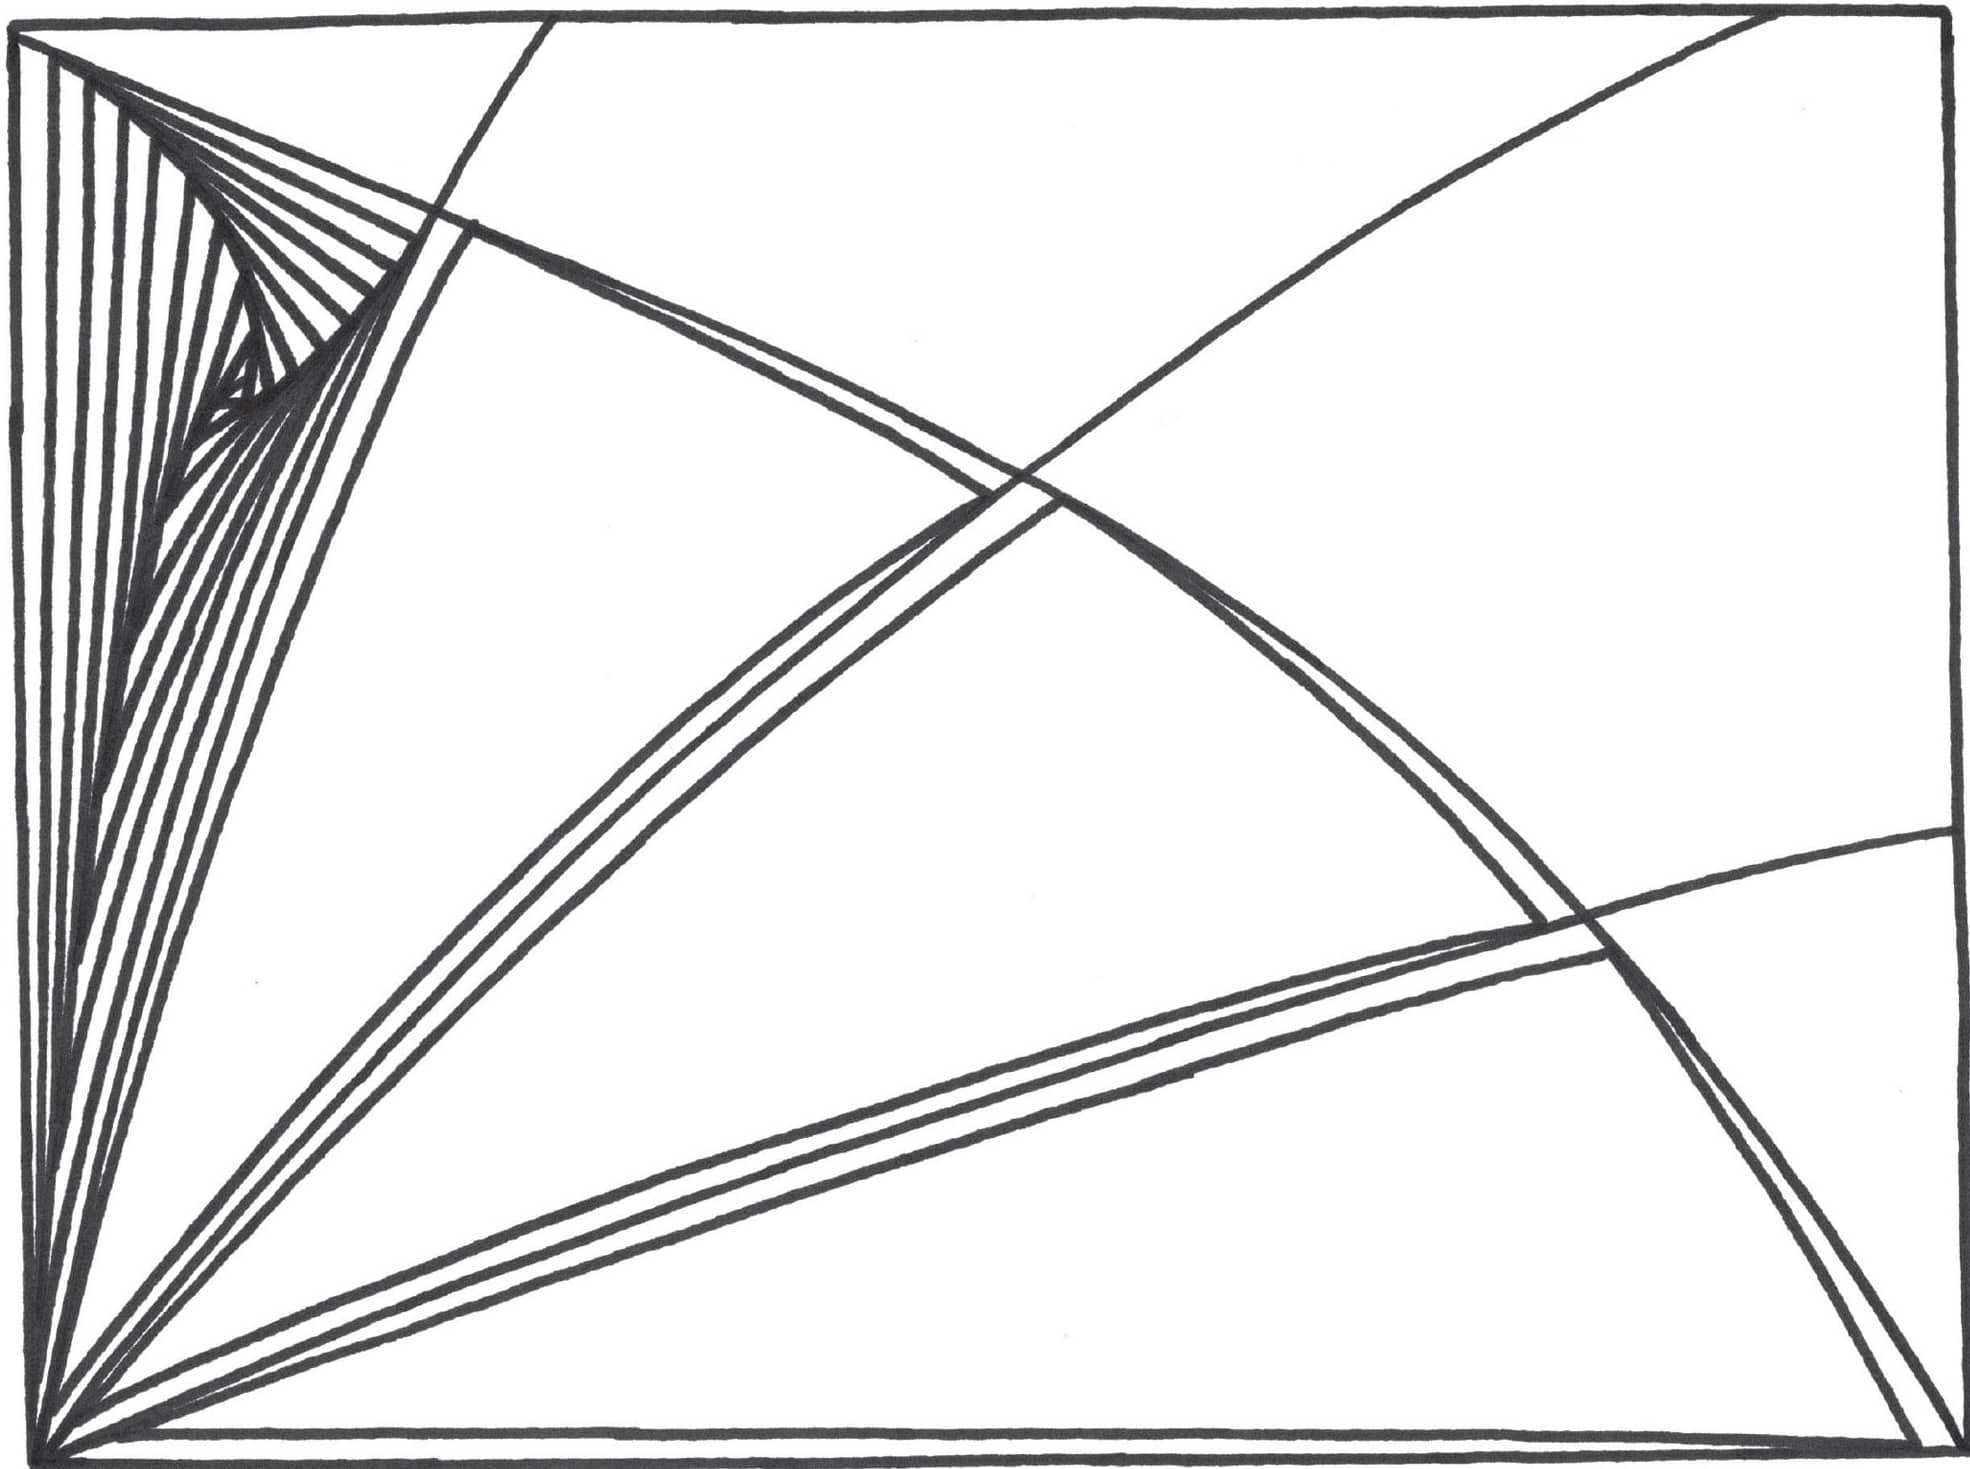
CURVED PATTERN
STEP ONE
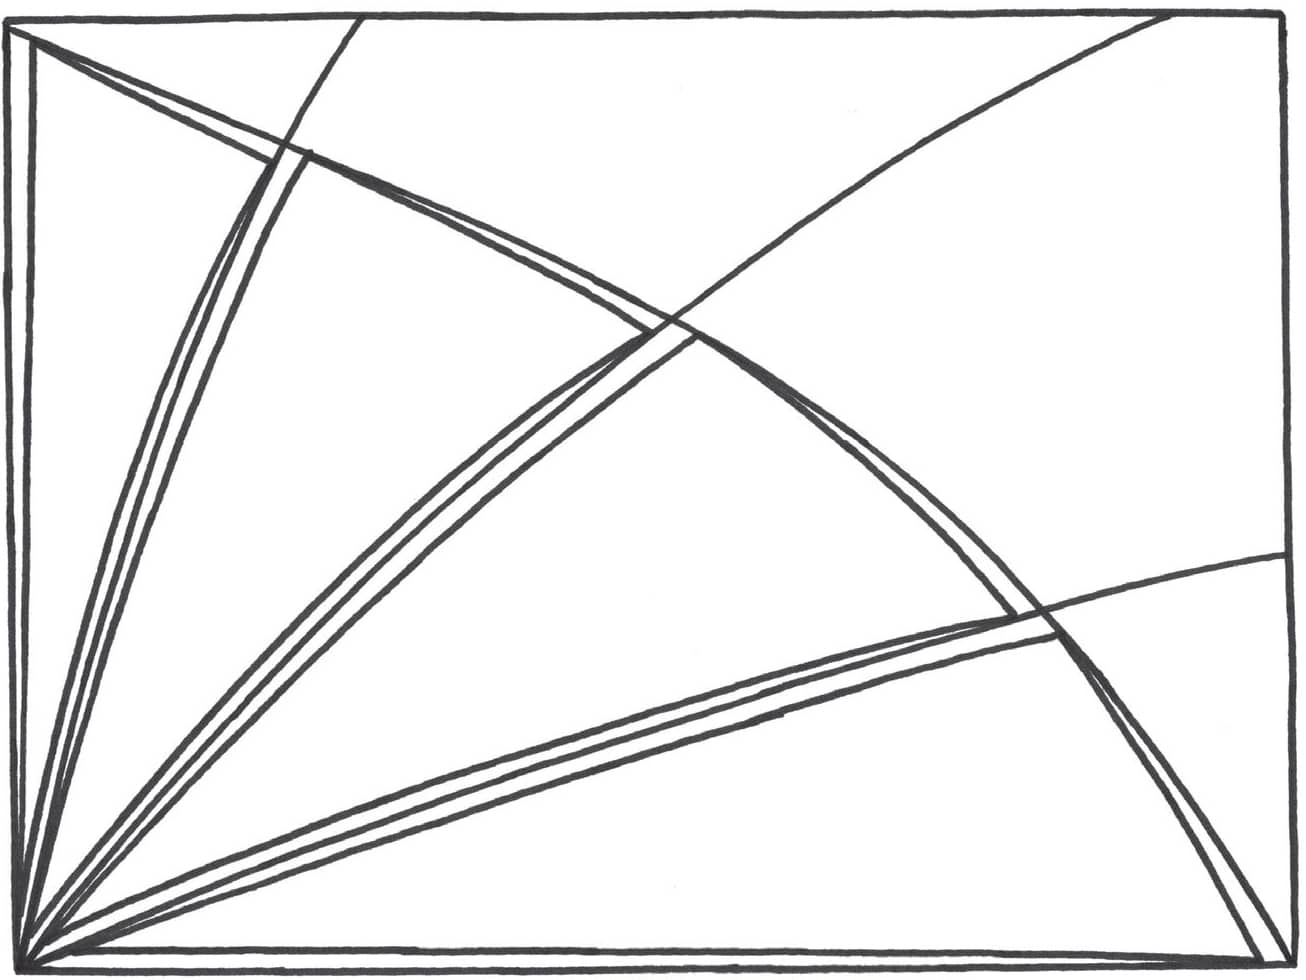
First, draw a rectangle. Then, from the bottom corner, draw three curves across the entire rectangle. Draw a single curved line from the top-left corner to the bottom right.

STEP TWO
In each of the bottom four sections of the rectangle, draw a single tapered line next to one of the existing lines.
STEP THREE
Complete the spiral pattern in one of the sections.
STEP FOUR
Move on to the next section and complete the spiral pattern there.

STEP FIVE
Repeat the same process for the other two sections.

STEP SIX
Continue adding the spiral pattern in the remaining sections. Make sure the lines flow in the same direction as the ones on the other side of the corner-to-corner curve.

STEP SEVEN
Repeat the same process in the last two sections.


Now add color!
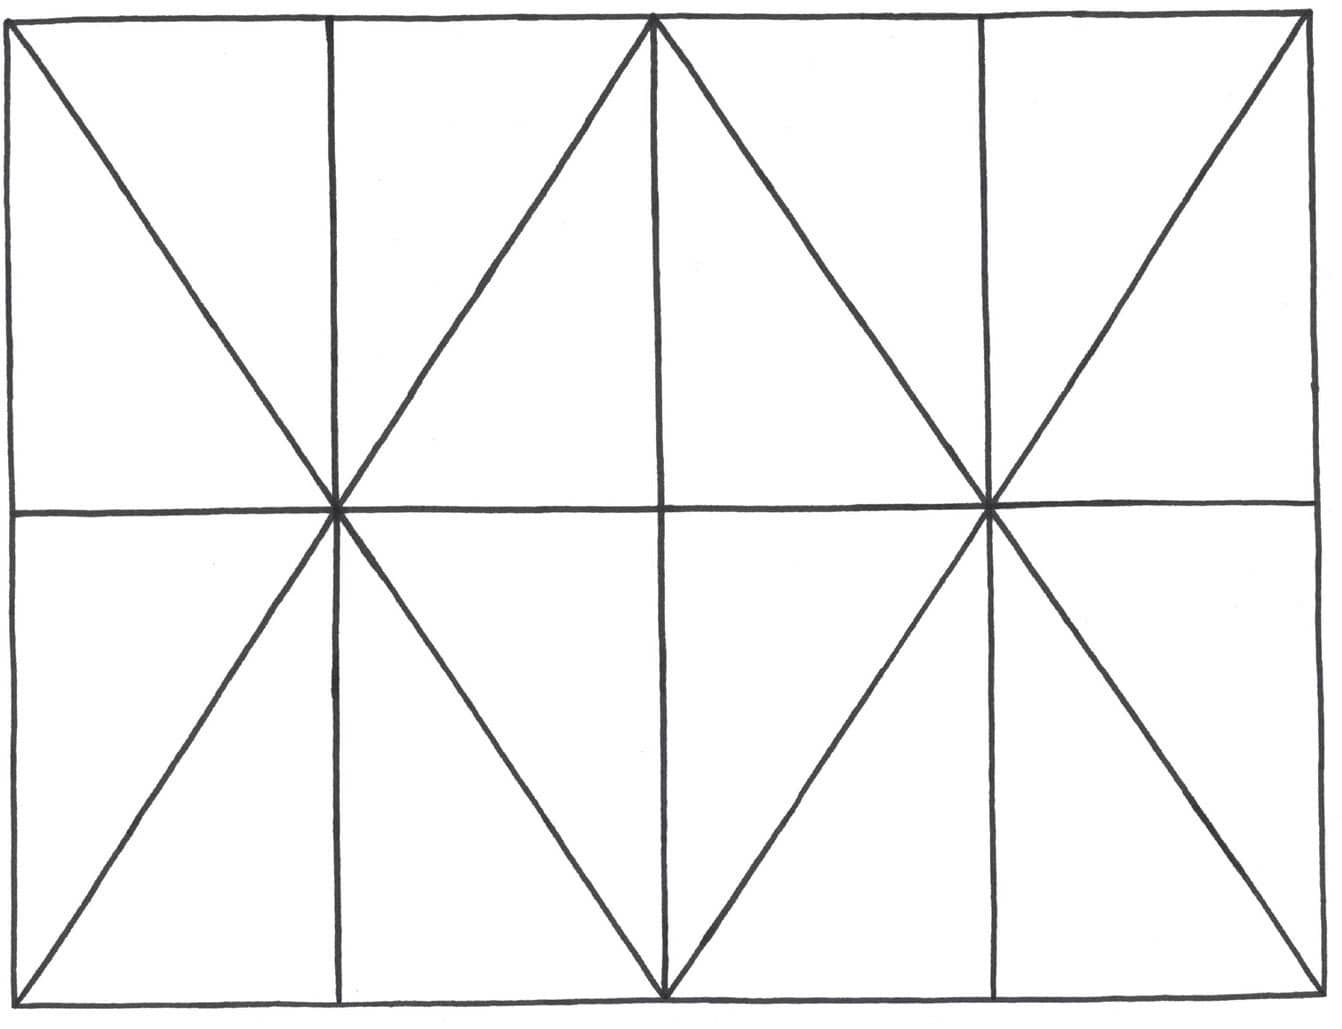
CROSS PERSPECTIVE PATTERN
STEP ONE
Start by drawing a rectangle. Then draw a horizontal line and a vertical line through the center and two diagonal lines from corner to corner.

STEP TWO
Begin the spiral pattern in one of the eight sections by drawing four lines on each side. Keep the spacing consistent.
STEP THREE
Draw four more lines on each side. This time, however, taper them in the opposite direction.

STEP FOUR
Draw four more lines in the opposite direction. Move to the next section and start by drawing lines that mirror the ones in the first section.

STEP FIVE
Repeat these steps in every section.

STEP six
Draw four more lines on each side of each section, tapering them in the opposite direction.

STEP SEVEN
Finish the design by drawing four more lines in the opposite direction.

Now add color!
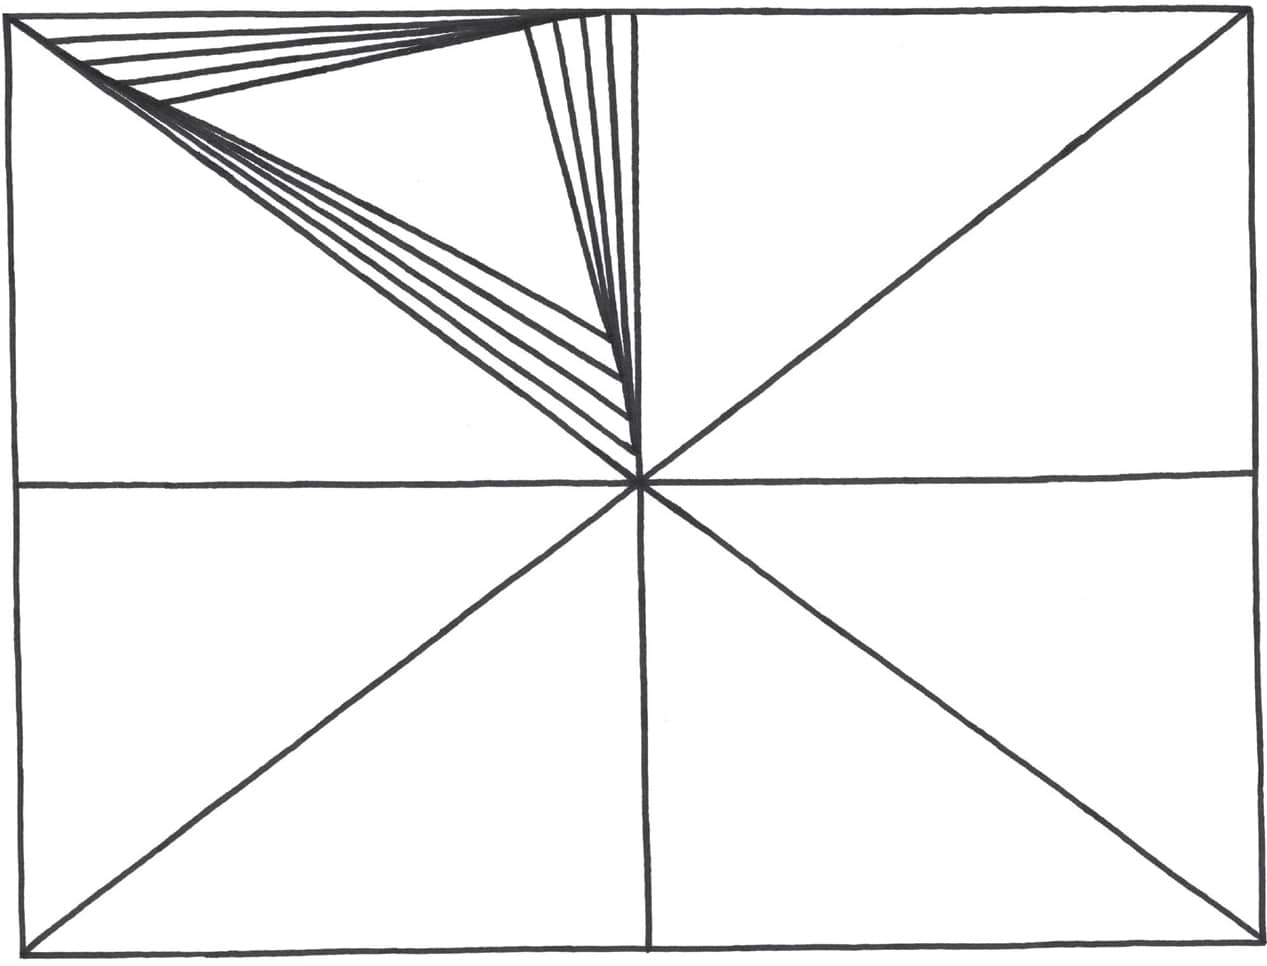
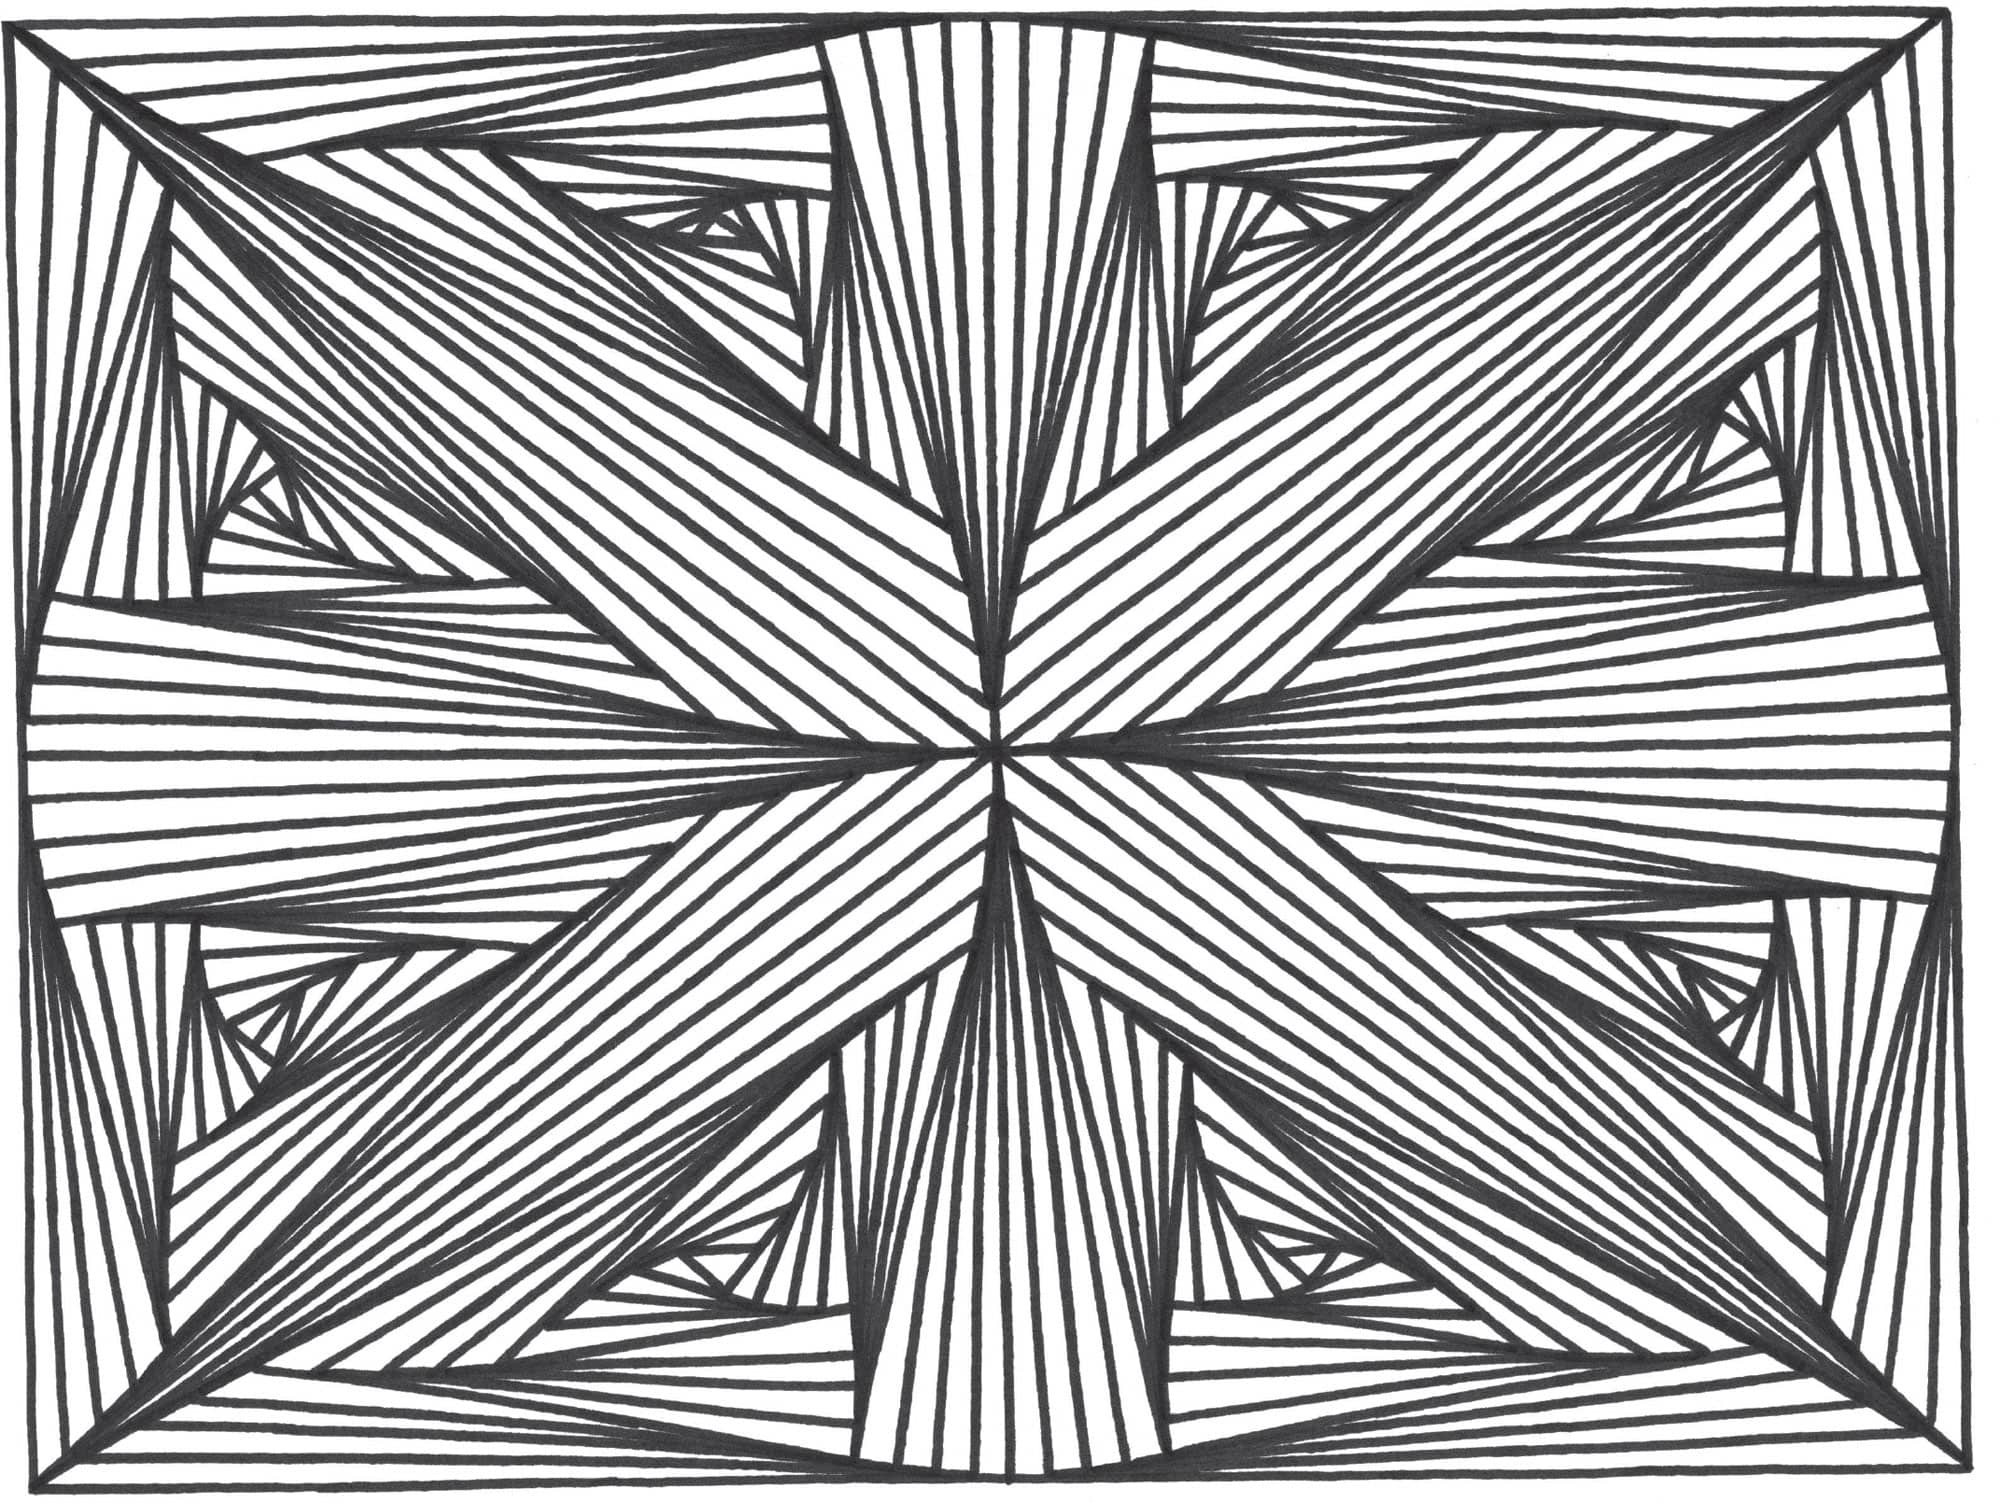
SYMMETRICAL PATTERN
STEP ONE
Start by drawing a rectangle with a horizontal line and a vertical line through the center. Draw an “X” through each section, with a vertical line down the center.
STEP TWO
Begin creating the spiral pattern by drawing tapered lines inside each shape.

STEP THREE
Repeat the same process on the right side.

STEP FOUR
Add tapered lines throughout the entire pattern.

STEP FIVE
Continue adding lines, ensuring that the spacing is consistent to keep the design symmetrical.

STEP SIX
To add to the spiral effect, continue adding lines, but keep some white space in the design.

STEP SEVEN
If your triangular white spaces are different sizes, keep adding lines until they look consistent.

Now add color!
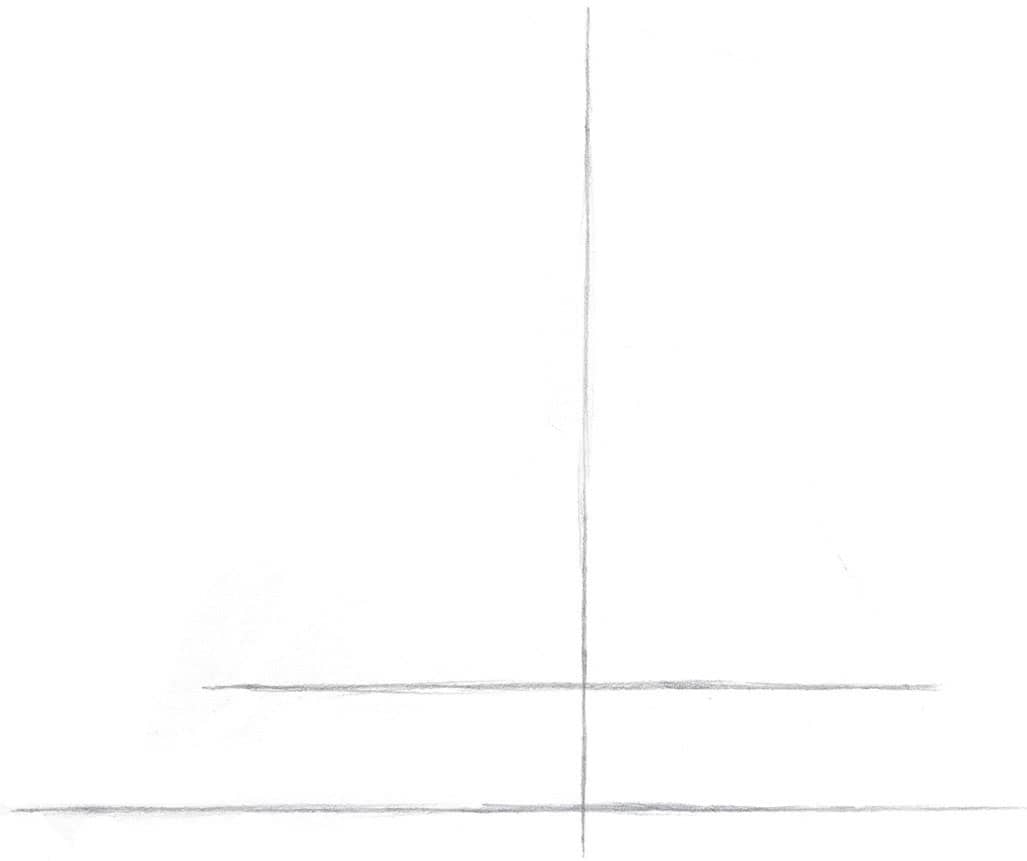
SAILBOAT
STEP ONE
Sketch a vertical line and then two horizontal lines across the bottom, making the top horizontal line slightly shorter than the bottom.
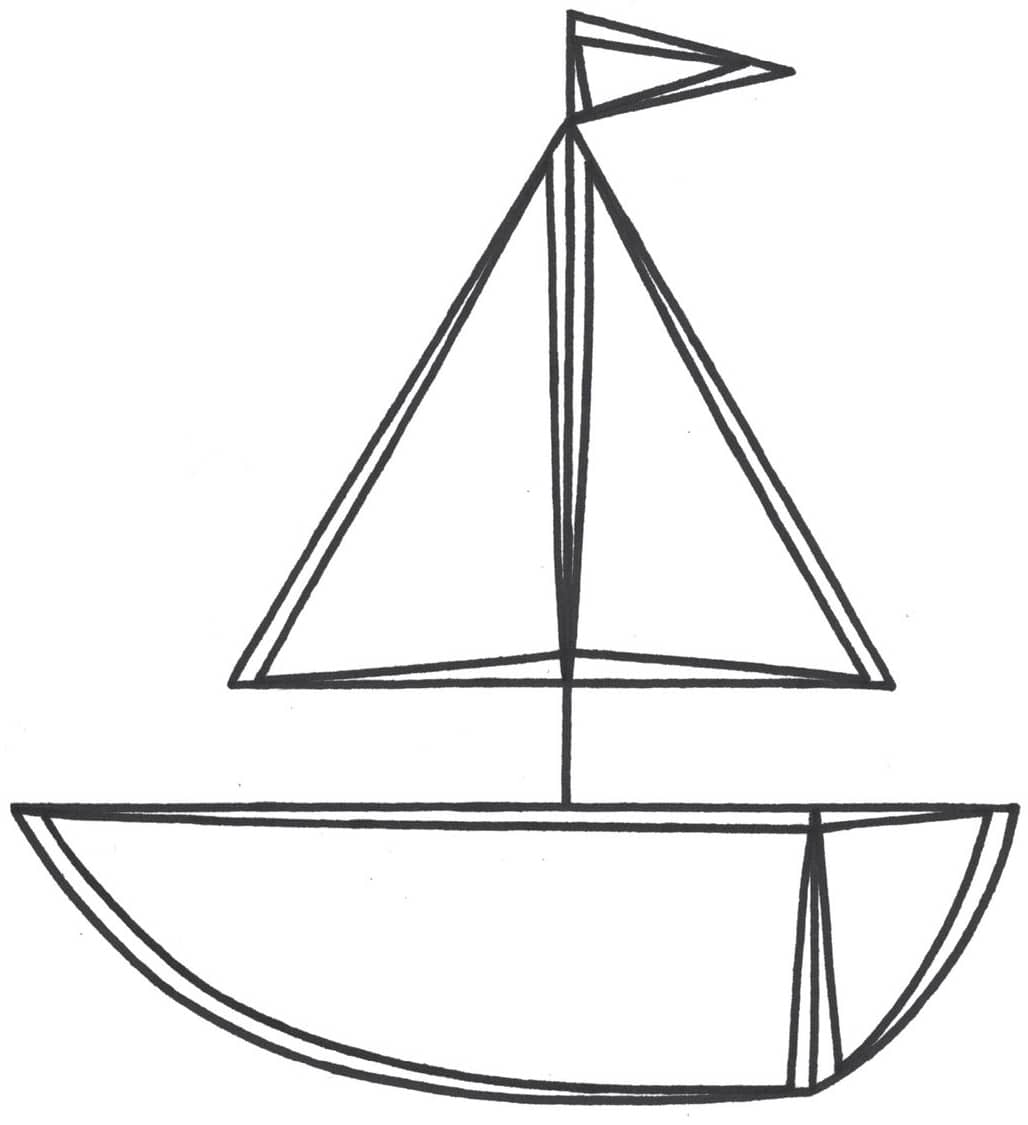
STEP TWO
Draw two diagonal lines from the top of the vertical line to the ends of the shorter horizontal line. Draw a small flag at the top of the sail and add a simple boat shape below the longer horizontal line.

STEP THREE
Use a darker pencil or a pen to trace over your image, and then erase any pencil marks.

STEP FOUR
Draw tapered lines inside the image, along each side of the sailboat.
STEP FIVE
Continue adding lines inside one side of the sail.

STEP SIX
Add lines inside the other half of the sail. Make the two sides symmetrical.

STEP SEVEN
Add lines to the boat to complete the image.

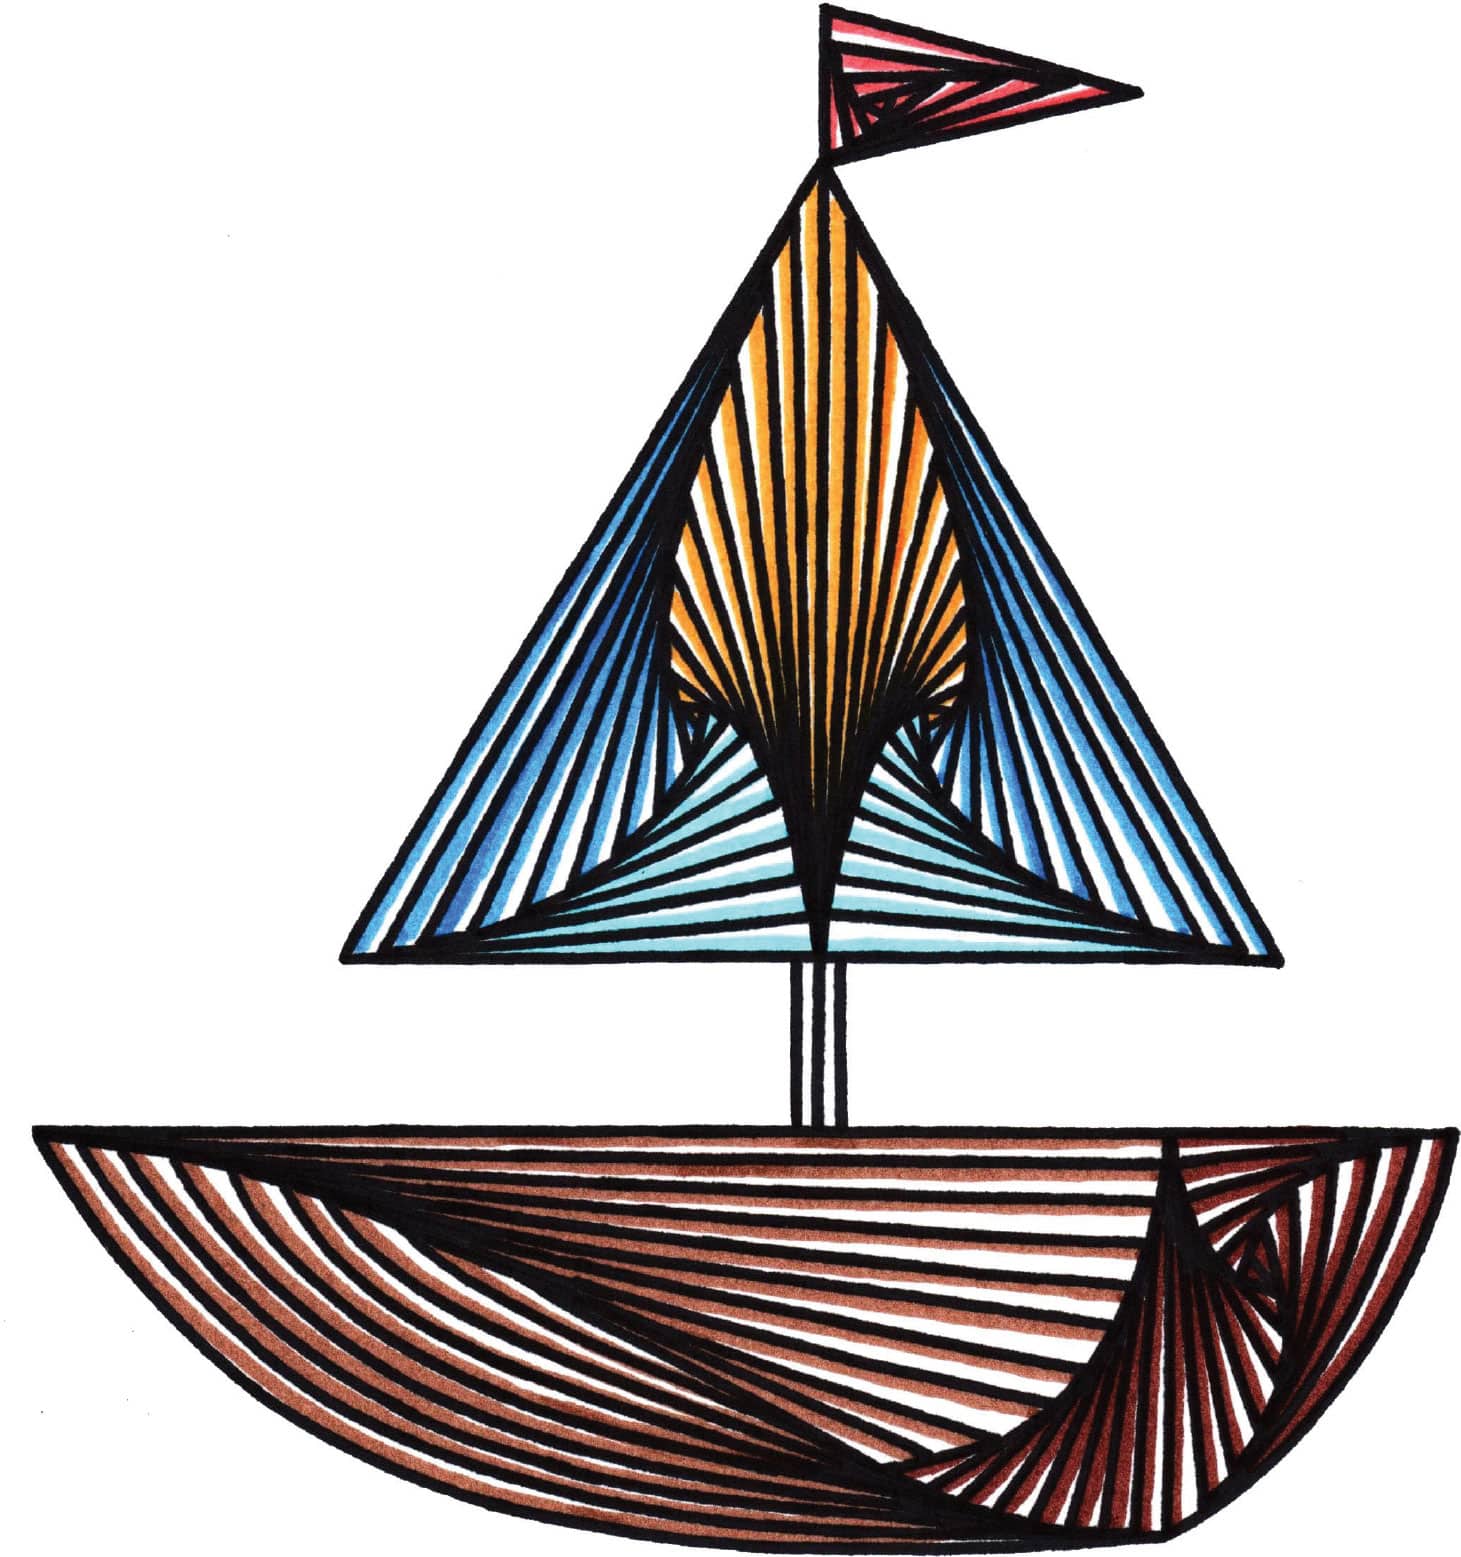
Now add color!
TREE
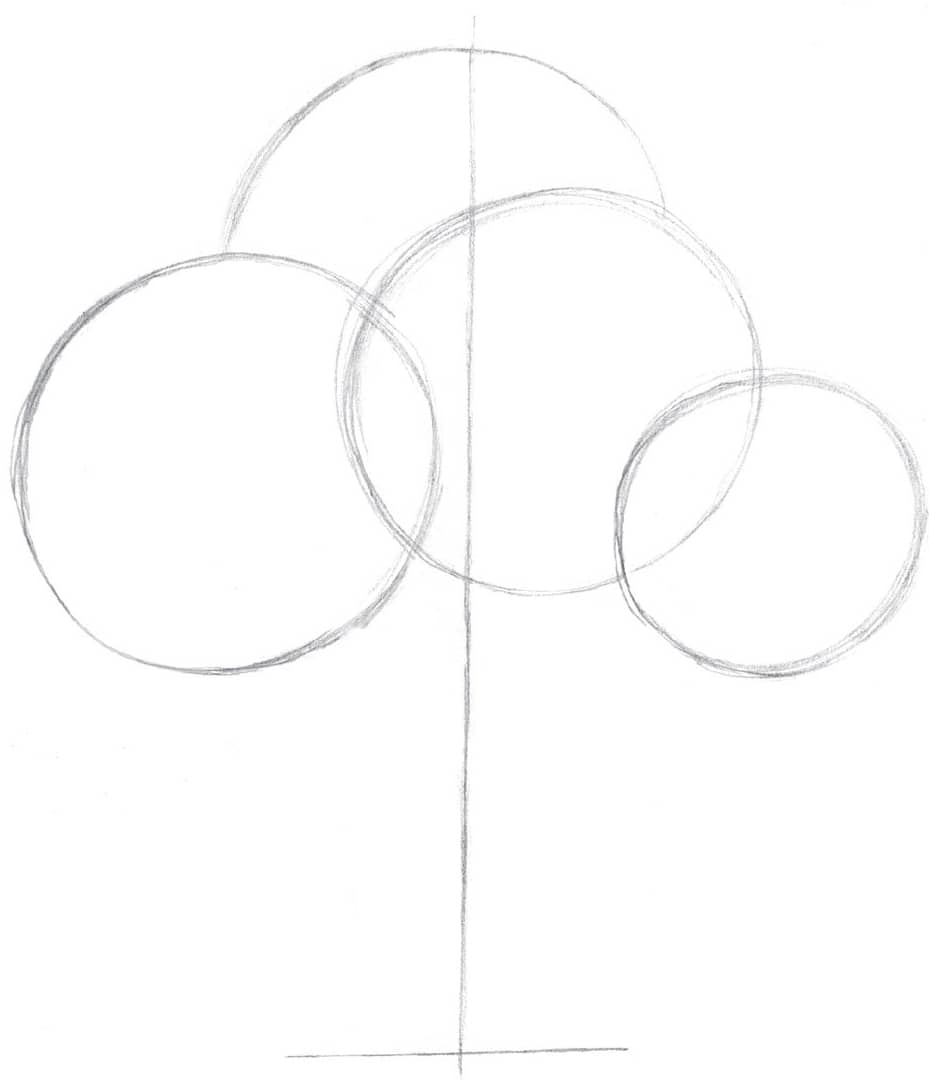
STEP ONE
Sketch a long vertical line and a shorter horizontal line across the bottom; then draw three circles and one semicircle. Don’t worry if the circles overlap; just make sure they’re all different sizes.
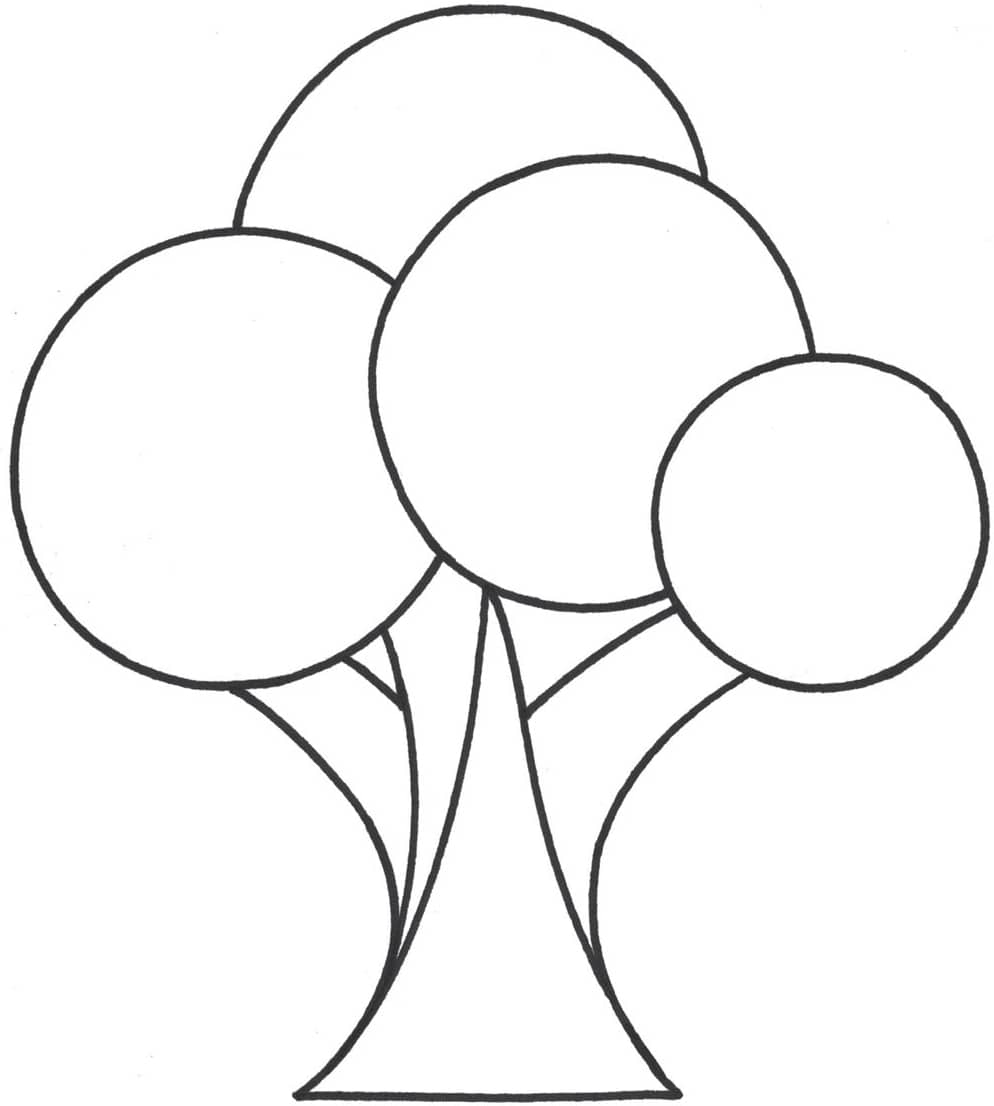
STEP TWO
Add the tree trunk; then break up the trunk into four sections using three curved lines, as shown here.

STEP THREE
Trace over the image with a darker pencil or pen and erase all unwanted pencil marks.
STEP FOUR
Draw curved lines inside the circles. (If you prefer, you can mark small guidelines to help with this step.)
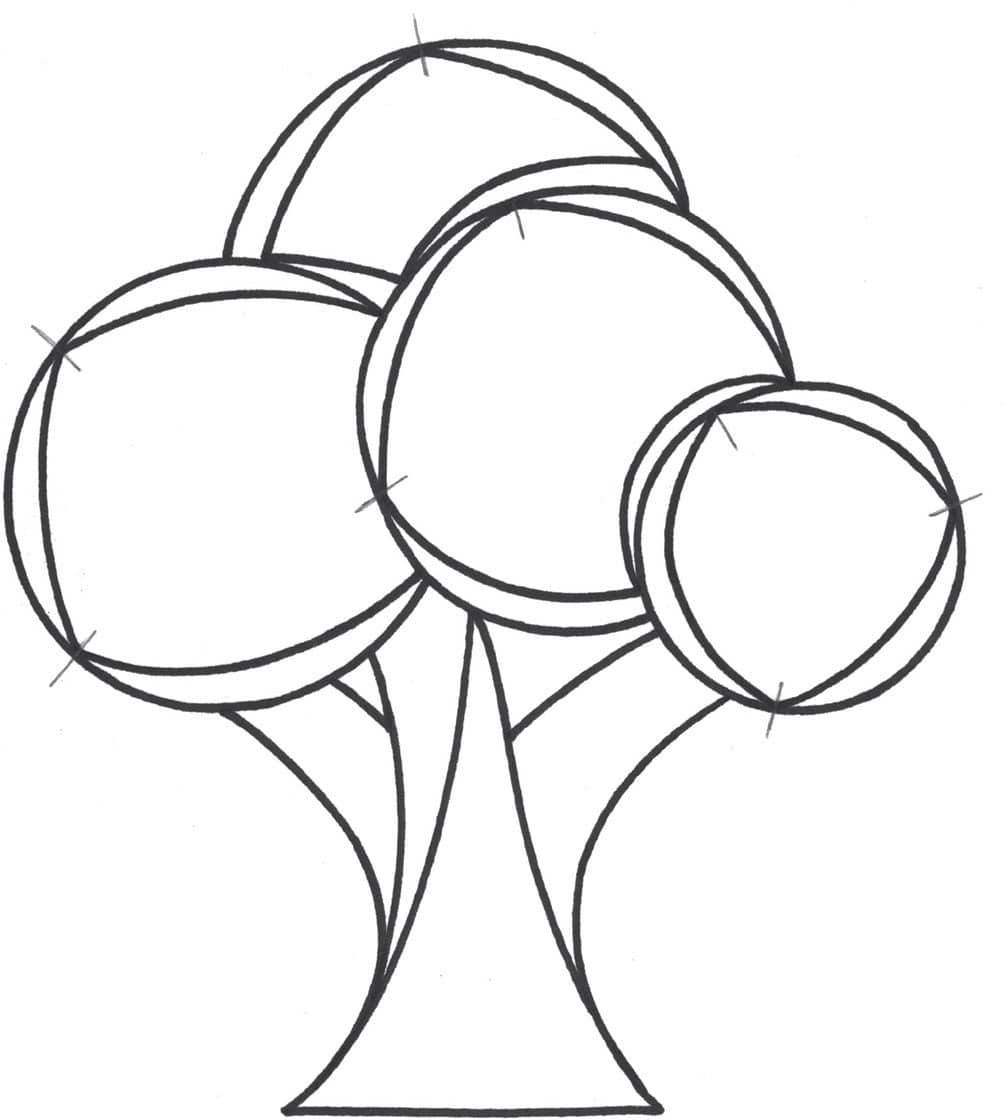
STEP FIVE
Continue adding lines and watch the spiral effect form.

STEP SIX
Draw tapered lines inside the trunk.
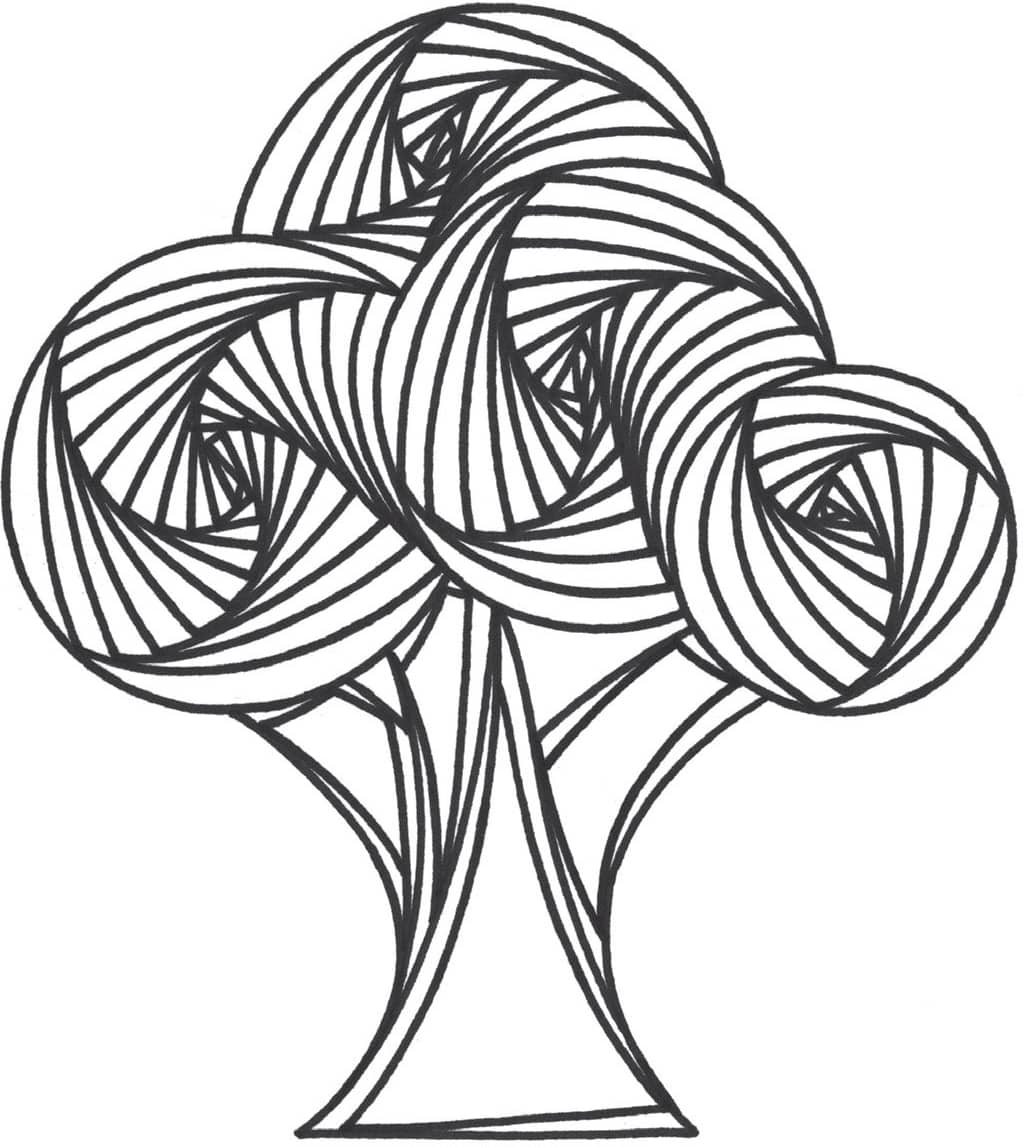
STEP SEVEN
Continue adding lines until you complete the image.


Now add color!
CUPCAKE
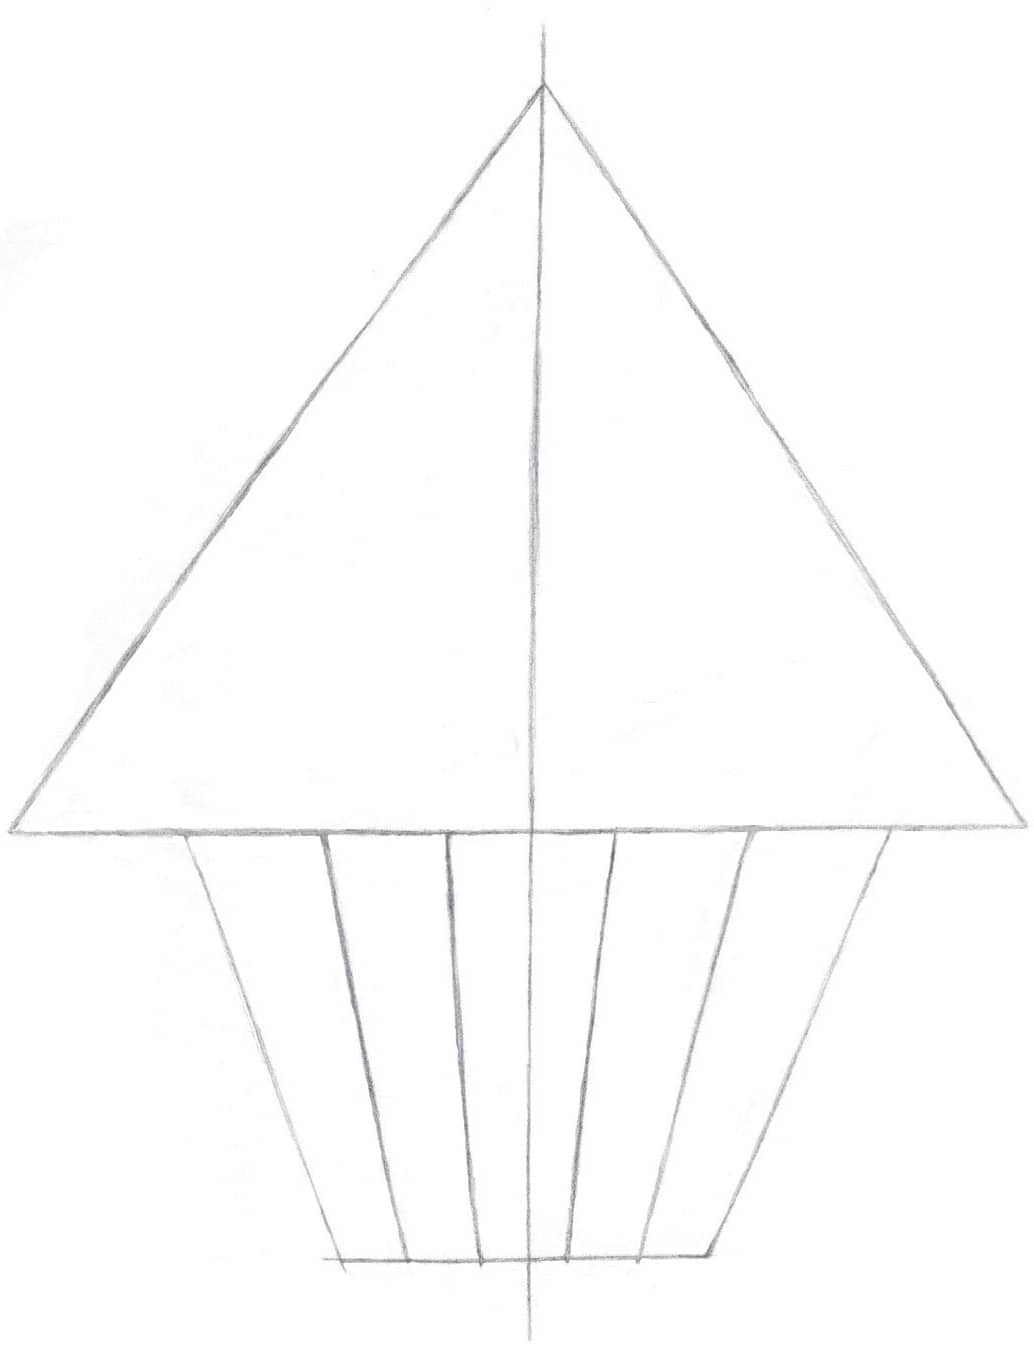
STEP ONE
With a graphite pencil, lightly sketch a vertical line and two horizontal lines, as shown here.

STEP TWO
Add diagonal lines to connect the horizontal and vertical lines.

STEP THREE
Draw two diagonal lines in the bottom portion of the image to create five columns.
STEP FOUR
Add curved lines at the bottom of each column, as well as two curves of different sizes at the top of the columns.
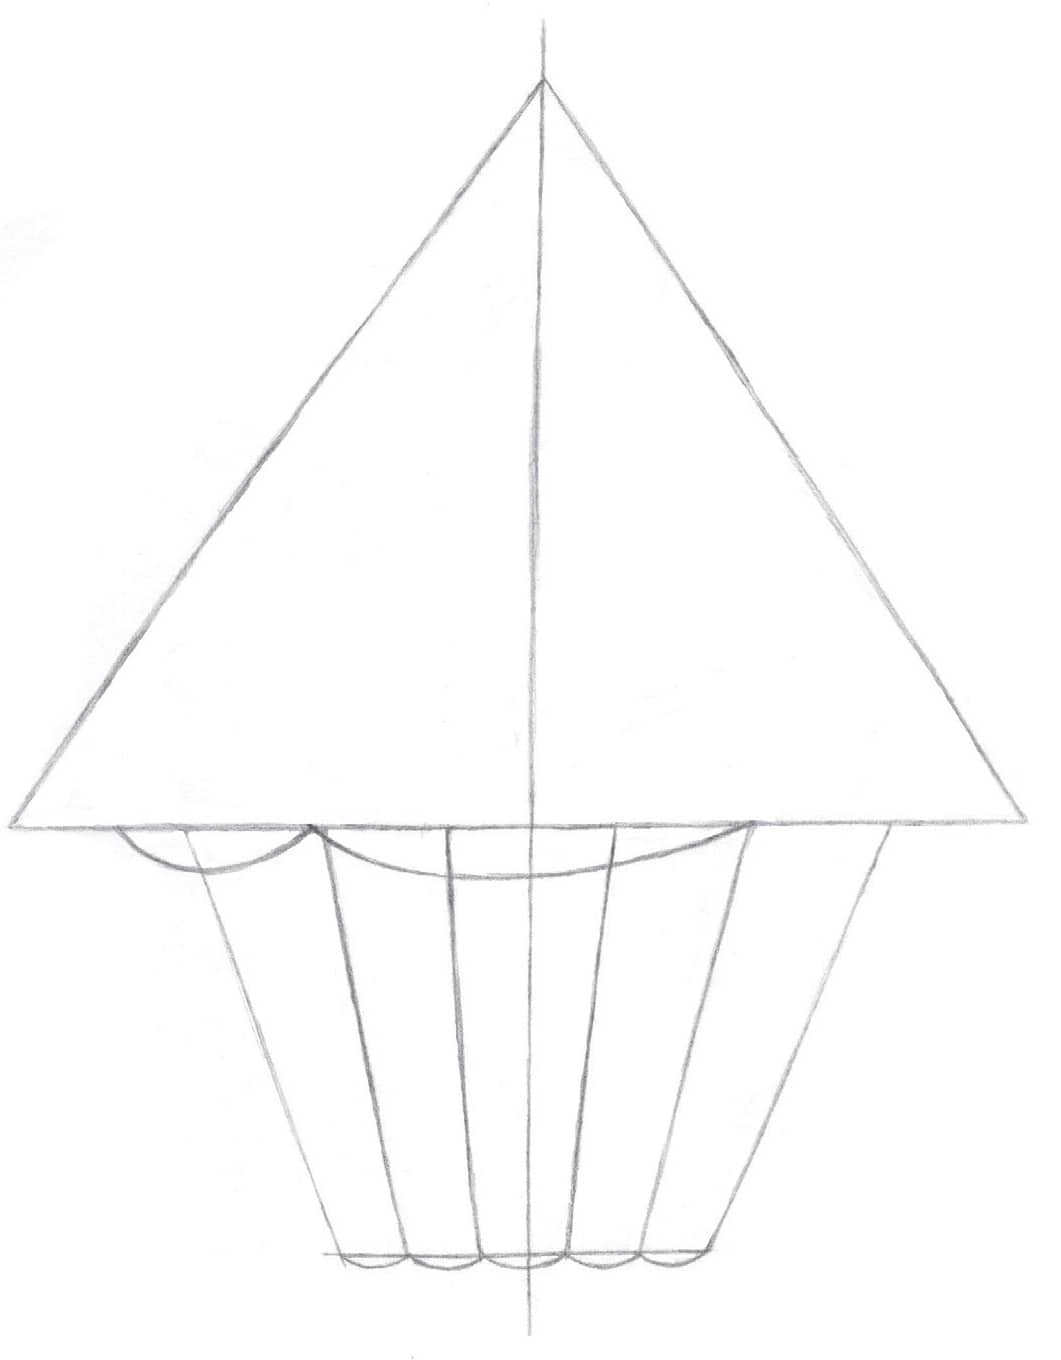
STEP FIVE
Add “S” shapes to complete the top portion of the image.
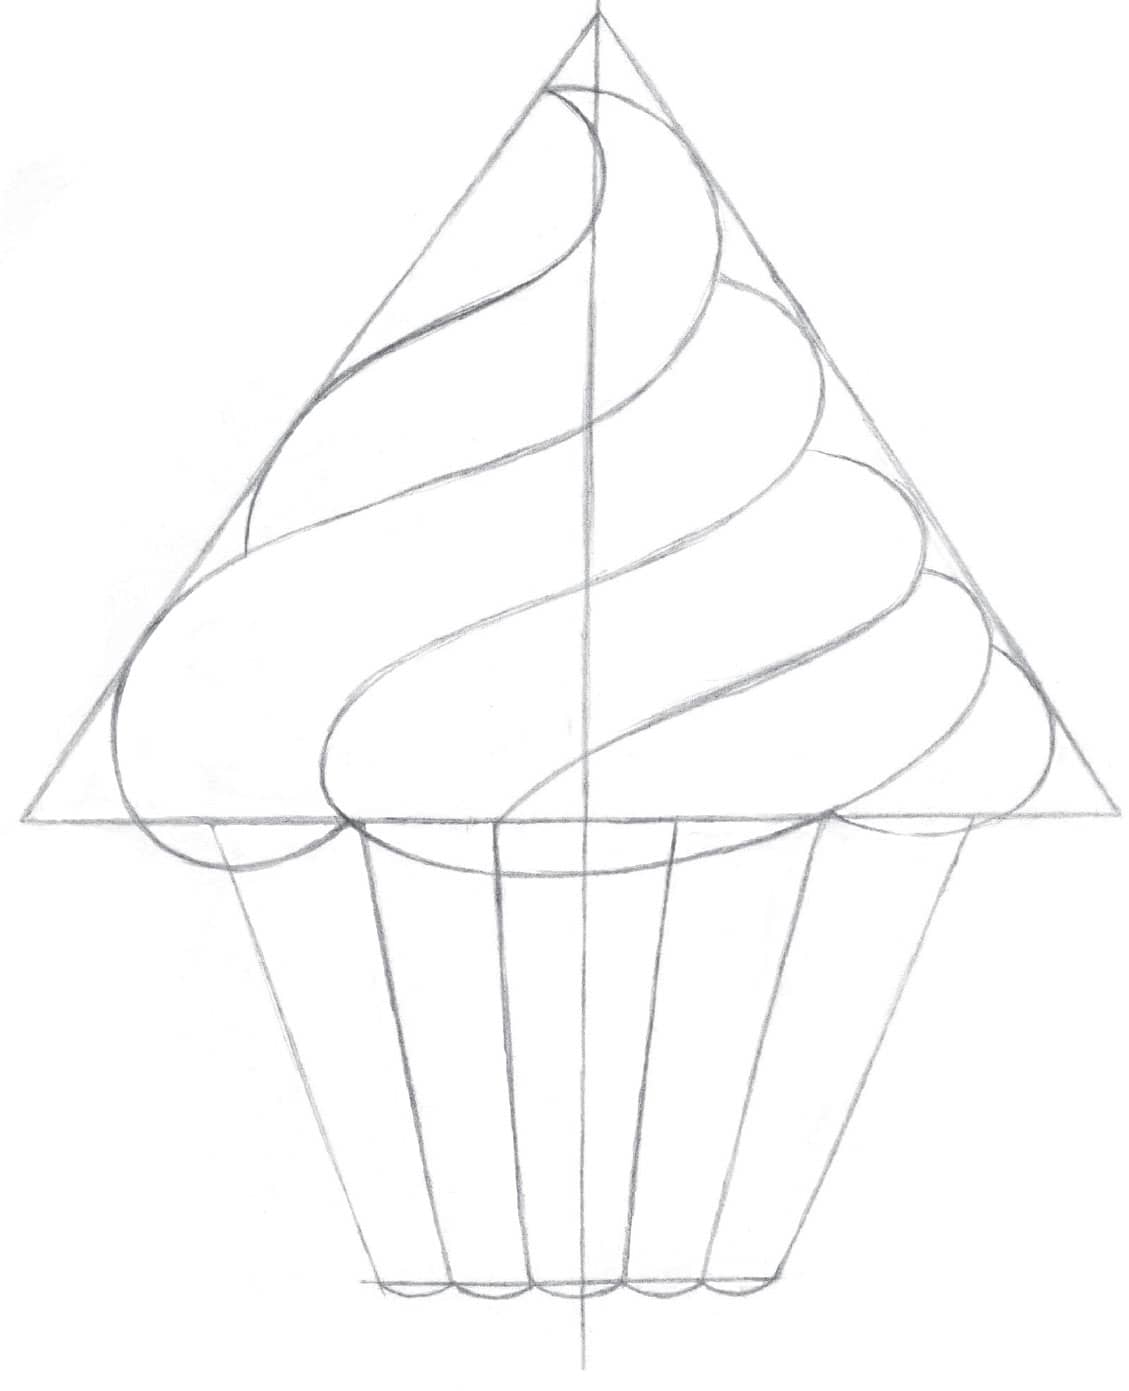
STEP SIX
Trace over the pencil lines with a darker pencil or pen and erase the pencil marks.

STEP SEVEN
Fill the left column with curved lines.

STEP EIGHT
Repeat the same curved lines in the four remaining columns.

STEP NINE
Draw lines inside the top portion of the image, as shown here.

STEP TEN
Continue adding lines until you’ve completed the pattern, ensuring that each interior line follows the same direction as the outside ones.

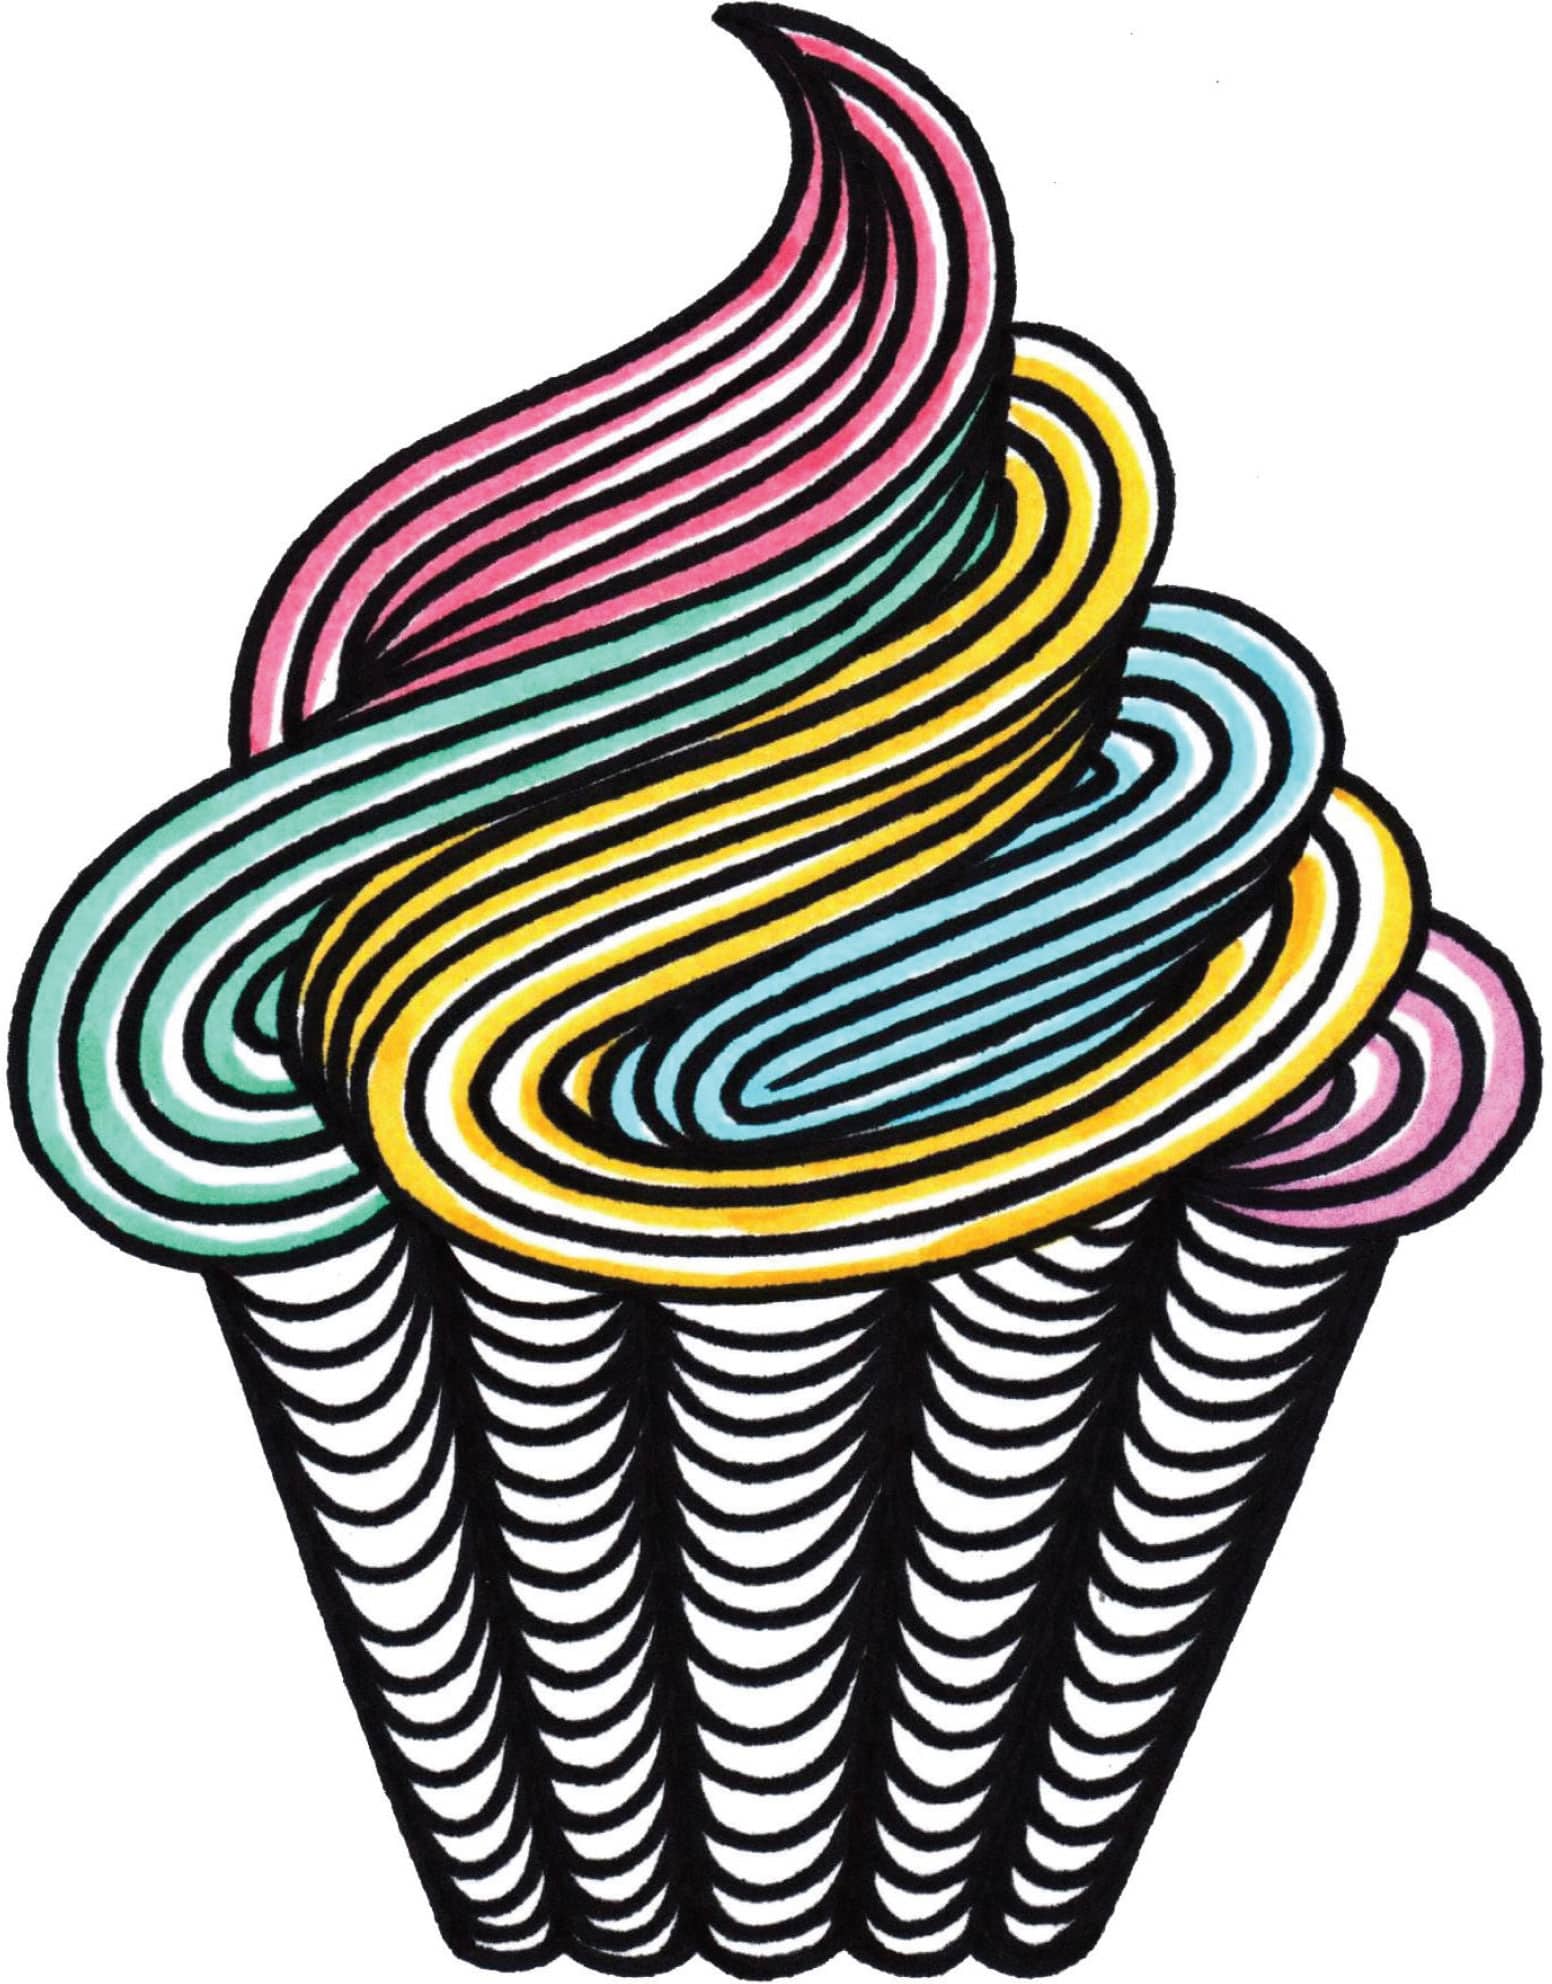
Now add color!
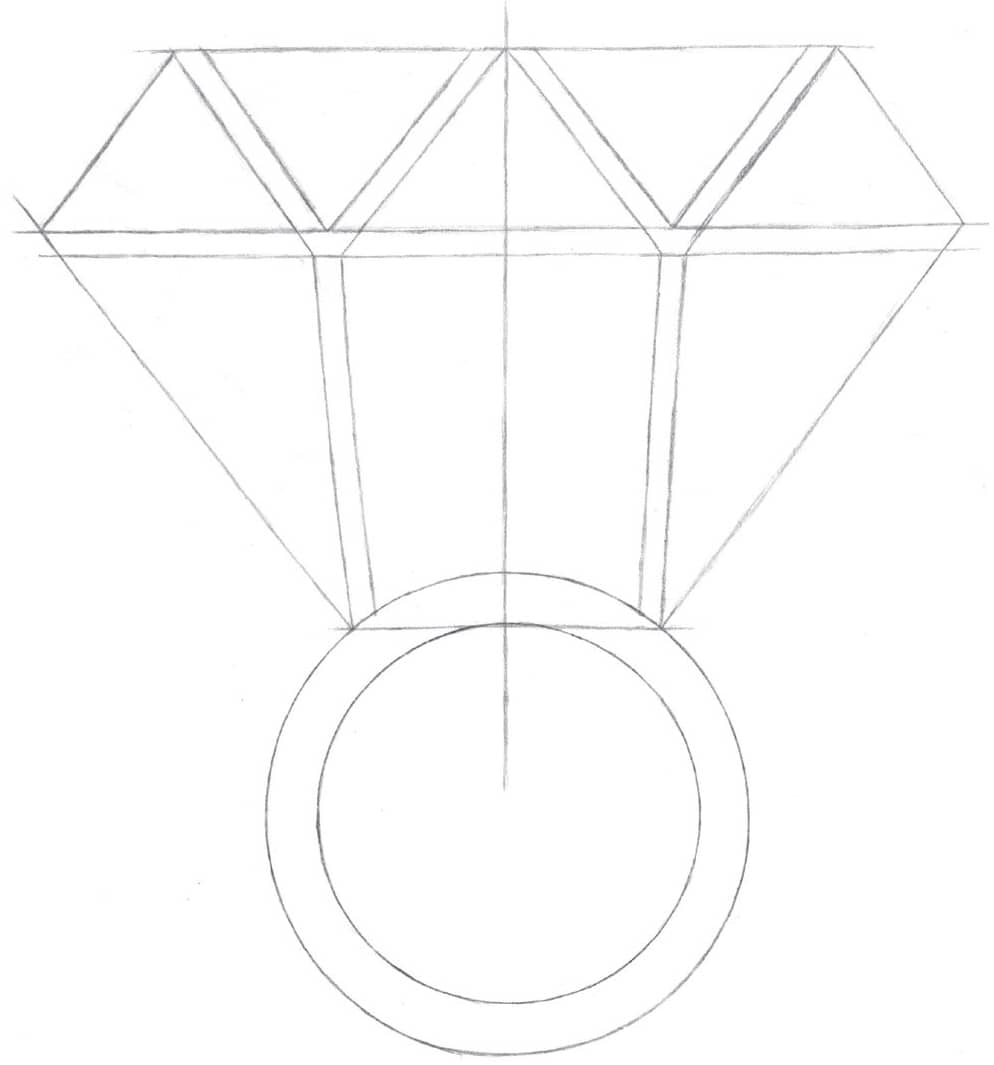
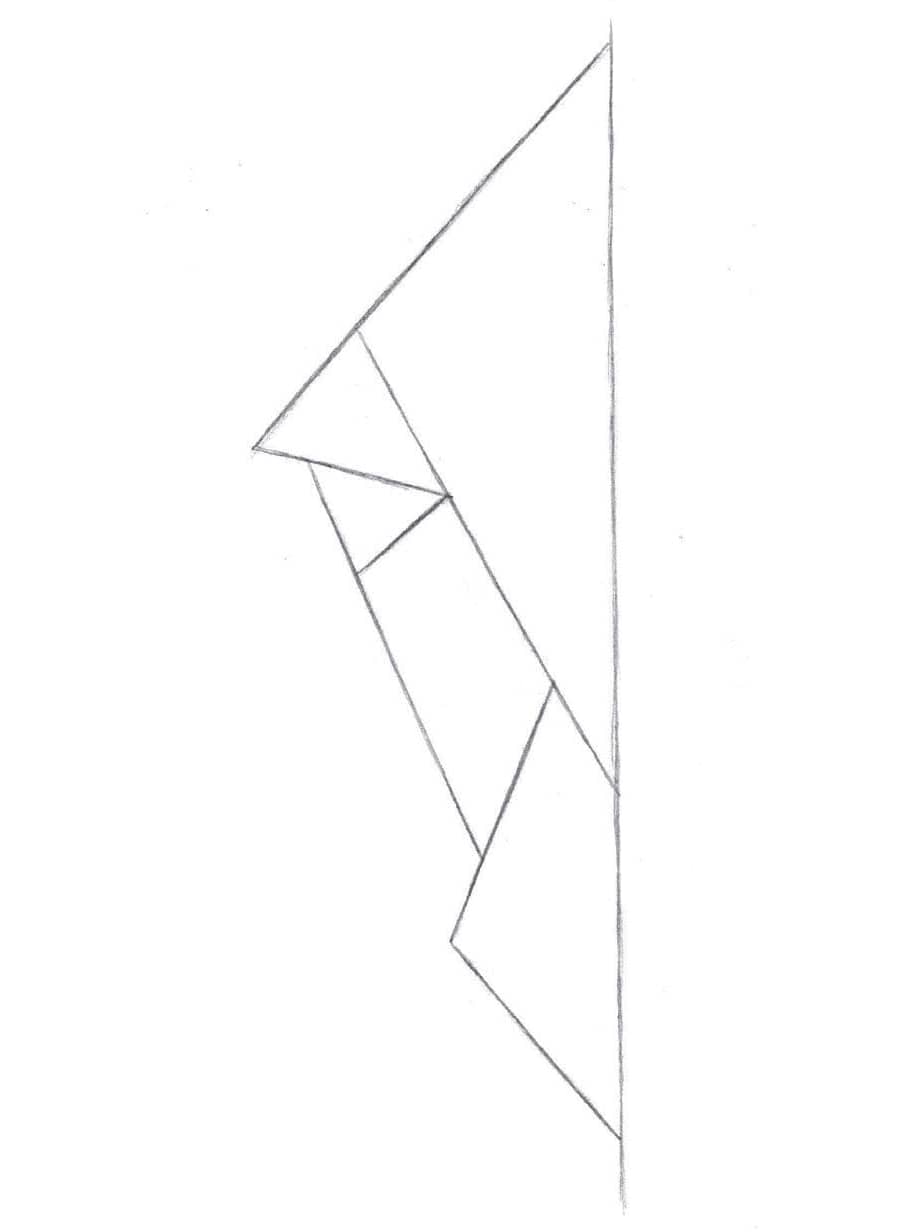
DIAMOND RING
STEP ONE
Trace around an object or use a compass to draw two circles: one large and a smaller one inside. Draw a long vertical line from the top of the page into the center of the two circles. Add four horizontal lines: one at the top of the image, two more close together, and one across the top of the inside circle.

STEP TWO
Draw diagonal lines to connect the horizontal lines above the circle.

STEP THREE
Split the top section of the image into five triangles by drawing diagonal lines that do not touch at the bottom.

STEP FOUR
Draw two diagonal lines inside the downward-pointing triangles. Then draw two slightly diagonal lines on either side of the vertical lines down toward the top of the exterior circle.
STEP FIVE
Trace over the image with a darker pencil or a pen and erase the pencil marks. Draw three lines inside each of the five triangles and the three shapes below.

STEP SIX
Continue adding lines until you’ve completed the spiral pattern in the triangles at the top of the image.

STEP SEVEN
Add lines inside the three remaining shapes to finish the spiral patterns.

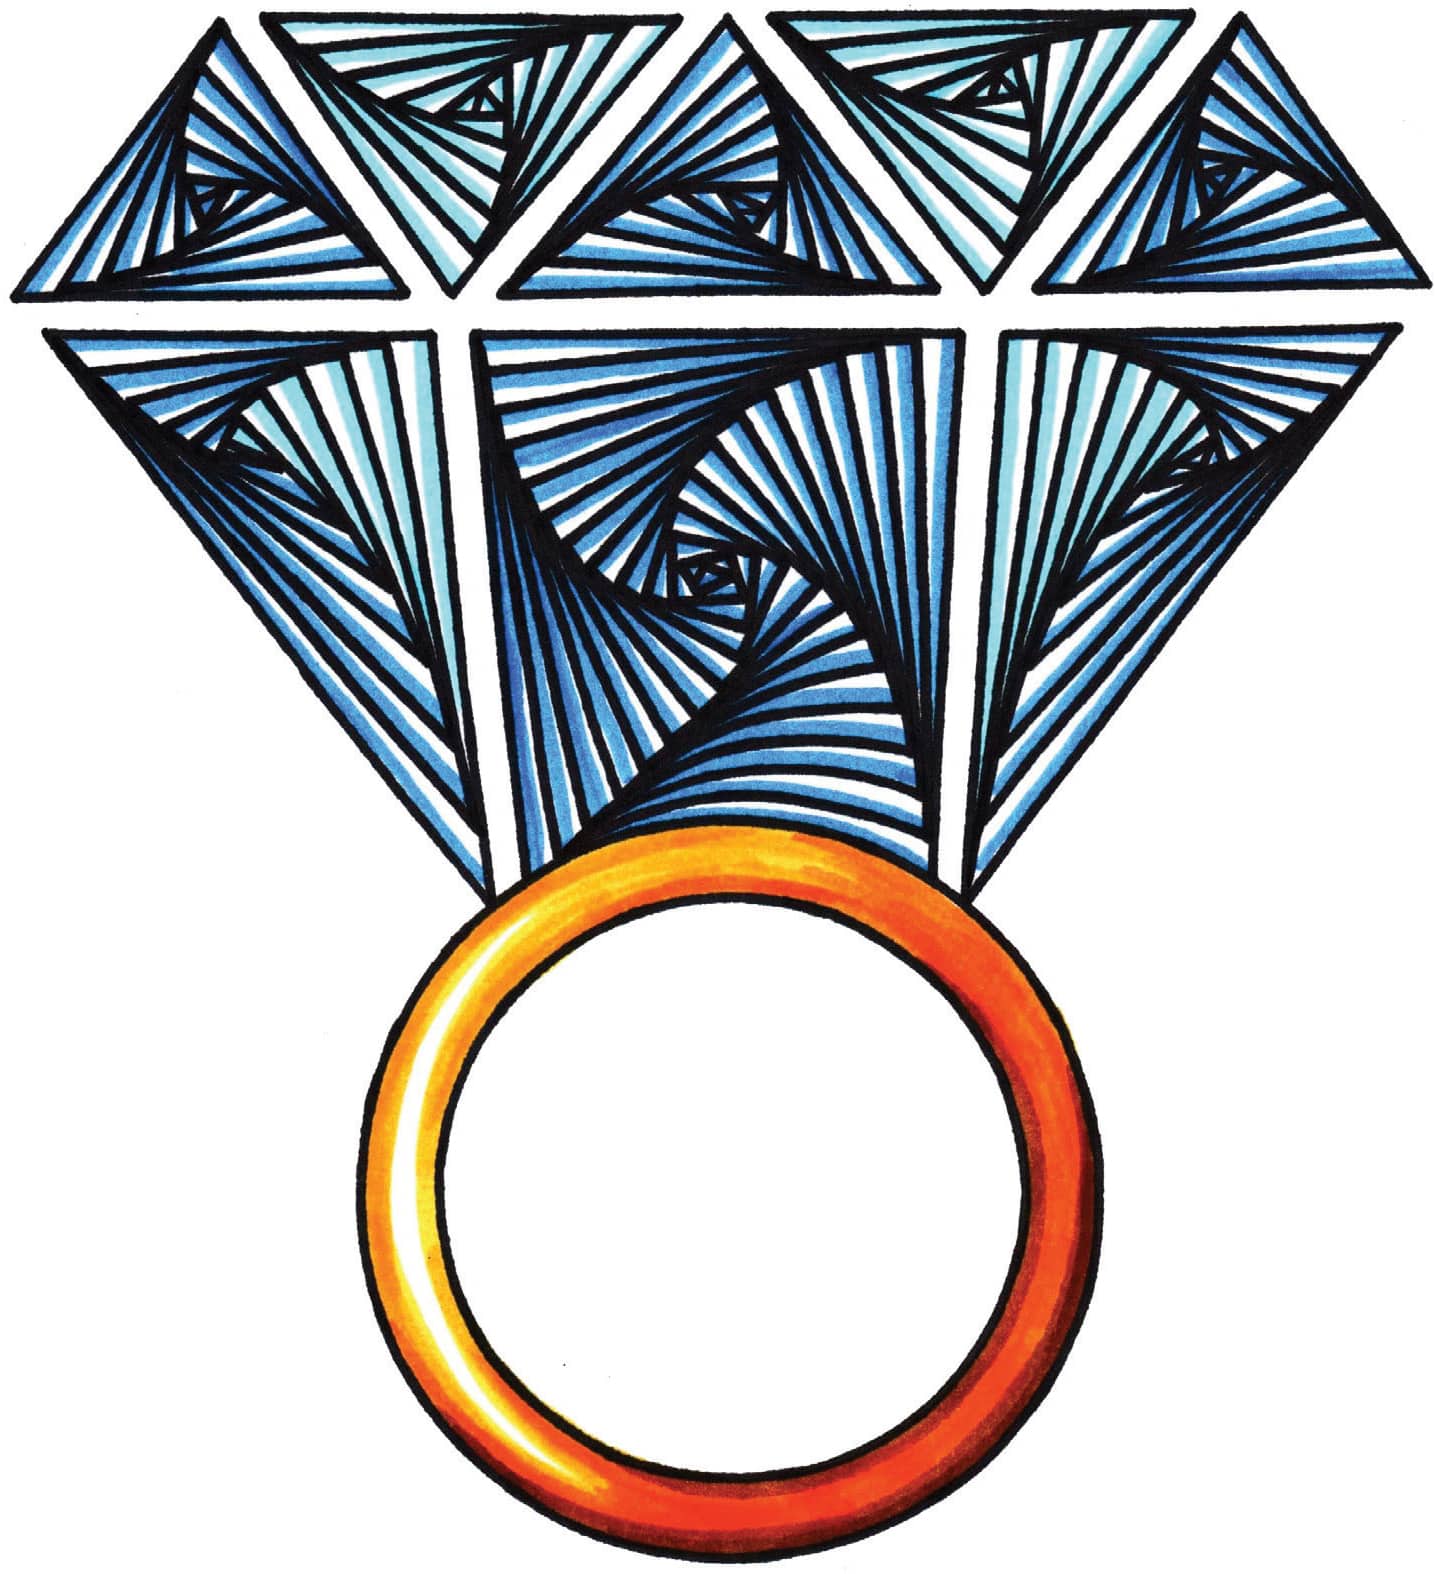
Now add color!
ROSE
STEP ONE
Use a compass or a round object to lightly draw a circle; then split it into eight sections using vertical, horizontal, and diagonal lines. The diagonal lines should be slightly shorter than the others.
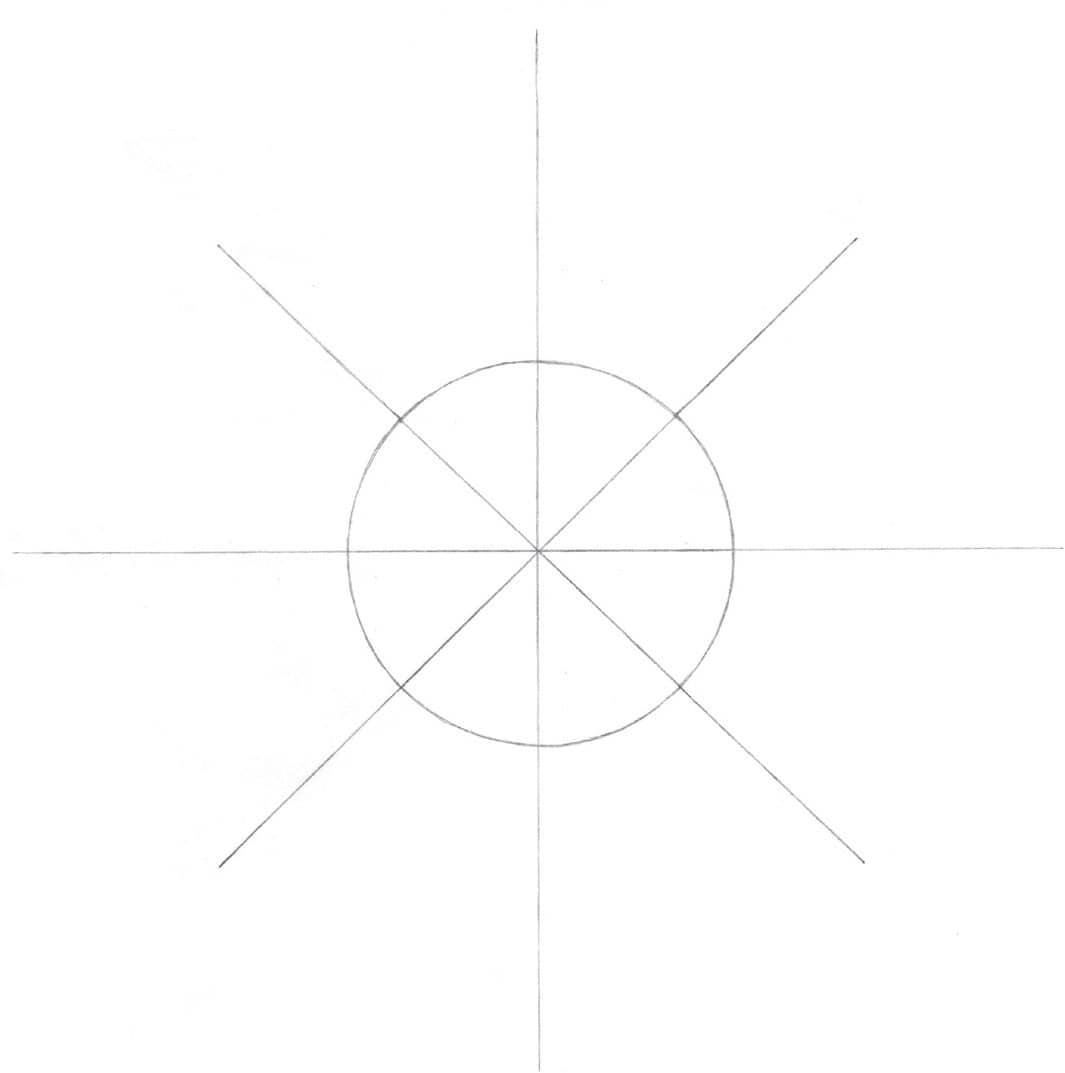
STEP TWO
Using the straight lines, create four teardrop shapes around the circle.

STEP THREE
Create ovals on both sides of the diagonal lines, as shown here. Then draw a small “V” shape at the end of each diagonal line, inside the four ovals.

STEP FOUR
Trace over the image with a darker pencil or pen and erase the pencil marks. Draw four lines inside the circle.

STEP FIVE
Continue drawing lines until you’ve completed the spiral pattern inside the circle; then move on to the teardrop shapes. Start with the lines shown here.
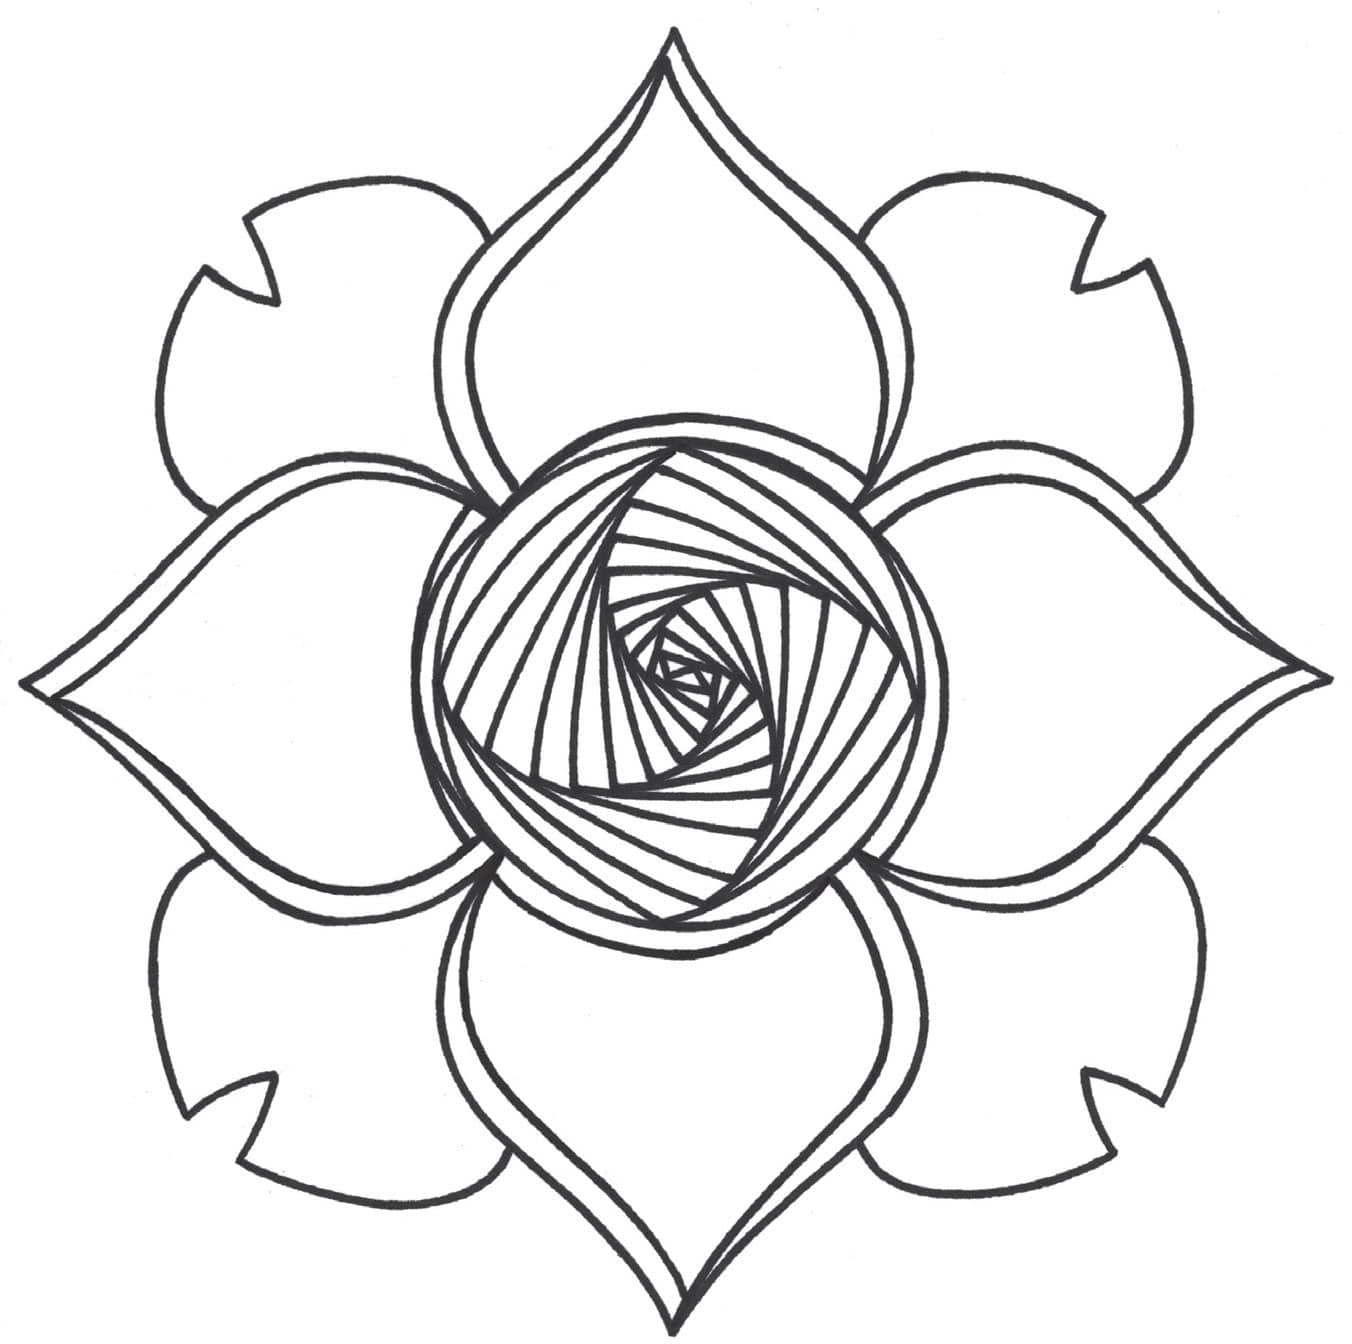
STEP SIX
Complete the spiral pattern inside the teardrops, and then work on the ovals. I marked the first lines in this image; you may copy this step if you wish.

STEP SEVEN
Add lines inside the shapes until you’ve completed the image.


Now add color!
EYE
STEP ONE
With a graphite pencil, lightly sketch an oval with a teardrop shape on the side. Sketch a circle inside the oval. Then draw a smaller circle in the center and an even smaller one inside that. Now split the circle into eight sections as shown.
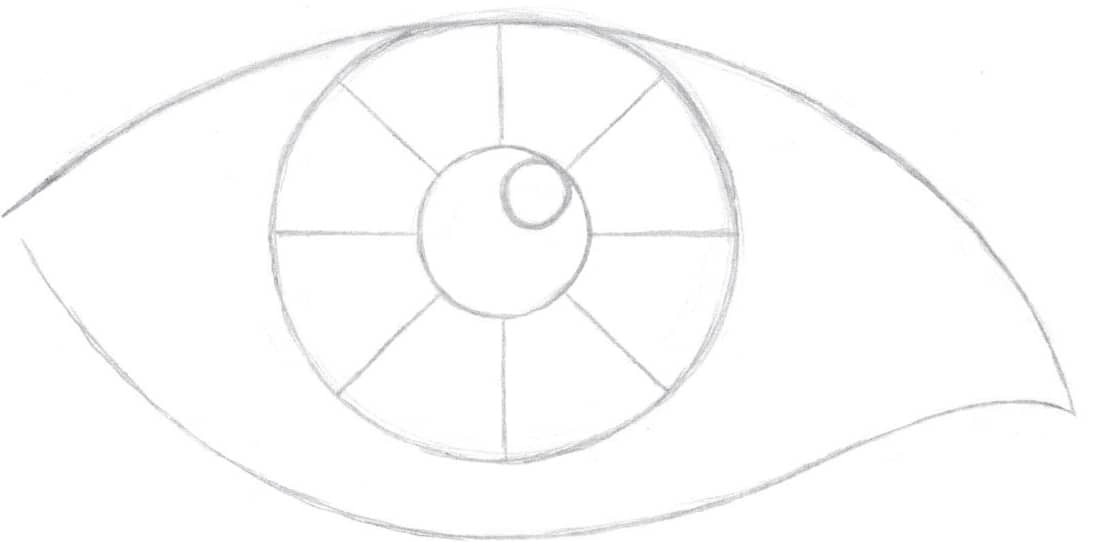
STEP TWO
Add a slight curve to the end of the left side of the oval and draw a curve on the inside of the right side of the oval. Then sketch a flowing, tapering shape beneath the oval. Sketch an arc above the top of the oval and draw curved lines for the eyelashes.

STEP THREE
With a darker pencil or pen, trace over the image and erase your pencil marks.

STEP FOUR
Begin to add the spiral pattern to the eyelids.

STEP FIVE
Fill the top and bottom eyelids with the spiral pattern.

STEP SIX
Draw a spiral pattern inside the iris.

STEP SEVEN
Fill the blank areas of the eye with black to complete the drawing.


Now add color!
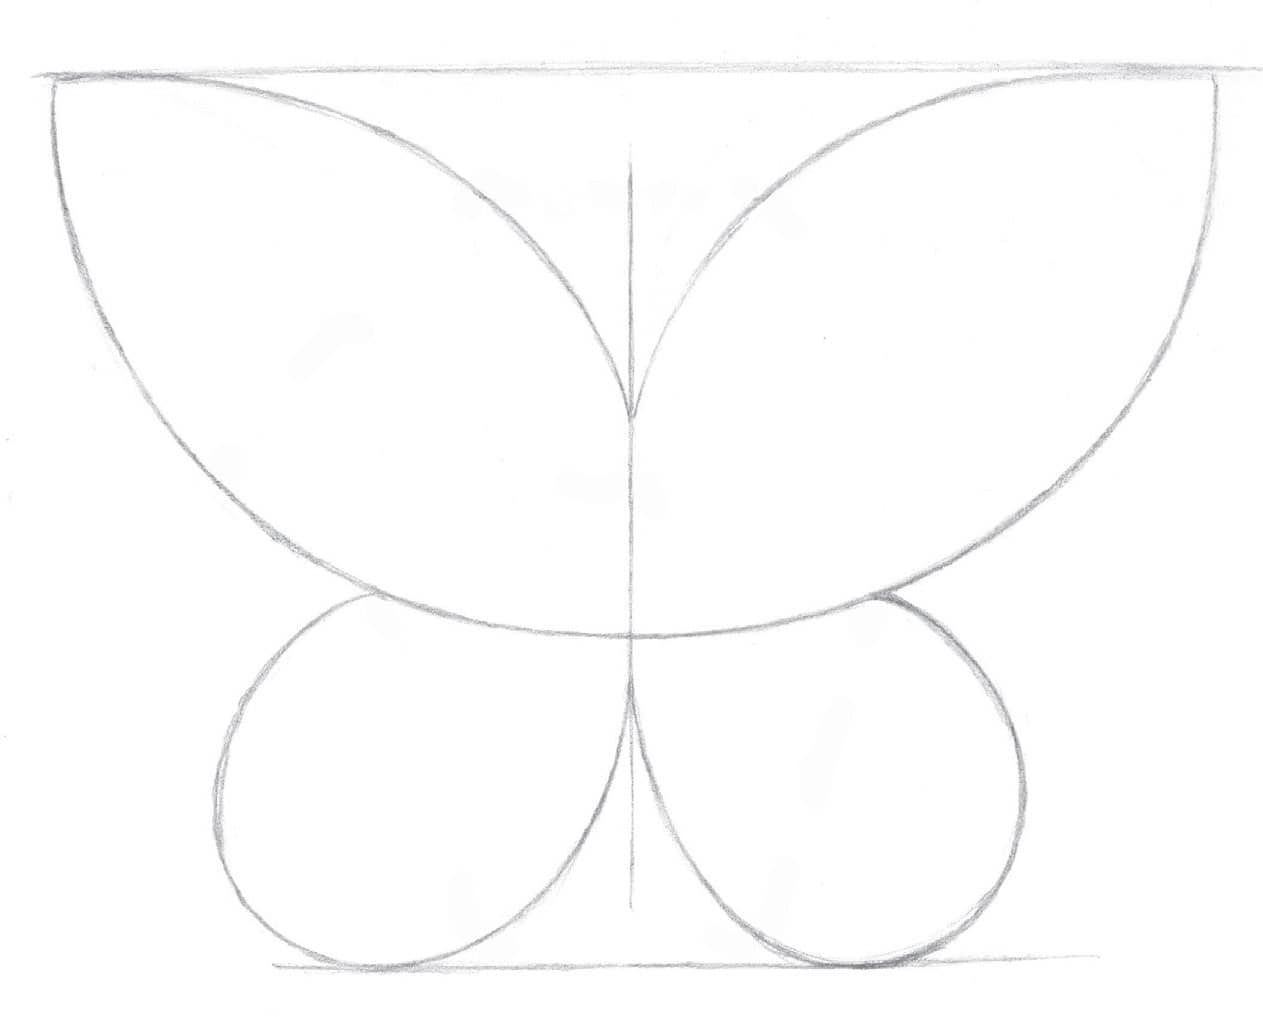
BUTTERFLY
STEP ONE
With a graphite pencil, lightly sketch a vertical line and two partial ovals on one side.

STEP TWO
Draw two partial ovals on the opposite side. These should mirror the first two shapes
you drew.
STEP THREE
Draw a diagonal line inside each oval shape; then add horizontal lines inside the top two shapes to form a trapezoid. Draw curved lines for the antennae.

STEP FOUR
Draw over your pencil lines with a darker pencil or a pen; then erase your pencil marks.

STEP FIVE
Begin drawing diagonal and straight lines inside the shapes, as shown here.

STEP SIX
Complete the pattern by adding lines until you’ve filled in the left side of the butterfly.
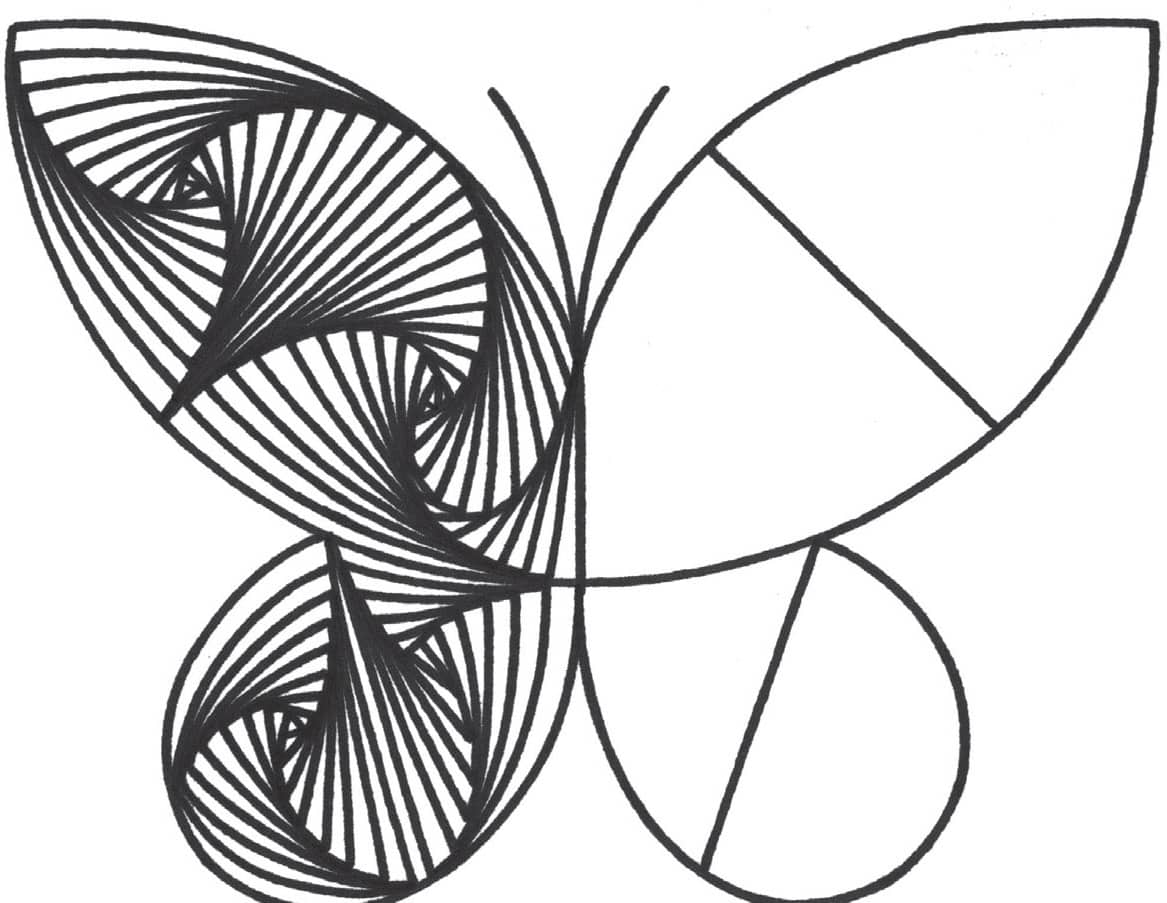
STEP SEVEN
Add lines on the right side of the butterfly, making sure they mirror the lines on the left.


Now add color!
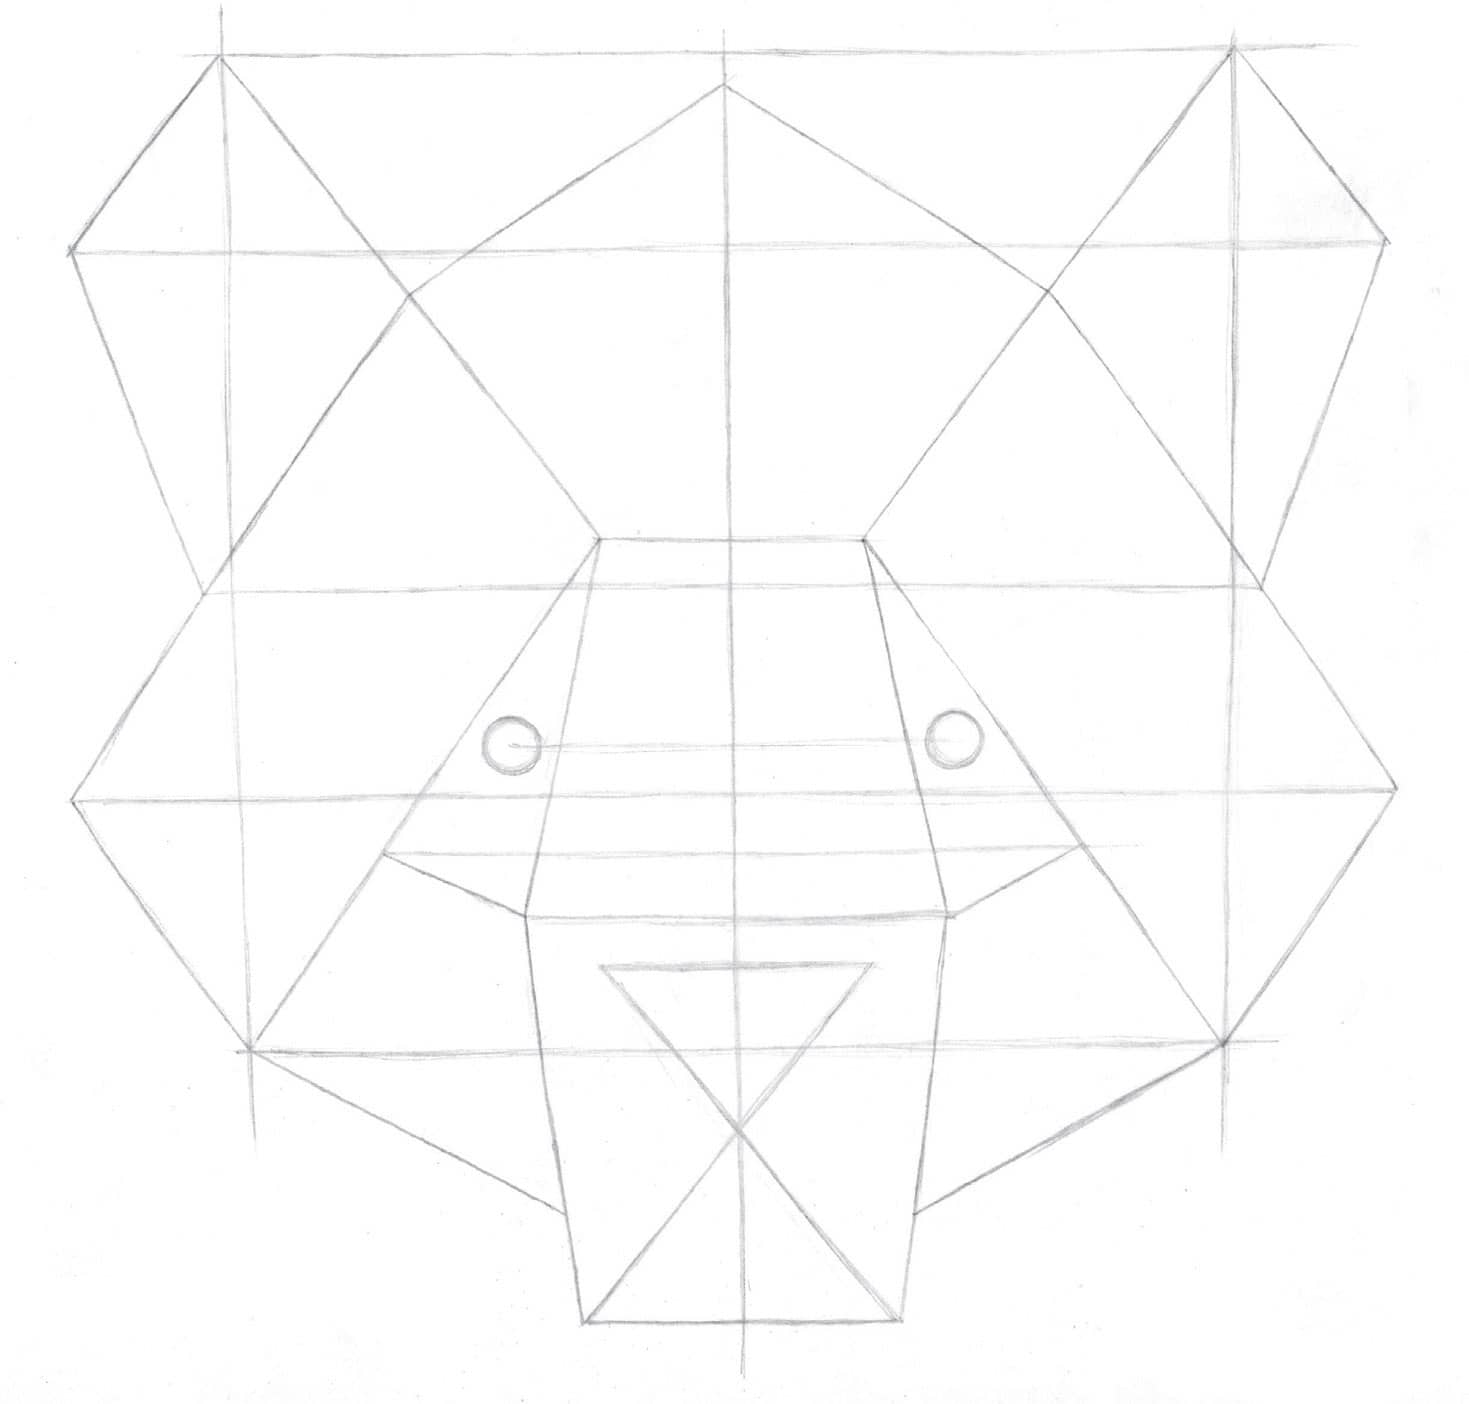
PANDA
STEP ONE
Begin by sketching a long vertical line. Then draw diagonal lines from the vertical line, as shown here.

STEP TWO
Draw diagonal lines plus a horizontal one, as shown in the image.
STEP THREE
Draw lines going away from the lines you’ve already drawn, as seen here.

STEP FOUR
Draw symmetrical lines on the other side of the image, and pencil in the panda’s eyes, nose, and mouth. For better accuracy, sketch horizontal lines from the top and bottom of the shapes you just drew on the left side. This will help keep everything aligned and symmetrical.
STEP FIVE
Trace over the image with a darker pencil or pen, and erase all unwanted pencil marks.

STEP SIX
Add spiral patterns in sections of the panda’s face, beginning on the left side.

STEP SEVEN
Fill the left side of the panda’s face with spiral patterns.

STEP EIGHT
Repeat the same process on the right side of the panda’s face, and fill in the nose and eyes.

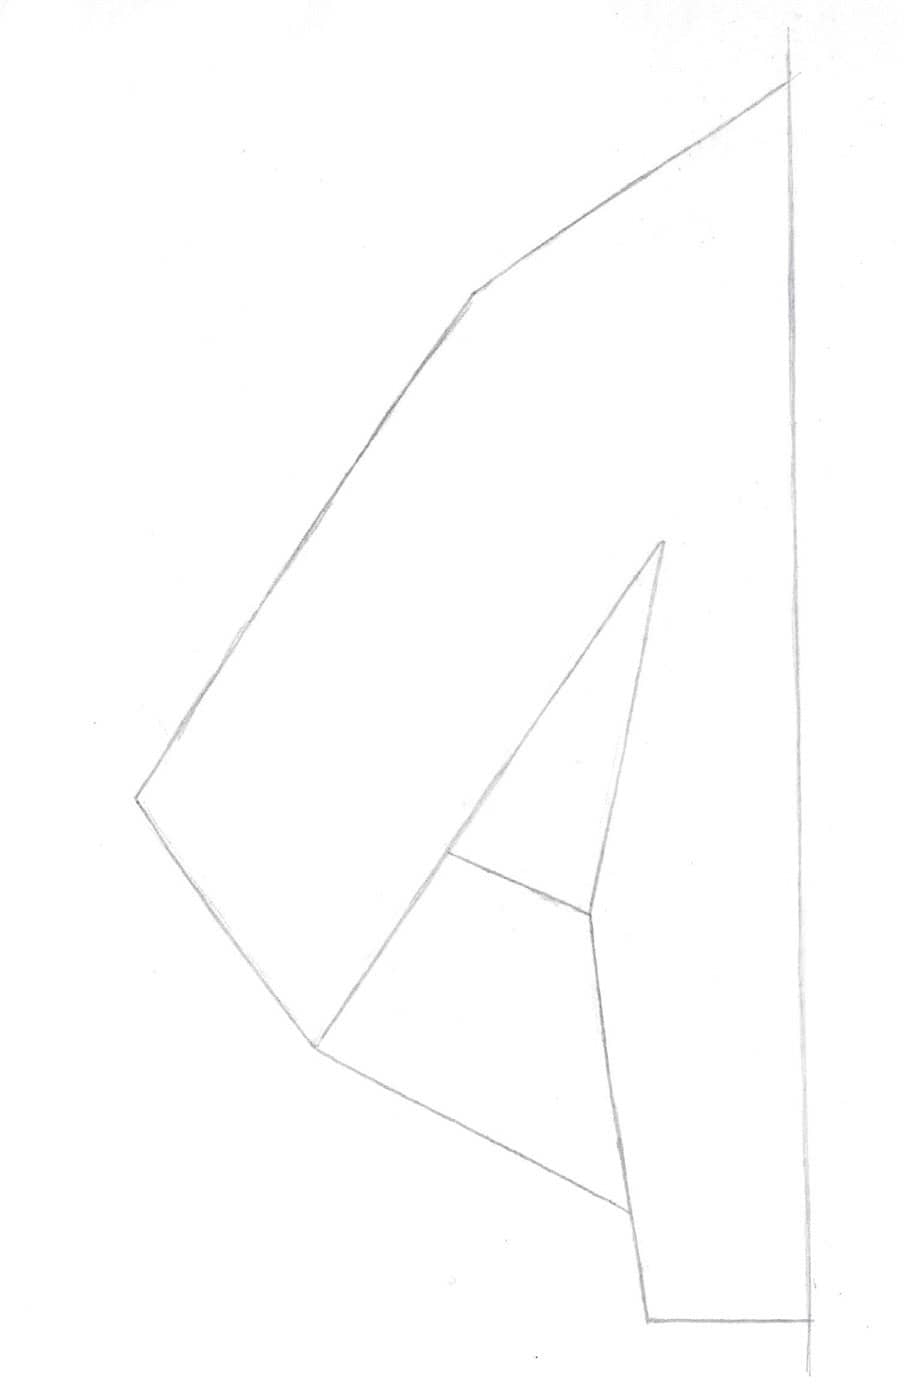
LION
STEP ONE
Start by lightly drawing a long vertical line and two shorter horizontal lines; then draw diagonal lines, as shown here.

STEP TWO
Add two diagonal lines on the top-left side, creating a triangle. Then create another triangular shape for the eye and draw a line from the bottom of the left diagonal, as seen in the image.

STEP THREE
Draw a large arc from the left side all the way down to the bottom of the vertical line. Then draw another arc for the lion’s ear. Draw diagonal lines to the lower side of the arc and add a triangular shape for the nose.
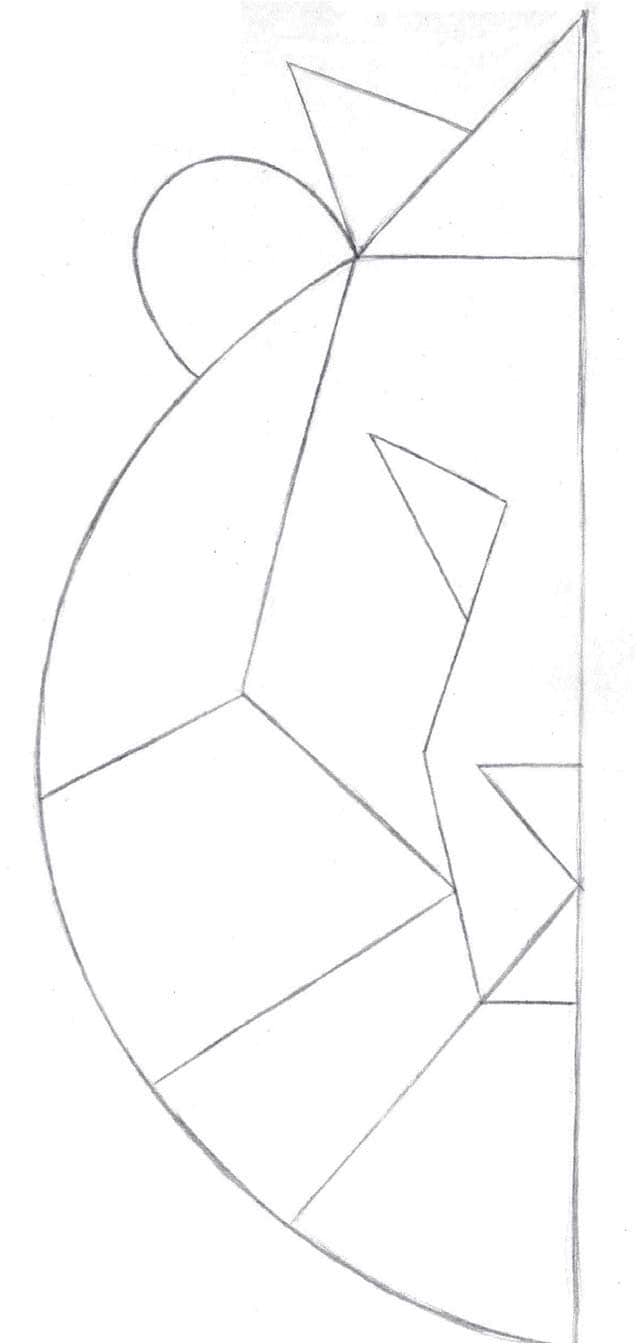
STEP FOUR
Sketch horizontal lines through the shapes you just drew to help keep your drawing aligned and symmetrical; then mirror the left side of the drawing on the right side.

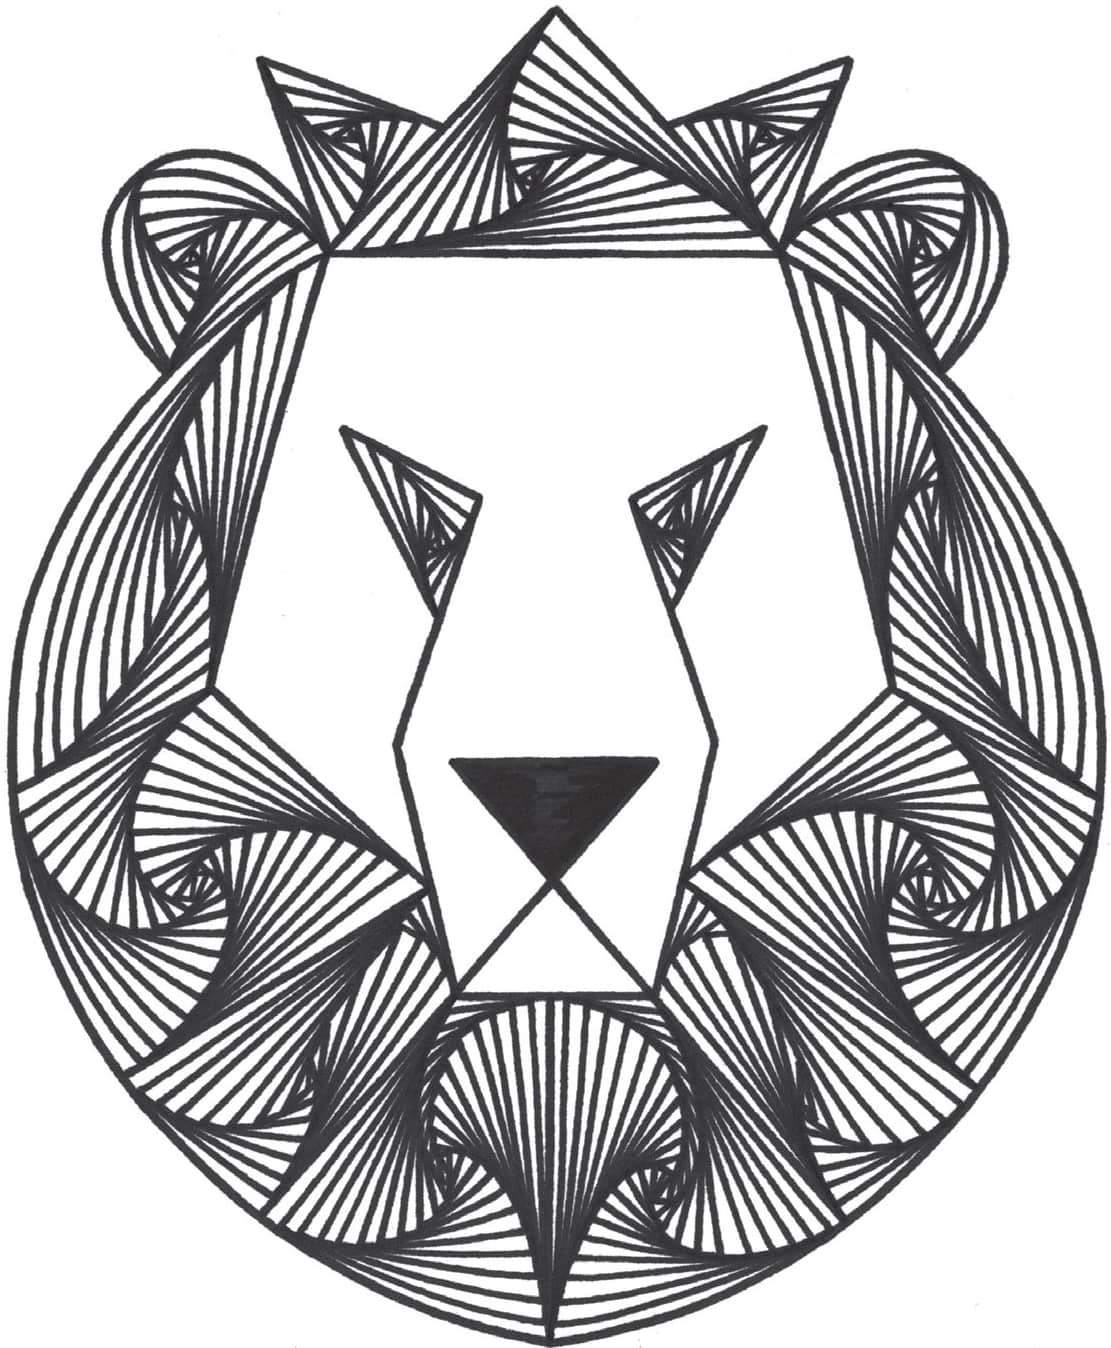
STEP FIVE
With a darker pencil or pen, trace over your image and erase any pencil lines. Begin adding a spiral pattern to one section of the lion’s mane.

STEP SIX
Complete the left side of the mane and start working on the ear and eye.

STEP SEVEN
Add spirals on the right side as well, and work in your magic for the lion’s crown!
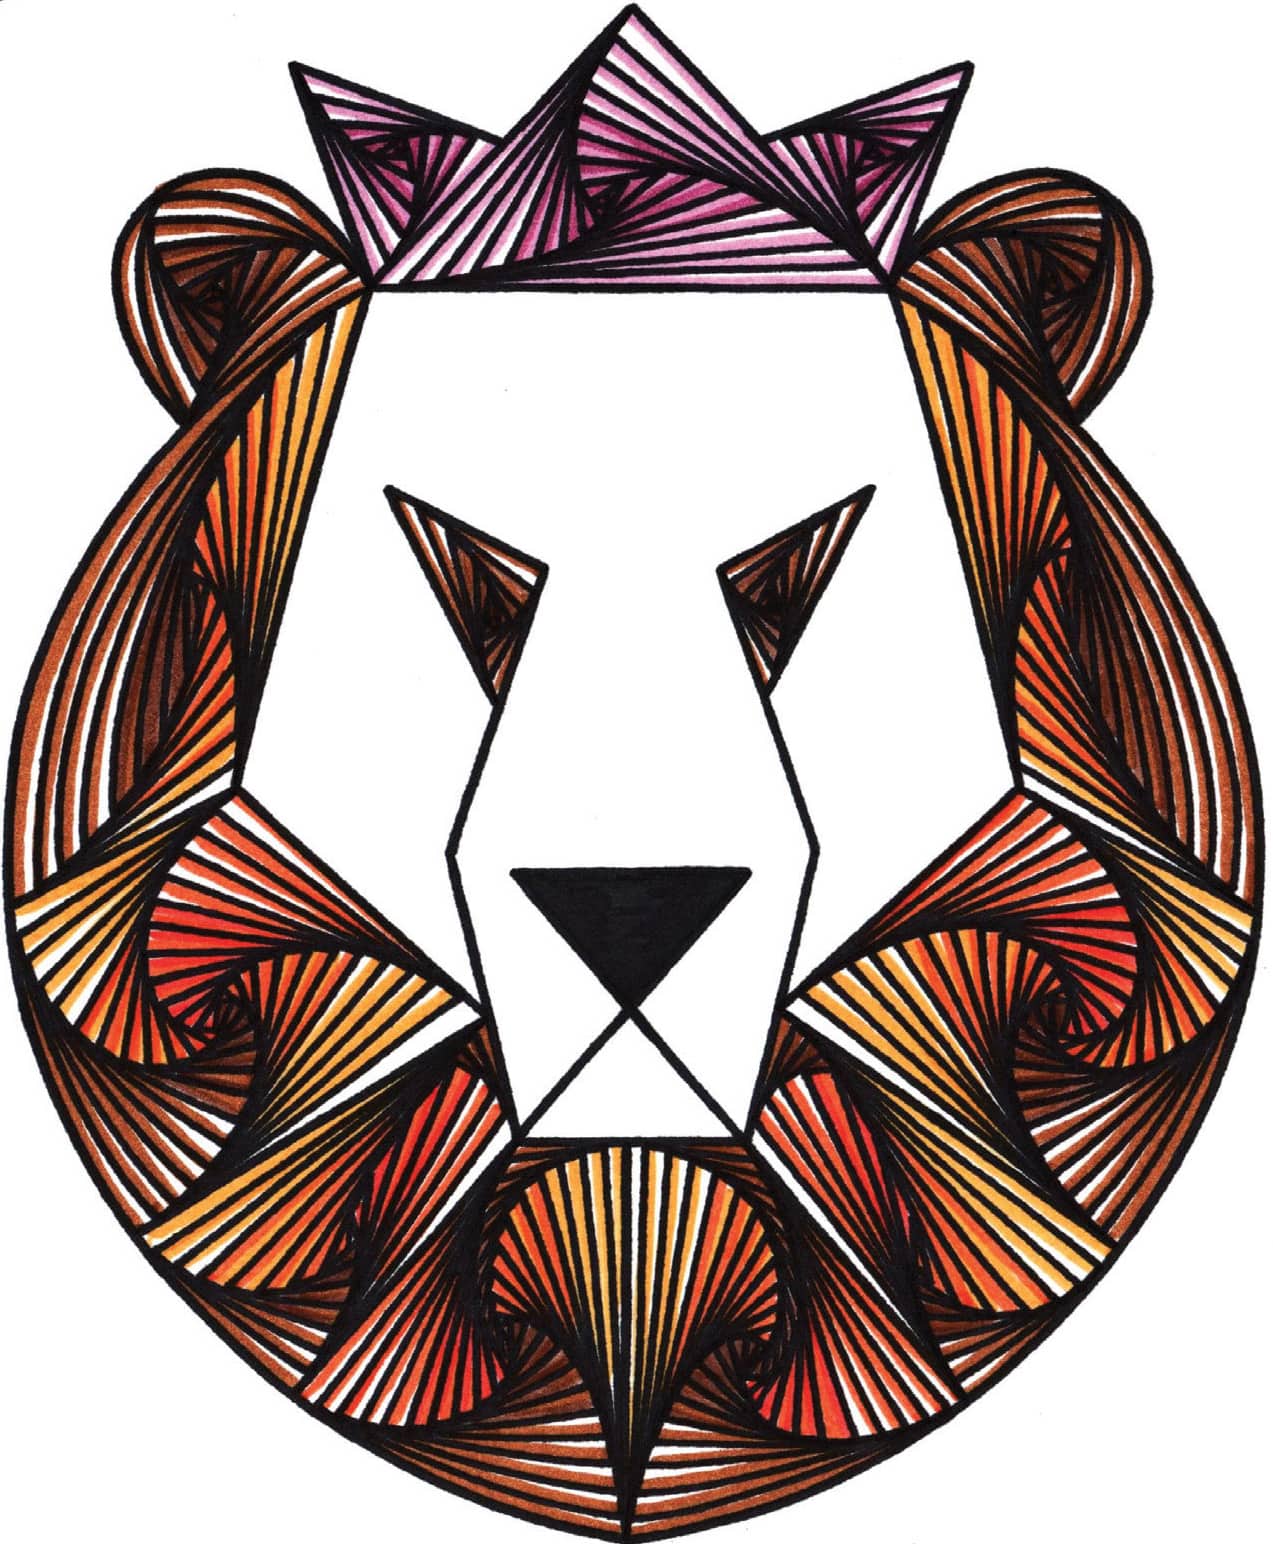
Now add color!
GIRAFFE
STEP ONE
With a graphite pencil, lightly sketch a long vertical line. Then draw vertical lines from the first line, as shown here.
STEP TWO
Add a wavy oval shape for the giraffe’s ear and another one for the horn.

STEP THREE
Add details, as shown here.

STEP FOUR
Add horizontal lines across both sides of the image to help with accuracy as you draw symmetrical shapes and lines on the right side.
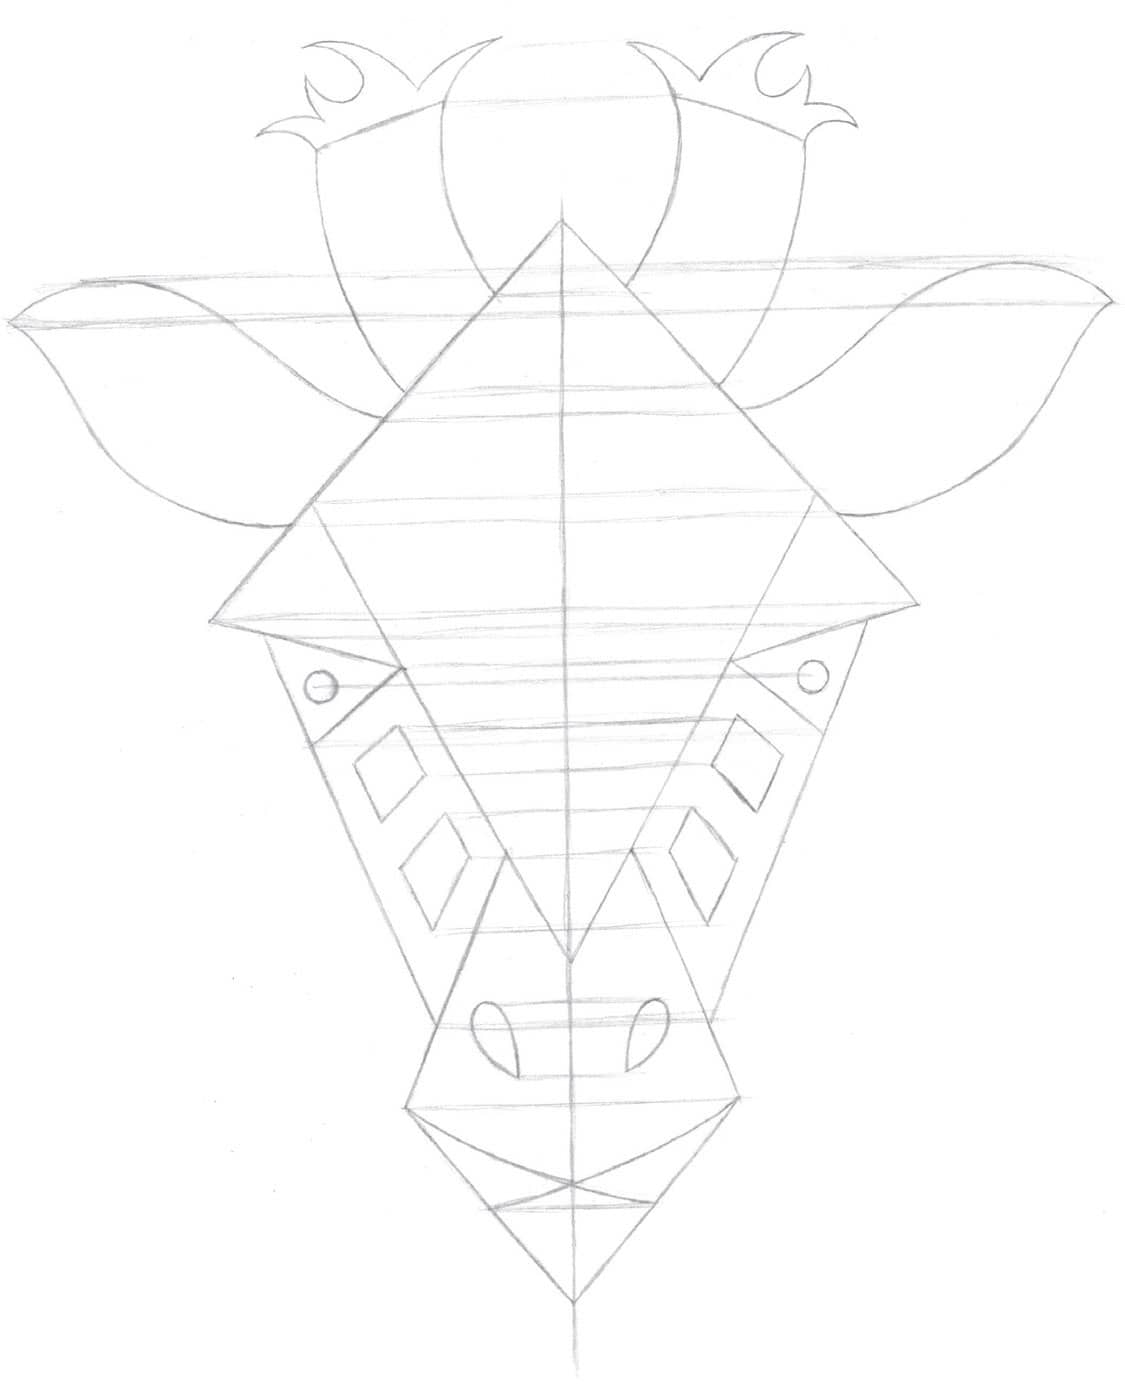
STEP FIVE
Draw the giraffe’s neck and some square shapes for the spots. For extra detail, add hair.

STEP SIX
Once you’re happy with your drawing, trace over it with darker pencil or pen, and erase all unwanted pencil marks.

STEP SEVEN
Begin to add the spiral pattern in the ear and horn.

STEP EIGHT
Keep adding spirals!
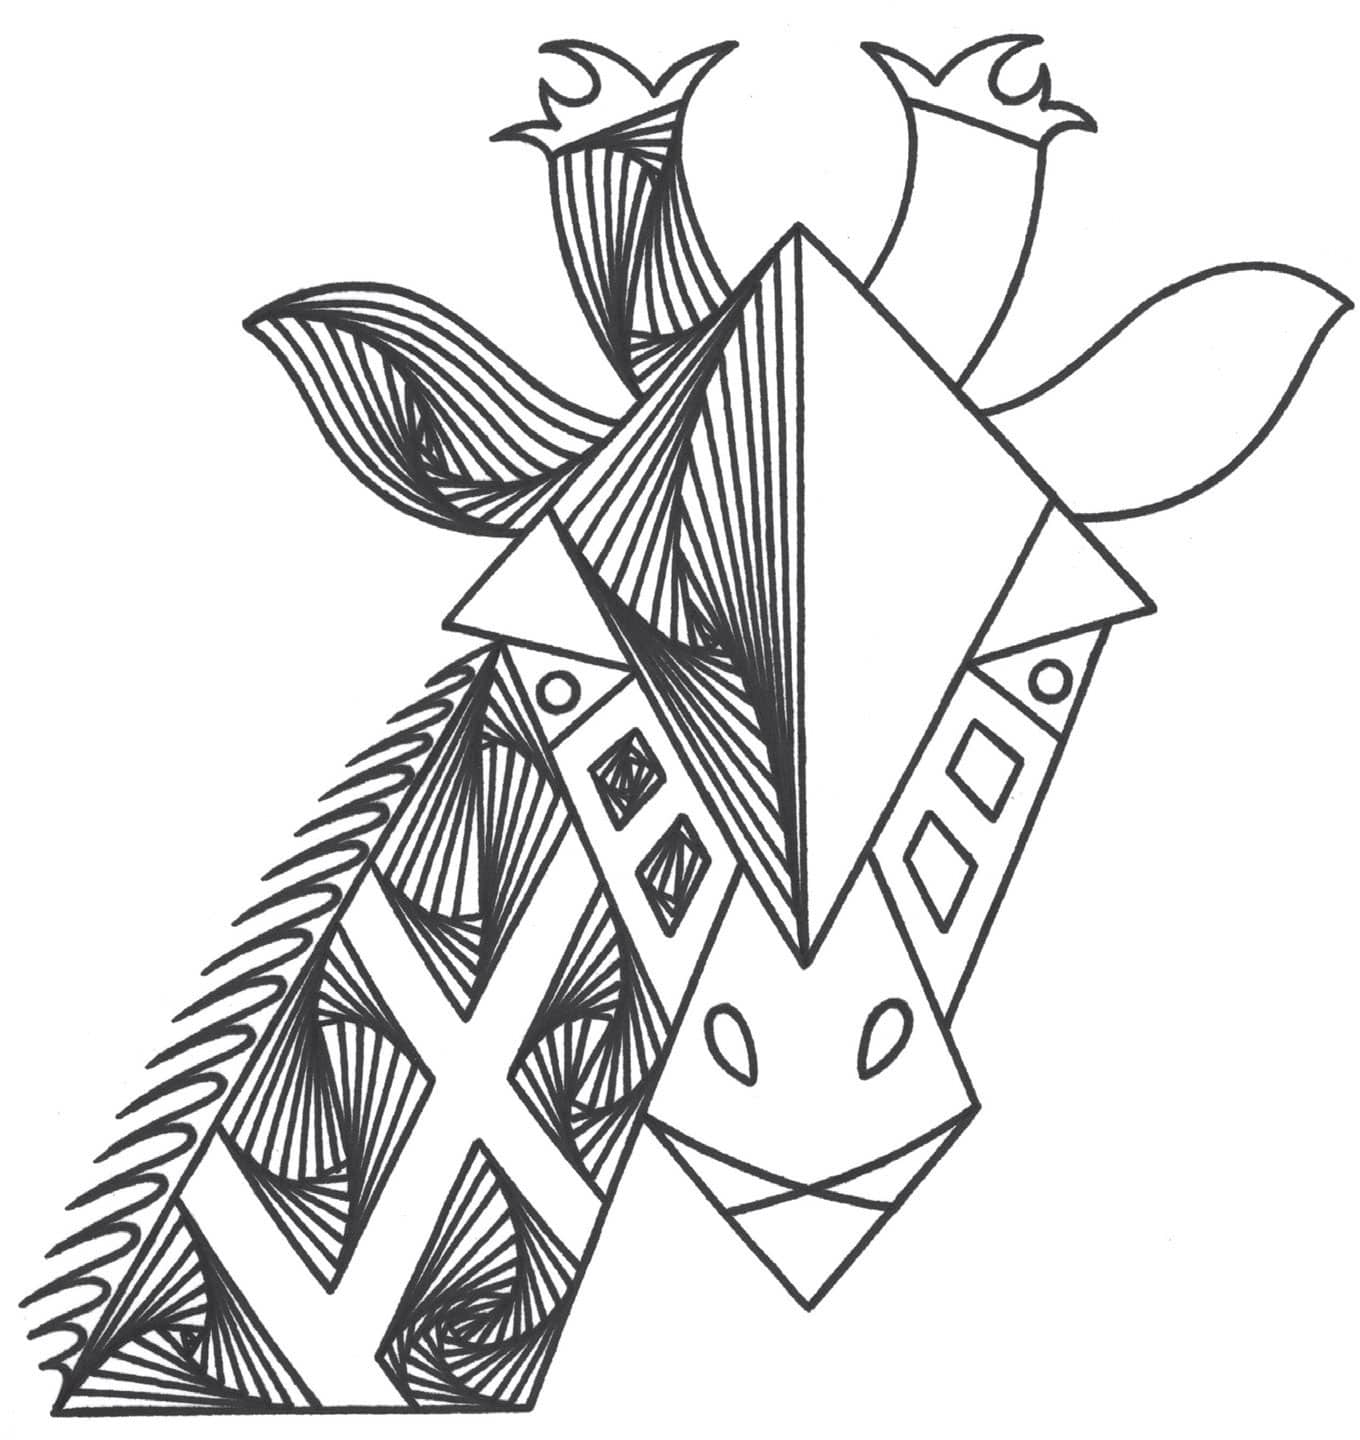
STEP NINE
Now fill in the hair, eye, and nostrils to finish your artwork.


Now add color!
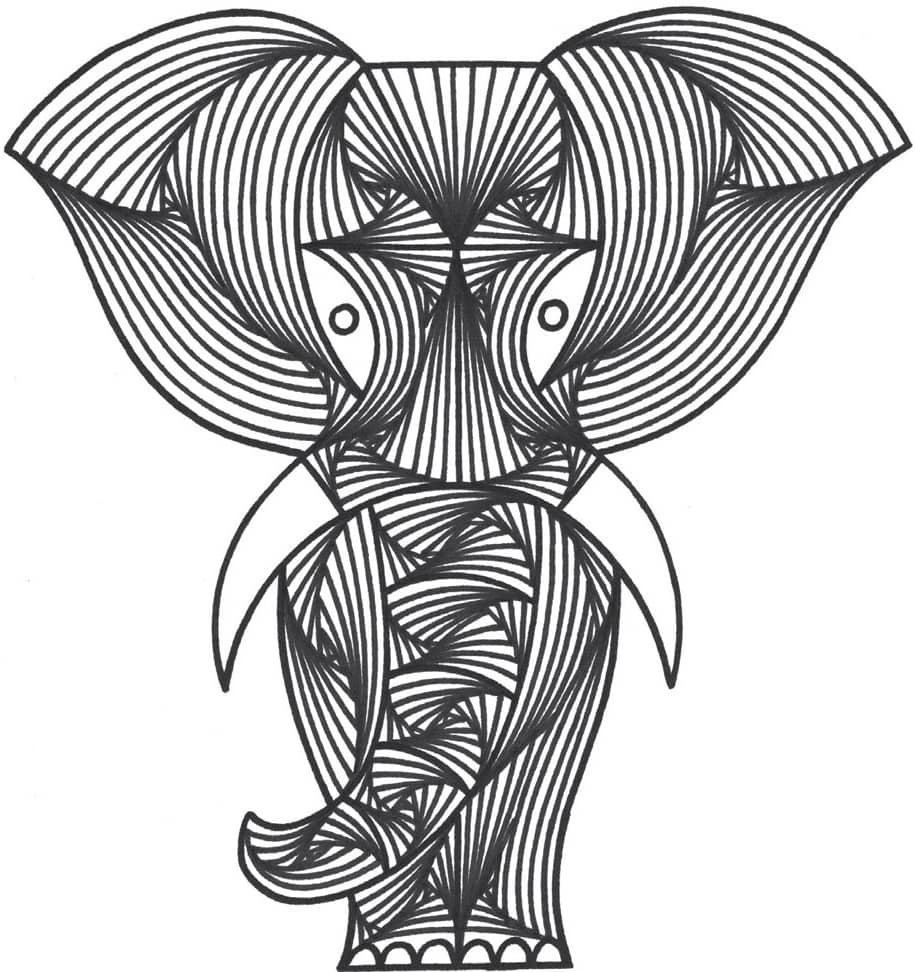
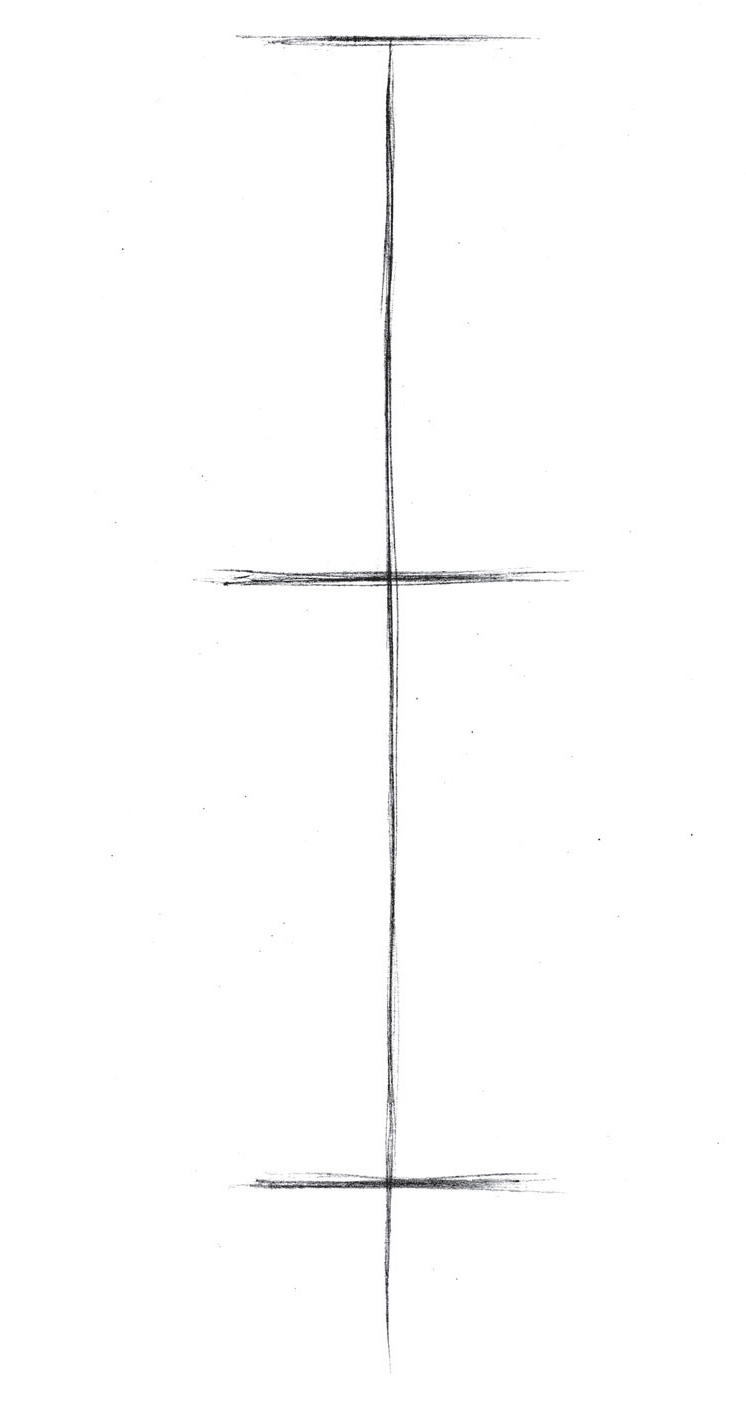
ELEPHANT
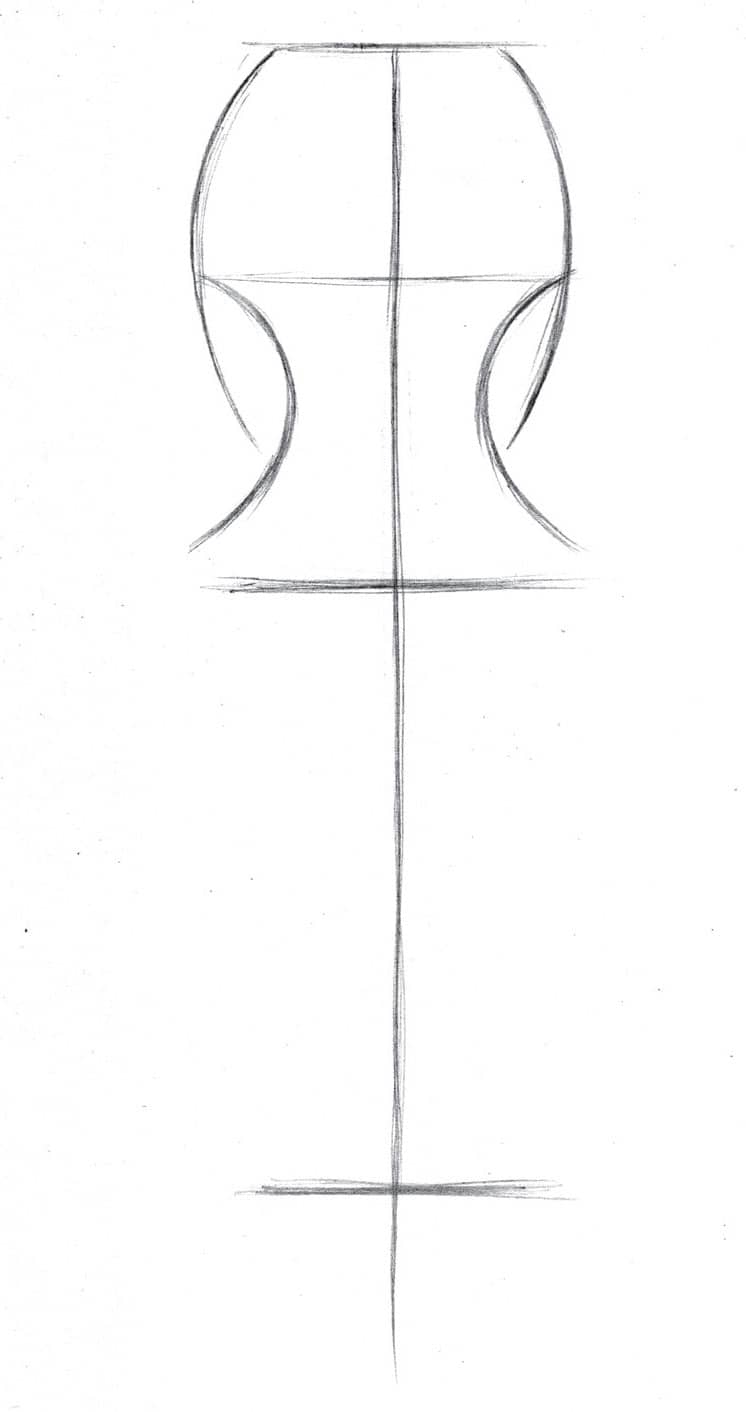
STEP ONE
With a graphite pencil, lightly sketch a long vertical line with three horizontal lines going through it.
STEP TWO
Sketch a curve on either side of the top horizontal line; then draw two smaller curves that flow in the opposite direction.
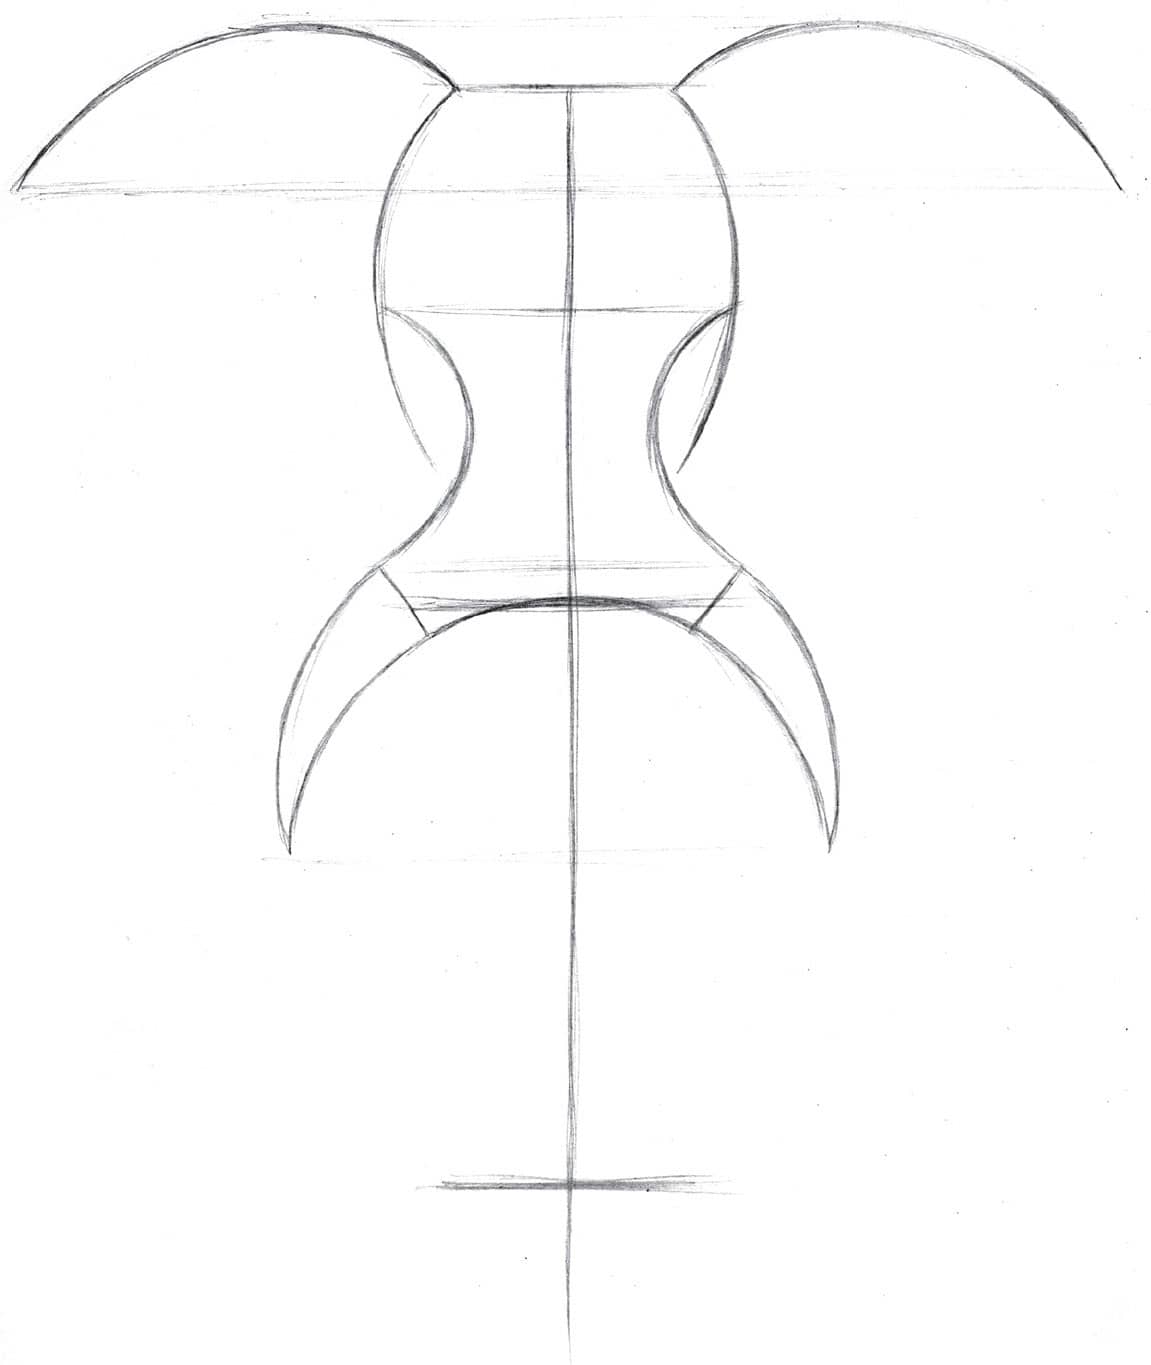
STEP THREE
Draw curves for the tusks, as shown in the image, as well as arcs from the top of the image for the elephant’s ears.
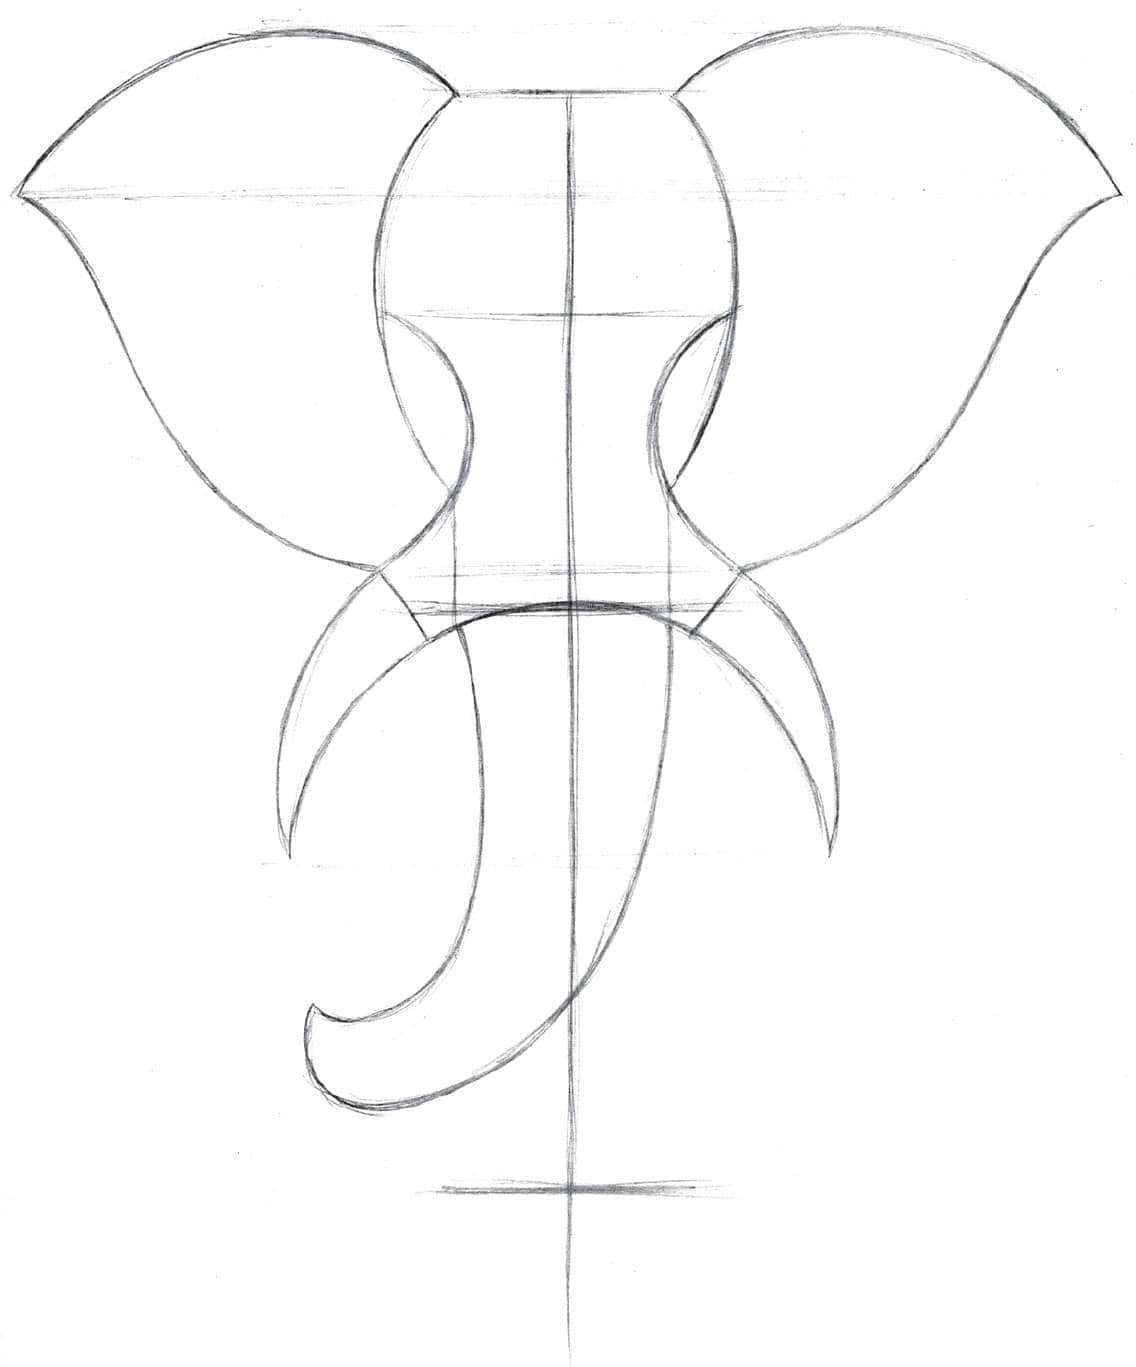
STEP FOUR
Complete the ears by drawing a slightly wavy line to the point where the tusks start; then draw the trunk. The trunk can bend in either direction—just make sure it is wider at the top than at the bottom.
STEP FIVE
Add circles for the eyes and arcs for the toes. If you wish to add more spiral details during the later steps, add lines now, like the two diagonal lines I drew at the top of the elephant’s head.

STEP SIX
With a marker or darker pencil, trace over the image and erase your pencil marks. For additional detail, draw curved lines inside the trunk.

STEP SEVEN
Begin drawing the spiral effect inside the ears. If you prefer lots of detail in your drawings, add even more lines.

STEP EIGHT
Complete the ears and move on to the rest of the face. Make the spacing between the lines consistent, and keep your
lines symmetrical.

STEP NINE
Fill in the trunk.

STEP TEN
Finish by filling in the legs. To make certain features stand out, leave them white or fill them with color.


Now add color!
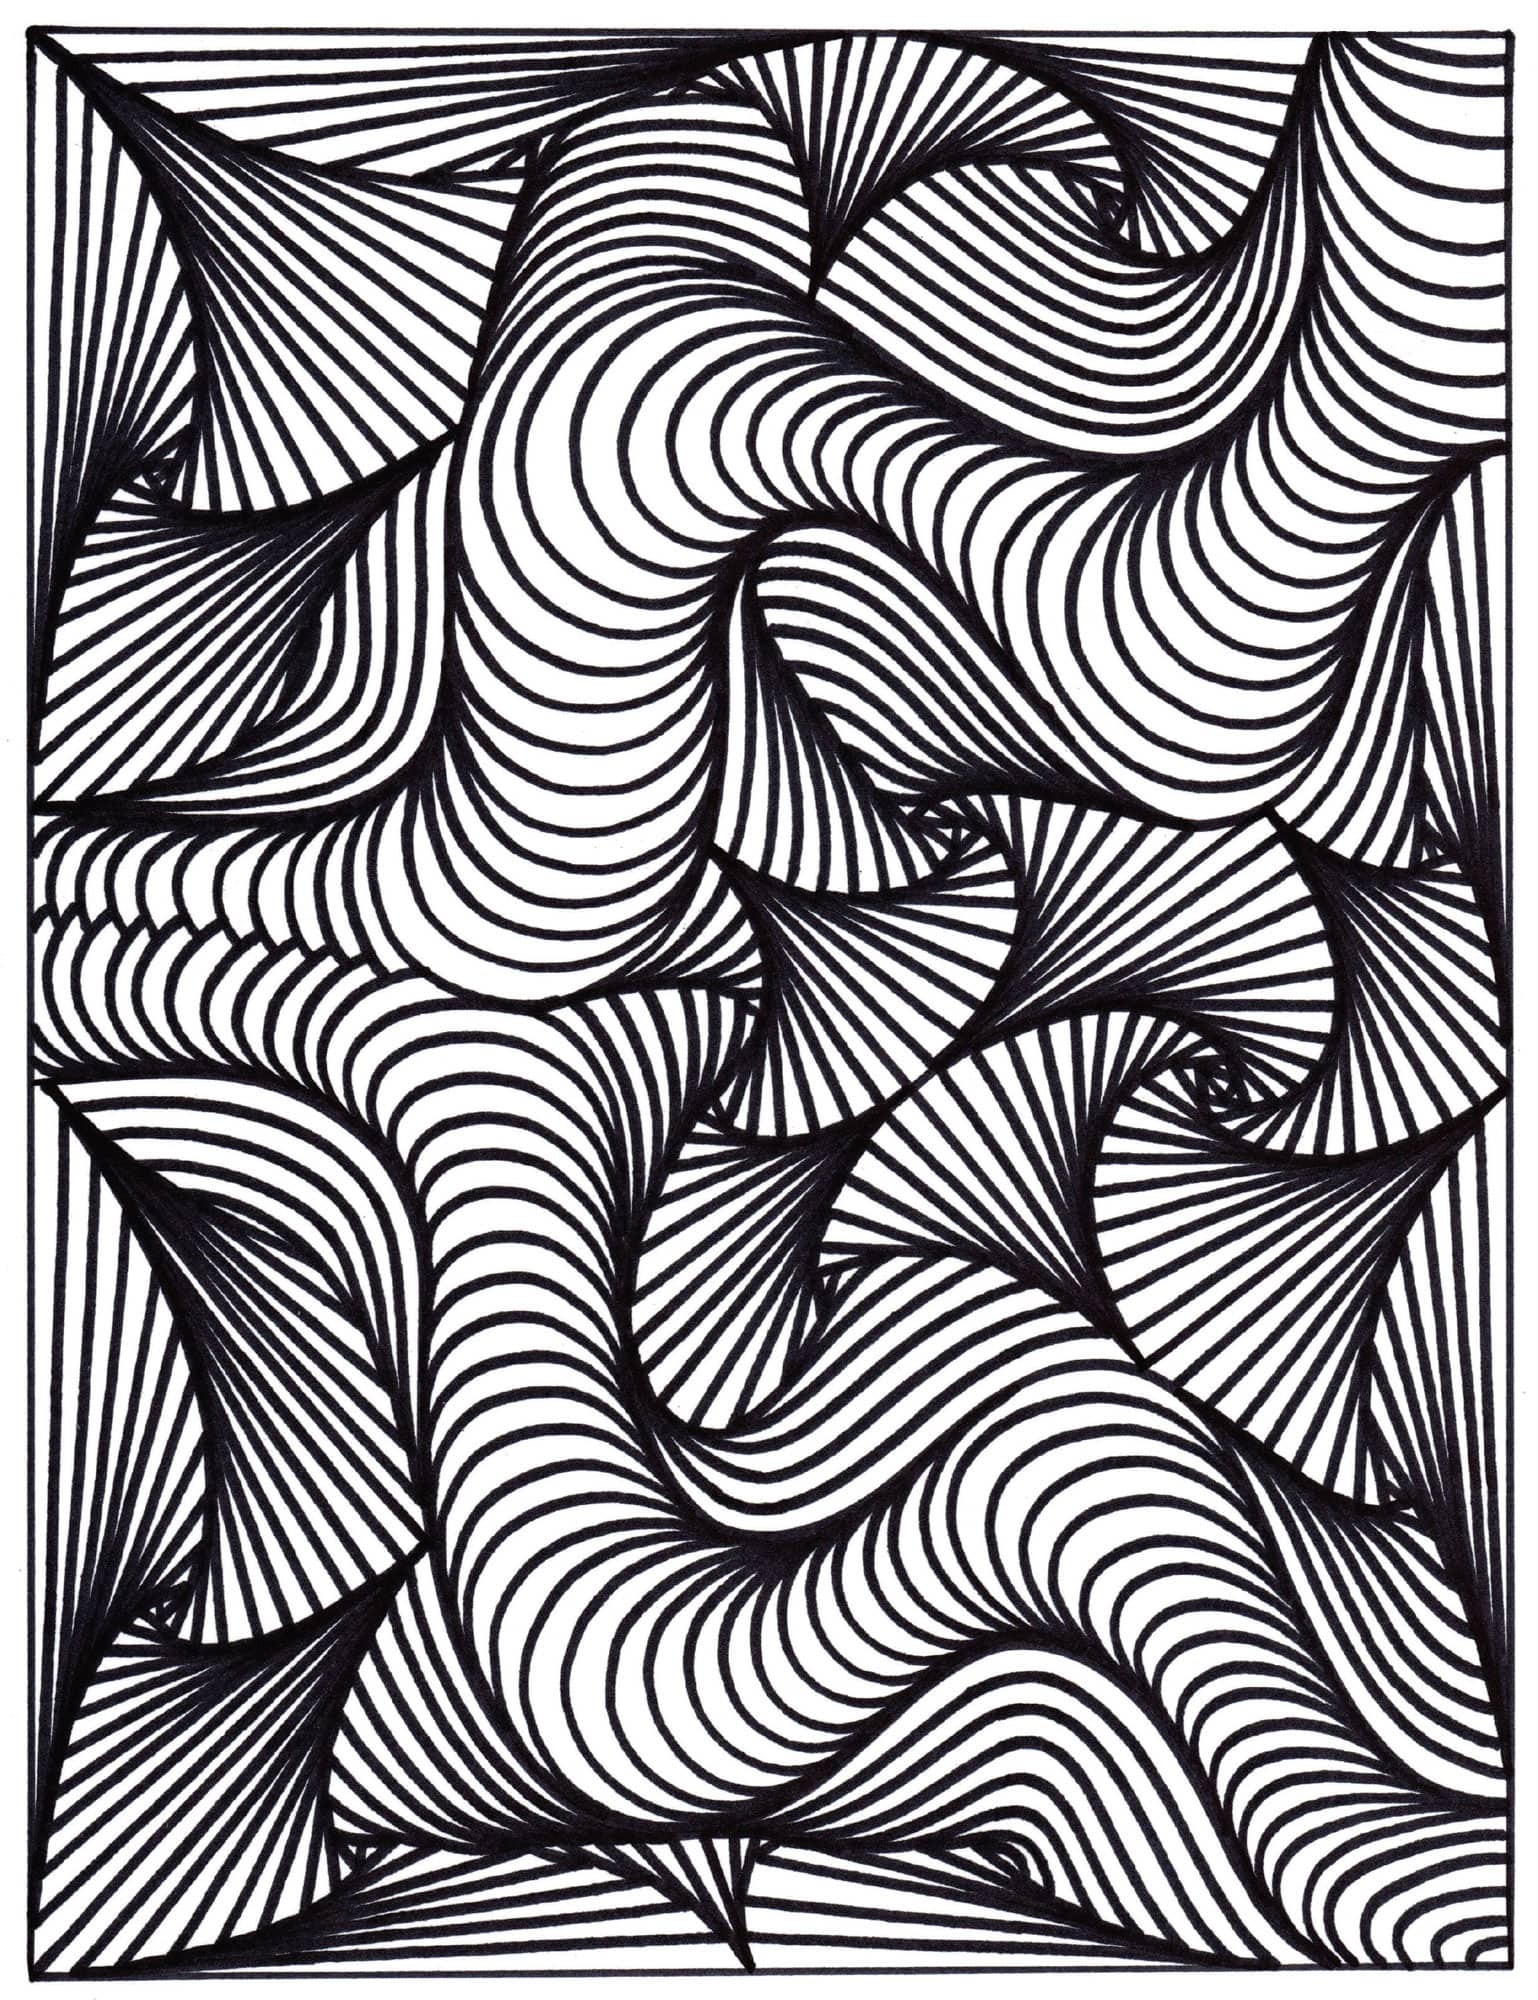
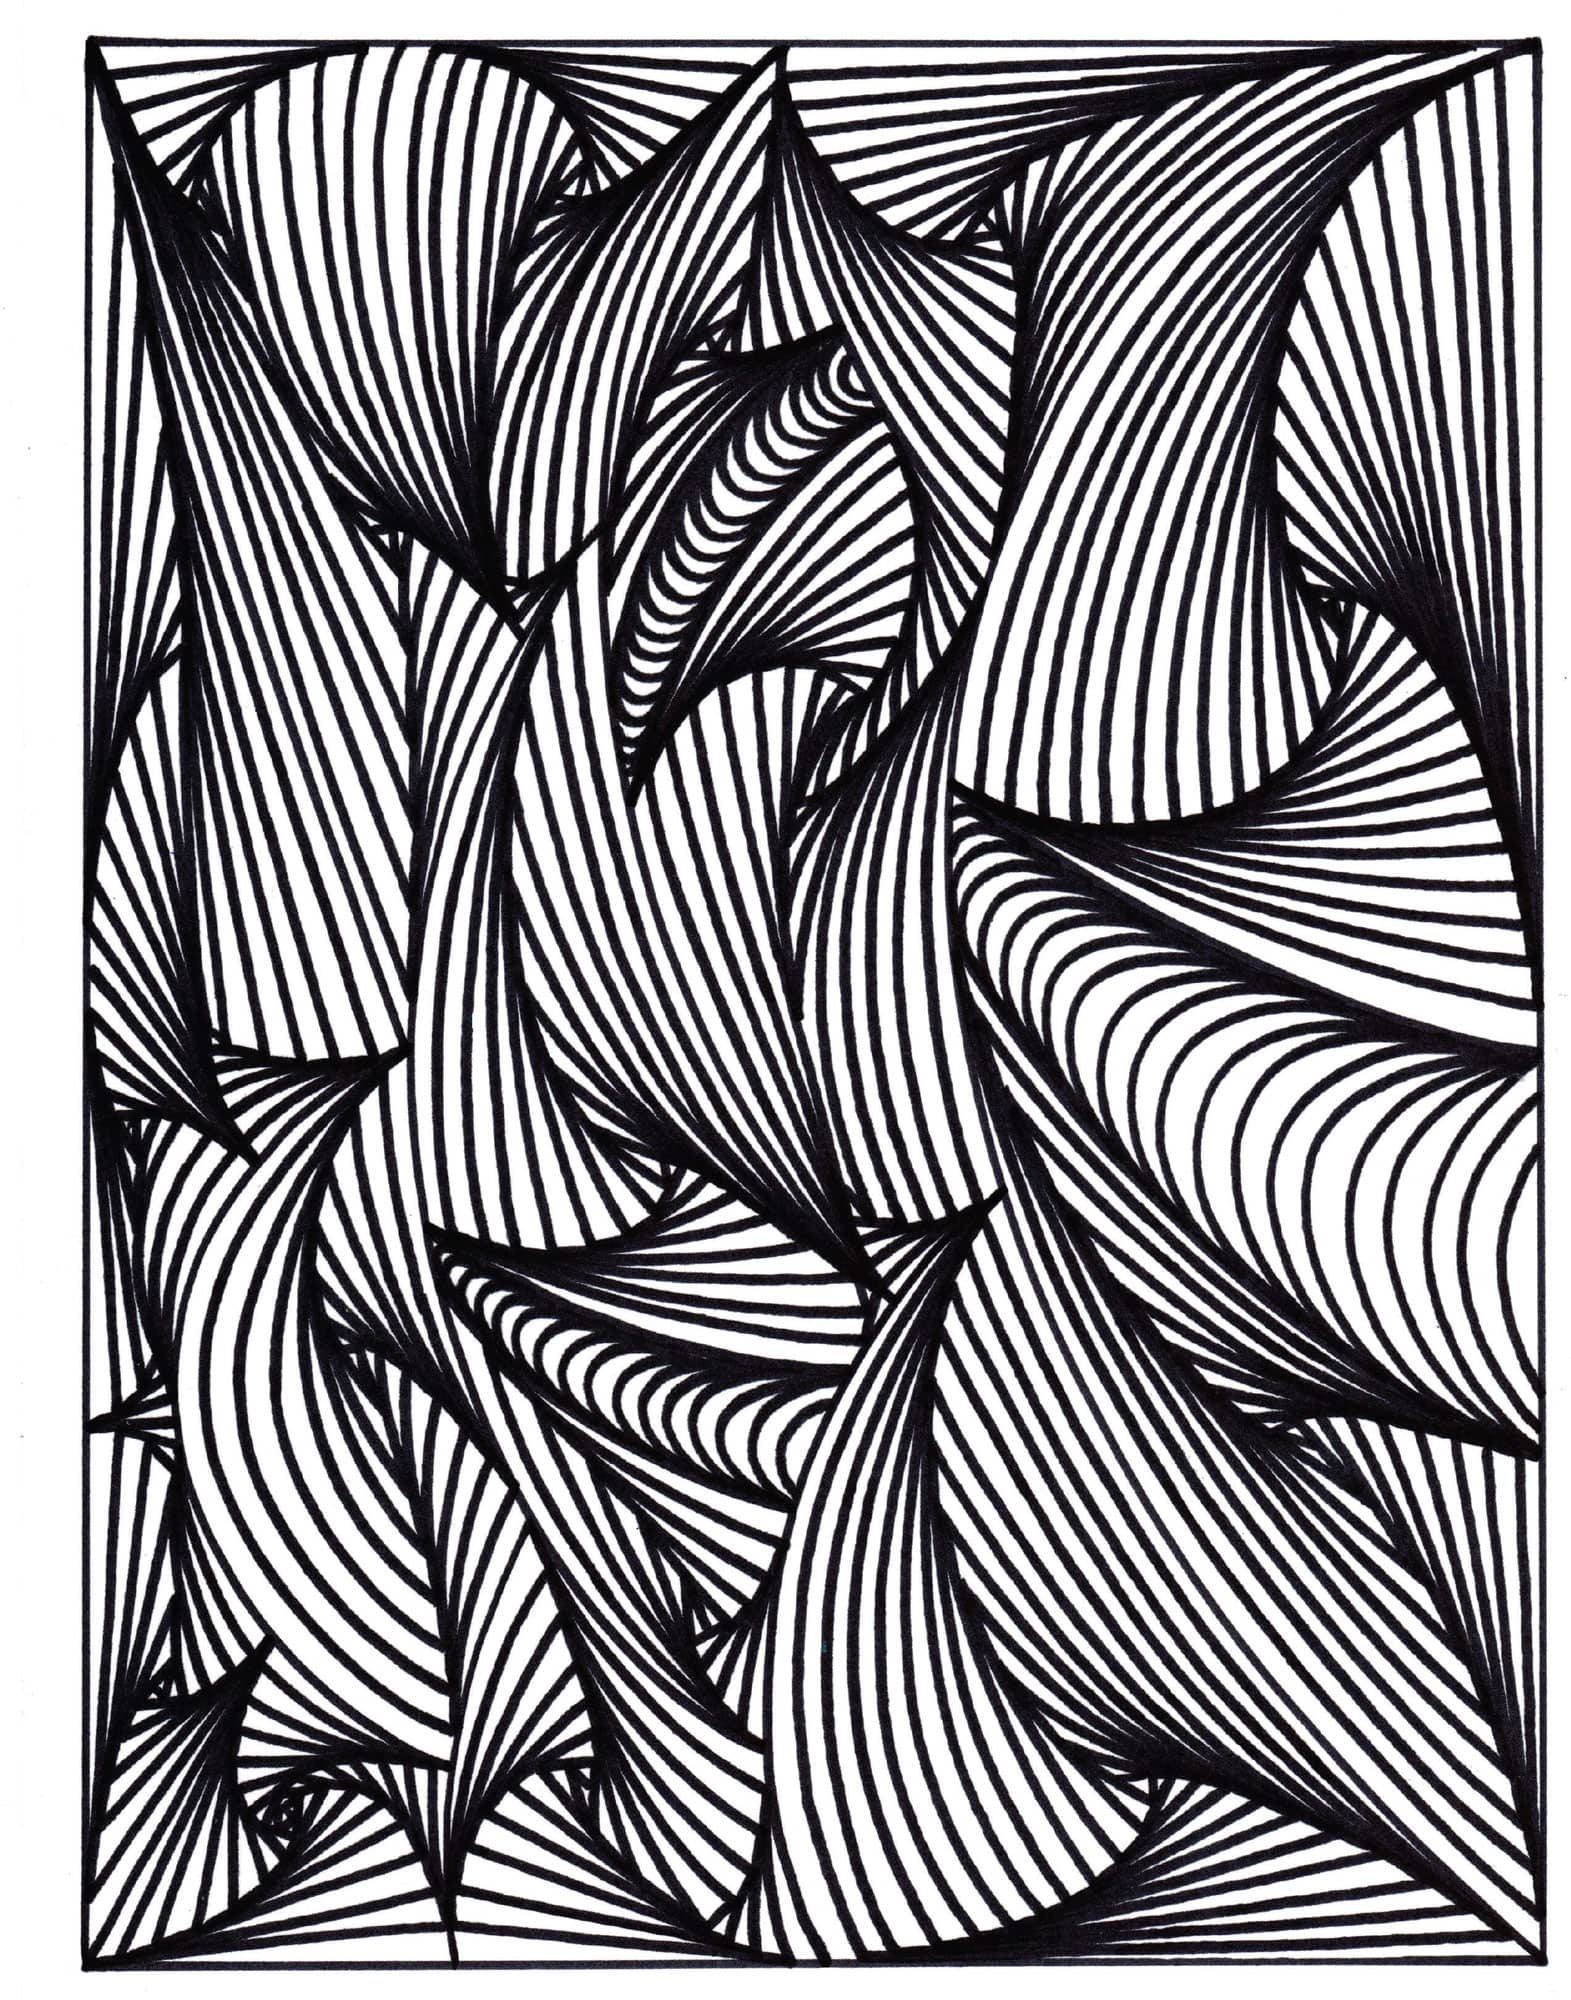
GALLERY
Here are some more complex variations of what you’ve already learned.