
Chapter 7. The pillars of good tests
- Writing trustworthy tests
- Writing maintainable tests
- Writing readable tests
- Exploring naming conventions for unit tests
No matter how you organize your tests, or how many you have, they’re worth very little if you can’t trust them, maintain them, or read them. The tests that you write should have three properties that together make them good:
- Trustworthiness— Developers will want to run trustworthy tests, and they’ll accept the test results with confidence. Trustworthy tests don’t have bugs, and they test the right things.
- Maintainability— Nonmaintainable tests are nightmares because they can ruin project schedules, or you risk losing the tests when the project is put on a more aggressive schedule. Developers will simply stop maintaining and fixing tests that take too long to change.
- Readability— This means not just being able to read a test but also figuring out the problem if the test seems to be wrong. Without readability, the other two pillars fall pretty quickly. Maintaining tests becomes harder, and you can’t trust them anymore.
This chapter presents a series of practices related to each of these three pillars that you can use when doing test reviews. Together, the three pillars ensure your time is well used. Drop one of them, and you run the risk of wasting everyone’s time.
7.1. Writing trustworthy tests
There are several indications that a test is trustworthy. If it passes, you don’t say, “I’ll step through the code in the debugger to make sure.” You trust that it passes and that the code it tests works for that specific scenario. If the test fails, you don’t tell yourself, “Oh, it’s supposed to fail,” or “That doesn’t mean the code isn’t working.” You believe that there’s a problem in your code and not in your test. In short, a trustworthy test is one that makes you feel you know what’s going on and that you can do something about it.
In this chapter, I’ll introduce guidelines and techniques to help you do the following:
- Decide when to remove or change tests
- Avoid test logic
- Test only one thing
- Make tests easy to run
- Assure code coverage
I’ve found that tests that follow these guidelines tend to be tests that I can trust more than others, and that I feel confident will continue to find errors in my code.
7.1.1. Deciding when to remove or change tests
Once you have tests in place, you should generally not change or remove them. They are there as your safety net, to let you know if anything breaks when you change your code. That said, there are times you might feel compelled to change or remove existing tests. To understand when this might cause a problem and when it’s reasonable to do so, let’s look at the reasons for each.
The main reason for removing a test is when it fails. A test can “suddenly” fail for several reasons:
- Production bugs— There’s a bug in the production code under test.
- Test bugs— There’s a bug in the test.
- Semantics or API changes— The semantics of the code under test changed, but not the functionality.
- Conflicting or invalid tests— The production code was changed to reflect a conflicting requirement.
There are also reasons for changing or removing tests when nothing is wrong with the tests or code:
- To rename or refactor the test
- To eliminate duplicate tests
Let’s see how you might deal with each of these cases.
Production bugs
A production bug occurs when you change the production code and an existing test breaks. If indeed this is a bug in the code under test, your test is fine, and you shouldn’t need to touch the test. This is the best and most desired outcome of having tests.
Because the occurrence of production bugs is one of the main reasons we have unit tests in the first place, the only thing left to do is to fix the bug in the production code. Don’t touch the test.
Test bugs
If there’s a bug in the test, you need to change the test. Bugs in tests are notoriously hard to detect in the first place, because the test is assumed to be correct. I’ve detected several stages developers go through when a test bug is encountered:
- Denial— The developer will keep looking for a problem in the code itself, changing it, causing all the other tests to start failing. The developer introduces new bugs into production code while hunting for the bug that’s actually in the test.
- Amusement— The developer will call another developer, if possible, and they will hunt for the non-existent bug together.
- Debuggerment— The developer will patiently debug the test and discover that there’s a problem in the test. This can take anywhere from an hour to a couple of days.
- Acceptance and slappage— The developer will eventually realize where the bug is, and will slap herself on the forehead.
When you finally find and start fixing the bug, it’s important to make sure that the bug gets fixed, and that the test doesn’t magically pass by testing the wrong thing. You need to do the following:
1.
Fix the bug in your test.
2.
Make sure the test fails when it should.
3.
Make sure the test passes when it should.
The first step, fixing the test, is quite straightforward. The next two steps make sure you’re still testing the correct thing, and that your test can still be trusted.
Once you have fixed your test, go to the production code under test and change it so that it manifests the bug that the test is supposed to catch. Then run the test. If the test fails, that means it’s half working. The other half will be completed in step 3. If the test doesn’t fail, you’re most likely testing the wrong thing. (I’ve seen developers accidentally delete the asserts from their tests when fixing bugs in tests. You’d be surprised how often that happens and how effective step 2 is at catching these cases.)
Once you see the test fail, change your production code so that the bug no longer exists. The test should now pass. If it doesn’t, you either still have a bug in your test, or you’re testing the wrong thing. You want to see the test fail and then pass again after you fix it so that you can be sure that it fails and passes when it should.
Semantics or API changes
A test can fail when the production code under test changes so that an object being tested now needs to be used differently, even though it may still have the same end functionality.
Consider the simple test in listing 7.1.
Listing 7.1. A simple test against the LogAnalyzer class
Let’s say that a semantics change has been made to the LogAnalyzer class, in the form of an Initialize method. You now have to call Initialize on the LogAnalyzer class before calling any of the other methods on it.
If you introduce this change in the production code, the assert line
![]() of the test in listing 7.1 will throw an exception because Initialize was not called. The test will be broken, but it’s still a valid test. The functionality it tests still works, but the semantics
of using the object under test has changed.
of the test in listing 7.1 will throw an exception because Initialize was not called. The test will be broken, but it’s still a valid test. The functionality it tests still works, but the semantics
of using the object under test has changed.
In this case, we need to change the test to match the new semantics, as shown in listing 7.2.
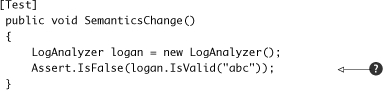
Listing 7.2. The changed test using the new semantics of LogAnalyzer
[Test]
 public void SemanticsChange()
 {
     LogAnalyzer logan = new LogAnalyzer();
 logan.Initialize();
     Assert.IsFalse(logan.IsValid("abc"));
}
Changing semantics accounts for most of the bad experiences developers have with writing and maintaining unit tests, because the burden of changing tests while the API of the code under test keeps changing gets bigger and bigger. Listing 7.3 shows a more maintainable version of the test in listing 7.2.
Listing 7.3. A refactored test using a factory method

In this case, the refactored test uses a utility factory method
![]() . We can do the same for other tests and have them use the same utility method. Then, if the semantics of creating and initializing
the object should change again, we don’t need to change all the tests that create this object; we just need to change one
little utility method. We’ll see other maintainability techniques later in this chapter.
. We can do the same for other tests and have them use the same utility method. Then, if the semantics of creating and initializing
the object should change again, we don’t need to change all the tests that create this object; we just need to change one
little utility method. We’ll see other maintainability techniques later in this chapter.
Conflicting or invalid tests
A conflict problem arises when the production code introduces a new feature that’s in direct conflict with a test. This means that, instead of the test discovering a bug, it discovers conflicting requirements.
Let’s look at a short example. Suppose the customer requests LogAnalyzer to not allow filenames shorter than three letters. The analyzer should throw an exception in that case. The feature is implemented and tests are written.
Much later on, the customer realizes that three-letter filenames do have a use and requests that they be handled in a special way. The feature is added and the production code changed. Then we write new tests so that the production code no longer throws an exception. Suddenly, an old test (the one with a three-letter filename) breaks because it expects an exception. Fixing the production code to make that test pass would break the new test that expects three-letter filenames to be handled in a special way.
This either-or scenario, where only one of two tests can pass, serves as a warning that these may be conflicting tests. In this case, you first need to make sure that the tests are in conflict. Once that’s confirmed, you need to decide which requirement to keep. You should then remove (not comment out) the invalid requirement and its tests.
Conflicting tests can sometimes point out problems in customer requirements, and the customer may need to decide on the validity of each requirement.
Renaming or refactoring tests
An unreadable test is more of a problem than a solution. It can hinder your code’s readability and your understanding of any problems it finds.
If you encounter a test that has a bad name or that can be made more maintainable, change the test code (but don’t change the basic functionality of the test). Listing 7.3 showed one such example of refactoring a test for maintainability, which also makes it a lot more readable.
Eliminating duplicate tests
When dealing with a team of developers, it’s common to come across multiple tests written by different developers for the same functionality. I’m not crazy about removing duplicate tests for a couple of reasons:
- The more (good) tests you have, the more certain you are to catch bugs.
- You can read the tests and see different ways or semantics of testing the same thing.
Here are some of the cons of having duplicate tests:
- It may be harder to maintain several different tests that provide the same functionality.
- Some tests may be higher quality than others, and you need to review them all for correctness.
- Multiple tests may break when a single thing doesn’t work. (This may not really be a con.)
- Similar tests must be named differently, or the tests can be spread across different classes.
- Multiple tests may create more maintainability issues.
- Tests may have little differences, and so can be thought of as testing the same things slightly differently. They may make for a larger and better picture of the object being tested.
- Some tests may be more expressive than others, so more tests may improve the chances of test readability.
Although, as I said, I am not crazy about removing duplicate tests, I usually do so; the cons usually outweigh the pros.
7.1.2. Avoiding logic in tests
The chances of having bugs in your tests increase almost exponentially as you include more and more logic in them. I’ve seen plenty of tests that should have been simple turned into dynamically changing logic, random-number generating, thread-creating, file-writing monsters that are little test engines in their own right. Sadly, because they had a [Test] attribute on them, the writer didn’t consider that they might have bugs or didn’t write them in a maintainable manner. Those test monsters take more time to debug and verify than they save.
But all monsters start out small. Often, a guru in the company will look at a test and start thinking, “What if we made the method loop and create random numbers as input? We’d surely find lots more bugs that way!” And you will, especially in your tests. Test bugs are one of the most annoying things for developers, because you’ll almost never search for the cause of a failing test in the test itself.
If you have any of the following inside a test method, your test contains logic that should not be there:
- switch, if, or else statements
- foreach, for, or while loops
A test that contains logic is usually testing more than one thing at a time, which isn’t recommended, because the test is less readable and more fragile. But test logic also adds complexity that may contain a hidden bug.
Tests should, as a general rule, be a series of method calls with no control flows, not even try-catch, and with assert calls. Anything more complex causes the following problems:
- The test is harder to read and understand.
- The test is hard to recreate. (Imagine a multithreaded test, or a test with random numbers that suddenly fail.)
- The test is more likely to have a bug or to test the wrong thing.
- Naming the test may be harder because it does multiple things.
Generally, monster tests replace original simpler tests, and that makes it harder to find bugs in the production code. If you must create a monster test, it should be added to and not replace existing tests.
7.1.3. Testing only one thing
If your test contains more than a single assert, it may be testing more than one thing. That doesn’t sound so bad until you go to name your test or consider what happens if the first assert fails.
Naming a test may seem like a simple task, but if you’re testing more than one thing, giving the test a good name that indicates what is being tested becomes almost impossible. When you test just one thing, naming the test is easy.
A failed assert message in most test frameworks (NUnit included) throws a special type of exception that’s caught by the test framework runner. When the test framework catches that exception, it means the test has failed. Unfortunately, exceptions, by design, don’t let the code continue. The method exits on the same line the exception is thrown. Listing 7.4 shows an example. If the first assert (IsFalse()) fails, it will throw an exception, which means the second assert will never run.
Listing 7.4. A test with multiple asserts
[Test]
 public void TestWithMultipleAsserts()
 {
     LogAnalyzer logan = MakeDefaultAnalyzer();

     Assert.IsFalse(logan.IsValid("abc"));
     Assert.IsTrue(logan.IsValid("abcde.txt"));
 }
Consider assert failures as symptoms of a disease. The more symptoms you can find, the easier the disease will be to diagnose. After a failure, subsequent asserts aren’t executed, and you miss seeing other possible symptoms that could provide valuable data (symptoms) that would help you narrow your focus and discover the underlying problem.
Running multiple asserts in a single test adds complexity with little value. You should run additional asserts in separate, self-contained unit tests so that you can see what really fails.
7.1.4. Making tests easy to run
In chapter 6, I discussed the safe green zone for tests. If developers don’t trust your tests to run out of the box easily and consistently, they won’t run them. Refactoring your tests so they’re easy to run and provide consistent results will make them feel more trustworthy. Having a safe green zone in your tests can lead to more confidence in your tests.
7.1.5. Assuring code coverage
To ensure good coverage for your new code, use one of the automated tools (for example, NCover or Visual Studio Team System Test Edition). Find a good tool and stick with it, making sure you never have low coverage; less than 20 percent means you’re missing a whole bunch of tests. You never know if the next developer will try to play with your code. He may try to optimize it or wrongly delete some essential line, and if you don’t have a test that will fail, the mistake may go unnoticed.
When doing code and test reviews, you can also do a manual check, which is great for ad hoc testing of a test: try commenting out a line or a constraint check. If all tests still pass, you might be missing some tests, or the current tests may not be testing the right thing.
When you add a new test that was missing, check whether you’ve added the correct test with these steps:
1.
Comment out the production code you think isn’t being covered.
2.
Run all the tests.
3.
If all the tests pass, you’re missing a test or are testing the wrong thing. Otherwise there would have been a test somewhere that was expecting that line to be called, or some resulting consequence of that line of code to be true, and that missing test would now fail.
4.
Once you’ve found a missing test, you’ll need to add it. Keep the code commented out and write a new test that fails, proving that the code you’ve commented is missing.
5.
Uncomment the code you commented before.
6.
The test you wrote should now pass. You’ve detected and added a missing test!
7.
If the test still fails, it means the test may have a bug or is testing the wrong thing. Modify the test until it passes. Now you’ll want to see that the test is OK, making sure it fails when it should, and doesn’t just pass when it should. To make sure the test fails when it should, reintroduce the bug into your code (commenting out the line of production code) and see if the test indeed fails.
As an added confidence booster, you might also try replacing various parameters or internal variables in your method under test with constants (making a bool always true to see what happens, for example).
The trick to all this testing is making sure it doesn’t take up too much time to make it worth your while. That’s what the next section is about: maintainability.
7.2. Writing maintainable tests
Maintainability is one of the core issues most developers face when writing unit tests. Eventually the tests seem to become harder and harder to maintain and understand, and every little change to the system seems to break one test or another, even if bugs don’t exist. With all pieces of code, time adds a layer of “indirection” between what you think the code does and what it really does.
This chapter will cover some techniques I’ve learned the hard way, writing unit tests in various teams. They include testing only against public contracts, removing duplication in tests, and enforcing test isolation, among others.
7.2.1. Testing private or protected methods
Private or protected methods are usually private for a good reason in the developer’s mind. Sometimes it’s to hide implementation details, so that the implementation can change later without the end functionality changing. It could also be for security-related or IP-related reasons (obfuscation, for example).
When you test a private method, you’re testing against a contract internal to the system, which may well change. Internal contracts are dynamic, and they can change when you refactor the system. When they change, your test could fail because some internal work is being done differently, even though the overall functionality of the system remains the same.
For testing purposes, the public contract (the overall functionality) is all that you need to care about. Testing the functionality of private methods may lead to breaking tests, even though the overall functionality is correct.
If a method is worth testing, it might be worth making it public, static, or at least internal, and defining a public contract against any user of it. In some cases, the design may be cleaner if you put the method in a different class altogether. We’ll look at these approaches in a moment.
Does this mean there should eventually be no private methods in the code base? No. With test-driven development, we usually write tests against methods that are public, and those public methods are later refactored into calling smaller, private methods. All the while, the tests against the public methods continue to pass.
Making methods public
Making a method public isn’t necessarily a bad thing. It may seem to go against the object-oriented principles you were raised on, but wanting to test a method means that the method has a known behavior or contract against the calling code. By making it public, you’re making this official. By keeping the method private, you tell all the developers who come after you that they can change the implementation of the method without worrying about unknown code that uses it, because it only serves as part of a larger group of things that together make up a contract to the calling code.
Extracting methods to new classes
If your method contains a lot of logic that can stand on its own, or it uses state in the class that’s only relevant to the method in question, it may be a good idea to extract the method into a new class, with a specific role in the system. You can then test that class separately. Michael Feathers’ book, Working Effectively with Legacy Code, has some good examples of this technique.
Making methods static
If your method doesn’t use any of its class’s variables, you might want to refactor the method by making it static. That makes it much more testable, but also states that this method is a sort of utility method that has a known public contract specified by its name.
Making methods internal
When all else fails, and you can’t afford to expose the method in an “official” way, you might want to make it internal, and then use the [InternalsVisibleTo("TestAssembly")] attribute on the production code assembly so that tests can still call that method. This is my least favorite approach, but sometimes there’s no choice (perhaps because of security reasons, lack of control over the code’s design, and so on).
Making the method internal isn’t a great way to make sure your tests are more maintainable, because a coder can still feel it’s easier to change the method. But by exposing a method as an explicit public contract, the coder who may change it knows that the method has a real usage contract he can’t break.
Removing the method isn’t a good option because the production code uses the method too. Otherwise, there would be no reason to write the tests in the first place.
Another way to make code more maintainable is to remove duplication in tests.
7.2.2. Removing duplication
Duplication in our unit tests can hurt us as developers just as much as (if not more than) duplication in production code. The “don’t repeat yourself” (DRY) principle should be in effect in test code as in production code. Duplicated code means more code to change when one aspect we test against changes. Changing a constructor or changing the semantics of using a class can have a large effect on tests that have a lot of duplicated code.
To understand why, let’s begin with a simple example of a test, seen in listing 7.5.
Listing 7.5. A class under test, and a test that uses it
public class LogAnalyzer
    {
        public bool IsValid(string fileName)
        {
            if (fileName.Length < 8)
            {
                return true;
            }
            return false;
        }
    }

   [TestFixture]
    public class LogAnalyzerTestsMaintainable
    {
       [Test]
        public void IsValid_LengthBiggerThan8_IsFalse()
        {
           LogAnalyzer logan = new LogAnalyzer();
           bool valid = logan.IsValid("123456789");
           Assert.IsFalse(valid);
        }
    }
The test at the bottom of listing 7.5 seems reasonable, until you introduce another test for the same class and end up with two tests, as in listing 7.6.
Listing 7.6. Two tests with duplication
[Test]
    public void IsValid_LengthBiggerThan8_IsFalse()
    {
        LogAnalyzer logan = new LogAnalyzer();
        bool valid = logan.IsValid("123456789");
        Assert.IsFalse(valid);
    }

   [Test]
    public void IsValid_LengthSmallerThan8_IsTrue()
    {
        LogAnalyzer logan = new LogAnalyzer();
        bool valid = logan.IsValid("1234567");
        Assert.IsTrue(valid);
    }
What’s wrong with the tests in listing 7.6? The main problem is that, if the way you use LogAnalyzer changes (its semantics), the tests will have to be maintained independently of each other, leading to more maintenance work. Listing 7.7 shows an example of such a change.
Listing 7.7. LogAnalyzer with changed semantics that now requires initialization
public class LogAnalyzer
    {
    private bool initialized=false;

        public bool IsValid(string fileName)
        {
            if(!initialized)
            {
                throw new NotInitializedException(
               "The analyzer.Initialize() method should be" +
               " called before any other operation!");
            }
            if (fileName.Length < 8)
            {
                return true;
            }
            return false;
        }
        public void Initialize()
        {
        //initialization logic here
        ...
        initialized=true;
        }
    }
Now, the two tests in listing 7.6 will both break because they both neglect to call Initialize() against the LogAnalyzer class. Because we have code duplication (both of the tests create the class within the test), we need to go into each one and change it to call Initialize().
We can refactor the tests to remove the duplication by creating the LogAnalyzer in a CreateDefaultAnalyzer() method that both tests can call. We could also push the creation and initialization up into a new setup method in our test class.
Removing duplication using a helper method
Listing 7.8 shows how you could refactor the tests into a more maintainable state by introducing a shared factory method that creates a default instance of LogAnalyzer. Assuming all the tests were written to use this factory method, we could then add a call to Initialize() within that factory method instead of changing all the tests to call Initialize().
Listing 7.8. Adding the Initialize() call in the factory method
[Test]
 public void IsValid_LengthBiggerThan8_IsFalse()
 {
     LogAnalyzer logan = GetNewAnalyzer();
     bool valid = logan.IsValid("123456789");
     Assert.IsFalse(valid);
 }
[Test]
 public void IsValid_LengthSmallerThan8_IsTrue()
 {
     LogAnalyzer logan = GetNewAnalyzer();
     bool valid = logan.IsValid("1234567");
     Assert.IsTrue(valid);
 }

 private LogAnalyzer GetNewAnalyzer()
 {
     LogAnalyzer analyzer = new LogAnalyzer();
     analyzer.Initialize();
     return analyzer;
 }
Factory methods aren’t the only way to remove duplication in tests, as the next section shows.
Removing duplication using [SetUp]
We could also easily initialize LogAnalyzer within the Setup method, as shown in listing 7.9.
Listing 7.9. Using a setup method to remove duplication
[SetUp]
 public void Setup()
 {
     logan=new LogAnalyzer();
     logan.Initialize();
 }

 private LogAnalyzer logan= null;

[Test]
 public void IsValid_LengthBiggerThan8_IsFalse()
 {
     bool valid = logan.IsValid("123456789");
     Assert.IsFalse(valid);
 }

[Test]
 public void IsValid_LengthSmallerThan8_IsTrue()
 {
     bool valid = logan.IsValid("1234567");
     Assert.IsTrue(valid);
 }
In this case, we don’t even need a line that creates the analyzer object in each test: a shared class instance is initialized before each test with a new instance of LogAnalyzer, and then Initialize() is called on that instance. But beware: using a setup method to remove duplication isn’t always a good idea, as I explain in the next section.
7.2.3. Using setup methods in a maintainable manner
The Setup() method is easy to use. In fact, it’s almost too easy to use—enough so that developers tend to use it for things it was not meant for, and tests become less readable and maintainable.
Nevertheless, setup methods have several limitations, which you can get around using simple helper methods:
- Setup methods can only help when you need to initialize things.
- Setup methods aren’t always the best candidate for duplication removal. Removing duplication isn’t always about creating and initializing new instances of objects. Sometimes it’s about removing duplication in assertion logic, calling out code in a specific way.
- Setup methods can’t have parameters or return values.
- Setup methods can’t be used as factory methods that return values. They’re run before the test executes, so they must be more generic in the way they work. Tests sometimes need to request specific things or call shared code with a parameter for the specific test (for example, retrieve an object and set its property to a specific value).
- Setup methods should only contain code that applies to all the tests in the current test class, or the method will be harder to read and understand.
Now that we know the basic limitations of setup methods, let’s see how developers try to get around them in their quest to use setup methods no matter what, instead of using helper methods. Developers abuse setup methods in several ways:
- Initializing objects in the setup method that are only used in some of the tests in the class
- Having setup code that’s long and hard to understand
- Setting up mocks and fake objects within the setup method
Let’s take a closer look at these.
Initializing objects that are only used by some of the tests
This sin is a deadly one. Once you commit it, it becomes difficult to maintain the tests or even read them, because the setup
method quickly becomes loaded with objects that are specific only to some of the tests. Listing 7.10 shows what our test class would look like if we initialized a FileInfo object setup method but only used it in one test
![]() .
.
Listing 7.10. A poorly implemented Setup() method
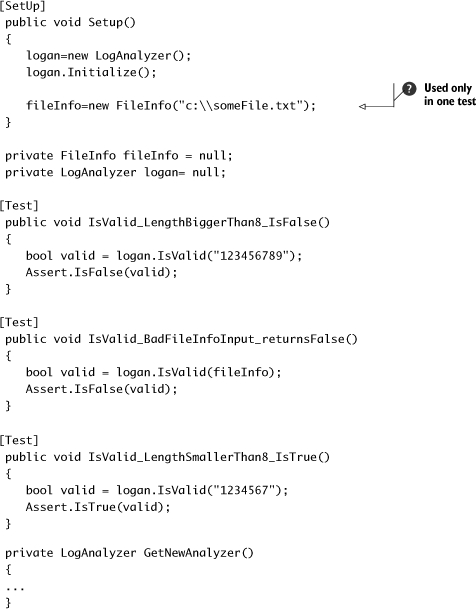
Why is the setup method in listing 7.10 less maintainable? Because, to read the tests for the first time and understand why they break, you need to do the following:
1.
Go through the setup method to understand what is being initialized.
2.
Assume that objects in the setup method are used in all tests.
3.
Find out later you were wrong, and read the tests again more carefully to see which test uses the objects that may be causing the problems.
4.
Dive deeper into the test code for no good reason, taking more time and effort to understand what the code does.
Always consider the readers of your tests when writing the tests. Imagine this is the first time they read them. Make sure they don’t get angry.
Having setup code that’s long and hard to understand
Because the setup method provides only one place in the test to initialize things, developers tend to initialize many things, which inevitably is cumbersome to read and understand. One solution is to refactor the calls to initialize specific things into helper methods that are called from the setup method. This means that refactoring the setup method is usually a good idea; the more readable it is, the more readable your test class will be.
But there’s a fine line between over-refactoring and readability. Over-refactoring can lead to less readable code. This is a matter of personal preference. You need to watch for when your code is becoming less readable. I recommend getting feedback from a partner during the refactoring. We all can become too enamored with code we’ve written, and having a second pair of eyes involved in refactoring can lead to good and objective results. Having a peer do a code review (a test review) after the fact is also good, but not as productive as doing it as it happens.
Setting up mocks and fakes in the setup method
It’s not always a bad idea to use the setup method to create mocks and fake objects, but it’s important that only those mocks and fakes that are used in all the tests in the class are initialized in the setup method, or it will become hard to read and maintain.
My preference is to have each test create its own mocks and stubs by calling helper methods within the test, so that the reader of the test knows exactly what is going on, without needing to jump from test to setup to understand the full picture.
7.2.4. Enforcing test isolation
The lack of test isolation is the biggest single cause of test blockage I’ve seen while consulting and working on unit tests. The basic concept is that a test should always run in its own little world, isolated from even the knowledge that other tests out there may do similar or different things.
The test that cried “fail”
One project I was involved in had unit tests behaving strangely, and they got even stranger as time went on. A test would fail and then suddenly pass for a couple of days straight. A day later, it would fail, seemingly randomly, and other times it would pass even if code was changed to remove or change its behavior. It got to the point where developers would tell each other, “Ah, it’s OK. If it sometimes passes, that means it passes.”
It turned out that the test was calling out a different test as part of its code, and when the other test failed, it would break the first test.
It only took us three days to figure this out, after spending a month living with the situation. When we finally had the test working correctly, we discovered that we had a bunch of real bugs in our code that we were ignoring because we were getting what we thought were false positives from the failing test. The story of the boy who cried “wolf” holds true even in development.
When tests aren’t isolated well, they can step on each other’s toes enough to make you miserable, making you regret deciding to try unit testing on the project, and promising yourself never again. I’ve seen this happen. We don’t bother looking for problems in the tests, so when there’s a problem with the tests, it can take a lot of time to find it.
There are several test “smells” that can hint at broken test isolation:
- Constrained test order— Tests expecting to be run in a specific order or expecting information from other test results
- Hidden test call— Tests calling other tests
- Shared-state corruption— Tests sharing in-memory state without rolling back
- External-shared-state corruption— Integration tests with shared resources and no rollback
Let’s look at these simple anti-patterns.
Anti-pattern: constrained test order
This problem arises when tests are coded to expect a specific state in memory, in an external resource, or in the current test class—a state that was created by running other tests in the same class before the current test. The problem is that most test platforms (including NUnit, JUnit, and MbUnit) don’t guarantee that tests will run in a specific order, so what passes today may fail tomorrow.
For example, listing 7.11 shows a test against LogAnalyzer that expects that an earlier test had already called Initialize().
Listing 7.11. Constrained test order: the second test will fail if it runs first
[TestFixture]
 public class IsolationsAntiPatterns
 {
    private LogAnalyzer logan;
   [Test]
    public void CreateAnalyzer_BadFileName_ReturnsFalse()
    {
        logan = new LogAnalyzer();
        logan.Initialize();
        bool valid = logan.IsValid("abc");
        Assert.That(valid, Is.False);
    }

   [Test]
    public void CreateAnalyzer_GoodFileName_ReturnsTrue()
    {
        bool valid = logan.IsValid("abcdefg");
        Assert.That(valid, Is.True);
    }
 }
A myriad of problems can occur when tests don’t enforce isolation. Here’s a short list:
- A test may suddenly start breaking when a new version of the test framework is introduced that runs the tests in a different order.
- Running a subset of the tests may produce different results than running all the tests or a different subset of the tests.
- Maintaining the tests is more cumbersome, because you need to worry about how other tests relate to particular tests and how each one affects state.
- Your tests may fail or pass for the wrong reasons; for example, a different test may have failed or passed before it, leaving the resources in an unknown state.
- Removing or changing some tests may affect the outcomes of other tests.
- It’s difficult to name your tests appropriately because they test more than a single thing.
There are a couple of common patterns that lead to poor test isolation:
- Flow testing— A developer writes tests that must run in a specific order so that they can test flow execution, a big use case composed of many actions, or a full integration test where each test is one step in that full test.
- Laziness in cleanup— A developer is lazy and doesn’t return any state her test may have changed back to its original form, and other developers write tests that depend on this symptom, knowingly or unknowingly.
These problems can be solved in various manners:
- Flow testing— Instead of writing flow-related tests in unit tests (long-running use cases, for example), consider using some sort of integration testing framework like FIT or FitNesse, or QA-related products such as AutomatedQA, WinRunner, and the like.
- Laziness in cleanup— If you’re too lazy to clean up your database after testing, your filesystem after testing, or your memory-based objects, consider moving to a different profession. This isn’t a job for you.
Anti-pattern: hidden test call
In this anti-pattern, tests contain one or more direct calls to other tests in the same class or other test classes, which causes tests to depend on one another. For example, listing 7.12 shows the CreateAnalyzer_Good NameAndBadNameUsage test calling a different test at the end, creating a dependency between the tests and breaking both of them as isolated units.
Listing 7.12. One test calling another breaks isolation and introduces a dependency
    [TestFixture]
public class HiddenTestCall
{
    private LogAnalyzer logan;
   [Test]
    public void CreateAnalyzer_GoodNameAndBadNameUsage()
    {
        logan = new LogAnalyzer();
        logan.Initialize();
        bool valid = logan.IsValid("abc");
        Assert.That(valid, Is.False);

        CreateAnalyzer_GoodFileName_ReturnsTrue();
    }

   [Test]
    public void CreateAnalyzer_GoodFileName_ReturnsTrue()
    {
        bool valid = logan.IsValid("abcdefg");
        Assert.That(valid, Is.True);
    }
}
This type of dependency can cause several problems:
- Running a subset of the tests may produce different results than running all the tests or a different subset of the tests.
- Maintaining the tests is more cumbersome, because you need to worry about how other tests relate to particular tests and how and when they call each other.
- Tests may fail or pass for the wrong reasons. For example, a different test may have failed, thus failing your test or not calling it at all. Or a different test may have left some shared variables in an unknown state.
- Changing some tests may affect the outcome of other tests.
- It’s difficult to clearly name tests that call other tests.
Here are a few causes for this problem:
- Flow testing— A developer writes tests that need to run in a specific order so that they can test flow execution, a big use case composed of many actions, or a full integration test where each test is one step in that full test.
- Trying to remove duplication— A developer tries to remove duplication in the tests by calling other tests (which have code they don’t want the current test to repeat).
- Laziness in separating the tests— A developer is lazy and doesn’t take the time to create a separate test and refactor the code appropriately, instead taking a shortcut and calling a different test.
Here are some solutions for those problems:
- Flow testing— Instead of writing flow-related tests in unit tests (long-running use cases, for example), consider using some sort of integration testing framework like FIT or FitNesse, or QA-related products such as AutomatedQA, WinRunner, and the like.
- Trying to remove duplication— Don’t ever remove duplication by calling another test from a test. You’re preventing that test from relying on the setup and teardown methods in the class and are essentially running two tests in one (because the calling test has an assertion as well as the test being called). Instead, refactor the code you don’t want to write twice into a third method that both your test and the other test call.
- Laziness in separating the tests— If you’re too lazy to separate your tests, think of all the extra work you’ll have to do if you don’t separate them. Try to imagine a world where the current test you’re writing is the only test in the system, so it can’t rely on any other test.
Anti-pattern: shared-state corruption
This anti-pattern manifests in two major ways, independent of each other:
- Tests touch shared resources (either in memory or in external resources, such as databases, filesystems, and so on) without cleaning up or rolling back any changes they make to those resources.
- Tests don’t set up the initial state they need before they start running, relying on the state to be there.
Either of these situations will cause the symptoms we’ll look at shortly.
The problem is that tests rely on specific state to have consistent pass/fail behavior. If a test doesn’t control the state it expects, or other tests corrupt that state for whatever reason, the test can’t run properly or report the correct result consistently.
For example, assume we have a Person class with simple features: it has a list of phone numbers and the ability to search for a number by specifying the beginning of the number. Listing 7.13 shows a couple of tests that don’t clean up or set up a Person object instance correctly.
Listing 7.13. Shared-state corruption by a test
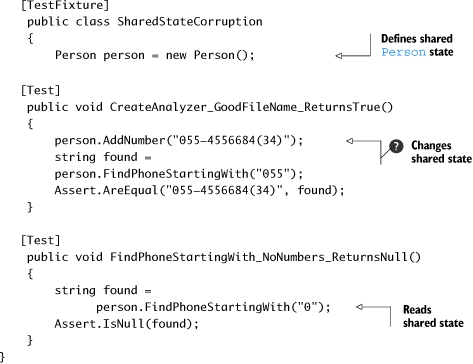
In this example, the second test (expecting a null return value) will fail because the previous test has already added a number
![]() to the Person instance.
to the Person instance.
This type of problem causes a number of symptoms:
- Running a subset of the tests may produce different results than running all the tests or a different subset of the tests.
- Maintaining the test is more cumbersome, because you may break the state for other tests, breaking those tests without realizing it.
- Your test may fail or pass for the wrong reason; for example, a different test may have failed or passed before it, leaving the shared state in a problematic condition, or it may not have cleaned up after it ran.
- Changing some tests may affect the outcomes of other tests, seemingly randomly.
Here are a few causes of this problem:
- Not setting up state before each test— A developer doesn’t set up the state required for the test, or assumes the state was already correct.
- Using shared state— A developer uses shared memory or external resources for more than one test without taking precautions.
- Using static instances in tests— A developer sets static state that’s used in other tests.
Here are some solutions:
- Not setting up state before each test— This is a mandatory practice when writing unit tests. Use either a setup method or call specific helper methods at the beginning of the test to ensure the state is what you expect it to be.
- Using shared state— In many cases, you don’t need to share state at all. Having separate instances of an object for each test is the safest way to go.
- Using static instances in tests— You need to be careful how your tests manage static state. Be sure to clean up the static state using setup or teardown methods. Sometimes it’s effective to use direct helper method calls to clearly reset the static state from within the test. If you’re testing singletons, it’s worth adding public or internal setters so your tests can reset them to a clean object instance.
Anti-pattern: external-shared-state corruption
This anti-pattern is similar to the in-memory state corruption pattern, but it happens in integration-style testing:
- Tests touch shared resources (either in memory or in external resources, such as databases, filesystems, and so on) without cleaning up or rolling back any changes they make to those resources.
- Tests don’t set up the initial state they need before they start running, relying on the state to be there.
Now that we’ve looked at isolating tests, let’s manage our asserts to make sure we get the full story when a test fails.
7.2.5. Avoiding multiple asserts
To understand the problem of multiple asserts, let’s take a look at the example in listing 7.14.
Listing 7.14. A test that contains multiple asserts
[Test]
 public void CheckVariousSumResults()
 {
     Assert.AreEqual(3, Sum(1001, 1, 2));
     Assert.AreEqual(3, Sum(1, 1001, 2));
     Assert.AreEqual(3, Sum(1, 2, 1001));
 }
There’s more than one test in this test method. The author of the test method tried to save some time by including three tests as three simple asserts. What’s the problem here? When asserts fail, they throw exceptions. (In NUnit’s case, they throw a special AssertException that’s caught by the NUnit test runner, which understands this exception as a signal that the current test method has failed.) Once an assert clause throws an exception, no other line executes in the test method. That means that, if the first assert in listing 7.14 failed, the other two assert clauses would never execute.
There are several ways to achieve the same goal:
.
Create a separate test for each assert.
.
Use parameterized tests.
.
Wrap the assert call with try-catch.
Why does it matter if some asserts aren’t executed?
If only one assert fails, you never know if the other asserts in that same test method would have failed or not. You may think you know, but it’s an assumption until you can prove it with a failing or passing assert. When people see only part of the picture, they tend to make a judgment call about the state of the system, which can turn out wrong. The more information you have about all the asserts that have failed or passed, the better equipped you are to understand where in the system a bug may lie, and where it doesn’t.
I’ve gone on wild goose chases hunting for bugs that weren’t there because only one assert out of several failed. Had I bothered to check whether the other asserts failed or passed, I might have realized that the bug was in a different location.
Sometimes people go and find bugs that they think are real, but when they “fix” them, the assert that previously failed passes and the other asserts in that test fail (or continue to fail). Sometimes you can’t see the full problem, so fixing part of it can introduce new bugs into the system, which will only be discovered after you’ve uncovered each assert’s result.
That’s why it’s important that all the asserts have a chance to run, even if other asserts have failed before. In most cases, that means putting single asserts in tests.
Refactoring into multiple tests
Multiple asserts are really multiple tests without the benefit of test isolation; a failing test causes the other asserts (tests) to not execute. Instead, we can create separate test methods with meaningful names that represent each test case. Listing 7.15 shows an example of refactoring from the code from listing 7.14.
Listing 7.15. A refactored test class with three different tests
[Test]
 public void Sum_1001AsFirstParam_Returns3()
 {
     Assert.AreEqual(3, Sum(1001, 1, 2));
 }

[Test]
 public void Sum_1001AsMiddleParam_Returns3()
 {
     Assert.AreEqual(3, Sum(1, 1001, 2));
 }

[Test]
 public void Sum_1001AsThirdParam_Returns3()
 {
     Assert.AreEqual(3, Sum(1, 2, 1001));
 }
As you can see, the refactoring in listing 7.15 gives us three separate tests, each with a slightly different name indicating how we’re testing the unit. The benefit is that, if one of those tests fails, the others will still run. Unfortunately, this is too verbose, and most developers would feel this refactoring is overkill for the benefit. Although I disagree that it’s overkill (it took about 20 seconds of work to get the benefit), I agree that the verbosity is an issue. It’s an issue because developers won’t do it, and we end up with our original problem.
That’s why many unit-testing frameworks, including MbUnit and NUnit, have a custom attribute you can use that achieves the same goal with much more concise syntax.
Using parameterized tests
Both MbUnit and NUnit support the notion of parameterized tests using a special attribute called [RowTest]. Listing 7.16 shows how you can use the [RowTest] and [Row] attributes (found in NUnit.Extensions.dll under the NUnit bin directory) to run the same test with different parameters in a single test method. Notice that, when you use the [RowTest] attribute, it replaces the [Test] attribute in NUnit.
Listing 7.16. A refactored test class using parameterized tests
[RowTest]
[Row(1001,1,2,3)]
[Row(1,1001,2,3)]
[Row(1,2,1001,3)]
 public void SumTests(int x,int y, int z,int expected)
 {
     Assert.AreEqual(expected, Sum(x, y, z));
 }
Note
To use [RowTest] in NUnit, you’ll need to add a reference to NUnit.Extensions.dll, which is found in the bin directory of NUnit’s installation folder.
Parameterized test methods in NUnit and MbUnit are different from regular tests in that they can take parameters. They also expect at least one [RowTest] attribute to be placed on top of the current method instead of a regular [Test] attribute. The attribute takes any number of parameters, which are then mapped at runtime to the parameters that the test method expects in its signature.
The example in listing 7.16 expects four arguments. We call an assert method with the first three parameters, and use the last one as the expected value. This gives us a declarative way of creating a single test with different inputs.
The best thing about this is that, if one of the [RowTest] attributes fails, the other attributes are still executed by the test runner, so we see the full picture of pass/fail states in all tests.
Wrapping with try-catch
Some people think it’s a good idea to use a try-catch block for each assert to catch and write its exception to the console, and then continue to the next statement, bypassing the problematic nature of exceptions in tests. I think using parameterized tests is a far better way of achieving the same thing. Use parameterized tests instead of try-catch around multiple asserts.
Now that we know how to avoid multiple asserts acting as multiple tests, let’s look at multiple asserts being used to test multiple aspects of a single object.
7.2.6. Avoiding testing multiple aspects of the same object
Let’s look at another example of a test with multiple asserts, but this time it’s not trying to act as multiple tests in one test, it’s trying to check multiple aspects of the same state. If even one aspect fails, we need to know about it. Listing 7.17 shows such a test.
Listing 7.17. Testing multiple aspects of the same object in one test
[Test]
 public void
  Analyze_SimpleStringLine_UsesDefaulTabDelimiterToParseFields()
 {
    LogAnalyzer log = new LogAnalyzer();
    AnalyzedOutput output =
        log.Analyze("10:05	Open	Roy");
    Assert.AreEqual(1,output.LineCount);
    Assert.AreEqual("10:05",output.GetLine(1)[0]);
    Assert.AreEqual("Open",output.GetLine(1)[1]);
    Assert.AreEqual("Roy",output.GetLine(1)[2]);
 }
This example is testing that the parse output from the LogAnalyzer worked by testing each field in the result object separately. They should all work, or the test should fail.
Making tests more maintainable
Listing 7.18 shows a way to refactor the test from listing 7.17 so that it’s easier to read and maintain.
Listing 7.18. Comparing objects instead of using multiple asserts
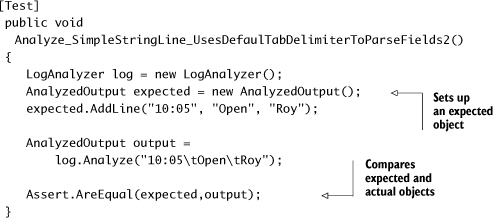
Instead of adding multiple asserts, we can create a full object to compare against, set all the properties that should be on that object, and compare the result and the expected object in one assert. The advantage of this approach is that it’s much easier to understand what we’re testing and to recognize that this is one logical block that should be passing, not many separate tests.
Note that, for this kind of testing, the objects being compared must override the Equals() method, or the comparison between the objects won’t work. Some people find this an unacceptable compromise. I use it from time to time, but am happy to go either way. Use your own discretion.
Overriding ToString()
Another approach you might try is to override the ToString() method of compared objects so that, if tests fail, you’ll get more meaningful error messages. For example, here’s the output of the test in listing 7.18 when it fails.
|
TestCase 'AOUT.CH7.LogAn.Tests.MultipleAsserts |
Not very helpful, is it?
By implementing ToString() in both the AnalyzedOutput class and the LineInfo class (which are part of the object model being compared), we can get more readable output from the tests. Listing 7.19 shows the two implementations of the ToString() methods in the classes under test, followed by the resulting test output.
Listing 7.19. Implementing ToString() in compared classes for cleaner output
///Overriding ToString inside The AnalyzedOutput Object//////////////
        public override string ToString()
        {
            StringBuilder sb = new StringBuilder();
            foreach (LineInfo line in lines)
            {
                sb.Append(line.ToString());
            }
            return sb.ToString();

        }

///Overriding ToString inside each LineInfo Object//////////////
        public override string ToString()
        {
            StringBuilder sb = new StringBuilder();
            for (int i = 0; i < this.fields.Length; i++)
            {
                sb.Append(this[i]);
                sb.Append(",");
            }

                return sb.ToString();
        }

///TEST OUTPUT//////////////
------ Test started: Assembly: er.dll ------

TestCase 'AOUT.CH7.LogAn.Tests.MultipleAsserts
.Analyze_SimpleStringLine_UsesDefaulTabDelimiterToParseFields2'
failed:
  Expected: <10:05,Open,Roy,>
  But was:  <>
    C:GlobalShareInSyncBookCodeARtOfUniTesting
LogAn.TestsMultipleAsserts.cs(41,0):
at AOUT.CH7.LogAn.Tests.MultipleAsserts
.Analyze_SimpleStringLine_UsesDefaulTabDelimiterToParseFields2()
Now the test output is much clearer, and we can understand that we got very different objects. Clearer output makes it easier to understand why the test fails and makes for easier maintenance.
Another way tests can become hard to maintain is when we make them too fragile by overspecification.
7.2.7. Avoiding overspecification in tests
An overspecified test is one that contains assumptions about how a specific unit under test should implement its behavior, instead of only checking that the end behavior is correct.
Here are some ways unit tests are often overspecified:
- A test specifies purely internal behavior for an object under test.
- A test uses mocks when using stubs would be enough.
- A test assumes specific order or exact string matches when it isn’t required.
Tip
This topic is also discussed in xUnit Test Patterns by Gerard Meszaros. Let’s look at some examples of overspecified tests.
Specifying purely internal behavior
Listing 7.20 shows a test against LogAnalyzer’s Initialize() method that tests internal state, and no outside functionality.
Listing 7.20. An overspecified test that tests a purely internal behavior
[Test]
 public void Initialize_WhenCalled_SetsDefaultDelimiterIsTabDelimiter()
 {
    LogAnalyzer log = new LogAnalyzer();

    Assert.AreEqual(null,log.GetInternalDefaultDelimiter());
    log.Initialize();
    Assert.AreEqual('	', log.GetInternalDefaultDelimiter());
 }
This test is overspecified because it only tests the internal state of the LogAnalyzer object. Because this state is internal, it could change later on.
Unit tests should be testing the public contract and public functionality of an object. In this example, the tested code isn’t part of any public contract or interface.
Using mocks instead of stubs
Using mocks instead of stubs is a common mistake. Let’s look at an example.
Listing 7.21 shows a test that uses mocks to assert the interaction between LogAnalyzer and a provider it uses to read a text file. The test wrongly checks that LogAnalyzer calls the provider correctly to read the file’s text (an implementation detail that could change later and break our test). Instead, the test could use a stub to return the fake results from the text file, and assert against the public output of the LogAnalyzer’s method, which makes for a more robust, less brittle test.
Listing 7.21 shows the method we want to test, followed by an over-specified test for that code.
Listing 7.21. An overspecified test that uses mocks when stubs would do fine
public AnalyzeResults AnalyzeFile(string fileName)
   {
        int lineCount = logReader.GetLineCount();
        string text = "";
        for (int i = 0; i < lineCount; i++)
        {
            text += logReader.GetText(fileName, i, i);
        }
        return new AnalyzeResults(text);
    }
//////////////////////////the test/////////////////
   [Test]
    public void AnalyzeFile_FileWith3Lines_CallsLogProvider3Times()
    {
         MockRepository mocks = new MockRepository();
        ILogProvider mockLog = mocks.CreateMock<ILogProvider>();
        LogAnalyzer log = new LogAnalyzer(mockLog);
        using(mocks.Record())
        {
            mockLog.GetLineCount();
            LastCall.Return(3);

            mockLog.GetText("someFile.txt", 1, 1);
            LastCall.Return("a");

            mockLog.GetText("someFile.txt", 2, 2);
            LastCall.Return("b");

            mockLog.GetText("someFile.txt", 3, 3);
            LastCall.Return("c");
        }
        AnalyzeResults results = log.AnalyzeFile("someFile.txt");
        mocks.VerifyAll();
 }
The test in listing 7.21 is overspecified because it tests the interaction between the interface of some LogReader (which reads text files) and the LogAnalzyer object. This means it’s testing the underlying reading algorithm inside the method under test, instead of testing for an expected result from the method under test. The test should let the method under test run its own internal algorithms, and test the results. By doing that, we make the test less brittle.
Listing 7.22 shows a modified test that only checks the outcome of the operation.
Listing 7.22. Replacing mocks with stubs and checking outputs instead of interactions

The important thing about this test is that the end assert
![]() is against the end result, and it doesn’t care how many times the internal Get-Text() method is called. We also use a stub that doesn’t care how many times it gets called, and it always returns the same result.
This test is much less fragile, and it tests the right thing.
is against the end result, and it doesn’t care how many times the internal Get-Text() method is called. We also use a stub that doesn’t care how many times it gets called, and it always returns the same result.
This test is much less fragile, and it tests the right thing.
Note
When you refactor internal state to be visible to an outside test, could it be considered a code smell (a sign that something might be wrong in the code’s design or logic)? It’s not a code smell when you’re refactoring to expose collaborators. It’s a code smell if you’re refactoring and there are no collaborators (so you don’t need to stub or mock anything).
I am using NUnit’s Assert.That syntax instead of Assert.AreEqual because the fluent nature of the new syntax is much cleaner and nicer to work with.
Tip
Also notice that this test has no mock objects, only stubs. The assert is done against a return value, and a stub is used internally to simulate some scenario. This is often the way I like to write my tests. In fact, less than 10 percent of the tests I write have any mock objects. Most tests will have stubs, and nothing more.
One more way developers tend to overspecify their tests is the overuse of assumptions.
Assuming an order or exact match when it’s not needed
Another common pattern people tend to repeat is to have asserts against hardcoded strings in the unit’s return value or properties, when only a specific part of a string is necessary. Ask yourself, “Can I use string.Contains() rather than string.Equals()?”
The same goes for collections and lists. It’s much better to make sure a collection contains an expected item than to assert that the item is in a specific place in a collection (unless that’s specifically what is expected).
By making these kinds of small adjustments, you can guarantee that, as long as the string or collection contains what is expected, the test will pass. Even if the implementation or order of the string or collection changes, you won’t have to go back and change every little character you add to a string.
Now let’s cover the third and final pillar of good unit tests: readability.
7.3. Writing readable tests
Readability is so important that, without it, the tests we write are almost meaningless. From giving good names to the tests to having good assert messages, readability is the connecting thread between the person who wrote the test and the poor soul who has to read it a few months later. Tests are stories we tell the next generation of programmers on a project. They allow a developer to see exactly what an application is made of and where it started.
This section is all about making sure the developers who come after you will be able to maintain the production code and the tests that you write, while understanding what they’re doing and where they should be doing it.
There are several facets to readability:
Let’s go through these one by one.
7.3.1. Naming unit tests
Naming standards are important because they give us comfortable rules and templates that outline what we should explain about the test. The test name has three parts:
The name of the method being tested— This is essential, so that you can easily see where the tested logic is. Having this as the first part of the test name allows easy navigation and as-you-type intellisense (if your IDE supports it) in the test class.
The scenario under which it’s being tested— This part gives us the “with” part of the name: “When I call method X with a null value, then it should do Y.”
- The expected behavior when the scenario is invoked—This part specifies in plain English what the method should do or return, or how it should behave, based on the current scenario: “When I call method X with a null value, then it should do Y.”
Removing even one of these parts from a test name can cause the reader of the test to wonder what is going on, and to start reading the test code. Our main goal is to release the next developer from the burden of reading the test code in order to understand what the test is testing.
A common way to write these three parts of the test name is to separate them with underscores, like this: MethodUnderTest_Scenario_Behavior(). Listing 7.23 shows a test that uses this naming convention.
Listing 7.23. A test with three parts in its name
[Test]
 public void
   AnalyzeFile_FileWith3LinesAndFileProvider_ReadsFileUsingProvider()
 {
 //...
 }
The method in listing 7.23 tests the AnalyzeFile method, giving it a file with three lines and a file-reading provider, and expects it to use the provider to read the file.
If developers stick to this naming convention, it will be easy for other developers to jump in and understand tests.
7.3.2. Naming variables
How you name variables in unit tests is as important as, or even more important than, variable-naming conventions in production code. Apart from their chief function of testing, tests also serve as a form of documentation for an API. By giving variables good names, we can make sure that people reading our tests understand what we’re trying to prove as quickly as possible (as opposed to understanding what we’re trying to accomplish when writing production code).
Listing 7.24 shows an example of a poorly named and poorly written test. I call this “unreadable” in the sense that I can’t figure out what this test is about.
Listing 7.24. An unreadable test name
[Test]
 public void BadlyNamedTest()
 {
    LogAnalyzer log = new LogAnalyzer();
    int result= log.GetLineCount("abc.txt");
    Assert.AreEqual(-100,result);
 }
In this instance, the assert is using some magic number (-100) (a number that represents some value the developer needs to know). Because we don’t have a descriptive name for what the number is expected to be, we can only assume what it’s supposed to mean. The test name should have helped us a little bit here, but the test name needs more work, to put it mildly.
Is -100 some sort of exception? Is it a valid return value? This is where we have a choice:
- We can change the design of the API to throw an exception instead of returning -100 (assuming -100 is some sort of illegal result value).
- We can compare the result to some sort of constant or aptly named variable, as shown in listing 7.25.
Listing 7.25. A more readable version of the test
[Test]
 public void BadlyNamedTest()
 {
    LogAnalyzer log = new LogAnalyzer();
    int result= log.GetLineCount("abc.txt");
    const int COULD_NOT_READ_FILE = -100;
    Assert.AreEqual(COULD_NOT_READ_FILE,result);
 }
The code in listing 7.25 is much better, because we can easily understand the intent of the return value.
The last part of a test is usually the assert, and we need to make the most out of the assert message. If the assert fails, the first thing the user will see is that message.
7.3.3. Asserting yourself with meaning
Writing a good assert message is much like writing a good exception message. It’s easy to get it wrong without realizing it, and it makes a world of difference (and time) to the people who have to read it.
There are several key points to remember when writing a message for an assert clause:
- Don’t repeat what the built-in test framework outputs to the console.
- Don’t repeat what the test name explains.
- If you don’t have anything good to say, don’t say anything.
- Write what should have happened or what failed to happen, and possibly mention when it should have happened.
Listing 7.26 shows a bad example of an assert message and the output it produces.
Listing 7.26. A bad assert message that repeats what the test framework outputs
[Test]
 public void BadAssertMessage()
 {
    LogAnalyzer log = new LogAnalyzer();
    int result= log.GetLineCount("abc.txt");
    const int COULD_NOT_READ_FILE = -100;
    Assert.AreEqual(COULD_NOT_READ_FILE,result,
             "result was {0} instead of {1}",
             result,COULD_NOT_READ_FILE);
 }

//Running this would produce:
TestCase 'AOUT.CH7.LogAn.Tests.Readable.BadAssertMessage'
failed:
  result was -1 instead of -100
  Expected: -100
  But was: -1
    C:GlobalShareInSyncBookCode
ARtOfUniTestingLogAn.TestsReadable.cs(23,0)
: at AOUT.CH7.LogAn.Tests.Readable.BadAssertMessage()
As you can see, there’s a message that repeats. Our assert message didn’t add anything except more words to read. It would have been better to not output anything but instead have a better-named test. A clearer assert message would be something like this:
Calling GetLineCount() for a non-existing file should have returned
  a COULD_NOT_READ_FILE.
Now that your assert messages are understandable, it’s time to make sure that the assert happens on a different line than the method call.
7.3.4. Separating asserts from actions
This is a short section, but an important one nonetheless. For the sake of readability, avoid writing the assert line and the method call in the same statement.
Listing 7.27 shows a good example, and listing 7.28 shows a bad example.
Listing 7.27. Separating the assert from the thing asserted improves readability
[Test]
 public void BadAssertMessage()
 {
 //some code here
     int result= log.GetLineCount("abc.txt");
     Assert.AreEqual(COULD_NOT_READ_FILE,result);
 }
Listing 7.28. Not separating the assert from the thing asserted makes reading difficult
[Test]
 public void BadAssertMessage()
 {
    //some code here

Assert.AreEqual(COULD_NOT_READ_FILE,log.GetLineCount("abc.txt"));
 }
See the difference between the two examples? Listing 7.28 is much harder to read and understand in the context of a real test, because the call to the GetLineCount() method is inside the call to the assert message.
7.3.5. Setting up and tearing down
Setup and teardown methods in unit tests can be abused to the point where the tests or the setup and teardown methods are unreadable. Usually the situation is worse in the setup method than the teardown method.
Let’s look at one possible abuse. If you have mocks and stubs being set up in a setup method, that means they don’t get set up in the actual test. That, in turn, means that whoever is reading your test may not even realize that there are mock objects in use, or what the expectations are from them in the test.
It’s much more readable to initialize mock objects directly in the test itself, with all their expectations. If you’re worried about readability, you can refactor the creation of the mocks into a helper method, which each test calls. That way, whoever is reading the test will know exactly what is being set up instead of having to look in multiple places.
Tip
I’ve several times written full test classes that didn’t have a setup method, only helper methods being called from each test, for the sake of maintainability. The class was still readable and maintainable.
7.4. Summary
Few developers write tests that they can trust when they first start out writing unit tests. It takes some discipline and some imagination to make sure you’re doing things right. A test that you can trust is an elusive beast at first, but when you get it right, you’ll feel the difference immediately.
Some ways of achieving this kind of trustworthiness involve keeping good tests alive and removing or refactoring away bad tests, and we discussed several such methods in this chapter. The rest of the chapter was about problems that can arise inside tests, such as logic, testing multiple things, ease of running, and so on. Putting all these things together can be quite an art form.
If there’s one thing to take away from this chapter, it’s this: tests grow and change with the system under tests. The topic of writing maintainable tests has not been covered much in the unit-testing and TDD literature, but as I write, it’s starting to appear online in blogs and forums. I believe that this is the next step in the evolution of unit-testing techniques. The first step of acquiring the initial knowledge (what a unit test is, and how you write one) has been covered in many places. The second step involves refining the techniques to improve all aspects of the code we write, and looking into other factors, such as maintainability and readability. It’s this critical step that this chapter (and most of this book) focuses on.
In the end, it’s simple: readability goes hand in hand with maintainability and trustworthiness. People who can read your tests can understand them and maintain them, and they will also trust the tests when they pass. When this point is achieved, you’re ready to handle change, and to change the code when it needs changing, because you’ll know when things break.
In the next chapters, we’ll take a broader look at what makes code testable, how to design for testability, and how to refactor existing code into a testable state.