
Chapter 6. Test hierarchies and organization
- Running unit tests during automated nightly builds
- Using continuous integration for automated builds
- Organizing tests in a solution
- Exploring test class inheritance patterns
Unit tests are as important to an application as the production source code. As with the regular code, you need to give careful thought to where the tests reside, both physically and logically, in relation to the code under test. If you put the tests in the wrong place, the tests you’ve written so carefully may not be run.
Similarly, if you don’t devise ways to reuse parts of your tests, create utility methods for testing, or use test hierarchies, you’ll end up with test code that’s either unmaintainable or hard to understand.
This chapter addresses these issues with patterns and guidelines that will help you shape the way your tests look, feel, and run, and will affect how well they play with the rest of your code and with other tests.
Where the tests are located depends on where they will be used and who will run them. There are two common scenarios: tests run as part of the automated build process, and tests run locally by developers on their own machines. The automated build process is very important, and that’s what we’ll focus on.
6.1. Having automated builds run automated tests
The power of the automated build cannot and should not be ignored. If you plan to make your team more agile and equipped to handle requirement changes as they come into your shop, you need to be able to do the following:
1.
Make a small change to your code.
2.
Run all the tests to make sure you haven’t broken any existing functionality.
3.
Make sure your code can still integrate well and not break any other projects you depend upon.
Running those tests lets you know whether you’ve broken any existing or new functionality. Integrating your code with the other projects will indicate whether or not you broke the compilation of the code or things that are logically dependent on your code.
Integrating your code usually means doing the following:
1.
Getting the latest version of everyone’s source code from the source control repository
2.
Trying to compile it all locally
3.
Running all tests locally
4.
Fixing anything that has been broken
5.
Checking in your source code
An automated build process combines all these steps under a special build script that will make sure all these things are done without human interaction. If anything breaks in the process, the build server will notify the relevant parties of a build break.
6.1.1. Anatomy of an automated build
An automated build process should perform at least the bold points in the following list, but it may include many other things:
- Get the latest version of all projects in question.
- Compile all the projects in their latest version.
- Deploy build output to a test server.
- Run tests locally or on the test server.
- Create an archive of build outputs based on date and build number.
- Deploy outputs to staging or even production server.
- Configure and install components on target server.
- Notify relevant people (by email) if any of the steps failed.
- Merge databases.
- Create reports on build quality, history, and test statuses.
- Create tasks or work items automatically (such as adding a Team System work item) if specific tasks have failed.
The easiest way to get an automated build going is by creating a build process and scripts as soon as the project is started. It’s much easier to create an automated build for a small project and keep adding to it as the project grows than it is to start later in the game.
There are many tools that can help you create an automated build system. Some are free or open source, and some are commercial. Here are a few tools you can look at:
- CruiseControl.NET (cruisecontrol.sourceforge.net)
- TeamCity (JetBrains.com)
- NAnt (nant.sourceforge.net)
- MSBuild (http://msdn.microsoft.com/en-us/library/wea2sca5(VS.80).aspx)
- FinalBuilder (www.FinalBuilder.com)
- Visual Build Pro (www.kinook.com)
- Visual Studio Team Foundation Server (http://msdn.microsoft.com/en-us/teamsystem/default.aspx)
These are all configuration-based programs that allow you to create a series of steps that will be run in a hierarchy structure. You can create custom commands to be run, and you can schedule these builds to run automatically.
6.1.2. Triggering builds and continuous integration
The term continuous integration is literally about making the automated build and integration process run continuously. For example, you could have the build run every time someone checks in source code to the system, or every 45 minutes.
One popular continuous integration tool is CruiseControl.NET. It’s fully open source and supports both the idea of tasks, which are individual commands that are run during a build, and the concept of triggers, which can start a build automatically when certain events occur, such as source control updates.
Among the commercial tools, Visual Studio Team System 2008 supports automated builds and continuous integration out of the box. If that’s a bit beyond your budget, look at FinalBuilder and Visual Build Pro. These two commercial and highly successful build tools allow visual editing and maintenance of automated build projects. That means easier maintenance of the build file, which can get pretty scary for larger projects.
6.1.3. Automated build types
You can configure many types of automated builds to produce different results or builds that run in specific amounts of time (all of which compile the code first, though). Here are a few examples:
- A nightly build
- runs all the long-running tests.
- runs system tests.
- A release build
- runs the nightly build.
- deploys to server and archives.
- A CI (continuous integration) build
- runs all the fast-running tests.
- finishes in less than 10 minutes.
When you start writing tests, you should categorize them by their running times:
- Fast-running tests
- Slow-running tests
Integration tests generally run slower than unit tests, which usually happen in memory, so the fast-running tests are usually unit tests and the slow-running tests are usually integration tests.
Automated builds usually fall into two categories: those that are too long to run every 15 minutes, and those that can be run every 15 minutes or less. Once you’ve categorized the tests, you can set the short and quick builds that run continuously to run a subset of the tests—the quick ones. If you can afford it, it’s much better to run all the tests. But if your tests really slow down a build, running a subset of quick tests is the next best thing.
6.2. Mapping out tests based on speed and type
It’s easy to run the tests to check their run times and to determine which are integration tests and which are unit tests. Once you do, put them in separate places. They don’t need to be in separate test projects; a separate folder and namespace should be enough.
Figure 6.1 shows a simple folder structure you can use inside your Visual Studio projects.
Figure 6.1. Integration tests and unit tests can reside in different folders and namespaces but remain under the same project. Base classes have their own folders.

Some companies, based on the build software and unit-testing framework they use, find it easier to use separate test projects for unit and integration tests. This makes it easier to use command-line tools that accept and run a full test assembly containing only specific kinds of tests. Figure 6.2 shows how you’d set up two separate kinds of test projects under a single solution.
Figure 6.2. The unit-testing and integration projects are unique for the LogAn project and have different namespaces.

Even if you haven’t already implemented an automated build system, separating unit from integration tests is a good idea. Mixing up the two tests can lead to severe consequences, such as people not running your tests, as we’ll see next.
6.2.1. The human factor of separating unit from integration tests
I recommend separating unit from integration tests. If you don’t, there’s a big risk people won’t run the tests often enough. If the tests exist, why wouldn’t people run them as often as needed? One reason is that developers can be lazy.
If a developer gets the latest version of the source code and finds that some unit tests fail, there are several possible causes:
- There’s a bug in the code under test.
- The test has a problem in the way it’s written.
- The test is no longer relevant.
- The test requires some configuration to run.
All but the last point are valid reasons for a developer to stop and investigate the code. The last one isn’t a development issue; it’s a configuration problem, which is often considered less important because it gets in the way of running the tests. If such a test fails, the developer will often ignore the test failure and go on to other things. (He has “more important” things to do.)
In many ways, having such “hidden” integration tests mixed in with unit tests and scattered around your test project with unknown or unexpected configuration requirements (like a database connection) is bad form. These tests are less approachable, they waste time and money on finding problems that aren’t there, and they generally discourage the developer from trusting the set of tests again. Like bad apples in a bunch, they make all the others look bad. The next time something similar happens, the developer may not even look for a cause for the failure, and may simply say, “Oh, that test sometimes fails; it’s OK.”
To make sure this doesn’t happen, you can create a safe green zone.
6.2.2. The safe green zone
Separate your integration and unit tests into separate places. By doing that, you give the developers on your team a safe green test area that only contains unit tests, where they know that they can get the latest code version, they can run all tests in that namespace or folder, and they should all be green. If some tests in the safe green zone don’t pass, there’s a real problem, not a (false positive) configuration problem in the test.
This doesn’t mean that the integration tests shouldn’t all be passing. But because integration tests inherently take longer to execute, it’s more likely that developers will run the unit tests more times a day and run the integration tests fewer, but still hopefully at least during the nightly build. Developers can focus on being productive and getting at least a partial sense of confidence when all their unit tests are passing. The nightly build should have all the configuration needed to make the integration tests pass.
In addition, creating a separate integration zone (the opposite of a safe green zone) for the integration tests gives you not only a place to quarantine tests that may run slowly, but also a place to put documents detailing what configuration needs to take place to make all these tests work.
An automated build system will do all that configuration work for you. However, if you want to run locally, you should have in your solution or project an integration zone that has all the information you need to make things run but that you can also skip if you want to just run the quick tests (in the safe green zone).
But none of this matters if you don’t have your tests inside the source control tree, as we’ll see next.
6.3. Ensuring tests are part of source control
Tests must be part of source control. The test code that you write needs to reside in a source control repository, just like your real production code. In fact, you should treat your test code as thoughtfully as you treat your production code. It should be part of the branch for each version of the product, and it should be part of the code that developers get automatically when they get the latest version.
Because unit tests are so connected to the code and API, they should always stay attached to the version of the code they’re testing. Getting version 1.0.1 of your product will also get version 1.0.1 of the tests for your product; version 1.0.2 of your product and its tests will be different.
Also, having your tests as part of the source control tree is what allows your automated build processes to make sure they run the correct version of the tests against your software.
6.4. Mapping test classes to code under test
When you create test classes, the way they’re structured and placed should allow you to easily do the following:
- Look at a project and find all the tests that relate to it.
- Look at a class and find all the tests that relate to it.
- Look at a method and find all the tests that relate to it.
There are several patterns that can help you do this. We’ll go through these points one by one.
6.4.1. Mapping tests to projects
Create a project to contain the tests, and give it the same name as the project under test, adding [.Tests] to the end of the name. For example, if I had a project named Osherove.MyLibrary, I would also have a test project named Osherove.MyLibrary.Tests.Unit as well as Osherove.MyLibrary.Tests.Integration. (See figure 6.2, earlier in this chapter, for an example.) This may sound crude, but it’s easy, and it allows a developer to find all the tests for a specific project.
You may also want to use Visual Studio’s ability to create folders under the solution, and group this threesome into its own folder, but that’s a matter of taste.
6.4.2. Mapping tests to classes
There are several ways to go about mapping the tests for a class you’re testing. We’ll look at two main scenarios: having one test class for each class under test and having separate test classes for complex methods being tested.
Tip
These are the two test class patterns I use most, but others exist. I suggest you look at Gerard Meszaros’ xUnit Test Patterns book for more.
One test class per class under test
You want to be able to quickly locate all tests for a specific class, and the solution is much like the previous pattern for projects: take the name of the class you want to write tests for and, in the test project, create a test class with the same name postfixed with “Tests”. For a class called LogAnalyzer, you’d create a test class in your test project named LogAnalyzerTests.
Note the plural; this is a class that holds multiple tests for the class under test, not just one test. It’s important to be accurate. Readability and language matter a lot when it comes to test code, and once you start cutting corners in one place, you’ll be doing so in others, which can lead to problems.
The one-test-class-per-class pattern (also mentioned in Meszaros’ xUnit Test Patterns book) is the simplest and most common pattern for organizing tests. You put all the tests for all methods of the class under test in one big test class. When using this pattern, some methods in the class under test may have so many tests that the test class becomes much less readable or browsable. Sometimes the tests for one method drown out the other tests for other methods. That in itself could indicate that maybe the method is doing too much.
Tip
Test readability is important. You’re writing tests as much for the person who will read them as for the computer that will run them.
If the person reading the test has to spend more time browsing the test code than understanding it, the test will cause maintenance headaches as the code gets bigger and bigger. That’s why you might think about doing it differently.
One test class per feature
An alternative is creating a separate test class for a particular feature (which could be as small as a method). The one-test-class-per-feature pattern is also mentioned in Meszaros’ xUnit Test Patterns book. If you seem to have lots of test methods that make your test class difficult to read, find the method or group of methods whose tests are drowning out the other tests for that class, and create a separate test class for it, with the name relating to the feature.
For example, suppose a class named LoginManager has a ChangePassword method you’d like to test, but it has so many test cases that you want to put it in a separate test class. You might end up with two test classes: LoginManagerTests, which contains all the other tests; and LoginManagerTestsChangePassword, which contains only the tests for the ChangePassword method.
6.4.3. Mapping tests to specific methods
Beyond making test names readable and understandable, our main goal is to be able to easily find all test methods for a specific method under test, so we should give our test methods meaningful names. We can use the method name as part of the test name.
We could name a test ChangePassword_scenario_expectedbehavior. This naming convention is discussed in chapter 2 (section 2.3.2).
6.5. Building a test API for your application
Sooner or later, as you start writing tests for your applications, you’re bound to refactor them, and create utility methods, utility classes, and many other constructs (either in the test projects or in the code under test) solely for the purpose of testability or test readability and maintenance.
Here are some things you may find you want to do:
.
Use inheritance in your test classes for code reuse, guidance, and more.
.
Create test utility classes and methods.
.
Make your API known to developers.
Let’s look at these in turn.
6.5.1. Using test class inheritance patterns
One of the most powerful arguments for object-oriented code is that you can reuse existing functionality instead of recreating it over and over again in other classes—what Andy Hunt and Dave Thomas called the DRY (“don’t repeat yourself”) principle in The Pragmatic Programmer. Because the unit tests you write in .NET and most object-oriented languages are in an object-oriented paradigm, it’s not a crime to use inheritance in the test classes themselves. In fact, I urge you to do this if you have a good reason to. Implementing a base class can help alleviate standard problems in test code by
- reusing utility and factory methods.
- running the same set of tests over different classes. (We’ll look at this one in more detail.)
- using common setup or teardown code (also useful for integration testing).
- creating testing guidance for programmers who will derive from the base class.
I’ll introduce you to three patterns based on test class inheritance, each one building on the previous pattern. I’ll also explain when you might want to use each of them and what the pros and cons are for each of them.
These are the basic three patterns:
- Abstract test infrastructure class
- Template test class
- Abstract test driver class
We’ll also take a look at the following refactoring techniques that you can apply when using the preceding patterns:
- Refactoring into a class hierarchy
- Using generics
Abstract test infrastructure class pattern
The abstract test infrastructure class pattern creates an abstract test class that contains essential common infrastructure for test classes deriving from it. Scenarios where you’d want to create such a base class can range from having common setup and teardown code to having special custom asserts that are used throughout multiple test classes.
We’ll look at an example that will allow us to reuse a setup method in two test classes. Here’s the scenario: all tests need to override the default logger implementation in the application so that logging is done in memory instead of in a file (that is, all tests need to break the logger dependency in order to run correctly).
Listing 6.1 shows these classes:
- The LogAnalyzer class and method— The class and method we’d like to test
- The LoggingFacility class— The class that holds the logger implementation we’d like to override in our tests
- The ConfigurationManager class— Another user of LoggingFacility, which we’ll test later
- The LogAnalyzerTests class and method— The initial test class and method we’re going to write
- The StubLogger class— An internal class that will replace the real logger implementation
- The ConfigurationManagerTests class— A class that holds tests for ConfigurationManager
Listing 6.1. An example of not following the DRY principle in test classes

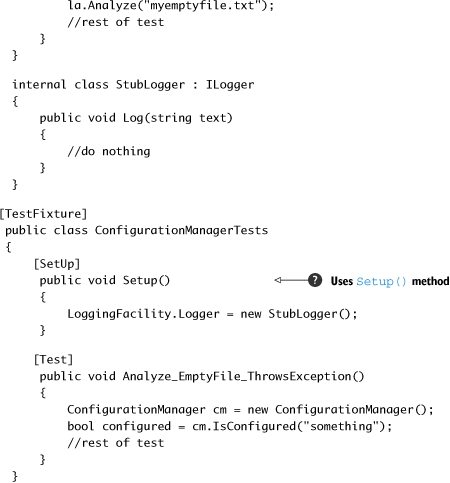
The LoggingFacility class is probably going to be used by many classes. It’s designed so that the code using it is testable by allowing the implementation of the logger to be replaced using the property setter (which is static).
There are two classes that use the LoggingFacility class internally, and we’d like to test both of them: the LogAnalyzer and ConfigurationManager classes.
One possible way to refactor this code into a better state is to find a way to reuse the setup method
![]() , which is essentially the same for both test classes. They both replace the default logger implementation.
, which is essentially the same for both test classes. They both replace the default logger implementation.
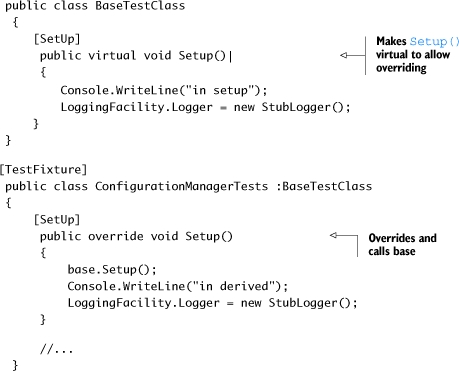
We could refactor the test classes and create a base test class that contains the setup method. The full code for the test classes is shown in listing 6.2.
Listing 6.2. A refactored solution

Figure 6.3 shows this pattern more clearly.
Figure 6.3. One base class with a common setup method, and two test classes that reuse that setup method

The Setup method from the base class is now automatically run before each test in either of the derived classes. We’ve definitely reused some code, but there are pros and cons in every technique. The main problem we’ve introduced into the derived test classes is that anyone reading the code can no longer easily understand what happens when setup is called. They will have to look up the setup method in the base class to see what the derived classes get by default. This leads to less readable tests, but it also leads to more code reuse.
What if you wanted to have your own derived setup in one of the derived classes? Most of the unit-testing frameworks (including NUnit) will allow you to make the setup method virtual and then override it in the derived class. Listing 6.3 shows how a derived class can have its own setup method but still keep the original setup method (making them work one after the other).
Listing 6.3. A derived test class with its own setup method
This style of inheritance is easier for the reader of the test class, because it specifically indicates that there’s a base setup method that’s called each time. You may be helping your team by requiring them to always override base methods and call their base class’s implementation in the tests for the sake of readability. This approach is shown in listing 6.4.
Listing 6.4. Overriding a setup method purely for clarity
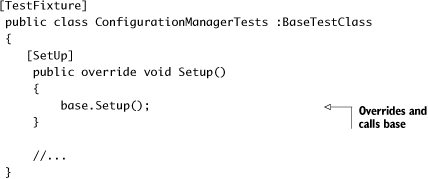
This type of coding may feel a bit weird at first, but anyone reading the tests will thank you for making it clear what’s going on.
Template test class pattern
The template test class pattern creates an abstract class that contains abstract test methods that derived classes will have to implement. The driving force behind this pattern is the need to be able to dictate to deriving classes which tests they should always implement. It’s commonly used when there’s a need to create one or more test classes for a set of classes that implement the same interface.
Think of an interface as a “behavior contract” where the same end behavior is expected from all who have the contract, but they can achieve the end result in different ways. An example of such a behavior contract could be a set of parsers all implementing parse methods that act the same way but on different input types.
Developers often neglect or forget to write all the required tests for a specific case. Having a base class for each set of identically interfaced classes can help create a basic test contract that all developers must implement in derived test classes.
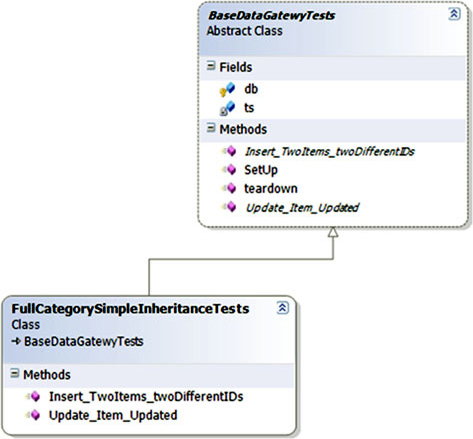
Figure 6.4 shows an example base class that helps to test data-layer CRUD (create, retrieve, update, and delete) classes.
Figure 6.4. A template test pattern ensures that developers don’t forget important tests. The base class contains abstract tests that derived classes must implement.
I’ve found this technique useful in many situations, not only as a developer, but also as an architect. As an architect, I was able to supply a list of essential test classes for developers to implement, and to provide guidance on what kinds of tests they’d want to write next. It’s essential in this situation that the naming of the tests is understandable.
But what if you were to inherit real tests from the base class, and not abstract ones?
Abstract test driver class pattern
The abstract test driver class pattern creates an abstract test class that contains test method implementations that all derived classes inherit by default, without needing to reimplement them. Instead of having abstract test methods, you implement real tests on the abstract class that your derived classes will inherit. It’s essential that your tests don’t explicitly test one class type, but instead test against an interface or base class in your production code under test.
Let’s see a real scenario. Suppose you have the object model shown in figure 6.5 to test.
Figure 6.5. A typical inheritance hierarchy that we’d like to test includes an abstract class and classes that derive from it.
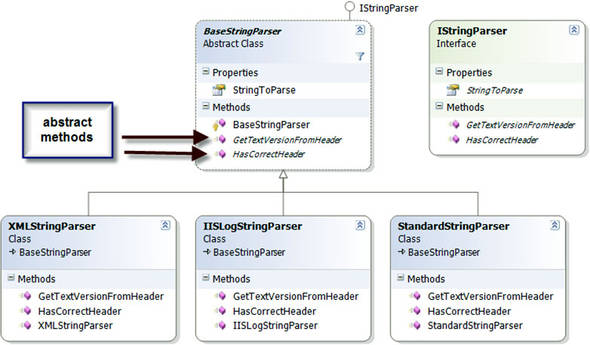
The BaseStringParser is an abstract class that other classes derive from to implement some functionality over different string content types. From each string type (XML strings, IIS log strings, standard strings), we can get some sort of versioning info (metadata on the string that was put there earlier). We can get the version info from a custom header (the first few lines of the string) and check whether that header is valid for the purposes of our application. The XMLStringParser, IISLogStringParser, and StandardStringParser classes derive from this base class and implement the methods with logic for their specific string types.
The first step in testing such a hierarchy is to write a set of tests for one of the derived classes (assuming the abstract class has no logic to test in it). Then you’d have to write the same kinds of tests for the other classes that have the same functionality.
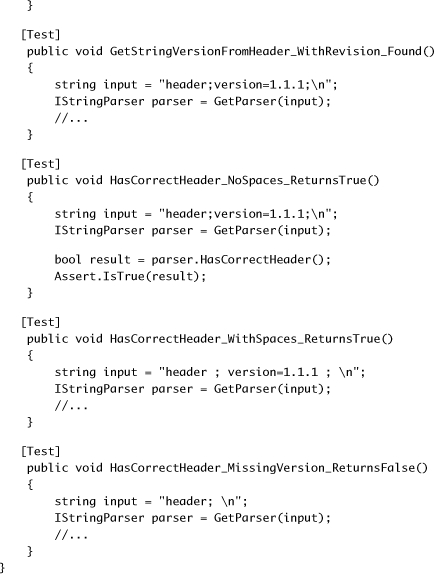
Listing 6.5 shows tests for the StandardStringParser that we might start out with before we refactor our test classes.
Listing 6.5. An outline of a test class for StandardStringParser


Note how we use the GetParser() helper method
![]() to refactor away
to refactor away
![]() the creation of the parser object, which we use in all the tests. We use the helper method, and not a setup method, because
the constructor takes the input string to parse, so each test needs to be able to create a version of the parser to test with
its own specific inputs.
the creation of the parser object, which we use in all the tests. We use the helper method, and not a setup method, because
the constructor takes the input string to parse, so each test needs to be able to create a version of the parser to test with
its own specific inputs.
When you start writing tests for the other classes in the hierarchy, you’ll want to repeat the same tests that are in this specific parser class. All the other parsers should have the same outward behavior: getting the header version and validating that the header is valid. How they do this differs, but the behavior semantics are the same. This means that, for each class that derives from BaseStringParser, we’d write the same basic tests, and only the type of class under test would change.
Instead of repeating all those tests manually, we can create a ParserTestsBase class that contains all the basic tests we’d like to perform on any class that implements the IStringParser interface (or any class that derives from BaseStringParser). Listing 6.6 shows an example of this base class.
Listing 6.6. An abstract test base class with test logic for IStringParser interface

Several things are different from listing 6.5 and are important in the implementation of the base class:
- The GetParser() method is abstract
 , and its return type is now IStringParser. This means we can override this factory method in derived test classes and return the type of the parser we’d like to test.
- The test methods only get an IStringParser interface
 and don’t know the actual class they’re running against.
- A derived class can choose to add tests against a specific subclass of IStringParser by adding another test method in its own test class (as we’ll see next).
Once we have the base class in order, we can easily add tests to the various subclasses. Listing 6.7 shows how we can write tests for the StandardStringParser by deriving from BaseStringParserTests.
Listing 6.7. A derived test class that overrides a small number of factory methods

Note that in listing 6.7 we only have two methods in the derived class:
- The factory method
that tells the base class what instance of the class to run tests on
- A new test
that may not belong in the base class, or that may be specific to the current type under test
Figure 6.6 shows the visual inheritance chain that we’ve just created.
Figure 6.6. A standard test class hierarchy implementation. Most of the tests are in the base class, but derived classes can add their own specific tests.

How do we modify existing code to use this pattern? That’s our next topic.
Refactoring your test class into a test class hierarchy
Most developers don’t start writing their tests with these inheritance patterns in mind. Instead, they write the tests normally, as was shown in listing 6.5. The steps to convert your tests into a base class are fairly easy, particularly if you have IDE refactoring tools available, like the ones found in Eclipse, IntelliJ IDEA, or Visual Studio 2008 (JetBrains’ ReSharper or Refactor! from DevExpress).
Here is a list of possible steps for refactoring your test class:
1.
Refactor: extract the superclass.
.
Create a base class (BaseXXXTests).
.
Move the factory methods (like GetParser) into the base class.
.
Move all the tests to the base class.
2.
Refactor: make factory methods abstract, and return interfaces.
3.
Refactor: find all the places in the test methods where explicit class types are used, and change them to use the interfaces of those types instead.
4.
In the derived class, implement the abstract factory methods and return the explicit types.
You can also use .NET generics to create the inheritance patterns.
A variation using .NET generics to implement test hierarchy
You can use generics as part of the base test class. This way, you don’t even need to override any methods in derived classes; just declare the type you’re testing against. Listing 6.8 shows both the generic version of the test base class and a class derived from it.
Listing 6.8. Implementing test case inheritance with .NET generics

There are several things that change in the generic implementation of the hierarchy:
- The GetParser factory method
no longer needs to be overridden. Create the object using Activator.CreateInstance (which allows creating objects without knowing their type) and send the input string arguments to the constructor.
- The tests themselves don’t use the IStringParser interface, but instead use the T generic type
 .
.
- The generic class declaration contains the where clause that specifies that the T type of the class must implement the IStringParser interface
.
Overall, I don’t find more benefit in using generic base classes. Any performance gain that would result is insignificant to these tests, but I leave it to you to see what makes sense for your projects. It’s more a matter of taste than anything else.
Let’s move on to something completely different: infrastructure API in your test projects.
6.5.2. Creating test utility classes and methods
As you write your tests, you’ll also create many simple utility methods that may or may not end up inside your test classes. These utility classes become a big part of your test API, and they may turn out to be a simple object model you could use as you develop your tests.
You might end up with the following types of utility methods:
- Factory methods for objects that are complex to create or that routinely get created by your tests.
- System initialization methods (such as methods for setting up the system state before testing, or changing logging facilities to use stub loggers).
- Object configuration methods (for example, methods that set the internal state of an object, such as setting a customer to be invalid for a transaction).
- Methods that set up or read from external resources such as databases, configuration files, and test input files (for example, a method that loads a text file with all the permutations you’d like to use when sending in inputs for a specific method, and the expected results). This is more commonly used in integration or system testing.
- Special assert utility methods, which may assert something that’s complex or that’s repeatedly tested inside the system’s state. (If something was written to the system log, the method might assert that X, Y, and Z are true, but not G.)
You may end up refactoring your utility methods into these types of utility classes:
- Special assert utility classes that contain all the custom assert methods
- Special factory classes that hold the factory methods
- Special configuration classes or database configuration classes that hold integration style actions
Having those utility methods around doesn’t guarantee anyone will use them. I’ve been to plenty of projects where developers kept reinventing the wheel, recreating utility methods they didn’t know already existed. That’s why making your API known is an important next step.
6.5.3. Making your API known to developers
It’s imperative that the people who write tests know about the various APIs that have been developed while writing the application and its tests. There are several ways to make sure your APIs are used:
- Have teams of two people write tests together (at least once in a while), where one of the people is familiar with the existing APIs and can teach the other person, as they write new tests, about the existing benefits and code that could be used.
- Have a short document (no more than a couple of pages) or a cheat sheet that details the types of APIs out there and where
to find them. You can create short documents for specific parts of your testing framework (APIs specific to the data layer,
for example) or a global one for the whole application. If it’s not short, no one will maintain it. One possible way to make sure it’s up to date is by automating the generation process:
- Have a known set of prefixes or postfixes on the API helpers’ names (helperXX for example).
- Have a special tool that parses out the names and their locations and generates a document that lists them and where to find them, or have some simple directives that the special tool can parse from comments you put on them.
- Automate the generation of this document as part of the automated build process.
- Discuss changes to the APIs during team meetings—one or two sentences outlining the main changes and where to look for the significant parts. That way the team knows that this is important and it’s always on people’s minds.
- Go over this document with new employees during their orientation.
- Perform test reviews (as opposed to code reviews) that make sure tests are up to standards of readability, maintainability, and correctness, and ensure that the right APIs are used when needed.
Following one or more of these recommendations can help keep your team productive and will create a shared language the team can use when writing their tests.
6.6. Summary
Let’s look back and see what we can draw out from the chapter we’ve been through.
- Whatever testing you do—however you do it—automate it, and use an automated build procedure to run it as many times as possible during day or night.
- Separate the integration tests from the unit tests (the slow tests from the fast ones) so that your team can have a safe green zone where all the tests must pass.
- Map out tests by project and by type (unit versus integration tests, slow versus fast tests), and separate them into different directories, folders, or namespaces (or all of the above). I usually use all three types of separation.
- Use a test class hierarchy to apply the same set of tests to multiple related types under test in a hierarchy, or to types that share a common interface or base class.
- Use helper classes and utility classes instead of hierarchies if the test class hierarchy makes tests less readable, especially if there’s a shared setup method in the base class. Different people have different opinions on when to use which, but readability is usually the key reason for not using hierarchies.
- Make your API known to your team. If you don’t, you’ll lose time and money as team members unknowingly reinvent many of the APIs over and over again.
The next three chapters will deal with practices you can use to make your tests more maintainable, readable, and correct (in the sense that they test the right things).