
Chapter 9. Working with legacy code
- Examining common problems with legacy code
- Deciding where to begin writing tests
- Surveying helpful tools for working with legacy code
I once consulted for a large development shop that produced billing software. They had over 10,000 developers and mixed .NET, Java, and C++ in products, subproducts, and intertwined projects. The software had existed in one form or another for over five years, and most of the developers were tasked with maintaining and building on top of existing functionality.
My job was to help several divisions (using all languages) learn test-driven development techniques. For about 90 percent of the developers I worked with, this never became a reality for several reasons, some of which were a result of legacy code:
- It was difficult to write tests against existing code.
- It was next to impossible to refactor the existing code (or there was not enough time to do it).
- Some people didn’t want to change their designs.
- Tooling (or lack of tooling) was getting in the way.
- It was difficult to determine where to begin.
Anyone who’s ever tried to add tests to an existing system knows that most such systems are almost impossible to write tests for. They were usually written without proper places in the software (seams) to allow extensions or replacements to existing components.
There are several problems that need to be addressed when dealing with legacy code:
- There’s so much work, where should I start to add tests? Where should I focus my efforts?
- How can I safely refactor my code if it has no tests to begin with?
- What tools can I use with legacy code?
This chapter will tackle these tough questions associated with approaching legacy code bases, by listing techniques, references, and tools that can help.
9.1. Where do you start adding tests?
Assuming you have existing code inside components, you’ll need to create a priority list of components for which testing makes the most sense. There are several factors to consider that can affect each component’s priority:
- Logical complexity— This refers to the amount of logic in the component, such as nested ifs, switch cases, or recursion. Tools for checking cyclomatic complexity can also be used to determine this.
- Dependency level— This refers to the number of dependencies in the component. How many dependencies do you have to break in order to bring this class under test? Does it communicate with an outside email component, perhaps, or does it call a static log method somewhere?
- Priority— This is the component’s general priority in the project.
You can give each component a rating for these factors, from 1 (low priority) to 10 (high priority).
Table 9.1 shows a short list of classes with ratings for these factors. I call this a test-feasibility table.
Table 9.1. A simple test-feasibility table
|
Logical complexity |
Dependency level |
Priority |
Notes |
|
|---|---|---|---|---|
|
Utils |
6 |
1 |
5 |
This utility class has few dependencies but contains a lot of logic. It will be easy to test, and it provides lots of value. |
|
Person |
2 |
1 |
1 |
This is a data-holder class with little logic and no dependencies. There’s some (small) real value in testing this. |
|
TextParser |
8 |
4 |
6 |
This class has lots of logic and lots of dependencies. To top it off, it’s part of a high priority task in the project. Testing this will provide lots of value but will also be hard and time-consuming. |
|
ConfigManager |
1 |
6 |
1 |
This class holds configuration data and reads files from disk. It has little logic but many dependencies. Testing it will provide little value to the project and will also be hard and time-consuming. |
From the data in table 9.1, we can create the diagram shown in figure 9.1, which graphs our components by the amount of value to the project and number of dependencies.
Figure 9.1. Mapping components for test feasibility

We can safely ignore items that are below our designated threshold of logic (which I usually set at 2 or 3), so Person and ConfigManager can be ignored. We’re left with only the top two components from figure 9.1. There are two basic ways to look at the graph and decide what you’d like to test first (see figure 9.2):
- Choose the one that’s more complex and easier to test (top left).
- Choose the one that’s more complex and harder to test (top right).
Figure 9.2. Easy, hard, and irrelevant component mapping based on logic and dependencies

The question now is what path you should take. Should you start with the easy stuff or the hard stuff?
9.2. Choosing a selection strategy
As the previous section explained, you can start with the components that are easy to test or the ones that are hard to test (because they have many dependencies). Each strategy presents different challenges.
9.2.1. Pros and cons of the easy-first strategy
Starting out with the components that have fewer dependencies will make writing the tests initially much quicker and easier. But there’s a catch, as figure 9.3 demonstrates.
Figure 9.3. When starting with the easy components, the time to test gets longer and longer until the hardest components are done.

Figure 9.3 shows how long it takes to bring components under test during the lifetime of the project. Initially it’s easy to write tests, but as time goes by, we’re left with components that are increasingly harder and harder to test, with the particularly tough ones waiting for us at the end of the project cycle, just when everyone is stressed about pushing a product out the door.
If your team is relatively new to unit-testing techniques, it’s worth starting with the easy components. As time goes by, the team will learn the techniques needed to deal with the more complex components and dependencies.
For such a team, it may be wise to initially avoid all components over a specific number of dependencies (with 4 being a good place to start).
9.2.2. Pros and cons of the hard-first strategy
Starting with the more difficult components may seem like a losing proposition to begin with, but it has an upside, as long as your team has experience with unit-testing techniques.
Figure 9.4 shows the average time to write a test for a single component over the lifetime of the project, if you start testing the components with the most dependencies first.
Figure 9.4. When you use a hard-first strategy, the time to test is long for the first few components, and then it gets shorter as more dependencies are refactored away.

With this strategy, you could be spending a day or more to get even the simplest tests going on the more complex components. But notice the quick decline in the time required to write the test relative to the slow incline in figure 9.3. Every time you bring a component under test and refactor it to make it more testable, you may also be solving testability issues for the dependencies it uses, or for other components. Specifically because that component has lots of dependencies, refactoring it can improve things for other parts of the system. That’s why the quick decline appears.
The hard-first strategy is only possible if your team has experience in unit-testing techniques, because it’s harder to implement. If your team does have experience, use the priority aspect of components to choose whether to start with the hard or easy components first. You might want to choose a mix, but it’s important that you know in advance how much effort will be involved and what the possible consequences are.
9.3. Writing integration tests before refactoring
If you do plan to refactor your code for testability (so you can write unit tests), a practical way to make sure you don’t break anything during the refactoring phase is to write integration-style tests against your production system.
I consulted on a large legacy project, working with a developer who needed to work on an XML configuration manager. The project had no tests and was hardly testable. It was also a C++ project, so we couldn’t use a tool like Typemock Isolator to isolate components without refactoring the code.
The developer needed to add another value attribute into the XML file and be able to read and change it through the existing configuration component. We ended up writing a couple of integration tests that used the real system to save and load configuration data, and that asserted on the values the configuration component was retrieving and writing to the file. Those tests set the “original” working behavior of the configuration manager as our base of work.
Next, we wrote an integration test that showed that, once the component was reading the file, it contained no attribute in memory with the name we were trying to add. We proved that the feature was missing, and we now had a test that would pass once we added the new attribute to the XML file and correctly wrote to it from the component.
Once we wrote the code that saved and loaded the extra attribute, we ran the three integration tests (two tests for the original base implementation, and a new one that tried to read the new attribute). All three passed, so we knew that we hadn’t broken existing functionality while adding the new functionality.
As you can see, the process is relatively simple:
- Add one or more integration tests (no mocks or stubs) to the system to prove the original system works as needed.
- Refactor or add a failing test for the feature you’re trying to add to the system.
- Refactor and change the system in small chunks, and run the integration tests as often as you can, to see if you break something.
Sometimes, integration tests may seem easier to write than unit tests, because you don’t need to mess with dependency injection. But making those tests run on your local system may prove annoying or time-consuming because you have to make sure every little thing the system needs is in place.
The trick is to work on the parts of the system that you need to fix or add features to. Don’t focus on the other parts. That way, the system grows in the right places, leaving other bridges to be crossed when you get to them.
As you continue adding more and more tests, you can refactor the system and add more unit tests to it, growing it into a more maintainable and testable system. This takes time (sometimes months and months), but it’s worth it.
Did I mention that you need to have good tools? Let’s look at some of my favorites.
9.4. Important tools for legacy code unit testing
Here are a few tips on tools that can give you a head start if you’re doing any testing on existing code in .NET:
- Isolate dependencies easily with Typemock Isolator.
- Find testability problems with Depender.
- Use JMockit for Java legacy code.
- Use Vise while refactoring your Java code.
- Use FitNesse for acceptance tests before you refactor.
- Read Michael Feathers’ book on legacy code.
- Use NDepend to investigate your production code.
- Use ReSharper to navigate and refactor your production code more easily.
- Detect duplicate code (and bugs) with Simian.
- Detect threading issues with Typemock Racer.
Let’s look at each of these in a little more detail.
9.4.1. Isolate dependencies easily with Typemock Isolator
Typemock Isolator was introduced in chapter 5, and it’s the only commercial-grade isolation framework (which means it allows stubs and mocks) of the frameworks currently on the market. It’s also different from the other frameworks in that it’s the only one that allows you to create stubs and mocks of dependencies in production code without needing to refactor it at all, saving valuable time in bringing a component under test.
Note
Full disclosure: While writing this book, I also worked as a developer at Typemock on a different product. I also helped to design the API in Isolator 5.0.
In its latest version (5.2 at the time of writing this book), Isolator uses the term “fake” and removes completely the words “mock” and “stub” from the API. Using the new framework, you can “fake” interfaces, sealed and static types, nonvirtual methods, and static methods. This means you don’t need to worry about changing the design (which you may not have time for, or perhaps can’t for testability reasons). You can start testing almost immediately. There’s also a free version of Typemock Isolator for open source projects, so you can feel free to download this product and try it on your own.
Listing 9.1 shows a couple of examples of using the new Isolator API to fake instances of classes.
Listing 9.1. Faking static methods and creating fake classes with Isolator
[Test]
 public void FakeAStaticMethod()
 {
    Isolate
    .WhenCalled(()=>MyClass.SomeStaticMethod())
    .WillThrowException(new Exception());

 }

[Test]
 public void FakeAPrivateMethodOnAClassWithAPrivateConstructor()
 {
    ClassWithPrivateConstructor c =
      Isolate.Fake.Instance<ClassWithPrivateConstructor>();
    Isolate.NonPublic
          .WhenCalled(c,"SomePrivateMethod").WillReturn(3);
 }
As you can see, the API is simple and clear, and uses generics and delegates to return fake values. There’s also an API specifically dedicated for VB.NET that has a more VB-centric syntax. In both APIs, you don’t need to change anything in the design of your classes under test to make these tests work, because Isolator uses the specialized extended reflection (or profiler APIs) of the .NET Common Language Runtime to perform its actions. This gives it much more power than other frameworks.
Isolator is a great framework if you want to start testing, you have existing code bases, and you want a bridge that can help make the hard stuff more agile. There are more examples and downloads at www.Typemock.com.
9.4.2. Find testability problems with Depender
Depender is a free tool I’ve created that can analyze .NET assemblies for their types and methods, and can help determine possible testability problems in methods (static methods, for example). It displays a simple report for an assembly or a method, as shown in figure 9.5.
Figure 9.5. Depender is simple and easy to use.

You can download Depender from my blog: http://weblogs.asp.net/rosherove/archive/2008/07/05/introducing-depender-testability-problem-finder.aspx.
9.4.3. Use JMockit for Java legacy code
JMockit is an open source project that uses the Java instrumentation APIs to do some of the same things that Typemock Isolator does in .NET. You don’t need to change the design of your existing project to isolate your components from their dependencies.
JMockit uses a swap approach. First, you create a manually coded class that will replace the class that acts as a dependency to your component under test (say you code a FakeDatabase class to replace a Database class). Then you use JMockit to swap calls from the original class to your own fake class. You can also redefine a class’s methods by defining them again as anonymous methods inside the test.
Listing 9.2 shows a sample of a test that uses JMockit.
Listing 9.2. Using JMockit to swap class implementations

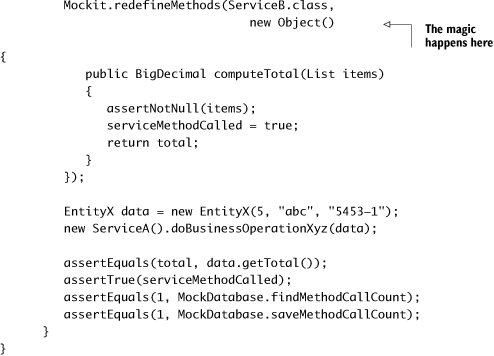
JMockit is a good place to start when testing Java legacy code.
9.4.4. Use Vise while refactoring your Java code
Michael Feathers wrote an interesting tool for Java that allows you to verify that you aren’t messing up the values that may change in your method while refactoring it. For example, if your method changes an array of values, you want to make sure that as you refactor you don’t screw up a value in the array.
Listing 9.3 shows an example of using the Vise.grip() method for such a purpose.
Listing 9.3. Using Vise in Java code to verify values aren’t changed while refactoring

Note
The code in listing 9.3 is copied with permission from http://www.artima.com/weblogs/viewpost.jsp?thread=171323.
Vise forces you to add lines to your production code, and it’s there to support refactoring of the code. There’s no such tool for .NET, but it should be pretty easy to write one. Every time you call the Vise.grip() method, it checks whether the value of the passed-in variable is still what it’s supposed to be. It’s like adding an internal assert to your code, with a simple syntax. Vise can also report on all “gripped” items and their current values.
You can read about and download Vise free from Michael Feathers’ blog: http://www.artima.com/weblogs/viewpost.jsp?thread=171323.
9.4.5. Use FitNesse for acceptance tests before you refactor
It’s a good idea to add integration tests to your code before you start refactoring it. FitNesse is one tool that helps create a suite of integration- and acceptance-style tests. FitNesse allows you to write integration-style tests (in Java or .NET) against your application, and then change or add to them easily without needing to write code.
Using the FitNesse framework involves three steps:
1.
Create code adapter classes (called fixtures) that can wrap your production code and represent actions that a user might take against it. For example, if it were a banking application, you might have a bankingAdapter class that has withdraw and deposit methods.
2.
Create HTML tables using a special syntax that the FitNesse engine recognizes and parses. These tables will hold the values that will be run during the tests. You write these tables in pages in a specialized wiki website that runs the FitNesse engine underneath, so that your test suite is represented to the outside world by a specialized website. Each page with a table (which you can see in any web browser) is editable like a regular wiki page, and each has a special “execute tests” button. These tables are then parsed by the testing runtime and translated into test runs.
3.
Click the Execute Tests button on one of the wiki pages. That button invokes the FitNesse engine with the parameters in the table. Eventually, the engine calls your specialized wrapper classes that invoke the target application and asserts on return values from your wrapper classes.
Figure 9.6 shows an example FitNesse table in a browser.
Figure 9.6. Using FitNesse for integration

You can learn more about FitNesse at http://fitnesse.org/. For .NET integration with FitNesse, go to http://fitnesse.org/FitNesse.DotNet.
9.4.6. Read Michael Feathers’ book on legacy code
Working Effectively with Legacy Code, by Michael Feathers, is the only book I know that deals with the issues you’ll encounter with legacy code (other than this chapter). It shows many refactoring techniques and gotchas in depth that this book doesn’t attempt to cover. It’s worth its weight in gold. Go get it.
9.4.7. Use NDepend to investigate your production code
NDepend is a relatively new commercial analyzer tool for .NET that can create visual representations of many aspects of your compiled assemblies, such as dependency trees, code complexity, changes between the different versions of the same assembly, and more. The possibilities of this tool are huge, and I recommend you learn how to use it.
NDepend’s most powerful feature is a special query language (called CQL) you can use against the structure of your code to find out various component metrics. For example, you could easily create a query that reports on all components that have a private constructor.
You can get NDepend from http://www.ndepend.com.
9.4.8. Use ReSharper to navigate and refactor production code
ReSharper is one of the best productivity-related plugins for VS.NET. In addition to powerful automated refactoring abilities (much more powerful than the ones built into Visual Studio 2008), it’s known for its navigation features. When jumping into an existing project, ReSharper can easily navigate the code base with shortcuts that allow you to jump from any point in the solution to any other point that might be related to it.
Here are some examples of possible navigations:
- When in a class or method declaration, you can jump to any inheritors of that class or method, or jump up to the base implementation of the current member or class, if one exists.
- You can find all uses of a given variable (highlighted in the current editor).
- You can find all uses of a common interface or a class that implements it.
These and many other shortcuts make it much less painful to navigate and understand the structure of existing code.
ReSharper works on both VB.NET and C# code. You can download a trial version at www.jetbrains.com.
9.4.9. Detect duplicate code (and bugs) with Simian
Let’s say you found a bug in your code, and you want to make sure that bug was not duplicated somewhere else. With Simian, it’s easy to track down code duplication and figure out how much work you have ahead of you, as well as refactoring to remove duplication. Simian is a commercial product that works on .NET, Java, C++, and other languages.
You can get Simian here: http://www.redhillconsulting.com.au/products/simian/.
9.4.10. Detect threading issues with Typemock Racer
If your production code uses multiple threads, Typemock Racer may help you discover common but hard-to-detect threading problems in your existing code. It’s a relatively new product that aims to find deadlocks and race conditions in your existing production code without needing to change it.
You can find out more about it at www.Typemock.com.
9.5. Summary
In this chapter, we talked about how to approach legacy code for the first time. It’s important to map out the various components according to their number of dependencies, their amount of logic, and the project priority. Once you have that information, you can choose the components to work on based on how easy or how hard it will be to get them under test.
If your team has little or no experience in unit testing, it’s a good idea to start with the easy components and let the team’s confidence grow as they add more and more tests to the system. If your team is experienced, getting the hard ones under test first can help you get through the rest of the system more quickly.
If your team doesn’t want to start refactoring code for testability, but only to start with unit testing out of the box, a tool like Typemock Isolator will prove helpful because it allows you to isolate dependencies without changing the existing code’s design. Consider this tool when dealing with legacy .NET code. If you work with Java, consider JMockit for the same reasons.
I also covered a number of tools that can prove helpful in your journey to better code quality for existing code. Each of these tools can be used in different stages of the project, but it’s up to your team to choose when to use which tool (if any at all).
Finally, as a friend once said, a good bottle of vodka never hurts when dealing with legacy code.