1. Investigating the Scene of the Crime
RUSHING INTO A CRIME SCENE TOO HASTILY CAN cause us to miss picking up important pieces of evidence, so we’ll start your apprenticeship by going over HTML best practices: document structure, good semantics, and tag structure. From there, we’ll move on to CSS, including rule structure, getting the styles into your documents, and commenting.
WE’LL ALSO TAKE A GOOD LOOK AT THE CLUES POSED by inheritance, the cascade, and the vast array of selectors you can employ to target the desired elements in your HTML document.
HTML Document Structure
As you know, HTML (Hypertext Markup Language) is the basis for all things web. And you also probably know that HTML has different version numbers, and that there is a character on the block known as XHTML. Without going into lengthy detail about the version histories and differences, I’ll cut to the chase: HTML 4.01 is the latest version of HTML. The W3C (World Wide Web Consortium) is working on a draft of HTML 5.0, which is slated to be released “soon.” XHTML was created to be an “extensible” version of HTML, which means that it conforms to the XML syntax and can be made modular (divided into usable components).
To learn more about HTML, see http://www.w3.org/TR/html4/.
The main difference between the two forms of markup is that XHTML by definition needs to be well formed; therefore, all elements need to be in lowercase, all elements need to be closed, and attributes are case-sensitive. By contrast, HTML, technically, does not need to be all in lowercase, empty elements do not have to be closed, nor are the attributes case-sensitive. However, just because the specification says you can be loosey-goosey about those items doesn’t mean you should be. To conform to best practices and industry standards, you should create consistent, well-formed, semantically correct documents.
Here are the underpinnings of a “well-formed” HTML document in a nutshell:
- All elements are closed.
- All tags are in lowercase.
- All attributes values are enclosed by quotes.
- All elements are properly nested.
A basic HTML 4.01 document using the strict doctype definition looks like this:
<!DOCTYPE HTML PUBLIC "-//W3C//DTD HTML 4.01//EN" "http://www.w3.org/TR/html4/strict.dtd">
<html>
<head>
<title>HTML 4.01 Strict Document</title>
</head>
<body>
</body>
</html>
A basic XHTML 1.0 document using the transitional doctype definition looks like this:
<!DOCTYPE html PUBLIC "-//W3C//DTD XHTML 1.0 Transitional//EN" "http://www.w3.org/TR/xhtml1/DTD/xhtml1-transitional.dtd">
<html xmlns="http://www.w3.org/1999/xhtml">
<head>
<title> XHTML 1.0 Transitional Document</title>
<meta http-equiv="Content-Type" content="text/html; charset=utf-8">
</head>
<body>
</body>
</html>
Note
![]()
Please refer to the Resources section for a detailed explanation of the differences between HTML and XHTML.
HTML tag structure
HTML tags can be distilled into this syntax:
<tagname attribute="value"></tagname>
The tag always has a tag name, may have an attribute, and when there is an attribute, the best practice is to always give the attribute a value.
Keep this syntax in mind for later; being able to recognize patterns like this one makes it easy to detect when tags fall outside the pattern.
Here’s a little quiz for you. What’s wrong with the HTML tag below?
<p class, highlight>Hunting for clues</p>
I know you caught it: the attribute and value were in the wrong format. Rather, it should be like this:
<p class="highlight">Clues found!</p>
The CSS pattern is analogous, which you will soon see. With both HTML and CSS, once you have the patterns down, you’ll be able to recognize them and know when a tag or a style declaration has gone wrong.
POSH, or Plain Old Semantic HTML
Standards advocates have coined the phrase “Plain Old Semantic HTML,” or POSH, as a mnemonic term to encapsulate the idea of using HTML as it was originally intended: to present information so that it conveys meaning and significance to the reader as well as the reader agent.
So what does that mean for you? It means that you must remember and practice the key concept: semantics over presentation. You’ve heard the term “separating presentation from content” before, right? It simply means making sure the markup that creates visual effects, but lends no meaning to the structure of the document, is stripped out and put into a style sheet.
To support separating content from presentation, you need to use your tags for their meaning, not for how you would like them rendered by the browser. Think of using the correct tags to convey meaning as adding the right intonation and facial expressions when you talk. Proper semantics are the key to getting the point across with HTML documents.
For example, while the following code snippet is syntactically correct (there are no actual errors), from a semantics standpoint it needs major help:
<p>Greatest Detectives of All Times</p>
<p>These have proven to be some of the best detectives to read and
learn from in literature.</p>
<p>Sherlock Holmes<br>
Encyclopedia Brown<br>
Hercule Poirot<br>
The CSS Detective</p>
What’s wrong with it? There is no indication of what the elements are in relationship to each other, and what they truly are themselves. With the corrected snippet, you can clearly see their identities and the code hierarchy.
<h1>Greatest Detectives of All Times</h1>
<p>These have proven to be some of the best detectives to read and
learn from in literature.</p>
<ol>
<li>Sherlock Holmes</li>
<li>Encyclopedia Brown</li>
<li>Hercule Poirot</li>
<li>The CSS Detective</li>
</ol>
And trust me, it is truly a boon for both you and your markup. Your HTML will be easier to read, you will be able to better control the visual display, and you will be that much farther on the road to becoming not only a CSS detective, but a CSS pro.
Note
![]()
Did you know that semantics helps with accessibility? Having accessible pages means that more than one audience can extract meaning from the page. For example, a screen reader would actually read a word enclosed by <em></em> with vocal emphasis to convey the meaning to a blind user. Not only is using semantic instead of presentational markup the right thing to do, Stevie Wonder would appreciate your efforts.
What’s in it for me?
POSH isn’t just a nice idea, nor is it solely promoted by a small contingent of well-intentioned groupies. Semantic HTML has become the standard, not the exception, for serious web professionals who care about their craft. What’s more, standards-based markup has many immediate and far-reaching benefits such as these:
• Your pages will be easier to maintain.
• Authors, users, and browser agents will find it easier to determine document and content hierarchies and relationships.
• Your pages will get a better search-engine ranking, as document content hierarchy is distinguishable.
• Your pages will load faster thanks to less code.
• Your pages will be more accessible to people seeing the document in an environment where CSS cannot be applied (text-only readers, other media).
• Your pages will be understandable to users who have it read to them through a screen reader.
But finally, writing HTML any other way makes it harder to see where the problems are in your code. Make life easy on yourself and write semantic code!
General HTML troubleshooting tips
When I troubleshoot, I start with the area that I think the problem is in and then work my way out of it in a spiral or concentric circles. I also tell myself “it’s something simple,” which helps me relax and find problems more easily.
Here are my guidelines for troubleshooting HTML code.
- Check the <tag> name—is it spelled correctly? You’ll know it isn’t if you have one or both of these problems:
• Tag contents (ie, the tagname itself) show up as text.
• The text or section of the document is not affected by the tag the way you intended.
- Check that the tag has its ending bracket (
>). You’ll know it’s missing if:
• The tag name shows up as text with a
<in front of it. - Make sure the start tag has a closing tag—for example,
<tag>word</tag>. You’ll know this is the problem if:
• text—text from the start tag on has that formatting.
• lists—any new lists indent after the initial one.
• tables—the new table is nested within the first table.
- Check the
<tag attribute="value">syntax. Check the spelling of the tag name, attributes, and values, and make sure the attribute value has an ending quotation mark. You’ll know this is the problem if:
• Contents of the tag don’t show up at all.
• Contents of the tag don’t have any of the formatting.
• Contents of the tag have some of the formatting, but not all of it.
- Check that you have placed the attribute you want in the proper tag. You’ll know this is the problem if:
• Contents of the tag don’t have any of the formatting you wanted.
• Contents of the tag have some of the formatting, but not all of it.
- Check the order of nested tags. Make sure that tags are nested properly, like parentheses: ( [{ word }] ). For example,
<a href=http://www.something.com><em>this is a link</em></a>. You’ll know this is the problem if:
• This may not show up as a problem—the browser may render it anyway.
• The text may not show up.
- Check that you have placed the tags in the proper place. You’ll know this is the problem if:
• Content is affected in a different area than you intended.
If you are really stumped and can’t find the errors in your markup, then validate your page using an HTML validator (see the Resources section for a complete list). Validation for both markup and CSS code is covered in further detail in Chapter 3.
CSS Document Structure
In the most basic form, a CSS style rule or “rule set” has the following syntax:
selector {property: value;}
Doesn’t that look suspiciously like the structure of an HTML tag? Earlier I mentioned that the tag syntax and rule syntax were roughly analogous. The image below (Figure 1.1) illustrates what I mean:
Figure 1.1. Analogous tag and style-rule structure
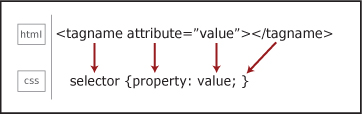
The tag name of the HTML tag and the selector of the CSS style rule are similar, and sometimes even the same if you are using the tag name as the selector. The CSS property is similar to the HTML attribute, and like the tag/selector, may share the same name.
In a style rule, the selector targets the HTML element that will be affected by the rule set. The selector is everything that comes before the curly brackets.
The declaration block is everything that is between the two curly braces, and the style declaration itself is the property: value pair. The semicolon at the end is not required for a single declaration, but is used to separate declarations from each other and to end a list of multiple declarations. Therefore, it is a good habit to end all declarations with a semicolon.
Just as HTML tags can have multiple attribute-value pairs in one tag, you can have multiple property-value pairs per style rule:
selector {property: value; property: value; property: value;}
For some properties, you can also have multiple values for one property:
selector {property: value, value, value;}
And you can have multiple selectors for a set of properties and values:
selector1, selector2, selector3 {property: value; property: value;}
In contrast to HTML, the CSS style rule always has a selector, the selector always has a property, and the property always has a value. This is important to keep in mind as it leads to some of the very first clues to hunt for when troubleshooting CSS. Forgot a selector? Then the declaration has nothing to be applied to. Don’t have a property? Then the browser can’t determine where to assign the value. Missing a value? Then the selector and property are all dressed up with nowhere to go and won’t render in the browser. Leave off the opening or closing curly bracket? Then the style won’t render, and the style declarations following it may be affected as well. Remember also that misspellings, use of improper terms, and unaccepted values will all have the same effect: your CSS won’t work as expected. These sorts of errors are among the most common problems when your pages don’t render as expected.
Employing styles in your documents
Now that you know the syntax, let’s look at where to place the style rules. There are several techniques for getting style rules into your HTML pages.
External styles
External style sheets are the modern-day workhorse of standards-based websites. Most websites have at least one style sheet for rendering the page on various media including standard monitors, cell phones, audio browsers, and printers.
Linking to an external style document with <link>
Connecting your style sheet to your HTML document is as easy as using the <link> tag, which establishes a relationship between documents. Here is the code:
<head>
<title>Black and White Page Example</title>
<link rel="stylesheet" href="stylesheet.css" type="text/css">
</head>
When the browser renders your page, it reaches the link tag, then retrieves the style sheet document and renders the styles. After the style sheet is downloaded, it is cached and reused without a new call to the server.
The external CSS document should not contain any HTML markup in it at all. The only content it has is style rules and comments. So if you got all riled up and put some <style></style> tags in the .css file, remove them! With HTML markup in the style sheet, the browser cannot properly render the page styles.
Obviously, using external style sheets is the best method for a website of any number of pages greater than one. Every page will call the style sheet and apply the styles, making the styles consistent throughout the website. If you ever want to change any piece of presentation, you just change the style sheet and the whole site changes. How in the world did we ever survive without this? Those were dark days pre-CSS!
Tip
![]()
When linking to a style sheet document from an HTML page, the URL is relative to the location of the HTML page. However, when linking to another file from a style sheet, the URL is relative to the location of the style sheet or the style sheet document.
Linking to an external style document with @import
Like using the <link> tag to link to an external CSS document, you can use the @import directive through the <style> tag to link to external CSS documents.
<head>
<title>Black and White Page Example</title>
<style type="text/css">
@import url("stylesheet.css");
</style>
</head>
The @import directive can also be used in an external style sheet. In this case, again, no HTML tags are needed. Simply use the directive as the first declaration in the document:
@import url("stylesheet.css");
If you use the @import directive in any of your style sheets, it needs to be the first declaration. If it is after any other style rules, the browser will ignore it. A useful advanced technique is to import multiple style sheets from one CSS document using the @import rule in that style sheet.
Document-level or embedded styles
Document-level styles are a great way to create and test all the styles you create for your pages before you export them to an external style sheet.
You place document-level styles in the head of the HTML document using the <style> tag.
<head>
<title>Black and White Page Example</title>
<style type="text/css">
body {background-color: #000000; color: #ffffff;}
</style>
</head>
The <style> tag always needs the type="text/css" attribute and value, and always needs to be closed.
As mentioned above, document-level styles are great for when you create your initial page or template document, and you want to work in one place to access both your styles and your markup. All of the styles can be reused within the document (as opposed to inline styles, which are only applied to the tag it is in). However, document-level styles add to the size of the page, and the styles are not applicable to any other pages in the website.
Inline styles
Inline styles are valid in HTML 4.01, but are so strongly recommended against that they are practically verboten, while in early proposed drafts of XHTML 2.0 the style attribute is fully deprecated and dropped from the specification altogether. In HTML 4.01 and XHTML 1.0, with the style attribute, you can insert style declarations directly into any HTML tag.
Before you use an inline style, however, think about it: what is the difference between that and, say, using the deprecated <font> tag? The answer is, not a whole lot. Don’t use inline styles: the styles themselves are not reusable by other elements on the page, they can’t be overwritten by embedded or external styles without the use of !important, they increase page-rendering time, and they quickly become a maintenance nightmare. Implementing your styles in other places will be a lot more powerful and portable for you in the long run.
CSS Foundations
To really troubleshoot CSS, we need to understand a few foundational concepts—specifically, document hierarchy and element relationships, inheritance, the cascade, and specificity.
Document tree, hierarchy, and element ancestry
The best way to understand the document tree, document hierarchy, and the relationships between elements is to see them. So let’s start with the code:
<html>
<head>
<title>Mikey Spillane vs. Mike Hammer</title>
</head>
<body>
<h1>Mikey Spillane vs. Mike Hammer</h1>
<p>Who is the toughest, smartest, and most steely? <em>You</em> get to be the judge by taking this <a href="survey.html">survey</a>.</p>
<p>Next month's survey: Sir Arthur Conan Doyle or Sherlock Holmes? <img src="doyle.jpg" alt="Doyle vs. Holmes"></p>
</body>
</html>
We can illustrate the document tree visually:
Figure 1.2. Document tree showing hierarchy and element ancestry
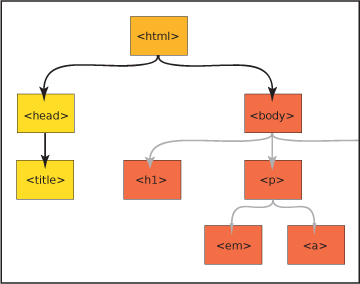
In this example, the html tag is the main ancestor of all of the tags in the document. In the <body> of the page, the <h1>, <p>, <img>, <em>, and <a> tags are all descendants of the <body> tag. The <h1> and <p> are siblings, and the <em>, <a>, and <img> are descendants of one of the <p> tags.
Did you notice the pattern? A descendant element is nested inside another element, which is its ancestor.
Let’s delve deeper into element relationships to get the full picture of the “family tree.”
An ancestor is any element that is connected to other elements but is higher up the document tree, no matter how many levels up. For example, in the document above, both the <html> and <body> tags are ancestors of the <p> tag.
A descendant is any element connected to an ancestor, but lower in the document tree, no matter how many levels down. In our example, the <em>, <a>, and <img> are descendants of the <body> tag.
A parent is an element directly above a connected element in the document tree. A parent element is also an ancestor, but an element can have ancestors that are not its parents.
A child element is directly below a connected element. A child is a descendant, but an element can have descendants that are not its children.
Sibling elements share the same parent, and are on the same level as each other in the hierarchy.
Inheritance
Just as art mimics life, so does CSS. One of the foundations of CSS, inheritance, is like a drama set in 18th-century England: just as in a family with descendants fighting for the fortune of a wealthy relative, in CSS, style rules often have to duke it out to be the one whose properties get expressed and displayed.
Inheritance is a process by which ancestor elements pass down selected properties to their descendants. The quality of inheritance in CSS is truly a godsend. Think about it: without inheritance, you would have to establish some of the exact same style rules for every single element in the page.
Not all the properties of the ancestor element are inherited, however, and there is a beautiful logic to the way inheritance works. Properties that are related to text display, foreground color, and list styles are inherited. These are the properties you most likely want to stay consistent throughout the document. In contrast, properties related to the box model are not inherited. These include margin, padding, borders, position (absolute, relative, and z-index), display, and overflow. You wouldn’t want these styles to be inherited—pages would be practically incomprehensible if properties like margin, padding, or position were inherited automatically.
Note
![]()
If you have a situation where you want a property that normally would not be inherited to be inherited, you can force inheritance by using the inherit value.
The cascade
Understanding how the cascade works is one of the most important skills to have as a CSS detective. In essence, the cascade is the property of styles being applied layer upon layer to each other. Some of your issues may be fixed simply by changing the order of your styles, but knowing the rules of the cascade will help you write cleaner, more concise style declarations.
Origin and importance
What happens when two or more conflicting styles target the same element in the page?
The style that ultimately gets applied trumps all of the others based on a scale of specificity (explained below). To get a visual equivalent of the concept of the cascade, imagine styles as steps. Styles that are closer to the element are more important, and more likely to be applied.
The first part of the cascade is determined by the origin of the styles themselves. Styles can originate from three places: the user agent, the author, or the user himself.
User agent is another term for a browser. Browsers have default styles built into them that will render an HTML page a certain way whether there are styles attached to it or not.
Author styles are the style sheets attached to the HTML file either externally via a link or @import, or embedded at the document level in the <head>.
User styles are a set of styles established by the user for his particular browser. This may be the case if a user is sight impaired or has any other disability that needs accommodating for on a consistent basis.
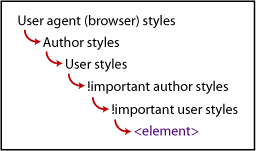
Normal style declarations can be taken up a notch and designated as !important. Doing so causes the style to override the cascade and be implemented over any conflicting styles. Both the style author and user can designate !important styles. !important user styles will override !important author styles.
Here is the cascade for user agents, author, and user styles (Figure 1.3):
Figure 1.3. The cascade for user agents, author, and user styles
The second factor in the cascade is the location of the style, whether it’s external, document level, or inline. This is a key factor in determining distance or closeness from the element targeted by the styles.
External style sheets are farther away from the element, document-level embedded styles are closer, and inline styles are closest.
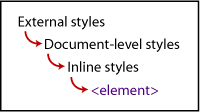
Here is the cascade for external styles to inline styles (Figure 1.4):
Figure 1.4. The cascade for external styles to inline styles
Specificity
The term specificity refers to how specific a style rule is to the desired element. The mechanism works like this: the more specific a rule is, the more easily it will trump other rules that may be targeting the same element. Let’s use the close-versus-distant metaphor: if the selector is less specific, then it is more distant from the element, whereas if it very specific, then it is closer to the element. The closer the rule to the element, the higher the specificity weight or number, and the more precedence that rule has over others targeting the same element.
Specificity takes into consideration all of the selectors to determine the proximity of the style rule to the element. Here are the questions you would ask to calculate the specificity weight and thus see which style will ultimately get applied to the element:
- Is it an inline style? If yes, then it has more weight. If it’s not an inline style, then proceed to Question 2.
- How many
ids are in the selector? The more it has, the higher the weight. If there are noids in the selector, then proceed to Question 3. - How many class names, pseudo-classes, and attributes are there in the selector? The more it has, the higher the weight. If there are none of these in the selector, then proceed to Question 4.
- How many element names or pseudo-elements are there in the selector? This number will ultimately determine the weight of the style rule. (See the next section for a description and examples of pseudo-elements.)
- If it has
!importantin the declaration, then it has more specificity weight than any other style.
Order
The order in which the styles are listed is important on all levels of styles: the order of the links to the style sheets, the style tag, and the @import directive in the HTML document; where the style is listed in the external style sheets, and where the style is listed within the style tag at the document level. The farther down the style is in the order of the documents, the closer it is to the element—and thus, the more weight and precedence it will have over any conflicting styles (Figure 1.5 and 1.6).
Figure 1.5. Style order
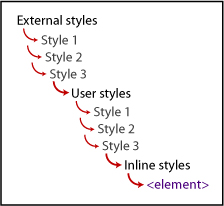
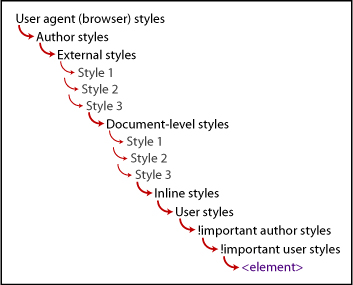
Figure 1.6. The grand view of the cascade, taking all factors into consideration
Selectors
Styles don’t do us much good until they are associated with an HTML element in a web page. To enable us to target the exact elements on the page for the maximum amount of display control, the CSS 1 and CSS 2 specifications provide a vast number of selectors.
General selectors
The possibilities for applying selectors seem almost endless, but you have to know the right way to do so. Once you know the rules for creating selectors and understand the patterns, writing well-constructed CSS will be a snap. As a bonus, you’ll able to troubleshoot really well and discern the root of any issues that may come up later.
Universal
The universal selector is the asterisk (*). This selector lets you select every element on the page and apply the style rules to them.
*{font-family: Arial, sans-serif;}
Element/type
The element or type selector targets an HTML element, and thus uses a tag name. This enables you to select any of this kind of element in the document.
p {font-size: 1em;}
Class
In HTML, every single tag can have the class attribute. A class selector targets the value of a class attribute of a tag. A class attribute can be used multiple times in a document and applied to different elements.
For example, both <p> and the <li> tag have the class attribute with the value of "highlight" assigned to them, so they both get the style applied to them:
<p class="highlight">Someone has been murdered!</p>
<p>What was the possible weapon?</p>
<ul>
<li>A candlestick </li>
<li class="highlight">A lead pipe</li>
<li>A rope</li>
</ul>
.highlight {color: #ffcc00;}
Because you can use a class selector many times in a document with multiple elements, it is very flexible and portable.
You can increase the specificity of a class selector by attaching it to an element selector, which would cause the style to be applied only to an element with a class attribute with that value.
So, from the example above, if you wanted only an <li> with the class="highlight" to have the color declared, you would change the selector to this:
li.highlight {color: #ffcc00;}
ID
Id selectors target an element with a particular id attribute. Ids help you zero in on a particular element, because you can only use an id once in any document. Ids have a very high specificity weight.
<div id="maincontent">
<p>Would Nancy Drew ever write a tell-all? <em>Yes, she would.</em> In <a href="nancydrewconfessions.html">"Confessions of Nancy Drew"</a> you'll find out that being a teen sleuth is not all the glitz and glamour that you may think.</p>
<p>Still want to be a detective? Then keep reading. <img
src="fingerprint.jpg" alt="fingerprint"></p>
</div>
#maincontent {background-color: #eee;}
Contextual selectors (relationship-based)
There are several selectors that focus on target elements based on their relationship with other elements in the document tree. The important thing to remember about all of the relationship-based or combined selectors—also sometimes called combinators—is that the target element is the final element of the combinator. It is easy to get distracted by all of the selectors at the beginning, but they are only there in reference to the element at the end.
Tip
![]()
Be sure to check the browser support for the selector you want you use. Support for some of the contextual selectors varies greatly. See the Resources section for good references.
Let’s take a look at the different combinations available.
Descendant
Descendant selectors select the element that is a descendant of another element in the document tree.
<div id="sidebar">
<h2>Missing Jewels</h2>
</div>
The syntax is as follows:
ancestor selector (space) descendant selector {property: value;}
So to target the <h2> that is the descendant of the <div>, we would write this:
div h2 {color: green;}
Child
A child selector targets an element that is a child of another element. Remember that a child is a direct descendant of an element in the document tree (as opposed to a more distant descendant).
<p>Here is text that is <strong>forcefully</strong> emphasized. More text, but that is only normally <em>emphasized</em>.</p>
Here’s the syntax:
parent selector > descendant selector {property: value;}
So to target the <strong> element that is the child of the <p> element, we would write this:
p > strong {font-family: Tahoma, sans-serif;}
Sibling/adjacent
A sibling selector (also known as adjacent) selects an element that is next to another element in the document tree.
<div id="sectiontwo">
<h3>Priorities</h3>
<p>Things to accomplish today</p>
<ol>
<li>Interrogate suspects for the case of the Lost Content</li>
<li>Track clues for the case of the Notorious Em</li>
<li>Clean kitchen</li>
</ol>
</div>
This is the syntax:
sibling selector + sibling selector {property: value;}
To target the <ol> element next to the <p> element (which are both descendants and children of the <div> element), we would write this:
p + ol {font-family: Georgia, serif;}
Pseudo-class selectors
Pseudo-class selectors let you select elements that are not part of the document tree, but rather are events or qualities of certain elements.
Link pseudo-classes
You use link pseudo-classes to target link text in its various states.
• :link targets an unvisited link
• :visited targets a visited link
Dynamic pseudo-classes
These pseudo-classes are typically used on the link element, but you can apply them to any element on the page as well.
• :focus targets any element that is in focus
• :hover targets any element that is being selected by a pointing device (such as a cursor)
• :active targets any element that is activated by the user (such as an active link)
The order of these pseudo-classes is important as it mimics the cascade that the browser follows, and most of the states are mutually exclusive. For example, you must have a regular link state before you have a visited link state.
Many people use the mnemonic LoVe For HAte to remember the order :link, :visited, :focus, :hover, :active. Usually, all of the link styles are written together:
a {color: #3f0;}
a:link {text-decoration: none;}
a:visited {color: #0f3;}
a:focus {text-decoration: none;}
a:active {color: #f03;}
a:hover {text-decoration: underline; color: #636;}
Esoteric selectors
These selectors are part of the CSS specifications, but not as widely used because of support issues with some browsers. Over time, however, the use of esoteric selectors will probably increase. I encourage you to check recent browser-support charts to determine which browsers support these selectors. Several helpful browser-support charts are listed in the Resources section.
Other pseudo-classes
• :first-child targets any element that is the first child of its parent element.
<ol>
<li>this list item is a first-child.</li>
<li>this list item is not.</li>
</ol>
li:first-child {font-variant: italic;}
• :lang(n) targets any element on the basis of the language that has been set for it.
<cite lang="fr">Faites les bon temps rouler!</cite>
:lang(fr) { font-face: Gigi, sans-serif;}
Pseudo-element
Pseudo-elements also target entities in the document that are not explicitly part of the document tree.
• :first-letter targets the first line of text within an element.
<h1>Solving your first case</h1>
<p>Make sure you act cool, calm, and collected. Remember everything you have learned about deduction, and take your toolkit.</p>
h1 + p:first-letter {font-size: 110%;}
• :first-line targets the first letter of a line of text within an element.
<p>Once you arrive at the scene of the crime, you have to start gathering the evidence. Hopefully, they won't have tidied up before you got there!</p>
p:first-line {font-weight: bold;}
• :before specifies content to be inserted before a given element.
#breadcrumbnav:before {content: "Current page:";}
• :after specifies content to be inserted after a given element.
<p>the crime took place at <span class="time">13:00</span>.</p>
.time:after {content: "hours";}
Attribute
Attribute selectors let you target an element by its attribute or attribute value.
• selector[attribute] targets a selector with a particular attribute.
<a href="http://www.mst3kinfo.com" title="Mystery Science Theater 3000"> Mystery Science Theater 3000</a>
a[title] {font-variant: italic;}
• selector[attribute="value"] targets a selector with a particular attribute and specific value.
<img src="catchathief.jpg" alt="learn how to catch a thief">
img[src="catchathief.jpg"] {border: 1px solid #999;}
• selector [attribute~="value"] targets a selector with a particular attribute and value where the value is one of multiple values separated by a space.
<img src="csi.jpg" alt="CSI">
img[alt~="CSI"] {border: 1px #ff8000 solid;}
• selector [attribute|="value"] targets an element with an attribute that contains values separated by a hyphen in a list.
<img src="lg-rope.gif" width="500" height="300" title="large-rope">
img[title|="large"] {border: 1px solid #000;}
Styles of writing CSS
People have different styles for writing their CSS code. You want to aim for maximum ease of readability and scanability for yourself and anyone else who may read your code after you.
Here are some ways of writing your style rules that can make your code more readable.
Style rule all in one line
selector {property: value; property: value; property: value;}
Pro: All of the styles are on one line and thus easy to find in the document.
Con: It may be difficult to scan to find the property-value pair you are looking for.
Selector separated from style rules
selector {
property: value;
property: value;
property: value;}
Pro: The style-declaration block is on a separate line from the selector, which can make it easier to find both the selector and the declarations.
Con: Breaking the declarations onto separate lines may cause the style-sheet page to be marginally larger.
Selector separated from style rules, declarations indented
selector
{
property: value;
property: value;
property: value;
}
Pros: The style-declaration block is on a separate line from the selector, and with the declarations indented, it’s easy to distinguish between the selector and the styles. Style declarations are easy to scan. You can add new declarations without worrying about the end bracket.
Con: Breaking the declarations onto separate lines may cause the style-sheet page to be marginally larger.
In all the cases above, the line breaks have no effect—the page will render the same. There are many other slight variations, but ultimately, it just boils down to your personal style. The way you think and find information visually will determine what best works for you.
Preliminary CSS troubleshooting tips
At this point, with the core concepts of the cascade and the structure of selectors under your belt, you have a good idea of how to approach any future coding crime scenes. But you also need to be able to correctly identify the evidence. By focusing on the syntax patterns for the different kinds of selectors and style rules, we can arrive at the first set of foundational troubleshooting tips for style declarations.
Basic style syntax troubleshooting
Selectors
• Check spelling.
• If grouped, make sure you have commas between selectors. Make sure there is no comma between the selector list and the opening curly bracket, and that you don’t accidentally use double commas.
• If combinators, check that your combinator syntax is correct.
Properties
• Check spelling.
• Check that you are using the correct property name.
• Check that you are using the correct format and order (such as with shorthand properties).
• If multiple, make sure you have semicolons between the property:value declarations to separate them.
Values
• Check spelling.
• Check that you are using the correct unit of measure for the value.
• Check that the value is an acceptable value for the property.
• Where applicable, make sure the value is properly enclosed by quote marks.
Declaration block
• Make sure your declaration block is enclosed with curly brackets (not square or angle brackets).
• Make sure your whole style declaration ends with a semicolon (which, with the end curly bracket, essentially delimits the end of the declaration).
In the markup
• If you are linking to an external style sheet using the <link> tag, make sure you have rel="stylesheet".
• If you are embedding styles, make sure you have a closing </style> tag.
Typical Tip-offs
How can you know what the culprits of your problems are? Here are some outcomes to look for:
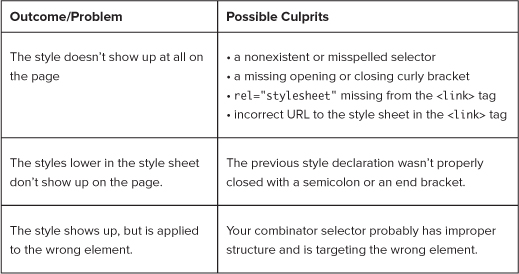
These guidelines are just the beginning. As we start to review the tools of the trade, you will learn some time-honored techniques for writing better and more efficient CSS code, as well as some intermediate troubleshooting tips.