6. Text Entry
Some might disparage the utility of text on a family of touch-based devices. After all, users can convey so much information already using simple gestures. However, text plays an important role, especially as mobile users move away from the office and home for their daily computing interactions. Users have many reasons they need to enter and read characters onscreen. Text allows users to sign in to accounts, view and reply to e-mail, specify URLs and read the Web pages they refer to, and more. Apple’s brilliant predictive keyboard transforms text entry into a simple and fairly reliable process; its classes and frameworks offer powerful ways to present and manipulate text from your applications. This chapter introduces text recipes that support a wide range of solutions. You’ll read about controlling keyboards, making onscreen elements “text aware,” scanning text, formatting text, and so forth. This chapter provides handy recipes for common problems that you’ll encounter while working with text entry.
Recipe: Dismissing a UITextField Keyboard
A commonly asked question about smaller devices and the UITextField control is “How do I dismiss the keyboard after the user finishes typing?” There’s no built-in way to automatically detect that a user has stop typing and then respond. Yet, when users finish editing the contents of a UITextField, the keyboard really should go away. The iPad offers a keyboard-dismissal button, but the iPhone or iPod touch do not offer one.
Fortunately, it takes little work to respond to the end of text field edits, regardless of platform. You do so by allowing users to tap Done and then resign first responder status. Resigning first responder moves the keyboard out of sight, as Recipe 6-1 shows. Here are a few key points about implementing this approach:
• Setting the return key type to UIReturnKeyDone replaces the word Return with the word Done. You can do this in Interface Builder’s attributes inspector or by assignment to the text field’s returnKeyType property. Using a Done-style return key tells the user how to finish editing, rather than just relying on the fact that users have used a similar approach on nonmobile systems. Figure 6-1 shows a keyboard with a Done key style.
Figure 6-1. Setting the name of the Return key to Done (left) tells your user how to finish editing the field. Specify this directly in code or use Interface Builder’s text field attributes inspector to customize the way the text field looks and acts.
• Be the delegate. You set the text field’s delegate property to your view controller either in code or in Interface Builder (IB) by right-clicking the text field and making the assignment there. Make sure your view controller declares and implements the UITextFieldDelegate protocol.
• Implement the textFieldShouldReturn: method. This method catches all Return key presses, no matter how they are named. Use this method to resign first responder hiding the keyboard until the user touches another text field or text view.
You can also use textFieldShouldReturn: to perform an action when the Return key is pressed in addition to dismissing the keyboard.
Your code needs to handle each of these points to create a smooth interaction process for your UITextField instances.
Preventing Keyboard Dismissal
Just as you can take charge of keyboard dismissal, your code can also block that action as well. View controllers can force keyboards to remain onscreen when the current responder does not support text. To do this, override the disablesAutomaticKeyboardDismissal method. The method returns a Boolean value, which allows or disallows keyboard dismissal.
Text Trait Properties
Text fields implement the UITextInputTraits protocol. This protocol provides eight properties that you set to define the way the field handles text input. Those traits are as follows:
• autocapitalizationType—Defines the text autocapitalization style. Available styles use sentence capitalization, word capitalization, all caps, and no capitalization. Avoid capitalizing when entering user names and passwords. Use word capitalization for proper names and street address entry fields.
• autocorrectionType—Specifies whether the text is subject to iOS’s autocorrect feature. When this property is enabled (set to UITextAutocorrectionTypeYes), iOS suggests replacement words to the user. Most developers disable autocorrection for user name and password fields, so iOS doesn’t accidentally correct myFacebookAccount to, for example, myofacial count.
• spellCheckingType—Determines whether to enable spell checking as the user types. Enable it with UITextSpellCheckingTypeYes, or disable it with UITextSpellCheckingTypeNo. Spell-checking is different from auto-correction, which updates items in-place as users type. Spell-checking detects and underlines misspelled items in text views, providing a visual hint for corrective replacement. By default, spellchecking is enabled whenever autocorrection is active.
• keyboardAppearance—Provides two keyboard presentation styles: the default style and a style meant to be used with an alert panel.
• keyboardType—Lets you specify the keyboard that appears when a user interacts with a field or text view. iOS provides nearly a dozen varieties. These types include standard ASCII, numbers and punctuation, PIN-based number entry (0–9), phone number entry (0–9, #, *), decimal number entry (0–9, and .), URL-optimized (prominent ., /, and .com), Email-optimized (prominent @ and .), and Twitter-optimized (prominent @ and #).
Each keyboard has its advantages and disadvantages in terms of the mix of characters it presents. The e-mail keyboard, for example, is meant to support address entry. It includes the @ symbol, along with text. The Twitter keyboard offers easy access to the hash tag (#) symbol as well as the user ID (@) symbol.
• enablesReturnKeyAutomatically—Helps control whether the Return key is disabled when there’s no text in an entry field or view. If you set this property to YES, the Return key becomes enabled after the user types in at least one character.
• returnKeyType—Specifies the text shown on the keyboard’s Return key. You can choose from the default (Return), Go, Google, Join, Next, Route, Search, Send, Yahoo, Done, and Emergency Call. Choose a value that matches the action the user performs when completing a task.
• secureTextEntry—Toggles a text-hiding feature meant to provide more secure text entry. When this property is enabled, you can see the last character typed, but all other characters are shown as a series of dots. Switch on this feature for password text fields.
Other Text Field Properties
In addition to the standard text traits, text fields offer other properties that control how the field is presented. Here are ones you should know about:
• Placeholder—Figure 6-2 shows a field’s placeholder text. This text appears in light gray when the text field is empty. It provides a user prompt, describing the target content for that field. Use the placeholder to provide usage hints such as User Name or E-mail address, as demonstrated in Figure 6-2.

Figure 6-2. Placeholder text appears inside text fields in a light gray color when the field is empty. Any text added to the field obscures the placeholder. You can set this text using IB’s text field attributes inspector or by editing the placeholder property for the field object.
• Border style—Text fields allow you to control the type of borderStyle displayed around the text area. You can choose from a simple line, a bezel (used in Figure 6-2), and a rounded rectangle presentation. These are best seen in IB, where the attributes inspector lets you toggle between each style.
• Clear button—The text field clear button appears as an X at the right side of the entry area. Set the clearButtonMode to specify if and when this button appears: always, never, when editing, or unless editing is ongoing. Always gives the greatest control to the user.
Recipe 6-1. Using the Done Key to Dismiss a Text Field Keyboard
// Dismiss the keyboard when the user taps Done
- (BOOL)textFieldShouldReturn:(UITextField *)textField
{
[textField resignFirstResponder];
return YES;
}
- (void) viewDidLoad
{
// Update all text fields, including those defined in IB,
// setting delegate, return key type, and other useful traits
for (UIView *view in self.view.subviews)
{
if ([view isKindOfClass:[UITextField class]])
{
UITextField *aTextField = (UITextField *)view;
aTextField.delegate = self;
aTextField.returnKeyType = UIReturnKeyDone;
aTextField.clearButtonMode =
UITextFieldViewModeWhileEditing;
aTextField.borderStyle = UITextBorderStyleRoundedRect;
aTextField.contentVerticalAlignment =
UIControlContentVerticalAlignmentCenter;
aTextField.autocorrectionType =
UITextAutocorrectionTypeNo;
aTextField.font =
[UIFont fontWithName:@"Futura" size:12.0f];
aTextField.placeholder = @"Placeholder";
}
}
}
To find this recipe’s full sample project, point your browser to https://github.com/erica/iOS-6-Cookbook and go to the folder for Chapter 6.
Recipe: Dismissing Text Views with Custom Accessory Views
Custom accessory views allow you to present material whenever the keyboard is shown onscreen. Common uses include adding custom buttons and other controls such as font and color pickers that affect text as the user types. Recipe 6-2 adds two buttons: one that clears already-typed text and another that dismisses the keyboard. The keyboard with these add-ons is shown in Figure 6-3.
Figure 6-3. Accessory input views allow you to add custom view elements to standard iOS keyboard presentations. Here, a pair of buttons augment iPad and iPhone keyboards.
Each accessory view is associated with a given responder (a descendent of the UIResponder class), such as a text field or text view. Add accessories by setting the inputAccessoryView property for the view. Recipe 6-2 uses a simple toolbar as its accessory view, providing extra functionality with minimal coding.
Adding a Done button to the toolbar provides the same kind of user control for text views (large, scrolling, multiline text editing views) as Recipe 6-1 offered for text fields (one-line text-input controls). The difference is that this approach allows text views to continue using the Return key to add carriage returns to text for paragraph breaks.
One of this book’s tech reviewers writes that he can never remember which is a text view and which is a text field. To this, I reply, “A view is two, a field is sealed.” Text views can use any number of lines (including two or more). Text fields are single-line text entry controls, limited to a styled bounding border.
iOS developer Phil Mills offers a more amusing mnemonic: Take my text field... please. Text fields are, as he points out, one-liners.
Recipe 6-2’s Done button resigns first-responder status in its callback method. This button is not required for iPad users whose keyboard automatically includes a dismiss button, but it does no harm as used here. If you want to filter out the Done button when a universal application is run on the iPad, check the current user interface idiom. The following macro provides a simple way to test for an iPad:
#define IS_IPAD (UI_USER_INTERFACE_IDIOM() == UIUserInterfaceIdiomPad)
Always be aware that Apple may introduce new iOS device form factors, with more space or less space available to users, so try to code accordingly, especially when working with screen-consuming features like accessory views. There’s really not much you can do on that account with the current two idioms (iPhone and iPad), but it’s worth inserting notes into code in places that could see changes in the future.
Recipe 6-2. Adding Custom Buttons to Keyboards
@interface TestBedViewController : UIViewController
{
UITextView *textView;
UIToolbar *toolBar;
}
@end
@implementation TestBedViewController
// Remove text from text view
- (void) clearText
{
[textView setText:@""];
}
// Dismiss keyboard by resigning first responder
- (void) leaveKeyboardMode
{
[textView resignFirstResponder];
}
- (UIToolbar *) accessoryView
{
// Create toolbar with Clear and Done
toolBar = [[UIToolbar alloc] initWithFrame:
CGRectMake(0.0f, 0.0f, self.view.frame.size.width, 44.0f)];
toolBar.tintColor = [UIColor darkGrayColor];
// Set up the items as Clear – flexspace - Done
NSMutableArray *items = [NSMutableArray array];
[items addObject:BARBUTTON(@"Clear", @selector(clearText))];
[items addObject:SYSBARBUTTON(UIBarButtonSystemItemFlexibleSpace, nil)];
[items addObject:BARBUTTON(@"Done", @selector(leaveKeyboardMode))];
toolBar.items = items;
return toolBar;
}
- (void) loadView
{
[super loadView];
self.view.backgroundColor = [UIColor whiteColor];
// Create text view and add the custom accessory view
textView = [[UITextView alloc] initWithFrame:self.view.bounds];
textView.font = [UIFont fontWithName:@"Georgia"
size:(IS_IPAD) ? 24.0f : 14.0f];
textView.inputAccessoryView = [self accessoryView];
// Use constraints to fill application bounds
[self.view addSubviewAndConstrainToBounds:textView];
[textView fitToHeightWithInset:0.0f];
[textView fitToWidthWithInset:0.0f];
}
@end
To find this recipe’s full sample project, point your browser to https://github.com/erica/iOS-6-Cookbook and go to the folder for Chapter 6.
Recipe: Adjusting Views Around Keyboards
By necessity, iOS keyboards are large. They occupy a good portion of the screen whenever they are in use. Because of that you’ll want to adjust your text fields and text views so the keyboard does not block them when it appears onscreen. Figure 6-4 demonstrates this problem.
Figure 6-4. Keyboards occupy a large portion of the iOS device screen. If you do not force views to resize themselves and/or shift up on the screen when a keyboard appears, the keyboards will obscure onscreen material that should remain visible. You cannot see the bottom text in the last image because the text view extends behind the keyboard and reaches all the way to the bottom of the screen.
The top image shows the source text view, before it becomes first responder. The middle image demonstrates what users expect to happen—namely that the entire view remains accessible by touch even when the keyboard is onscreen. The bottom image demonstrates what happens when you do not resize views. In this case, roughly one-third of a screen of text view material becomes inaccessible. Users cannot see the final line of text, let alone edit it in any meaningful manner. The keyboard prevents any touches from getting through to the last paragraph or so of text.
Mitigate the keyboard’s presence by allowing views to resize around it. When the keyboard appears, views that continue to require interaction should adjust themselves out of the way so that they don’t overlap. To accomplish this, your application must subscribe to keyboard notifications.
iOS offers several notifications that are transmitted using the standard NSNotificationCenter, as follows:
• UIKeyboardWillShowNotification
• UIKeyboardDidShowNotification
• UIKeyboardWillChangeFrameNotification
• UIKeyboardWillHideNotification
• UIKeyboardDidHideNotification
Listen for these by adding your class as an observer. The following snippet listens for the “will hide” notification, and uses a target-selector callback. You can also handle notification updates via a new blocks-based API:
[[NSNotificationCenter defaultCenter] addObserver:self
selector:@selector(keyboardWillHide:)
name:UIKeyboardWillHideNotification object:nil];
The two notifications you’ll usually want to listen for are “did show” and “will hide,” which offer opportune times for you to react to the keyboard arriving onscreen or preparing to leave. Each notification provides a userInfo dictionary that supplies the bounds for the keyboard, using the UIKeyboardBoundsUserInfoKey key. Sadly, there are no objects passed with the notification. You are not granted direct access to the keyboard itself.
Retrieving the keyboard bounds lets you resize views to adapt them to the keyboard’s presence. Recipe 6-3 adjusts its text view’s constraints to accommodate the height of the keyboard. As an alternative approach, you might want to update the text view’s bottom content inset. This provides a smoother presentation without animation side effects, and is left as an exercise for the reader.
Standard keyboards always appear at the bottom of the screen, generally when a text-capable view becomes first responder. Custom keyboards are not limited to that style of presentation. For that reason, when working with any nonstandard keyboard, use UIKeyboardFrameEndUserInfoKey instead of the keyboard bounds.
Recipe 6-3 has been tested with both soft and hardware keyboards, on devices and in the simulator. It has one limitation: It does not work consistently with accessory views and hardware keyboards. This specific issue is addressed in Recipe 6-4.
Recipe 6-3. Resizing a Text View to Make Way for a Keyboard
@implementation TestBedViewController
- (void) leaveKeyboardMode
{
// Dismiss keyboard by resigning first responder
[textView resignFirstResponder];
}
// Set constraints that leave an inset at the bottom of the text view
// Use "0.0" to stretch all the way to the bottom.
- (void) adjustToBottomInset: (CGFloat) offset
{
// Remove any vertical constraints currently applied
if (currentVerticalConstraints)
[self.view removeConstraints:currentVerticalConstraints];
// Create vertical constraints that apply the new bottom margin
currentVerticalConstraints =[NSLayoutConstraint
constraintsWithVisualFormat:@"V:|[textView(>=0)]-bottomMargin-|"
options:0 metrics:@{@"bottomMargin":@(offset)}
views:@{@"textView":textView}];
[self.view addConstraints:currentVerticalConstraints];
}
// When keyboard appears, adjust the text view's bottom margin
- (void) keyboardDidShow: (NSNotification *) notification
{
if (currentVerticalConstraints)
[self.view removeConstraints:currentVerticalConstraints];
// Retrieve the keyboard bounds via the notification's
// userInfo dictionary
CGRect kbounds;
[(NSValue *)[notification.userInfo
objectForKey:@"UIKeyboardBoundsUserInfoKey"] getValue:&kbounds];
[self adjustToBottomInset:kbounds.size.height];
}
// Upon dismissing the keyboard, readjust the text view down
- (void) keyboardWillHide: (NSNotification *) notification
{
[self adjustToBottomInset:0.0f];
}
- (void) loadView
{
[super loadView];
self.view.backgroundColor = [UIColor whiteColor];
// Establish a text view
textView = [[UITextView alloc] initWithFrame:self.view.bounds];
textView.font = [UIFont fontWithName:@"Georgia"
size:(IS_IPAD) ? 24.0f : 14.0f];
// Add it into the primary view and stretch it to fit
[self.view addSubviewAndConstrainToBounds:textView];
[textView fitToWidthWithInset:0.0f];
// Set up initial full-height constraint
[self adjustToBottomInset:0.0f];
// Listen for keyboard hiding/showing
[[NSNotificationCenter defaultCenter] addObserver:self
selector:@selector(keyboardWillHide:)
name:UIKeyboardWillHideNotification object:nil];
[[NSNotificationCenter defaultCenter] addObserver:self
selector:@selector(keyboardDidShow:)
name:UIKeyboardDidShowNotification object:nil];
// Add button to dismiss keyboard
self.navigationItem.rightBarButtonItem =
BARBUTTON(@"Done", @selector(leaveKeyboardMode));
}
@end
To find this recipe’s full sample project, point your browser to https://github.com/erica/iOS-6-Cookbook and go to the folder for Chapter 6.
Recipe: Adjusting Views Around Accessory Views
Input accessory views are always shown onscreen whenever their text-handling view is first responder. This happens whether hardware keyboards are being used or not. Figure 6-5 shows Recipe 6-2, the recipe with accessory views, when used with and without a hardware keyboard.
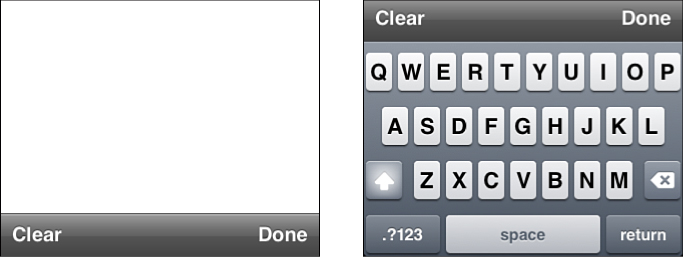
Figure 6-5. When iOS uses a hardware keyboard, it dismisses the keyboard but not the accessory view, which remains onscreen at all times that its owner view holds first responder.
When it came to early iOS support of hardware keyboards and notification updates, the rule of thumb was this: Sometimes it worked, and sometimes it did not. As of iOS 6, the situation is a bit better, but not yet perfect. Basic keyboards (that is, without accessory views) function properly when users work with the onscreen keyboard, a hardware keyboard, or a mix of both. Ejecting the hardware keyboard properly sends a keyboard-dismissal notice.
The trouble arises with custom accessory views, like in Recipe 6-2. Depending on the situation (namely when the keyboard appears or disappears, or a hardware keyboard is attached or removed), the notifications and size information can prove quirky. The perfect storm occurs when the accessory view remains onscreen, the rest of the keyboard hides and a state-change notification isn’t properly sent. This causes no end of trouble for those who implement content adjustment in their applications.
Apple introduced a way to listen for the transfer between onscreen and hardware keyboards in iOS 5.0. The UIKeyboardDidChangeFrameNotification fires whenever the onscreen keyboard changes geometry. Recipe 6-4 listens for this notification to catch frame changes. In response, it updates its text view constraints and matches them to the top of the accessory view.
This approach is still not as clean as you might wish (the code checks the toolbar’s superview), but it works. The actual frame data sent out, especially when you reorient a device, may arrive out of order or just simply wrong.
Testing for Hardware Keyboards
The following method tests whether your iOS device is using a hardware keyboard. It checks the accessory view’s origin. Pass it the bounds rectangle returned by any of the keyboard notifications:
- (BOOL) isUsingHardwareKeyboard: (CGRect) kbounds
{
// Check the start of the toolbar's parent frame
CGFloat startPoint = toolBar.superview.frame.origin.y;
// Check where the bounds end
CGFloat endHeight = startPoint + kbounds.size.height;
// Determine the height of the window's frame
CGFloat viewHeight = self.view.window.frame.size.height;
// If the keyboard bounds go beyond the view height, then
// the keyboard is currently offscreen
BOOL usingHardwareKeyboard = endHeight > viewHeight;
return usingHardwareKeyboard;
}
This method has been reliably working for several updates of the firmware now, but be aware that it’s a hack.
Recipe 6-4. Handling Hardware Keyboard Changes by Resizable Text Views
- (void) adjustToBottomInset: (CGFloat) offset
{
// Remove any existing vertical constraint
if (currentVerticalConstraints)
[self.view removeConstraints:currentVerticalConstraints];
// Create a vertical constraint using the new bottom margin
currentVerticalConstraints =[NSLayoutConstraint
constraintsWithVisualFormat:@"V:|[textView(>=0)]-bottomMargin-|"
options:0 metrics:@{@"bottomMargin":@(offset)}
views:@{@"textView":textView}];
[self.view addConstraints:currentVerticalConstraints];
}
// Respond to keyboard frame update notifications by
// updating the text view
- (void) updateTextViewBounds: (NSNotification *) notification
{
if (![textView isFirstResponder]) // no keyboard
{
[self adjustToBottomInset:0.0f];
return;
}
// Fetch the keyboard's bounds
CGRect kbounds;
[(NSValue *)[notification.userInfo
objectForKey:@"UIKeyboardBoundsUserInfoKey"] getValue:&kbounds];
// Adjust the bottom inset with respect to hardware use
BOOL isUsingHardware = [self isUsingHardwareKeyboard:kbounds];
[self adjustToBottomInset: (isUsingHardware) ?
toolBar.bounds.size.height: kbounds.size.height];
}
- (void) loadView
{
[super loadView];
self.view.backgroundColor = [UIColor whiteColor];
// Create a full-view textView instance
textView = [[UITextView alloc] initWithFrame:self.view.bounds];
textView.inputAccessoryView = [self accessoryView];
[self.view addSubviewAndConstrainToBounds:textView];
[textView fitToWidthWithInset:0.0f];
// Set up initial full-height constraint
[self adjustToBottomInset:0.0f];
// Start watching (only) for frame changes
[[NSNotificationCenter defaultCenter]
addObserver:self selector:@selector(updateTextViewBounds:)
name:UIKeyboardDidChangeFrameNotification object:nil];
}
To find this recipe’s full sample project, point your browser to https://github.com/erica/iOS-6-Cookbook and go to the folder for Chapter 6.
Recipe: Creating a Custom Input View
Custom input views replace the keyboard with a view of your design whenever a text view or text field becomes first responder. You can add custom input views to nontext views as well as text ones. Recipe 6-5 focuses on the text scenario.
When you set a responder’s inputView property, the view is assigned to that property replaces the system keyboard. The easiest way to demonstrate this feature is to create a colored view and assign it to the inputView property. Consider the following code snippet. It creates two text fields. The code assigns the second field’s inputView property to a basic UIView instance with a purple background:
// Create two standard text fields
UITextField *textField1 = [[UITextField alloc]
initWithFrame:CGRectMake(0.0f, 0.0f, 200.0f, 30.0f)];
textField1.center = CGPointMake(self.view.frame.size.width / 2.0f, 30.0f);
textField1.borderStyle = UITextBorderStyleRoundedRect;
[self.view addSubview: textField1];
UITextField *textField2 = [[UITextField alloc]
initWithFrame:CGRectMake(0.0f, 0.0f, 200.0f, 30.0f)];
textField2.center = CGPointMake(self.view.frame.size.width / 2.0f, 80.0f);
textField2.borderStyle = UITextBorderStyleRoundedRect;
[self.view addSubview: textField2];
// Create a purple view to be used as the input view
UIView *purpleView = [[UIView alloc] initWithFrame:CGRectMake(0.0f, 0.0f, self.view.
frame.size.width, 120.0f)];
purpleView.backgroundColor = COOKBOOK_PURPLE_COLOR;
// Assign the input view
textField2.inputView = purpleView;
Figure 6-6 shows this snippet’s results. When the first text field becomes first responder, the system-supplied keyboard scrolls onscreen; when the second field is selected, the purple view appears instead.
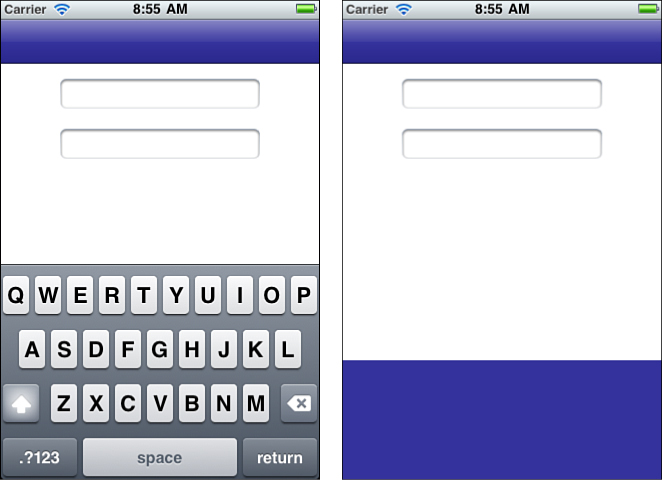
Figure 6-6. Otherwise identical, these two text fields produce different results upon becoming first responder. The top field (left image) presents a standard keyboard. The solid-color view assigned to the bottom field’s inputView property (right image) replaces the system keyboard.
Because the purple view offers no interactive elements, there’s not much you can do. You cannot enter text; you cannot dismiss the “keyboard.” You can only marvel at the functionality of displaying a custom view. Reselect the top text field to switch back to the standard keyboard.
For the most part, custom input views are not used for text input in real-life coding. Although input views play an important role in other design patterns, especially gaming, their utility for text is fairly limited. That’s because the inputAccessoryView property expands keyboard options without sacrificing built-in keys. Further, the range of keyboard options now includes numeric and decimal entry (added in iOS 4.1). These represented the prevailing requirements for designing custom keyboards in early iOS releases.
Where do custom input views make sense when working with text? For anyone willing to spend the time and effort developing their own keyboards, taking into account the various platforms and orientations, not to mention Shift modifier keys, input views provide complete control over the user experience. You create a fully customized skinnable input element that replaces the system keyboard with a look and feel uniquely suited to your design. It requires a huge amount of work, at many levels.
Recipe 6-5 provides a bare-bones example of a custom text-input view. Instead of character entry, it offers two buttons: One types Hello, and the other types World (see Figure 6-7). When tapped, each button inserts the word into its attached text view.

Figure 6-7. The custom keyboard attached as this text view’s input view allows users to enter Hello and World, and that’s pretty much all.
The challenge in creating a custom text-input view like this lies in how the text changes propagate back to the first responder. iOS offers no direct link or property that tells a custom input view who its owner is, nor can you use simple superview properties. Because of this challenge, you might want to implement a simple class extension to UIView to recover the current first responder.
In this code snippet, the class method, currentResponder, is named to marginally avoid conflict with private APIs. firstResponder is an actual unpublished method. When adding category methods to Apple’s classes in production code (rather than sample code, which this is), a good rule of thumb is to prefix all method names with your initials, your company’s initials, or some other unique identifier. This ensures your method names do not overlap with Apple’s or (importantly) with any methods Apple might add in the future. This book does not follow the advice it preaches. This choice enhances readability and recognition of method names in samples.
@interface UIView (FirstResponderUtility)
+ (UIView *) currentResponder;
@end
@implementation UIView (FirstResponderUtility)
- (UIView *) findFirstResponder
{
if ([self isFirstResponder]) return self;
for (UIView *view in self.subviews)
{
UIView *responder = [view findFirstResponder];
if (responder) return responder;
}
return nil;
}
+ (UIView *) currentResponder
{
return [[[UIApplication sharedApplication] keyWindow]
findFirstResponder];
}
@end
Recipe 6-5 builds a custom UIToolbar as an input view. This displays two options (Hello and World). When tapped, the toolbar inserts a string into the first responder’s text. It retrieves the first responder if this has not yet been set. Then it checks that the responder is a kind of UITextView. Only then does it insert the new text.
Certain truths are universally acknowledged regarding input views. First, the owner of a presented input view is always first responder. Second, that owner is a subview of the application’s key window. You may leverage these facts in code, although you’ll probably want to expand the minimal error condition checking shown in Recipe 6-5, particularly with regard to the reuse of the responderView instance variable.
Recipe 6-5. Creating a Custom Input View
@interface InputToolbar : UIToolbar
{
UIView *responderView;
}
@end
@implementation InputToolbar
- (void) insertString: (NSString *) string
{
if (!responderView || ![responderView isFirstResponder])
{
responderView = [UIView currentResponder];
if (!responderView) return;
}
if ([responderView isKindOfClass:[UITextView class]])
{
UITextView *textView = (UITextView *) responderView;
NSMutableString *text =
[NSMutableString stringWithString:textView.text];
NSRange range = textView.selectedRange;
[text replaceCharactersInRange:range withString:string];
textView.text = text;
textView.selectedRange =
NSMakeRange(range.location + string.length, 0);
}
else
NSLog(@"Cannot insert %@ in unknown class type (%@)",
string, [responderView class]);
}
// Perform the two insertions
- (void) hello: (id) sender {[self insertString:@"Hello "];}
- (void) world: (id) sender {[self insertString:@"World "];}
// Initialize the bar buttons on the toolbar
- (id) initWithFrame: (CGRect) aFrame
{
if (!(self = [super initWithFrame: aFrame])) return self;
NSMutableArray *theItems = [NSMutableArray array];
[theItems addObject:SYSBARBUTTON(
UIBarButtonSystemItemFlexibleSpace, nil)];
[theItems addObject:BARBUTTON(@"Hello", @selector(hello:))];
[theItems addObject:SYSBARBUTTON(
UIBarButtonSystemItemFlexibleSpace, nil)];
[theItems addObject:BARBUTTON(@"World", @selector(world:))];
[theItems addObject:SYSBARBUTTON(
UIBarButtonSystemItemFlexibleSpace, nil)];
self.items = theItems;
return self;
}
@end
To find this recipe’s full sample project, point your browser to https://github.com/erica/iOS-6-Cookbook and go to the folder for Chapter 6.
Recipe: Making Text-Input-Aware Views
Many months ago, I spent some time updating the open-source iOS BOCHS emulator build to allow it to work with keyboard entry. The default code allowed touch-based “mouse” interactions but didn’t offer any keyboard support. After a little investigation, I discovered and then implemented the UIKeyInput protocol. This simple protocol, when added to a little first responder manipulation, allows you to update any view to offer text input.
Recipe 6-6 illustrates how to transform a standard UIToolbar into a view that accepts keyboard entry, letting users type text directly into the toolbar, as shown in Figure 6-8. As the user types, the toolbar text updates, even properly handling the Delete key.
Figure 6-8. Adding the UIKeyInput protocol to a toolbar transforms the view into one that can accept and display keyboard input, including deletions.
This recipe requires several features. First, the toolbar must declare the UIKeyInput protocol. This protocol announces that the view implements simple text entry and can display the system keyboard (or a custom keyboard, if so desired) when it becomes first responder.
Second, the toolbar must retain state—namely, the current string it is storing. Saving the string as a retained mutable property allows the toolbar to know what text it is currently working with and to display that text to the user.
Next, the toolbar must be able to become first responder. It does so in two ways: by implementing canBecomeFirstResponder (returning YES) and by catching touches to detect when it should assume that role. Adding a touch handler allows Recipe 6-6 to become first responder when a user touches the view.
Finally, it must implement the three required UIKeyInput protocol methods, namely hasText, insertText:, and deleteBackwards. These methods do exactly what their names imply. The hasText method returns YES whenever the view has any text available. The other two methods insert text at the current insertion point (always at the end for this recipe) and delete a character at a time from the end of the displayed text.
By declaring the protocol, becoming first responder, and handling both the string state and the input callbacks, Recipe 6-6 provides a robust way to add basic text entry to standard UIView elements. You can extend these same text features to many other classes, including labels, navigation bars, buttons, and so forth, to use in your applications as needed.
Recipe 6-6. Adding Keyboard Input to Nontext Views
@interface KeyInputToolbar: UIToolbar <UIKeyInput>
{
NSMutableString *string;
}
@end
@implementation KeyInputToolbar
// Is there text available that can be deleted
- (BOOL) hasText
{
if (!string || !string.length) return NO;
return YES;
}
// Reload the toolbar with the string
- (void) update
{
NSMutableArray *theItems = [NSMutableArray array];
[theItems addObject:SYSBARBUTTON(UIBarButtonSystemItemFlexibleSpace, nil)];
[theItems addObject:BARBUTTON(string, @selector(becomeFirstResponder))];
[theItems addObject:SYSBARBUTTON(UIBarButtonSystemItemFlexibleSpace, nil)];
self.items = theItems;
}
// Insert new text into the string
- (void)insertText:(NSString *)text
{
if (!string) string = [NSMutableString string];
[string appendString:text];
[self update];
}
// Delete one character
- (void)deleteBackward
{
// Super caution, even if hasText reports YES
if (!string)
{
string = [NSMutableString string];
return;
}
if (!string.length)
return;
// Remove a character
[string deleteCharactersInRange:NSMakeRange(string.length - 1, 1)];
[self update];
}
// When becoming first responder, send out a notification to that effect
- (BOOL) becomeFirstResponder
{
BOOL result = [super becomeFirstResponder];
if (result)
[[NSNotificationCenter defaultCenter]
postNotification:[NSNotification notificationWithName:
@"KeyInputToolbarDidBecomeFirstResponder" object:nil]];
return result;
}
- (BOOL)canBecomeFirstResponder
{
return YES;
}
- (void)touchesBegan:(NSSet *)touches withEvent:(UIEvent *)event;
{
[self becomeFirstResponder];
}
@end
To find this recipe’s full sample project, point your browser to https://github.com/erica/iOS-6-Cookbook and go to the folder for Chapter 6.
Recipe: Adding Custom Input Views to Nontext Views
Although custom input views can be applied to text views and text fields, they are more valuable in other use-cases. Input doesn’t have to be about text. In fact, by taking the system keyboard out of the equation, custom input views can range to whatever kind of scenario you need.
Think of input views as context-sensitive graphical menus that appear only when a particular view class becomes first responder. When you tap a warrior, perhaps a set of weapons scrolls onscreen, including a bow, a mace, and a sword. The user can select the kind of attack the warrior should apply. Or think of a graphics layout program. When a circle, square, or line is tapped, maybe an onscreen palette is revealed that lets users set the stroke width, the stroke color, and the fill. The only limit to the utility of custom input is your imagination.
Recipe 6-7 demonstrates how a custom input view can affect a nontext view. It combines the code from Recipes 6-5 and 6-6, creating both an input-aware view (ColorView), which can become first responder with a touch, and an input view (InputToolbar) that affects the display of that primary view. In this example, the base view’s role is limited to displaying a color. The toolbar controls what color that is.
Because there’s no other way to transfer first responder control, the input view also offers a Done button, allowing the user to dismiss the keyboard, thus resigning first responder from the big color view.
Adding Input Clicks
Use the UIDevice class to add input clicks to your custom input accessory views. The playInputClick method plays the standard system keyboard click and can be called when you respond to user input taps.
Adopt the UIInputViewAudioFeedback protocol in the accessory input class and add an enableInputClicksWhenVisible delegate method that always returns YES. This defers audio playback to the user’s preferences, which are set in Settings > Sounds. To hear these clicks, the user must have enabled keyboard click feedback. If the user has not done so, your calls to playInputClick are simply ignored.
Recipe 6-7. Creating a Custom Input Controller for a Nontext View
@interface ColorView : UIView <UIKeyInput>
@property (retain) UIView *inputView;
@end
#pragma mark Key Input Aware View
@implementation ColorView
@synthesize inputView;
// UITextInput protocol skeleton
- (BOOL) hasText {return NO;}
- (void)insertText:(NSString *)text {}
- (void)deleteBackward {}
// First responder support
- (BOOL)canBecomeFirstResponder {return YES;}
- (void)touchesBegan:(NSSet *)touches
withEvent:(UIEvent *)event {[self becomeFirstResponder];}
// Initialize with user interaction allowed
- (id) initWithFrame:(CGRect)aFrame
{
if (!(self = [super initWithFrame:aFrame])) return self;
self.backgroundColor = COOKBOOK_PURPLE_COLOR;
self.userInteractionEnabled = YES;
return self;
}
@end
#pragma mark Color Input Toolbar
@interface InputToolbar : UIToolbar <UIInputViewAudioFeedback>
@end
@implementation InputToolbar
- (BOOL) enableInputClicksWhenVisible
{
return YES;
}
- (void) updateColor: (UIColor *) aColor
{
[UIView currentResponder].backgroundColor = aColor;
[[UIDevice currentDevice] playInputClick];
}
// Color updates
- (void) light: (id) sender {
[self updateColor:[COOKBOOK_PURPLE_COLOR
colorWithAlphaComponent:0.33f]];}
- (void) medium: (id) sender {
[self updateColor:[COOKBOOK_PURPLE_COLOR
colorWithAlphaComponent:0.66f]];}
- (void) dark: (id) sender {
[self updateColor:COOKBOOK_PURPLE_COLOR];}
// Resign first responder on pressing Done
- (void) done: (id) sender
{
[[UIView currentResponder] resignFirstResponder];
}
// Create a toolbar with each option available
- (id) initWithFrame: (CGRect) aFrame
{
if (!(self = [super initWithFrame: aFrame])) return self;
NSMutableArray *theItems = [NSMutableArray array];
[theItems addObject:SYSBARBUTTON(
UIBarButtonSystemItemFlexibleSpace, nil)];
[theItems addObject:BARBUTTON(@"Light", @selector(light:))];
[theItems addObject:SYSBARBUTTON(
UIBarButtonSystemItemFlexibleSpace, nil)];
[theItems addObject:BARBUTTON(@"Medium", @selector(medium:))];
[theItems addObject:SYSBARBUTTON(
UIBarButtonSystemItemFlexibleSpace, nil)];
[theItems addObject:BARBUTTON(@"Dark", @selector(dark:))];
[theItems addObject:SYSBARBUTTON(
UIBarButtonSystemItemFlexibleSpace, nil)];
[theItems addObject:BARBUTTON(@"Done", @selector(done:))];
self.items = theItems;
return self;
}
@end
To find this recipe’s full sample project, point your browser to https://github.com/erica/iOS-6-Cookbook and go to the folder for Chapter 6.
Recipe: Building a Better Text Editor (Part I)
Undo support and persistence help create better text editors in your application. These features ensure that your users can reverse mistakes and pick up their work from where they left off. To accomplish this requires surprisingly little programming, as is demonstrated in Recipe 6-8.
Text views provide built-in support that works hand in hand with select, cut, copy, and paste. The undo manager understands these actions, so possible user messages might include Undo Paste, Redo Cut, and so forth. All the view controller needs to do is instantiate an undo manager; it leaves the rest of the work to the built-in objects.
This recipe adds Undo and Redo buttons to the keyboard accessory view. These buttons must be updated each time the text view contents change. To accomplish this, the view controller becomes the text view’s delegate and implements the textViewDidChange: delegate method. Buttons are enabled or disabled accordingly.
This recipe uses persistence to store the text contents between application launches. It archives its contents to file in the performArchive method. The application delegate calls this method right before the application is due to suspend and also each time the text view resigns first responder status. This better ensures that the data remains fresh and up to date between application sessions:
- (void) applicationWillResignActive:(UIApplication *)application
{
[tbvc archiveData];
}
On launch, any data in that file is read in to initialize the text view instance during the view controller setup.
Recipe 6-8. Adding Undo Support and Persistence to Text Views
#define SYSBARBUTTON(ITEM, SELECTOR) [[UIBarButtonItem alloc]
initWithBarButtonSystemItem:ITEM target:self action:SELECTOR]
#define SYSBARBUTTON_TARGET(ITEM, TARGET, SELECTOR)
[[UIBarButtonItem alloc] initWithBarButtonSystemItem:ITEM
target:TARGET action:SELECTOR]
// Store data out to file
- (void) archiveData
{
[textView.text writeToFile:DATAPATH atomically:YES
encoding:NSUTF8StringEncoding error:nil];
}
// Update the undo and redo button states
- (void)textViewDidChange:(UITextView *)textView
{
[self loadAccessoryView];
}
// Choose which items to enable and disable on the toolbar
- (void) loadAccessoryView
{
NSMutableArray *items = [NSMutableArray array];
UIBarButtonItem *spacer =
SYSBARBUTTON(UIBarButtonSystemItemFixedSpace, nil);
spacer.width = 40.0f;
BOOL canUndo = [textView.undoManager canUndo];
UIBarButtonItem *undoItem = SYSBARBUTTON_TARGET(
UIBarButtonSystemItemUndo, textView.undoManager, @selector(undo));
undoItem.enabled = canUndo;
[items addObject:undoItem];
[items addObject:spacer];
BOOL canRedo = [textView.undoManager canRedo];
UIBarButtonItem *redoItem = SYSBARBUTTON_TARGET(
UIBarButtonSystemItemRedo, textView.undoManager, @selector(redo));
redoItem.enabled = canRedo;
[items addObject:redoItem];
[items addObject:spacer];
[items addObject:SYSBARBUTTON(UIBarButtonSystemItemFlexibleSpace, nil)];
[items addObject:BARBUTTON(@"Done", @selector(leaveKeyboardMode))];
toolbar.items = items;
}
// Return a plain accessory view
- (UIToolbar *) accessoryView
{
toolbar = [[UIToolbar alloc]
initWithFrame:CGRectMake(0.0f, 0.0f, 100.0f, 44.0f)];
toolbar.tintColor = [UIColor darkGrayColor];
return toolbar;
}
- (void) loadView
{
[super loadView];
// Load any existing string
if ([[NSFileManager defaultManager] fileExistsAtPath:DATAPATH])
{
NSString *string =
[NSString stringWithContentsOfFile:DATAPATH
encoding:NSUTF8StringEncoding error:nil];
textView.text = string;
}
// Subscribe to keyboard changes
[[NSNotificationCenter defaultCenter] addObserver:self
selector:@selector(updateTextViewBounds:)
name:UIKeyboardDidChangeFrameNotification object:nil];
}
To find this recipe’s full sample project, point your browser to https://github.com/erica/iOS-6-Cookbook and go to the folder for Chapter 6.
Recipe: Building a Better Text Editor (Part II)
Starting with iOS 6, text views and text fields can now work with attributed text strings (that is, strings that support styles, not just plain-text ones). This allows you to create highly featured text views and fields with multiple fonts, styles, and colors. Quite a bit of this styled functionality (like using color, for example) is tied up in Core Text, which is discussed in The Advanced iOS 6 Developer’s Cookbook. For simple text editors, however, it takes very little work to add support for basic styles: bold, italics, and underlines.
Enabling Attributed Text
To handle style requests, you must change a flag that lets your text view work with attributed (in other words styled) text. Set the allowsEditingTextAttributes property to YES. Upon doing so, several things happen:
• The text view begins updating its attributedText property. This property enables you to retrieve the text view’s contents as an attributed string.
• The view begins responding to a series of special UIResponder methods that toggle bold face, italics, and underlining for selected text. These methods are detailed in the next section.
• The view’s interactive user-interface menu starts to show new options, allowing users to style the current selection using bold, italics, and underlining.
Controlling Attributes
In iOS 6, NSObject offers new methods to control several text attributes. These methods are intended for use by UIResponder subclasses and are part of the UIResponderStandardEditActions informal protocol. This protocol declares common editing commands for the iOS user interface.
The methods of interest include toggleBoldFace:, toggleItalics:, and toggleUnderline:. These three methods apply styles to current text selections or, if the styles have already been applied, remove them.
To allow these updates, you just tell the responder (in this case, a text view) to enable text attribute editing. The text view or text field in question implements all the heavy lifting. You can implement these calls with nothing more than bar button actions.
Recipe 6-9 demonstrates how to build these features in to your iOS application. Figure 6-9 shows the interface built by this recipe.
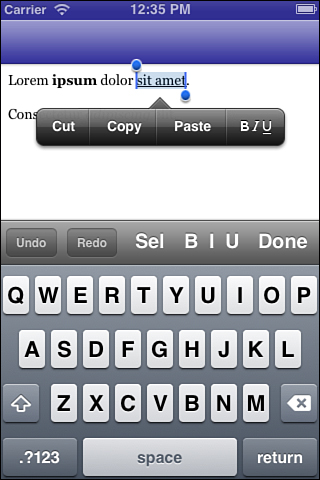
Figure 6-9. The UIResponderStandardEditActions protocol defines common text editing commands, which you wrap into your user interface. The keyboard accessory view offers one-button access in addition to the BIU options that automatically appear in the system menu. The accessory view allows you to select all (Sel), or apply (or remove) bolding (B), italics (I), and underlining (U).
Other Responder Functionality
Notice the Sel option on the accessory bar, to the left of the B/I/U bold, italics, and underlining choices. This bar button adds a Select All feature via by the same UIRespondersStandardEditActions protocol as style toggles. Editing methods include the following:
• copy:, cut:, delete: and paste: for basic edits
• select: and selectAll: for selections
• toggleBoldFace:, toggleItalics:, and toggleUnderline: for style updates
This protocol also lets you control the direction of writing through the makeTextWritingDirectionLeftToRight: and makeTextWritingDirectionRightToLeft: methods.
Recipe 6-9. Enhanced Text Editor
// Handy bar button macros
#define BARBUTTON(TITLE, SELECTOR) [[UIBarButtonItem alloc]
initWithTitle:TITLE style:UIBarButtonItemStylePlain
target:self action:SELECTOR]
#define BARBUTTON_TARGET(TARGET, TITLE, SELECTOR)
[[UIBarButtonItem alloc] initWithTitle:TITLE
style:UIBarButtonItemStylePlain target:TARGET action:SELECTOR]
#define SYSBARBUTTON(ITEM, SELECTOR) [[UIBarButtonItem alloc]
initWithBarButtonSystemItem:ITEM target:self action:SELECTOR]
// Choose which items to enable and disable on the toolbar
- (void) loadAccessoryView
{
NSMutableArray *items = [NSMutableArray array];
UIBarButtonItem *spacer = SYSBARBUTTON(UIBarButtonSystemItemFixedSpace, nil);
spacer.width = 20.0f;
BOOL canUndo = [textView.undoManager canUndo];
UIBarButtonItem *undoItem = SYSBARBUTTON_TARGET(
UIBarButtonSystemItemUndo, textView.undoManager, @selector(undo));
undoItem.enabled = canUndo;
[items addObject:undoItem];
BOOL canRedo = [textView.undoManager canRedo];
UIBarButtonItem *redoItem = SYSBARBUTTON_TARGET(
UIBarButtonSystemItemRedo, textView.undoManager, @selector(redo));
redoItem.enabled = canRedo;
[items addObject:redoItem];
// Add select all
[items addObject:SYSBARBUTTON(UIBarButtonSystemItemFlexibleSpace, nil)];
[items addObject:BARBUTTON_TARGET(textView, @"Sel", @selector(selectAll:))];
// Add style buttons
[items addObject:SYSBARBUTTON(UIBarButtonSystemItemFlexibleSpace, nil)];
[items addObject:BARBUTTON_TARGET(textView,
@"B", @selector(toggleBoldface:))];
[items addObject:BARBUTTON_TARGET(textView,
@"I", @selector(toggleItalics:))];
[items addObject:BARBUTTON_TARGET(textView,
@"U", @selector(toggleUnderline:))];
[items addObject:SYSBARBUTTON(UIBarButtonSystemItemFlexibleSpace, nil)];
[items addObject:BARBUTTON(@"Done", @selector(leaveKeyboardMode))];
toolbar.items = items;
}
To find this recipe’s full sample project, point your browser to https://github.com/erica/iOS-6-Cookbook and go to the folder for Chapter 6.
Recipe: Text-Entry Filtering
At times you want to ensure a user enters only a certain subset of characters. For example, you might want to create a numeric-only text field that does not handle letters. Although you can use predicates to test the final entry against a regular expression (the NSPredicate class’s MATCH operator supports regex values, and is demonstrated in Recipe 6-11), for filtered data it’s easier to check each new character as it is typed against a legal set.
A UITextField delegate can catch those characters as they are typed and decide whether to add the character to the active text field. The optional textField:shouldChangeCharactersInRange:replacementString: delegate method returns either YES, allowing the newly typed characters, or NO, disallowing it (or them). In practice, this works on a character-by-character basis, being called after each user keyboard tap. However, with iOS’s pasteboard support, the replacement string could theoretically be longer when text is pasted to a text field.
Recipe 6-10 looks for any disallowed characters within the new string. When it finds them, it rejects the entry, leaving the text field unedited. So, a paste of mixed allowed and disallowed text would be rejected entirely.
This recipe considers four scenarios: alphabetic text entry only, numeric, numeric with an allowed decimal point, and a mix of alphanumeric characters. You can adapt this example to any set of legal characters you want.
The third entry type, numbers with a decimal point, uses a little trick to ensure that only one decimal point gets typed. Once it finds a period character in the associated text field, it switches the characters it accepts from a set with the period to a set without it.
Users can sneak around this by using paste. Even if you feel that it’s unlikely for users to do so, design against the possibility. Disallow pasting by overriding your text field’s canPerformAction:withSender: method to specifically exclude this action.
The following snippet ensures that users cannot paste into a text field. It returns NO when queried about the paste: action. Similar guards offer selection (select and select all) when the field has text to select (hasText). The cut and copy options mandate that the user selection includes a valid nonempty selection range:
@interface LimitedTextField : UITextField
@end
@implementation LimitedTextField
- (BOOL)canPerformAction:(SEL)action withSender:(id)sender
{
UITextRange *range = self.selectedTextRange;
BOOL hasText = self.text.length > 0;
if (action == @selector(cut:)) return !range.empty;
if (action == @selector(copy:)) return !range.empty;
if (action == @selector(select:)) return hasText;
if (action == @selector(selectAll:)) return hasText;
if (action == @selector(paste:)) return NO;
return NO;
}
@end;
The lesson is this: Never underestimate your user’s ability to thwart your design when you leave openings for him or her to do so.
Recipe 6-10. Filtering User Text Entry
#define ALPHA @"ABCDEFGHIJKLMNOPQRSTUVWXYZabcdefghijklmnopqrstuvwxyz "
@implementation TestBedViewController
- (BOOL)textField:(UITextField *) aTextField
shouldChangeCharactersInRange: (NSRange)range
replacementString:(NSString *) string
{
NSMutableCharacterSet *cs =
[NSMutableCharacterSet
characterSetWithCharactersInString:@""];
switch (segmentedControl.selectedSegmentIndex)
{
case 0:
[cs addCharactersInString:ALPHA];
break;
case 1:
[cs formUnionWithCharacterSet:
[NSCharacterSet decimalDigitCharacterSet]];
break;
case 2:
[cs formUnionWithCharacterSet:
[NSCharacterSet decimalDigitCharacterSet]];
// permit one decimal only
if ([textField.text rangeOfString:@"."].location
== NSNotFound)
[cs addCharactersInString:@"."];
break;
case 3:
[cs addCharactersInString:ALPHA];
[cs formUnionWithCharacterSet:
[NSCharacterSet decimalDigitCharacterSet]];
break;
default:
break;
}
NSString *filtered =
[[string componentsSeparatedByCharactersInSet:[cs invertedSet]]
componentsJoinedByString:@""];
BOOL basicTest = [string isEqualToString:filtered];
return basicTest;
}
- (void) segmentChanged: (UISegmentedControl *) seg
{
// Reset text on segment change
textField.text = @"";
}
- (void) viewDidAppear: (BOOL) animated
{
// Create a testbed text field to work with
textField = [[UITextField alloc] initWithFrame:
CGRectMake(0.0f, 0.0f, 200.0f, 30.0f)];
textField.delegate = self;
[self.view addSubview: textField];
// Add segmented control with entry options
segmentedControl = [[UISegmentedControl alloc] initWithItems:
[@"ABC 123 2.3 A2C" componentsSeparatedByString:@" "]];
[segmentedControl addTarget:self action:@selector(segmentChanged:)
forControlEvents:UIControlEventValueChanged];
self.navigationItem.titleView = segmentedControl;
}
@end
To find this recipe’s full sample project, point your browser to https://github.com/erica/iOS-6-Cookbook and go to the folder for Chapter 6.
Recipe: Detecting Text Patterns
Recipe 6-10 introduced ways to limit users to entering legal characters. From there, it’s just a short hop to matching user input against a variety of legal patterns. Consider a floating-point number. It might be described as an optional sign followed by a whole component followed by an optional decimal and then a fractional component. Or maybe the whole component should be optional but the sign mandatory.
Unfortunately, there are many standard ways of describing things, and those ways increase exponentially when you expand from simple numbers to phone numbers, e-mail addresses, and URLs. Apple has taken care of many of these for you, with its built-in data detector classes, but it often helps to know how to roll your own.
Rolling Your Own Expressions
Some standards organizations have published descriptions of exactly what makes up a legal value, and enterprising developers have transformed many of those descriptions into fairly portable regular expressions. Consider the following regular expression definition of a floating-point number:
^[+-]?[0-9]+[.]?[0-9]*$
It’s not a perfect definition, but for many purposes it’s a pretty good one, and a flexible one to boot. It accepts a pretty good range of floating-point numbers with optional signs at the start. Admittedly, as presented it won’t accept –.75, but it will also not accept –. which I think offers a fair compromise, because –0.75 isn’t too hard to guess on the part of the user. Alternatively, you could use a set of regular expression checks, and accept any positive result that occurs out of that set—for example, adding in floating points that do not require a whole portion but do require a decimal point to start them followed by one or more digits:
^[+-]?.[0-9]+$
NSPredicate instances can compare NSString text to a regular expression, detecting when users have entered a valid floating-point number. Here’s an example:
NSPredicate *fpPredicate = [NSPredicate predicateWithFormat:
@"SELF MATCHES '^[+-]?[0-9]+[\.]?[0-9]*$'"];
BOOL match = [fpPredicate evaluateWithObject:string];
It is, as already stated, a bit harder to detect phone numbers, e-mail, and other more sophisticated entry types. Here’s my inexpert go at the phone number problem, using U.S. numbers, in the form of a regular expression:
^[(]?([2-9][0-9]{2})[)]?[-.. ]?([2-9][0-9]{2})[-.. ]?([0-9]{4})$
This regular expression offers optional parentheses, although there is no way to check that they balance; you could, however, accomplish that with some simple additional Objective-C coding. It ensures that both the area code and the phone number prefix don’t start with 0 or 1, and allows the user to enter optional spacers between the numbers (a space, a dash, or a period). In other words, for one line of description, it’s a pretty okay but not spectacular definition of phone numbers.
Recipe 6-11 uses this regular expression to determine when a user has entered a phone number. Upon receiving a positive match, it updates the navigation bar’s title to acknowledge success. This recipe demonstrates how you can perform real-time filtering and pattern matching to detect some goal pattern and provide a way to act on positive results.
Enumerating Regular Expressions
The NSRegularExpression class offers a block-based enumeration approach to find matches within a string. Use this to apply updates to given ranges. When you work with attributed text, you can apply color or font hints to just those elements that match the regex. This is similar to a text view’s spell checker, which adds underlines to highlight misspelled words.
To roll your own, create a regular expression. Enumerate it over a string (typically one found in a text view of some sort) and use each range to create some kind of visual update. With iOS 6’s support for attributed strings, it’s easier than ever to add visual feedback to text view contents:
// Check for matches
NSRegularExpression *regex = [NSRegularExpression
regularExpressionWithPattern:@"REGEXHERE"
options:NSRegularExpressionCaseInsensitive error:nil];
// Enumerate over a string
[regex enumerateMatchesInString:text options:0 range:fullRange
usingBlock:^(NSTextCheckingResult *match,
NSMatchingFlags flags, BOOL *stop){
NSRange range = match.range;
// Perform some action on the range
}];
Data Detectors
The NSDataDetector class is a subclass of NSRegularExpression. Data detectors allow you to search for well-defined data types, including dates, addresses, URL links, phone numbers, and transit information using Apple’s fully tested algorithms instead of trying to create your own regular expressions. Even better, they’re localized!
Take the same approach shown previously for enumerating regular expressions. This code snippet searches for links (URLs) and phone numbers:
NSError *error = NULL;
NSDataDetector *detector = [NSDataDetector
dataDetectorWithTypes:NSTextCheckingTypeLink|NSTextCheckingTypePhoneNumber
error:&error];
// Enumerate over a string
[detector enumerateMatchesInString:text options:0 range:fullRange
usingBlock:^(NSTextCheckingResult *match,
NSMatchingFlags flags, BOOL *stop){
NSRange range = match.range;
// Perform some action on the range
}];
The checks are built around the NSTextCheckingResult class. This class describes items that match the data detector’s content discovery. The kinds of data detectors supported by iOS are going to grow over time. For now, they are limited to dates (NSTextCheckingTypeDate), addresses (NSTextCheckingTypeAddress), links (NSTextCheckingTypeLink), phone numbers (NSTextCheckingTypePhoneNumber), and transit info like flight information (NSTextCheckingTypeTransitInformation). I expect to possibly see this list expand to include common stock symbols, UPS/FedEx shipping numbers, and other easily recognized patterns.
Using Built-In Type Detectors
UITextViews and UIWebViews offer built-in data type detectors, including phone numbers, HTTP links, and so forth. Set the dataDetectorTypes property to allow the view to automatically convert pattern matches into clickable URLs that are embedded into the view’s text. Legal types include addresses, calendar events, links, and phone numbers. Use UIDataDetectorTypeAll to match all supported types, or use UIDataDetectorTypeNone to disable pattern matching.
Useful Websites
When working with regular expressions, you may want to check out a number of handy websites to assist you with your work:
• The Regular Expression Library (http://regexlib.com) site has indexed thousands of regular expressions from contributors around the world.
• Go to Regex Pal (http://regexpal.com) to test your regex expressions via an interactive JavaScript tool.
• Use the txt2re generator (http://txt2re.com) to build code that extracts elements from source strings that you provide. It supports output in C as well as several other language destinations.
Recipe 6-11. Detecting Text Patterns Using Predicates and Regular Expressions
@implementation TestBedViewController
- (void) updateStatus: (NSString *) string
{
// This is a predicate matching U.S. telephone numbers
NSPredicate *telePredicate = [NSPredicate predicateWithFormat:
@"SELF MATCHES
'^[\(]?([2-9][0-9]{2})[\)]?[-.\. ]?([2-9][0-9]{2})
[-.\. ]?([0-9]{4})$'"];
BOOL match = [telePredicate evaluateWithObject:string];
self.title = match ? @"Phone Number" : nil;
}
- (BOOL)textField:(UITextField *)textField
shouldChangeCharactersInRange:(NSRange)range
replacementString:(NSString *)string
{
NSString *newString = [textField.text
stringByReplacingCharactersInRange:range withString:string];
if (!string.length)
{
[self updateStatus:newString];
return YES;
}
NSMutableCharacterSet *cs = [NSMutableCharacterSet
characterSetWithCharactersInString:@""];
[cs formUnionWithCharacterSet:
[NSCharacterSet decimalDigitCharacterSet]];
[cs addCharactersInString:@"()-. "];
// Legal characters check
NSString *filtered = [[string componentsSeparatedByCharactersInSet:
[cs invertedSet]] componentsJoinedByString:@""];
BOOL basicTest = [string isEqualToString:filtered];
// Test for phone number
[self updateStatus:basicTest ? newString : textField.text];
return basicTest;
}
- (void) loadView
{
[super loadView];
tf = [[UITextField alloc] initWithFrame:
CGRectMake(0.0f, 0.0f, 200.0f, 30.0f)];
tf.center = CGPointMake(self.view.frame.size.width / 2.0f, 40.0f);
tf.borderStyle = UITextBorderStyleRoundedRect;
tf.autocorrectionType = UITextAutocorrectionTypeNo;
tf.clearButtonMode = UITextFieldViewModeAlways;
tf.delegate = self;
[self.view addSubview:tf];
}
@end
To find this recipe’s full sample project, point your browser to https://github.com/erica/iOS-6-Cookbook and go to the folder for Chapter 6.
Recipe: Detecting Misspelling in a UITextView
The UITextChecker class provides a way to automatically scan text for misspellings. To use this class, you must first set the target language—for example, en for English, en_US for U.S. English, or fr_CA for Canadian French. The language codes use a combination of ISO 639-1 and optional ISO 3166-1 regions. So, while you can choose to use a general English dictionary (en), you can also differentiate between usage in the United States (en_US), Australia (en_AU), and the United Kingdom (en_GB). Query UITextChecker for an array of availableLanguages from which to pick.
The class also allows you to learn new words (learnWord:) and forget words (unlearnWord:) to customize the onboard dictionary to the user’s need. Learned words are used across languages; so, when you add a person’s name, that name is available universally. Checker objects can also set words to ignore using instance methods.
Recipe 6-12 demonstrates how to incorporate a text checker into your application by iteratively selecting each misspelled word. To do this, you need to control range selection for the text view. To select text in a UITextView, it must already be first responder. Check the responder status and update the view if needed:
if (![textView isFirstResponder])
[textView becomeFirstResponder];
Then calculate a range you want to select, making sure you take the content length into account and set the selectedRange property for the text view:
textView.selectedRange = NSMakeRange(offset, length);
Because a text view must be editable, as well as the first responder, the keyboard appears onscreen while you perform any range selection. Because the user can edit any material you have onscreen, code for cases in which user edits may disrupt your application.
Recipe 6-12. Searching for Misspellings
@implementation TestBedViewController
- (void) nextMisspelling: (id) sender
{
// Scan for a new word from the current offset
NSRange range = [textChecker rangeOfMisspelledWordInString: textView.text
range:NSMakeRange(0, textView.text.length) startingAt:textOffset
wrap:YES language:@"en"];
// Skip forward each time a new misspelling is found
if (range.location != NSNotFound)
textOffset = range.location + range.length;
else
textOffset = 0;
// Select the word
if (![textView isFirstResponder])
[textView becomeFirstResponder];
if (range.location != NSNotFound)
textView.selectedRange = range;
}
- (void) viewDidAppear: (BOOL) animated
{
self.navigationItem.rightBarButtonItem =
BARBUTTON(@"Next Misspelling", @selector(nextMisspelling:));
textView = [[UITextView alloc] initWithFrame:self.view.bounds];
[self.view addSubview:textView];
textView.editable = YES;
textChecker = [[UITextChecker alloc] init];
}
@end
To find this recipe’s full sample project, point your browser to https://github.com/erica/iOS-6-Cookbook and go to the folder for Chapter 6.
Searching for Text Strings
It takes little work to adapt Recipe 6-12 to search for text. To implement search, add a text field to your navigation bar and change the bar button to Find. Use NSString’s rangeOfString:options:range: method to locate the desired string. Careful, the string you search for must not be nil. After finding the range of your target text (and assuming the location is not NSNotFound), you can then scroll the text view to the right position by calling scrollRangeToVisible:. Pass the range returned by the string method.
NSNotFound is a constant used to indicate that a range was not successfully located. Check the location field after a search to ensure that a valid value was set.
Summary
This chapter introduced many ways to creatively use text in your iOS applications. In this chapter, you’ve read about controlling the keyboard and resizing views to accommodate text entry. You’ve discovered how to create custom input views and how to filter text and test it for valid entry. Before you leave this chapter, here are a few final thoughts to take away:
• Don’t assume your users will or will not be using Bluetooth keyboards. Test your applications with hardware as well as software text entry.
• Although accessory views provide a wonderful way to add extra functionality to your text-input chores, don’t overdo the accessories. Keyboards on the iPhone and iPod touch already cover an overwhelming portion of the screen. Adding accessory views further diminishes user space. Where possible, go spartan and minimal in your accessory design.
• Never assume your user will ever use shake-to-undo, a feature I find of questionable value. Provide undo/redo support directly in your application’s GUI, where the user can immediately recognize what to do rather than have to recall that Apple added that obscure feature and that it’s available for use. Shake-to-undo should always supplement other undo/redo support, not replace it. Undo/redo buttons are a best-use scenario for accessory views.
• Even though you might not be able to construct a perfect regular expression to test user input, don’t discount regular expressions that are good enough to cover most cases. And don’t forget that you can always use more than one regular expression in sequence to test different approaches to the same problem.