C H A P T E R 10
![]()
Android Development with SQLite
Android has stormed the mobile device market in the few short years it has been available, and if you've given in to temptation and bought a mobile phone, tablet, or other device running Android, then you've been a proud user of SQLite all this time! SQLite is one of the built-in data persistence technologies included in the Android platform and supported by the Dalvik virtual machine. Unlike iOS described in Chapter 9, the Java foundations of Dalvik mean that a purpose-built API wrapper is used around the underlying SQLite C API when application developers want to employ SQLite in their applications.
In this chapter, we'll mix things up with a walk-through of the Android SQLite library, its classes, and its methods. Instead of just a dry rehash of the documentation, we'll take the opportunity to build a working Android SQLite-based application (just as we did for iOS in Chapter 9). We'll use the concept of the Seinfeld food trivia application and walk through creating the code and UI for the application.
We'll also cover some of the developer considerations required for successfully maintaining Android applications on a device over time.
Prerequisites for SQLite Android Development
To do any development work with SQLite for Android, you'll need to equip yourself with the required tools. Once equipped with these tools, you'll be in a position to do all manner of Android development, not just work involving SQLite. Obviously, SQLite is our area of interest, so that's what we will focus on.
The four steps you need to complete are as follows:
- Check and install minimum prerequisites, including the Java development kit (JDK).
- Download and install the Android SDK starter package.
- Download and install the Android Developer Tools (ADT) if supported by your integrated development environment (IDE).
- Add any desired target Android platforms and other components to your environment.
We'll cover each of these quickly and move on to the SQLite work pronto!
Check Prerequisites and the JDK
To develop any Android application, you'll need to check that your development computer meets a few simple system requirements. First, you must be running Linux, OS X, or Windows XP or newer. The Android team lists particular versions and related dependencies at http://developer.android.com/sdk/requirements.html. In addition to that, about 500MB of free disk space is required for the Android components, in addition to space required for your IDE.
The most important prerequisite is the JDK. Android development requires either JDK 5 or JDK 6. Note that the Java runtime environment (JRE) is not sufficient. You can source the latest JDK from the Oracle web site if you require it, or you can choose an IDE that incorporates the JDK.
All your development of SQLite Android applications will be done in an IDE. There are many to choose from , but the most popular, and best for beginners, is Eclipse. Using Eclipse will enable you to also use Google's Android Developer Tools, which we cover shortly. The Android team recommends using Eclipse version 3.4 or newer and choosing a “classic” or “Java-focused” release.
Downloading and Installing the Android SDK Starter Package
The Android SDK Starter Package is the core set of tools required for any Android development. Importantly, it's not a complete SDK. Rather, it acts as a baseline that also guides you to download additional required components.
Google makes downloading the Android SDK Starter Package very easy. Browse to the site http://developer.android.com/sdk/index.html, and you'll see the latest SDK versions available directly for download. At the time of writing, release 7 is the latest release. Depending on your choice of Linux, OS X, or Windows, you'll need one of the following packages:
- Linux: android-sdk_r07-linux_x86.tgz
- Mac OS X: android-sdk_r07-mac_x86.zip
- Windows: android-sdk_r07-windows.zip
With the SDK downloaded, you can now proceed to installation. Extract the contents of your .zip or .tgz file to a convenient location on your computer. For example, we're using Eclipse under Windows, so we'll place the extracted SDK in the directory c:eclipsedropinsandroid-sdk-windows.
Once you've placed the extracted SDK in your desired location, you'll need to add that directory to your system's PATH environment variable. Refer to Chapter 2 if you need a refresher on how to add a directory to your PATH.
Downloading and Installing the Android Developer Tools
If you choose Eclipse as the IDE for your SQLite-based Android development, then you should download and install the Android Developer Tools in addition to the Android SDK Starter Package. ADT extends Eclipse to allow rapid setup of new Android projects through a dedicated Android aspect and provides additional tools for creating UIs, debugging, and exporting signed and unsigned packaged Android applications (called APKs).
To install ADT, run Eclipse, and choose Help ![]() Install New Software (that's under Eclipse 3.5—this may have a slightly different name in earlier Eclipse versions). Click Add to add a new repository, and enter the Android Developer Tools repository URL in the resulting Add Repository dialog box. Click OK, and return to the Install New Software screen. You should now see Developer Tools and the subcomponents Android DDMS and Android Developer Tools displayed, as shown in Figure 10-1.
Install New Software (that's under Eclipse 3.5—this may have a slightly different name in earlier Eclipse versions). Click Add to add a new repository, and enter the Android Developer Tools repository URL in the resulting Add Repository dialog box. Click OK, and return to the Install New Software screen. You should now see Developer Tools and the subcomponents Android DDMS and Android Developer Tools displayed, as shown in Figure 10-1.
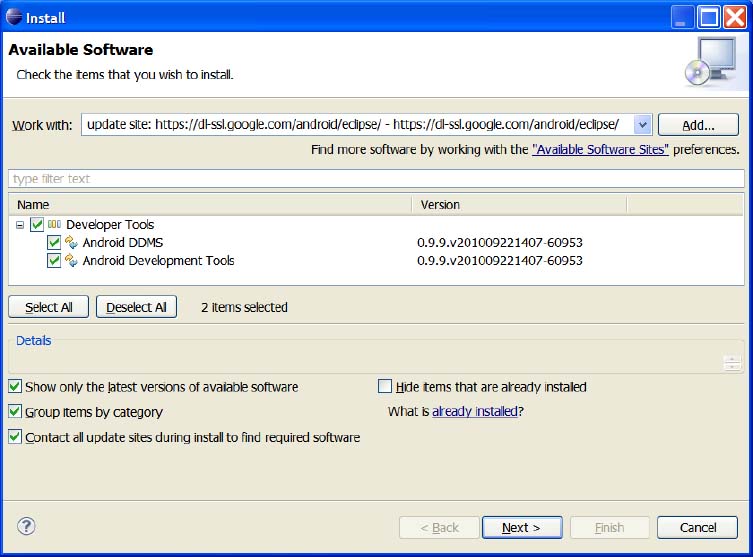
Figure 10-1. Installing the Android Developer Tools
Select all of the check boxes, and click the Next button. You'll be asked to agree to the licensing agreements and can then click Finish to complete the installation of ADT.
Adding Android Platforms and Components
The final task to get your Android SDK set up and ready for developing SQLite applications is to use the Android SDK and AVD Manager to download additional components to you environment. Google has built the full Android SDK to be modular, so things such as documentation, specific components for target versions and handsets, and other areas are split into separately managed and installed packages. You can choose the following components:
- The SDK Tools: This is the core part of the SDK and is already included in your environment when you install the SDK Starter Package.
- Android Platforms: An platform is available for each of the versions of the Android platform that have been released to production. You'll need to install at least one platform so you have a build target for your SQLite-based Android applications.
- SDK Add-Ons: The SDK Add-Ons are useful additional features bundled for use with the Android SDK. The most popular of these is the Google APIs Add-On, providing access to numerous Google technologies such as Maps, Street View, and so forth.
- USB Driver for Windows: The USB driver is provided for Windows developers so they can copy their applications to an actual device for running and debugging. Only Windows developers will need this—OS X and Linux need no special driver to allow this.
- Samples: This package includes numerous code snippets and examples of Android development.
- Documentation: This package contains full API documentation for all versions of the Android SDK.
Start the process of adding these components by choosing the menu option Window ![]() Android SDK and AVD Manager in Eclipse. The management window should appear, as shown in Figure 10-2.
Android SDK and AVD Manager in Eclipse. The management window should appear, as shown in Figure 10-2.
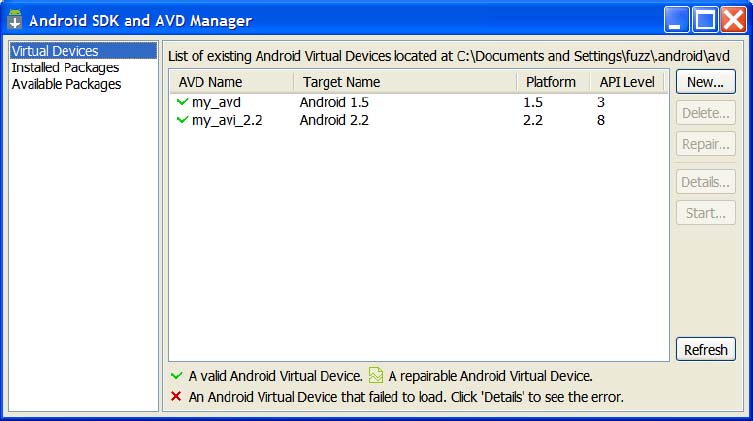
Figure 10-2. The Android SDK and AVD Manager in Eclipse
You may see one or more existing virtual devices listed in the manager. Let's create a new one specifically for our SQLite development, because this will allow us to ensure we have the components we want and need and none of the extraneous extras we don't need.
In the Android SDK and AVD Manager window, click the New button. You should see the Create New Android Virtual Device (AVD) dialog box appear, as shown in Figure 10-3.
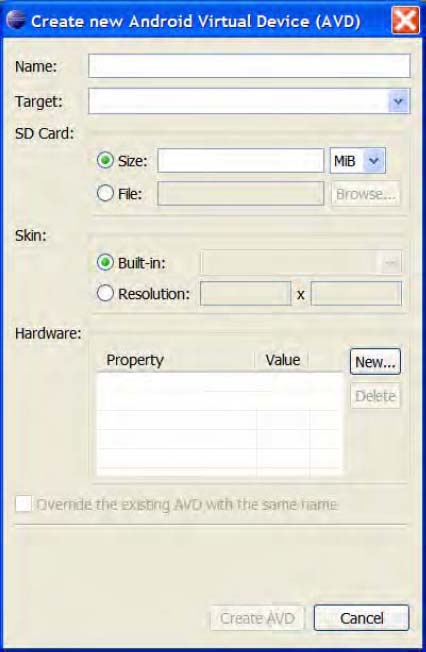
Figure 10-3. Adding a new Android virtual device for the SQLite project
You can call you virtual handset anything you like. We'll call ours SQLite_AVD. The Target field determines which Android SDK level you want to target for your application.
If you don't have any particular requirement in mind, you can support the oldest possible SDK release in order to target the widest possible audience. Otherwise, we recommend choosing at least the latest major release, which at this point is 2.2.
The SD Card and Skin settings aren't really a consideration with our SQLite focus, so at this point leave them at the defaults. The remaining aspect of your virtual device concerns the additional hardware this AVD will mimic. This includes many things that really won't impact our SQLite development, such as GPS and accelerometer devices. But several of the hardware options are worth considering.
The “Cache partition size” parameter will govern the fraction of on-board storage on the device available to applications and the phone's user (as opposed to Android and the system binaries). It's common to find phones and tablets with 4GB, 8GB, and even 16GB or more of onboard memory, and a good fraction of this is available to the Cache partition. If you plan to build applications with large SQLite databases, you should set this parameter to help you stay under the likely device ceilings your application would encounter in the wild.
The “Maximum VM application heap size” option sets the limit for the amount of heap allocation an Android application can take before it is killed by the system. This will impact your SQLite development when dealing with larger items allocated on the heap. The most likely culprits will be large result sets that are allocated as cursor objects (which we'll discuss later in this chapter). This defaults to 16MB. If you know you'll work with memory-limited devices, you can tweak this to enable your development to catch any low-memory scenarios before you reach real-world devices.
Device RAM Size designates the amount of physical memory present on the device. This is rarely going to be your limiting factor, but again for SQLite development on constraint devices, it's useful to dial down this value to make your development device more closely model your future target devices. The default is 96MB.
When you've finished choosing the hardware options you want for your virtual device, save it, and it should appear in the list of existing Android virtual devices in your environment.
The Android SQLite Classes and Interfaces
You now have a working environment in which to develop SQLite-based Android applications. The next step is to explore the classes and interfaces that Android uses to wrap the underlying SQLite C API. Unlike other APIs and language bindings that provide a one-to-one mapping between APIs, the Android SQLite API takes a very different approach.
Using the Basic Helper Class, SQLiteOpenHelper
The first and most important class provided by Android for working with SQLite databases is the SQLiteOpenHelper class, in the android.database.sqlite namespace. This is a helper class that is designed to be extended by you, to implement whatever tasks and actions you deem important when a database is first created, opened, or used. SQLiteOpenHelper has a single constructor defined as follows:
SQLiteOpenHelper(Context context, String name,

                 SQLiteDatabase.CursorFactory factory, int version)
The context is the application context allowing access to all the shared resources and assets for the given application. The name parameter contains the database file name within Android storage. The factory value introduces a new class, the SQLiteDatabase.CursorFactory. This is a factory class that generates cursor objects that act as the result set for all the queries you issue against SQLite under Android. The version parameter is your application-specific version number for the database (or more particularly, its schema). Don't confuse this with the actual SQLite version. SQliteOpenHelper will trigger its onUpgrade() method if your database isn't at the nominated version. All of SQLiteOpenHelper's methods are as follows:
synchronized void close()

synchronized SQLiteDatabase getReadableDatabase()

synchronized SQLiteDatabase getWritableDatabase()

abstract void onCreate(SQLiteDatabase db)

void onOpen(SQLiteDatabase db)

abstract void onUpgrade(SQLiteDatabase db, int oldVersion, int newVersion)
The close() method holds no surprises. This method closes the SQLite database within the SQLiteOpenHelper object.
The next two methods, getReadableDatabase() and getWriteableDatabase(), perform similar actions, with one difference that you can probably guess from their names. The getReadableDatabase() method will open the database specified for the SQLiteOpenHelper object but will open it such that it is read-only. In effect, any data manipulation statement that attempts to change data will not be allowed. getWriteableDatabase() is used to open a SQLite database for normal read/write operations. If for some reason your database cannot be opened for write operations, getWriteableDatabase() will open the database as a read-only database (just as if getReadableDatabase() had been called) and will throw an exception of type SQLiteException. You can test a database's read or read/write state by calling the isReadOnly() method on the database object itself. This is a Boolean value that returns true for a read-only database. You can later call getWriteableDatabase() on a database that is read-only to reopen it as a read/write database. Calling either method on a database that doesn't yet exist will implicitly invoke the helper object's onCreate() method. Otherwise, the first call to either method from your application will invoke onOpen() and optionally onUpgrade(). Your database will then be cached for the application to use, until the close() method is called.
![]() Caution Opening a large database can take some time, especially if you have complex logic built into your
Caution Opening a large database can take some time, especially if you have complex logic built into your onOpen() or onCreate() implementations. We strongly recommend that for real-world applications you don't call this from the application's main thread at startup time.
The final three methods—onCreate(), onOpen(), and onUpgrade()—are designed for you to subclass to implement your desired behavior. onCreate() is triggered when the database is initially created and typically used to create tables and load data with insert statements to bring a fresh database into existence.
onOpen() is triggered when the database completes opening. You would typically check things such as the read/write status of the database at this point with isReadOnly() to ensure your database is in a known state before working with it.
The onUpgrade() method is called when the database needs to be upgraded from an application perspective (remember, we're not talking about SQLite versions here; we're talking about your own application version). You typically start numbering your database version at 1 and increment this to 2, then 3, and so on, as you release new versions of your application. You code your desired alter table, create table, drop table, and other statements within this method to handle graceful upgrades of the database schema for your application as it evolves.
Working with the SQLiteDatabase Class
Now that you are familiar with the helper class that kick-starts the use of SQLite databases within Android, it's time to look at the core SQLiteDatabase class. A SQLiteDatabase object is conceptually easy to understand, being very similar to the underlying database object in the SQLite C API. However, the implementation of a wide range of helper methods and other tools means there's a little more under the wrapper than you might expect.
More than 50 methods are available for the SQLiteDatabase class, each with its own nuances and use cases. Many of these are basic helper methods to easily complete simple tasks such as one-table select, insert, update, and delete statements. Rather than an exhaustive list, we'll cover the most important subsets of methods and allow you to explore some of the overloaded methods at your leisure. At any time you can refer to the full online Android documentation for the SQLiteDatabase class at http://developer.android.com/reference/android/database/sqlite/SQLiteDatabase.html
Opening and Closing the SQLiteDatabase
SQLiteDatabase offers three methods to open a database and one to close a database. These methods are as follows:
void close()

static SQLiteDatabase openDatabase(String path,

                                   SQLiteDatabase.CursorFactory factory, int flags)

static SQLiteDatabase openOrCreateDatabase(File file,

                                   SQLiteDatabase.CursorFactory factory)

static SQLiteDatabase openOrCreateDatabase(String path,

                                           SQLiteDatabase.CursorFactory factory)
The close() method is as simple as it looks. The database is closed, and no further queries can be performed against the SQLiteDatabase object (that is, the database).
The openDatabase() method is the most versatile. It takes a path value to the file in your Android application's assets, together with an associated factory parameter that will act as a CursorFactory for your database. The final parameter is a “stackable” flags parameter that dictates options to opening the database. Four flag values pertain to opening the database.
OPEN_READWRITE: Opens the database for reading and writing.OPEN_READONLY: Opens the database for reading (select) only.CREATE_IF_NECESSARY: Creates the database file first if it does not already exist.NO_LOCALIZED_COLLATORS:Opens the database without support for theLOCALIZEDSQLite collations. These are custom collations that match the regional settings of the Android device.
The first openOrCreateDatabase() method accepts a File object as the target database to open. It does not have a flags parameter, defaulting to the behavior of the CREATE_IF_NECESSARY value.
The second openOrCreate Database() overloaded method is a shorthand version of openDatabase(). It acts in almost exactly the same fashion, accepting a string as the path to find the database file. It also has no flags parameter and likewise defaults to the CREATE_IF_NECESSARY behavior.
Executing General Queries with SQLiteDatabase
Just as there are numerous ways to compose SQL statements, Android provides a wealth of ways to run SQL against your SQLite database. In fact, there are no fewer than 16 methods that run general or specific styles of queries against your SQLite database. The can be separated into convenience functions that do single-table inserts, updates, and so forth, as well as general methods for executing DML and DDL. The general methods can be grouped together as shown in this list:
void execSQL(String sql)

void execSQL(String sql, Object[] bindArgs)

Cursor query(boolean distinct, String table, String[] columns, String selection,

             String[] selectionArgs, String groupBy, String having, String orderBy,

             String limit)

Cursor query(String table, String[] columns, String selection, String[] selectionArgs,

             String groupBy, String having, String orderBy)

Cursor query(String table, String[] columns, String selection, String[] selectionArgs,

             String groupBy, String having, String orderBy, String limit)

Cursor queryWithFactory(SQLiteDatabase.CursorFactory cursorFactory, boolean distinct,

                        String table, String[] columns, String selection,

                        String[] selectionArgs, String groupBy, String having,

                        String orderBy, String limit)

Cursor rawQuery(String sql, String[] selectionArgs)

Cursor rawQueryWithFactory(SQLiteDatabase.CursorFactory cursorFactory, String sql,

                            String[] selectionArgs, String editTable)
Don't be put off by the number of methods there. You can see that there are basically three core types—execSQL(), query(), and rawQuery(), with the latter two having variants that use the CursorFactory from your SQLiteOpenHelper() invocation if you choose to use it.
The two forms of execSQL() take a SQL statement as the sql parameter, and the second variant also accepts an array of bind parameters to bind to the query (bindArgs). The execSQL() methods are used for statements that don't return results, such as create table, insert, update, alter table, and so forth. The void method return type should help you remember this.
The query() and queryWithFactory() methods are essentially functions for performing lightweight single-table select statements against your database. Take a look at the various parameters. You'll see that they include table, columns, orderBy, and so on. In essence, each of these methods allows you to pass the clauses of a SQL statement to the relevant method, without having to include the SQL keywords themselves.
The final pair of methods, rawQuery() and rawQueryWithFactory(), allow you to use any string as a SQL select statement, returning the results as a Cursor object. You'll notice that each accepts an array of Strings named selectionArgs. Through this parameter, the SQLiteDatabase object will replace all question mark (?) bind parameters in your SQL statement with the String values in the array, on a positional basis (that is, the first question mark is replaced with the first element of the array, and so on).
Using Convenience Methods with SQLiteDatabase
We mentioned 16 methods that can execute queries, but the preceding section covered only 8 methods. The other 8 methods are convenience methods that allow you to issue insert, update, delete, and replace statements against a single database table. These methods are as follows:
int delete(String table, String whereClause, String[] whereArgs)

long insert(String table, String nullColumnHack, ContentValues initialValues)

long insertOrThrow(String table, String nullColumnHack, ContentValues initialValues)

long insertWithOnConflict(String table, String nullColumnHack,

                          ContentValues initialValues, int conflictAlgorithm)

long replace(String table, String nullColumnHack, ContentValues initialValues)

long replaceOrThrow(String table, String nullColumnHack, ContentValues initialValues)

int update(String table, ContentValues values, String whereClause, String[] whereArgs)

int updateWithOnConflict(String table, ContentValues values, String whereClause,

                         String[] whereArgs, int conflictAlgorithm)
At first glance, the various convenience methods are very easily understood. Decide on the action you want to take, nominate the table with the appropriate parameter, build a whereClause, and provide whereArgs. Take a closer look at the insert() and related methods and, for that matter, the replace() methods as well. You'll see a rather strange String parameter, nullColumnHack. This works in conjunction with the initialValues ContentValue map. Where the initialValues map is empty, nullColumnHack will provide NULL values for columns to prevent the attempt to insert no data, which would naturally fail.
Although these methods at first seem attractive, they are principally designed to appeal to the object-oriented developer who prefers simple CRUD-style primitive data manipulation. The methods tend to support using the database as just a persistence layer and, as already mentioned, leads to failing to do justice to both the power and the elegance of a relational database like SQLite. Now that we've mentioned these methods, we'll move on in the hopes you'll use the power of the other methods for building and executing queries.
Managing Transactions with SQLiteDatabase
All of SQLite's transaction management fundamentals are respected by the Android wrapper. Several useful methods are available to start, end, and manage your transactions.
void    beginTransaction()

void    beginTransactionWithListener(SQLiteTransactionListener transactionListener)

void    endTransaction()

boolean    inTransaction()

void    setTransactionSuccessful()
Several of these methods come close to needing no explanation. beginTransaction() starts a SQLite transaction, and endTransaction() ends the current transaction context for the SQLiteDatabase object. Crucially, whether the transaction commits or rolls back is dependent on the transaction being marked as “clean.” This is achieved by calling the setTransactionSuccessful() method. This added step is at first an annoyance, but in reality it exists to ensure you double-check all changes to the database before committing. The setTransactionSuccessful() method with throw an IllegalStateException exception if you are not in a transaction or have already set the transaction to successful. The inTransaction() method tests whether you are currently in an active transaction, returning true if that's the case.
This leaves the beginTransactionWithListener() method. This takes a SQLiteTransactionListener object as a parameter. An event will fire notifying this object every time a transaction management even happens in the transaction, whether that's a commit, rollback, or nested begin event.
Using Other SQLiteDatabase Methods
Numerous other helpful methods are available to the SQLiteDatabase object. Here are a select few to round out our discussion.
public long getMaximumSize(): Returns the maximum size allowed for the database.public int getVersion(): Returns your application-specific database version.public boolean isDbLockedByCurrentThread(): Tests whether your current thread holds the database lock.public boolean isDbLockedByOtherThreads(): Tests whether another thread holds the database lock.public static int releaseMemory(): Releases all working memory no longer needed by the database, cursors, and so on. The number of bytes freed is returned.
There are a number of other simple Boolean methods to test various aspects of your database's state, as well as a number of methods to control synchronizing cached copies of your database back to storage and other tasks.
Applying SQLiteOpenHelper and SQLiteDatabase in Practice
We've now covered enough of the Android SQLite API to walk through an example implementation of our own derived SQLiteOpenHelper class complete with overridden methods to manage our SQLiteDatabase—your underlying SQLite database.
Listing 10-1 shows a sample (large, working) fragment of Android code that implements our own subclass of SQLiteOpenHelper, dealing with the common creation and opening tasks of using our Seinfeld database. This code is included as myDatabaseHelper.java in the sample code.
Listing 10-1. myDatabaseHelper.java
import java.io.*;

import android.database.sqlite.*;

import android.database.SQLException;

import android.content.Context;


public class myDatabaseHelper extends SQLiteOpenHelper{

  //DBPATH uses the default system path for a given application

  // /data/data/<app namespace> , which in our example will be com.example.seinfeld

  private static String DBPATH = "/data/data/com.example.seinfeld/databases/";

  private static String DBNAME = "foods.db";

  private SQLiteDatabase myDatabase;

  private final Context myContext;
  //constructor

  public myDatabaseHelper(Context context) {

    super(context, DBNAME, null, 1);

    this.myContext = context;

  }


  //create an empty db, and replace with our chosen db

  public void createDatabase() throws IOException{

    if (!checkDatabase()) {

      this.getWritableDatabase();

      try {

        copyDatabase();

      }

      catch (IOException e) {

        throw new Error("Error copying database from system assets");

      }

    }

  }


  //Check if our database already exists

  private boolean checkDatabase(){

    SQLiteDatabase checkableDatabase = null;

    try {

      checkableDatabase =

        SQLiteDatabase.openDatabase(DBPATH+DBNAME, null,

                                    SQLiteDatabase.OPEN_READONLY);

    }

    catch (SQLiteException e) {

      //our database doesn't exist, so we'll return false below.

    }

    if (checkableDatabase != null) {

      checkableDatabase.close();

    }

    return checkableDatabase != null ? true : false;

  }


  //Copy our database from the Application's assets

  //over the empty DB for use

  private void copyDatabase() throws IOException{


    InputStream myInput = myContext.getAssets().open(DBNAME);

    OutputStream myOutput = new FileOutputStream(DBPATH+DBNAME);


    byte[] buffer = new byte[1024];

    int length;

    while ((length = myInput.read(buffer))>0){

      myOutput.write(buffer, 0, length);

    }
    myOutput.flush();

    myOutput.close();

    myInput.close();

  }


  public void openDatabase() throws SQLException{

    myDatabase = SQLiteDatabase.openDatabase(DBPATH+DBNAME, null,

                                             SQLiteDatabase.OPEN_READWRITE);

  }


  @Override

  public synchronized void close() {

    if(myDatabase != null)

      myDatabase.close();

    super.close();

  }


  @Override

  public void onCreate(SQLiteDatabase db) {

    //Handle creation tasks, etc.

  }


  @Override

  public void onUpgrade(SQLiteDatabase db, int oldVersion, int newVersion) {

    //Handle upgrade tasks, etc.

  }

} //end of myDatabaseHelper.java
We can now use our myDatabaseHelper class to open or create our Seinfeld foods database.
…

myDatabaseHelper mySeinfeldDBHelper = new myDatabaseHelper();

mySeinfeldDBHelper = new myDatabaseHelper(this);


try {

  mySeinfeldDBHelper.createDatabase();

}

catch (IOException e) {

  throw new Error("Failed to create Seinfeld database");

}


try {

  mySeinfeldDBHelper.openDatabase();

}

catch(SQLException e) {

  throw e;

}

…
We'll use our myDatabaseHelper class toward the end of the chapter to help build our working Android SQLite-based application.
Querying SQLite with SQLiteQueryBuilder
In the fine tradition of SQLite APIs, the Android SQLite class libraries support both database-style objects and statement-style objects issuing queries against the database. We've already seen the SQLiteDatabase object in action. Now we'll look at the complementary class, SQLiteQueryBuilder.
Just as with SQLiteDatabase, SQLiteQueryBuilder offers a range of methods to help compose a valid SQL statement, without the need to provide the various SQL reserved words for your clauses. Its key difference is the way the methods provide features to directly execute the generated statement against a provided SQLiteDatabase object, as well as being able to emit a string to pass to a SQLiteDatabase object for execution under that object's auspices. First, let's take a look at the methods supporting direct execution of your generated statement:
Cursor query(SQLiteDatabase db, String[] projectionIn, String selection,

             String[] selectionArgs, String groupBy, String having, String sortOrder)

Cursor query(SQLiteDatabase db, String[] projectionIn, String selection,

             String[] selectionArgs, String groupBy, String having, String sortOrder,

             String limit)
Those methods look eerily familiar. They are almost exactly identical to the query() methods of the SQLiteDatabase object, with a few exceptions. Rather than invoking them on the database object itself, you pass the database object as the first parameter (db). Many people find this just a case of personal preference, but there are use cases where the SQLiteQueryBuilder approach is helpful. You'll note the only difference between the two overloaded methods is that the second allows for a limit clause.
But wait! What's that? The careful reader will have spotted one more difference. Where has our table parameter gone? This is one of the key differences when using SQLiteQueryBuilder. A separate method is used to specify the table or tables against which the query will operate. This is the setTables() method.
public void setTables (String inTables)![]() Note This is probably the most common “Gotcha” developers encounter when switching between
Note This is probably the most common “Gotcha” developers encounter when switching between SQLiteQueryBuilder and SQLiteDatabase.
The setTables() method simply takes a comma-separated string of table names as a parameter. There are a few additional methods of SQLiteQueryBuilder that operate this way. These include setDistinct(), for indicating the SQL should use the distinct keyword, and setProjectionMap (Map<String, String> columnMap), which controls the aliasing of columns and column disambiguation.
The bulk of the remaining methods for SQLiteQueryBuilder are the “build” methods. These methods are designed to build a query string and return it for use elsewhere, such as through a SQLiteDatabase object or recursively in the SQLiteQueryBuilder itself.
String buildQuery(String[] projectionIn, String selection, String[] selectionArgs,

                  String groupBy, String having, String sortOrder, String limit)

static String buildQueryString(boolean distinct, String tables, String[] columns,

                               String where, String groupBy, String having,

                               String orderBy, String limit)

String  buildUnionQuery(String[] subQueries, String sortOrder, String limit)

String  buildUnionSubQuery(String typeDiscriminatorColumn, String[] unionColumns,

                           Set<String> columnsPresentInTable, int computedColumnsOffset,

                           String typeDiscriminatorValue, String selection,

                           String[] selectionArgs, String groupBy, String having)
Once again, there's a great deal of similarity there with the methods seen from SQLiteDatabase. Note however, that there are methods that focus heavily on union queries. Personally, we find it easier to construct these ourselves and use the rawQuery() methods on SQLiteDatabase, but if you're programmatically building up your union statements, the approach of buildUnionQuery() and the related methods provided added resilience against SQL injection attacks.
That's enough theory on the Android SQLite class libraries. Now let's move on to create a working Android SQLite-based application.
Building the Seinfeld Android SQLite Application
With a working development environment now in place from the start of this chapter and a working knowledge of the Android SQLite class libraries, you are ready to build your SQLite-based Android application. Our requirements are very similar to the iOS application we built in Chapter 9:
- Build an Android application that shows the foods mentioned in Seinfeld by order of popularity
- For any popular food, show how often the food is mentioned over all series of Seinfeld
- Indicate the show in which a food first appeared
Once again, we have a very simple set of requirements. We'll use the myDatabaseHelper.java class already developed earlier in the chapter, together with a little Android UI magic. That means some short coverage of non-SQLite areas will be needed, but we'll keep that to a minimum.
Here are the steps we will follow:
- Create a new Android project in Eclipse.
- Add the SQLite framework to project.
- Add our Seinfeld
foods.dbto our application assets. - Define the classes that map our food data from SQLite to our code.
- Define the UI elements that present our summary and detail SQLite data on-screen.
- Define our UI behavior.
- Launch!
Let's begin.
Creating a New Android Project
Launch Eclipse to get started. Choose File ![]() New
New ![]() Android Project, and you should see the New Android Project dialog box appear, as in Figure 10-4.
Android Project, and you should see the New Android Project dialog box appear, as in Figure 10-4.

Figure 10-4. Creating a new Android SQLite project
Fill in the project name, application name, and package name, as shown in Figure 10-3, or use meaningful names that you're likely to remember. The application name will be the title that appears with your application on Android. Your package name should follow normal Java package naming—remember this needs to be globally unique.
Adding the Seinfeld SQLite Database to Your Project
To add the foods.db SQLite database file to your project, open the Seinfeld project folder, and then open the assets folder. This will be empty by default. You can either drag and drop the foods.db file from your operating system on to the assets folder or choose to link the database file in place. We don't recommend the link option, because this makes packaging your application with the database more difficult.
Later in the chapter we'll explore how the adb utility enables you to still use the command line against your foods.db database, even after it has been loaded onto your (virtual or real) handset.
Querying the Foods Table
We now need to add additional functionality to our Seinfeld application to query our database to return the foods we know and love. We also need to “wire up” the results to a ListView in the Android UI world so that we can see our results through the Android application and play around with them.
Our first task is to add a method to our myDatabaseHelper class to fetch all the foods from the food table. This fragment is from the myDatabaseHelper.java file available with the sample code:
…

public Cursor fetchAllFoods() {


  return myDatabase.rawQuery("select name from foods order by name", null);

}

…
As you can see, we're not attempting a huge amount of sophistication here. You can always revisit our example later to increase the complexity of your Seinfeld application.
Next, we need to feed the Cursor for all our fetched foods into the ListView that will display them. Within our Seinfeld.java code, we declare a few handy strings representing our known field names and then a method to iterate over a result set, binding returned fields and values to our ListView:
…

  public static final String FOODS_NAME_FIELD = "name";

...


private void fillData() {

  Cursor foodCursor = mDbHelper.fetchAllNotes();

  startManagingCursor(foodCursor);


  // Create an array for our food names

  String[] from = new String[]{myDatabaseHelper.FOODS_NAME_FIELD};
  // Create an array of fields for binding to

  int[] to = new int[]{R.id.text1};


  SimpleCursorAdapter foods =

    new SimpleCursorAdapter(this, R.layout.food_row, foodCursor, from, to);

  setListAdapter(foods);

}
Don't worry if the Android-specific UI tweaking doesn't make sense; we'll discuss the mysterious R object next and how the text1 field is defined.
Defining the User Interface
When your fresh Seinfeld project was created, a blank canvas was put in place for the user interface. If you drill down into your project, under the res folder you'll see a main.xml file. This would be where you would start designing a fresh layout, either using a graphical interface builder or carefully crafting Android UI XML by hand.
Thankfully, we're not going to put you through that torture. Instead, we'll walk you through the example code we've provided. Listing 10-2 shows you the contents of our food_list.xml file. This controls the overall look and feel for our application as a whole.
Listing 10-2. food_list.xml
<?xml version="1.0" encoding="utf-8"?>

<LinearLayout xmlns:android="http://schemas.android.com/apk/res/android"

    android:layout_width="wrap_content"

    android:layout_height="wrap_content">


<ListView         android:id="@id/android:list"

       android:layout_width="wrap_content"

       android:layout_height="wrap_content"/>

       <TextView android:id="@id/android:empty"

       android:layout_width="wrap_content"

       android:layout_height="wrap_content"

       android:text="@string/no_foods"/>

</LinearLayout>
Very briefly, our design has a LinearLayout specification that is the most common for textual applications. Within that, we define a set of expected behaviors for our UI depending on what our UI is passed to display. Should a populated ListView be provided, we attempt to display this using list semantics. Should a (nominally empty) TextView be provided, we'll display the string no_foods. Otherwise, we'll display the textual content. Only one of these two views will be used at any one time. The values list and empty are helpers provided by the Android platform, to ease the complexity of defining the behavior of UI components.
This makes sense when viewed in conjunction with our other layout file, food_row.xml, shown in Listing 10-3.
<?xml version="1.0" encoding="utf-8"?>

<TextView android:id="@+id/text1"

    xmlns:android="http://schemas.android.com/apk/res/android"

    android:layout_width="wrap_content"

    android:layout_height="wrap_content"/>
Here we're instructing Android that we'd like a new ID called text1. The use of the + symbol is shorthand to say “If I've forgotten to define text1 by now, go ahead and do here, so I can start using it immediately.” We find it handy to use this approach to keep the definition of UI elements as close as possible to where they'll be used.
Go ahead and include these UI XML files in your project. Through the magic of the Android Developer Tools, Eclipse will note your newly defined field and IDs and add the necessary values to the mysterious R.java file. Actually, there really isn't too much mystery here. The R.java file is managed by ADT and automatically connects any UI resource to your Java code. Feel free to inspect R.java, but you'll rarely if ever need to manually change it.
Linking the Data and User Interface
Our last major task is to control when and how our interface receives its data. For this exercise, we'll take the subclass of onCreate() that we implemented earlier in the chapter, expand it to find and open our SQLite foods database, and populate the ListView we've created with the results of the fillData() method we've built. This code fragment is included in the file Seinfeld.java.
…

    @Override

    public void onCreate(Bundle savedInstanceState) {

        super.onCreate(savedInstanceState);

        setContentView(R.layout.food_list);

        mySeinfeldDbHelper = new MyDatabaseAdapter(this);

        mySeinfeldDbHelper.createDatabase();

        mySeinfeldDbHelper.openDatabase();

        fillData();

    }

…
Here, we invoke setContentView to accept our food ListView, R.layout.food_list. Next, we create an object using our myDatabaseAdapter class and create (copy to cache) and open the database. We then call fillData(), which from our earlier definition does the hard work of taking our Cursor full of food results and feeding the data into TextView elements for our ListView.
That's really about it. Be sure to take a look at the full listings for Seinfeld.java and the related code in the sample files included. We didn't want to waste a few dozen pages on printing code that you can more easily review yourself on-screen, but looking at the code in context will help further your understanding.
Viewing the Finished Seinfeld Application
We've walked through the new and changed code that makes up our Seinfeld application, so now it is time to see it in action. With Eclipse, choose Run ![]() Run As
Run As ![]() Android Application. This will launch your application in your Android virtual device created earlier in the chapter.
Android Application. This will launch your application in your Android virtual device created earlier in the chapter.
![]() Note It can take a few minutes for the virtual device to initialize, load, and be ready to use. Even then, it can take a few seconds longer to see your application. You should also check that you've activated the screen lock pattern to ensure your Seinfeld application is patiently waiting behind the screen lock for you.
Note It can take a few minutes for the virtual device to initialize, load, and be ready to use. Even then, it can take a few seconds longer to see your application. You should also check that you've activated the screen lock pattern to ensure your Seinfeld application is patiently waiting behind the screen lock for you.
Once your Seinfeld application has started, you should see familiar food names from our trusty foods.db SQLite database, as shown in Figure 10-5.
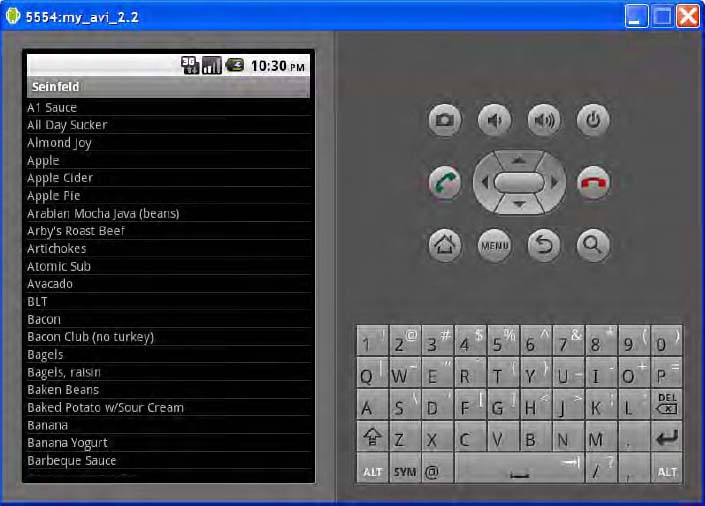
Figure 10-5. Your running Seinfeld Android SQLite application
That's it, you've created your first Android SQLite application. From here, you can go crazy adding features and devising new applications.
Care and Feeding for SQLite Android Applications
As with all mobile platforms, the somewhat constrained nature of hardware and resources under Android (compared with normal desktop or notebook computers) means some additional care and attention is warranted to ensure the best possible development and user experience.
Database Backup for Android
You've seen in our development of the myDatabaseHelper.java subclass that it is possible to work directly with the SQLite database file. Using normal Android API calls, it is possible to manipulate the SQLite file yourself, and therefore you could use this approach to provide for backups and recovery of your database. But there is a better way.
Google provides a backup service with Android, which allows you to copy any kind of persistent data to remote storage. This applies not just to SQLite database files, but that's our focus for now. This is a very useful way to provide for data resilience, backup, and recovery, way beyond what you could achieve manually. For instance, if a user invokes a factory reset on an Android-powered device, a do-it-yourself backup would likely be lost. But the data backup system can automatically restore your data when your application is reinstalled.
This feature is quite in-depth and is based around a number of classes. BackupAgent, BackupAgentHelper, and BackupManager are the main APIs involved. As with some of the classes we've seen, each of these classes includes a number of methods and subclasses designed to be overridden by you so that you can provide application-specific behavior for backup and restore activities. There's enough material required to cover these tasks to fill a book in its own right, so we'll point you to the online documentation for further reading at http://developer.android.com/guide/topics/data/backup.html.
Working with Large SQLite Databases Under Android
In our introduction to creating an Android virtual device, we mentioned several configuration options that control or mimic the memory, cache, and storage resources available to you when creating any Android application. These included maximum VM application heap size, cache partition size, and device RAM Size.
A subtle but frustrating issue can arise when you begin working with large sets of data derived from your SQLite databases. You run some queries, fetch very large results into your Cursor object, and start working with the data. At some point, your UI crashes and leaves you with bizarre UI errors in the trace output. What's going on?
Despite the sometime prodigious amounts of memory and storage now available on Android devices and configurable in your AVD, there are other limits that can crimp your style. The most common of these involves using the CursorWindow object as a secondary cache of Cursor result rows. A CursorWindow can accommodate only 1MB of data. The variable smooth operation or crashing behavior you can see can be caused by attempting to exceed the CursorWindow size limit with too many rows and or rows with excessively long data. Naturally, sometimes your data may be short and sweet, thus showing no problem, but at other times…kapow!
Our advice is to remember that you are dealing with devices usually sporting only a 3-inch or 4-inch screen and that caching thousands of rows is probably not a useful design. What user of yours will ever scroll or read through that amount of data in one action, especially on a screen that small?
Summary
You now have a firm understanding of the tools, classes, and practice of creating SQLite-based Android applications. The Android SQLite API is somewhat different from the APIs we've covered elsewhere, and it is evolving at a rapid rate, just as the rest of the Android platform is also evolving.
Because Android is proving to be a runaway mobile platform success, we're sure any interest you have in creating SQLite-based applications for Android will be well rewarded. Good luck!