
Chapter Twelve. Photo Recipes to Help You Get “The Shot”
The Simple Ingredients That Make It All Come Together
SHUTTER SPEED: 1/125 SEC F-STOP: F/13 ISO:100 FOCAL LENGTH: 112MM | PHOTOGRAPHER: SCOTT KELBY

Hey, it’s the end of the book, and now is as good a time as any to let you in on a secret. There’s really no way in hell we’re going to get those really magical shots (like you see in magazines such as Outdoor Photographer or Shutterbug). That’s because when we get out to that prime shooting location at the crack of dawn to hopefully capture one of these once-in-a-lifetime shots, carrying so much gear that our chiropractors are on speed dial, we’ll soon find that it’s too late—there are already a dozen or so photographers set up there waiting for that magical light, too. Since they were there first, the only spot left on that tiny plateau is behind them, and every shot you take is going to have some, if not all, of their camera gear fully in your frame, ruining any possible chance of you getting “the shot.” But this chapter is all about recipes for getting the shot, and I’ve got a special recipe for this very situation. Just as the golden light appears over the horizon, you quietly slide your foot inside one of their tripod legs, then quickly pull your foot back, toppling over their entire rig, and as their thousands of dollars of gear begins to crash violently to the ground, you deftly press the cable release on your camera and capture that amazing vista as the sound of broken glass echoes off the canyon walls. Ahh, that, my friends, is the magical sound of you getting “the shot.” If you hear the faint sound of sobbing in the distance, it all becomes that much sweeter. Enjoy.
The Recipe for Getting This Type of Shot
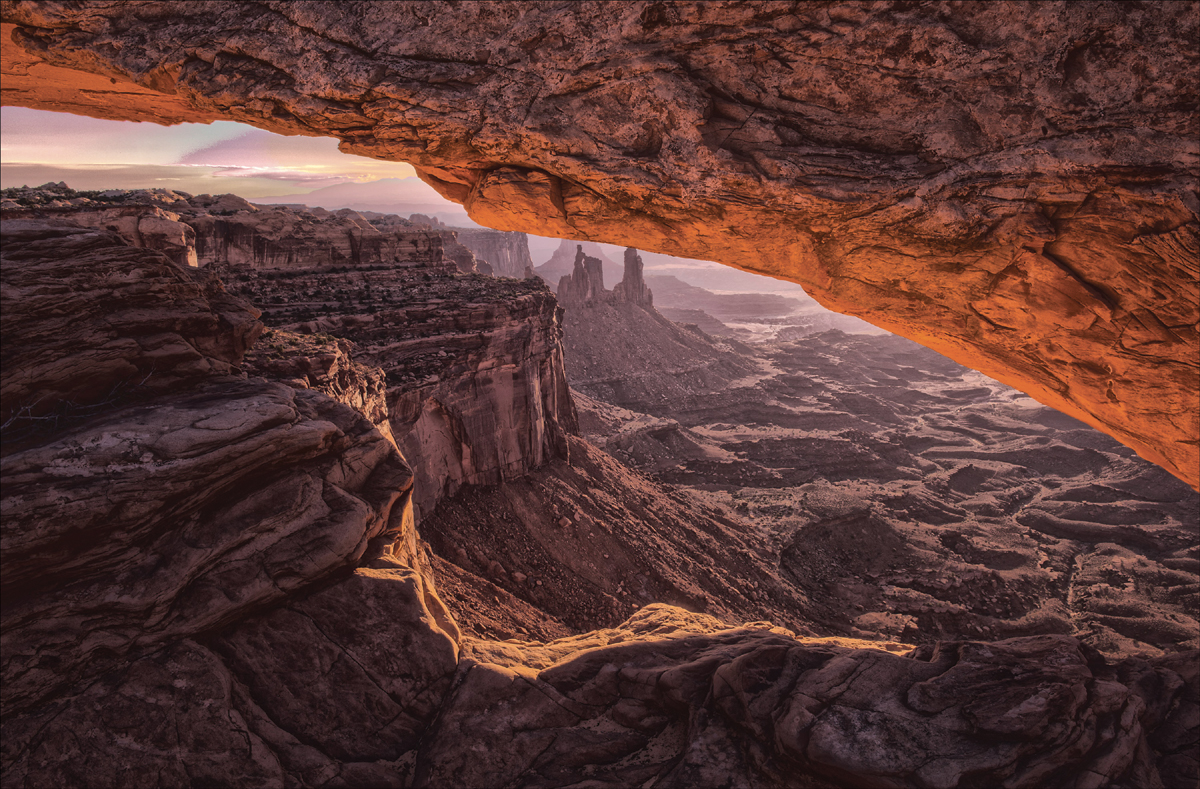
Characteristics of this type of shot: A sweeping landscape with beautiful overall light and some areas lit brighter than others.
(1) This type of beautiful light doesn’t happen at 2:00 p.m. You have to get up early and be in place, ready to shoot, 30 minutes before the sun comes up.
(2) To get a big, sweeping feel to your image, you’ll want to use a “big, sweeping feel” type of f-stop, something like f/22, which is perfect for landscape shots like this.
(3) Right around sunrise, the light is very low and since you’re shooting at a slow f-stop, like f/22, you’ll need to be on a tripod, and you’ll need a cable release (or wireless shutter release) to reduce the chance of any movement of your camera.
(4) Since you’ll be on a tripod, you can shoot at the lowest native ISO for your camera (usually 100 for Canon and Sony cameras, and 200 for most Nikons, although some of the newer ones are 100 ISO, as well. Check the manual for your camera).
(5) For landscape shots like this, use the widest wide-angle lens you have. If you’re using a full-frame camera, something like a 14mm or 16mm would be ideal. If you’re shooting a cropped-sensor camera, something like a 12mm would be ideal.
(6) For a warmer look overall, set your white balance to Cloudy.
(7) This particular shot was taken right at sunrise, which is why some of the mountains are still in the shade and some have some light peeking through. The red glow on the arch (that’s Mesa Arch in Moab, Utah) appears right before and during sunrise.
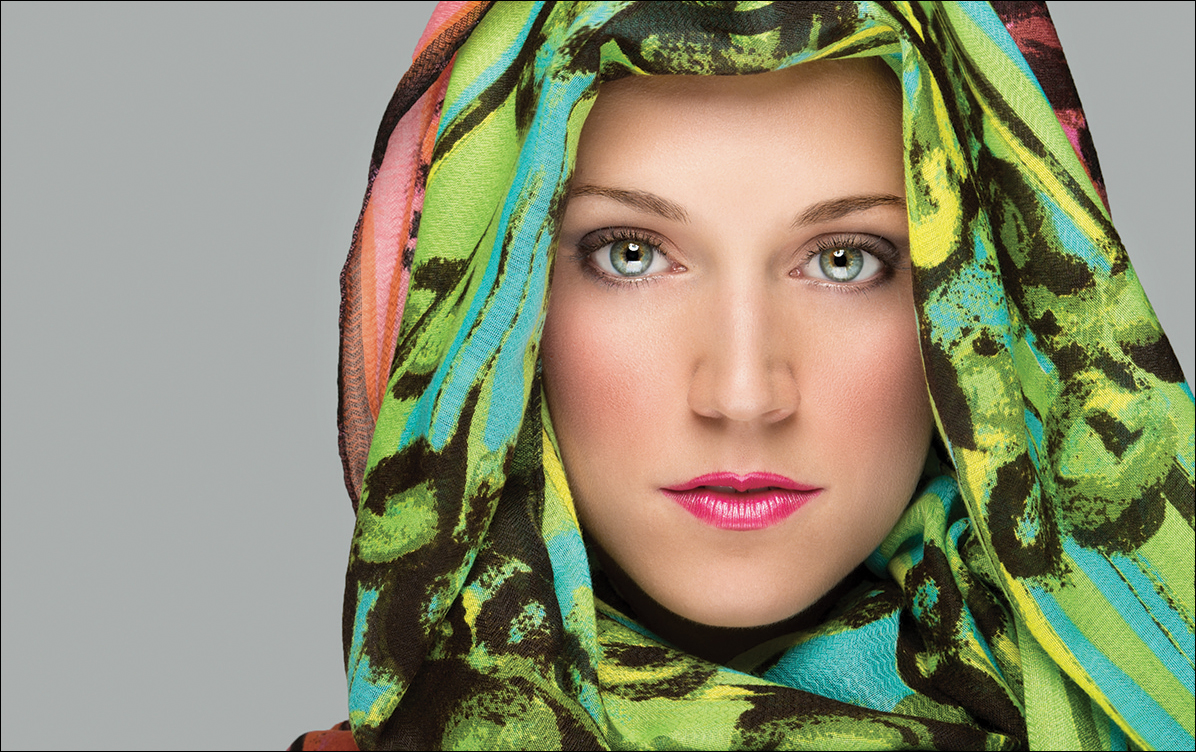
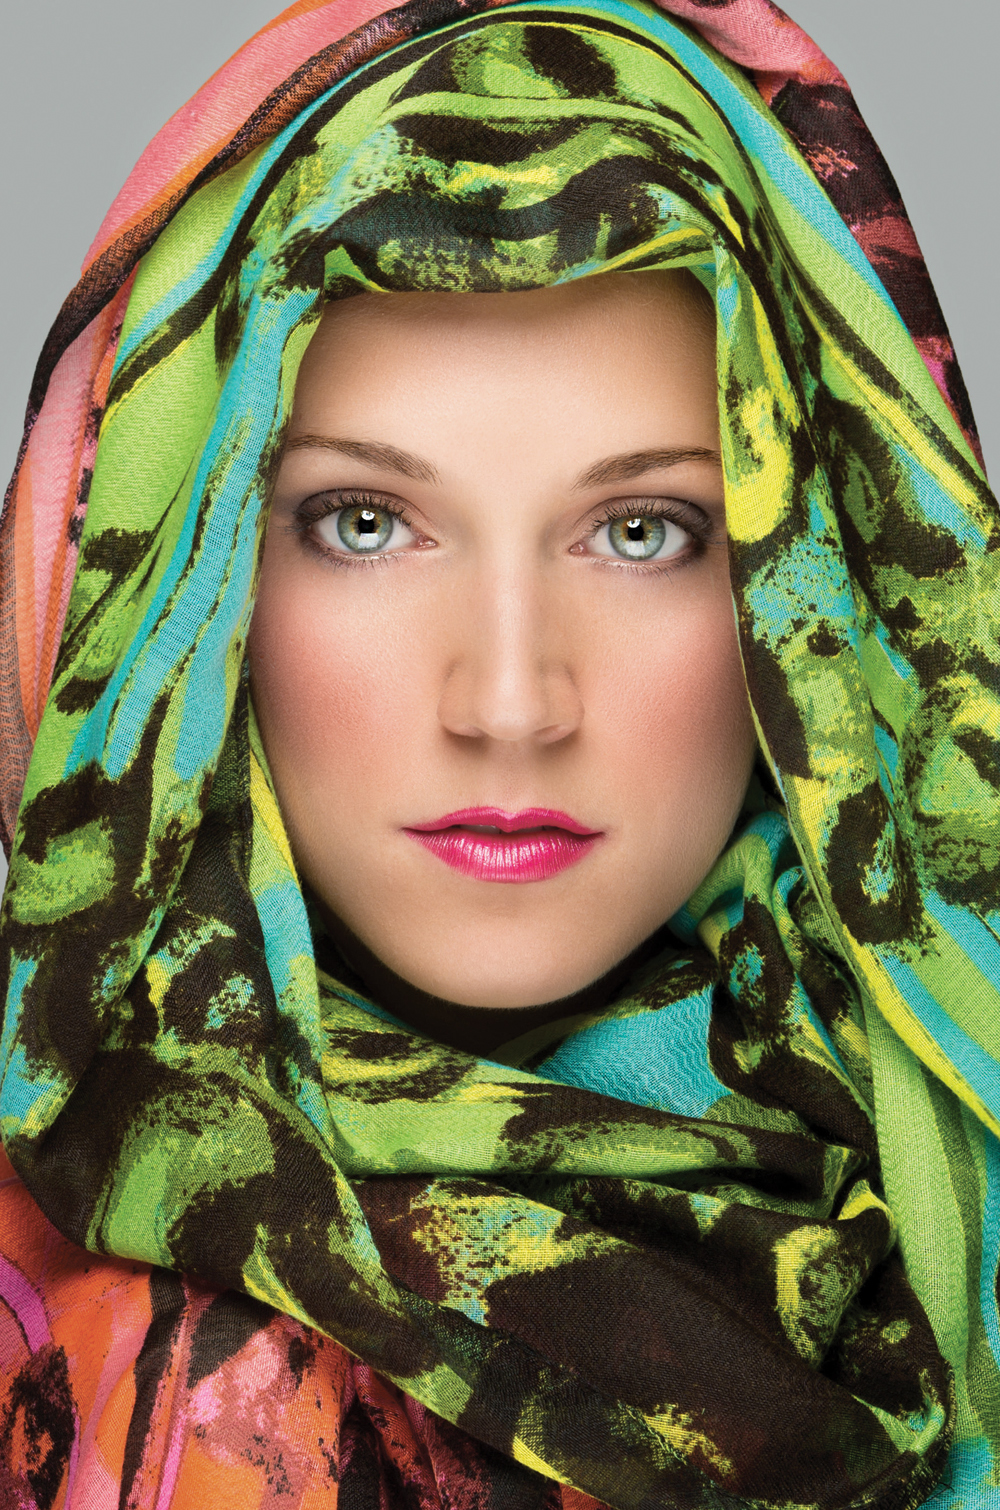
Characteristics of this type of shot: A “beauty style” shot with soft, punchy light that eliminates most shadows on the face.
(1) This is a two-light shoot: The main light is a studio strobe (flash) with a 17" beauty dish attachment that’s directly in front of the subject (to soften the punchy light from a beauty dish, put a diffusion sock over it), up about 2 feet above her face, aiming down at her at a 45° angle. (Note: If you don’t have a beauty dish, you can use a small softbox instead.) The other light is a small 24" square softbox down at her waist level, aiming up at her at a 45° angle.
(2) Position the camera height right at eye level and, to keep everything in focus from front to back, you’ll need to use an f-stop that holds details (like f/11) and a long enough lens (like a 200mm) to give nice perspective. You’re in the studio, so use the lowest native ISO you can (100 or 200 ISO max).
(3) Position your subject about 8 to 10 feet in front of a white seamless paper background. Don’t put any light on the background, and your white seamless paper will be light gray, like you see here.
(4) If you only have one strobe, use that as the main light up top, then have your subject hold a reflector flat at their chest level, as high as possible without being seen in the frame, to reflect the light from the top strobe back up onto their face to reduce any shadows.
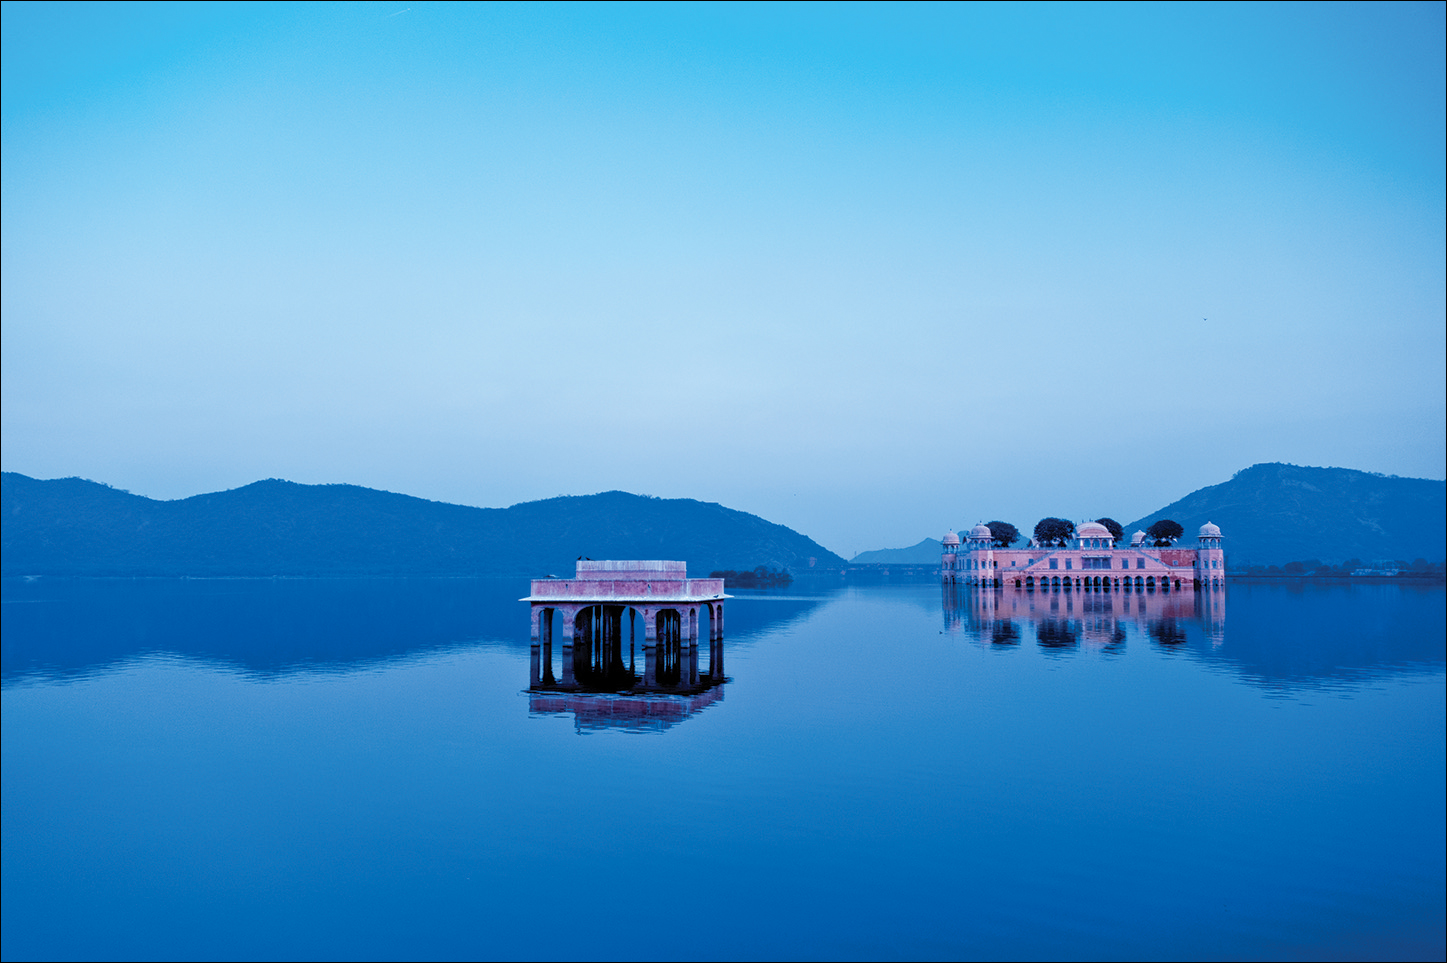
Characteristics of this type of shot: Still water and interesting shades of blue and pink come together for this travel shot taken in Jaipur, Rajasthan, India.
(1) Soft, beautiful light like this only happens twice a day—at sunrise and sunset—and this shot was taken after sunset. The fact that there is mirror-like water was total luck.
(2) Since this is taken in the low light of dusk, it has to be taken on a tripod with a cable release or the shutter speed will fall so low that the image will be blurry and out of focus.
(3) Since you’re shooting on a tripod, you can use the lowest, cleanest ISO for your camera (probably 100 or 200 ISO).
(4) The color comes from experimenting with the camera’s white balance setting. Try a different setting (like Fluorescent or Tungsten), take a shot, and then look at the LCD monitor on the back of your camera to see how it looks to you. You’re not looking for accuracy here, you’re looking to create art—something beautiful—so try different ones out and see which one really creates stunning color.
(5) The other key to getting a shot like this is composition. By putting the palace in the bottom third of the frame (rather than the boring dead center of the image), it creates more visual interest, a more dynamic image, and draws your eye right to the subject.
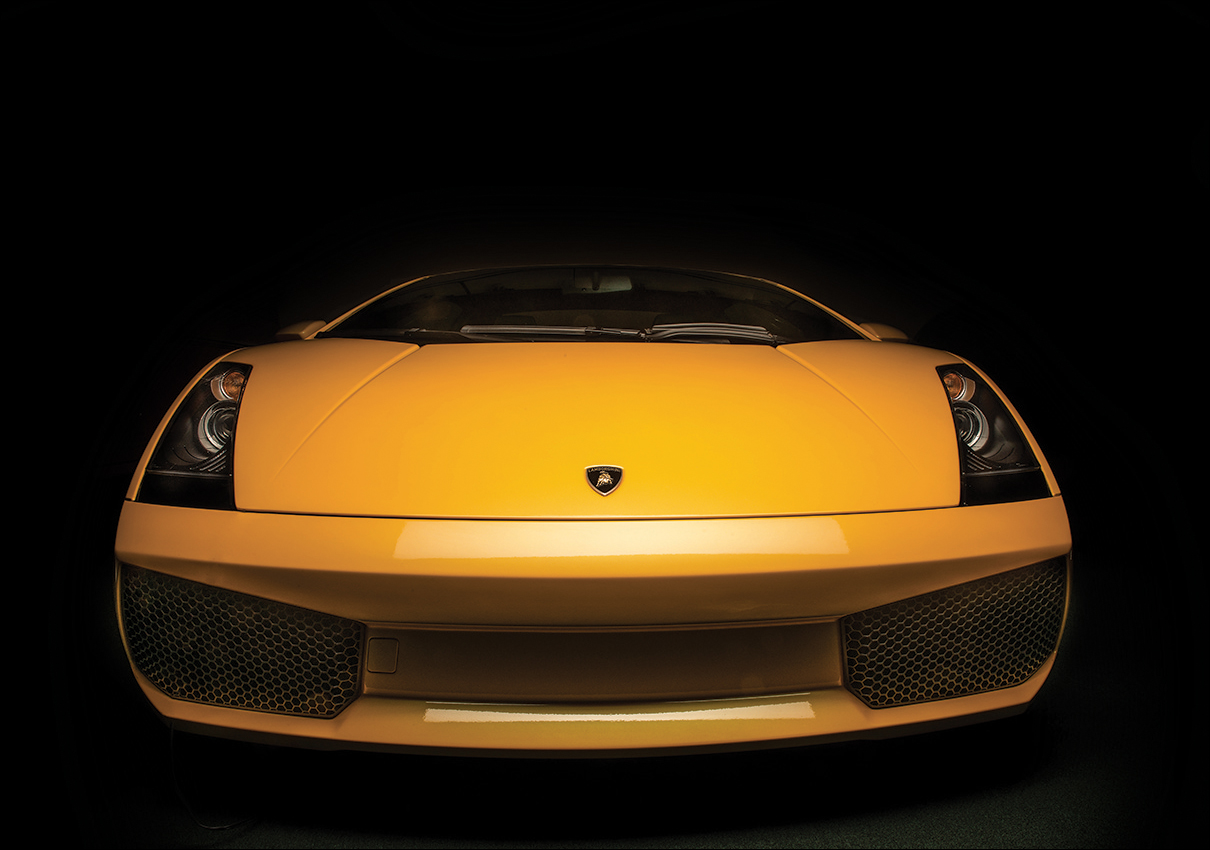
Characteristics of this type of shot: An aggressive-looking car detail shot (only showing part of the car—in this case, the front), lit with soft, even lighting.
(1) This shot is actually much easier than it looks, since it only uses one single light: a studio flash with a long, thin (14x35") softbox called a strip bank. It’s surprisingly affordable for the wonderful light it creates (the one I use costs around $175) and since it’s long and thin, the light it delivers is long and thin.
(2) The big trick to this is getting the background and sides to fall off to solid black, even though this was taken indoors with lots of lights on. The trick is the f-stop. Shooting at f/22 makes the light fall off (end) very quickly, so the flash only really lights just where you’re aiming it.
(3) In this case, I have the light on a boom stand directly over the front of the car, aiming straight down at the hood (you can see a reflection of the softbox right below the Lamborghini logo on the hood).
(4) To get the aggressive look to the image, I am literally lying down on the floor. This really low perspective makes the car look bigger and badder (not that it needs it).
(5) Since I’m using a flash, it will pretty much freeze any minor movement by my camera, so I don’t have to worry about setting up a tripod 6" off the ground. I used my elbows to steady my camera nevertheless. The hardest part of all of this is finding a friend with a really cool car. A big thanks to automotive photographer Tim Wallace for teaching me this car detail shooting technique and for letting me share it here with you.
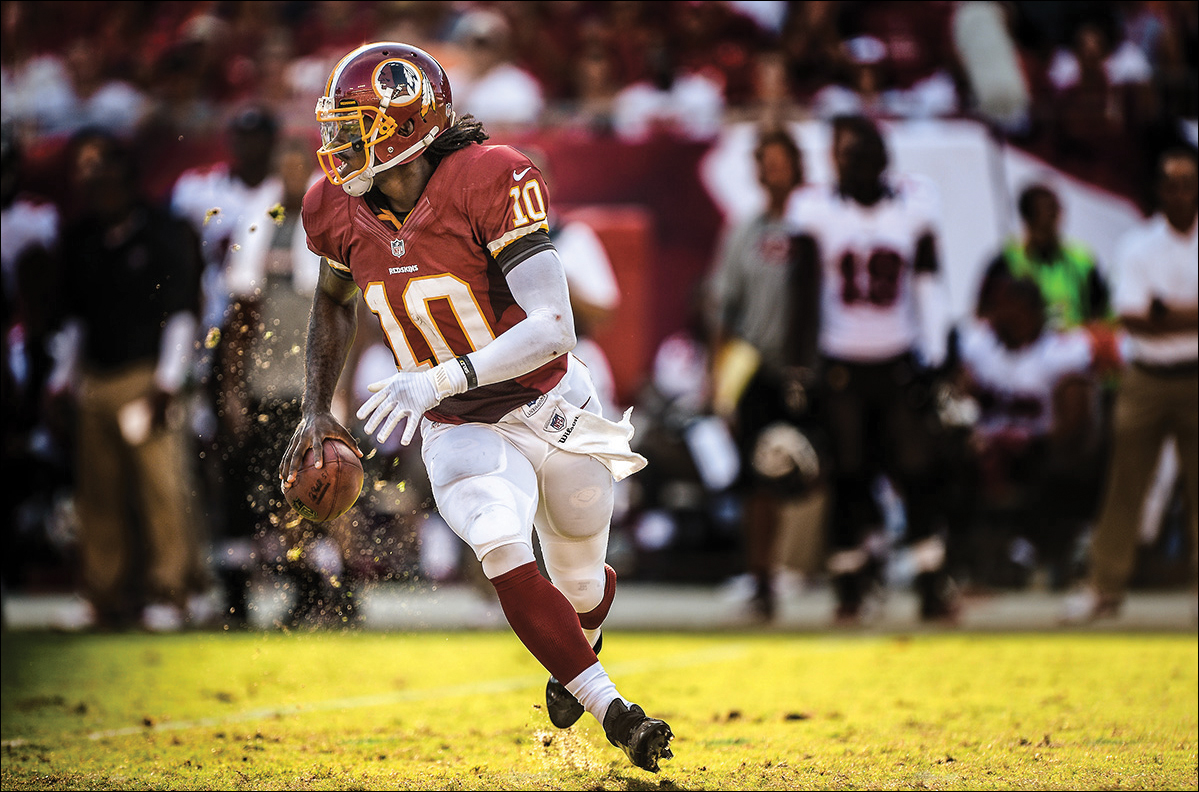
Characteristics of this type of shot: Sports photo, freezing the action and keeping the athlete in focus while the background is soft and out of focus.
(1) To get a tight-in shot like this, you’ll need a very long lens, ideally a 400mm f/2.8 lens or a 300mm lens with a 1.4x teleconverter to get you in closer. If this seems like a crazy-expensive proposition, turn back to page 92 for a refresher.
(2) To get the out-of-focus background (which you want, as it creates separation of the player from the background), you need to shoot at the widest possible aperture your lens will allow (meaning, shoot at the lowest number your lens will go. Ideally f/2.8, but if your lens won’t go that low, then f/4. If your lens will only go down to f/5.6, you’re not going to get the type of out-of-focus background and separation you see here, which is why these fast lenses—ones that shoot at f/2.8 or f/4—are ideal for sports). During a game, I shoot in aperture priority mode and I won’t change the f-stop even once—it will always be f/2.8 (and the camera will pick the shutter speed for me).
(3) Your shutter speed needs to be at least 1/1000 of a second or faster to freeze action in sports. During a daylight game like this, with you shooting at f/2.8, it will not be a problem (you’ll probably see shutter speeds more like 1/4000 or higher). However, if part of the field winds up in shadow later in the day, you might have to raise your ISO to get your shutter speed back up to 1/1000 of a second.
(4) Lastly, to shoot a moving athlete like this and not lose the focus, switch your camera to AI Servo Mode (Canon) or Continuous Focus mode (Nikon and Sony). That way, the focus tracks and moves with your athlete as he/she moves during the action.
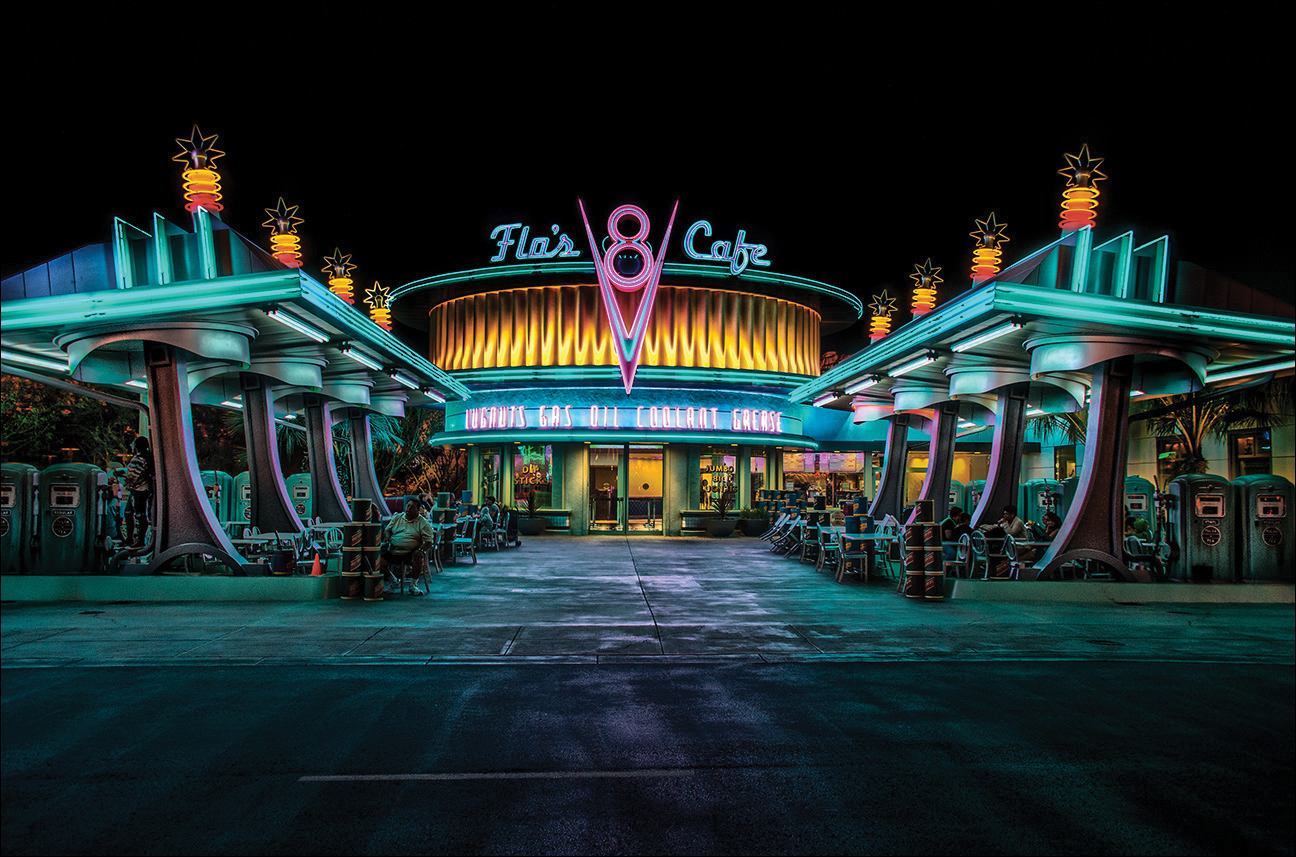
Characteristics of this type of shot: A nighttime shot of a building lit with neon lights (this is Flo’s V8 Cafe in Cars Land at Disney California Adventure Park).
(1) There are just three things you need to make a shot like this: The first is patience. I had to wait quite a while until there was a 5-second break between streaming crowds of tourists walking right in front of the cafe. This also took a lot of patience for my wife and kids (luckily, there was a gift shop nearby).
(2) The second thing you need is a tripod to steady your camera in low light. Unfortunately, I didn’t have a tripod with me, so I had to find something to steady my camera because the shutter was going to be open for a couple of seconds (if I hand-held that, it would be out of focus for certain). I tried leaning my camera on a garbage can right across the way from Flo’s. I also tried setting it on the ground and using a self-timer. I tried setting it on a railing and a few other different locations, but to get the perspective you see here, I actually wound up setting it on the seat of a park bench.
(3) The third thing is to shoot in manual mode. If you shoot in aperture priority mode, it’s probably going to overexpose the shot (not always, mind you, but enough times to where when I shoot nighttime shots, I switch to manual mode). Start by taking one shot in program mode, then note the settings it used. Now switch to manual mode, enter those settings as your starting place, and then if the shot looks too bright, raise your f-stop by one stop (like from f/5.6 to f/8) or higher until the sky gets nice and black.
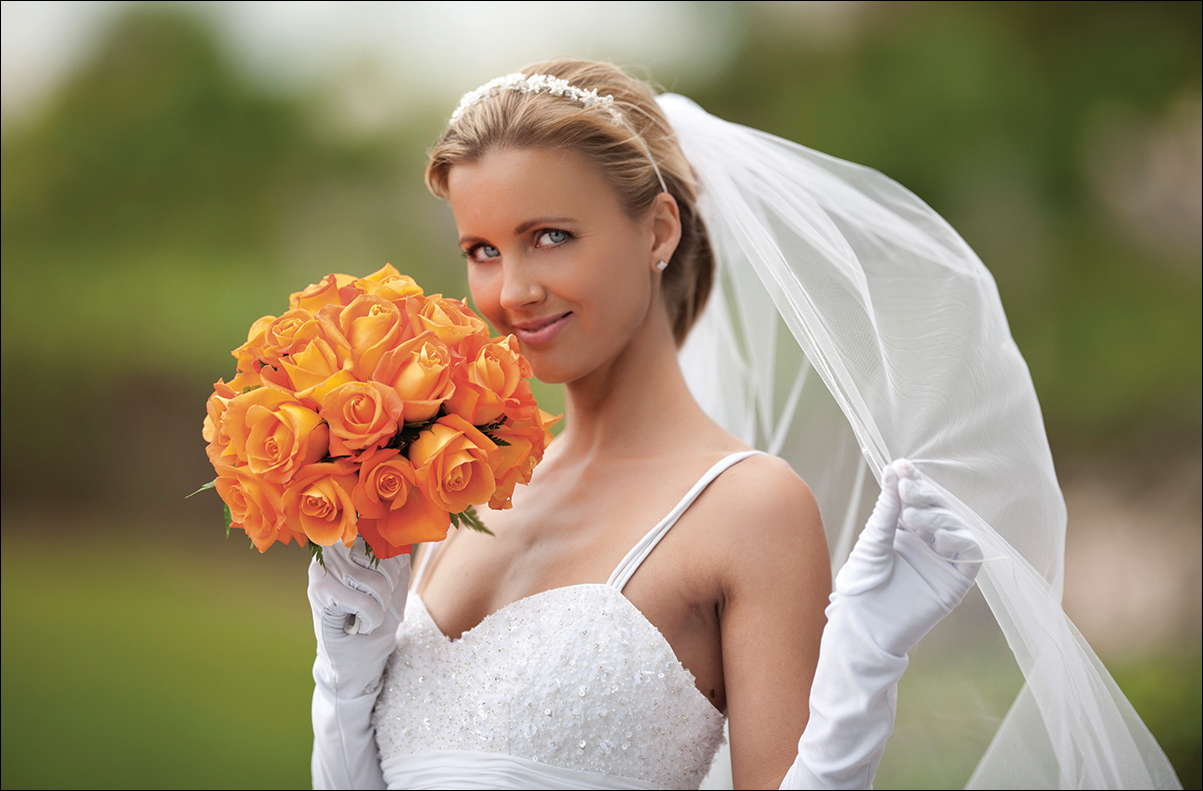
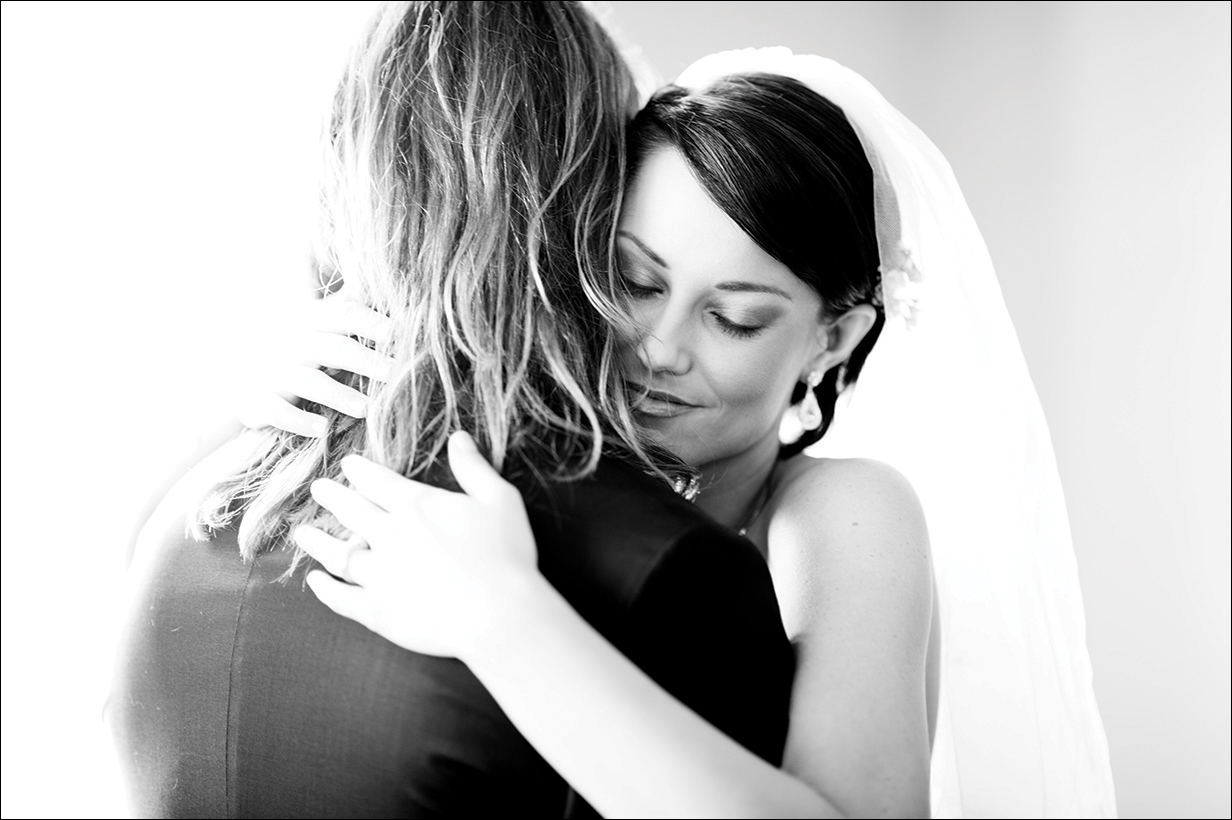
Characteristics of this type of shot: Soft, beautiful light with your background out of focus so there’s lots of separation between your subject and the background.
(1) The first step, way before the shoot, is to go to a bridal store and buy a very, very long veil. Years ago, I heard a top pro wedding photographer say, “Give me a really long veil, and I’ll give you magic!” So that’s the first step (and what I used here).
(2) Put your camera in aperture priority mode so you get to choose the f-stop you want, and in this case you want to shoot with the lowest numbered f-stop your lens will allow (the lower the better, so f/1.8, f/2, or f/2.8 would be ideal). This gives you that out-of-focus background. Well, it pretty much does, but not without the next step.
(3) Use a long lens (like a 200mm lens) and zoom in on your bride. Zooming in (like I did for this shot), combined with the f/2.8 f-stop is what gives you that magical, soft, out-of-focus background. If you shoot at f/2.8, but with a wide-angle lens or zoomed way out, the background will all be in focus and you won’t get this look.
(4) Shoot at the cleanest ISO your camera will allow (probably 100 or 200 ISO).
(5) Wait until the sun goes behind a cloud. That way, the cloud acts as a giant softbox and softens and spreads the sunlight so you don’t have harsh shadows. Then, try to position your subject so the sunlight that does come through the clouds hits mostly on one side of her face (in this case, the left side in the photo above).
(6) Set the focus on your subject’s eye that’s closest to the camera, because if her eyes aren’t in focus, the shot goes in the trash.

Characteristics of this type of shot: A soft beautiful gradient of light wrapping around a classic P-51 Mustang.
(1) Beautiful light like this, with that beautiful gradient of color in the sky, happens only twice a day—at dawn or at dusk—and this shot was taken at dusk, with the plane sitting on the ramp at an airshow.
(2) Since this is taken at dusk in low light, it has to be taken on a tripod with a cable release or the shutter speed will fall so low that the image will be blurry and out of focus.
(3) Since you’re shooting on a tripod, you can use the lowest, cleanest ISO for your camera (probably 100 or 200 ISO).
(4) To get the perspective you see here, you’ll need to lower the tripod way down (I took this shot with my tripod so low I had to shoot on my knees. Glad I remembered to take gel-filled knee pads with me, since I figured I’d wind up shooting down low like this on the airfield’s tarmac). However, the main reason I shot down low like this was to avoid seeing all the distracting stuff behind the plane, like other planes, airshow vendors, and an ugly trailer. By shooting up at the plane, all you see is sky.
(5) To capture as much of the plane as possible, and still be close enough for the shot to have impact, you’ll need to shoot with a wide-angle lens (this was shot at 24mm with a 24–105mm f/4 lens). Since you’re shooting on a tripod, this lens doesn’t have to be a fast lens (in fact, I shot it at f/8, so everything would be in focus).
Characteristics of this type of shot: Popular “blown-out” look with tons of light, and the image is converted into a high-contrast black and white.
(1) This is a natural-light shot made by positioning the bride and groom about 6 feet from a window in the church (you move them 6 feet back, so the light is soft and beautiful). The window is yellow stained glass, which means the light from it will be yellow, and if the light is yellow, the bride and groom will look very yellow, so I knew when I was taking the photo that I would have to convert this image to black and white (that’s an old trick: if the color looks way off, convert the image to black and white).
(2) Position yourself so you’re aiming into the window (if the bride and groom stepped away, I’d have a great shot of the empty window), but then use a long lens to zoom in tight. I used a 70–200mm lens all the way out at 200mm. Notice how tight in I am—the top of his head is cut off, which is perfectly fine (and very common). Zooming in tight like this makes the photo feel more intimate.
(3) The light from the window is so bright the photo is already kind of blown out, but you can make it more blown out in Photoshop (or Elements, or Lightroom) by dragging Camera Raw’s (or the Develop module’s) Highlights slider way over to the right to accentuate the effect.
(4) Lastly, convert the image to black and white (using one of the programs above). To create the high-contrast look, drag the Camera Raw (Develop module) Contrast slider way over to the right.

Characteristics of this type of shot: A food shot, cropping in tight with lots of detail, while the background falls off to being out-of-focus very quickly.
(1) The first step to a shot like this happens before you’re seated at your table. Ask to either be seated outside (if possible) or near the window. The reason is the challenge of shooting food—you need light. Nice, natural light looks wonderful for food shots, so if you can sit near a window, or outside, you’re halfway there. However, to keep the plates looking white (instead of tinted blue), make sure you change your camera’s white balance to Cloudy or Shade (try both and see which one looks better).
(2) The other key to great-looking food shots is to zoom in really tight on the food. For example, if you have an 18–200mm lens, zoom all the way in to 200mm. Don’t try to show the whole plate, just show part of it. To do this, you’ll probably have to stand up behind your chair for a moment, then shoot from a little lower angle (don’t stand up straight and shoot down on your food—crouch down to lower your angle).
(3) To get the soft, out-of-focus background, shoot in aperture priority mode at the lowest number f-stop your lens will allow (in this case, it was only f/5.6, but because I was zoomed in so tight, it still creates that out-of-focus background). If my lens would have gone to f/4 or f/2.8, I could have made it even more shallow and out-of-focus.
(4) To create some energy in food shots like this, I normally tilt the camera to the right or to the left (as seen here).
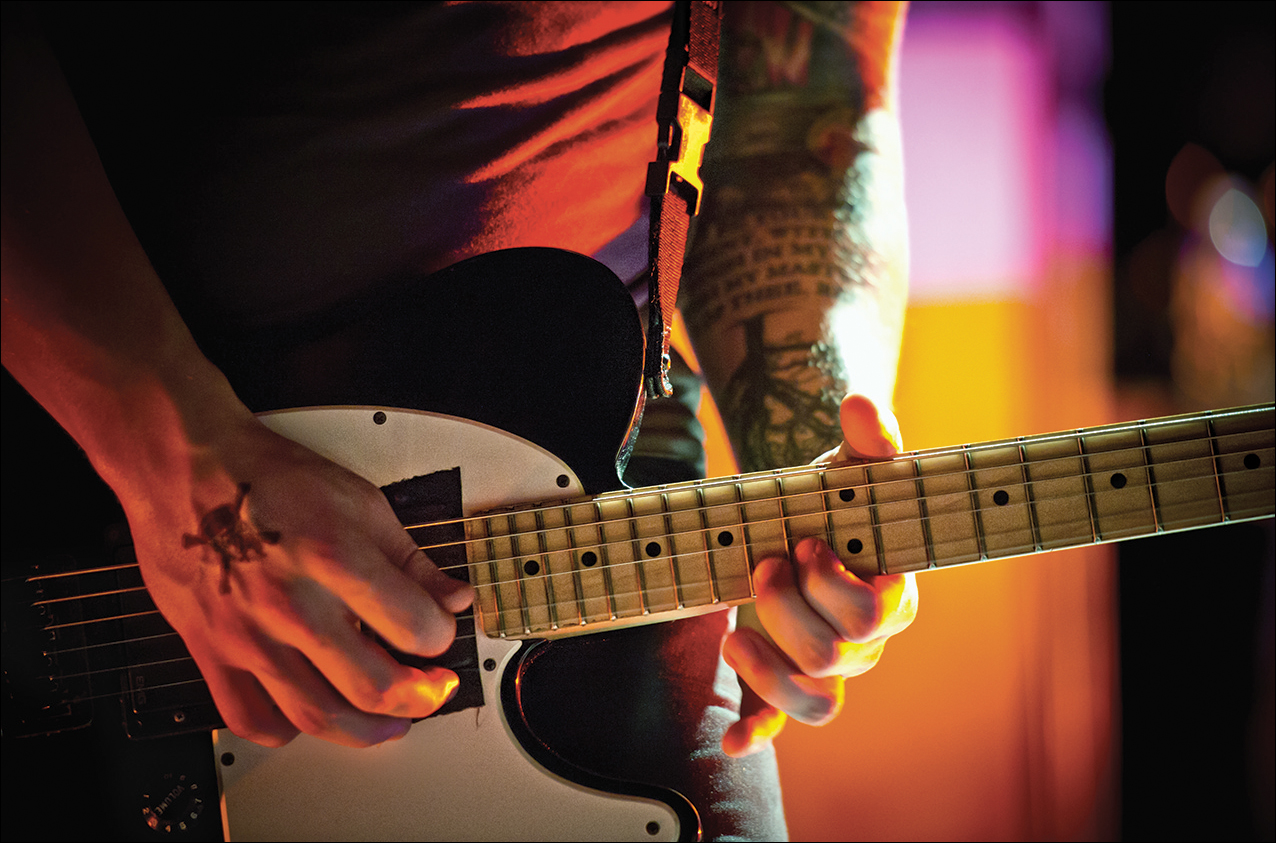
Characteristics of this type of shot: A concert shot with multi-colored lighting.
(1) You can’t (and shouldn’t) use a flash for concert or event photography, so you don’t have to worry about that. One key to a shot like this is to use the lowest possible f-stop your lens will allow (ideally, f/2.8 or f/4) to help separate the musician from the background by making the background go out of focus. In fact, the depth of field here is so shallow that the arm on the left is in focus and the arm on the right is out of focus.
(2) For a close-up shot like this, you’ll need a zoom lens to zoom in tight (this was taken with a 70–200mm lens at 200mm).
(3) The real challenge in getting a shot like this is freezing the motion of the musicians on stage, so the shot is in focus. That means keeping an eye on your shutter speed. If it falls below 1/60 of a second, your shot will definitely be out of focus. If you’re shooting a big major touring act, most times light will not be a problem, because there will be a ton of it. However, in some cases (like with the shot above), the light is low. Here, there were only four lights total for the whole night, so I had to shoot at (wait for it...wait for it...) 8,000 ISO to get to a shutter speed of just 1/100 of a second. If this happens to you, you’ll need to use the noise reduction software in Camera Raw (in Photoshop or Elements, or the Develop module in Lightroom) to reduce the amount of visible noise that you see when shooting at that high an ISO. Go to the Detail tab (panel) and drag the Luminance slider to the right until the noise starts to disappear (stop as soon as it’s gone, or your image will get blurry).
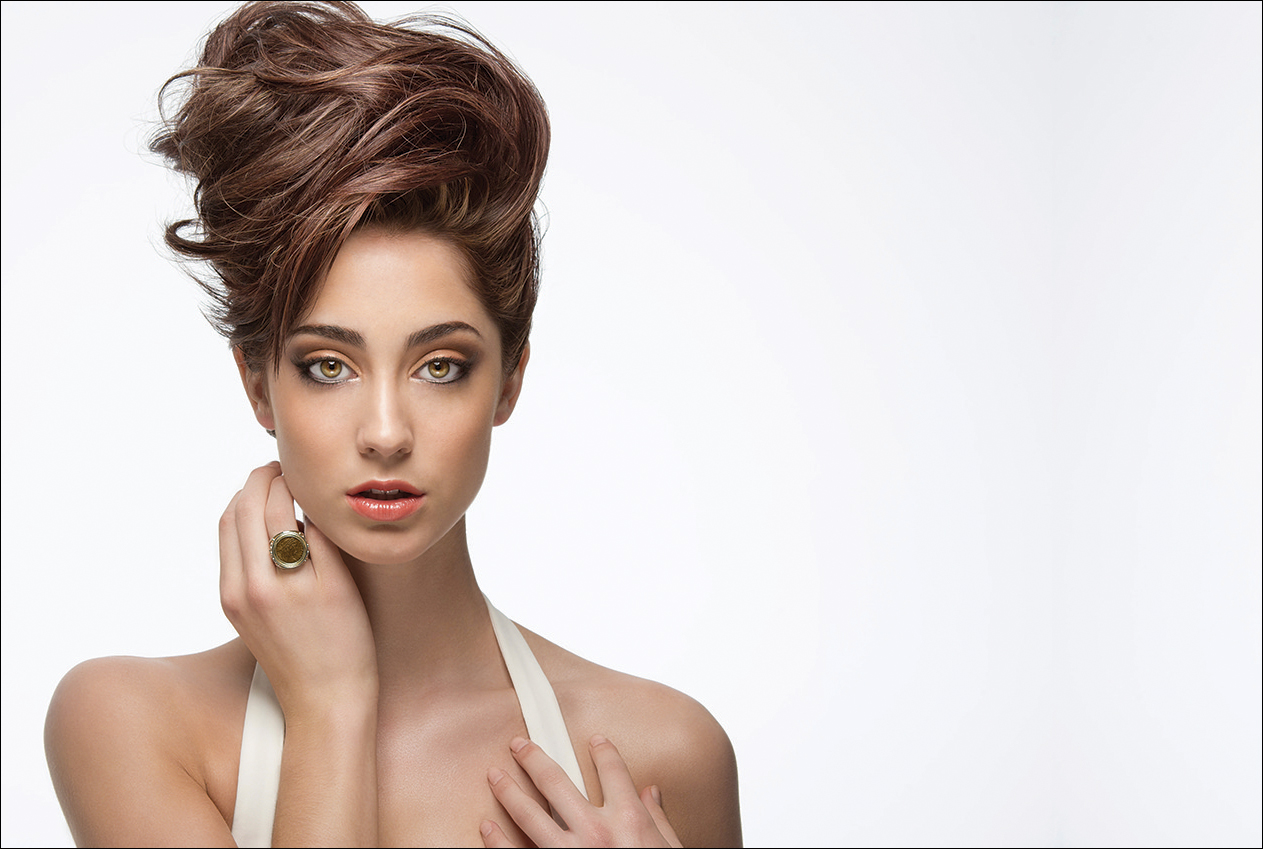
Characteristics of this type of shot: A “beauty style” shot with soft light against a white background.
(1) Unlike the beauty shot I showed at the beginning of this chapter, this is just a one-light shoot, but it has a lot in common with the first shot—this one is just easier. The one light is a single studio strobe (flash) with a 17" beauty dish attachment that’s directly in front of the subject, with a $20 diffusion sock over the front of the beauty dish to soften and diffuse the light. It’s positioned about 2 feet above her head, aiming back at her at a 45° angle. (Note: If you don’t have a beauty dish, you can use a small softbox instead.)
(2) Have your subject (or, ideally, a friend) hold a white reflector up at waist level, tilted back toward your subject to fill in any shadows under her eyes and her face. If you need the light to be brighter, have your subject hold the reflector up a little higher.
(3) Since you’re using studio lighting, you’ll want to shoot in manual mode so you can set the shutter speed and then forget it. Set it to 1/125 of a second. To keep everything in focus, set your aperture to f/11, and use a long lens (like a 200mm) to give a nice perspective. Also, use the lowest native ISO you can (like 100 or 200 ISO max).
(4) Position your subject fairly close to the white seamless paper background, so your front light spills over onto the background to help make it white (instead of gray). However, you shouldn’t see any shadows casting on the background. If you do, move your subject farther away from the background.
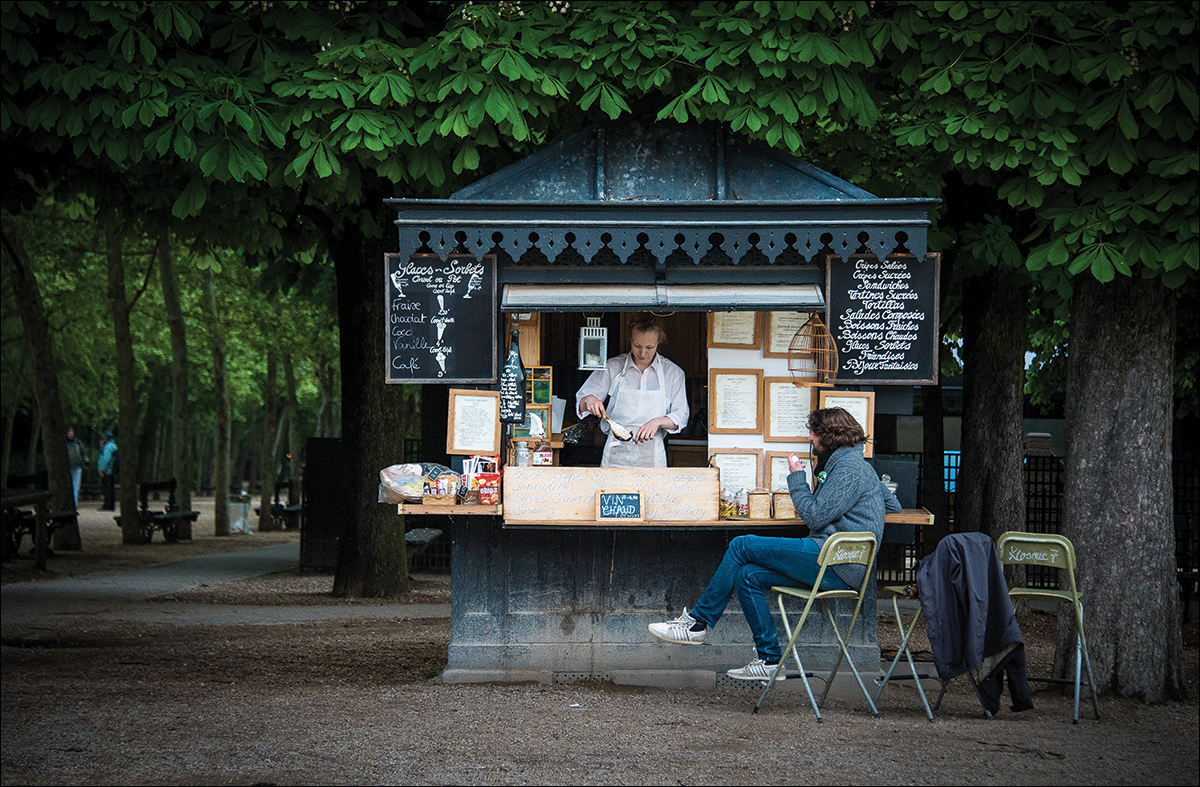
Characteristics of this type of shot: A travel shot taken with soft light, capturing a moment and capturing it in focus (which is the challenge).
(1) When you’re shooting travel photos and you’re not in bright, direct sunlight (this shot is taken on an overcast day and the subjects are under a tree), chances are the photo is going to be blurry because your shutter speed falls too low to keep everything in focus.
(2) The trick for having these types of shots in focus is to set your camera to a high ISO (this was shot at 1,600 ISO). By shooting at a high ISO like this, it raises your shutter speed high enough to freeze most movement (from your subjects, or from camera shake on your part). That way, you don’t miss a quiet moment like this (by the way, I bought one of the crêpes she’s making [in the Luxembourg Gardens in Paris], and it was insane!).
(3) If you look closely at the image, the edges all the way around the photo are darkened, and that is done using the Camera Raw software in either Photoshop or Elements, or the Develop module in Lightroom. You do it by going to the Effects tab (panel), under the Post Crop Vignetting section, and then dragging the Amount slider to the left. The farther you drag it, the more it darkens the edges. By default, it darkens just the outside edges, but if you want it to darken a little farther in toward the center of your photo, drag the Midpoint slider to the left, too.
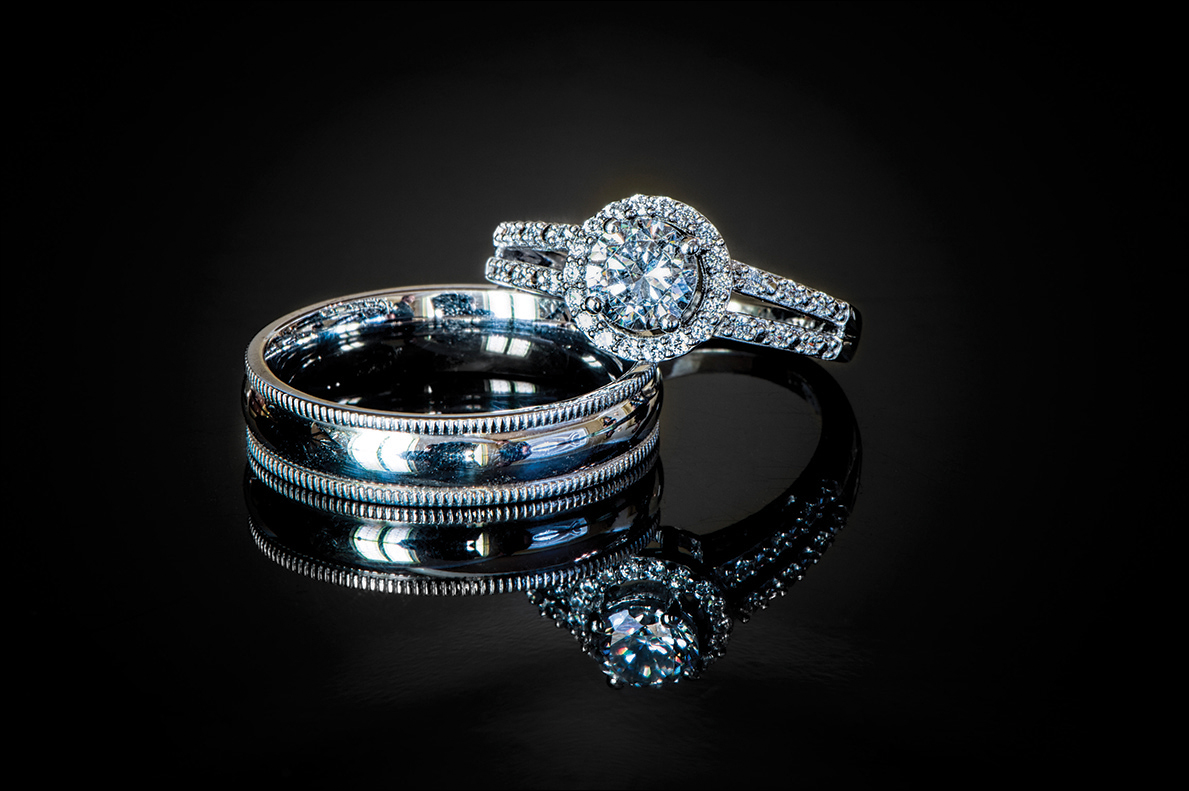
Characteristics of this type of shot: A brightly lit set of wedding rings with a mirror-like reflection.
(1) The trick here is simply to place the rings on a piano, so you get a natural reflection from the black, highly polished wood. If there’s not a piano where the wedding reception is being held, try placing them on the hood of a black car (ideally, one that’s not out in the direct sun. But, if that’s your only choice, have a friend or assistant hold a white handkerchief between the sun and the rings to soften and diffuse the light).
(2) The lighting is just light coming in from a nearby window. In this case, the piano was located about 6 feet from a nearby window, so the light wasn’t very bright. To keep the shutter open long enough to make it look like it’s perfectly lit, you have to shoot this on a tripod or it would be crazy-blurry.
(3) To have the rings appear this large in the photo and with this much detail, you’ll need to use a macro (close-up) lens. That way, you can position your lens really, really close to the rings (just a few inches away)—being that close makes them appear really large (this shot was taken with a 105mm macro).
(4) Because macro lenses have such an incredibly shallow depth of field (which means if you’re not really careful, just the front of the first ring will be in focus, and then the other ring, and basically everything else, will be totally out of focus), you need to choose an f-stop that offers as much depth as possible (like f/22). That lets you keep most of the rings in sharp focus.