This chapter starts our two-chapter guided tour of Dojo application Dijits. This chapter covers the Tooltip, Dialog, ProgressBar, ColorPalette, and Toolbar application Dijits.
The Tooltip Dijit adds a nice touch to any application: when the user rests the mouse cursor on over a page element, the tool tip appears.
Dialog Dijits let you pop up a dialog box that gives the user information or accepts user input.
ProgressBar Dijits are great when you have an operation that takes some time, such as a download, and you want to keep the user updated. The user can track the progress of the operation with a bar that fills up with color.
Color palettes let the user select a color from a display of multiple colors. You’ll see how to use ColorPalette Dijits in both a Web page and a dialog box.
The Dojo Toolbar application Dijit lets you group buttons and other Dijits into toolbars that can be positioned anywhere you want them in the page.
There’s a lot coming up in this chapter, so let’s get started.
Tool tips can add a lot to applications, and users have come to expect them. They’re those little windows that pop up when the mouse moves slowly over a page element. Creating a basic tool tip is easy: just give a <div> element the dojoType attribute set to dijit.Tooltip and set its connectId attribute to the ID of the element to which you want to connect the tool tip.
The example here, tooltip.html, attaches a tool tip to an accordion container.
Procedure 5.1. To create a tool tip:
Open your Web page in a text editor.
Add a
dojo.require("dijit.Tooltip");statement to your code.Connect the tool tip to the element for which you want it to appear by setting its
connectIdattribute to the ID of the target element.Script 5.1 shows what your page should look like after you make the additions.
Example 5.1. Creating a tool tip.
1   <html>
2     <head>
3       <title>Using Tool Tips</title>
4
5       <link rel="stylesheet"
6         type="text/css"
7         href="http://o.aolcdn.com/
8         dojo/1.1/dojo/
9         resources/dojo.css" />
10
11      <link rel="stylesheet"
12        type="text/css"
13        href="http://o.aolcdn.com/dojo/
14        1.1/dijit/
15        themes/tundra/tundra.css" />
16
17      <script
18        djConfig="parseOnLoad:true"
19        type="text/javascript"
20        src="http://o.aolcdn.com/dojo/1.1/
21          dojo/dojo.xd.js">
22      </script>
23
24      <script type="text/javascript">
25        dojo.require("dojo.parser");
26        dojo.require(
27        "dijit.layout.ContentPane");
28        dojo.require(
29        "dijit.layout
30        .AccordionContainer");
31        dojo.require(
32        "dijit.Tooltip");
33      </script>
34    </head>
35    <body class="tundra">
36      <h1>Using Tool Tips</h1>
37      <br>
38      <div dojoType=
39        "dijit.layout.AccordionContainer"
40        style="width:150px; height:180px;
41        margin:5px">
42        <div dojoType=
43          "dijit.layout.AccordionPane"
44          title="CEO">
45          Ralph Kramden
46        </div>
47
48        <div dojoType=
49          "dijit.layout.AccordionPane"
50          title="VP Operations">
51          Ed Norton
52        </div>
53
54        <div dojoType=
55          "dijit.layout.AccordionPane"
56          title="VP Marketing">
57          Alice Kramden
58        </div>
59
60        <div id="blue" dojoType=
61          "dijit.layout.AccordionPane"
62          title="Treasurer">
63          Trixie Norton
64        </div>
65      </div>
66      </div>
67      <div dojoType="dijit.Tooltip"
68        connectId="accordion">
69        Our staff
70      </div>
71    </body>
72  </html>
Save your file.
Navigate to your file in a browser. You should see a tool tip with the text “Our staff” when the mouse cursor rests on the target element (Figure 5.1).

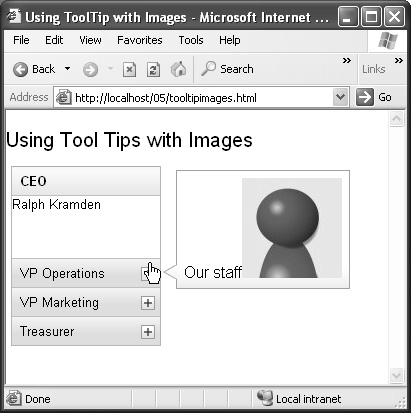
You can add images to tool tips simply by enclosing an <img> element when you create the tool tip.
The example tooltipimages.html adds an image to the tool tip you saw in the previous task: it adds an icon of a person, person.jpg, to the tool tip “Our staff.”
Procedure 5.2. To create a tool tip with images:
Open your Web page in a text editor.
Add a
dojo.require("dijit.Tooltip");statement to your code.Connect the tool tip to the element for which you want it to appear by setting its
connectIdattribute to the ID of the target element. Add an<img>element to the tool tip definition.Script 5.2 shows what your page should look like after you make the additions.
Example 5.2. Creating a tool tip with images.
1   <html>
2     <head>
3       <title>Using Tool Tips with
4         Images</title>
5       <link rel="stylesheet"
6         type="text/css"
7         href="http://o.aolcdn.com/
8         dojo/1.1/dojo/
9         resources/dojo.css" />
10      <link rel="stylesheet"
11        type="text/css"
12        href="http://o.aolcdn.com/dojo/
13        1.1/dijit/
14        themes/tundra/tundra.css" />
15      <script
16        djConfig="parseOnLoad:true"
17        type="text/javascript"
18        src="http://o.aolcdn.com/dojo/1.1/
19          dojo/dojo.xd.js">
20      </script>
21      <script type="text/javascript">
22        dojo.require("dojo.parser");
23        dojo.require(
24        "dijit.layout.ContentPane");
25        dojo.require(
26        "dijit.layout
27        .AccordionContainer");
28        dojo.require(
29        "dijit.Tooltip");
30      </script>
31    </head>
32    <body class="tundra">
33      <h1>Using Tool Tips with Images</h1>
34      <br>
35      <div dojoType=
36        "dijit.layout.AccordionContainer"
37        style="width:150px; height:180px;
38        margin:5px">
39        <div dojoType=
40          "dijit.layout.AccordionPane"
41          title="CEO">
42          Ralph Kramden
43        </div>
44        <div dojoType=
45          "dijit.layout.AccordionPane"
46          title="VP Operations">
47          Ed Norton
48        </div>
49        <div dojoType=
50          "dijit.layout.AccordionPane"
51          title="VP Marketing">
52          Alice Kramden
53        </div>
54        <div id="blue" dojoType=
55          "dijit.layout.AccordionPane"
56          title="Treasurer">
57          Trixie Norton
58        </div>
59      </div>
60      <div dojoType="dijit.Tooltip"
61      connectId="accordion">
62        Our staff<img src='person.jpg'/>
63      </div>
64    </body>
65  </html>
Save your file.
Navigate to your file in a browser. You should see a tool tip with an image when the mouse cursor rests on the target element (Figure 5.2).
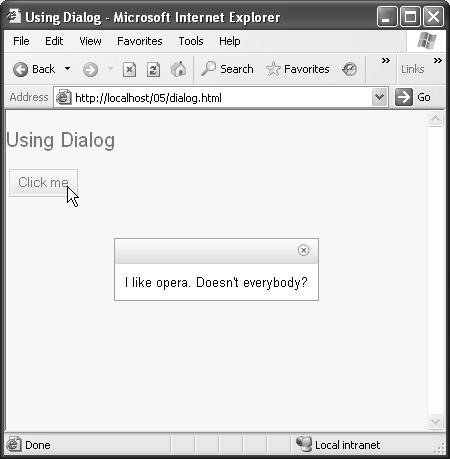
The Dialog Dijit lets you display dialog boxes that fade in and out as they appear and disappear.
This example, dialog.html, displays a dialog box with a message “I like opera. Doesn’t everybody?” when the user clicks a button. In the next task, you’ll see how to accept user input in dialog boxes.
Procedure 5.3. To create a dialog box:
Open your Web page in a text editor.
Add
dojo.require("dijit.form.Button");anddojo.require("dijit.Dialog");statements to your code.Create a new dialog box with the
dojoTypeattribute set todijit.Dialogand enclose the text you want to display in the dialog box. Have the button call the dialog box’sshowmethod to display the dialog box.Script 5.3 shows what your page should look like after you make the additions.
Example 5.3. Creating a dialog box.
1   <html>
2     <head>
3       <title>Using Dialog</title>
4
5       <link rel="stylesheet"
6         type="text/css"
7         href="http://o.aolcdn.com/
8         dojo/1.1/dojo/
9         resources/dojo.css" />
10
11      <link rel="stylesheet"
12        type="text/css"
13        href="http://o.aolcdn.com/dojo/
14        1.1/dijit/
15        themes/tundra/tundra.css" />
16
17      <script
18        djConfig="parseOnLoad:true"
19        type="text/javascript"
20        src="http://o.aolcdn.com/dojo/1.1/
21          dojo/dojo.xd.js">
22      </script>
23
24      <script type="text/javascript">
25        dojo.require("dojo.parser");
26        dojo.require("dijit.Dialog");
27        dojo.require(
28          "dijit.form.Button");
29      </script>
30    </head>
31
32    <body class="tundra">
33      <h1>Using Dialog</h1>
34      <br>
35      <button id="button" dojoType=
36        "dijit.form.Button">Click me
37        <script type="dojo/method"
38          event="onClick" args="evt">
39          dijit.byId("dialog").show();
40        </script>
41      </button>
42
43      <div id="dialog"
44        dojoType="dijit.Dialog">
45        I like opera. Doesn't everybody?
46      </div>
47    </body>
48  </html>
Save your file.
Navigate to your file in a browser and click the button. The dialog box should appear (Figure 5.3).
Click the close button on the dialog box to dismiss it.
Dialog boxes can also display other Dijits, such as text boxes and buttons, to let the user make entries.
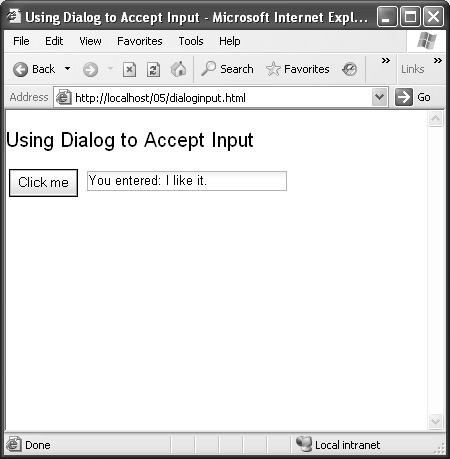
The example dialoginput.html displays a dialog box with a text box and an OK button. When you enter text in the text box and click OK, the dialog box disappears and the text appears in a text box in the main Web page.
Procedure 5.4. To accept input in a dialog box:
Open your Web page in a text editor.
Add
dojo.require("dijit.form.Button");,dojo.require("dijit.form.TextBox");, anddojo.require("dijit.Dialog");statements to your code.Create a new dialog box with the
dojoTypeattribute set todijit.Dialogand enclose a text box, an OK button, and a prompt (in this case, “Enter your opinion of opera”). Connect the OK button to code that hides the dialog box and displays the entered text in a text box in the main Web page.Script 5.4 shows what your page should look like after you make the additions.
Example 5.4. Accepting input in a dialog box.
1   <html>
2     <head>
3       <title>Using Dialog to Accept
4         Input</title>
5       <link rel="stylesheet"
6         type="text/css"
7         href="http://o.aolcdn.com/
8         dojo/1.1/dojo/
9         resources/dojo.css" />
10      <link rel="stylesheet"
11        type="text/css"
12        href="http://o.aolcdn.com/dojo/
13        1.1/dijit/
14        themes/tundra/tundra.css" />
15      <script
16        djConfig="parseOnLoad:true"
17        type="text/javascript"
18        src="http://o.aolcdn.com/dojo/1.1/
19          dojo/dojo.xd.js">
20      </script>
21
22      <script type="text/javascript">
23        dojo.require("dojo.parser");
24        dojo.require("dijit.Dialog");
25        dojo.require(
26          "dijit.form.Button");
27        dojo.require("dijit.form.TextBox");
28      </script>
29    </head>
30
31    <body class="tundra">
32      <h1>Using Dialog to Accept
33        Input</h1>
34      <br>
35      <button id="button" dojoType=
36        "dijit.form.Button">Click me
37        <script type="dojo/method"
38          event="onClick" args="evt">
39          dijit.byId("dialog").show();
40        </script>
41      </button>
42
43      <div id="dialog" dojoType=
44        "dijit.Dialog">
45        Enter your opinion of opera.
46        <input id="text" dojoType=
47          "dijit.form.TextBox"></input>
48        <button id="OKbutton" dojoType=
49          "dijit.form.Button">OK
50          <script type="dojo/method"
51            event="onClick" args="evt">
52            dijit.byId("dialog").hide();
53            dijit.byId("result")
54            .setValue("You entered: " +
55            dijit.byId("text").getValue());
56          </script>
57        </button>
58      </div>
59      <input id="result" dojoType=
60        "dijit.form.TextBox"></input>
61    </body>
62  </html>
Save your file.
Navigate to your file in a browser and click the button. You should see a dialog box (Figure 5.4).
Enter text in the text box and click the OK button. The text you entered should appear in the text box in the main Web page (Figure 5.5).

You use progress bars to keep the user apprised of some time-consuming operation, such as downloading of data. A progress bar fills with color as the operation progresses from 0% to 100% complete.
The example progressbar.html uses a JavaScript timer to make a progress bar move from 0% to 100% in a few seconds. The code uses the progress bar’s update method to update its progress attribute like this, where timer is the value of the timer: dijit.byId("pb").update({progress : timer});
Procedure 5.5. To create a progress bar:
Open your Web page in a text editor.
Add a
dojo.require("dijit.ProgressBar");statement to your code.Create a new progress bar with
dojoTypeset todijit.ProgressBar. Set up a JavaScript timer to update the progress bar’s progress attribute every 50 milliseconds with a steadily increasing value.Script 5.5 shows what your page should look like after you make the additions.
Example 5.5. Creating a progress bar.
1   <html>
2     <head>
3       <title>Using Progress Bars</title>
4
5       <link rel="stylesheet"
6         type="text/css"
7         href="http://o.aolcdn.com/
8         dojo/1.1/dojo/
9         resources/dojo.css" />
10
11      <link rel="stylesheet"
12        type="text/css"
13        href="http://o.aolcdn.com/dojo/
14        1.1/dijit/
15        themes/tundra/tundra.css" />
16
17      <script
18        djConfig="parseOnLoad:true"
19        type="text/javascript"
20        src="http://o.aolcdn.com/dojo/1.1/
21          dojo/dojo.xd.js">
22      </script>
23
24      <script type="text/javascript">
25        dojo.require("dojo.parser");
26        dojo.require(
27          "dijit.ProgressBar");
28        var timer = 0;
29        dojo.addOnLoad(function() {
30          var progressInterval =
31          setInterval(function() {
32            timer++;
33            dijit.byId("pb")
34            .update({progress : timer});
35            if(timer > 100){
36              clearInterval(
37              progressInterval);
38            }
39          }, 50);
40        });
41      </script>
42    </head>
43
44    <body class="tundra">
45      <h1>Using Progress Bars</h1>
46      <br>
47      <div id="pb"
48        dojoType="dijit.ProgressBar"
49        style="width:200px"></div>
50      </div>
51    </body>
52  </html>
Save your file.
Navigate to your file in a browser. You should see a progress bar that fills in a few seconds (Figure 5.6).

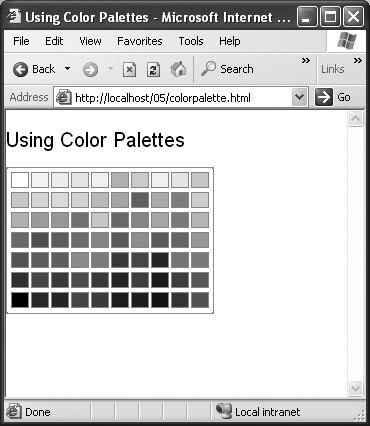
The ColorPalette Dijit lets users select a color from a palette control—a great aid when you want users to be able to customize pages with a background color, personalize email, or select a drawing color. This control displays a table of colors that the user can click.
In the example colorpalette.html, when the user clicks a color in the palette, its onChange event occurs, and the event handling function is passed the new color as a hexadecimal string (the same format as you use for colors in Web pages).
Procedure 5.6. To create a color palette:
Open your Web page in a text editor.
Add a
dojo.require("dijit.ColorPalette");statement to your code.Create a new color palette and connect its
onChangeevent to a script that displays the newly selected color in an alert box.Script 5.6 shows what your page should look like after you make the additions.
Example 5.6. Creating a color palette.
1   <html>
2     <head>
3       <title>Using Color Palettes</title>
4
5       <link rel="stylesheet"
6         type="text/css"
7         href="http://o.aolcdn.com/
8         dojo/1.1/dojo/
9         resources/dojo.css" />
10
11      <link rel="stylesheet"
12        type="text/css"
13        href="http://o.aolcdn.com/dojo/
14        1.1/dijit/
15        themes/tundra/tundra.css" />
16
17      <script
18        djConfig="parseOnLoad:true"
19        type="text/javascript"
20        src="http://o.aolcdn.com/dojo/1.1/
21          dojo/dojo.xd.js">
22      </script>
23
24      <script type="text/javascript">
25        dojo.require("dojo.parser");
26        dojo.require(
27          "dijit.ColorPalette");
28      </script>
29    </head>
30
31    <body class="tundra">
32      <h1>Using Color Palettes</h1>
33      <br>
34      <div dojoType="dijit.ColorPalette">
35        <script type="dojo/method"
36        event="onChange"
37        args="selectedColor">
38        alert("You selected : " +
39        selectedColor);
40        </script>
41      </div>
42    </body>
43  </html>
Save your file.
Navigate to your file in a browser. You should see the color palette (Figure 5.7).
Double-click a color in the palette. The hexadecimal value of the color you selected appears in an alert box (Figure 5.8).

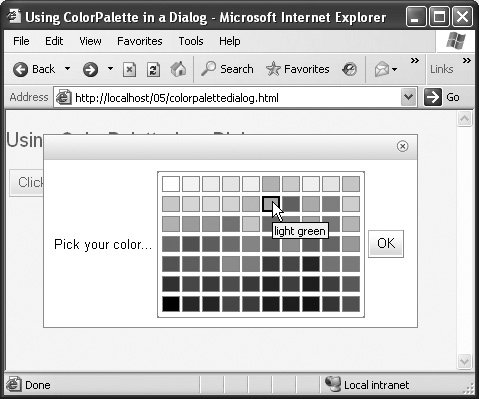
You can let the user select colors from a color palette in a dialog box. Such a dialog box is often called a color picker or color chooser.
The next example, colorpalettedialog.html, lets the user select a color in a dialog box and then stores that color value internally. When the user closes the dialog box, the selected color is displayed in an alert box.
Procedure 5.7. To create a color picker dialog box:
Open your Web page in a text editor.
Add
dojo.require("dijit.Dialog");,dojo.require("dijit.form.Button");, anddojo.require("dijit.ColorPalette");statements to your code.Create a new dialog box with a color palette and an OK button and connect its
onChangeevent to a function that stores the color that the user selected. When the user clicks the OK button to close the dialog box, display the selected color in an alert box.Script 5.7 shows what your page should look like after you make the additions.
Example 5.7. Creating a color picker dialog box.
1   <html>
2     <head>
3       <title>Using ColorPalette in a
4         Dialog</title>
(5–19)  . . .
20      <script type="text/javascript">
21        dojo.require("dojo.parser");
22        dojo.require("dijit.Dialog");
23        dojo.require(
24          "dijit.form.Button");
25        dojo.require(
26          "dijit.ColorPalette");
27        var selectedColor;
28        function recordColor(color)
29        {
30          selectedColor = color;
31        }
32        function displayColor()
33        {
34          alert("You chose " +
35          selectedColor);
36        }
37           </script>
38      </head>
39    <body class="tundra">
40      <h1>Using ColorPalette in a
41        Dialog</h1>
42      <br>
43      <button id="button" dojoType=
44      "dijit.form.Button">Click me
45        <script type="dojo/method"
46          event="onClick" args="evt">
47          dijit.byId("dialog").show();
48        </script>
49      </button>
50      <div id="dialog" dojoType=
51        "dijit.Dialog">
52        Pick your color...
53        <div id="cp" dojoType=
54        "dijit.ColorPalette">
55        <script type="dojo/method" event=
56          "onChange" args="selectedColor">
57          recordColor(selectedColor);
58        </script>
59        </div>
60        <button id="OKbutton" dojoType=
61          "dijit.form.Button">OK
62          <script type="dojo/method" event=
63            "onClick" args="evt">
64            dijit.byId("dialog").hide();
65            displayColor();
66          </script>
67        </button>
68      </div>
69    </body>
70  </html>
Save your file.
Navigate to your file in a browser and click the Click me button. You should see the dialog box with the color palette (Figure 5.9).
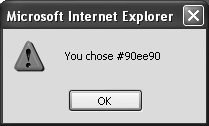
Click a color and click the OK button.
You should see the color you selected displayed in an alert box (Figure 5.10).
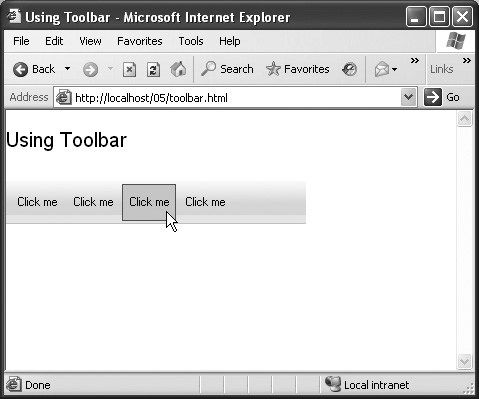
The Toolbar Dijit let you arrange buttons in—you guessed it—a toolbar. It’s super easy to use: just enclose buttons inside a Toolbar Dijit.
The example toolbar.html arranges four buttons in a toolbar, each of which displays an alert box when clicked. To create this example, you enclose four buttons in a toolbar and connect each of them to an alert box.
Procedure 5.8. To create a toolbar:
Open your Web page in a text editor.
Add
dojo.require("dijit.Toolbar");anddojo.require("dijit.form.Button");statements to your code.Create a new toolbar with four buttons and connect each button to an alert box.
Script 5.8 shows what your page should look like after you make the additions.
Example 5.8. Creating a toolbar.
1   <html>
2     <head>
3       <title>Using Toolbar</title>
4
5       <link rel="stylesheet"
6         type="text/css"
7         href="http://o.aolcdn.com/
8         dojo/1.1/dojo/
9         resources/dojo.css" />
10
11      <link rel="stylesheet"
12        type="text/css"
13        href="http://o.aolcdn.com/dojo/
14        1.1/dijit/
15        themes/tundra/tundra.css" />
16
17      <script
18        djConfig="parseOnLoad:true"
19        type="text/javascript"
20        src="http://o.aolcdn.com/dojo/1.1/
21          dojo/dojo.xd.js">
22      </script>
23
24      <script type="text/javascript">
25        dojo.require("dojo.parser");
26        dojo.require(
27          "dijit.Toolbar");
28        dojo.require(
29          "dijit.form.Button");
30      </script>
31    </head>
32
33    <body class="tundra">
34      <h1>Using Toolbar<h1>
35      <div dojoType="dijit.Toolbar"
36        style="width:300px">
37        <button id="button1" dojoType=
38          "dijit.form.Button">Click me
39          <script type="dojo/method"
40            event="onClick" args="evt">
41            alert("You clicked button 1.");
42          </script>
43        </button>
44        <button id="button2" dojoType=
45          "dijit.form.Button">Click me
46          <script type="dojo/method"
47            event="onClick" args="evt">
48            alert("You clicked button 2.");
49          </script>
50        </button>
51        <button id="button3" dojoType=
52          "dijit.form.Button">Click me
53          <script type="dojo/method"
54            event="onClick" args="evt">
55            alert("You clicked button 3.");
56          </script>
57        </button>
58        <button id="button4" dojoType=
59          "dijit.form.Button">Click me
60          <script type="dojo/method"
61            event="onClick" args="evt">
62            alert("You clicked button 4.");
63          </script>
64        </button>
65      </div>
66    </body>
67  </html>
Save your file.
Navigate to your file in a browser. You should see the buttons arranged in a toolbar (Figure 5.11).
Click a button. You should see an alert box confirming the button click (Figure 5.12).

You can add images to toolbar buttons: for example, icons for operations such as editing, copying, and so on that the buttons on your toolbar support.
This example, toolbarimage.html, displays the person icon (person.jpg) from the tool tip example earlier in this chapter in a toolbar’s buttons.
Procedure 5.9. To create a toolbar with images:
Open your Web page in a text editor.
Add
dojo.require("dijit.Toolbar");anddojo.require("dijit.form.Button");statements to your code.Create a new toolbar with four buttons and connect each button to an alert box. Add an image to each button by nesting
<img src="person.jpg">elements in each button.Script 5.9 shows what your page should look like after you make the additions.
Example 5.9. Creating a toolbar with images.
1   <html>
2     <head>
3       <title>Using Toolbar and
4         Images</title>
5       <link rel="stylesheet"
6         type="text/css"
7         href="http://o.aolcdn.com/
8         dojo/1.1/dojo/
9         resources/dojo.css" />
10      <link rel="stylesheet"
11        type="text/css"
12        href="http://o.aolcdn.com/dojo/
13        1.1/dijit/
14        themes/tundra/tundra.css" />
15      <script
16        djConfig="parseOnLoad:true"
17        type="text/javascript"
18        src="http://o.aolcdn.com/dojo/1.1/
19          dojo/dojo.xd.js">
20      </script>
21      <script type="text/javascript">
22        dojo.require("dojo.parser");
23        dojo.require(
24          "dijit.Toolbar");
25        dojo.require(
26          "dijit.form.Button");
27      </script>
28    </head>
29    <body class="tundra">
30      <h1>Using Toolbar and Images</h1>
31      <div dojoType="dijit.Toolbar"
32        style="width:700px">
33        <button id="button1" dojoType=
34          "dijit.form.Button">Click me
35          <img src="person.jpg">
36          <script type="dojo/method"
37          event="onClick" args="evt">
38          alert("You clicked button 1");
39          </script>
40        </button>
41        <button id="button1" dojoType=
42          "dijit.form.Button">Click me
43          <img src="person.jpg">
44          <script type="dojo/method"
45          event="onClick" args="evt">
46          alert("You clicked button 1");
47          </script>
48        </button>
49        <button id="button1" dojoType=
50          "dijit.form.Button">Click me
51          <img src="person.jpg">
52          <script type="dojo/method"
53          event="onClick" args="evt">
54          alert("You clicked button 1");
55          </script>
56        </button>
57        <button id="button1" dojoType=
58          "dijit.form.Button">Click me
59          <img src="person.jpg">
60          <script type="dojo/method"
61          event="onClick" args="evt">
62          alert("You clicked button 1");
63          </script>
64        </button>
65      </div>
66    </body>
67  </html>
Save your file.
Navigate to your file in a browser. You should see the toolbar with the images (Figure 5.13).
Click a button in the toolbar. You should see an alert box indicating the button you clicked (Figure 5.14).