This chapter offers more popular Dijits: menus, title panes, inline edit boxes, and trees.
Menus in Dojo are presented much like open <select> controls—and you need to do a little work to get them to drop down in the way familiar to menu users everywhere. You’ll also see how to create context menus that you can make appear with a right-click of the mouse.
Title panes give their content a title, and their content is collapsible, and therefore can be hidden.
Inline edit boxes can be used to edit the text in a page. Using these Dijits, you can edit a page, such as a form letter, and then print the page on a printer.
Trees list data items in tree format, with collapsible nodes. Trees are a familiar control to anyone who uses Windows Explorer, for example, and you see how to add your own nodes to a tree structure here.
We have a lot to cover, so let’s get started.
Standard menus in Dojo may not be what you expect: they look like open <select> controls, presenting a list of clickable items, and such a menu is always open. You’ll see how to create traditional menus that open and close later in the chapter.
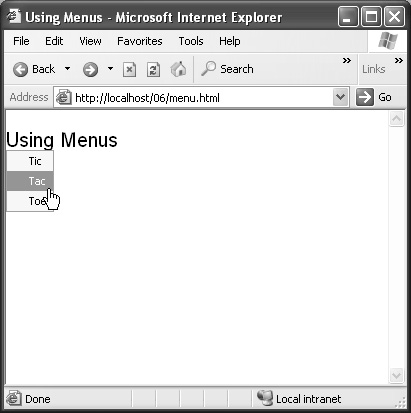
The example here, menu.html, creates a menu containing three items—Tic, Tac, and Toe—and when the user clicks an item, the code displays an alert box containing the item’s name (Tic, Tac, or Toe).
Procedure 6.1. To create a menu:
Open your Web page in a text editor.
Add a
dojo.require("dijit.Menu");statement to your code.Create a new
<div>element withdojoTypeset todijit.Menuand three<div>elements inside it, withdojoTypeset todijit.MenuItem. Add a click event handler to each menu item.Script 6.1 shows what your page should look like after you make the additions.
Example 6.1. Creating a menu.
1   <html>
2     <head>
3       <title>Using Menus</title>
4       <link rel="stylesheet"
5         type="text/css"
6         href="http://o.aolcdn.com/
7         dojo/1.1/dojo/
8         resources/dojo.css" />
9       <link rel="stylesheet"
10        type="text/css"
11        href="http://o.aolcdn.com/dojo/
12        1.1/dijit/
13        themes/tundra/tundra.css" />
14      <script
15        djConfig="parseOnLoad:true"
16        type="text/javascript"
17        src="http://o.aolcdn.com/dojo/1.1/
18          dojo/dojo.xd.js">
19      </script>
20      <script type="text/javascript">
21        dojo.require("dojo.parser");
22        dojo.require("dijit.Menu");
23      </script>
24    </head>
25    <body class="tundra">
26      <h1>Using Menus</h1>
27      <div dojoType="dijit.Menu">
28        <div dojoType="dijit.MenuItem">Tic
29          <script type="dojo/method"
30          event="onClick" args="evt">
31            alert("Tic");
32          </script>
33        </div>
34        <div dojoType="dijit.MenuItem">Tac
35          <script type="dojo/method"
36          event="onClick" args="evt">
37            alert("Tac");
38          </script>
39        </div>
40        <div dojoType="dijit.MenuItem">Toe
41          <script type="dojo/method"
42            event="onClick" args="evt">
43              alert("Toe");
44          </script>
45        </div>
46      </div>
47    </body>
48  </html>
Save your file.
Navigate to your file in a browser. You should see the menu (Figure 6.1).
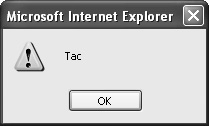
Click a menu item. You should see an alert box displaying the menu item’s name (Figure 6.2).
Dijit menus are ideal as context menus: those menus that appear at the mouse location when you right-click an element.
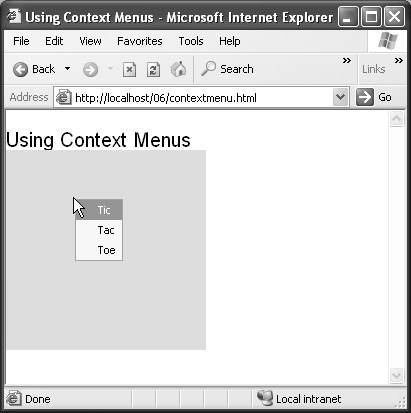
The next example, contextmenu.html, displays a colored <div> element, which, when right-clicked, displays a context menu.
Procedure 6.2. To create a context menu:
Open your Web page in a text editor.
Add a
dojo.require("dijit.Menu");statement to your code.Create a new
<div>element with a colored background. Create a new<div>element withdojoTypeset todijit.Menu, itstargetNodeIdsattribute set to the ID of the first<div>element, and three<div>elements inside it, withdojoTypeset todijit.MenuItem. Add a click event handler to each menu item.Script 6.2 shows what your page should look like after you make the additions.
Example 6.2. Creating a context menu.
1   <html>
2     <head>
3       <title>Using Context Menus</title>
4       <link rel="stylesheet"
5         type="text/css"
6         href="http://o.aolcdn.com/
7         dojo/1.1/dojo/
8         resources/dojo.css" />
9       <link rel="stylesheet"
10        type="text/css"
11        href="http://o.aolcdn.com/dojo/
12        1.1/dijit/
13        themes/tundra/tundra.css" />
14      <script
15        djConfig="parseOnLoad:true"
16        type="text/javascript"
17        src="http://o.aolcdn.com/dojo/1.1/
18          dojo/dojo.xd.js">
19      </script>
20      <script type="text/javascript">
21        dojo.require("dojo.parser");
22        dojo.require("dijit.Menu");
23      </script>
24    </head>
25    <body class="tundra">
26      <h1>Using Context Menus</h1>
27      <div id="context"
28        style="background:#ddd;
29        height:200px; width:200px;"></div>
30      <div dojoType="dijit.Menu"
31        targetNodeIds="context"
32        style="display:none">
33        <div dojoType="dijit.MenuItem">Tic
34          <script type="dojo/method"
35          event="onClick" args="evt">
36            alert("Tic");
37          </script>
38        </div>
39        <div dojoType="dijit.MenuItem">Tac
40          <script type="dojo/method"
41          event="onClick" args="evt">
42            alert("Tac");
43          </script>
44        </div>
45        <div dojoType="dijit.MenuItem">Toe
46          <script type="dojo/method"
47          event="onClick" args="evt">
48            alert("Toe");
49          </script>
50        </div>
51      </div>
52    </body>
53  </html>
Save your file.
Navigate to your file in a browser and right-click the
<div>element. You should see the context menu (Figure 6.3).As in the previous task, selecting an item in the context menu displays an alert box with that item’s name.
You can also create submenus in Dojo, using pop-up menus that appear when you click another menu item.
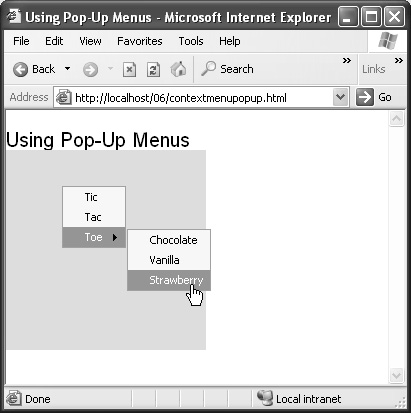
The example contextmenupopup.html adds a pop-up menu containing three items—Chocolate, Vanilla, and Strawberry—to a context menu.
Procedure 6.3. To create a pop-up menu:
Open your Web page in a text editor.
Add a
dojo.require("dijit.Menu");statement to your code.Create a new
<div>element with a colored background. Create a new<div>element withdojoTypeset todijit.Menu, itstargetNodeIdsattribute set to the ID of the first<div>element, and three<div>elements inside it, withdojoTypeset todijit.MenuItem. Set the third menu item’sdojoTypeattribute todijit.PopupMenuItemand add three new menu items inside the menu item. Add a click event handler to each menu item.Script 6.3 shows what your page should look like after you make the additions.
Example 6.3. Creating pop-up menu.
1   <html>
2     <head>
3       <title>Using Pop-Up Menus</title>
(4–18)  . . .
19      <script type="text/javascript">
20        dojo.require("dojo.parser");
21        dojo.require("dijit.Menu");
22      </script>
23    </head>
24    <body class="tundra">
25      <h1>Using Pop-Up Menus</h1>
26      <div id="context" style=
27        "background:#ddd; height:200px;
28        width:200px;"></div>
29      <div dojoType="dijit.Menu"
30        targetNodeIds="context"
31        style="display:none">
32        <div dojoType=
33          "dijit.MenuItem">Tic
34          <script type="dojo/method"
35          event="onClick" args="evt">
36            alert("Tic");
37          </script>
38        </div>
39        <div dojoType="dijit.MenuItem">Tac
40          <script type="dojo/method"
41          event="onClick" args="evt">
42            alert("Tac");
43          </script>
44        </div>
45        <div dojoType=
46          "dijit.PopupMenuItem">
47          <span>Toe</span>
48          <div dojoType="dijit.Menu">
49            <div dojoType=
50              "dijit.MenuItem">Chocolate
51              <script type="dojo/method"
52                event="onClick" args="evt">
53                alert("Chocolate");
54              </script>
55            </div>
56            <div dojoType=
57              "dijit.MenuItem">Vanilla
58              <script type="dojo/method"
59                event="onClick" args="evt">
60                alert("Vanilla");
61              </script>
62            </div>
63            <div dojoType=
64              "dijit.MenuItem">Strawberry
65              <script type="dojo/method"
66                event="onClick" args="evt">
67                alert("Strawberry");
68              </script>
69            </div>
70          </div>
71        </div>
72      </div>
73    </body>
74  </html>
Save your file.
Navigate to your file in a browser and right-click the colored
<div>element.You should see the context menu appear.
Select the third menu item, making the pop-up menu open (Figure 6.4).
Selecting an item in the pop-up menu displays an alert box containing the name of the item.
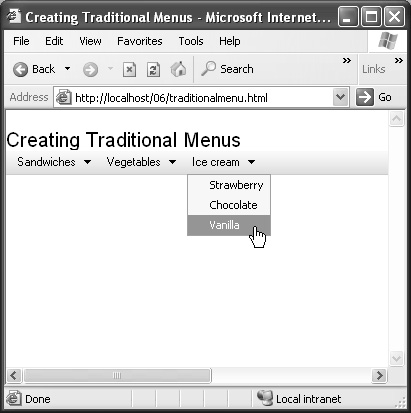
The previous tasks demonstrated that Dijit menus work well as context menus. What about creating traditional menus, with menu bars? For that, you use toolbars and drop-down buttons.
The next example, traditionalmenu.html, creates a menu bar and three drop-down menus.
Procedure 6.4. To create a traditional menu:
Open your Web page in a text editor.
Add a
dojo.require("dijit.Menu");statement to your code.Create a new toolbar containing three drop-down buttons and add a menu in each drop-down button; then add menu items to the three menus and click handlers for each menu item.
Script 6.4 shows what your page should look like after you make the additions.
Example 6.4. Creating a traditional menu.
1   <html>
2     <head>
3       <title>Creating Traditional
          Menus</title>
(4–18)  . . .
19      <script type="text/javascript">
20        dojo.require("dojo.parser");
21        dojo.require("dijit.Toolbar");
22        dojo.require("dijit.Menu");
23        dojo.require("dijit.form.Button");
24      </script>
25    </head>
26    <body class="tundra">
27      <h1>Creating Traditional Menus</h1>
28      <div dojoType="dijit.Toolbar"
29      style="width:700px">
30        <button dojoType=
31          "dijit.form.DropDownButton">
(32–44) . . .
45        </button>
46        <button dojoType=
47          "dijit.form.DropDownButton">
48          <span>Vegetables</span>
49          <div dojoType="dijit.Menu">
50            <div dojoType="dijit.MenuItem"
51              label="Peas">
52             <script type="dojo/method"
53               event="onClick" args="evt">
54               alert("You clicked Peas");
55             </script>
56           </div>
57           <div dojoType="dijit.MenuItem"
58           label="Broccoli">
59           <script type="dojo/method"
60             event="onClick" args="evt">
61           alert("You clicked Broccoli");
62           </script>
63           </div>
64         </div>
65       </button>
66       <button dojoType=
67         "dijit.form.DropDownButton">
68         <span>Ice cream</span>
69         <div dojoType="dijit.Menu">
70         <div dojoType="dijit.MenuItem"
71           label="Strawberry">
72           <script type="dojo/method"
73             event="onClick" args="evt">
74             alert("You clicked
75             Strawberry");
76           </script>
77         </div>
78         <div dojoType="dijit.MenuItem"
79           label="Chocolate">
80           <script type="dojo/method"
81             event="onClick" args="evt">
82             alert("You clicked
83             Chocolate");
84           </script>
85         </div>
86         <div dojoType="dijit.MenuItem"
87           label="Vanilla">
88           <script type="dojo/method"
89             event="onClick" args="evt">
90            alert("You clicked Vanilla");
91           </script>
92           </div>
93         </div>
94       </button>
95     </div>
96    </body>
97  </html>
Save your file.
Navigate to your file in a browser. You should see a menu bar, which opens to display menu items when you click a menu button (Figure 6.5).
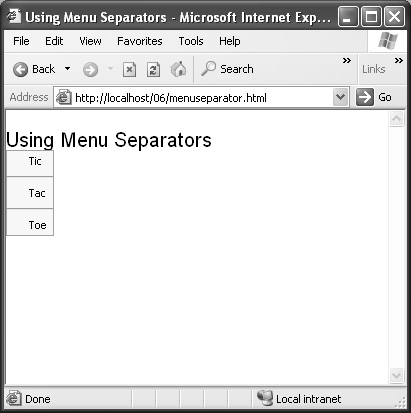
You can also create menu separators with Dojo. You use such separators to separate menu items visually—the separators appear as thin black lines—and to organize your menu items into groups.
The example menuseparator.html adds two menu separators to three menu items.
Procedure 6.5. To create menu separators:
Open your Web page in a text editor.
Add a
dojo.require("dijit.Menu");statement to your code.Create a new menu and add three menu items to it. Then add two new
<div>elements with thedojoTypeattribute set todijit.MenuSeparator.Script 6.5 shows what your page should look like after you make the additions.
Example 6.5. Creating menu separators.
1   <html>
2   <html>
3     <head>
4       <title>Using Menu Separators</title>
5
6       <link rel="stylesheet"
7         type="text/css"
8         href="http://o.aolcdn.com/
9         dojo/1.1/dojo/
10        resources/dojo.css" />
11
12      <link rel="stylesheet"
13        type="text/css"
14        href="http://o.aolcdn.com/dojo/
15        1.1/dijit/
16        themes/tundra/tundra.css" />
17
18      <script
19        djConfig="parseOnLoad:true"
20        type="text/javascript"
21        src="http://o.aolcdn.com/dojo/1.1/
22          dojo/dojo.xd.js">
23      </script>
24
25      <script type="text/javascript">
26        dojo.require("dojo.parser");
27        dojo.require("dijit.Menu");
28      </script>
29    </head>
30
31    <body class="tundra">
32      <h1>Using Menu Separators</h1>
33
34      <div dojoType="dijit.Menu" >
35
36        <div dojoType="dijit.MenuItem">Tic
37          <script type="dojo/method"
38            event="onClick" args="evt">
39            alert("Tac");
40          </script>
41        </div>
42
43        <div dojoType=
44          "dijit.MenuSeparator">
45        </div>
46
47        <div dojoType="dijit.MenuItem">Tac
48          <script type="dojo/method"
49            event="onClick" args="evt">
50            alert("Tac");
51          </script>
52        </div>
53
54        <div dojoType=
55          "dijit.MenuSeparator">
56        </div>
57
58        <div dojoType="dijit.MenuItem">Toe
59          <script type="dojo/method"
60            event="onClick" args="evt">
61            alert("Toe");
62          </script>
63        </div>
64
65      </div>
66    </body>
67  </html>
Save your file.
Navigate to your file in a browser. You should see the new menu with two menu separators (Figure 6.6).
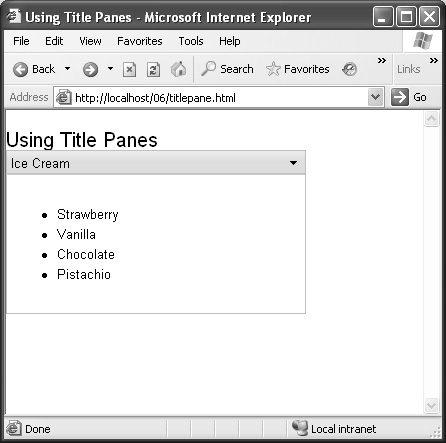
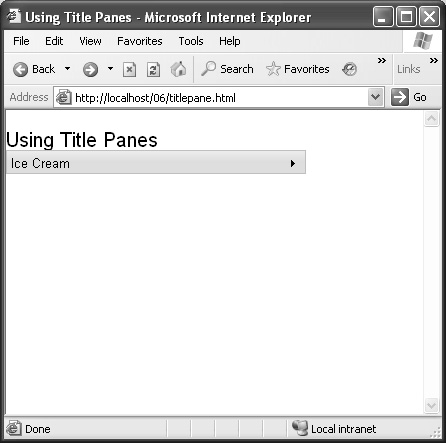
Title panes are slick Dijits that display items in a titled box. The items can be hidden, when the user clicks the down arrow in the title bar. This Dijit is particularly useful for displaying lists of items, such as names of contacts or a set of links.
This example, titlepane.html, displays four flavors of ice cream. When you click the arrow in the title bar, the list box closes.
Procedure 6.6. To create a title pane:
Open your Web page in a text editor.
Add a
dojo.require("dijit.TitlePane");statement to your code.Create a new
<div>element and set the<div>element’sdojoTypeattribute todijit.TitlePane. Enclose a list of items using an HTML unordered list (that is, use a<ul>list).Script 6.6 shows what your page should look like after you make the additions.
Example 6.6. Creating a title pane.
1   <html>
2     <head>
3       <title>Using Title Panes</title>
4
5       <link rel="stylesheet"
6         type="text/css"
7         href="http://o.aolcdn.com/
8         dojo/1.1/dojo/
9         resources/dojo.css" />
10
11      <link rel="stylesheet"
12        type="text/css"
13        href="http://o.aolcdn.com/dojo/
14        1.1/dijit/
15        themes/tundra/tundra.css" />
16
17      <script
18        djConfig="parseOnLoad:true"
19        type="text/javascript"
20        src="http://o.aolcdn.com/dojo/1.1/
21          dojo/dojo.xd.js">
22      </script>
23
24      <script type="text/javascript">
25        dojo.require("dojo.parser");
26        dojo.require("dijit.TitlePane");
27      </script>
28    </head>
29
30    <body class="tundra">
31      <h1>Using Title Panes</h1>
32      <div dojoType="dijit.TitlePane"
33        title="Ice Cream"
34        style="width:300px">
35        <ul>
36          <li>Strawberry</li>
37          <li>Vanilla</li>
38          <li>Chocolate</li>
39          <li>Pistachio</li>
40        </ul>
41      </div>
42    </body>
43  </html>
Save your file.
Navigate to your file in a browser. You should see the title pane showing the unordered list (Figure 6.7).
Click the arrow in the title bar. The title pane closes (Figure 6.8).
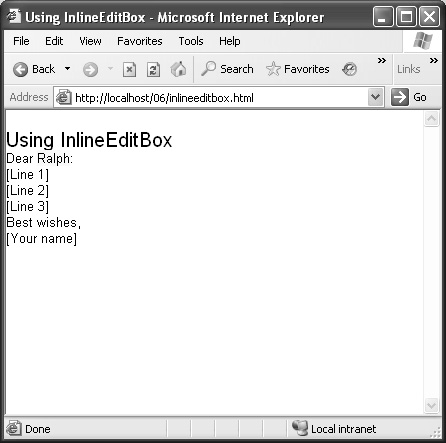
You use InlineEditBox to let the user edit text in your Web page. That’s a cool thing—being able to edit the text in a Web page. These edit boxes use existing Dijits such as text boxes and text areas and allow their text to be edited it when the text is clicked. You set the type of Dijit used for the editor with the editor attribute.
This example, inlineeditbox.html, displays a form letter with InlineEditBox Dijits for the greeting, body, and signature; after editing, the form letter can be printed. You can display HTML in an inline edit box by setting the renderAsHtml attribute to "true".
Procedure 6.7. To create an inline edit box:
Open your Web page in a text editor.
Add
dojo.require("dijit.InlineEditBox");,dojo.require("dijit.form.TextBox");, anddojo.require("dijit.form.Textarea");statements to your code.Create an editable form letter with a new inline edit box for the greeting (using a TextBox Dijit), body (using a Textarea Dijit), and signature (using another TextBox Dijit).
Script 6.7 shows what your page should look like after you make the additions.
Example 6.7. Creating an inline edit box.
1   <html>
2     <head>
3       <title>Using InlineEditBox</title>
4
5       <link rel="stylesheet"
6         type="text/css"
7         href="http://o.aolcdn.com/
8         dojo/1.1/dojo/
9         resources/dojo.css" />
10
11      <link rel="stylesheet"
12        type="text/css"
13        href="http://o.aolcdn.com/dojo/
14        1.1/dijit/
15        themes/tundra/tundra.css" />
16
17      <script
18        djConfig="parseOnLoad:true"
19        type="text/javascript"
20        src="http://o.aolcdn.com/dojo/1.1/
21          dojo/dojo.xd.js">
22      </script>
23
24      <script type="text/javascript">
25        dojo.require("dojo.parser");
26        dojo.require(
27          "dijit.InlineEditBox");
28        dojo.require(
29          "dijit.form.TextBox");
30        dojo.require(
31          "dijit.form.Textarea");
32      </script>
33    </head>
34
35    <body class="tundra">
36      <h1>Using InlineEditBox</h1>
37      Dear
38      <span dojoType="dijit.InlineEditBox"
39        autoSave="false"
40        editor="dijit.form.TextBox">
41        [person]
42      </span>:
43      <div dojoType="dijit.InlineEditBox"
44        autoSave="false"
45        editor="dijit.form.Textarea"
46        renderAsHtml="true">
47        [Line 1]<br>
48        [Line 2]<br>
49        [Line 3]
50      </div>
51      <div>Best wishes,</div>
52      <span dojoType="dijit.InlineEditBox"
53        autoSave="false"
54        editor="dijit.form.TextBox">
55        [Your name]
56      </span>
57    </body>
58  </html>
Save your file.
Navigate to your file in a browser. You should see the form letter.
Click the [person] text and enter a new name. A text box appears to accept the new name (Figure 6.9).
Click Save to save the name in the text of the page (Figure 6.10).

Dijit trees present the user with collapsible trees filled with items. Creating a tree takes a little work, however. You typically create a data file in JavaScript Object Notation (JSON) format, which the tree reads in to populate that tree with nodes (that is, the leaves of the tree).
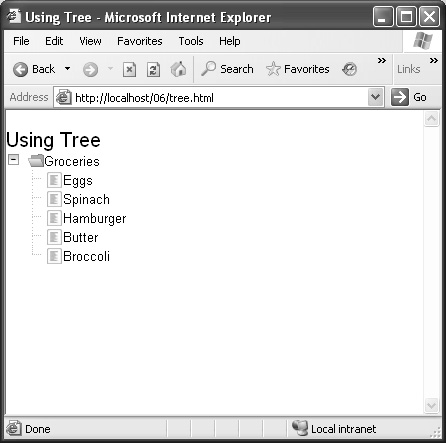
The example groceries.json creates data file for a node named Groceries and gives that node five subnodes: Eggs, Spinach, and so on. You will use this data file in the task in the next section to populate a tree.
Procedure 6.8. To create tree data:
Create a new document, groceries.json, in a text editor.
Add this JSON code to create the framework for the tree’s data, making that data accessible under the name
'name':{ identifier : 'name', label : 'name', ] }Add this code to start listing the items in the tree:
{
 identifier : 'name',
 label : 'name',
 items : [
   {
   }
 ]
}
Add this code to create a Groceries node:
{
 identifier : 'name',
 label : 'name',
 items : [
   {
     name : 'Groceries',
   }
 ]
}
Add the child nodes (the groceries) to the Groceries node like this:
{
 identifier : 'name',
 label : 'name',
 items : [
   {
     name : 'Groceries',
     children: [
       {name : 'Eggs'},
       {name : 'Spinach'},
       {name : 'Hamburger'},
       {name : 'Butter'},
       {name : 'Broccoli'}
     ]
   }
 ]
}
Save your file.
You’ll put this file to work in the next task.
You use the Tree Dijit to display a tree of collapsible nodes of data. The data for the tree is typically supplied by a dojo.data.ItemFileReadStore data store. Here, we’ll connect our data store to the groceries.json file created in the previous task.
The example here, tree.html, displays the data in groceries.json in a tree. You can use dojo.data.ItemFileReadStore to read the data in from groceries.json and then connect the data store to a dijit.tree.TreeStoreModel Dijit, which the tree can then use to display the data.
Procedure 6.9. To create a tree:
Open your Web page in a text editor.
Add
dojo.require("dijit.Tree");anddojo.require("dojo.data.ItemFileReadStore");statements to your code.Create a new
dojo.data.ItemFileReadStoreobject and connect it to groceries.json with theurlattribute.Create a new
dijit.tree.TreeStoreModelDijit and connect it to the data store with thestoreandqueryattributes (use"{name:'*'}"as the query to select all nodes in the tree).Create a new
dijit.tree.TreeDijit and connect it to thedijit.tree.TreeStoreModelDijit with themodelattribute.Script 6.8 shows what your page should look like after you make the additions.
Example 6.8. Creating a tree.
1   <html>
2     <head>
3       <title>Using Tree</title>
4
5       <link rel="stylesheet"
6         type="text/css"
7         href="http://o.aolcdn.com/
8         dojo/1.1/dojo/
9         resources/dojo.css" />
10
11      <link rel="stylesheet"
12        type="text/css"
13        href="http://o.aolcdn.com/dojo/
14        1.1/dijit/
15        themes/tundra/tundra.css" />
16
17      <script
18        djConfig="parseOnLoad:true"
19        type="text/javascript"
20        src="http://o.aolcdn.com/dojo/1.1/
21          dojo/dojo.xd.js">
22      </script>
23
24      <script type="text/javascript">
25        dojo.require("dojo.parser");
26        dojo.require(
27          "dojo.data.ItemFileReadStore");
28        dojo.require("dijit.Tree");
29      </script>
30    </head>
31
32    <body class="tundra">
33      <h1>Using Tree</h1>
34
35      <div dojoType=
36        "dojo.data.ItemFileReadStore"
37        jsId="data" url=
38        "groceries.json">
39      </div>
40
41      <div dojoType=
42        "dijit.tree.TreeStoreModel"
43        jsId="model" store="data"
44        query="{name:'*'}">
45      </div>
46
47      <div dojoType="dijit.Tree"
48        model="model">
49      </div>
50
51    </body>
52  </html>
Save your file.
Navigate to your file in a browser. You should see the new tree Dijit (Figure 6.11).
The Groceries node can be opened or closed (hiding the rest of the tree) by clicking it.