Throughout this book, you've been exposed to the concept of using Access as the data layer, and Excel as the presentation layer. This obviously suggests that data has to be moved from Access to Excel. In this chapter, you explore a few basic techniques that will help you efficiently move Access data into your Excel workbook.
While it's important to know the numerous ways to get our Access data into Excel, it's equally important to know when a particular method is more efficient than another! In this section, you'll be introduced to several methods for getting data into Excel and examine what circumstances make one method better suited than another.
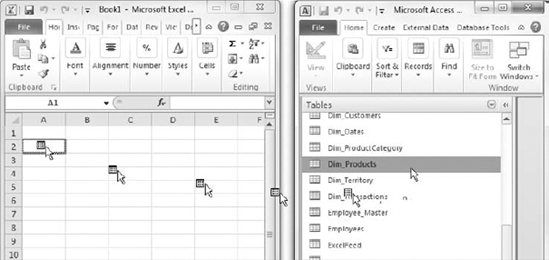
For simplicity and ease, you just can't beat the Drag and Drop method. Try this: Simultaneously open an empty Excel workbook and an Access database from which you want to import. In this case, you can use the ZalexCorp sample database you downloaded with this book. Now resize each application's window such that they are both fully visible on your screen.
Hover on the Access table or query you wish to transfer into Excel. Now press and hold the left mouse button and move the mouse cursor over to the blank worksheet in Excel as demonstrated in Figure 14-1. Release the mouse to see the data move to Excel.
The Drag and Drop method comes in handy when you are doing a quick one-time analysis where you need a specific set of data in Excel. It is not so useful if:
You expect this step to occur routinely, as a part of a repeated analysis or report.
You expect the users of your Excel report to get or refresh the report data via this method.
It's not possible or convenient for you to simply open up Access at the time you need the data.
Under the preceding scenarios, it is much better to use another technique.
You may remember from Chapter 2 that Access has a built-in Import wizard for importing data from various sources. Well, Access also has an Export wizard. It's relatively simple to use.
With the ZalexCorp sample database open, click the Dim_Products table one time to select it.
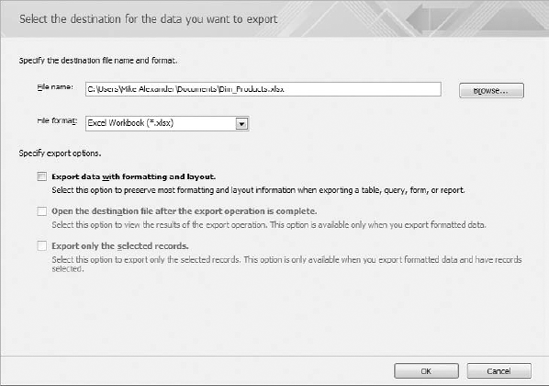
With the table selected, browse to the External Data tab on the Ribbon and select the Excel icon under the Export group. This activates the wizard shown in Figure 14-2.
As you can see in Figure 14-2, you have a few discretionary options you can specify in the Excel Export wizard. You can specify the file location, the file type and some format preservation options.
Note
You may export your Access object to an existing Excel file instead of creating a new file. However, you should be aware of several things. By default, the name of the exported object becomes the name of the table or query in Access. Be cautious if you have an object with the same name in your Excel workbook, as it may be overwritten. For example, if you export the "PriceMaster" table to an Excel worksheet that already has a worksheet named PriceMaster, Excel will overwrite the worksheet. Second, make sure the workbook to which you are exporting is closed. If you try to export to an open workbook, you will likely get an error in Access.
Select the Export data with formatting and layout option. Notice that a second menu option becomes available that asks if you wish to open the file for viewing after export. Select that as well and click OK.
Immediately, Excel opens to show you the exported data.
In Access, the last page in the Export wizard (Figure 14-3) asks if you want to save your export steps. Saving your export steps can be useful if you expect to frequently send that particular query or table to Excel.
The benefit of this method is that, unlike dragging and dropping, the ability to save export steps allows you to automate your exports by using macros.

Figure 14.3. Be sure to utilize the Save Export Steps option if you are going to Export your data frequently.
The limitation of this export method is that it is done within Access. If you are making an Excel report where data refresh must be under the Excel user's control, this method is not viable. In this circumstance, importing data from the Excel menu and/or using MS Query in Excel is the more viable option.
Tip
Use the RunSavedImportExport macro action to automate the exporting of data using "saved export steps." Feel free to review Chapter 9 for a refresher on how to use macros.
The option to pull data from Access has been available in Excel for many versions; it was just buried several layers deep in somewhat cryptic menu titles. This made getting Access data into Excel seem like a mysterious and tenuous proposition for many Excel analysts. With the introduction of the Ribbon in Excel 2007, Microsoft made importing Access data from Excel a little less nebulous, including the option right on the Ribbon under the Data tab.
Using the Get External Data method in Excel allows you to establishing a refreshable data connection between Excel and Access. To see the power of this method, walk through these steps:
Open a new Excel workbook and select the Data tab on the Ribbon.
Simply click the From Access icon found in the Get External Data group.
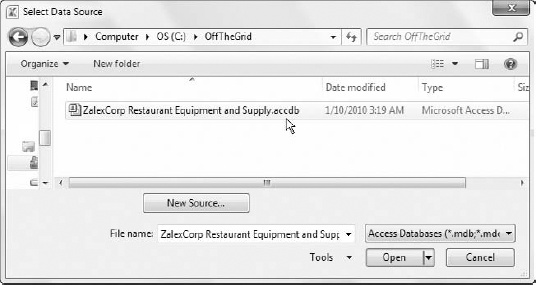
This activates the Select Database dialog box you see in Figure 14-4. The idea is to browse for your Access database. If the database from which you wish to import is local, simply browse to the file location and open it. If you have an Access database on a network drive at your employer, you may also select that database as well — provided you have the proper authorization and access.
Navigate to the sample database found under C:OffTheGrid (see Figure 14-4): then click the Open button.
In some environments, a series of Data Link Properties dialog boxes will activate, asking for credentials (username and password). Most Access databases do not require login credentials, but if your database does require a username and password, enter them in the Data Link Properties. Otherwise, press the OK button to go to the next step.
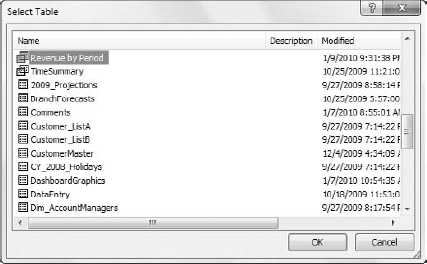
Once you reach this step, the Select Table dialog box (Figure 14-5) activates and allows you to choose a table or query from your database. Choose Revenue by Period query and click the OK button.
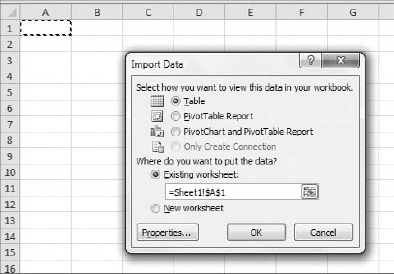
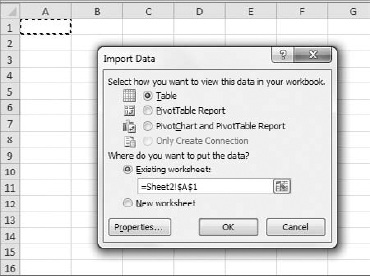
At this point, you will see the Import Data dialog box shown in 14-6. This dialog box allows you to define where and how to import the table. As you can see, you have the option of importing the data into a Table, a PivotTable, or a PivotChart/PivotTable combination.
In this scenario, you want the raw data to be written directly onto your spreadsheet, so you'll choose the Table option.
Note
If you choose PivotTable or PivotChart, the data is saved to a pivot cache without writing the actual data to the spreadsheet. This allows your pivot table to function as normal without having to import potentially hundreds of thousands of data rows twice (once for the pivot cache and once for the spreadsheet).
Select Table as the output view and define cell A1 as the output location (see Figure 14-6). Click the OK button to finalize your selections.
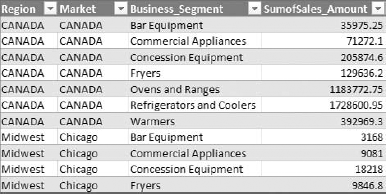
Your reward for all the work will be a table similar to that shown in Figure 14-7, which contains the imported data from your Access database.
The incredibly powerful thing about importing data this way is that it's refreshable! That's right. If you import data from Access using this technique, Excel creates a table that you can refresh by right-clicking and selecting Refresh, as demonstrated in Figure 14-8. When you Refresh your imported data, Excel reconnects to your Access database and imports the data again. As long as a connection to your database is available, you can refresh it with a mere click of the mouse.

Figure 14.8. As long as a connection to your database is available, you can refresh your table with the latest data.
Again, a major advantage to using the Get External Data method is that it allows you to establish a refreshable data connection between Excel and Access. This means, in most cases, you can set up the connection one time and then just refresh the data connection when needed. You can even record an Excel macro to refresh the data on some trigger or event. This is ideal for automating the transfer of data from Access.
The disadvantage to this method is that you have to take the data as it is in Access. That is to say, you give up the ability to utilize sorts, filters, and table joins to customize the data you bring into Excel.
Microsoft Query (affectionately known as MS Query) is a stand-alone program, installed with the Office suite, which can connect to external data sources from Excel. MS Query has one distinct advantage over the other methods for importing Access data into Excel: flexibility.
When transferring data using any of the previously mentioned methods, you can only import an existing table or query as is. That is to say, there is no opportunity to parse, filter or sort the data on the fly before importing it.
Not so with MS Query! With MS Query, you don't have to rely on the original tables or queries to be filtered or configured in a particular way. You can apply your own filters and sorts to your data pulls (through MS Query), essentially creating custom views that don't necessarily exist in the source database.
Note
MS Query may or may not be installed on your system, based on how you performed your Office installation. Keep in mind that if you do not have the MS Query program installed on your system, you cannot link to external data sources in Excel. To install MS Query you need your Microsoft Office installation disk. Start the Microsoft Office Setup and choose to customize your installation. While you are customizing your installation, look for Office Tools. You will find an entry called Microsoft Query under Office Tools. Make sure you set it to the Run from My Computer option and then complete the installation.
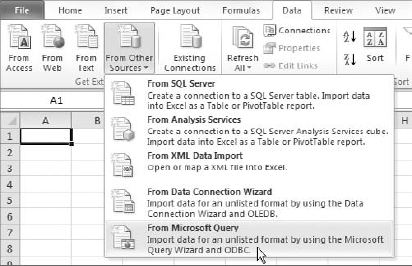
Begin by going to the Get External Data menu under the Data tab of the Excel ribbon. To start Microsoft Query, you choose the From Other Sources option and then select From Microsoft Query from the dropdown menu. Figure 14-9 shows what the menu will look like.
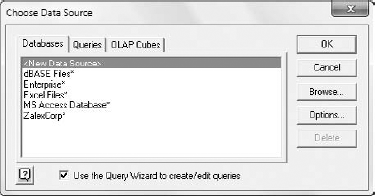
After Microsoft Query opens, you will see the Choose Data Source dialog box illustrated in Figure 14-10. This is where you start building your MS Query import.
For this exercise, you will source data from the ZalexCorp database you downloaded with the sample files for this book. To set this database as an available data source, follow these steps:
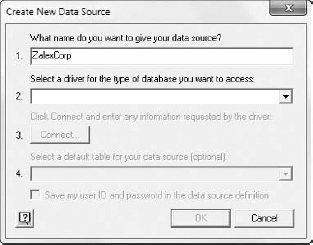
From the Choose Data Source dialog, choose <New data source> from the Databases tab and click OK. This opens the Create New Data Source dialog box.
Type a name for your data source at the top of the dialog box, for example, ZalexCorp (see Figure 14-11).
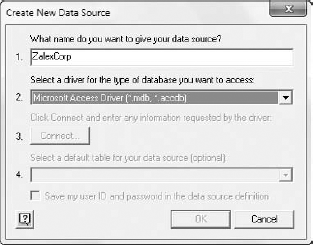
In the dropdown list box below, choose a type of driver for the database to which you want to connect. From this dropdown menu, make sure you select Microsoft Access Driver (*.mdb, *.accdb), as shown in Figure 14-12.
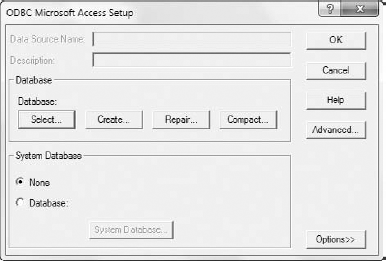
Click Connect. This opens the ODBC Microsoft Access Setup dialog box illustrated in Figure 14-13.
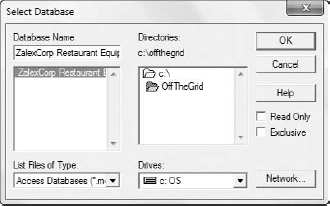
Click the Select button in the Database section to browse for your database in the Select Database dialog box (see Figure 14-14). In this example, you will select the ZalexCorp database found in the C:OffTheGrid directory.
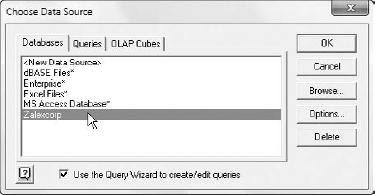
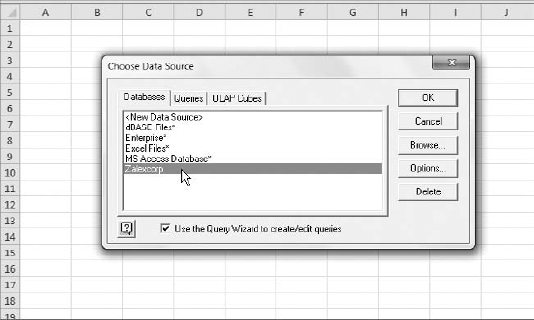
After you have selected your database, continue to click OK until you come back to the Choose Data Source dialog box. ZalexCorp now shows up in the list of databases (see Figure 14-15).
Now that your ZalexCorp data source is set up, MS Query remembers its location, allowing you to use it repeatedly without the need to point to it each time you need to use it.
Tip
Microsoft Query works equally well for non-local databases (those that reside on a networked drive or even on the Web). In the Select Database dialog box, you'll find a dropdown menu with a list of computer drives available to you.
If your target database is on a network drive that is already mapped to your computer, choosing it is as simple as choosing that drive from the dropdown menu, and browsing the file hierarchy until you find the database you are looking for.
If your database is on a network that isn't mapped to your computer, simply click the Network button (shown in the lower right of the dialog box in Figure 14-14). This fires up a wizard to help you connect to a network drive or folder to which you are not currently mapped.
Now that you have your ZalexCorp database set as an available data source, you can start building your own custom data pull. If you've closed the MS Query wizard, start it back up by going to the Data tab of the Excel Ribbon, choosing the From Other Sources option and then selecting From Microsoft Query.
Select your ZalexCorp datasource, as demonstrated in Figure 14-16, and click OK.
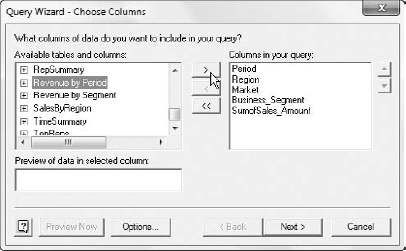
As you can see in Figure 14-17, you are presented with a dialog box that shows tables and queries within the ZalexCorp database. Select the Revenue by Period object and click the button with the right-pointing arrow.
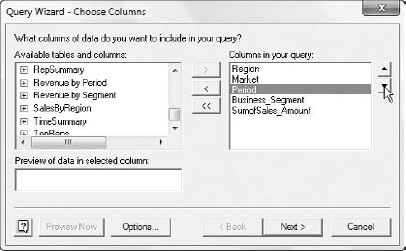
In the next step, you can change the order of the data fields by clicking the up and down arrows to the right of the Columns in your query list box. Arrange the columns so that Region and Market come before Period as demonstrated in Figure 14-18. Click the Next button.
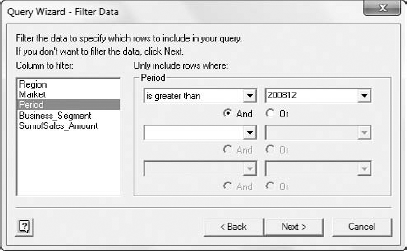
The next pane of the query wizard gives you the option of applying your own criteria to filter your data before importing (see Figure 14-19). Select the Period field to enable the filter options on the right. Once filtering is enabled, select "is greater than" from the condition dropdown. Then select 200812 in the criteria input box. Click the Next button.
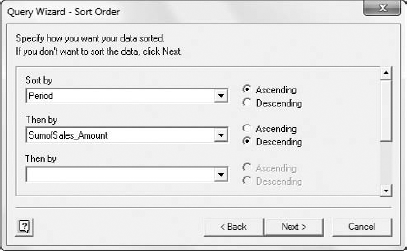
In the next step, you're offered the opportunity to sort your query results. In this scenario, you want to sort by Period in ascending order, then by SumofSalesAmount in descending order. Figure 14-20 illustrates what this step looks like after the needed sorts have been applied. Click the Next button.
The last screen of the wizard asks you whether you want to return your data to Excel or further modify the query in Microsoft Query. Choose to view our data in Excel and click the Finish button.
At this point, you should see the Import dialog box shown in Figure 14-21. Here, elect to return the data to a Table in cell A1, and then click the OK button.
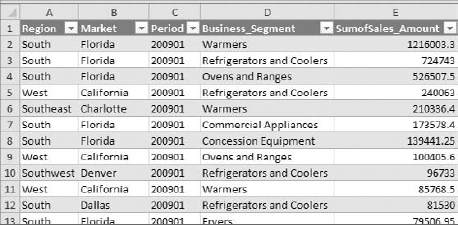
If all went well, you should have a table similar to that shown in Figure 14-22. Note that as designed, your query results contain only records where the Period is greater than 200812. Also, the columns have the correct order and sorting.
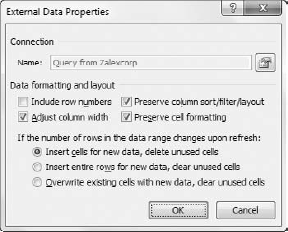
You can refresh the data by right-clicking anywhere inside your query table and selecting the Refresh button. You can also click the Refresh button found in the Design tab which activates when you cursor is inside the query table.
Again, while setting up an MS Query seems like a lot of work, the ability to parse, filter and sort data on the fly gives MS Query a distinct advantage over the previously mentioned methods for transferring data.
There are several basic techniques you can use to move Access data into your Excel workbooks. The most basic of these is the Drag and Drop method, where you literally drag access tables and queries onto a spreadsheet. Although this method comes in handy when you are doing a quick one-time analysis, it's not ideal when your analytical processes require that the data coming from Access be refreshed on a routine basis.
Another method of transferring data is to use Access' own Export wizard. This method is easy and it is ideal for automating exports to Excel using macros. However, if you are making an Excel report where data refresh must be under the Excel user's control, this method is not for you.
Excel's Get External Data functionality is yet another method you can employ to transfer data from Access to Excel. With a simple wizard guiding your way, it's extremely easy to get up and running with this option. The advantage to using the Get External Data method is that it allows you to establish a refreshable data connection between Excel and Access. The disadvantage to this method is that you have to take the data as it is in Access. That is to say, you give up the ability to utilize sorts, filters, and table joins to customize the data you bring into Excel.
The last method covered in this chapter is MS Query. MS Query is a standalone application that works with Excel to pull external data via queries. Like the Get External Data method, MS Query allows you to create refreshable data connections between Excel and Access. But MS Query has a distinct advantage over the Get External Data method in that it allows you to customize your query results. That is to say, MS Query enables you to apply your own filters and sorts to your data pulls, essentially creating custom views that don't necessarily exist in the source database.
With these basic options at your disposal, you should have no problem integrating Excel and Access.

