As intimidating as XML may seem, it is really nothing more than a text file that contains data wrapped in markup (tags that denote structure and meaning). These tags essentially make a text file machine-readable. The term "machine-readable" essentially means that any application or Web-based solution designed to read XML files is able to discern the structure and content of your file.
Because XML is text-based, it is not dependent on a specific application for construction, reading, or editing. This versatility makes XML an excellent integration mechanism.
In this chapter, you gain a solid understanding of the fundamentals of XML. You also get some context for XML functionality in Excel and Access by exploring some of the ways both Excel and Access allow you to work with XML data through the user interface.
Up to this point, you have explored several integration techniques that use well-established technologies that you are sure to feel comfortable with. So the question is: Why XML? Why should you explore a relatively new technology that, frankly, few in the Excel and Access community are using? There are three major benefits to using XML as an integration mechanism.
With XML, you can bypass technologies that you may not feel comfortable with such as MS Query, SQL statements, or ADO. Imagine incorporating external data into your Excel or Access processes without the need to manage database connectivity or use complex SQL statements. And because XML files are nothing more than text files, the process of moving and refreshing data, in most cases, is faster and more streamlined.
Second, XML gives you more flexibility than standard text files. With XML, you can import and use only the columns of data required as opposed to importing the entire text file. You can also import different parts of the XML file to different locations instead of importing the entire block of text into one table.
The third and possibly most attractive reason to use XML is that you can simply "refresh" your XML maps to get new data. With text files, you need to walk through the import process again. Of course, you could write some code to automate the import process, but again, XML allows you to bypass the need for that.
Can you survive without using XML? Sure, you can. However, there are enough attractive possibilities with XML to warrant a closer look.
Before working with XML functionality, it's important to understand the makeup of an XML document and how its syntactic constructs work. Let's take a moment to explore the fundamental components of a standard XML document.
The first line of an XML document is called the XML declaration. Look at an example of a typical XML declaration:
<?xml version="1.0"? encoding="UTF-8" standalone="Yes"?>
The XML declaration typically contains three parts: a version attribute, an optional encoding attribute, and a standalone attribute.
Version attribute: The version attribute tells the processing application that this text file is an XML document.
Encoding attribute: You primarily use the encoding attribute to work around character encoding issues that may be raised when dealing with international characters and those outside of the Unicode/ASCII standard. Since XML documents are inherently Unicode, the encoding attribute is optional if the character encoding used to create the document is UTF-8, UTF16 or ASCII. Indeed, you will find that the character encoding is omitted from many of the XML documents you may encounter.
Standalone attribute: The standalone attribute tells the processing application whether the document references an external data source. If the document contains no reference to external data sources, it is deemed a standalone, thus having the "Yes" value. Since every XML document is inherently standalone, this attribute is optional for documents that do not reference an external source.
As their name implies, processing instructions provide explicit instructions to the processing application. These can be identified by distinctive tags composed of left and right angle brackets coupled with question marks (<?, ?>). These instructions are typically found directly under the XML declaration and can provide any number of directives. For example, the following processing instruction would direct Excel to open the given XML document.
<?mso-application progid="Excel.Sheet"?>
Comments allow XML developers to enter plain-language explanation or remarks about the contents of the document. Just as in VBA, where the single quote signifies a comment, XML has its own syntax to denote a comment. Comments in XML begin with the <!-- characters and ends with the --> characters, as in the following example.
<!--Document created by Mike Alexander-->
An element is defined by a start tag and an end tag (for example, <MyData> </MyData>). Any data you enter in between the start and end tags makes up the contents of that element. As you can see in the following example, the document begins with <MyTable> and ends with </MyTable>; all the syntax you see in between these tags makes up the content for the MyTable element.
<?xml version="1.0"?>
<MyTable>
       <Customer>
              <Quarter>Q1</Quarter>
              <Region>North</Region>
              <Revenue>25000</Revenue>
       </Customer>
</MyTable>
The concept of tags is a familiar one if you have worked with HTML. However, unlike HTML, tags in XML are not predefined. That is to say, the text "MyTable" has no predefined utility or meaning. You can change that text to anything and it's all the same to the XML document. Herein you stumble on the beauty of XML: XML allows you to create custom tags, tags to which you give definition and purpose. As long as you adhere to a few basic rules, you can create and describe any number of elements by creating your own custom tags. Here are the basic syntactic rules you must follow when creating elements:
Every element must have a start tag, represented by left and right angle brackets (
<>), as well as a corresponding end tag represented by a left angle bracket, back slash and right angle bracket (</>). Naturally, to avoid errors, you need to use the same syntactical name within the start and end tags.Names in XML are case sensitive, so the start and end tags of an element must match in case as well as in syntax. For example, an element defined by the tags
<Data> </data>causes a parsing error. XML is looking for the end tag for<Data>as well as the start tag for</data>.
You must begin all element names with a letter or an underscore, never a digit or other character. In addition, names that begin with any permutation of xml are reserved and cannot be used.
Elements can contain numbers, text, and even other elements. Elements are normally framed in a parent/child hierarchy. For example, in the MyTable example, the Customer element is a child of the MyTable root element. Likewise, the MyTable element is the parent of the Customer element. Following that logic, the Quarter, Region, and Revenue elements are the children of the Customer element. This parent/child hierarchy allows the XML document to describe the arrangement of the data as well as the content. Later in this chapter, you will discover how this parent/child hierarchy is leveraged to programmatically move around in XML documents.
The root element (which is always the top-most element in an XML document) serves as the container for all of the contents within the document. Every XML document must have one (and only one) root element. The MyTable element shown in the following example is the root element for this particular XML document.
<?xml version="1.0"?>
<MyTable>
       <Customer>
<Quarter>Q1</Quarter>
<Region>North</Region>
<Revenue>25000</Revenue>
</Customer>
</MyTable>In this example, the root element contains four elements, each one containing its own content.
Attributes in XML documents come in two flavors: data attributes and metadata attributes. Data attributes are used to provide the actual data for an element. For example, the following attributes (name and age) provide the data for the Pet element.
<Pet name='Spot' age="4">Dog</Pet>
Notice that the age attribute is wrapped in quotes although the value itself is a number. This is because unlike elements, attributes are textual. This means that attributes must be wrapped in either single or double quotes.
Metadata attributes typically provide descriptive information about the contents of elements. For instance, in the following example, the Customer element has an attribute called id which provides that Customer with a unique identifier.
<?xml version="1.0"?>
<MyTable>

       <Customer id="1"/>
       <Quarter>Q1</Quarter>
       <Region>North</Region>
       <Revenue>25000</Revenue>

</MyTable>
Many new users of XML find the concept of attributes versus elements a bit confusing. After all, you can easily convert most elements to attributes (or vice versa) and the XML document would parse just fine. For example, the Customer id attribute could just as easily be presented in an element as such: <id>1</id >. However, most XML documents adhere to some general rules of thumb when it comes to elements versus attributes:
If the content is not an actual data item but is instead a descriptor of the data (record number, index number, unique identifier, and so on), then an attribute is typically used.
Elements are used for any content that consists of multiple values.
If there is a chance that the content will expand in structure to include children, elements are typically used.
The idea behind namespaces is simple. Because XML lets developers create and name their own elements and attributes, there is a possibility that a particular name could be used in different contexts. For instance, an XML document may use the name ID to describe both a customer ID and an invoice ID. Namespaces associate overlapping identifiers with Uniform Resource Identifiers (URI), allowing applications that process XML documents to make a distinction between similar names.
A URI is typically made up of a URL and a relative descriptor. For instance, the following line defines a namespace. As you can image, Xmlns stands for XML namespace.
Xmlns="http://www.datapigtechnologies.com/customers"
The fact that URLs are used to define namespaces leads many to believe that namespaces point to some sort of online source. URLs provide some semblance of ownership to anyone reading the XML file. The goal of a namespace is merely to create a unique string. So you could technically use something like Xmlns="arbitrary_namespace", although it wouldn't be very useful in identifying ownership or utility.
As you can imagine, using a URL can lead to some fairly long namespace strings. Most XML developers get around this problem by creating namespace prefixes. A prefix is nothing more than an alias for the namespace. For instance, the following namespace uses the prefix dpc. Then the dpc prefix is applied to an attribute.
Xmlns:dpc=http://www.datapigtechnologies.com/customers
<Invoice dpc:id="201">
Notice that in the example illustrated that follows, the namespace is placed directly into the root element. Any namespace declared within an element automatically applies to all child elements.
<?xml version="1.0"?>
<MyTable xmlns="http://www.datapigtechnologies.com/customers">
       <Customer>
<Quarter>Q1</Quarter>
<Region>North</Region>
<Revenue>25000</Revenue>
</Customer>
</MyTable>Now you may be wondering why you would use a namespace in a document where there are no duplicate names. This is primarily to avoid overlapping names with other XML documents that may be consumed in the same process or application.
In a reporting solution, you typically have a data layer and a presentation layer. In this section, you will discover how XML can help you easily create a simple reporting solution where Access provides the data and Excel uses the data in some sort of a presentation layer.
Despite the anxiety that some people feel about XML, it's interesting to observe that most of the XML functionality built into Excel and Access requires no programming and little knowledge of databases. That is to say, all the steps you need to create an XML-based reporting solution can be performed using only the user interfaces that come with Excel and Access.
To start the export from Access, follow these steps:
Right click the SalesByRegion table found in the sample database and select Export

Tip
You can also start the export process by highlighting a table in your database, selecting the External Data tab in the ribbon, and then selecting More

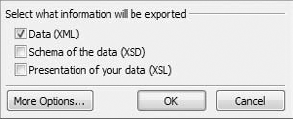
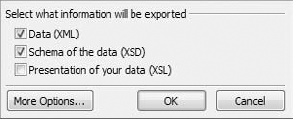
Clicking the OK button activates the Export XML dialog box illustrated in Figure 17-2. Here, you are given the option of exporting the schema definition and presentation specifications as well as the data. In this example, you only want the XML data exported; therefore, you deselect all but that option in the dialog box.
Note
The schema definition exports as an XSD (Extensible Schema Definition) document, while the presentation specifications export as an XSL (Extensible Stylesheet Language) document. XSD files dictate the layout and sequencing for the data in an XML document, as well as the data types, and default values for each element and attribute. An XSL file dictates the formatting rules for the document, controlling the way the XML data is presented. The topics of XSD and XSL are focused on areas outside the scope of this chapter, so they're not covered in detail here. If you want to learn more about XSD and XSL, feel free to visit
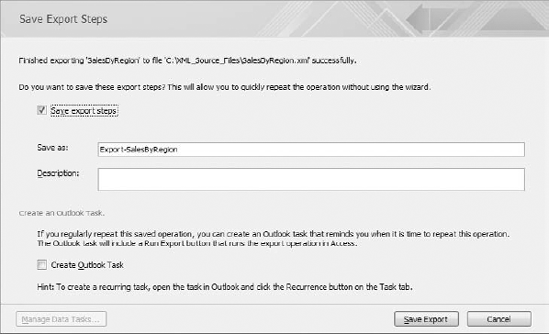
www.w3schools.com, where you can get free tutorials on these topics.Once you click the OK button, your data will be saved to an XML file in the location you specified. Access then gives you the option to save your export process (see Figure 17-3). Here you can save the steps of the export process so you can perform the export at the touch of a button.
Simply check that you want to save your export and give your export process a name. As you can see in Figure 17-3, you can even create a task reminder in Outlook!
Once your export process is saved, you can call it by clicking the Saved Exports button found on the External Data tab in the ribbon. This activates the Manage Data Tasks dialog box, shown in Figure 17-4, where you can run your export process as often as you need.
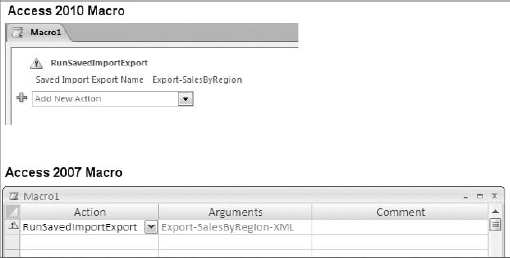
As Figure 17-5 illustrates, you can even get fancy and automate your export by calling the saved export via a macro.
Tip
Want to export only specific records to XML? Write a query. You can export the results of a query to XML just as you would a table.
One of the simplest ways to utilize an XML document in Excel is to open it directly. To help demonstrate this, follow these steps:
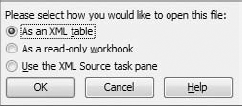
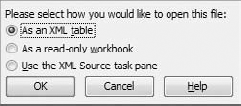
Start Excel and open the SalesByRegion.xml file you just saved. Excel immediately recognizes that the file you are opening is an XML document, so it actives the Open XML dialog box shown in Figure 17-6.
Select the As an XML table option and click the OK.
Because the EmployeeSales.xml file does not have an associated schema file (XSD), Excel infers a schema from our XML document. This means Excel essentially creates an internal schema that will dictate the rules for the document.
Tip
Again, an XSD or schema file dictates the layout and sequencing for the data in an XML document, as well as the data types and default values for each element and attribute.
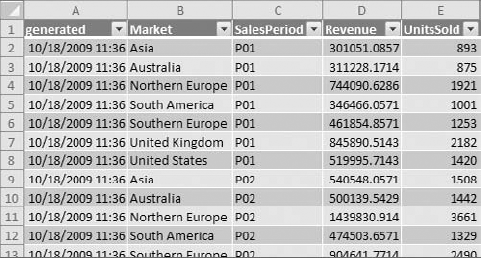
From here, Excel automatically creates an XML list, mapping a range of cells to the elements in the source XML document (see Figure 17-7).
Note
You will note in Figure 17-7 that Access has included a field called "generated," specifying the date and time the XML extract was created. You can safely delete this column if it does not suit your needs.
So now what? Well, you can use this data as if it were a normal range. You can create a pivot table report, build charts, apply some fancy conditional formatting, and so on. The nifty thing about this setup, however, is that these cells are linked back to the XML document and can be refreshed with the latest data by right-clicking inside the XML list and selecting Refresh XML Data!
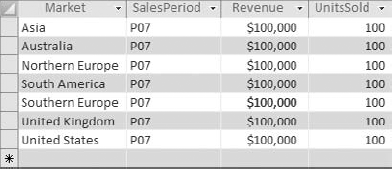
To test out the refresh function, go back to Access and add a few records to the SalesByRegion table, as demonstrated in Figure 17-8.
Re-export the SalesByRegion XML file. If you saved your export process, you can simply call it by clicking the Saved Exports button found on the External Data tab in the Ribbon. If you did not save your export process, you have to go through the steps of exporting your XML file. Either way, the idea is to replace the previously exported SalesByRegion.xml file. Therefore, you need to save your export in the exact same file path you used previously.
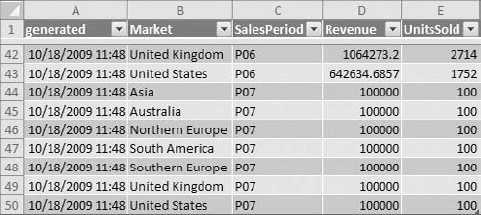
Once you have updated your XML document, you can return to your Excel file and refresh the XML list. As you can see in Figure 17-9, the newly added records are included in the mapped range.
Take a moment now to think about what XML allows you to do. Imagine building an Excel-based reporting system where all data that feeds your pivot tables and charts link back to XML files on a network server. Imagine that you can update those XML files on a nightly basis using an automated Access process. In addition, you could design your client's workbooks to automatically refresh on open. Moreover, remember that you are essentially working with a text file, so your clients do not have to worry about server drivers, passwords, and the like.
Tip
If you are interested in programming XML in Excel, feel free to check out Excel 2007 VBA Programmer's Reference, published by Wiley, ISBN: 978-0-470-04643-2.
In many data entry processes, Excel is used as the interface to enter the data and then the data is sent to an Access database to be stored and analyzed. In this section, you will discover how XML can help simplify these sorts of processes as well.
The general idea in this exercise is to create a data entry template in Access and convert that template to an XML file. Then you use that XML file to create a data entry form in Excel that can be completed and exported back out to XML. The final step is to pick up the XML with Access and import it into a source table.
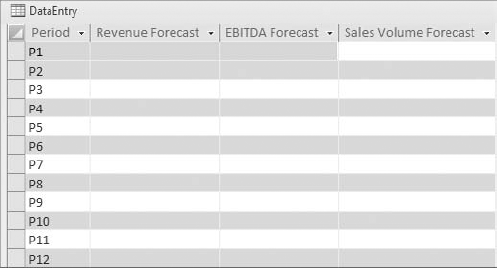
Start the process by building an Access table that will generate the base XML and the schema file. You can also use this table to capture the results of your data entry exercise. Figure 17-10 illustrates the table that you'll use in this example. Save this table as "DataEntry."
Note
What's all this talk about a schema file? Well, way back in Figure 17-2, remember that you chose to only export the XML data, not the schema or presentation specifications. In this example, you tell Access to create the schema file. Why? Doing so ensures that Access provides Excel with the information it needs to map the empty fields to your worksheet.
Once you have created the source table, you can export an XML file from the source table using the same process outlined in Figures 17-1 through 17-3 earlier in this chapter, with one exception. In the step highlighted in Figure 17-2, you need to tell Access to create the XSD file. Figure 17-11 illustrates what the Export XML dialog box should look like when both XML and XSD are selected.
Start Excel and open the DataEntry.xml file you saved in the previous section. Excel immediately recognizes that the file you are opening is an XML document, activating the Open XML dialog box shown in Figure 17-12. Select the As an XML table option and click OK.
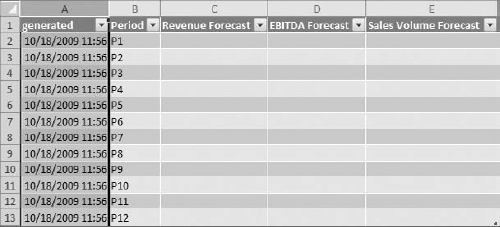
Note that Access has included a field called "generated" specifying the date and time the XML extract was created (see Figure 17-13). You need to delete this column in order to export your results back into XML.
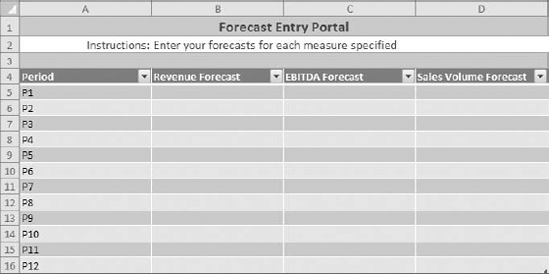
Obviously, the idea is to distribute the data entry form and have your users complete it. So at this point, you should take some time to format your data entry form, making it easy to work with as shown in Figure 17-14.
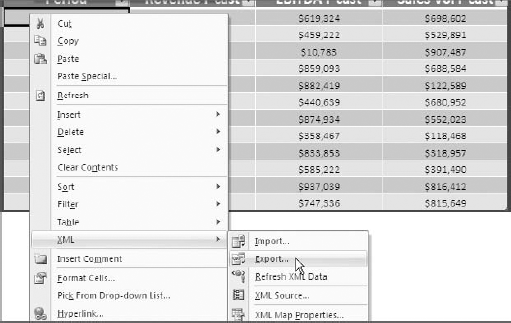
So how do you get the data back into Access? Once the data entry form is completed, Excel can export the data back into an XML file and save that file to a specified location. To test this, fill out your data entry form and right click anywhere inside the list. This pulls up a context menu where you will select XML
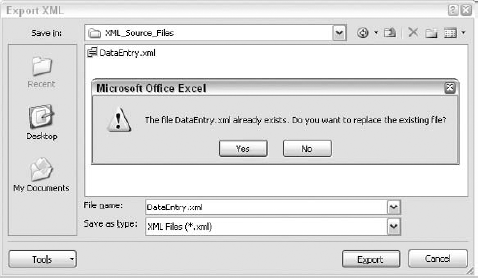
Excel asks you to specify the file path of the exported XML. In this example, you replace the DataEntry.xml file you have saved (see Figure 17-16).
Tip
Record a macro to capture the process of exporting the data in your XML list to an XML file path. Once recoded, you can assign the macro to a button, allowing your users to export their results at the click of a button.
Once you have an XML file with the results, all Access has to do is find the file and import it. Start by selecting the External Data tab in the ribbon. From there, select XML File under the Import group as illustrated in Figure 17-17.
This activates the Get External Data-XML File dialog box (see Figure 17-18), where you're asked to specify the file path of the XML file you want to import.
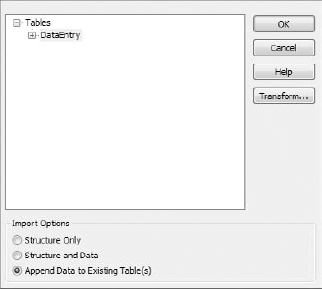
When you click OK, the Import XML dialog box allows you to determine how the XML data is imported. As you can see here in Figure 17-19, you can choose to import only the XML structure, both the structure and the data, or you can choose to append only the data to an existing table. Since you have already created a table to capture the data, you will select the last option (Append Data to Existing Table).
After a few clicks, your DataEntry table is updated with the data from the XML file (Figure 17-19).
Again, no data connections, no MS Query, and no programming are needed. Simply passing XML files between Excel and Access allows you to integrate data between the two programs.
An XML document is little more than a text file that contains data wrapped in tags that denote structure and meaning. These tags essentially make a text file machine-readable, which means that any application designed to read XML files will be able to discern the structure and content of the XML document. Because XML is text-based, XML is not dependent on a specific application for construction, reading, or editing. This versatility makes XML an excellent integration mechanism.
With XML, you can bypass those technologies that you may not feel comfortable with such as MS Query, SQL statements, or ADO. You can incorporate external data into your Excel or Access processes without the need to manage database connectivity or use complex SQL statements.
Despite the anxiety that some people feel about XML, most of the XML functionality built into Excel and Access requires no programming and little knowledge of databases. That is to say, all of the steps you need to create an XML-based reporting solution can be performed using only the user interfaces that come with Excel and Access. For example, you can open an XML file directly with Excel. Excel will immediately recognize that the file you are opening is an XML document, so it will active the user-friendly Open XML dialog box.
The exercises in this chapter are very basic examples that use only a small fraction of the power of XML. Incorporating a little creative thinking and a handful of code via Macros or VBA will allow you to create relatively robust XML-based processes that integrate Excel and Access quite nicely.


