Every data-oriented process has an application flow, a succession of applications that take the data from creation to end user. Sometimes only one application touches a dataset, such as when you create a report and present it in Excel. In many cases, however, data is moved from a database such as Access, is analyzed and aggregated in Excel, and is then distributed via a Word document, PowerPoint presentation, or even email.
As you know, the focus of this book has been on the integration of Excel and Access. However, it is worth looking at how Excel integrates with some other Office applications. In this chapter, you will do just that, learning how you can integrate Excel with some of the other applications in the Microsoft Office Suite.
Note
All the code in this chapter is in the Chapter18_SampleFile.xlsm file you downloaded with the sample files for this book.
It's not unusual to see a Word document that contains a table that originated in Excel. In most cases, that table was simply copied and pasted directly into Word. While this is indeed a valid form of integration, there are countless ways to integrate Excel and Word that go beyond copying and pasting data. This section offers a few examples, demonstrating different techniques you can leverage to integrate Excel and Word.
How many times have you copied and pasted the same Excel table into Word, only because the data changed? There is a better way. You can create a dynamic link to your Excel data, allowing your Word document to pick up changes to the table automatically.
When you copy and paste a range, you are simply creating a picture of the range. However, when you create a link to a range, Word stores the location information to your source field and then displays a representation of the linked data. The net effect is that when the data in your source file changes, Word updates its representation of the data to reflect the changes. To test this concept of linking to an Excel range, take a moment to walk through an example.
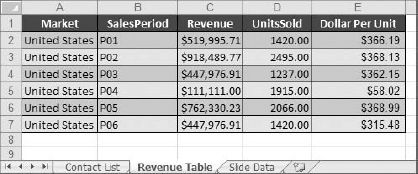
Open the Chapter18_SampleFile.xlsm file and go to the Revenue Table tab. Select and copy the range of cells shown here in Figure 18-1.
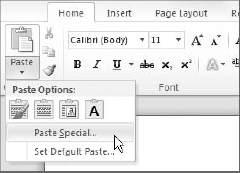
Open a Word document and place your cursor where you want to display the linked table. Go up to the Home tab in Word and select Paste

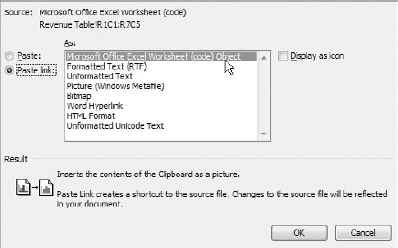
In the Paste Special dialog box, illustrated in Figure 18-3, select the Paste link option and choose Microsoft Excel Worksheet from the list of document types.
Click the OK button to apply the link. At this point, you have the table linked to your Excel file (Figure 18-4).
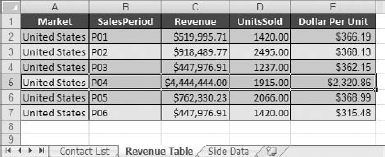
Open your Excel file and change some data as demonstrated in Figure 18-5.
Upon returning to Word, you will see that your linked table automatically captured the changes (see Figure 18-6)!
Word automatically captured the changes here because both the Word file and the source Excel file were open. Close and save both files and then open Word again. This time you will see the message shown here in Figure 18-7. Clicking the Yes button will refresh the link.
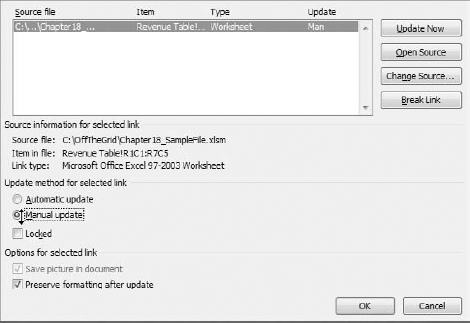
There may be situations where getting the message you see in Figure 18-7 is not ideal. For example, if you are distributing this document, you may not want your clients to see this message. Also, you may have a linked table that contains data that doesn't change that often, so there's no need for Word to automatically refresh on every open. In these situations, you may want to specify that you will always refresh the link manually. That is to say, you don't want Word to automatically try to refresh the link:
Right-click the linked table and select Linked Worksheet Object

As you can see, the idea here is to choose the target source file from the Source File list and select the Manual update option.
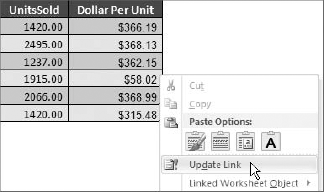
To manually refresh the link at any time, simply right click the linked table and select Update Link as demonstrated in Figure 18-9.
If you're more of the automation type, here is an example of how you can copy an Excel range into a Word document. The idea here is that instead of linking a table, you can create your document on the fly.
To set up for a process like this, you must have a template Word document already created. In that document, create a bookmark tagging the location where you want your Excel data to be copied.
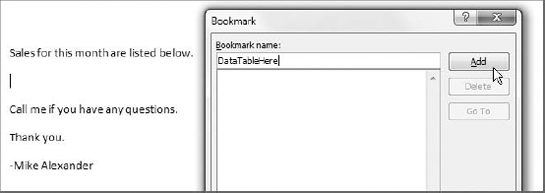
To create a bookmark in a Word document, place your cursor where you want the bookmark, select the Insert tab, and select Bookmark (found under the Links group). This activates the Bookmark dialog box, illustrated in Figure 18-10. Here, you assign a name for your bookmark and click the Add button.
In the sample files, you will find a document called PasteTable.docx. This document is a simple template that contains one bookmark called DataTableHere. In the following example code, you copy a range to that PasteTable.docx template, using the DataTableHere bookmark to specify where to paste the copied range.
Note
This code is designed to run from Excel. Therefore, you need to set a reference to the Microsoft Word Object Library. To do so, open the Visual Basic Editor in Excel and select Tools
Sub PasteExcelTableIntoWord()

'Step 1: Declare your variables
   Dim MyRange As Excel.Range
   Dim wd As Word.Application
   Dim wdDoc As Word.Document
   Dim WdRange As Word.Range

'Step 2: Copy the defined range
   Sheets("Revenue Table").Range("A1:E7").Copy


'Step 3: Open the target Word document
   Set wd = New Word.Application
   Set wdDoc = wd.Documents.Open("C:OffTheGridPasteTable.docx")
   wd.Visible = True
'Step 4: Set focus on the target bookmark
Set WdRange = wdDoc.Bookmarks("DataTableHere").Range
'Step 5: Delete the old table and paste new
On Error Resume Next
WdRange.Tables(1).Delete
WdRange.Paste 'paste in the table
'Step 6: Adjust column widths
WdRange.Tables(1).Columns.SetWidth _
(MyRange.Width / MyRange.Columns.Count), wdAdjustSameWidth
'Step 7: Reinsert the bookmark
wdDoc.Bookmarks.Add "DataTableHere", WdRange
'Step 8: Memory cleanup
Set wd = Nothing
Set wdDoc = Nothing
Set WdRange = Nothing
End SubThe following outlines what the steps in the code do:
Declaring the necessary variables: In Step 1, you first declare four variables:
Copying the Excel range: Step 2 copies a range from the Revenue Table worksheet. In this example, the range is hard-coded, but you can always make this range into something more variable.
Opening the target Word document: In Step 3, you are opening an existing target Word document that will serve as your template. Note that you are setting the
Visibleproperty of the Word application toTrue. This will ensure that you can see the action in Word as the code runs.Selecting the target bookmark: In Step 4, you use Word's
Rangeobject to set focus on the target bookmark. This essentially selects the bookmark as a range, allowing you to take actions in that range.Deleting the old table and paste the new table: In Step 5, you delete any table that may exist within the bookmark; then you paste the copied Excel range. If you don't delete any existing tables first, the copied range will be appended to the existing data.
Adjusting column widths: When pasting an Excel range in to a Word document, the column widths don't always come out clean. Step 6 fixes this issue by adjusting the column widths. Here, each column's width is set to a number that equals the total width of the table divided by the number of columns in the table.
Reinserting the bookmarks: When you paste your Excel range to the target bookmark, you essentially overwrite the bookmark. In Step 7, you re-create the bookmark to ensure that the next time you run this code, the bookmark is there.
Cleaning up the open objects: In Step 8, you release the objects assigned to your variables, reducing the chance of any problems caused by rogue objects that may remain open in memory.
One of the most requested forms of integration with Word is the mail merge. In most cases, mail merge refers to the process of creating one letter or document for each customer in a list of customers. For example, suppose you had a list of customers and you wanted to compose a letter to each customer. With mail merge, you can write the body of the letter one time and then run the Mail Merge feature in Word to automatically create a letter for each customer, affixing the appropriate address, name, and other information to each letter.
To create your first mail-merge process, walk through this next example.
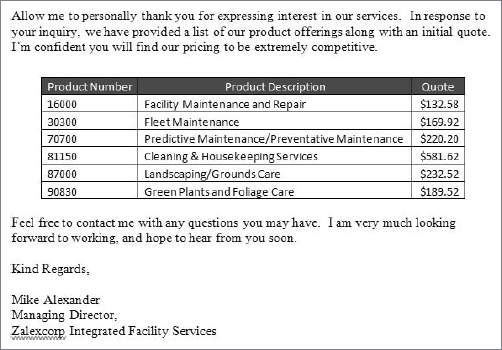
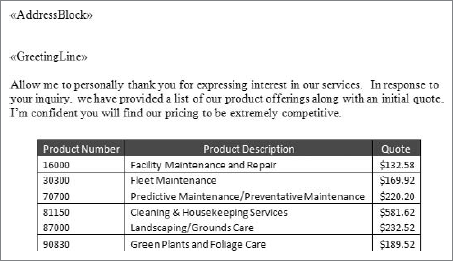
Although it's not necessary, it's typically a good idea to create a template for your mail merge document. Creating a template beforehand allows you take some time in constructing and formatting your letter or document. Figure 18-11 shows the MyTemplate.docx file found in the sample files for this book. Open this file.
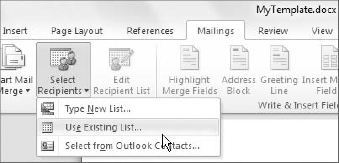
Click the Mailings tab in Word and click Select Recipients

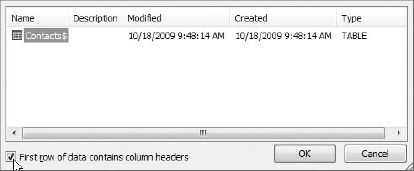
Once you open an existing list of resources, you see the dialog box illustrated in Figure 18-13. The most notable aspect of this step is that you can specify whether the file you are using as your list of recipients has a header row. That is to say, the first row of the dataset is dedicated to column headers.
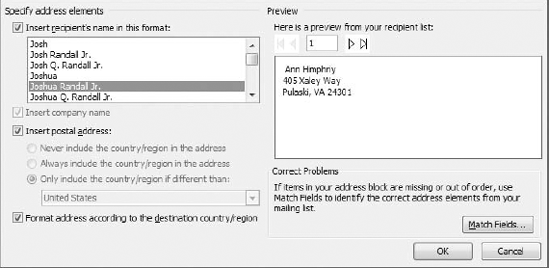
Go back to the Mailings tab in Word and select the Address Block command button (found under the Write & Insert Fields group). This activates the dialog box shown here in Figure 18-14. Here, you specify how you want your address block to be compiled. Word takes all the components that make up an address and compiles them into a standard address format. Word typically does a good job at getting this right the first time; however, you can configure the address block if needed.
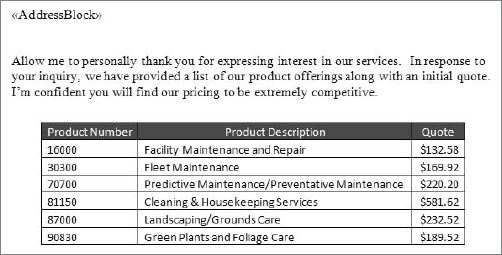
At this point, you will see a marker in your document called Address Block (Figure 18-15). You can move this tag to the most appropriate location.
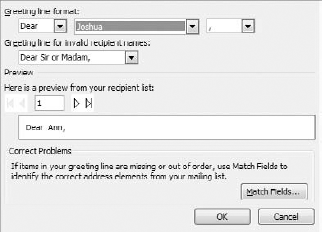
Go back to the Mailings tab in Word and select the Greeting Line command button (you can find this under the Write & Insert Field group). This activates the dialog box shown here in Figure 18-16. Here, you specify how you want your greetings to be configured.
At this point, you will see an additional marker in your document called Greeting Line (Figure 18-17). Again, you can move this tag to the location that is most appropriate.
Go back to the Mailings tab and select the Finish and Merge command button (Figure 18-18). As you can see, you can choose to edit the documents, print the documents, or send each document via email. In this case, select Edit Individual Documents.
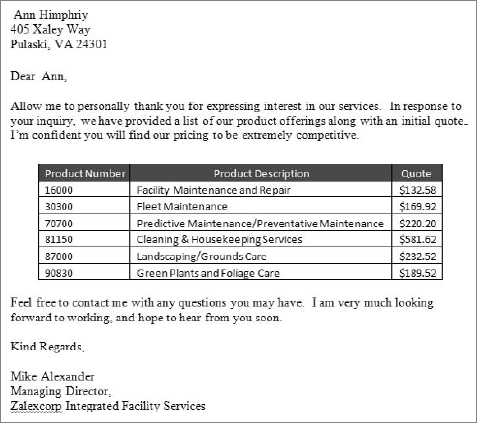
After you indicated the records you want, you'll see a set of Word documents that contain your original template with personalized contact information for each person in your Excel contacts list (Figure 18-19).
For you automation buffs, you can also simulate the Word Mail Merge function from Excel. The idea is relatively simple. You start with a template that contains bookmarks identifying where each element of contact information will go.
Note
You can open the MailMerge.docx document (found in the sample files for this book) to take a peek at the template. However, you'll have to open the Chapter18_SampleFile.xlsm file to run the code example demonstrated here.
With the template set to go, the idea for the following code is to simply loop through each contact in your contact list, assigning the component pieces of their contact information to the respective bookmarks.
Private Sub MailMergeWithExcel()

'Step 1: Declare your variables
   Dim wd As Word.Application
   Dim wdDoc As Word.Document
   Dim MyRange As Excel.Range
   Dim MyCell As Excel.Range
   Dim txtAddress As String
   Dim txtCity As String
   Dim txtState As String
   Dim txtPostalCode As String
   Dim txtFname As String
   Dim txtFullname As String

'Step 2: Start Word and add a new document
   Set wd = New Word.Application
   Set wdDoc = wd.Documents.Add
   wd.Visible = True

'Step 3: Set the range of your contact list
   Set MyRange = Sheets("Contact List").Range("A2:A21")

'Step 4: Start the loop through each cell
   For Each MyCell In MyRange.Cells

'Step 5: Assign values to each component of the letter
   txtAddress = MyCell.Value
   txtCity = MyCell.Offset(, 1).Value
   txtState = MyCell.Offset(, 2).Value
   txtPostalCode = MyCell.Offset(, 3).Value
   txtFname = MyCell.Offset(, 5).Value
   txtFullname = MyCell.Offset(, 6).Value

'Step 6:Insert the structure of your template document
   wd.Selection.InsertFile "C:OffTheGridMailMerge.docx"

'Step 7: Fill each relevant bookmark with its respective value
   wd.Selection.Goto What:=wdGoToBookmark, Name:="Customer"
   wd.Selection.TypeText Text:=txtFullname
wd.Selection.Goto What:=wdGoToBookmark, Name:="Address"
wd.Selection.TypeText Text:=txtAddress
wd.Selection.Goto What:=wdGoToBookmark, Name:="City"
wd.Selection.TypeText Text:=txtCity
wd.Selection.Goto What:=wdGoToBookmark, Name:="State"
wd.Selection.TypeText Text:=txtState
wd.Selection.Goto What:=wdGoToBookmark, Name:="Zip"
wd.Selection.TypeText Text:=txtPostalCode
wd.Selection.Goto What:=wdGoToBookmark, Name:="FirstName"
wd.Selection.TypeText Text:=txtFname
'Step 8: Clear any remaining bookmarks
On Error Resume Next
wdDoc.Bookmarks("Address").Delete
wdDoc.Bookmarks("Customer").Delete
wdDoc.Bookmarks("City").Delete
wdDoc.Bookmarks("State").Delete
wdDoc.Bookmarks("FirstName").Delete
wdDoc.Bookmarks("Zip").Delete
On Error GoTo 0
'Step 9: Go to the end, insert new page, and start with the next cell
wd.Selection.EndKey Unit:=wdStory
wd.Selection.InsertBreak Type:=wdPageBreak
Next MyCell
'Step 10: Set cursor to beginning and clean up memory
wd.Selection.HomeKey Unit:=wdStory
wd.Activate
Set wd = Nothing
Set wdDoc = Nothing
End SubThe following outlines what the steps in the code do:
Declaring the necessary variables: In Step 1, you first declare four variables:
Then you declare six string variables. Each of the string variables will hold a component piece of information for each contact in the contact list.
Opening Word and starting a new document: Step 2 opens Word with a blank document. Note that you're setting the
Visibleproperty of the Word application toTrue. This ensures that you can see the action in Word as the code runs.Setting the range of the contact list: Step 3 defines each contact in the contact list. Note that this range only selects the first column in the contacts table. This is because each cell in the range must be passed individually to string variables. Selecting only the first column gives you one cell per row. From that one cell, you can easily adjust your cursor to the right or left to capture the cells around it. The idea is that if you move to the right one space, you get the value of the next field in that row. If you move to the right two spaces, you get the value of that field, and so on.
Starting looping through each contact: Step 4 starts the loop through each contact as defined in the range set in Step 3.
Assigning values to each component piece of the contact's information: In Step 5, you use Excel's
Offsetmethod to capture the value of each field in a particular row. You start with the range defined in Step 3 (the first column in the list of contacts). You then useOffsetto move your cursor a certain number of columns to the right to capture the data each relevant field. As each field is covered, you assign their values to the appropriate string variable.Inserting the structure of your template: In Step 6, you insert your existing template into the empty document in Word. This is tantamount to copying the structure of your template and pasting it into a blank document.
Assigning values to the bookmarks: In Step 7, you assign the value of each string variable to its respective bookmark. As you can see in the code, you simply select the bookmark by name, and then change the text to equal the value of the assigned string variable.
Deleting bookmarks: The goal in Step 8 is to remove any stray bookmarks. If any bookmarks linger, you will get duplicate bookmarks as the procedure loops through each cell.
Inserting a new document and looping to next contact: At this point in the code, you have created a document for one contact in your list of contacts. The idea now is to create a new blank document so that you can perform the same procedure for the next contact.
Inserting a page break effectively creates the blank document. You then loop back to Step 5 where you pick up the contact information for the next row in the list. Then at Step 6, you insert the blank template (complete with bookmarks) into the new page. Finally, you assign values to the bookmarks and clean up. The
For...Nextloop ensures that this cycle is repeated for each row in your contact listCleaning up the open objects: In Step 10, you release the objects assigned to your variables, reducing the chance of any problems caused by rogue objects that may remain open in memory.
It's been said that up to 50 percent of PowerPoint presentations contain data that has been copied straight out of Excel. This is not difficult to believe. It's often much easier to analyze and create charts and data views in Excel than in PowerPoint. Once you create those charts and data views, why wouldn't you simply copy them into PowerPoint? The time and effort saved by copying directly from Excel is too good to pass up.
This section offers up a few techniques that can help you automate the process of getting your Excel data into PowerPoint.
To help get a few fundamentals down, let's start simple and automate the creation of a PowerPoint presentation containing one slide with a title. The idea here is that you place this code into an Excel module and run it directly from Excel.
Note
Keep in mind that because this code is run from Excel, you need to set a reference to the Microsoft PowerPoint Object Library. Again, you can set the reference by opening the Visual Basic Editor in Excel and selecting Tools
Sub CreatePowerPointSlideWithTitle()

'Step 1: Declare variables
   Dim PP As PowerPoint.Application
   Dim PPPres As PowerPoint.Presentation
   Dim PPSlide As PowerPoint.Slide
   Dim SlideTitle As String

'Step 2: Open PowerPoint and create new presentation
   Set PP = New PowerPoint.Application
Set PPPres = PP.Presentations.Add
   PP.Visible = True

'Step 3: Add new slide as slide 1 and set focus to it
   Set PPSlide = PPPres.Slides.Add(1, ppLayoutTitleOnly)
   PPSlide.Select

'Step 4: Add the title to the slide
   SlideTitle = "My First PowerPoint Slide"
   PPSlide.Shapes.Title.TextFrame.TextRange.Text = SlideTitle

'Step 5: See the presentation
   PP.Activate

'Step 6: Memory Cleanup
   Set PPSlide = Nothing
   Set PPPres = Nothing
   Set PP = Nothing

End sub
The following outlines what the steps in the code do:
Declaring the necessary variables: In Step 1, you first declare four variables:
Opening PowerPoint and start a new presentation: Step 2 opens PowerPoint with an empty presentation. Note that you are setting the
Visibleproperty of the PowerPoint application toTrue. This ensures that you can see the action as the code runs.Adding a new slide: In Step 3, you add a new slide to the presentation using the
Addmethod ofSlideobject. Notice that when you add a new slide, you'll need to provide two arguments: the index number for the slide and the layout option for the slide. Since this is the first slide in the presentation, the index number is 1. The default layout option allows you to specify which one of PowerPoint's many layout options you want to apply to your slide. When you're automating PowerPoint, it's generally best to use eitherppLayoutTitleOnly(when you want a title in your presentation) orppLayoutBlank(when you don't need a title in your presentation).Adding the title to the slide: In Step 4, you store the text for the title in a string variable and pass that variable to PowerPoint to apply text to the title text frame.
Saving the presentation: Step 5 uses the
Activatemethod to set the focus on PowerPoint, ensuring that is comes into view when the code is done running.Cleaning up the open objects: In Step 6, you release the objects assigned to your variables, reducing the chance of any problems caused by rogue objects that may remain open in memory.
Now that you have a good sense of the basic code that creates a PowerPoint presentation, you should try adding some utility and actually copy a range from Excel into a PowerPoint presentation. In the following code, you copy a range from the Chapter18_SampleFile.xlsm file and paste that range to a slide in a newly created PowerPoint presentation.
Sub CopyRangeToPresentation ()

'Step 1: Declare your variables
   Dim PP As PowerPoint.Application
   Dim PPPres As PowerPoint.Presentation
   Dim PPSlide As PowerPoint.Slide
   Dim SlideTitle As String

'Step 2: Open PowerPoint and create new presentation
   Set PP = New PowerPoint.Application
   Set PPPres = PP.Presentations.Add
   PP.Visible = True

'Step 3: Add new slide as slide 1 and set focus to it
   Set PPSlide = PPPres.Slides.Add(1, ppLayoutTitleOnly)
   PPSlide.Select

'Step 4: Copy the range as a picture
   Sheets("Slide Data").Range("A1:J28").CopyPicture _
   Appearance:=xlScreen, Format:=xlPicture

'Step 5: Paste the picture and adjust its position
   PPSlide.Shapes.Paste.Select
   PP.ActiveWindow.Selection.ShapeRange.Align msoAlignCenters, True
   PP.ActiveWindow.Selection.ShapeRange.Align msoAlignMiddles, True

'Step 6: Add the title to the slide
SlideTitle = "My First PowerPoint Slide" PPSlide.Shapes.Title.TextFrame.TextRange.Text = SlideTitle 'Step 7: Memory Cleanup PP.Activate Set PPSlide = Nothing Set PPPres = Nothing Set PP = Nothing End sub
Declaring the necessary variables: In Step 1, you first declare four variables:
Opening PowerPoint and start a new presentation: Step 2 opens PowerPoint with an empty presentation. Note that you're setting the
Visibleproperty of the PowerPoint application toTrue. This ensures that you can see the action as the code runs.Adding a new slide and setting focus to it: In Step 3, you add a new slide to the presentation using the
Addmethod ofSlideobject. Note that you're using theppLayoutTitleOnlyattribute, ensuring your slide is created with a title text frame. You then take an extra step here and actually set focus on the slide. That is to say, you explicitly tell PowerPoint to select this slide, making it active.Copying your range as a picture: In Step 4, use the
CopyPicturemethod to copy the target range as a picture. The range you're copying here is A1 to J28 in the Slide Data tab.Pasting the picture into the presentation: Step 5 pastes the picture into the active slide and centers the picture both horizontally and vertically.
Adding the title to the slide: In Step 6, you store the text for the title in a string variable and then pass that variable to PowerPoint to apply text to the title text frame.
Cleaning up the open objects: In Step 7, you release the objects assigned to your variables, reducing the chance of any problems caused by rogue objects that may remain open in memory.
It's not uncommon to see multiple charts on one worksheet. For example, open the Chapter18_SampleFile.xlsm sample file and go to the Slide Data tab. There, you will see a worksheet that contains multiple charts, one for each Region. The idea here is that you can automate the process of copying each one of these charts into its own slide.
The example code that follows does just that. In this code, you loop through each chart in the specified worksheet, copying each and pasting it into its own slide in PowerPoint.
Sub CopyAllChartsToPresentation()

'Step 1: Declare your variables
   Dim PP As PowerPoint.Application
   Dim PPPres As PowerPoint.Presentation
   Dim PPSlide As PowerPoint.Slide
   Dim PPSlideCount As Long
   Dim i As Integer

'Step 2: Check for charts; exit if no charts exist
   Sheets("Slide Data").Select
   If ActiveSheet.ChartObjects.Count < 1 Then
   MsgBox "No charts existing the active sheet"
   Exit Sub
   End If

'Step 3: Open PowerPoint and create new presentation
   Set PP = New PowerPoint.Application
   Set PPPres = PP.Presentations.Add
   PP.Visible = True

'Step 4: Start the loop based on chart count
   For i = 1 To ActiveSheet.ChartObjects.Count

'Step 5: Copy the chart as a picture
   ActiveSheet.ChartObjects(i).Chart.CopyPicture _
   Size:=xlScreen, Format:=xlPicture
   Application.Wait (Now + TimeValue("0:00:1"))

'Step 6: Count slides and add new slide as next available slide number
   PPSlideCount = PPPres.Slides.Count
   Set PPSlide = PPPres.Slides.Add(PPSlideCount + 1, ppLayoutBlank)
   PPSlide.Select

'Step 7: Paste the picture and adjust its position; Go to next chart
   PPSlide.Shapes.Paste.Select
   PP.ActiveWindow.Selection.ShapeRange.Align msoAlignCenters, True
PP.ActiveWindow.Selection.ShapeRange.Align msoAlignMiddles, True Next i 'Step 8: Memory Cleanup Set PPSlide = Nothing Set PPPres = Nothing Set PP = Nothing End Sub
The following outlines what the steps in the code do:
Declaring the necessary variables: In Step 1, you first declare four variables:
PPis an object variable that exposes the PowerPointApplicationobject.PPPresis an object variable that exposes the PowerPointPresentationobject.PPSlideis an object variable that exposes the PowerPointSlideobject.PPSlideCountis numeric variable that helps keep track of which slide is the target slide.iis a counter to help loop through the charts in the worksheet.
Checking for charts: Step 2 is an administrative check to ensure there are actually charts in the specified worksheet. If no charts are found, you exit the procedure with no further action.
Opening PowerPoint and starting a new presentation: Step 3 opens PowerPoint with an empty presentation. Note that you're setting the
Visibleproperty of the PowerPoint application toTrue. This ensures that you can see the action as the code runs.Starting looping through the charts: In Step 4, you establish how many times you will loop through the procedure by capturing the number of charts in the worksheet. In other words, if you have five charts in the worksheet, you loop five times. You start the loop with 1 and keep looping through the procedure until you hit the number of charts in the worksheet. The variable
iultimately represents the chart number you are currently on.Copying your chart as a picture: In Step 5, use the
CopyPicturemethod to copy the chart as a picture. The variableipasses the actual chart number you are currently working with. TheApplication.Waitmethod, here, tells the macro to pause for a second, allowing the clipboard to catch up with all the copying going on.Count the slides and adding a new slide at the next available index: In Step 6, you add a new slide to the presentation using the
Addmethod of theSlideobject. You will notice that you are usingSlideCount+1to specify the index number of the added slide. Because you are looping through an unknown number of charts, you can't hard-code the index number for each slide. UsingSlideCount+1allows you to dynamically assign the next available number as the slide index.Also note that you are using
ppLayoutBlank, which ensures that the newly created slides start with a blank layout. You then take an extra step here and actually set focus on the slide. That is to say, you explicitly tell PowerPoint to select this slide, making it active.Pasting the chart into the presentation and moving to next chart: Step 7 pastes the picture into the active slide, centers the picture both horizontally and vertically and then moves to the next chart.
Cleaning up the open objects: In Step 8, you release the objects assigned to your variables, reducing the chance of any problems caused by rouge objects that may remain open in memory.
This last example takes the concept of using Excel data in PowerPoint to the extreme. Open the sample workbook called WorkbooktoPowerpoint.xlsm. In this workbook, you notice that each worksheet contains its own data about a region—almost like each worksheet has its own separate slide, which provides information on a particular region.
The idea here is that you can build a workbook in such a way that it mimics a PowerPoint presentation; the workbook is the presentation itself and each worksheet becomes a slide in the presentation. Once you do that, you can easily convert that workbook into an actual PowerPoint presentation using a bit of automation.
With this technique, you can build entire presentations in Excel where you have better analytical and automation tools. Then you can simply convert the Excel version of your presentation to a PowerPoint presentation.
The following code will convert the sheets of an Excel workbook to a PowerPoint presentation.
Sub WorkbooktoPowerPoint()

'Step 1: Declare your variables
  Dim pp As PowerPoint.Application
  Dim PPPres As PowerPoint.Presentation
  Dim PPSlide As PowerPoint.Slide
  Dim xlwksht As Excel.Worksheet
Dim MyRange As String
  Dim MyTitle As String
  Dim Slidecount As Long


'Step 2: Open PowerPoint, add a new presentation and make visible
  Set pp = New PowerPoint.Application
  Set PPPres = pp.Presentations.Add
  pp.Visible = True


'Step 3: Set the ranges for your data and title
  MyRange = "A1:I27"

'Step 4: Start the loop through each worksheet
  For Each xlwksht In ActiveWorkbook.Worksheets
  xlwksht.Select
  Application.Wait (Now + TimeValue("0:00:1"))
  MyTitle = xlwksht.Range("20").Value

'Step 5: Copy the range as picture
  xlwksht.Range(MyRange).CopyPicture _
  Appearance:=xlScreen, Format:=xlPicture

'Step 6: Count slides and add new slide as next available slide number
  SlideCount = PPPres.Slides.Count
  Set PPSlide = PPPres.Slides.Add(SlideCount + 1, ppLayoutTitleOnly)
  PPSlide.Select

'Step 7: Paste the picture and adjust its position
  PPSlide.Shapes.Paste.Select
  pp.ActiveWindow.Selection.ShapeRange.Align msoAlignCenters, True
  pp.ActiveWindow.Selection.ShapeRange.Top = 100

'Step 8: Add the title to the slide then move to next worksheet
  PPSlide.Shapes.Title.TextFrame.TextRange.Text = MyTitle
  Next xlwksht

'Step 9: Memory Cleanup
  pp.Activate
  Set PPSlide = Nothing
  Set PPPres = Nothing
  Set pp = Nothing

End Sub
The following outlines what the steps in the code do:
Declaring the necessary variables: In Step 1, you first declare six variables:
PPis an object variable that exposes the PowerPointApplicationobject.PPPresis an object variable that exposes the PowerPointPresentationobject.PPSlideis an object variable that exposes the PowerPointSlideobject.xlwkshtis an object variable that exposes theWorksheetobject.MyRangeis a string variable that stores and passes a range name as a string.MyTitleis a string variable that stores and passes a title for each slide.PPSlideCountis numeric variable that helps keep track of which slide is the target slide.
Opening PowerPoint and start a new presentation: Step 2 opens PowerPoint with an empty presentation. Note that you're setting the
Visibleproperty of the PowerPoint application toTrue. This ensures that you can see the action as the code runs.Setting the ranges for your data and title: In Step 3, fill the
MyRangevariable with a string representing the range you want to capture as the slide content.Starting a loop through the charts: In Step 4, you start the loop through each worksheet in the workbook. The loop stops when all worksheets have been looped through. Note that you're using the
Application.Waitmethod, telling the macro to pause for a second. This allows the chart to render completely before the range is copied. While you loop, you fill theMyTitlevariable with the value of cell C20. This value becomes the title for the slide.Copying your range as a picture: In Step 5, use the
CopyPicturemethod to copy your specified range as a picture.Count the slides and add a new slide at the next available index: In Step 6, you add a new slide to the presentation using the
Addmethod of theSlideobject. Notice that you are usingSlideCount+1to specify the index number of the added slide. UsingSlideCount+1allows you to dynamically assign the next available number as the slide index. Note that you are using theppLayoutTitleOnly, ensuring your slide is created with a title text frame.Pasting the chart into the presentation and moving to next chart: Step 7 pastes the picture into the active slide, centers the picture horizontally, and adjusts the picture vertically 100 pixels from the top margin.
Adding the title to the slide: Step 8 passes the
MyTitlevariable to apply text to the title text frame.Cleaning up the open objects: In Step 9, you release the objects assigned to your variables, reducing the chance of any problems caused by rogue objects that may remain open in memory.
Did you know that you integrate Excel and Outlook every day? It's true. If you sent or received an Excel workbook through Outlook, you've integrated the two programs, albeit manually. In this section, you will discover a few examples of how to integrate Excel and Outlook in a more automated fashion.
The most fundamental Outlook task you can perform through automation is sending an email. In the example that follows code, the active workbook is sent to two email recipients as an attachment.
Note
Keep in mind that because this code is run from Excel, you need to set a reference to the Microsoft Outlook Object Library. Again, you can set the reference by opening the Visual Basic Editor in Excel and selecting Tools
Sub Mail_workbook_Outlook()
'Step 1: Declare your variables
   Dim OLApp As Outlook.Application
   Dim OLMail As Object

'Step 2: Open Outlook start a new mail item
   Set OLApp = New Outlook.Application
   Set OLMail = OLApp.CreateItem(0)
   OLApp.Session.Logon

'Step 3: Build your mail item and send
   With OLMail
   .To = "[email protected]; [email protected]"
   .CC = ""
   .BCC = ""
   .Subject = "This is the Subject line"
   .Body = "Hi there"
   .Attachments.Add ActiveWorkbook.Fullname
   .Send
   End With
'Step 4: Memory cleanup
   Set OLMail = Nothing
   Set OLApp = Nothing

End Sub
The following outlines what the steps in the code do:
Declaring the necessary variables: In Step 1, you first declare two variables:
Open Outlook and start a new session: In Step 2, you activate Outlook and start a new session. Note that you'll use OLApp.Session.Logon to log on to the current MAPI session with default credentials. You also create a mail item. This is equivalent to selecting the New Message button in Outlook.
Build your mail item and send: In Step 3, you build the profile of your mail item. This includes the
Torecipients, theCCrecipients, theBCCrecipients, theSubject, theBody, and theAttachments. Note that you enter the recipients in quotes, and you separate recipients using a semicolon.The standard syntax for an attachment is as follows:
.Attachments.Add "File Path"
Here, in the previous code, you specify the current workbook's file path with the syntax:
ActiveWorkbook.Fullname. This sets the current workbook as the attachment for the email. When the message is built, you use theSendmethod to send the email.Clean up the open objects: It is generally good practice to release the objects assigned to your variables. This reduces the chance of any problems caused by rogue objects that may remain open in memory. As you can see in the code, you simply set variable to
Nothing.
Note
Your workbook must be saved before running the preceding code. You cannot attach an unsaved workbook to an email.
You can imagine that you may not always want to send your entire workbook through email. The following example code demonstrates how you would send a specific range of data rather than the entire workbook.
Sub Mail_Range()
'Step 1: Declare your variables
  Dim OLApp As Outlook.Application
  Dim OLMail As Object

'Step 2: Copy range, paste to new workbook, and save it
  Sheets("Revenue Table").Range("A1:K50").Copy
  Workbooks.Add
  Range("A1").PasteSpecial xlPasteValues
  Range("A1").PasteSpecial xlPasteFormats
  ActiveWorkbook.SaveAs "C:OffTheGridExcel_to_be_Mailed.xls"

'Step 3: Open Outlook start a new mail item
  Set OLApp = New Outlook.Application
  Set OLMail = OLApp.CreateItem(0)
  OLApp.Session.Logon

'Step 4: Build your mail item and send
  With OLMail
  .To = "[email protected]; [email protected]"
  .CC = ""
  .BCC = ""
  .Subject = "This is the Subject line"
  .Body = "Hi there"
  .Attachments.Add ("C:OffTheGridExcel_to_be_Mailed.xls")
  .Send
  End With

'Step 5: Delete the temporary Excel file
  ActiveWorkbook.Close SaveChanges:=True
  Kill "C:Excel_to_be_Mailed.xls"

'Step 6: Memory cleanup
  Set OLMail = Nothing
  Set OLApp = Nothing

End Sub
The following outlines what the steps in the code do:
Declaring the necessary variables: In Step 1, you first declare two variables:
OLAppis an object variable that exposes the OutlookApplicationobject.OLMail.is an object variable that holds a mail item.
Copy the desired range to a temporary Excel file: In Step 2, you copy a specified range and paste the values and formats to a temporary Excel file. You then save that temporary file, giving it a file path and file name.
Open Outlook and start a new session: In Step 3, you activate Outlook and start a new session. Note that you'll use OLApp.Session.Logon to log on to the current MAPI session with default credentials. You'll also create a mail item. This is equivalent to selecting the New Message button in Outlook.
Build your mail item and send: In Step 4, you build the profile of your mail item. This includes the
Torecipients, theCCrecipients, theBCCrecipients, theSubject, theBody, and theAttachments. Note that you enter the recipients in quotes, and you separate recipients using a semicolon.Here in Step 4, you specify your newly created temporary Excel file path as the attachment for the email. When the message is built, you use the
Sendmethod to send the email.Delete the temporary Excel file: You don't want to leave temporary files hanging out there, so once the email has been sent, you delete the temporary Excel file you created.
Clean up the open objects: It is generally good practice to release the objects assigned to your variables. This reduces the chance of any problems caused by rogue objects that may remain open in memory. As you can see in the code, you simply set variable to
Nothing.
Ever need to send out a mass mailing such as a newsletter or a memo? Instead of manually entering your contacts' email addresses, you can run the following code. In this code, you send out one email, automatically adding all the email addresses in your contact list to your email.
Sub Mail_To_All_Contacts()
'Step 1: Declare your variables
   Dim OLApp As Outlook.Application
   Dim OLMail As Object
   Dim MyCell As Range
   Dim MyContacts As Range

'Step 2: Define the range to loop through
   Set MyContacts = Sheets("Contact List").Range("H2:H21")

'Step 3: Open Outlook
   Set OLApp = New Outlook.Application
   Set OLMail = OLApp.CreateItem(0)
   OLApp.Session.Logon

'Step 4: Add each address in the contact list
   With OLMail
.BCC = ""
For Each MyCell In MyContacts
.BCC = .BCC & MyCell.Value & ";"
Next MyCell
.Subject = "Chapter 18 Sample Email"
.Body = "Sample file is attached"
.Attachments.Add ActiveWorkbook.Fullname
.Send
End With
'Step 5: Memory cleanup
Set OLMail = Nothing
Set OLApp = Nothing
End subThe following outlines what the steps in the code do:
Declaring the necessary variables: In Step 1, you first declare four variables:
Define the target range: In Step 2, you point to the
MyContactsvariable to the range of cells that contains your email addresses. This is the range of cells through which you'll loop to add email addresses to your email.Open Outlook and start a new session: In Step 3, you activate outlook and start a new session. Note that you'll use OLApp.Session.Logon to log on to the current MAPI session with default credentials. You'll also create a mail item. This is equivalent to selecting the New Message button in Outlook.
Add each address in your contact list: In Step 4, you build the profile of your mail item. Note that you loop through each cell in the
MyContactsrange and add the contents (which are email addresses) to the BCC. Here, you are using theBCCproperty instead ofToorCCso that each recipient gets an email that looks as though it was sent only to him. He will not be able to see the other email addresses, as they have been sent with BCC (Blind Courtesy Copy).Clean up the open objects: It is generally good practice to release the objects assigned to your variables. This reduces the chance of any problems caused by rogue objects that may remain open in memory. As you can see in the code, you simply set variable to
Nothing.
You may often find that certain processes lend themselves to the exchange of data via email. For example, you may send a budget template out for each branch manager to fill out and send back to you via email. Well, if there are 150 branch members, it could be a bit of a pain to bring down all those email attachments.
The code that follows demonstrates one solution to this problem. In this code, you use automation to search for all attachments in your inbox and save them to a specified folder.
Sub SaveAttachments()
'Step 1: Declare your variables
   Dim ns As Namespace
   Dim MyInbox As MAPIFolder
   Dim MItem As MailItem
   Dim Atmt As Attachment
   Dim FileName As String

'Step 2: Set a reference to your inbox
   Set ns = GetNamespace("MAPI")
   Set MyInbox = ns.GetDefaultFolder(olFolderInbox)

'Step 3: Check for messages in your inbox; exit if none
   If MyInbox.Items.Count = 0 Then
   MsgBox "No messages in folder."
   Exit Sub
   End If

'Step 4: Create directory to hold attachments
   On Error Resume Next
   MkDir "C:OffTheGridMyAttachments"

'Step 5: Start to loop through each mail item
   For Each MItem In MyInbox.Items

'Step 6: Save each attachement then go to the next attachment
   For Each Atmt In MItem.Attachments
   FileName = "C:OffTheGridMyAttachments" & Atmt.FileName
   Atmt.SaveAsFile FileName
   Next Atmt

'Step 7: Move to the next mail item
   Next MItem
End Sub
The following outlines what the steps in the code do:
Declaring the necessary variables: In Step 1, you first declare five variables:
nsis an object that exposes theMAPInamespace.MyInboxexposes the target mail folder.MItemexposes the properties of a mail item.Atmtis an object variable that holds anAttachmentobject.FileNameis a string variable that holds the name of the attachment.
Point to your Inbox: In Step 2, you set the
MyInboxvariable to point to the inbox for your default mail client.Check for messages: In Step 3, you perform a quick check to make sure there are actually messages in your inbox. If there are no messages, you exit the procedure with a message box telling you there are no messages.
Create directory to hold attachments: In Step 4, you create a directory to hold the attachments you find. Although you could use an existing directory, it's generally best to use a directory dedicated specifically for the attachments you bring down. Here, you are creating that directory on the fly. Note you are using
On Error Resume Next. This ensures the code does not error out if the directory you are trying to create already exists.Start the loop: In Step 5, you start the loop through each mail item in the target mail folder.
Loop through all attachments in each mail item: Step 6 ensures that each mail item you loop through is checked for attachments. As you loop, you will save each attachment you find into the specified directory you created.
Move to next mail item: Step 7 loops back to Step 5 until there are no more mail items to go through.
Clean up the open objects: It is generally good practice to release the objects assigned to your variables. This reduces the chance of any problems caused by rogue objects that may remain open in memory. As you can see in the code, you simply set variable to
Nothing.
In the previous procedure, you use automation to search for all attachments in your inbox and save them to a specified folder. However, you'll more likely only want to save certain attachments. That is to say, those attachments attached to emails that contain a certain subject, for example. In the following example code, you get a demonstration of how to check for certain syntax and selectively bring down attachments.
Sub SaveCertainAttachments()

'Step 1: Declare your variables
   Dim ns As Namespace
   Dim MyInbox As MAPIFolder
   Dim MItem As Object
   Dim Atmt As Attachment
   Dim FileName As String
   Dim i As Integer

'Step 2: Set a reference to your inbox
   Set ns = GetNamespace("MAPI")
   Set MyInbox = ns.GetDefaultFolder(olFolderInbox)

'Step 3: Check for messages in your inbox; exit if none
   If MyInbox.Items.Count = 0 Then
   MsgBox "No messages in folder."
   Exit Sub
   End If

'Step 4: Create directory to hold attachments
   On Error Resume Next
   MkDir "C:OffTheGridMyAttachments"

'Step 5: Start to loop through each mail item
   For Each MItem In MyInbox.Items

'Step 6: Check for the words Data Submission in Subject line
   If InStr(1, MItem.Subject, "Data Submission") < 1 Then
   GoTo SkipIt
   End If

'Step 7: Save each with a log number; go to the next attachment
   i = 0
   For Each Atmt In MItem.Attachments
   FileName = _
   "C:OffTheGridMyAttachmentsAttachment-" & i & "-" & Atmt.FileName
   Atmt.SaveAsFile FileName
   i = i + 1
   Next Atmt

'Step 8: Move to the next mail item
SkipIt:
   Next MItem
'Step 9: Memory cleanup Set ns = Nothing Set MyInbox = Nothing End Sub
The following outlines what the steps in the code do:
Declaring the necessary variables: In Step 1, you first declare six variables:
nsis an object that exposes theMAPInamespace.MyInboxexposes the target mail folder.MItemexposes the properties of a mail item.Atmtis an object variable that holds anAttachmentobject.FileNameis a string variable that holds the name of the attachment.iis an integer variable that ensures each attachment is saved as a unique name.
Point to your inbox: In Step 2, you set the
MyInboxvariable to point to the inbox for your default mail client.Check for messages: In Step 3, you perform a quick check to make sure there are actually messages in your inbox. If there are no messages, you exit the procedure with a message box telling you there are no messages.
Create directory to hold attachments: In Step 4, you create a directory to hold the attachments you find. Note you are using
On Error Resume Next. This ensures the code does not error out if the directory you are trying to create already exists.Start the loop: In Step 5, you start the loop through each mail item in the target mail folder.
Check for the correct key words in the Subject line: In Step 6, you use the
Instrfunction to check if the string "Data Submission" is in the Subject line of the email. If that string does not exist, then you are not interested in the attachment there. Therefore, you force the code to go to theSkipItreference (in Step 8). Because the line of code immediately following theSkipItreference is essentially a "move next" command, this has the effect of telling the procedure to move to the next mail item.Loop through all attachments in each mail item: Step 7 loops through all the attachments and saves each one into the specified directory you created. Note that you are adding a running integer to the name of each attachment. This is to ensure that each attachment is saved as a unique name, helping you to avoid overwriting attachments.
Move to next mail item: Step 8 loops back to Step 5 until there are no more mail items to go through.
Clean up the open objects: It is generally good practice to release the objects assigned to your variables. This reduces the chance of any problems caused by rogue objects that may remain open in memory. As you can see in the code, you simply set the variable to
Nothing.
Excel data has a way of touching every application in the Office suite. Excel data is often distributed via a Word document, displayed through a PowerPoint presentation and even shared using Outlook. Although Access is the most well suited to integrate with Excel, these other Office applications also have the ability to integrate with Excel. You can use Excel and Word to create a Mail Merge document. You can automate the creation of an entire PowerPoint presentation directly from an Excel workbook. You can send mass emails through outlook, using nothing more than a list of email addresses in Excel. Use the techniques you learned in this chapter to think about some of the ways you can integrate Excel with the other applications in Office.
