
1. YOUR X-T10 SYSTEM
To start off, here’s a brief overview of the buttons and controls on your Fujifilm X-T10:
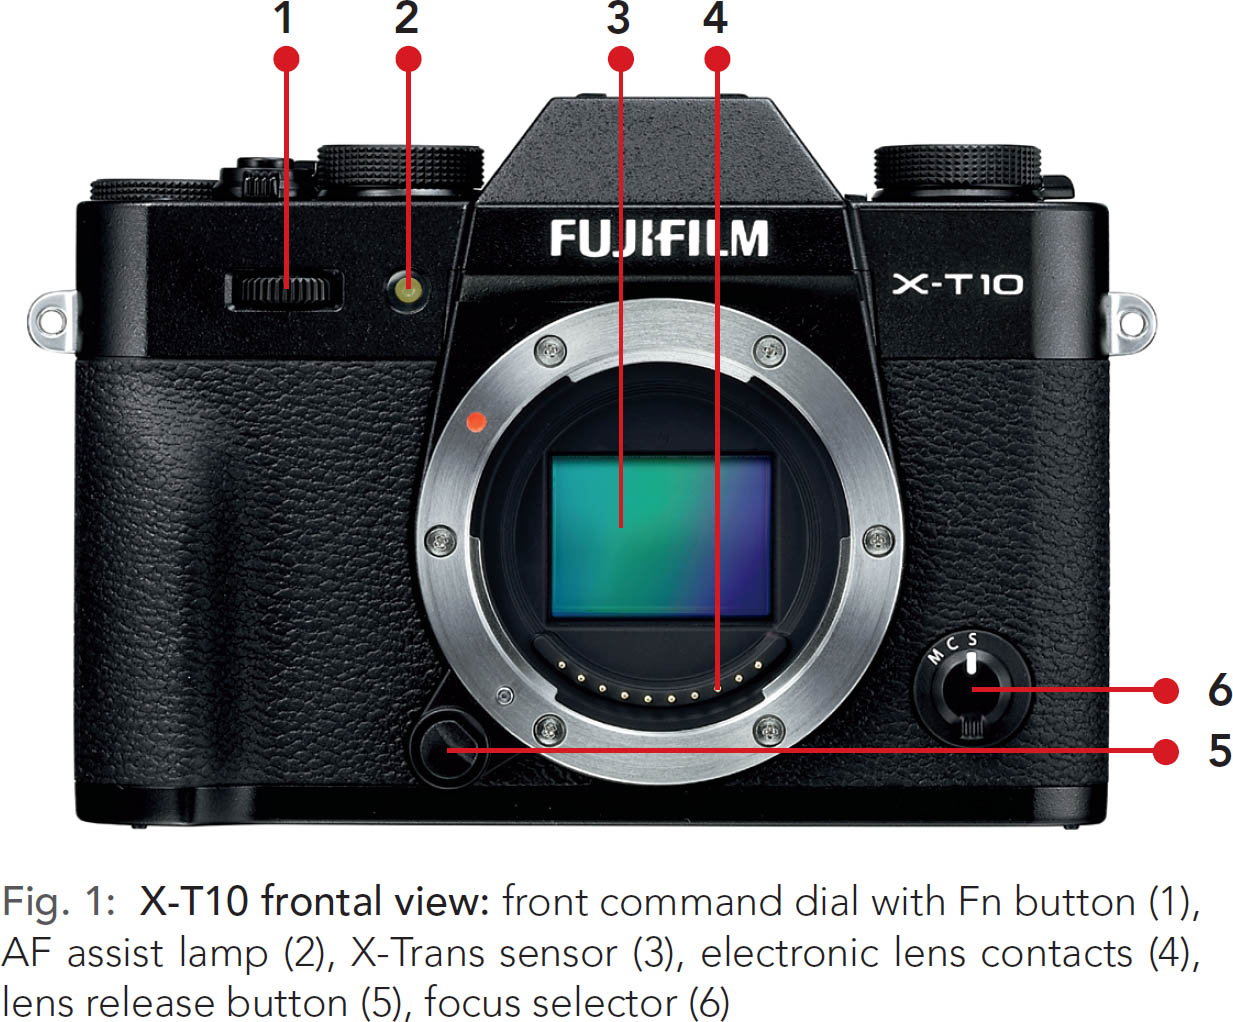
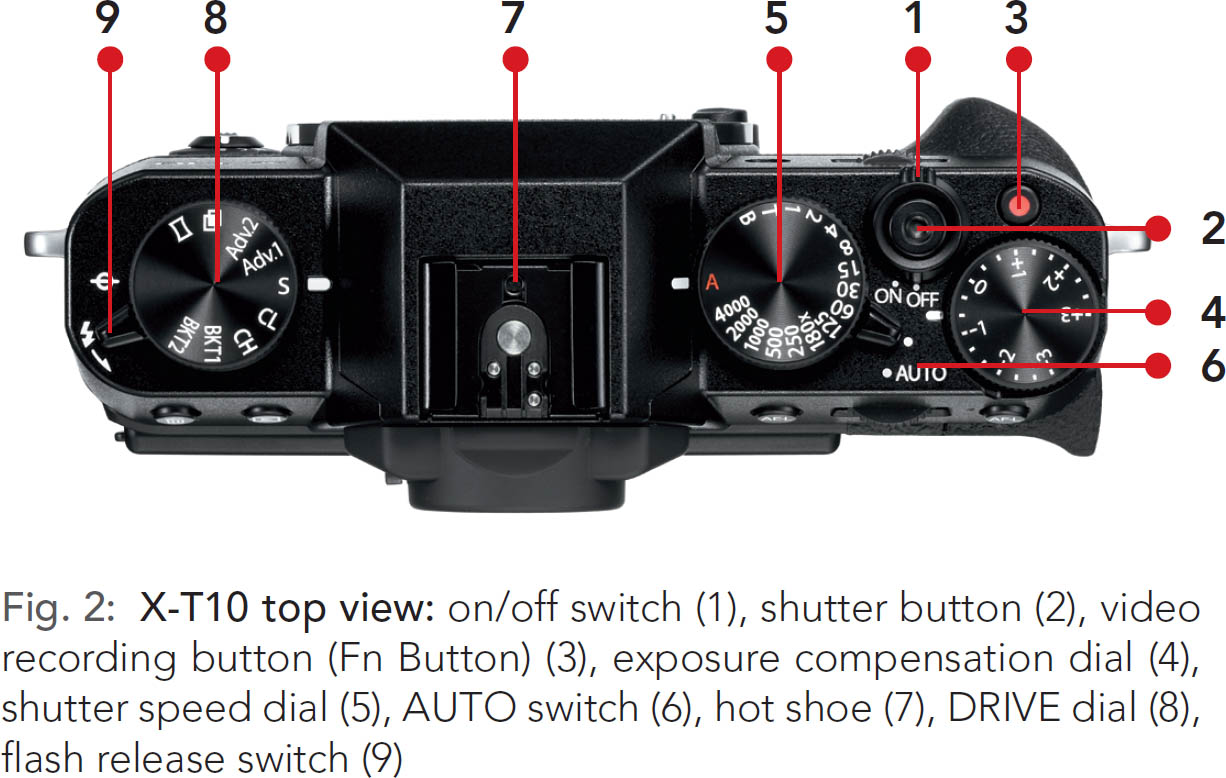
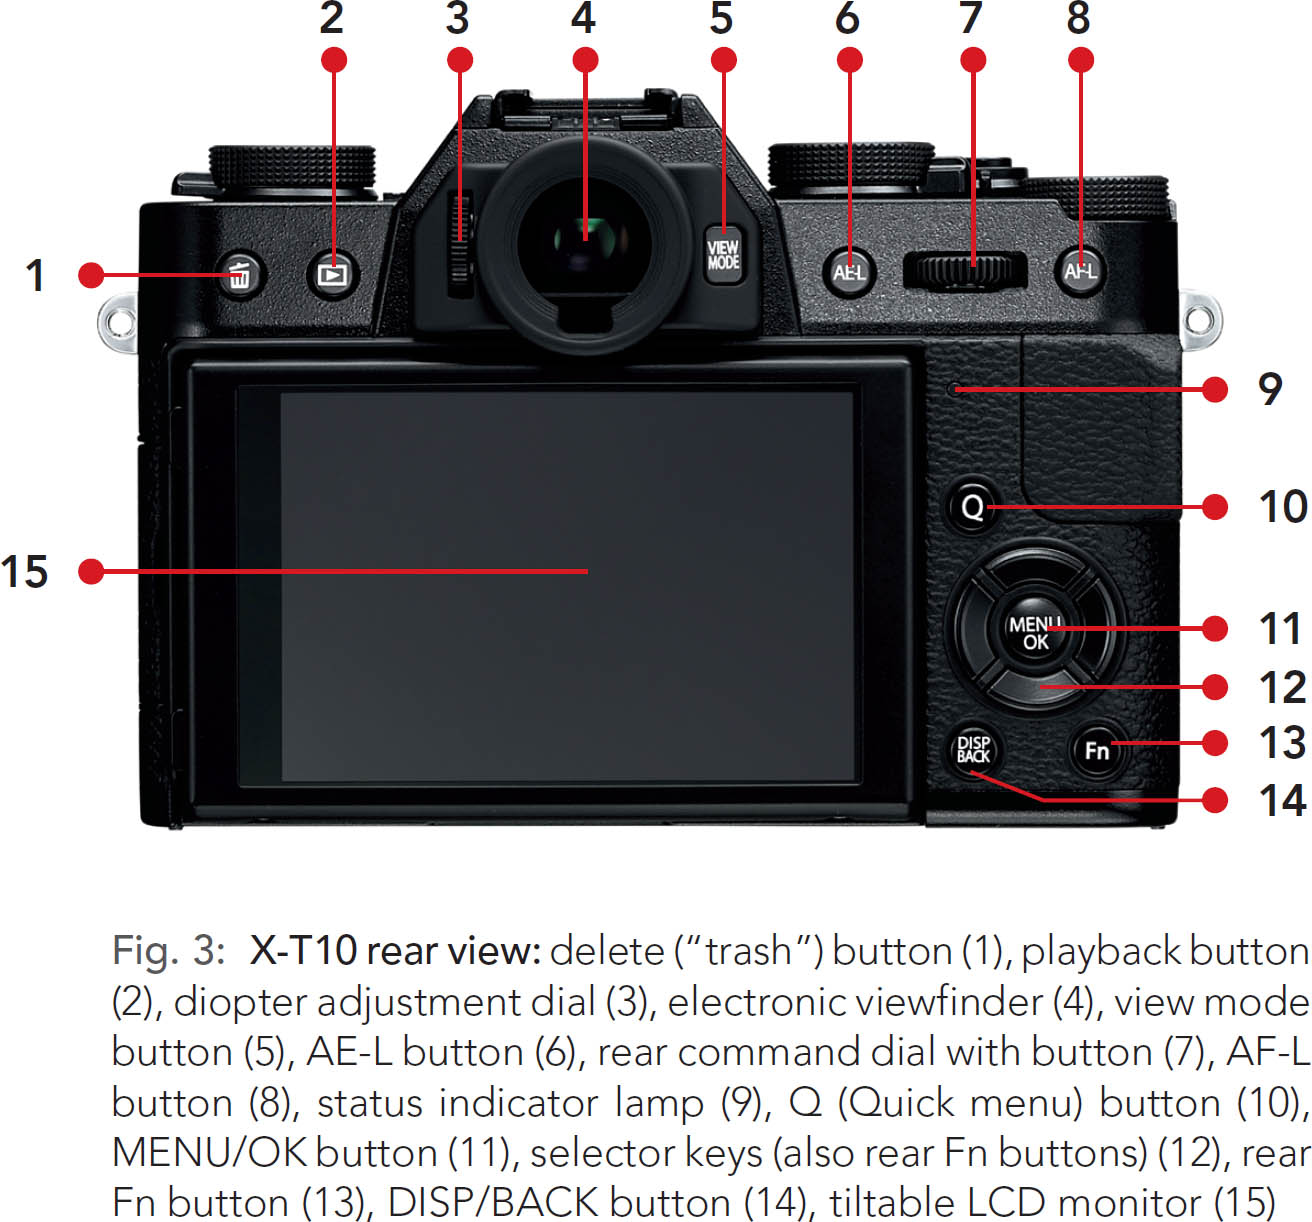
1.1 THE BASICS (1):
THINGS YOU SHOULD KNOW ABOUT YOUR CAMERA
RTFM! Read The Fuji Manual! It is included with your camera. You have a choice between the printed version and the PDF version on the CD that comes with the camera. |
In case you have misplaced your printed user manual and camera CD, or you want to update to a newer edition of a manual, you can obtain downloadable PDF versions in all supported languages at this website: www.fujifilm.com/support/digital_cameras/manuals/. There, you will also find supplementary material that covers new features and changes based on firmware updates.
Please do yourself a big favor and thoroughly study this manual in order to get acquainted with the different functions of your X-T10, and don’t forget that your lenses come with a user manual, as well. This book doesn’t replace the X-T10 camera manual; it builds on it as an enhancement to the existing user manual, and offers valuable tips and background information about how to use the various features and functions of the X-T10 and make the most of your equipment.
Get a few spare batteries. You can buy suitable batteries either from Fujifilm or from a third party. |
The X-T10 is quite a compact camera, which means that the rechargeable battery is also rather small. Depending on how you use your camera, a fully charged battery will last for 250 to 400 shots.
I recommend always setting the camera to High Performance Mode (SET-UP > POWER MANAGEMENT > HIGH PERFORMANCE > ON) in order to secure maximum autofocus and overall performance.
![]() When the battery indicator changes from three to two bars, you have already used up more than half of its energy.
When the battery indicator changes from three to two bars, you have already used up more than half of its energy.
![]() When the indicator shows one remaining red bar, it’s almost time to replace the battery.
When the indicator shows one remaining red bar, it’s almost time to replace the battery.
Your X-T10 is using NP-W126 rechargeable batteries. This type of battery is also used in Fujifilm’s X-Pro1, X-E1, X-E2, X-T1, X-M1, X-A1, and X-A2 cameras, and can be interchanged between these models.
You can obtain NP-W126 batteries from Fujifilm or compatible products from a variety of third-party vendors. Not all aftermarket batteries offer the same quality and capacity as the Fujifilm batteries, but third-party products tend to be significantly cheaper, so you can buy more of them.
If you store your camera for several days (or longer) without a charged battery, the X-T10’s built-in emergency power source may run out of juice, and all camera and user settings will reset to factory conditions.
Get a suitable battery charger and a travel adapter. |
Along with spare batteries, the aftermarket also offers chargers that work with regular power outlets, USB ports, or a car’s cigarette lighter jack. This way, you can charge your batteries not only at home or in your hotel room, but also on your computer’s USB port or when you are traveling in a car or plane.
While traveling, don’t forget that different countries use different formats for power outlets, so you may want to carry a suitable travel adapter. A particularly small and practical solution is the Apple World Travel Adapter Kit. It contains adapters for North America, Japan, China, the United Kingdom, Continental Europe, Korea, Australia, and Hong Kong. The adapters connect directly to the charger that comes with your X-T10 (no cable required). You can also use them with chargers for your Apple device (iPhone, iPad, MacBook, etc.).

Make sure that your camera and lenses are running with the latest firmware. |
Fujifilm keeps improving the firmware of the X-T10 and XF/XC lenses.
![]() In order to check which firmware version is installed in your camera and lens, switch on the camera while pressing and holding the DISP/BACK button.
In order to check which firmware version is installed in your camera and lens, switch on the camera while pressing and holding the DISP/BACK button.
![]() Use the following link to find and download the latest firmware versions for your cameras and lenses: www.fujifilm.com/support/digital_cameras/software/. Here, you can also find current versions of Fuji’s application software, such as RAW File Converter EX.
Use the following link to find and download the latest firmware versions for your cameras and lenses: www.fujifilm.com/support/digital_cameras/software/. Here, you can also find current versions of Fuji’s application software, such as RAW File Converter EX.
![]() A step-by-step video guide illustrating the firmware upgrade process is available here: faq.fujifilm.com/digitalcamera/faq_detail.html?id=110200895. Mac OS users can find detailed firmware download instructions here: faq.fujifilm.com/digitalcamera/faq_detail.html?id=110200803. Windows users can go to the following site: faq.fujifilm.com/digitalcamera/faq_detail.html?id=110200802.
A step-by-step video guide illustrating the firmware upgrade process is available here: faq.fujifilm.com/digitalcamera/faq_detail.html?id=110200895. Mac OS users can find detailed firmware download instructions here: faq.fujifilm.com/digitalcamera/faq_detail.html?id=110200803. Windows users can go to the following site: faq.fujifilm.com/digitalcamera/faq_detail.html?id=110200802.
Things to remember when updating your firmware: |
![]() If you can’t find a new firmware version on Fuji’s firmware update page, there’s a good chance that your web browser is still caching an older version of this page. In this case, either delete your browser cache or force your browser to reload the webpage from the server.
If you can’t find a new firmware version on Fuji’s firmware update page, there’s a good chance that your web browser is still caching an older version of this page. In this case, either delete your browser cache or force your browser to reload the webpage from the server.
![]() Make sure that your computer doesn’t change the name of firmware files you download due to naming conflicts caused by older firmware versions in the download folder. The correct file name of the camera firmware for your X-T10 is always FWUP0007.DAT.
Make sure that your computer doesn’t change the name of firmware files you download due to naming conflicts caused by older firmware versions in the download folder. The correct file name of the camera firmware for your X-T10 is always FWUP0007.DAT.
![]() Make sure your battery is fully charged when updating your firmware.
Make sure your battery is fully charged when updating your firmware.
![]() Always copy new firmware files for your camera or lenses into the top directory of your SD memory card, and always use cards that have been freshly formatted in your camera. After you have copied the firmware to the card, make sure to properly unmount the card from your computer before removing it.
Always copy new firmware files for your camera or lenses into the top directory of your SD memory card, and always use cards that have been freshly formatted in your camera. After you have copied the firmware to the card, make sure to properly unmount the card from your computer before removing it.
![]() If you want to update the firmware for a specific lens, make sure that lens is attached to the camera when you initiate the update process.
If you want to update the firmware for a specific lens, make sure that lens is attached to the camera when you initiate the update process.
![]() To start the update process for your camera or a lens, switch on the camera while pressing and holding the DISP/BACK button and follow the instructions on the screen.
To start the update process for your camera or a lens, switch on the camera while pressing and holding the DISP/BACK button and follow the instructions on the screen.
![]() Never switch off the camera during the updating process. The camera will tell you when the update is complete. Only then can you safely switch it off.
Never switch off the camera during the updating process. The camera will tell you when the update is complete. Only then can you safely switch it off.
If the firmware of your camera or lens needs to be updated due to compatibility issues, the camera will alert you of this when you switch it on. If that’s the case, download the new firmware from the website links provided in tip 4 and update your camera and/or lens.
Use fast memory cards with at least 80 MB/s write speed. |
Turbo-charge your camera and its built-in buffer memory by using the fastest UHS-I memory cards available. SanDisk, Lexar, Panasonic, and Toshiba offer cards with nominal write speeds of 80 MB/s or higher. SanDisk Extreme Pro SD cards are particularly popular among X-series photographers.
Unlike the X-T1, The X-T10 does not support the new and even faster UHS-II standard, which offers transmission speeds of up to 300 MB/s. Hence it’s not recommended to use one of these rather expensive cards.

Your camera is automatically numbering your images. With a little trick, you can reset the frame counter and even assign a new starting number. |
Follow these steps to reset the image counter to zero:
![]() First select SET-UP > SAVE DATA SET-UP > FRAME NO. > RENEW, then format the SD card with SET-UP > FORMAT and take a picture. The frame counter will start from zero.
First select SET-UP > SAVE DATA SET-UP > FRAME NO. > RENEW, then format the SD card with SET-UP > FORMAT and take a picture. The frame counter will start from zero.
![]() To avoid another automatic image counter reset when you are reformatting an SD card, select SET-UP > SAVE DATA SET-UP > FRAME NO. > CONTINUOUS.
To avoid another automatic image counter reset when you are reformatting an SD card, select SET-UP > SAVE DATA SET-UP > FRAME NO. > CONTINUOUS.
You can assign pretty much any number as the camera’s new frame-counter starting number. The method is quite similar, but involves an extra step in your computer:
![]() Select SET-UP > SAVE DATA SET-UP > FRAME NO. > RENEW, then format the SD card with SET-UP > FORMAT and take a picture. The frame counter will now start from zero.
Select SET-UP > SAVE DATA SET-UP > FRAME NO. > RENEW, then format the SD card with SET-UP > FORMAT and take a picture. The frame counter will now start from zero.
![]() Remove the SD card from your camera and insert it in your computer. Locate your image (for example DSCF0001. JPG or DSCF0001.RAF) in the DCIM folder and change the frame-number portion of the file name (0001) to the number you’d like to use as your new starting point. For example, you can change the file name to DSCF2000.JPG.
Remove the SD card from your camera and insert it in your computer. Locate your image (for example DSCF0001. JPG or DSCF0001.RAF) in the DCIM folder and change the frame-number portion of the file name (0001) to the number you’d like to use as your new starting point. For example, you can change the file name to DSCF2000.JPG.
![]() Properly unmount and remove the SD card from your computer and put the card back into your camera. Now take another picture. The camera will use the modified frame number as a starting point. In our example, the new image file’s name would be DSCF2001.
Properly unmount and remove the SD card from your computer and put the card back into your camera. Now take another picture. The camera will use the modified frame number as a starting point. In our example, the new image file’s name would be DSCF2001.
![]() To avoid another automatic frame-counter reset when you are reformatting an SD card, select SET-UP > SAVE DATA SET-UP > FRAME NO. > CONTINUOUS.
To avoid another automatic frame-counter reset when you are reformatting an SD card, select SET-UP > SAVE DATA SET-UP > FRAME NO. > CONTINUOUS.
Please note that the X-T10 doesn’t feature an internal shutter actuations counter. Image file numbers are no indication of the actual number of shots that have been taken with a particular camera and aren’t a suitable measurement to gauge the wear and tear of the camera’s mechanical shutter.
Always use High Performance Mode! |
In its default setting, the X-T10 operates with limited performance in order to conserve power. To enjoy the camera’s full capabilities, it’s important to select SET-UP > POWER MANAGEMENT > HIGH PERFORMANCE > ON.
Since the X-T10 consumes more power in this mode, it’s even more important to always have replacement batteries at hand.
Keep the camera sensor clean! |
Sooner or later, all cameras with interchangeable lenses get dust or dirt on the sensor. This manifests as spots on your image, especially in photos taken at small apertures. You can prevent this from happening by taking measures to avoid sensor dust as much as possible. You can clean dust by using your camera’s built-in cleaning mechanism:
![]() Select SET-UP > SENSOR CLEANING > OK to activate the built-in cleaning mechanism that helps loosen dust particles. By default, this mechanism will be employed when you switch off the camera. I recommend setting the camera to also automatically activate this mechanism when the X-T10 is switched on: to do this, select SET-UP > SENSOR CLEANING > WHEN SWITCHED ON > ON.
Select SET-UP > SENSOR CLEANING > OK to activate the built-in cleaning mechanism that helps loosen dust particles. By default, this mechanism will be employed when you switch off the camera. I recommend setting the camera to also automatically activate this mechanism when the X-T10 is switched on: to do this, select SET-UP > SENSOR CLEANING > WHEN SWITCHED ON > ON.
In addition to that, it’s sensible to adhere to a regime that avoids exposing the camera to dust and dirt:
![]() Never leave the camera without a lens or its protective body cap.
Never leave the camera without a lens or its protective body cap.
![]() Don’t exchange lenses in dusty environments.
Don’t exchange lenses in dusty environments.
![]() When exchanging lenses, always hold the camera with the open lens mount pointed downward—never upward.
When exchanging lenses, always hold the camera with the open lens mount pointed downward—never upward.
![]() When you attach a new lens, make sure the rear glass of the lens is clean and free of dust particles. Otherwise, dust from the lens could travel to the sensor.
When you attach a new lens, make sure the rear glass of the lens is clean and free of dust particles. Otherwise, dust from the lens could travel to the sensor.
![]() Never touch the sensor!
Never touch the sensor!

Do-it-yourself sensor cleaning for tough sensor spots |
When the built-in sensor-cleaning function doesn’t do a proper job, you have three basic options for cleaning the sensor by yourself:
![]() Touchless cleaning
Touchless cleaning
![]() Dry cleaning
Dry cleaning
![]() Wet cleaning
Wet cleaning
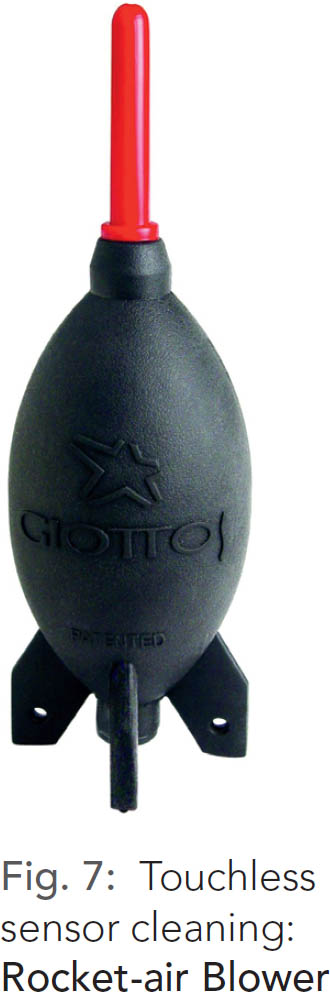
Touchless cleaning involves using a blower, like the Giottos Rocket-air Blower, to rid the sensor of dust particles. An important feature of such devices is a filter in the intake valve that prevents contaminated (dusty) air from being blown against the sensor.
Important: Don’t use compressed air from aerosol cans that contain propellants. Particles could hit the sensor like tiny projectiles and damage it!
A popular means to dry clean the sensor is the Pentax Sensor Cleaning Kit. The sticky head of this funny-looking cleaning device picks up dust and dirt from the sensor surface and transfers it to sticky paper sheets that are included with the product.

Tough sensor dirt (like water or oil spots) requires wet cleaning with a sensor swab. Suitable products are offered by companies likes Photographic Solutions and Visible Dust. They consist of wipers that are wetted with special cleaning fluids (such as Eclipse). Wipe one side of the swab from left to right over the full width of the sensor, and then from right to left with the other side of the swab. Your X-T10 requires swabs that match APS-C-sized sensors. At Photographic Solutions, this translates into product size number 2.

Inexpensive and effective alternatives to products from Visible Dust or Photographic Solutions are APS-C-sized swabs from the Asian brand VSGO.
If some spots simply won’t go away, you can always have your camera serviced and cleaned by Fujifilm. In some countries (such as Germany), the first sensor cleaning is even free of charge.
There’s also a small chance that spots are caused by dust particles that are enclosed behind the protective surface of the sensor. In this case, the camera needs to be serviced by Fujifilm.
1.2 THE BASICS (2):
THINGS YOU SHOULD KNOW ABOUT YOUR LENSES
Your camera is compatible with the following native X-mount lenses:
![]() Fujinon XF lenses (prime and zoom lenses)
Fujinon XF lenses (prime and zoom lenses)
![]() Fujinon XC lenses (compact, more affordable lenses)
Fujinon XC lenses (compact, more affordable lenses)
![]() Zeiss Touit X-mount lenses (primes)
Zeiss Touit X-mount lenses (primes)
Confused about which lens category does what? Here’s the lowdown as of September 2015:
![]() All current Fujinon zoom lenses (except for the XF16–55mmF2.8 lens) feature an optical image stabilizer (OIS).
All current Fujinon zoom lenses (except for the XF16–55mmF2.8 lens) feature an optical image stabilizer (OIS).
![]() All Fujinon XF lenses (with the exception of the XF27mmF2.8 pancake lens) and Zeiss Touit lenses feature an aperture ring.
All Fujinon XF lenses (with the exception of the XF27mmF2.8 pancake lens) and Zeiss Touit lenses feature an aperture ring.
![]() XC lenses don’t feature an aperture ring. With these lenses, the aperture is set using the camera’s command dial.
XC lenses don’t feature an aperture ring. With these lenses, the aperture is set using the camera’s command dial.
![]() All Fujinon XF and XC lenses (with the exception of the XF56mm APD prime lens) support fast phase detection autofocus (PDAF) with the camera’s central AF frames.
All Fujinon XF and XC lenses (with the exception of the XF56mm APD prime lens) support fast phase detection autofocus (PDAF) with the camera’s central AF frames.
![]() Fujinon XF lenses offer LMO (lens modulation optimizer) support. The LMO mitigates undesirable optical effects such as diffraction, which occurs when a lens is stopped-down to a small aperture.
Fujinon XF lenses offer LMO (lens modulation optimizer) support. The LMO mitigates undesirable optical effects such as diffraction, which occurs when a lens is stopped-down to a small aperture.
![]() Zeiss Touit lenses and Fujinon XC lenses do not support the LMO.
Zeiss Touit lenses and Fujinon XC lenses do not support the LMO.
In addition to native X-mount lenses, you can also attach a host of current and older lenses from other manufacturers with the use of a suitable adapter. Remember that adapted lenses will always operate either wide open or at the set working aperture, and autofocus, program AE, and shutter priority AE are no longer available.
XC or XF? Zoom or prime? |
System cameras are mostly sold in discounted “kits” that consist of a camera body that’s paired with a so-called “kit lens,” which is typically a standard zoom lens with second- rate image quality.
Fujifilm is doing things a little bit differently here with the affordable and flexible XC16–50mmF3.5–5.6 OIS II kit zoom, which delivers great results. This is the second generation of the XC16–50mmF3.5–5.6 OIS kit zoom that was introduced in concert with the X-M1. The most notable improvement of the Mark II edition is its reduced minimum focus distance (MFD). This means that you can now get closer to your subject, basically adding macro capability without using an extension tube.
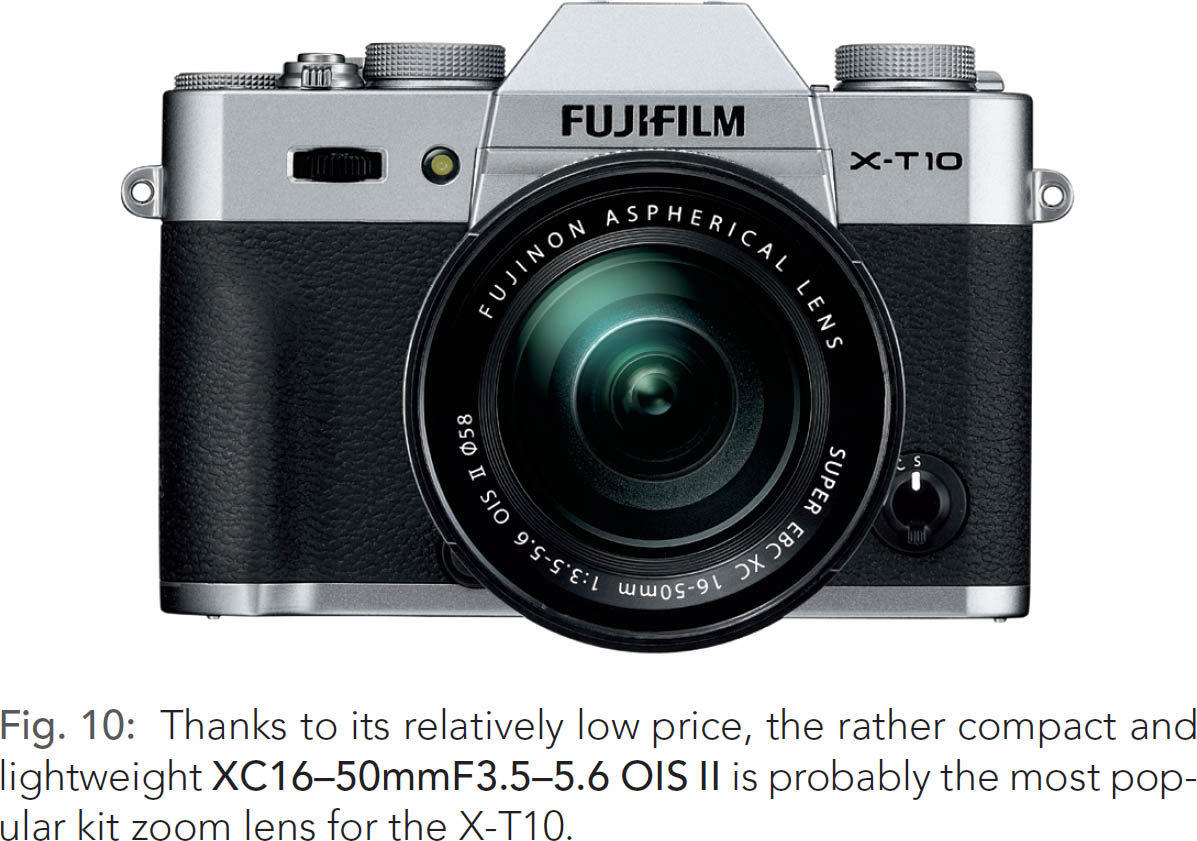
The XC16–50mmF3.5–5.6 OIS II is made in China with an exterior and bayonet made of less expensive plastic. To save costs, there’s no aperture ring and no switch for the optical image stabilizer (OIS). With a maximum aperture of F3.5–5.6, it’s also not the fastest lens on planet Earth, but make no mistake: it’s built from top-notch optical glass, and the results can easily keep up with more expensive lenses.

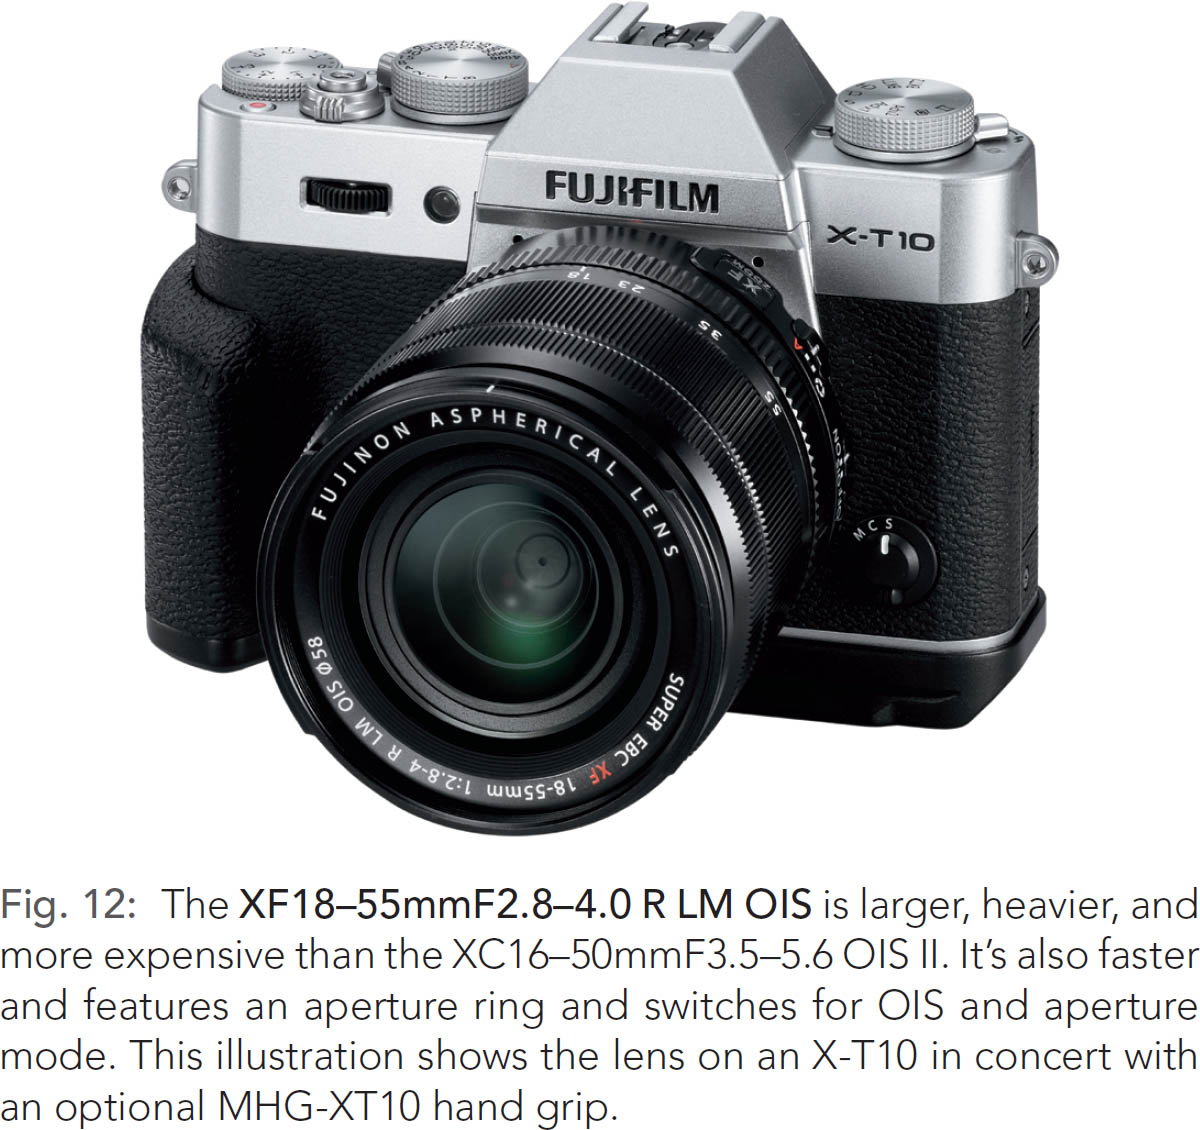
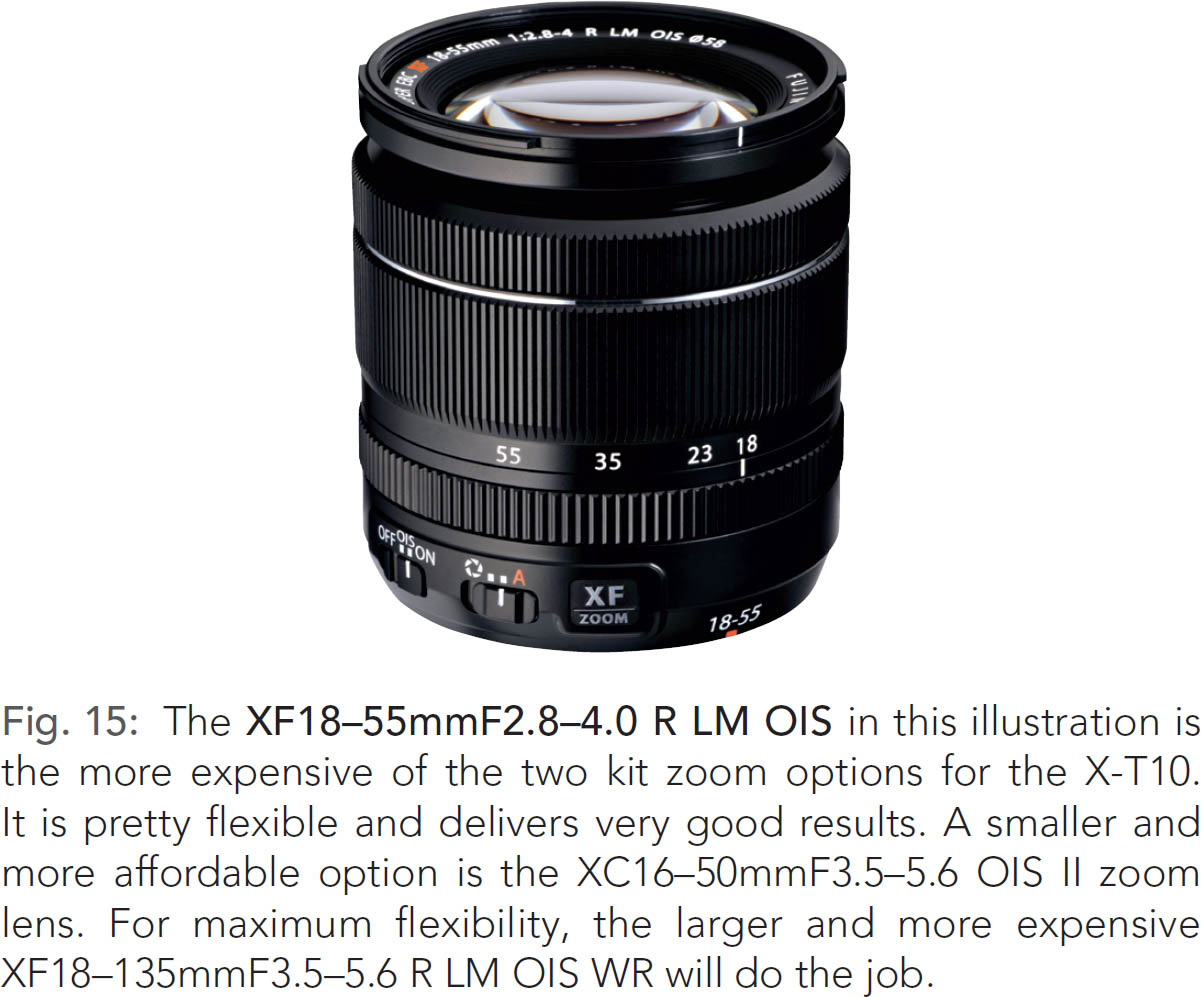
If you are looking for a faster alternative to the affordable XC16–50mmF3.5–5.6 OIS II, the XF18–55mmF2.8–4.0 R LM OIS may be your weapon of choice. This larger, heavier kit zoom features an aperture ring and switches for OIS and aperture mode. Its build quality is very good. After years of “made in Japan,” this lens is now manufactured in China, too.
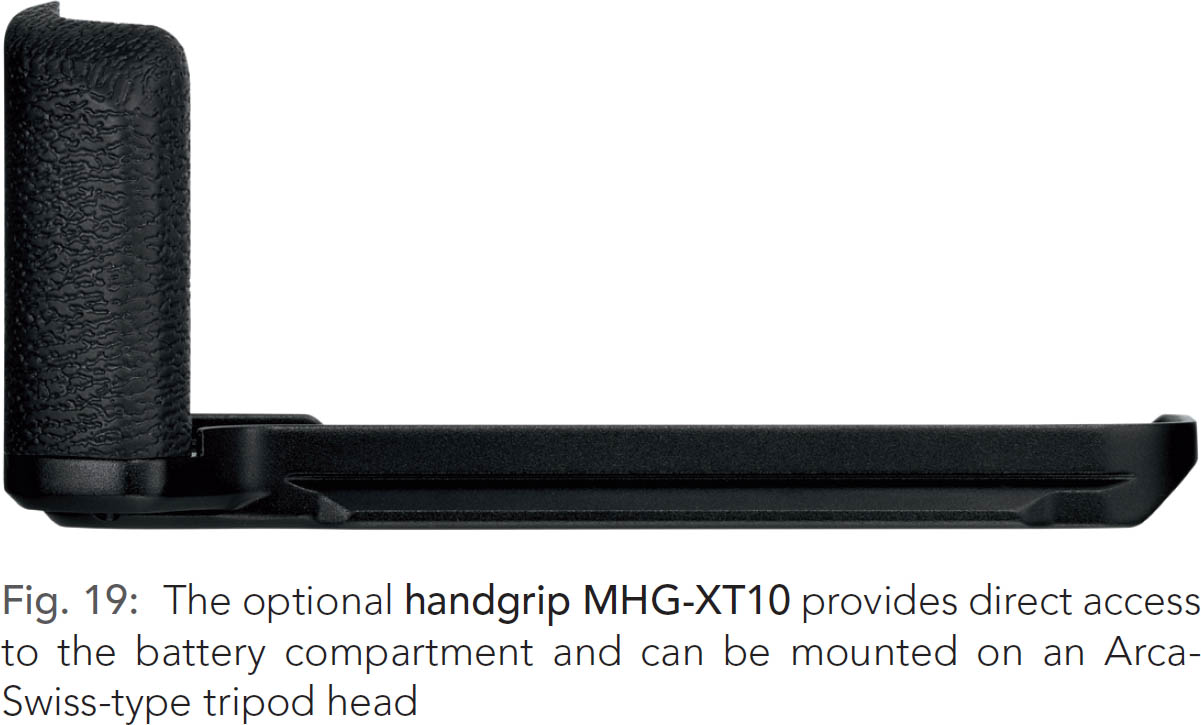
To better fit this combo into your hand, you might want to consider adding an optional MHG-XT10 handgrip to the camera. Give it a try!
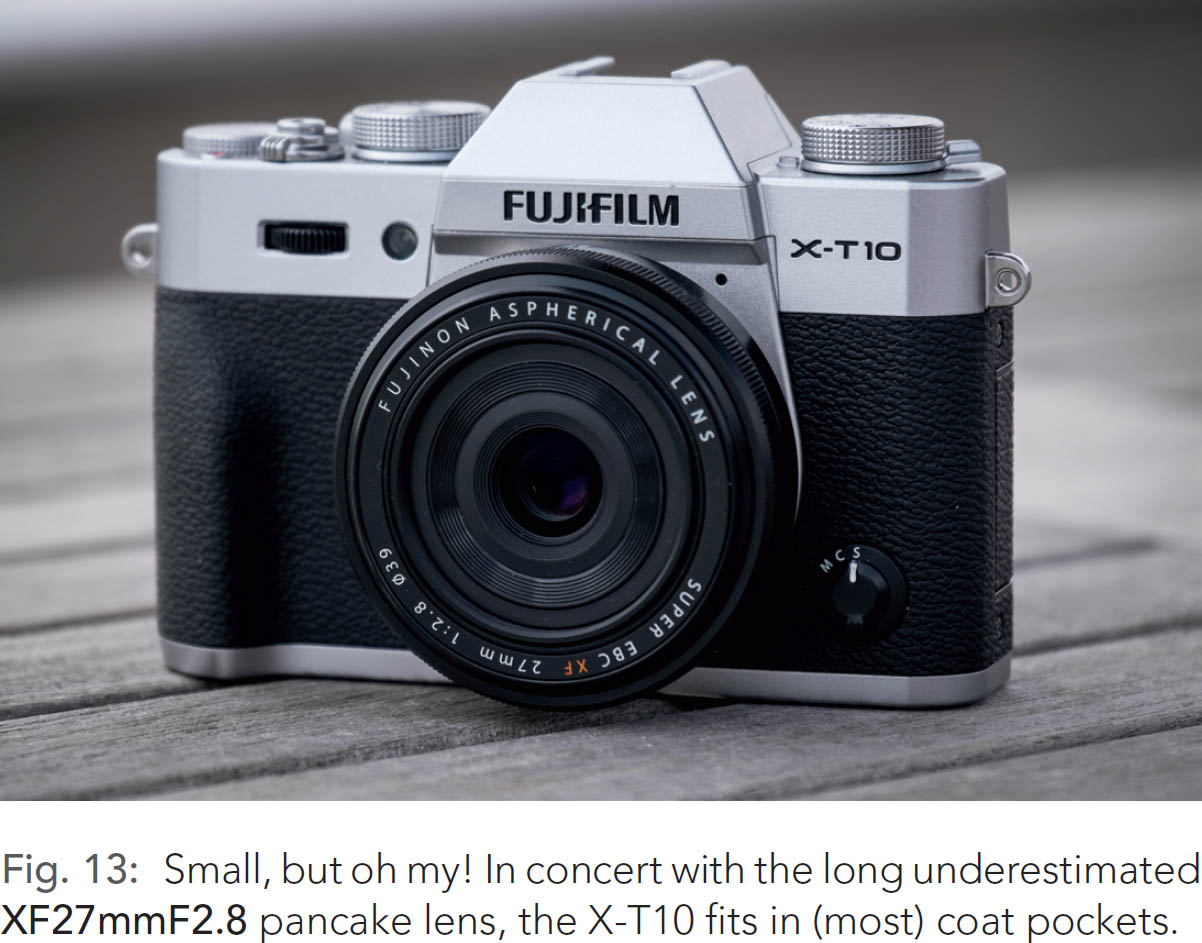
Since the X-T10 is a very compact system camera, it’s a good idea to also consider a small prime lens as your standard walk-around gear. A particularly fitting choice is the small and flexible XF27mmF2.8 pancake lens. With it, the camera fits in the pocket of almost every coat or jacket. Optically, this little lens is pretty big. At 27mm (that’s a full-frame equivalent of 41mm), it’s very flexible and can be used for street photography, landscape (including panoramas), or even portraits with nice subject-background separation.
My recommendation: Have a closer look at the X-T10 with an XF27mm pancake lens.
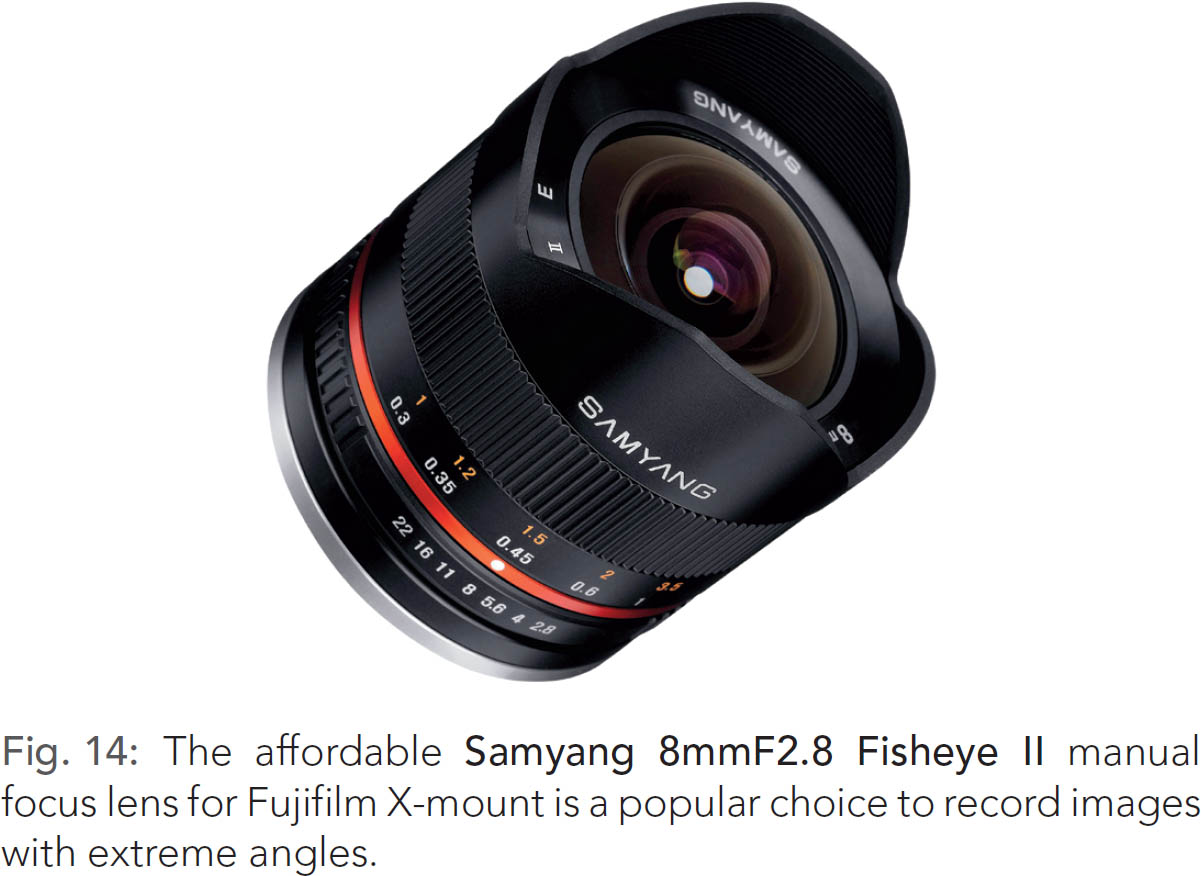
X-mount compatible Samyang lenses are just like adapted lenses! |
Manual focus lenses from Samyang (Rokinon) and similar brands aren’t native X-mount lenses. They simply come with a compatible mechanical mount so you don’t have to buy an additional adapter. These lenses behave like other adapted third-party lenses: they don’t communicate with the camera (there’s no data transmission because there aren’t any electronic contacts), there’s no autofocus, the live view operates with the currently set working aperture, and you can only use AE modes ![]() and
and ![]() .
.
Zeiss Touit lenses |
Even though Touit lenses with native X-mount compatibility offer great image quality and work like Fujinon XF lenses, Zeiss tends to be hesitant to support new camera features with lens firmware updates. It took Zeiss about half a year longer than Fuji to offer PDAF support, and to date there is still no LMO support. There’s also no indication that Zeiss wants to continue with the Touit line of lenses.
Decoding XF18–135mmF3.5–5.6 R LM OIS WR |
This tip is of the “what you always wanted to know but never dared to ask” variety:
![]() XF: “X” means X-mount or X-series; “F” means Fine, for Fuji’s premium line of lenses. There’s also the smaller, more affordable XC line (“C” stands for Compact or Casual).
XF: “X” means X-mount or X-series; “F” means Fine, for Fuji’s premium line of lenses. There’s also the smaller, more affordable XC line (“C” stands for Compact or Casual).
![]() 18–135mm: This is the focal length range of the zoom lens. To translate the numbers to their full-frame equivalents, you have to multiply them by the APS-C crop factor of 1.5. Hence, the field-of-view (FOV) of an 18–135mm zoom on your X-T10 is identical to the FOV of a 27–202mm zoom lens on a full-frame camera.
18–135mm: This is the focal length range of the zoom lens. To translate the numbers to their full-frame equivalents, you have to multiply them by the APS-C crop factor of 1.5. Hence, the field-of-view (FOV) of an 18–135mm zoom on your X-T10 is identical to the FOV of a 27–202mm zoom lens on a full-frame camera.
![]() F3.5–5.6: This range describes the maximum aperture opening at the low and high end of the focal-length range. In this case, the lens offers a maximum aperture of f/3.5 at 18mm and f/5.6 at 135mm.
F3.5–5.6: This range describes the maximum aperture opening at the low and high end of the focal-length range. In this case, the lens offers a maximum aperture of f/3.5 at 18mm and f/5.6 at 135mm.
![]() R: This stands for Ring and simply means that the lens features an aperture ring. This is a standard feature of all Fujinon XF lenses, with the exception of the XF27mmF2.8 pancake lens. XC zooms don’t offer an aperture ring, either. With those lenses, the aperture setting is controlled with the rear command dial (thumb dial) when you are using exposure modes
R: This stands for Ring and simply means that the lens features an aperture ring. This is a standard feature of all Fujinon XF lenses, with the exception of the XF27mmF2.8 pancake lens. XC zooms don’t offer an aperture ring, either. With those lenses, the aperture setting is controlled with the rear command dial (thumb dial) when you are using exposure modes ![]() or
or ![]() .
.
![]() LM: This stands for Linear Motor, which ensures quick and silent autofocus operation.
LM: This stands for Linear Motor, which ensures quick and silent autofocus operation.
![]() OIS: This is the Optical Image Stabilizer. This feature allows you to perform handheld shots at up to five stops slower of a shutter speed than you would usually need to eliminate camera shake. For example, in situations that would normally require a shutter speed of 1/80s to ensure a clear image, you could shoot with 1/4s and still get usable results. It’s important to remember that motion blur often plays a role at slower shutter speeds, since many subjects tend to move. Obviously the OIS cannot reduce motion blur—only blurring that occurs due to camera shake (i.e., the shaky hands of the photographer).
OIS: This is the Optical Image Stabilizer. This feature allows you to perform handheld shots at up to five stops slower of a shutter speed than you would usually need to eliminate camera shake. For example, in situations that would normally require a shutter speed of 1/80s to ensure a clear image, you could shoot with 1/4s and still get usable results. It’s important to remember that motion blur often plays a role at slower shutter speeds, since many subjects tend to move. Obviously the OIS cannot reduce motion blur—only blurring that occurs due to camera shake (i.e., the shaky hands of the photographer).
![]() WR denotes weather resistant lenses. These lenses were designed with your weather resistant X-T1 in mind, but they also work with all other X-mount camera models (like your X-T10).
WR denotes weather resistant lenses. These lenses were designed with your weather resistant X-T1 in mind, but they also work with all other X-mount camera models (like your X-T10).
The optical image stabilizer (OIS) has its quirks! |
With the exception of the XF16–55mmF2.8 zoom, all XF and XC zoom lenses feature built-in optical image stabilization (OIS). Switch on the OIS to prevent camera shake and blurry images in situations that require you to take handheld shots at a slower-than-usual shutter speed. XF lenses offer a dedicated OIS on/off switch on the lens barrel. The OIS in XC lenses is controlled through a camera menu.
For handheld shots, an old rule of thumb recommends using shutter speeds that are at least as fast as the reciprocal of the full-frame-equivalent focal length that is in use. For example, with a 50mm lens and an APS-C crop factor of 1.5, the minimum safe shutter speed for handheld camera use would be [1 / (50×1.5)]s = 1/75s. In other words, when you are shooting handheld with a 50mm lens and don’t want shaky images, you should use shutter speeds that are at least as fast as 1/75s. Or you can use the OIS to add a few more stops.

Of course, rules of thumb don’t apply to everybody. Some users have quite steady hands and some have rather shaky hands. The settings and equipment that work for me may not work for you. However, the OIS will always give you a few extra stops of shutter-speed headroom.
In SHOOTING MENU > IS MODE, you can choose between two basic OIS modes:
![]() OIS mode 1 (CONTINUOUS) is the default setting. It’s always stabilizing the image, even when you are just looking through the viewfinder before you press the shutter button.
OIS mode 1 (CONTINUOUS) is the default setting. It’s always stabilizing the image, even when you are just looking through the viewfinder before you press the shutter button.
![]() OIS mode 2 (SHOOTING ONLY) only engages when you fully depress the shutter button to take an image.
OIS mode 2 (SHOOTING ONLY) only engages when you fully depress the shutter button to take an image.
Please note that the OIS can also introduce camera shake, especially at fast shutter speeds. This adverse effect is more likely to occur in OIS mode 1 than in mode 2. However, OIS mode 1 is more effective when used at very slow shutter speeds, such as 1/15s, 1/8s, or even 1/4s.
These are my recommendations for using the OIS:
![]() Only use (switch on) the OIS when necessary. When you are using fast shutter speeds that don’t require image stabilization, you can safely turn the OIS off to eliminate it as a potential interference.
Only use (switch on) the OIS when necessary. When you are using fast shutter speeds that don’t require image stabilization, you can safely turn the OIS off to eliminate it as a potential interference.
![]() I prefer to use the OIS in mode 2 (“shooting only”). Mode 1 is useful at very slow shutter speeds and when you are using very long focal lengths because the camera will also stabilize the live view image, making it easier to compose a shot.
I prefer to use the OIS in mode 2 (“shooting only”). Mode 1 is useful at very slow shutter speeds and when you are using very long focal lengths because the camera will also stabilize the live view image, making it easier to compose a shot.
![]() Turn off the OIS when you are working from a tripod or with shutter speeds that are slower than a second. You should also switch it off for panning shots.
Turn off the OIS when you are working from a tripod or with shutter speeds that are slower than a second. You should also switch it off for panning shots.
By the way, the OIS emits a soft humming sound, even when the function is turned off. Don’t worry about the noise.
OIS and motion detection: what’s going on? |
When Auto-ISO is active and you are shooting in either aperture priority ![]() or program AE
or program AE ![]() , the X-T10 offers another OIS option: motion detection. When the camera detects subject movement at the time of shooting, this feature increases the shutter speed by one or two stops in order to reduce unwanted motion blur. To compensate for the reduced exposure time, the camera will increase the ISO value of the shot accordingly.
, the X-T10 offers another OIS option: motion detection. When the camera detects subject movement at the time of shooting, this feature increases the shutter speed by one or two stops in order to reduce unwanted motion blur. To compensate for the reduced exposure time, the camera will increase the ISO value of the shot accordingly.
Motion detection reacts on either subject movement or camera movement, which can’t be compensated by the OIS. This makes it possible to select a slower minimum shutter speed (SHOOTING MENU > ISO > AUTO (1–3) > MIN. SHUTTER SPEED) in the Auto-ISO settings, which would be suitable for static subjects. However, when the motion detection registers subject or camera movement while the shutter is half or fully depressed, it will temporarily increase the minimum shutter speed by one or two stops. It’s a smart way of adapting to a quickly changing scene.
Motion detection can be combined with both OIS modes (1 and 2). You can find the option in the OIS menu (SHOOTING MENU > IS MODE) as CONTINUOUS+MOTION (= OIS mode 1 with motion detection) and SHOOTING+MOTION (= OIS mode 2 with motion detection).
Don’t forget that these two additional options are only available when Auto-ISO is active and the camera is set to either aperture priority or program AE. To grant motion detection sufficient operating room, the Auto-ISO ceiling (MAX. SENSITIVITY) should be set to a reasonably high value, such as 3200 or 6400.
XF23mmF1.4 R, XF16mmF1.4 R WR and XF14mmF2.8 R are different beasts! |
Unlike standard X-mount lenses, the wide-angle primes XF23mmF1.4 R, XF16mmF1.4 R WR, and XF14mmF2.8 R feature a more traditional manual focus ring with a clutch mechanism:
![]() Pull the focus ring toward the camera to set the lens to manual focus.
Pull the focus ring toward the camera to set the lens to manual focus.
![]() Push the focus ring away from the camera to set the lens to autofocus.
Push the focus ring away from the camera to set the lens to autofocus.
![]() Alternatively, you can use the traditional focus selector switch at the front of the camera to set the X-T10 to manual focus mode. In this case, the lens remains in autofocus mode, and you can only use the AF-L button (Instant AF) to change the focus. This also means that you cannot manually adjust your focus after focusing with Instant AF.
Alternatively, you can use the traditional focus selector switch at the front of the camera to set the X-T10 to manual focus mode. In this case, the lens remains in autofocus mode, and you can only use the AF-L button (Instant AF) to change the focus. This also means that you cannot manually adjust your focus after focusing with Instant AF.
![]() You cannot use Instant AF (AF-L button) to focus when the focus ring of the lens is set to manual focus. In this case, you can only use the manual focus ring to change or adjust the focus.
You cannot use Instant AF (AF-L button) to focus when the focus ring of the lens is set to manual focus. In this case, you can only use the manual focus ring to change or adjust the focus.
![]() As soon as you set the camera and/or the lens to manual focus, the combined electronic distance and depth-of-field (DOF) scale becomes unavailable. It simply disappears from the display, leaving you with the analog (engraved) distance and DOF markers on the lens barrel.
As soon as you set the camera and/or the lens to manual focus, the combined electronic distance and depth-of-field (DOF) scale becomes unavailable. It simply disappears from the display, leaving you with the analog (engraved) distance and DOF markers on the lens barrel.
![]() The analog depth-of-field markers on the lens barrel are less conservative (and in my opinion less useful) than the camera’s digital scale. This is because the camera’s electronic scale is using a much smaller circle of confusion (CoC) of 0.005mm in order to display DOF ranges with pixel-sharp results at 100% magnification, whereas the engraved scale on the lens uses a value that’s based on looking at typically sized prints from a typical distance with typical eyesight. Some photographers regard the engraved scale as more practical. Personally, I prefer the electronic scale. In any case, the actual difference between the two scales is about two stops. This means that in order to determine the pixel-sharp DOF for f/16 on the engraved scale, you are better off using the range that has been engraved for f/8.
The analog depth-of-field markers on the lens barrel are less conservative (and in my opinion less useful) than the camera’s digital scale. This is because the camera’s electronic scale is using a much smaller circle of confusion (CoC) of 0.005mm in order to display DOF ranges with pixel-sharp results at 100% magnification, whereas the engraved scale on the lens uses a value that’s based on looking at typically sized prints from a typical distance with typical eyesight. Some photographers regard the engraved scale as more practical. Personally, I prefer the electronic scale. In any case, the actual difference between the two scales is about two stops. This means that in order to determine the pixel-sharp DOF for f/16 on the engraved scale, you are better off using the range that has been engraved for f/8.
![]() The analog distance/DOF scale is not illuminated and is hard (or even impossible) to read in dark environments. In addition to that, you have to remove the camera from your eye in order to get a current distance or DOF reading, because the digital scales are suppressed when the lens is in MF mode. It’s also not possible to reverse the focusing direction of the manual focus ring with the 14mm, 16mm, or 23mm lenses (a nice feature common to all other X-series cameras and lenses).
The analog distance/DOF scale is not illuminated and is hard (or even impossible) to read in dark environments. In addition to that, you have to remove the camera from your eye in order to get a current distance or DOF reading, because the digital scales are suppressed when the lens is in MF mode. It’s also not possible to reverse the focusing direction of the manual focus ring with the 14mm, 16mm, or 23mm lenses (a nice feature common to all other X-series cameras and lenses).
![]() If you set your X-T10 to AF+MF mode (SHOOTING MENU > AUTOFOCUS SETTING > AF+MF > ON), you can only use this feature when the lens clutch is set to MF and the camera to AF-S. In this configuration, you can autofocus by half-pressing the shutter button and then manually adjust the focus with the focus ring (while keeping the shutter button half-pressed).
If you set your X-T10 to AF+MF mode (SHOOTING MENU > AUTOFOCUS SETTING > AF+MF > ON), you can only use this feature when the lens clutch is set to MF and the camera to AF-S. In this configuration, you can autofocus by half-pressing the shutter button and then manually adjust the focus with the focus ring (while keeping the shutter button half-pressed).

Use the Lens Modulation Optimizer (LMO)! |
The X-T10 supports the so-called LMO or Lens Modulation Optimizer. This feature premiered in the X100S and X20 fixed-lens cameras, and it counteracts common optical phenomena (like diffraction and corner softness) when the camera converts the RAW data into JPEG images. To make it work, the firmware in the attached lens sends the LMO correction data to the camera.
![]() Neither Fujinon XC lenses nor Zeiss Touit lenses support the LMO.
Neither Fujinon XC lenses nor Zeiss Touit lenses support the LMO.
If your lens supports the LMO (all Fujinon XF lenses do), you should enable the function by selecting LENS MODULATION OPTIMIZER > ON in the shooting menu.
You can also use the built-in RAW converter of your X-T10 (PLAYBACK MENU > RAW CONVERSION) to enable or disable the LMO for a specific image. With this method it is easy to create versions of a shot with and without LMO enhancements.
In its current incarnation (late 2015), the LMO takes care of the following two optical effects:
![]() Diffraction softness: This effect increasingly occurs when the lens is stopped down beyond a certain point. APS-C cameras like the X-T10 typically exhibit diffraction at apertures of 11 and smaller. While stopping down increases the overall depth of field (DOF), it also reduces the maximum resolution of the lens/camera combination. The LMO counteracts this effect and reconstructs some of the lost detail.
Diffraction softness: This effect increasingly occurs when the lens is stopped down beyond a certain point. APS-C cameras like the X-T10 typically exhibit diffraction at apertures of 11 and smaller. While stopping down increases the overall depth of field (DOF), it also reduces the maximum resolution of the lens/camera combination. The LMO counteracts this effect and reconstructs some of the lost detail.
![]() Corner softness: Even the best lenses aren’t as sharp in the corners as they are in the center. The LMO in the X-T10 is able to digitally compensate for that loss of quality.
Corner softness: Even the best lenses aren’t as sharp in the corners as they are in the center. The LMO in the X-T10 is able to digitally compensate for that loss of quality.
LMO corrections are based on complex deconvolution algorithms. Currently, this is only supported in-camera with the built-in RAW converter. As of October 2015, external converters such as Lightroom, Adobe Camera Raw, Apple Aperture, Capture One Pro, Silkypix, Iridient Developer, Photo Ninja, and AccuRaw can’t process LMO data. This means that LMO corrections are only visible in JPEGs that are generated in the camera.
Most modern lenses achieve their optimal image quality through a combination of optical and digital corrections. Corrections are mostly applied to the three following phenomena:
![]() Vignetting: This effect results in a loss of brightness from center to corner. Vignetting is more pronounced at large apertures.
Vignetting: This effect results in a loss of brightness from center to corner. Vignetting is more pronounced at large apertures.
![]() Distortion: There are pincushion- and barrel-type distortions, both of which make straight lines seem curved. Premium primes like the XF14mm, XF23mm, XF35mmF1.4, XF56mm, and XF90mm are fully optically corrected for distortion. Others (such as the Zeiss Touit range, compact pancake lenses, the XF35mmF2, or zoom lenses) require a combination of optical and digital distortion correction.
Distortion: There are pincushion- and barrel-type distortions, both of which make straight lines seem curved. Premium primes like the XF14mm, XF23mm, XF35mmF1.4, XF56mm, and XF90mm are fully optically corrected for distortion. Others (such as the Zeiss Touit range, compact pancake lenses, the XF35mmF2, or zoom lenses) require a combination of optical and digital distortion correction.
![]() Chromatic aberration: Chromatic aberration results in color fringing. This effect can be corrected (or mitigated) with apochromatic lenses or digitally corrected during RAW conversion.
Chromatic aberration: Chromatic aberration results in color fringing. This effect can be corrected (or mitigated) with apochromatic lenses or digitally corrected during RAW conversion.
Some camera makers rely on dedicated correction profiles that have to be provided by each RAW converter maker. Fujifilm isn’t one of these companies: all current Fujifilm cameras store digital corrections as metadata in the RAW file. RAW converters can access this lens-specific metadata and use it to apply appropriate corrections. This way, the built-in RAW converter and external software, such as Lightroom, Aperture, Silkypix, Iridient Developer, or Capture One, can use the metadata in the RAW file to correct or mitigate vignetting, distortion, and chromatic aberration.
A major benefit of this method is that many RAW converters automatically support new lenses since Fujifilm delivers the correction data via the RAW metadata. However, there’s also a drawback: some RAW converters (such as Lightroom, Adobe Camera Raw, Aperture, and Silkypix) don’t give you the option to switch off metadata-based digital lens corrections, even if you’re convinced they aren’t necessary. Since digital distortion correction always results in some loss of image sharpness and detail due to the required stretching and interpolation, this can be a headache for some users. Obviously, not all subjects or images require the same amount of digital correction (it can also be a simple matter of taste), so full user control over the application of digital lens corrections is a very nice feature.
Luckily, software like Iridient Developer and Capture One offer full control over how much digital metadata distortion (or vignetting) correction should be applied. Other programs (like Photo Ninja, Raw Photo Processor/RPP, and AccuRaw) simply ignore lens correction metadata. With such programs, all corrections have to be applied either manually or by using a dedicated profile.
Use the included lens hood! |
With the single exception of the XF27mmF2.8 pancake lens, all Fujifilm XF and XC lenses come with a fitted lens hood, which should be used whenever possible. Apart from its optical benefits, the hood protects the lens and the front glass element from damage.
Lens hoods can pose problems, too: they make the lens appear bigger than it actually is, and they can shade the camera flash or the autofocus assist light. They also use up extra space in your bag, although most hoods can be reverse-mounted on the lens for transport purposes.
When you shoot with a small shoe-mounted flash, or when you depend on using the AF assist lamp, it’s best to remove the lens hood.
Lens protection filters—yes or no? |
Digital cameras like the X-T10 don’t require the UV or skylight filters that used to be very popular in the days of analog film photography. This means that a permanently affixed filter has no optical purpose, and only serves as protective glass. This additional glass can have a negative effect on image quality, especially at night and when you shoot against a bright light source. Filters increase the chance of ghosting, unwanted reflections, or a loss of contrast.
This is why I recommend using protective glass only in situations that actually require this additional protection layer. In most situations, the lens hood should provide sufficient protection. If you still decide to use a filter, make sure to choose a high-quality product. Fujifilm offers suitable protective filters that feature the same Super EBC coating used on all of their XF/XC lenses. Be prepared to pay a premium, though.
39mm filters can be tricky! |
The XF60mmF2.4 R and XF27mmF2.8 lenses require filters with a 39mm thread. It’s important that those filters are designed in a way that allows the inner lens barrel to freely retract into the outer barrel while the filter is attached. If this isn’t possible (for example, because a thin step-up ring is directly attached to the lens or because the filter’s overall diameter is too large), the lens can be damaged when the filter or step-up ring collides with the outer barrel of the lens.
A typical indicator for this and other mechanical lens problems is a message alerting you that the camera needs to be switched off and on again. A possible solution is putting a spacer (a suitable 39mm filter, for example) between the lens and the step-up ring. You should remove the glass from the spacer, so any cheap/old/unused 39mm filter will do the job as long as it fits and doesn’t interfere with the outer lens barrel when the inner barrel is retracting.

1.3 THE BASICS (3):
USEFUL ACCESSORIES
There’s a rich selection of accessories for your X-T10. Whether or not you believe such add-ons are useful, I’ll cover a few select items that can, in my opinion and experience, improve the functionality of your camera.
Optional handgrip |
An optional handgrip can improve the ergonomics of the X-T10 when you are using large, heavy lenses or if you have large hands.
The MHG-XT10 offers a tripod mount on the optical axis, provides full access to the battery compartment, and is compatible with Arca-Swiss-type tripod heads, so you don’t need a dedicated quick release plate. The handgrip is the quick release plate.
Off-camera TTL flash with a Canon OC-E3 TTL extension cord |
Basically, the X-T10 can be combined with most third-party flashes, as long as the flash output is controlled manually. However, Fuji’s automated TTL flash exposure (called Super Intelligent Flash in a grossly exaggerated fashion) currently only works with Fujifilm compatible TTL flash units like the EF-20, EF-X20, and EF-42, or the new Nissin i40. There’s also a small Metz flash offering Fujifilm TTL support: the mecablitz 26 AF-1 digital.
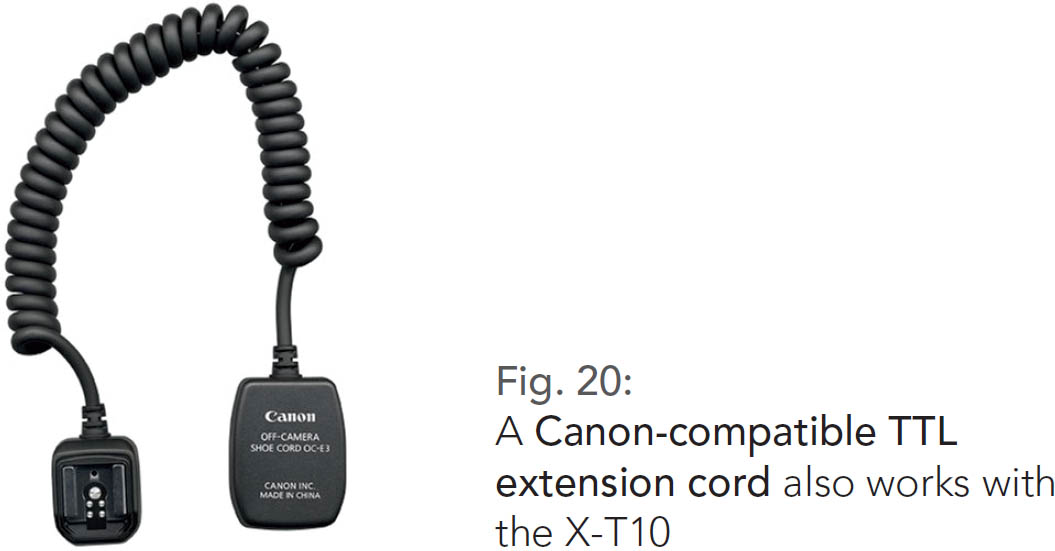
TTL is an abbreviation for “Through The Lens,” which means that the camera determines the appropriate flash output by measuring a scene through the lens with a weak preflash. In order to work in TTL mode, TTL flash units have to be connected with the camera’s hot shoe, and strangely enough, there’s still no Fujifilm-branded TTL extension cable on the market that would allow you to use a TTL flash off-camera. A simple solution is using a Canon OC-E3 extension cable, because it’s pin-compatible with Fuji’s own flash contacts. With such a cable (or a compatible third-party product), it is possible to use an EF-20, EF-X20, or EF-42 off-camera in TTL mode. Please note that Canon OC-E3 cables are only compatible with Fuji’s TTL flash connectors, not with Fuji’s TTL flash protocol. This means that it isn’t possible to use Canon TTL flash units with an X-T10 in TTL mode. The protocols won’t match. You can still use them in manual mode, though.
Fujifilm’s compact (and retro-styled) EF-X20 flash features an optical slave mode and can be wirelessly triggered by another flash unit. However, this is no automated TTL mode, so the output of the EF-X20 has to be manually controlled while in slave mode.
Remote shutter release: three options for the X-T10 |
Now and then you may encounter situations that require you to remotely release the shutter without vibration. A quick-and-dirty method is using the camera’s self-timer with a delay of either two or ten seconds, although a better way is using a remote shutter release. Your X-T10 features three different ports to connect remote shutter releases:
![]() A mechanical thread on the shutter button allows you to connect a traditional cable release.
A mechanical thread on the shutter button allows you to connect a traditional cable release.
![]() There’s an RR-90 port (Micro-USB port) that is compatible with a variety of electronic remote controls.
There’s an RR-90 port (Micro-USB port) that is compatible with a variety of electronic remote controls.
![]() You can connect electronic remote shutter releases to the camera’s microphone port (a 2.5mm input).
You can connect electronic remote shutter releases to the camera’s microphone port (a 2.5mm input).
Electronic shutter releases are available in tethered and wireless versions. Wireless options always consist of a transmitter and a receiver. The transmitter sends a trigger signal that is picked up by the receiver, which triggers the camera with an electronic cable that’s connected to the RR-90 or microphone port.
Fujifilm offers a simple RR-90-compatible shutter release cable, but there are more sophisticated (both tethered and wireless) solutions from third parties, such as programmable intervalometers.
If you already own an older RR-80-type shutter release (which was the standard for the X-E1), you can buy a third-party adapter cable that lets you use RR-80 remote shutter releases with RR-90 cameras. Please note that a simple USB adapter doesn’t work; you have to ask for a dedicated RR-80 to RR-90 adapter.
The microphone port of the X-T10 is compatible with a widely used Canon remote shutter release standard. Among others, it is compatible to the following camera models: Canon EOS Digital Rebel, Canon EOS 1000D, Canon EOS 100D, Canon EOS 1100D, Canon EOS 300D, Canon EOS 350D, Canon EOS 400D, Canon EOS 450D, Canon EOS 500D, Canon EOS 550D, Canon EOS 600D, Canon EOS 60D, Canon EOS 60Da, Canon EOS 650D, Canon EOS 700D, Canon EOS Kiss Digital, Canon EOS Kiss F, Canon EOS Kiss Digital N, Canon EOS Kiss X2, Canon EOS Kiss X3, Canon EOS Kiss X4, Canon EOS Kiss X5, Canon EOS Kiss X50, Canon EOS Kiss X6i, Canon PowerShot G1 X, Canon PowerShot G10, Canon PowerShot G11, Canon PowerShot G12, Canon PowerShot G15, Canon PowerShot SX50 HS, Canon EOS Rebel SL1, Canon EOS Rebel T1i, Canon EOS Rebel 70 T2i, Canon EOS Rebel T3, Canon EOS Rebel T3i, Canon EOS Rebel T4i, Canon EOS Rebel XS, Canon EOS Rebel XSi, Canon EOS Rebel XT, Canon EOS Rebel XTi, Canon EOS Rebel T5i, Contax 645, Contax N, Contax N Digital, Contax N1, Contax NX, Hasselblad H1, Hasselblad H3D, Hasselblad H4D-200MS, Hasselblad H4D-31, Hasselblad H4D-40, Hasselblad H4D-50, Hasselblad H4D-50MS, Hasselblad H4D-60, Pentax 645D, Pentax *ist D, Pentax *ist DL, Pentax *ist DL2, Pentax *ist DS, Pentax *ist DS2, Pentax K-30, Pentax K-5, Pentax K-7, Pentax K-m, Pentax K10 Grand Prix, Pentax K100D, Pentax K100D Super, Pentax K10D, Pentax K110D, Pentax K200D, Pentax K20D, Pentax MZ-6, Pentax MZ-L, Pentax ZX-L, Samsung GX-1L, Samsung GX-1S, Samsung GX-20, Samsung NX10, Samsung NX100, Samsung NX11, Samsung NX5, Sigma SD1, Sigma SD1 Merrill, and Sigma SD15.
This list isn’t complete, but it’s a pretty good start. Remote shutter releases that are compatible with any of these listed cameras should also work with the your X-T10.
Triggertrap Mobile is a smart and flexible way to trigger cameras with a smartphone (Android or iOS). In order to make it work with an X-T10, you need a dongle and an adapter cable. You can read more about this on Triggertrap’s official website: www.triggertrap.com.
Of course, you can also remote control the camera using its built-in Wi-fi function and the free Fujifilm Camera Remote app for iOS or Android devices.