
2.4 FOCUSING WITH THE X-T20
The X-T20 features a hybrid autofocus system that combines CDAF and PDAF. CDAF, PDAF, hybrid AF? It can be quite confusing.
- CDAF means Contrast Detection AutoFocus and is the current standard in mirrorless cameras. CDAF is available throughout the entire sensor area (91 or 325 AF frames in Single Point mode or 91 AF frames in Zone and Wide/Tracking mode). It works quite precisely, but is not particularly fast.
- PDAF means Phase Detection AutoFocus and is the current standard in DSLRs. Since the X-T20 is mirrorless, its PDAF works directly on the sensor, but is only available throughout the 49 (respectively 169) central AF frames. PDAF is fast and particularly good at tracking moving subjects. It can predict where a moving object will be a split second from now, a feature that can be quite useful when you shoot in burst mode.
- Hybrid AF means that the X-T20 automatically chooses the best method (CDAF or PDAF) for the current subject and the current light conditions.
CDAF and PDAF: what’s the difference? |
Both AF methods offer distinct qualities that can be useful during your daily shooting:
- CDAF focuses on surfaces and works best with areas that offer a lot of contrast. A solid white or black wall doesn’t work well with CDAF, but a checkered wall works great. It’s the same with clothes: unicolor may not work, but patterned clothes work wonderfully. CDAF operates with a trial-and-error approach: it keeps adjusting the focus until it finds the distance setting with the utmost contrast. CDAF doesn’t directly go to the optimal focus setting. This results in heightened autofocus motor activity and visible focus hunting while the AF goes back and forth until it finds the optimal focus position.
- PDAF in the X-T20 loves focusing on edges, especially vertical edges (or horizontal ones if you hold the camera upright). Unlike CDAF, PDAF can directly determine the distance to an object, so there’s no need for focus hunting. That’s why PDAF is considerably faster.
- Both methods depend on sufficient light to work with maximum efficiency. The brighter a scene is and the more contrast it has, the better the AF will work. Bright lenses with large maximum aperture openings are beneficial because they allow the AF to work with more light and less depth of field, which helps increase the precision of the CDAF. It’s worth noting that most lenses are less bright near their edges than they are at the center (this effect is called vignetting), so in bad lighting, the autofocus may work less efficiently with AF frames that are located far off center.
AF-S or AF-C? |
Your X-T20 features two basic AF modes that can be selected with the focus selector at the front of the camera:
- AF-S (AF Single) is meant for stationary subjects. Once you half-press the shutter button, the camera will focus on the object covered by the active AF frame and lock the distance (as long as you keep the shutter button half-depressed). You can either fully press the shutter button to take the shot, or you can take your finger off the shutter release and try again.
- AF-C (AF Continuous) is meant for moving subjects, especially those that move toward or away from the camera. When you half-press the shutter button, the camera starts focusing on the object covered by the active AF frame and continuously adjusts the distance to the moving object while you keep the shutter button half-depressed. In the live view, this may look like the camera is continuously hunting, while the green AF confirmation dot in the bottom-left corner of the screen keeps going on and off. Don’t worry! This is normal: the hybrid AF (PDAF and CDAF) has a pretty good track record of getting the moving object in focus when the shutter button is finally fully depressed. Just make sure that the active AF frame or AF zone always covers the part of the image that is supposed to be in focus. Don’t forget that PDAF (with its predictive tracking capability) is only available in concert with one of the central AF frames.
- Every camera experiences a small delay between pressing the shutter and recording the image. This shutter lag can be considered by the predictive PDAF: the camera isn’t focusing on the object’s current position, but on the position the object is predicted to be when the image is captured. Please note that predictive autofocus is also possible with CDAF, though to a lesser degree of performance.
- While AF-C focuses using the set working aperture, AF-S can open the aperture beyond working aperture to improve the AF performance in poor light. This also improves focusing accuracy due to the reduced depth of field caused by the wide-open aperture.

Fig. 47: Shooting with AF-C in poor light, it helps to keep the aperture wide open.
AF modes: Single Point AF vs. Zone AF vs. Wide/Tracking AF |
The AF/MF SETTING > AF MODE menu lets you choose between SINGLE POINT, ZONE, or WIDE/TRACKING autofocus:
- Single Point AF mode is my recommended AF setting for most applications. In this mode, you can manually select one of 91 (or 325) available AF frames. Try to avoid old habits like using only the central frame in concert with the focus and recompose [41] technique. It’s better to compose the shot and then select a suitable AF frame that covers the part of the image that needs to be in perfect focus. This helps you avoid focus errors that invariably occur when you pan the focus plane in another direction. Such focus errors may be irrelevant with long focal lengths and small aperture openings (large depth of field), but they can be quite unpleasant with wide-angle lenses, a wide aperture opening (small DOF), and situations with a short distance between the camera and the subject. Single Point AF can be used in concert with both AF-S and AF-C.

Fig. 48: Shooting with minimal depth of field, you can’t afford to use a focus and recompose habit because it would quickly lead to soft results that appear out of focus. Instead, compose the shot, and then focus using a single autofocus frame (there are 91 or 325 to choose from in Single Point AF mode) that covers the part of the image that is supposed to be in focus.
- You can think of Zone AF as an extension of Single Point AF. Basically, an AF zone is a particularly large AF frame that consists of a set of smaller AF points. Zones are available in sizes that cover 3x3, 5x5, or 7x7 out of a total of 91 AF points. Like Single Point AF frames, AF zones can be moved around within the image area. Since they are larger, AF zones make it easier to focus on moving subjects. In Zone AF mode, the camera will start looking for something to focus on in the center (crosshairs) of the selected zone and then expand its search toward the edges of the zone until it finds a target. Like Single Point AF, Zone AF works in concert with either AF-S or AF-C.
- When you combine Wide/Tracking AF mode with AF-S, the camera scans the entire image frame and automatically selects up to 9 out of 91 available AF frames. It’s a bit like rolling dice, since the camera is looking for areas with a lot of contrast. It doesn’t know what’s important in a scene. This changes when Wide/Tracking is used in concert with AF-C: This combination offers real 3D tracking of moving objects; that is, objects that not only move toward or away from the camera, but also left, right, up, or down within the image frame. To track such an object, select Wide/Tracking and AF-C and pick one of the 91 available AF points. To start the tracking process, make sure the selected point covers the moving object you want to track. Half-press the shutter button to start the tracking process. While you keep the shutter-button half-pressed, the camera will automatically follow the selected subject with a cloud of small AF frames as it moves across the image area.
Please note that Fujifilm has released an AF Special Site [42] detailing the autofocus modes and mode combinations that come with your X-T20.
In addition to that, I have published a blog article [43] describing the new AF features that came with firmware 4 for the X-T1. These features are also found in the X-T20. This article also contains links to short videos with examples of Single Point AF, Zone AF, and Wide/Tracking AF.
The X-T20 offers an indirect and a direct method for selecting one of its 91 or 325 available AF frames in Single Point AF and for moving an AF zone around in Zone AF:
- The indirect method requires you to first press the AF button and then use the selector buttons to pick an AF frame or move an AF zone. Since the X-T20 doesn’t feature a hard-wired AF button, you must assign this function to one of the Fn buttons by pressing and holding the desired Fn button until its configuration menu appears. Then you can select FOCUS AREA.
- The direct method involves using the touchscreen. Make sure that the touchscreen is enabled and in AREA mode, then tap anywhere on the screen to select an AF area or zone.
Choosing a suitable AF frame or AF zone size |
The X-T20 offers 91 (or 325) different AF frames in Single Point AF, and each frame comes in several sizes. You can change the size of an AF frame by pressing the AF button (the Fn button performing the FOCUS AREA task) and turning one of the command dials left or right to decrease or increase the frame size.
AF frame size affects the efficiency of CDAF and PDAF. A basic rule to follow is: Make your AF frame as large as possible and as small as necessary.
This is why:
- With a large AF frame size, the camera has more to work with and a better chance to find contrast, especially when the light conditions aren’t optimal. There’s also a better chance the camera will be able to use the faster PDAF method when one of the central AF frames is active. When PDAF isn’t available, the camera will fall back to the slower CDAF.
- With a smaller AF frame size, the autofocus becomes more accurate. A small AF frame gives you better control over what exactly the camera is focusing on. Avoid AF frame sizes that are larger than the part of your image that needs to be in focus. For example, if your AF frame is larger than the head of the person you are focusing on, there’s a chance that the camera will instead focus on the background behind them, especially if that background contains a lot of contrast.

Fig. 49: To get tiny parts of an image in perfect focus, it’s best to choose a small AF frame size.
In a similar fashion, you can change the size of AF zones by pressing the AF button and turning the command dial left or right. You have a choice of three AF zone sizes: 3x3 (default), 5x5, or 7x7 out of 91 frames.
Since we can regard AF zones as very large AF frames, the same rules apply: larger zones are more convenient, and they potentially offer a faster AF response; but they are also potentially less accurate than smaller zones.
Keep in mind that the faster PDAF method is only available if the zone doesn’t extend beyond the central PDAF point matrix. As soon as an AF zone is configured to include at least one CDAF-only AF point, the focus system will switch to CDAF. You can easily tell the difference between AF points that are PDAF-enabled and those that are CDAF-only: the 49 (or 169) PDAF-enabled points are displayed as larger squares than the surrounding CDAF-only points.
Manual focus and DOF zone focusing |
To set the camera to manual focus, move the focus selector at the front of your X-T20 to the M position. There are several manual focus aids available:
- A magnification tool with different magnification levels
- Focus peaking (Focus Peak Highlight) with two strength levels and optional colors (red or blue)
- Digital split image
- An electronic distance scale with depth-of-field bars that can be based on two formats: PIXEL BASIS and FILM FORMAT BASIS
- One-Touch-AF (or Instant AF): autofocus in MF mode with the AF-L button
The digital distance scale can help you define a focus zone with pre-determined depth of field (DOF). If you opt for PIXEL BASE in AF/MF SETTING > DEPTH-OF-FIELD SCALE, everything within the DOF zone will look pixel-sharp even when the image is magnified to a 100% view. Please don’t confuse manual zone focusing with Zone AF—they are completely different.
Here’s a zone-focusing example: using an 18mm lens, manually set a distance of 15 feet and stop down to f/6.4. The DOF bars will show a depth-of-field zone that begins at around 12 feet and ends at around 30 feet. This means that everything located in this zone (between 12 and 30 feet) will appear equally in-focus in the final image. All you have to do is make sure that your subject is within that zone when you press the shutter button.
A special case of manual zone focusing is setting the hyperfocal distance [44]. This is the distance setting with the maximum DOF (all the way to infinity). Again, the electronic DOF scale can be very helpful: all you have to do is manually set the distance where the blue DOF bar on the right touches the infinity mark. For example, using an 18mm lens at f/16, the hyperfocal distance is at about 16 feet, with the pixel-sharp DOF zone extending from nine feet to infinity.

Fig. 50: Setting the hyperfocal distance with the electronic distance and DOF scale: instead of focusing on a predetermined distance, manually change the focus distance until the blue DOF bar touches the ∞ mark on the right end of the scale. This gives us the hyperfocal distance for a given aperture and focal length. This image shows the hyperfocal distance of a wide-angle lens at f/9 for both the PIXEL BASIS format (left) and FILM FORMAT BASIS format (right).
Please note that depth of field is very much dependent on the circle of confusion (CoC) [12]. Fujifilm uses a very conservative CoC that guarantees pixel-sharp results even when the DOF zone is viewed at 100% magnification on a computer screen. Fuji is literally using the sensor’s maximum resolution as a benchmark. In PIXEL BASIS mode, everything that’s located within the electronic DOF zone will be rendered as sharp as the sensor can resolve it. In the age of pixel peeping, this is as good as it can get.
It’s important to know that the engraved analog distance and DOF scales on the XF14mmF2.8, XF16mmF1.4, and XF23mmF1.4 lenses follow a different rule: the FILM FORMAT BASIS option. They are based on a less conservative circle of confusion that is several aperture stops more generous than the electronic PIXEL BASIS scale. You can change the electronic scale to FILM FORMAT BASIS (and hence use a less conservative scale with all your lenses) in the AF/MF SETTING > DEPTH-OF-FIELD SCALE menu.
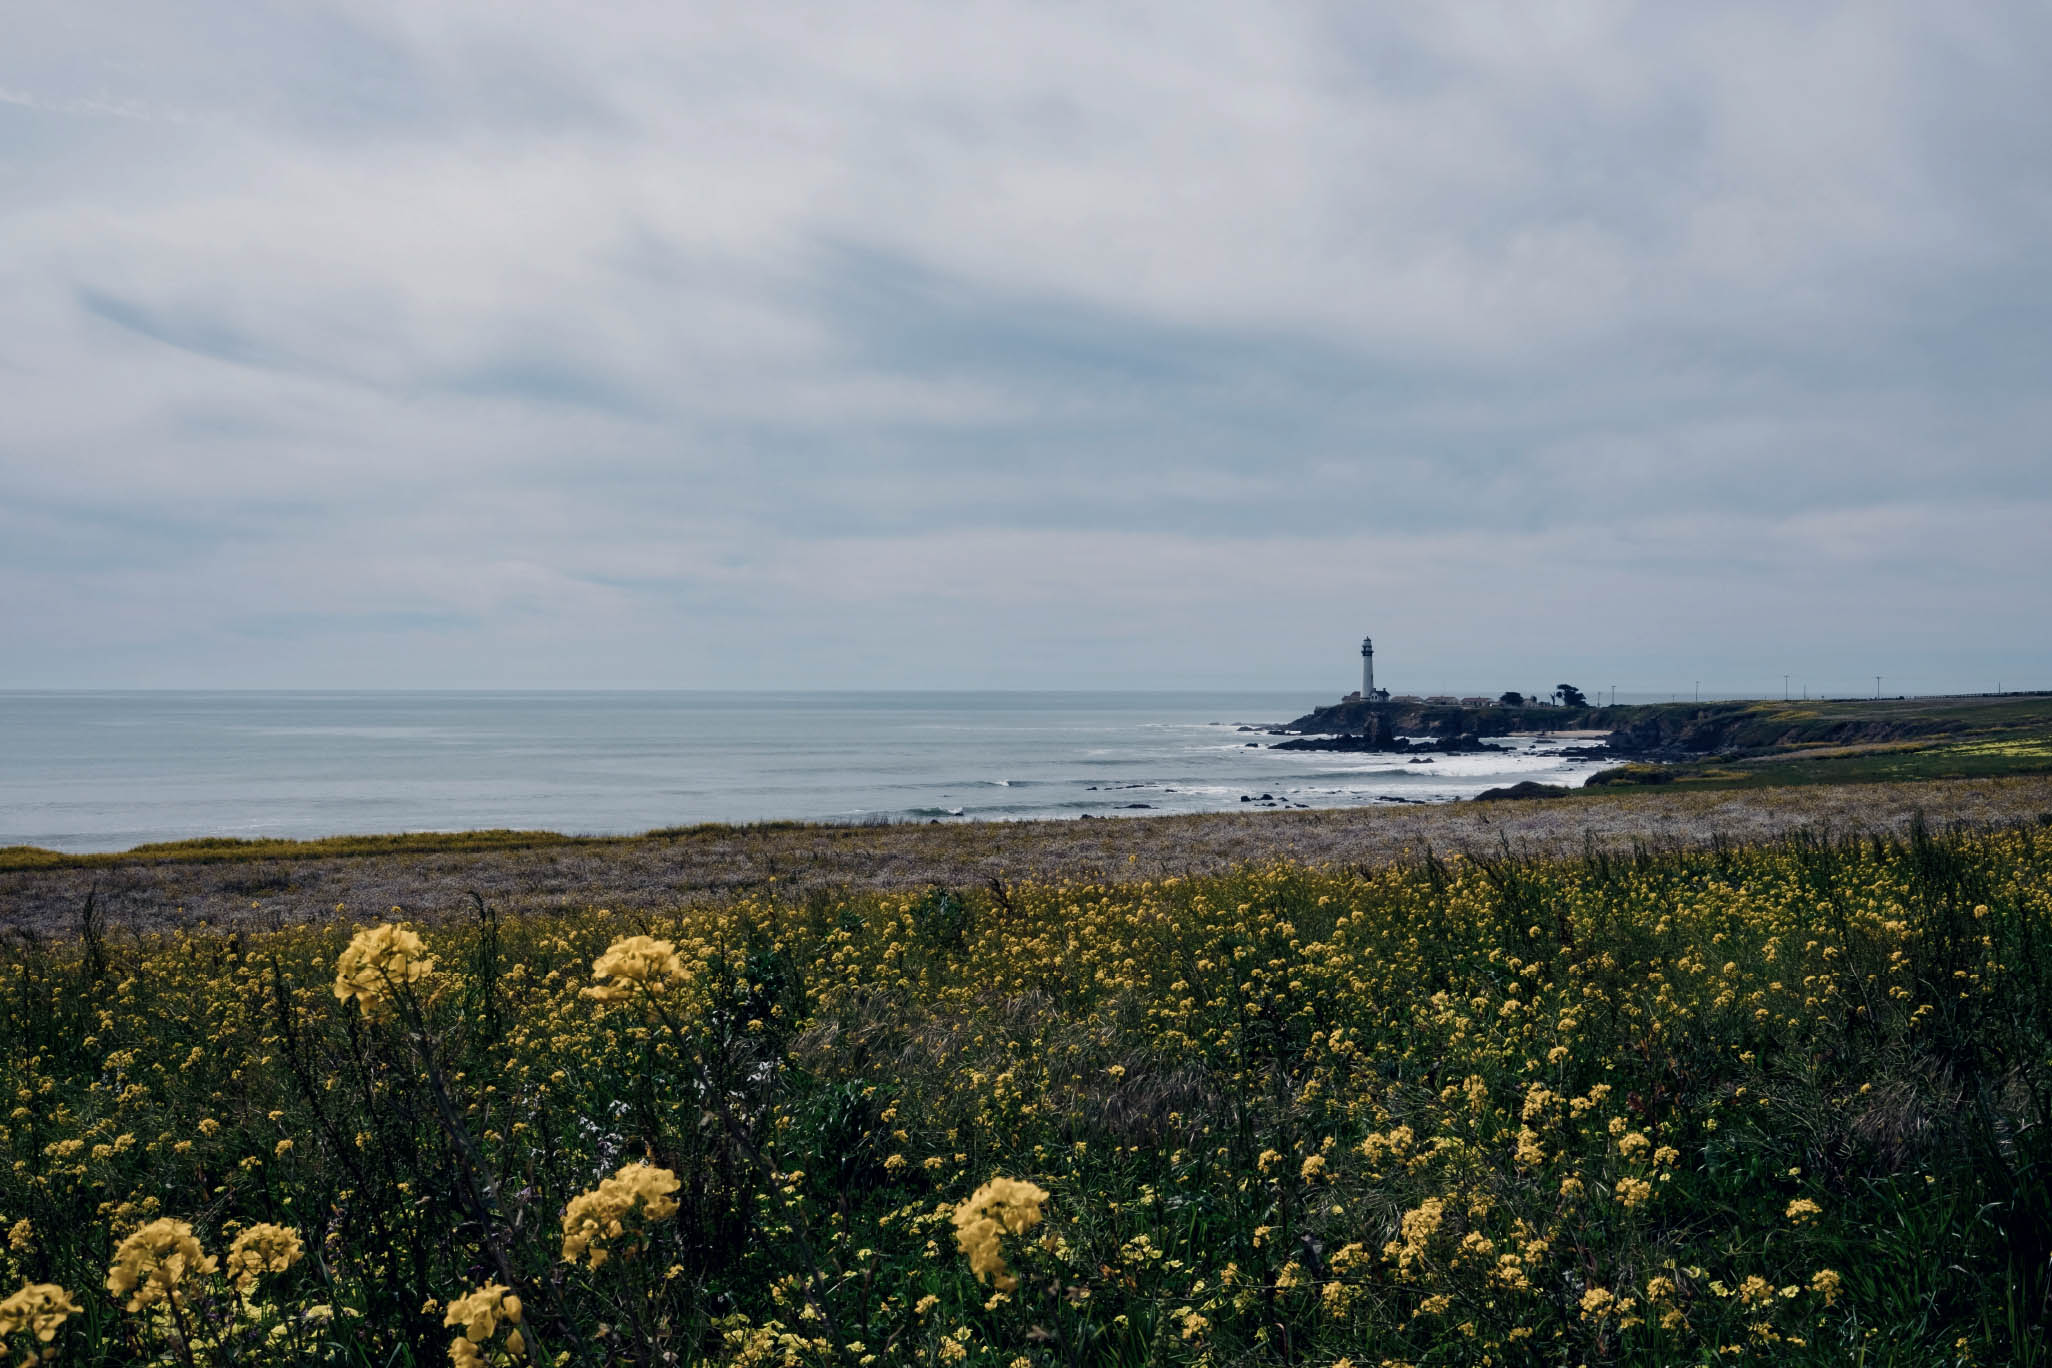
Fig. 51: This shot was manually focused by setting the hyperfocal distance for f/14 on the camera’s electronic focus distance scale (XF27mmF2.8 Pancake).
Manual focus assistants: focus peaking and digital split image |
The X-T20 features two MF assistants:
- Focus Peaking (or Focus Peak Highlight) emphasizes the edges of objects when they are in focus. This method is especially useful in concert with longer focal lengths and bright lenses with a tiny DOF.
- Digital Split Image tries to simulate the split image indicator of analog SLRs. It works best with vertical lines (or horizontal lines when the camera is held in portrait orientation). It uses the sensor’s PDAF-enabled area, which is why the digital split image is just as large as the area covered by the central PDAF frames.
To quickly switch between the two MF assistants, you can press and hold the rear command dial for about a second while you are in MF mode.
You can watch a short video [45] demonstrating the manual focus assistants.
Focus check: use the magnifier tool! |
The magnifier tool is helpful for checking if the current focus is spot-on. Simply press the rear command dial (either in AF-S/Single Point AF or in MF mode) to magnify everything that is covered by the active focus frame. Of course, this assumes that the rear command dial is still operating with its default FOCUS CHECK Fn button assignment.
You can change the magnification level by turning the rear command dial. You can also combine the focus check with both MF assistants (focus peaking and digital split image). Please note that in digital split image mode, there’s only one magnification level available.
By selecting AF/MF SETTING > FOCUS CHECK > ON, the magnifier tool is automatically activated when you turn the manual focus ring of a lens in MF mode. You can immediately cancel any automatic focus check by half-pressing the shutter button.
Like the AF-S and AF-C modes, there are 91 (or 325) different MF frames in manual focus mode. These frames indicate which part of the image will be magnified when focus check is activated. As usual, you can change the active frame by pressing the AF button and then moving the MF frame around with the selector keys.
One-Touch-AF (Instant AF) |
One-Touch-AF (or Instant AF) allows you to use autofocus in manual focus mode. All you have to do is press the AF-L button. One-Touch-AF always works with a wide-open aperture and with both PDAF and CDAF. Like normal autofocus, its efficiency depends on the size of the selected focus frame.
One-Touch-AF is the most precise AF method available, which also makes it a bit slower than the camera’s normal autofocus. It can be combined with conventional manual focusing: you can use One-Touch-AF to quickly autofocus on an object, then manually fine-tune the focus by turning the focus ring and using MF assistants like the magnifier and focus peaking. Please note that this convenient method of fine-tuning One-Touch-AF with manual focus is not available when you are using lenses with manual focus clutches (XF14mmF2.8, XF16mmF1.4, and XF23mmF1.4).
One-Touch-AF normally works like AF-S, but you can also set it to continuous focus with AF/MF SETTING > INSTANT AF SETTING > AF-C. In this mode, One-Touch-AF will track an object while you keep the AF-L button depressed in manual focus mode. Unlike normal AF-C, One-Touch-AF-C can focus with a wide-open aperture (instead of the set working aperture) when the light is poor, making it an option for stage and concert photography with moving subjects. Just keep the AF-L button depressed for continuous instant autofocus as you press the shutter button in the right moment.

Fig. 52: Instant AF forces the lens to focus with wide open aperture. This AF method is particularly accurate when you shoot with a stopped down wide-angle lens.
Using AF+MF |
AF+MF enables you to focus in AF mode, then adjust the focus manually by turning the focus ring, all while holding the shutter button half-depressed. Select AF/MF SETTING > AF+MF > ON to enable this feature. To use AF+MF, your X-T20 has to be in AF-S autofocus mode.
Here’s how it works:
- Autofocus on your subject as usual in AF-S mode by half-pressing the shutter button.
- Once the autofocus has been confirmed (green square[s]) or not confirmed (red AF warning), keep the shutter button half-depressed and rotate the focus ring of your lens to manually adjust the focus distance until you are satisfied. If focus peaking is enabled, it will automatically engage as soon as the focus ring is rotated and manual focus (MF) kicks in. You can also use the Focus Check function (AF/MF SETTING > FOCUS CHECK > ON) to automatically magnify the focus area as soon as you turn the focus ring. For this to work, make sure that AF-S and SINGLE POINT AF are set. You can also combine Focus Check magnification with focus peaking. Turn the rear command dial to change the magnification factor and press the rear command dial to manually enable/disable the live view magnification. Remember that all this has to be performed while you hold the shutter button half-depressed, so this might need some practice.
- When you are happy with your manual focus adjustments, fully depress the half-pressed shutter button to take the shot.
I see three main applications for AF+MF:
- Manual focus in situations when autofocus fails: Instead of losing time by changing the focus mode from AF to MF, you can immediately focus manually when the camera’s AF fails to acquire the subject. Simply adjust the focus manually using the focus ring.
- Correcting the camera’s autofocus: There are instances when you might want to fine-tune the autofocus of your camera by adjusting it manually. Again, focus peaking is available to make things easier, and you can enable Focus Check to automatically show a magnified view of the focus area when you turn the focus ring.
- Shifting the depth-of-field (DOF) zone or setting the hyperfocal distance: After half-pressing the shutter button, AF+MF lets you quickly shift the DOF zone toward or away from the camera by turning the focus ring. The digital distance scale on the screen can be quite helpful here. For example, you can set the hyperfocal distance [46] by shifting the right tip of the blue DOF bar to touch the infinity mark of the digital distance scale.
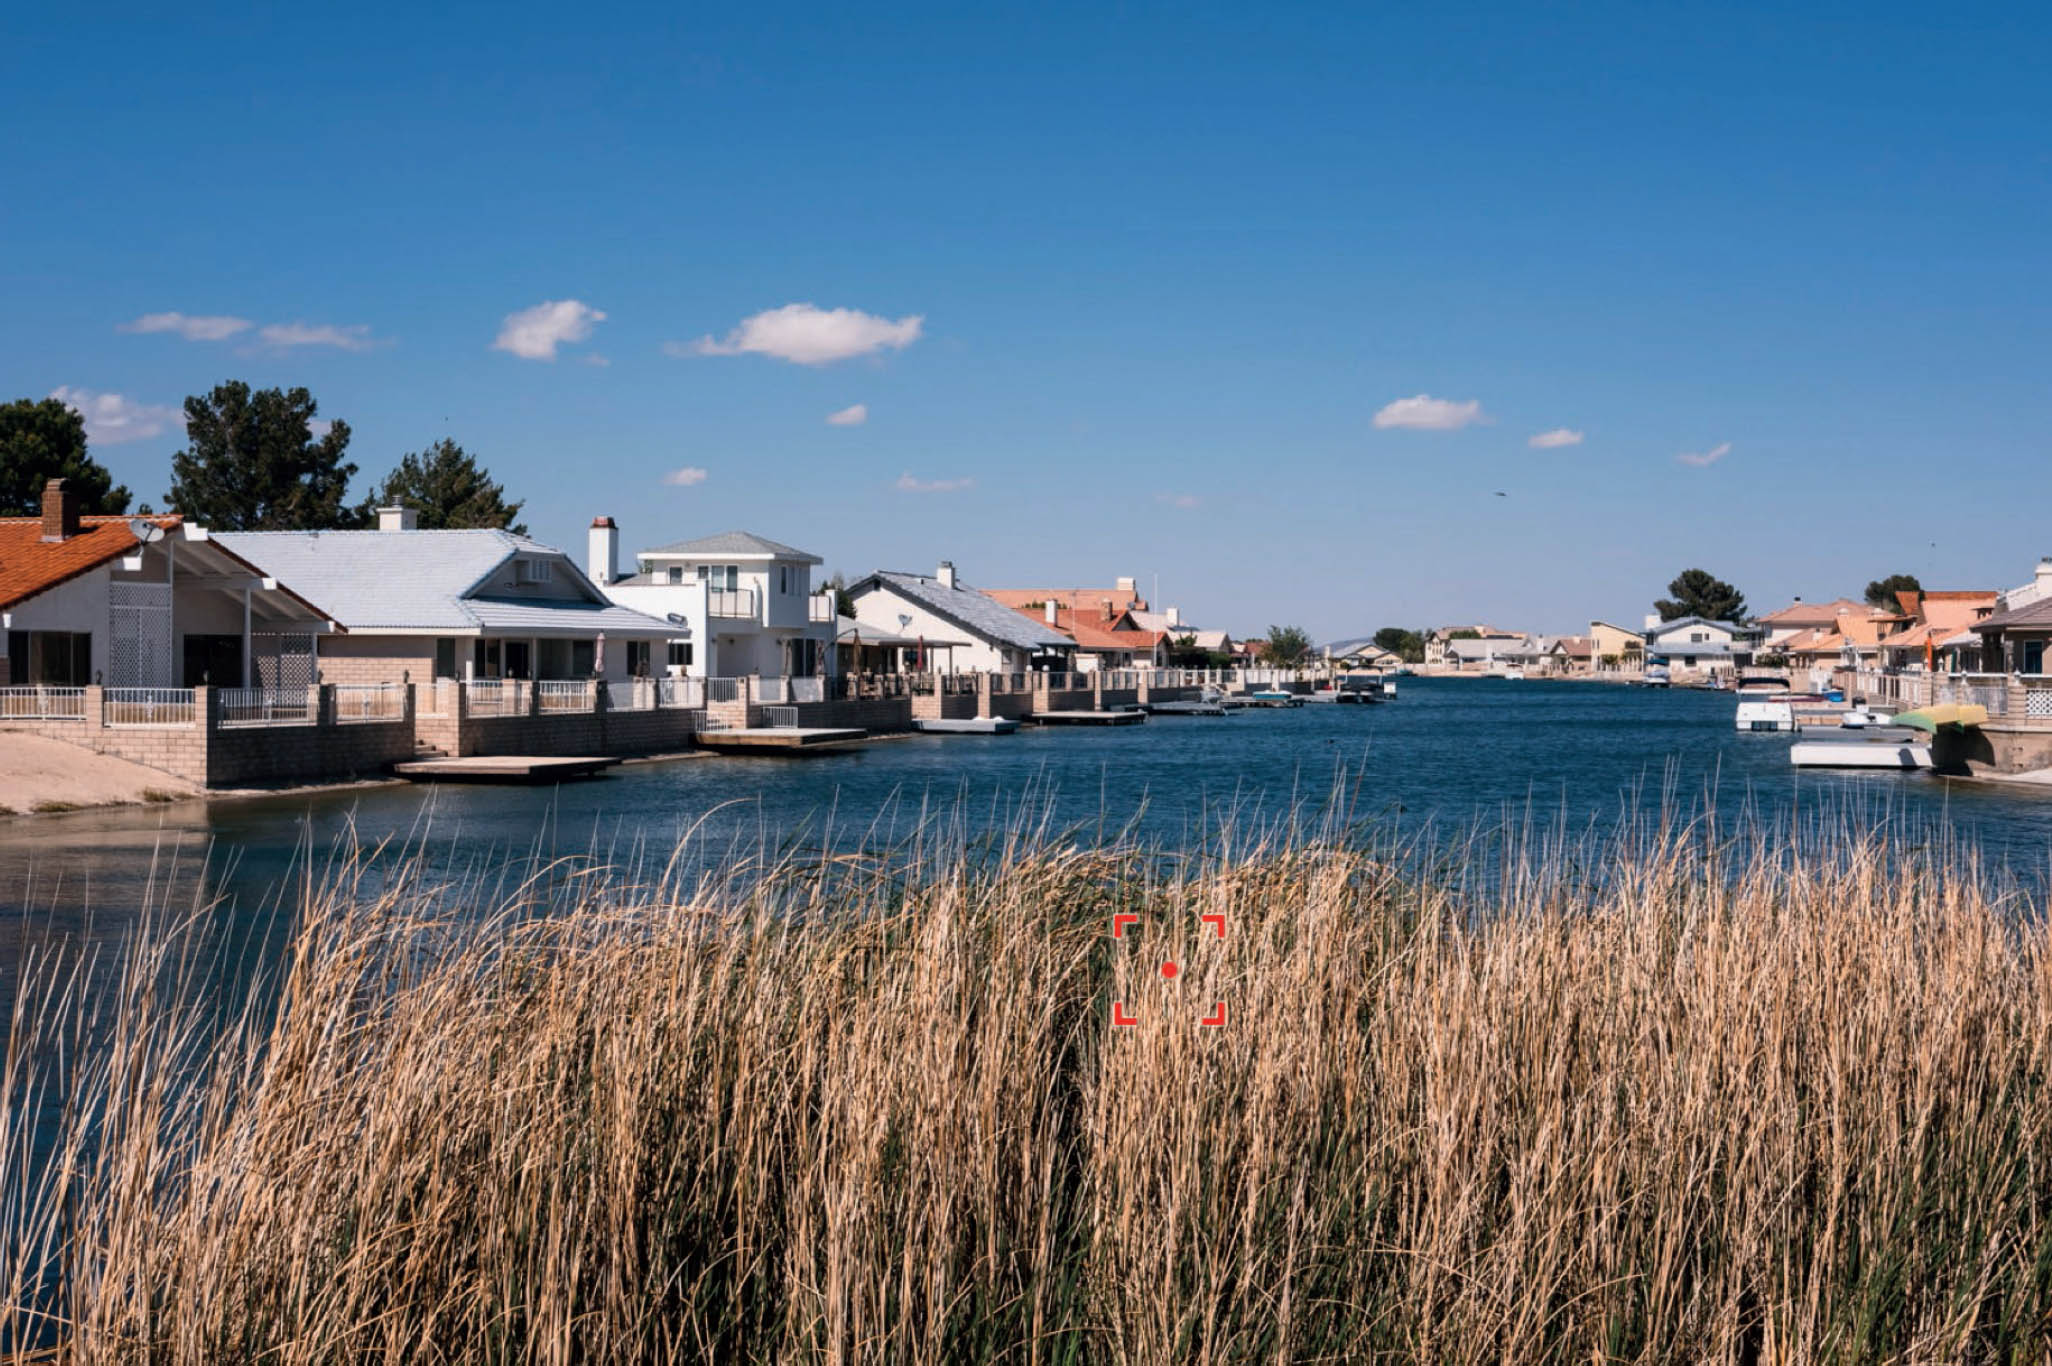
Fig. 53: In this example, I autofocused on the reeds by placing the AF frame right over them. I used a small aperture of f/9 for a decent amount of depth of field (DOF). Since the portion of the DOF zone that extends in front of the reeds toward the camera is useless in this case, I manually shifted the DOF zone away from the camera using AF+MF. The resulting DOF zone starts at the reeds and extends all the way back.
At first glance, the MF component of AF+MF may look like your usual manual focus, but it’s not. While genuine MF is performed at a wide-open aperture, the MF part of AF+MF is performed at the selected working aperture. That’s because the shutter button is half-pressed, so the camera has already been primed to take the shot with minimal shutter lag.
This also means that the EVF/LCD will display a live view image that shows the actual depth of field of the resulting image, and focus peaking will show an increasingly larger zone as being in focus when you stop down the lens. This can make it more difficult to nail your manual focus adjustment.
AF+MF also works with clutch-type lenses such as the XF14mm, XF16mm, or XF23mm. These lenses feature a clutch to mechanically switch between MF and AF mode. Since the focus ring of these lenses can only be turned when the clutch is in the MF position, you need the following configuration to get AF+MF to work:
- Enable AF+MF in the shooting menu.
- Select AF-S in the camera (using the focus mode switch) and MF on the lens (by pulling the clutch mechanism toward the camera).
- Use AF+MF as described above.
Here are a few tips regarding AF+MF and clutch lenses:
- Make sure that the manual focus ring of the lens has sufficient play to the left and right so you can make the necessary MF adjustments.
- The distance and DOF markings on your clutch lens have no meaning in the AF+MF configuration. Instead, use the digital distance/DOF scale that’s displayed in the camera’s viewfinder or on the LCD (in either PIXEL BASIS or FILM FORMAT BASIS format).
- To use clutch lenses in manual focus mode when AF+MF is on, both the lens and the camera must be set to MF.
Pre-AF brings the AF-C of older Fujifilm X cameras (like the X-Pro1) to the X-T20: with Pre-AF set to ON, the camera will always focus on whatever is covered by the active AF frame, even when the shutter button is not half-depressed.
Pre-AF burns plenty of power because the autofocus in the lens is always working. On the other hand, using it can potentially result in a quicker AF response. If you shoot a lot of action, Pre-AF may be helpful—but don’t forget to pack a few extra batteries. Normally, I set this option (AF/MF SETTING > PRE-AF) to OFF.
Using face detection and eye detection |
Face detection is a combined autofocus and exposure metering mode. It even affects auto white balance. You can activate it with AF/MF SETTING > FACE/EYE DETECTION SETTING and picking one of the four FACE ON options.
Here’s what it does:
- The camera scans the scene and detects one or more human faces. In AF-S mode, it automatically focuses on one of the faces when the shutter button is half-pressed. When more than one face is detected, the camera tends to focus on the face that’s closest to the center. That face will be highlighted with a green frame. The other detected faces will be highlighted with a white frame.
- Face detection uses a custom version of weighted multi metering that puts an emphasis on the selected face. The goal is to deliver an exposure with correct skin tones. It may also influence the camera’s auto white balance.
Face detection is both a blessing and a curse. It’s a blessing when it works because it focuses directly on a face and makes sure that it’s correctly exposed. It’s a curse when the detection goes wrong, because it doesn’t just mean that the focus might miss; it may also mess up your exposure metering.
The good news is that in many cases, face detection works, even with people who only show their profiles to the camera. The bad news is that face detection may not work well on folks wearing glasses.
- If you want to take face detection exposure metering out of the equation, you can set the camera to manual exposure mode M. While the metering will still be affected in this mode, the exposure itself will not. Alternatively, you can use the AE-L button to meter and lock the exposure and prohibit face detection from interfering with it while AE-L is active. You can still adjust your locked exposure with the exposure compensation dial.
- Face detection works with the full sensor area, and thus only partly employs the fast PDAF. This means that AF-C tracking performance of moving objects varies depending on which kind of AF method (PDAF or CDAF) can be used by the camera. Face detection isn’t the best option to use when tracking an athlete or a child running toward the camera. It’s better to use the camera’s conventional AF-C mode with one of the central AF frames or an appropriate AF zone.
- Spot, center-weighted, and average metering aren’t available when face detection is active. The camera is always using a derivate of multi metering.
- When face detection fails to detect a face in the scene, the camera will automatically fall back to the selected AF mode: Single Point, Zone, or Wide/Tracking. At the same time, exposure metering reverts to regular multi metering.
- AF-Lock is not available when face detection is active.
- Face detection can be assigned to one of the X-T20’s function (Fn) buttons. Personally, I tend to assign it to the lower selector button.

Fig. 54: Face detection is best for stationary scenes with one or more people looking at (or showing their profile to) the camera. For people who are moving toward the camera, better use one of the central AF frames or an AF zone in concert with the X-T20’s tracking autofocus (AF-C). In this example, I used AF-S and eye detection.
The X-T20 has improved face detection accuracy due to an added, optional eye-detection feature. Eye detection is only available in AF-S mode. To activate it, select either FACE ON/LEFT EYE PRIORITY or FACE ON/RIGHT EYE PRIORITY. You can also select FACE ON/EYE AUTO to make the camera focus on the eye that’s closest to the camera, or select FACE ON/EYE OFF to deactivate eye detection during face detection.
In the viewfinder, the camera will highlight a detected eye with a small square and focus on it when you half-press the shutter button. In my experience, it doesn’t hurt to leave this feature on all the time. I usually set it to EYE AUTO. However, don’t forget that it’s only available in AF-S mode.
In AF-S or AF-C mode, pressing the AF-Lock button locks the current distance setting. In SET UP > BUTTON/DIAL SETTING > AE/AF LOCK MODE, you can configure the button to function as an on/off switch (which is always my choice) or to work only while it is being pressed.
When AF-Lock is active, the camera won’t refocus when the shutter button is half or fully depressed. Instead, it will keep the focus at the previously locked distance. This is convenient when you want to take multiple shots of a non-moving subject in quick succession. With AF-Lock, you don’t have to refocus every time to take another image. AF-Lock decouples autofocus and exposure metering: while AF-Lock is on, half-pressing the shutter button will only meter and lock the exposure, not the focus. Of course, this only applies if SHUTTER AF (in the SET UP > BUTTON/DIAL SETTING menu) is in its default ON position.
In a similar fashion, you can use the AE-Lock button to meter and lock exposure; in this case, half-pressing the shutter button will only change the focusing. You can even combine both AE-L and AF-L. In this case, half-pressing the shutter will only set the working aperture and prime the camera. There won’t be any new metering for focus or exposure.
Please don’t forget that the X-T20 treats the AF-L and AE-L buttons as Fn buttons that you can reconfigure as you see fit. Of course, this book assumes that your AF-L and AE-L buttons are configured as AF-Lock and AE-Lock buttons.
Using AF-ON (back-button focusing) |
AF-ON is a new option that brings real back-button focusing to the X-T20. Back-button focusing is a common practice with DSLR users. Simply put, AF-ON puts the X-T20’s autofocus function on a function button. Press it, and the camera starts focusing. Stop pressing it, and the focusing stops at the current position until you press the AF-ON button again.
This means that AF-ON performs the same function as half-pressing the shutter button (assuming that SHUTTER AF ON is set in the SET UP > BUTTON/DIAL SETTING menu). In AF-S mode, pressing AF-ON will perform a single focus search and lock the target. In AF-C mode, AF-ON will continuously focus on a target while the button is pressed.
Since the X-T20 has no dedicated AF-ON button, it must be assigned to a Fn button. To keep things simple and comfortable, it’s best to replace the AF-L button with AF-ON. To do so, press and hold the DISP/BACK button until the Fn/AE-L/AF-L BUTTON SETTING page appears. Scroll down to AF-L, press the right selector button and select AF-ON from the list of available functions.
You can press and hold AF-ON while you simultaneously release the shutter. In AF-S, pressing and holding AF-ON will focus the camera and lock it while AF-ON is held, so simultaneously half-pressing or pressing the shutter button won’t interfere with your locked focus. In AF-C, pressing and holding AF-ON means that the camera keeps tracking your target while AF-ON is held.
If you are a “religious” back-button-AF user (some DLSR converts are), you may find it more comfortable to entirely disable the shutter button’s AF functionality by selecting SET UP > BUTTON/DIAL SETTING > SHUTTER AF > OFF, meaning AF-ON will be the only available method to autofocus in AF-S or AF-C mode.
In manual focus (MF) mode, AF-ON turns into Instant AF (One-Touch-AF), just like the normal AF-L button.
Focusing in poor light |
Low light can quickly lead to poor contrast, making it difficult for the camera to find and lock the correct autofocus distance. However, the amount of light that reaches the sensor depends not only on the brightness of a scene, but also on the brightness of the lens. The XF56mmF1.2 is 3.5 stops or EVs (exposure values) brighter than the XF18–55mmF2.8–4 kit zoom in its 55mm position. In other words, with the XF56mmF1.2 lens, the world looks 3.5 stops brighter to the camera’s autofocus system. You can guess which lens will perform better when the light gets difficult.
Don’t be confused by appearances—it’s true that the live view image in the viewfinder will look equally bright with both lenses, but that’s only because the camera is electronically amplifying the live view display. Don’t forget that autofocus needs actual light and contrast. When the light is bad, it’s vital to target surfaces with contrast and, if possible, use a larger AF frame size.
One way of tackling a bad lighting situation is by using fast lenses, like the XF56mmF1.2, XF35mmF1.4, or XF23mmF1.4. You can also generate light—the camera’s AF assist lamp can illuminate a subject to help the autofocus find better contrast. Be aware that the AF assist lamp can be easily blocked by an attached lens hood. Watch for it, and remove the lens hood if necessary. Since the AF assist lamp tends to concentrate on the center of the image, it works best in concert with one of the more central AF frames. To use the AF assist lamp, make sure to set AF/MF SETTING > AF ILLUMINATOR > ON.
An alternative to using the AF assist lamp is using a flashlight to temporarily illuminate a subject. If you are indoors, you can try turning on the lights in the room for a moment and using AF-Lock to lock the focus. Just make sure to meter the exposure after the lights are off again.
Important: If you intend to stop down the aperture of your lens in poor lighting, make sure to use either AF-S or manual focus (Instant AF) as your focus mode. Do not use regular AF-C, because this mode will usually focus with your stopped-down working aperture, which will make things difficult for your camera since less light will reach the sensor.
The biggest challenge with shooting macro is the lack of depth of field. The slightest movement may cause the shot to be out of focus. That’s why macro photography is usually performed using a tripod and manual focus, often with One-Touch-AF, Focus Check (magnifier tool), and focus peaking. It’s vital not to recompose after the focus has been set. To get a visual impression of the current DOF, you can half-press the shutter (make sure SHUTTER AE is ON) or assign PREVIEW DEPTH OF FIELD to one of the Fn buttons.
Macro shots usually require you to stop down the lens to increase the DOF. Since this can result in slower shutter speeds, it’s important to make sure that the subject isn’t moving too fast or out of the focus plane. Shooting a close-up of a flower in the wind may not yield excellent results.
If you don’t want to use manual focus in macro mode, you can also focus automatically. Here’s how:
- Set the focus selector switch to AF-S.
- Set Single Point AF and select the smallest AF frame size available.
- Reposition the small AF frame to exactly cover the part of the image that you want to be in focus. Quickly take the shot after you half-press the shutter—don’t recompose. Don’t forget that your X-T20 offers you the opportunity to use 325 instead of 91 AF frames in Single Point AF mode. This may be the time to use this option.
- You can check your focus before taking a shot by pressing the rear command dial. After doing so, you can change the magnification factor by turning the command dial.
- Try not to shoot hand-held; it’s better to use a tripod.
- Stop down the lens and visually check the depth of field by half-pressing the shutter button or using the DOF preview function (remember that function can be assigned to any Fn button).
- Make sure there is sufficient light, and try to shoot subjects that don’t move in and out of the focus plane.

Fig. 55: Macro shots can be quite challenging due to their lack of DOF. That’s why a tripod is highly recommended. With a little bit of luck, hand-held shots are possible, as well. This handheld snapshot was taken in 2012 with the classic X-Pro1 and an XF60mmF2.4 R.
You can add macro capability to many of your existing XF and XC lenses by using Fujifilm’s electronic macro extension tubes: MCEX-11 or MCEX-16. You can download a PDF file [47] from Fujifilm’s website that provides a chart that shows how these extension tubes enhance the magnification factor of each lens. Please note that the camera’s electronic DOF/distance scale doesn’t reflect the use of macro extension tubes.
Focusing on moving subjects (1): the “autofocus trick” |
Rule of thumb: Use AF-S (Single) for stationary subjects; use AF-C (Continuous) for subjects that move toward or away from the camera. But, as usual, there’s no rule without an exception: meet the so-called “autofocus trick” or “shutter mash” technique:
- Set the focus selector switch to AF-S and the camera to single shot (S) using the DRIVE dial. Make sure that High-Performance mode is on. You might also want to use PRE-AF in this case. Finally, make sure to use the mechanical shutter.
- Use Single Point AF or Zone AF. Select an AF frame or zone position and size that cover the part of the moving subject you want to be in focus. If possible, use the inner AF frames, which, as you know, are PDAF-enabled. However, it’s possible to also use the outer frames that only operate with CDAF. If your composition requires them, go for it!
- Set a suitable exposure and make sure that the shutter speed is fast enough to avoid unwanted motion blur. Most action shots require shutter speeds of at least 1/1000s.
- Follow the moving subject in the viewfinder, making sure that the selected AF frame or AF zone always covers the part that needs to be in focus. Do not half-press the shutter button!
- Fully depress the shutter button in one swift motion when you want to take the shot. The camera will need some time to focus, so make sure the AF frame stays positioned over the moving subject while the camera is focusing. As soon as the camera can lock the focus, it will automatically take the shot. The time between fully depressing the shutter and the camera taking the shot can extend to a good fraction of a second.
The AF trick, also known as shutter mash, is based on the camera’s autofocus priority logic. When you release the shutter, the camera first attempts to lock the focus, then take the shot. Since the delay between having locked the focus and releasing the shutter is very short, the moving subject ends up being in focus most of the time. This means that the AF trick works best with aperture settings that offer sufficient depth of field, and with subjects that don’t move too fast toward the camera.
A negative aspect of this method is the delay between fully depressing the shutter button and the camera taking the shot. This makes it challenging to hit decisive moments, and requires some amount of foresight from the photographer.
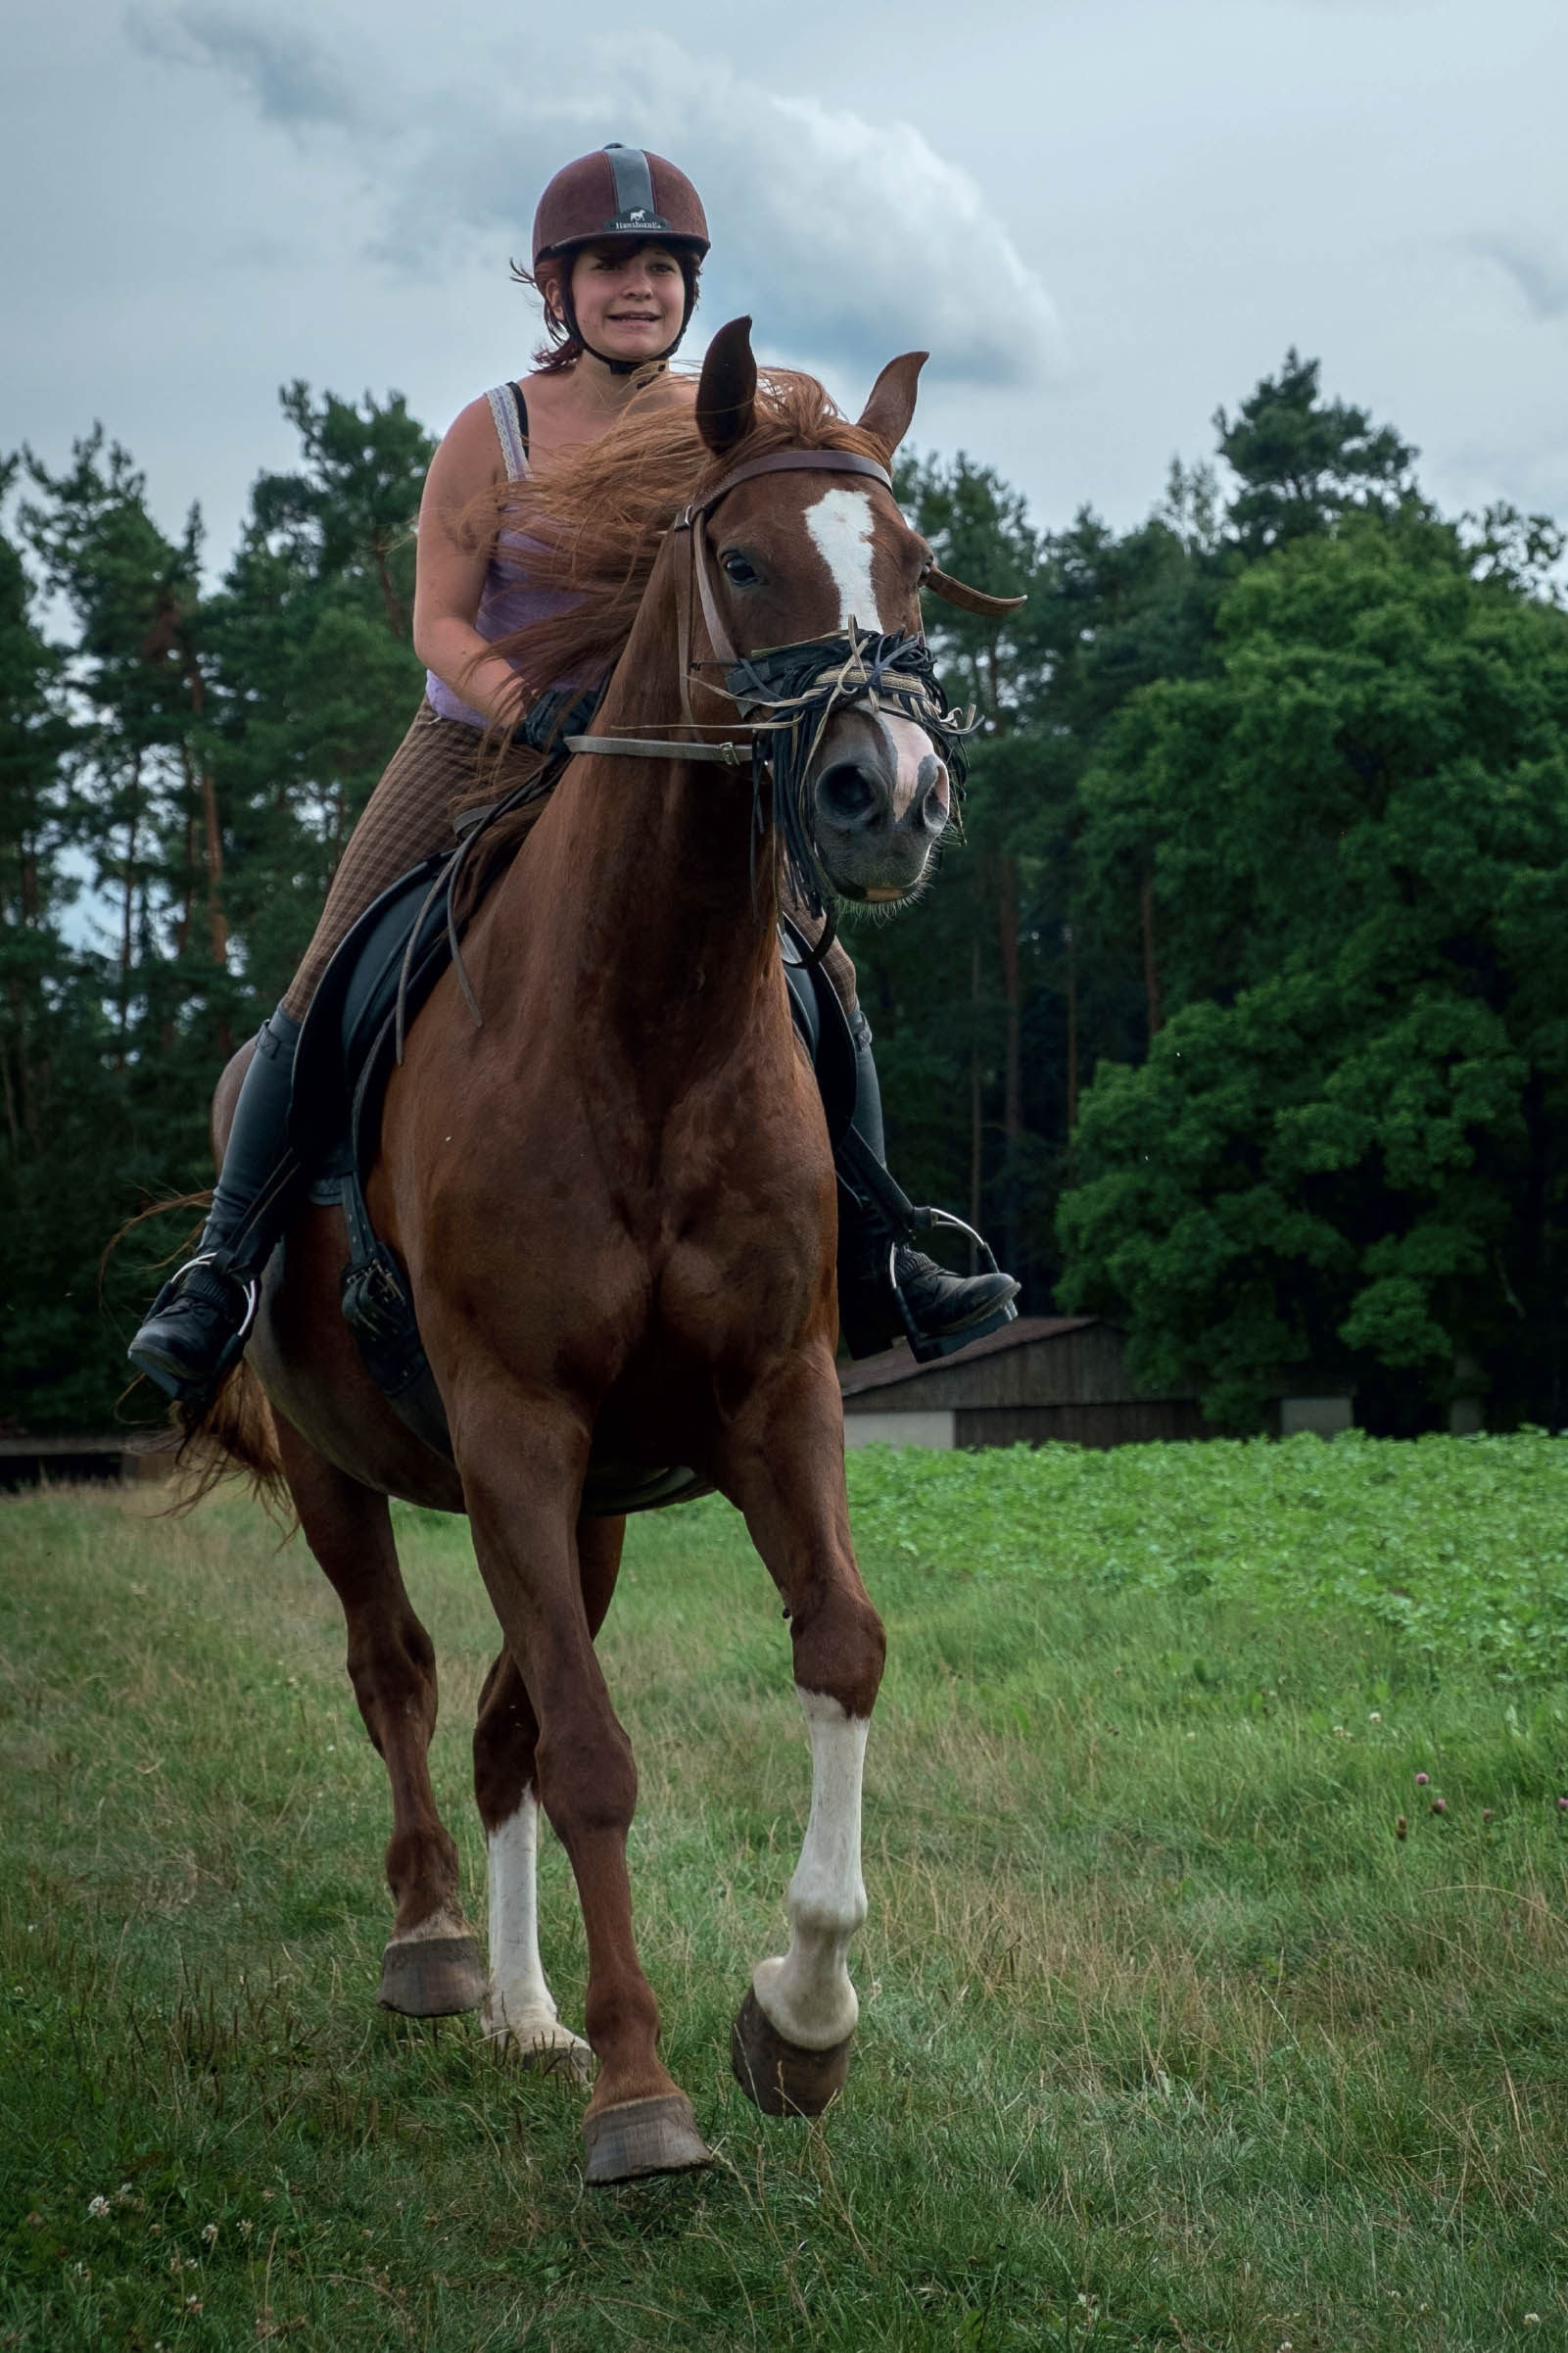
Fig. 56: A running horse captured using the autofocus trick or shutter mash technique. With older X-mount models like the X-Pro1, X-E1, X-M1, X-A1, or X-A2, this method is the only way to capture subjects (using the camera’s autofocus) that are moving toward the camera. This sample image was taken with an X-E1.
Setting up a focus trap is about pre-focusing on a location that a moving object will eventually pass through. This method can be useful with sports and other action that runs along a pre-determined course (track, street, trail, etc.).
This is how it works:
- Set the camera to manual focus (MF) using the focus selector switch. Make sure to use the mechanical shutter.
- Pre-focus on the location where you want to capture the moving subject. Select an aperture with sufficient depth of field (DOF) to make sure that all relevant parts of the object will be in focus.
- Half-press the shutter button when the moving object is approaching the location you have in focus. The camera will lock the exposure and set the working aperture (assuming SHUTTER AE is ON).
- Fully depress the shutter as soon as the object is about to cross the in-focus location.
There’s only a very small shutter lag between half-pressing and fully depressing the shutter button. Depending on how fast the object is moving, it may be necessary to fully depress the shutter button a split second early.
Alternatively, you can set the camera to burst mode (set the DRIVE dial to CH). With this setting, the X-T20 takes 8 frames per second (fps), so there’s a good chance that one or two of them will capture your fast-moving subject as it crosses your focus trap.

Fig. 57: Focus trap: To capture this landing Airbus A330 as it was flying over me at a distance of only a few meters, timing was essential. Instead of using autofocus, I pre-focused my 18mm lens with sufficient depth of field and waited for the right moment with my camera primed and the shutter half-pressed.
You can also trap your moving subjects in a set-up focus zone. Stop down your lens enough to create a sufficiently large DOF zone, and then wait until a subject enters the zone. This method is often used by street photographers with wide-angle lenses (typically 18–23mm) who can’t afford to miss the decisive moment.
A variant of this method is panning [11] the camera with a slow shutter speed and a small aperture (plenty of DOF). The slow shutter speed makes sure that the background is blurred while the subject remains in focus.
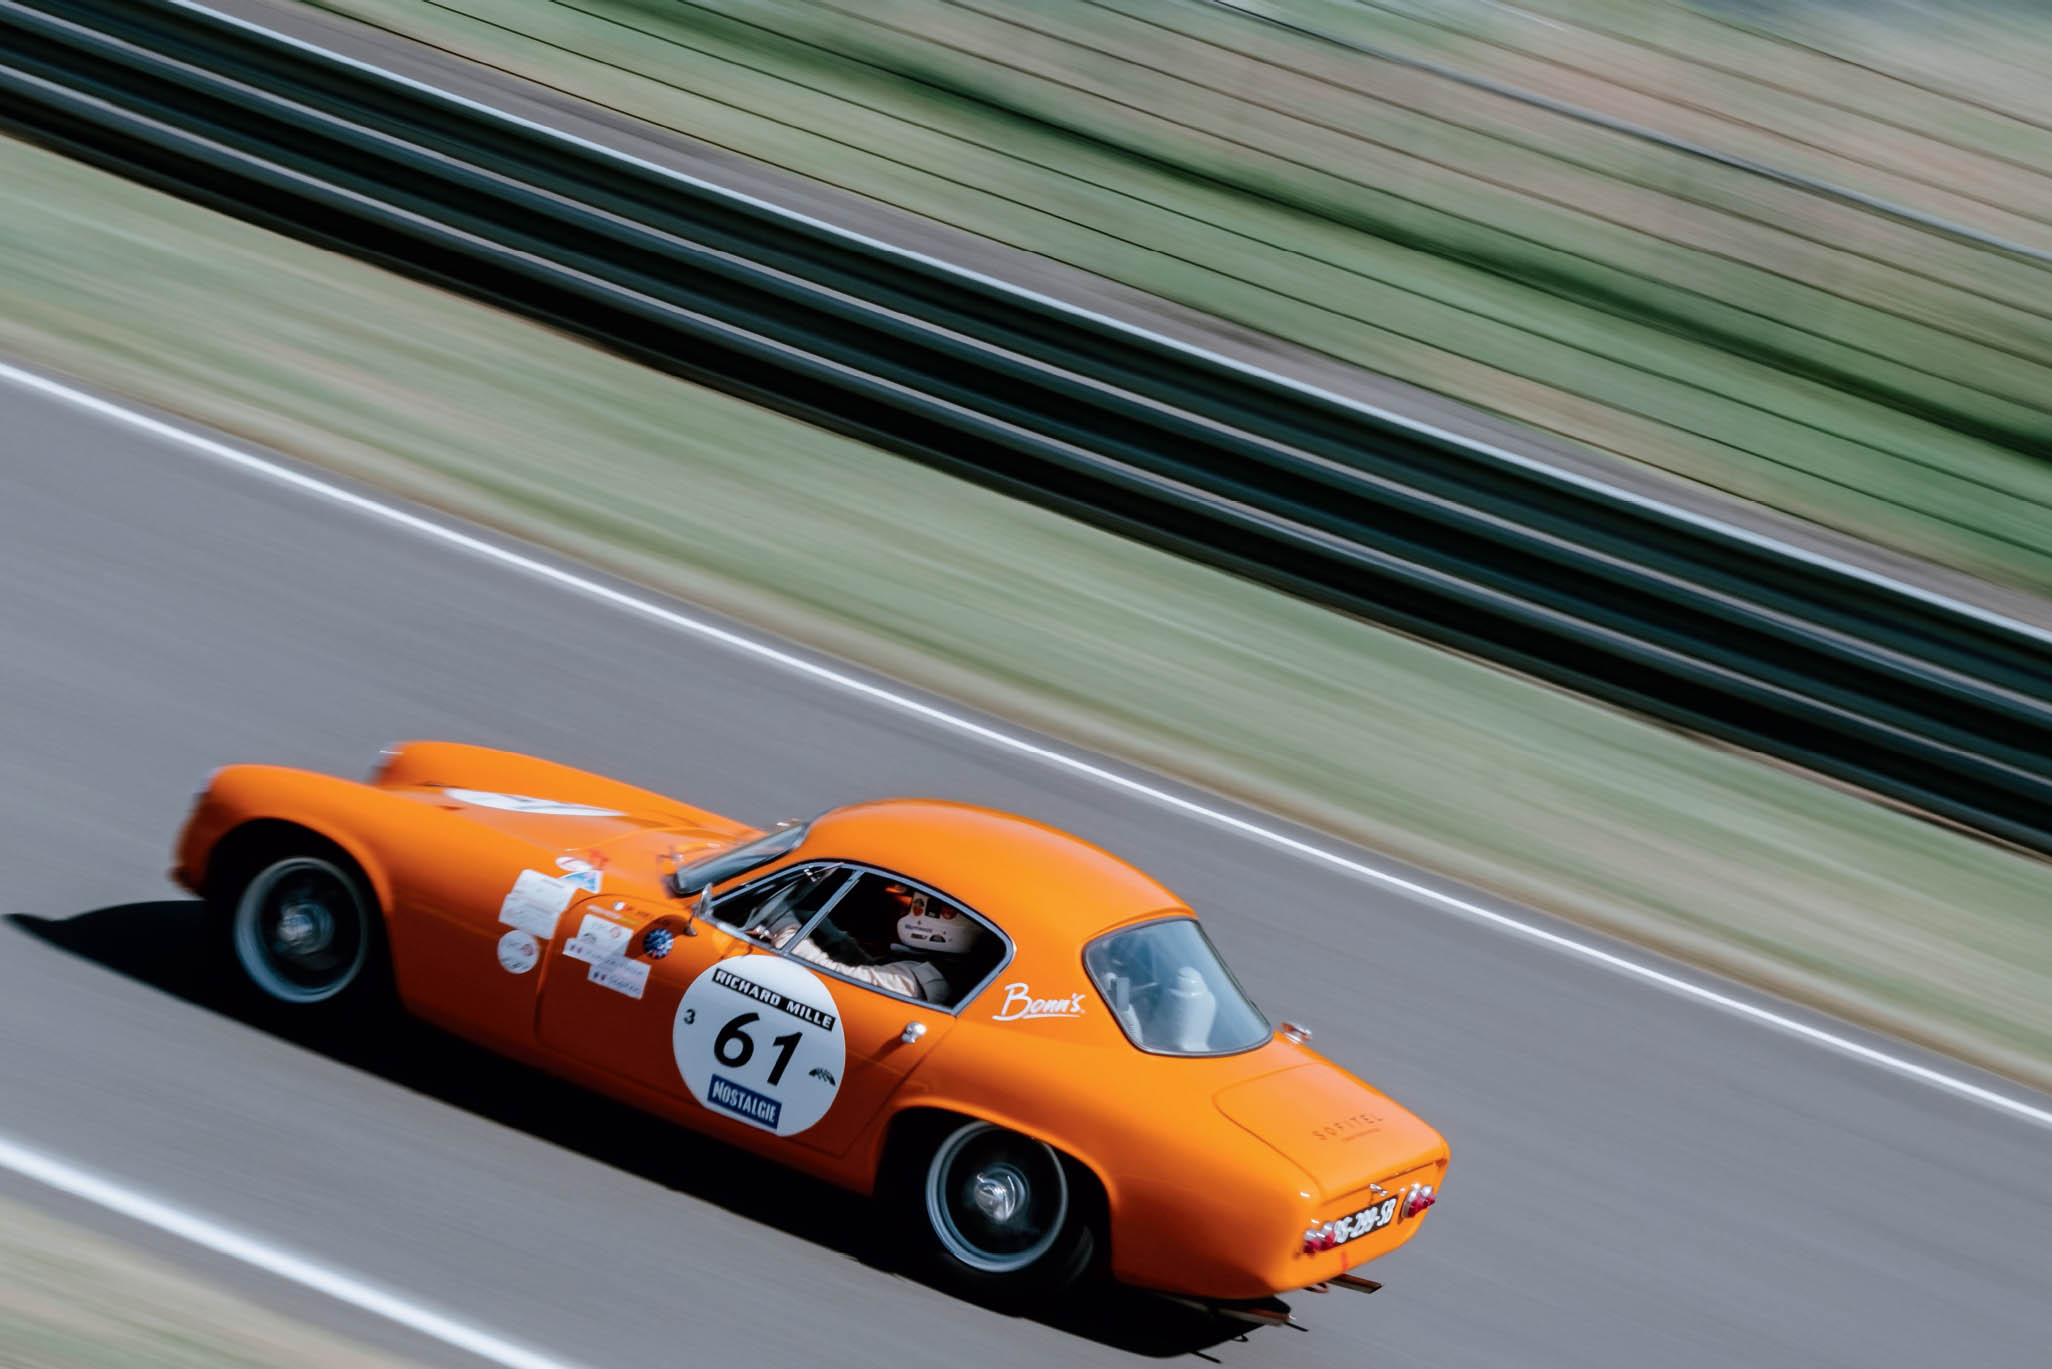
Fig. 58: Panning the camera in-synch with a racecar at 1/60s: the slow shutter speed resulted in f/18 and more than sufficient DOF using a focal length of 50mm.
Focusing on moving subjects (3): autofocus tracking using Single Point AF, Zone AF, or Wide/Tracking AF |
The predictive PDAF of your X-T20 uses the 49 or 169 (depending on your NUMBER OF FOCUS POINTS setting) central AF points. Predictive PDAF allows you to track moving subjects with your camera in three-dimensional space. Since the camera can calculate the movement of the object, it can automatically pre-focus on its future position and compensate for any inherent shutter lag.
The X-T20 also improves the predictive capabilities of the CDAF. This means that CDAF subject tracking is also available with AF frames that surround the central PDAF points, as long as the burst rate in continuous shooting mode doesn’t exceed 5 frames per second. It’s important to note that the hit rate of such predictions is never near 100%, but it’s accurate enough to deliver good results in concert with the camera’s burst mode settings.
Let’s start with the Single Point AF and Zone AF modes:
- Set the focus mode selector switch to AF-C and make sure that High Performance mode is on. Also make sure that the shutter type is set to the mechanical shutter (MS).
- Set the camera to burst mode (set the DRIVE dial to CL or CH). I recommend using the slower CL mode, since it displays a real-time live view image between shots and supports all AF frames.
- If you are using Single Point AF, select one of the central PDAF-enabled autofocus frames. If you use one of the outer AF frames, the camera will only use CDAF. In concert with one of the outer AF frames, you can only use the slower of the two burst modes (CL). You should still get pretty good results, though.
- If you are using Zone AF, select a zone that doesn’t extend beyond the central 7x7 AF point matrix. If you use a zone that includes AF points beyond this PDAF-enabled area, the camera can only use CDAF, and only the slower of the two burst modes (CL) is available.
- Position the selected AF frame or AF zone to directly cover the subject or the part of the subject that you want in focus. Half-press the shutter button, and the camera will start tracking the subject covered by the AF frame or AF zone.
- Keep the shutter button half-depressed as you follow the moving subject with the selected AF frame or AF zone.
- Fully depress the shutter when you want to start taking a series of exposures. The actual burst speed (frame rate) depends on how well the camera can track the subject. As the camera is taking pictures, keep the selected AF frame or AF Zone over the part of your image that is supposed to be in focus. This may be challenging at first, so practicing is important.
In the above configuration with burst mode and AF-C, the X-T20 is not adjusting the exposure between shots when SHUTTER AE is set to ON. White balance and dynamic range settings are also determined with the first shot and remain constant throughout the series.
If you want the camera to adjust exposure between shots in burst mode, select SET UP > BUTTON/DIAL SETTING > SHUTTER AE > OFF.
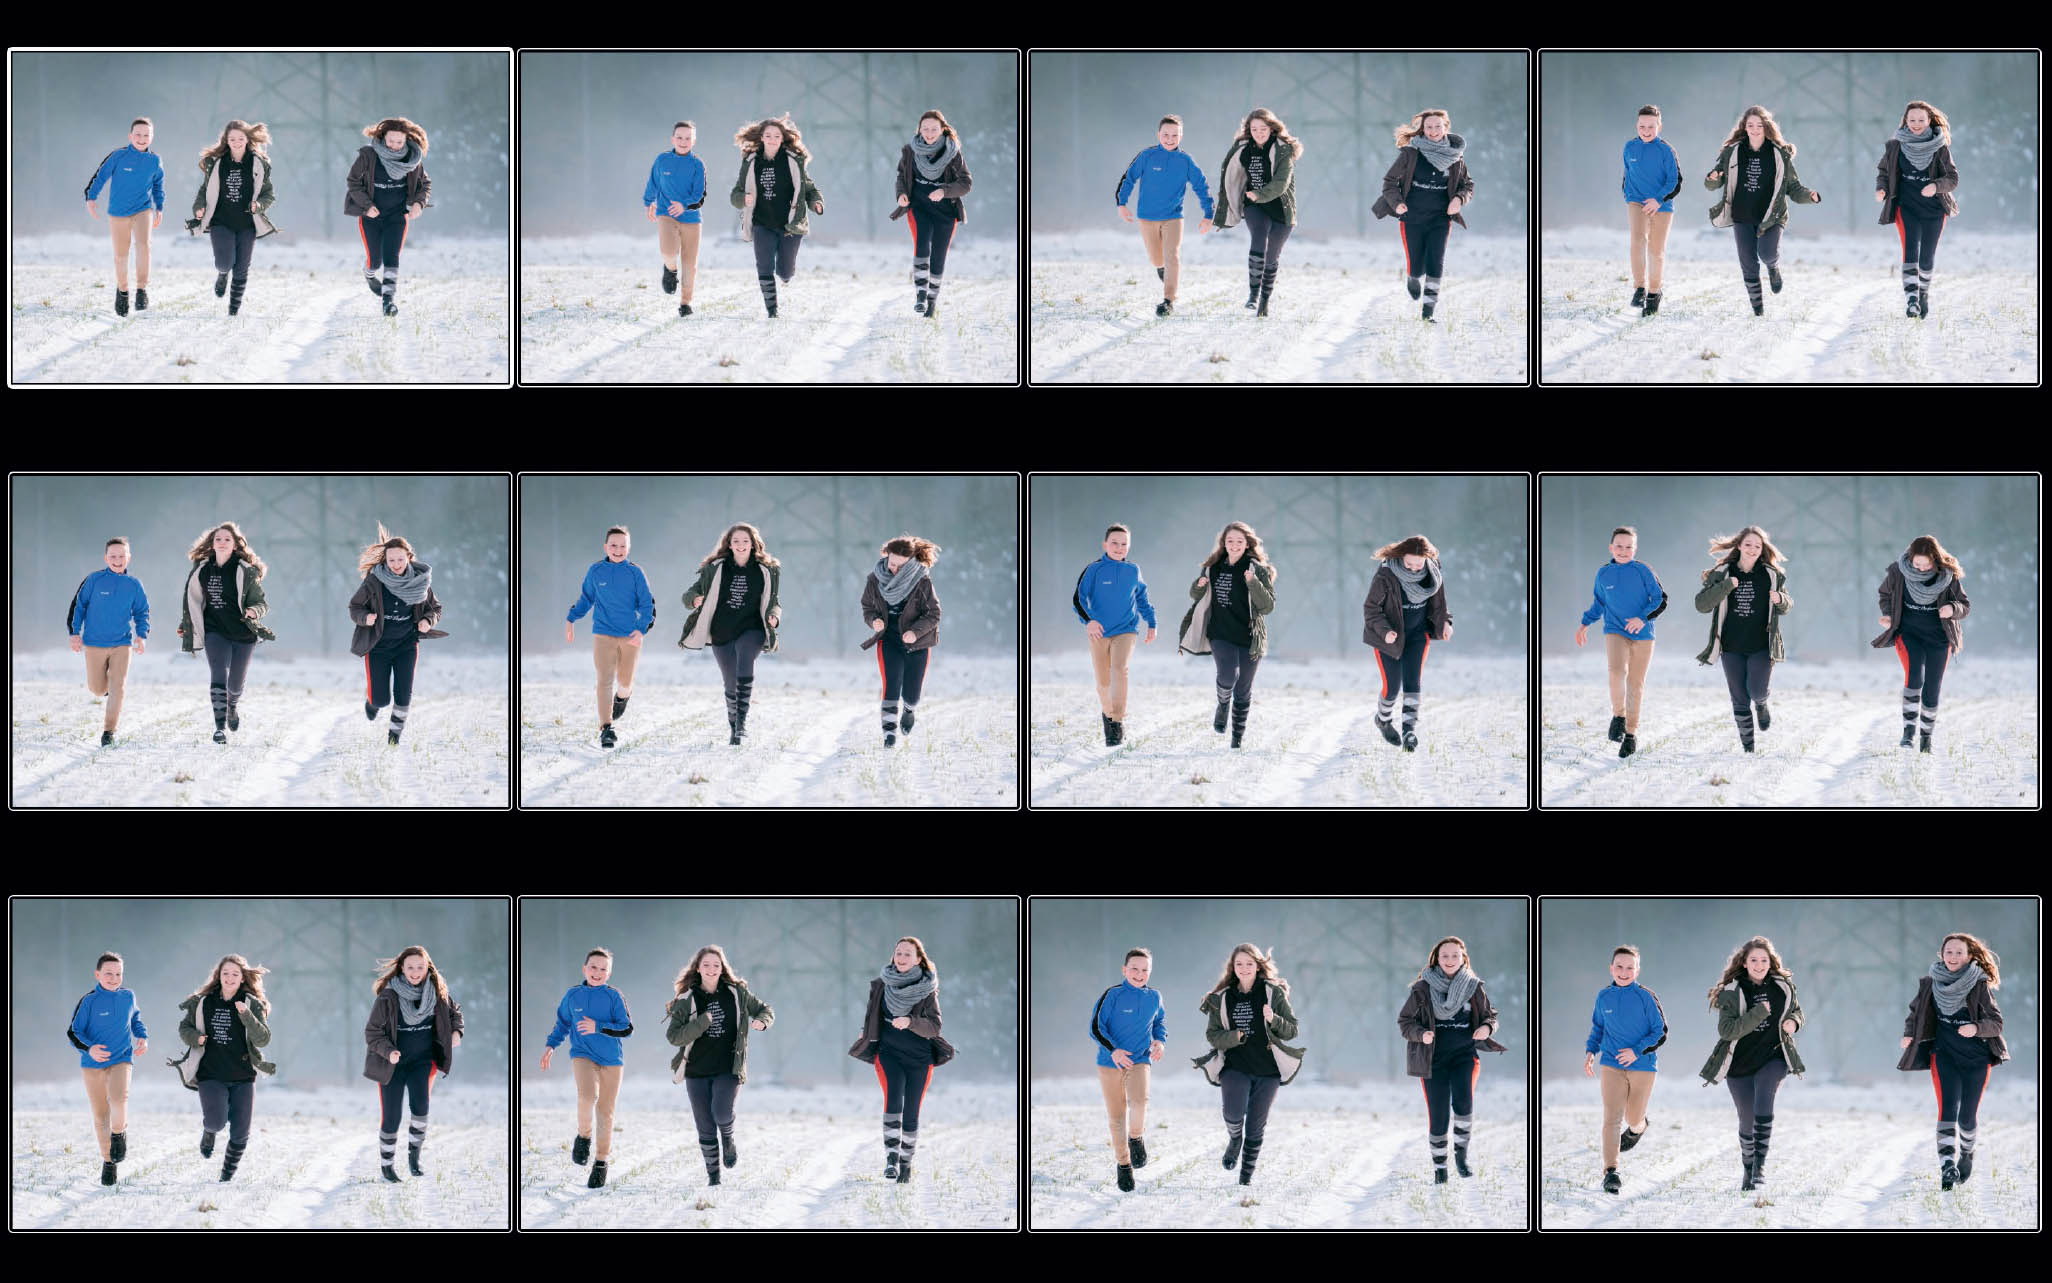
Fig. 59: AF tracking with AF-C and burst mode: The predictive autofocus was tracking one of the kids with the selected AF zone while they were running toward the camera. To make this kind of shot work, it’s vital to follow the subject with the active AF frame or AF zone, making sure it’s always covering the part of the subject that is supposed to be in focus.
In principle, AF-C tracking also works in single shot mode (DRIVE dial set to S, not to be confused with the AF mode selector). In this case, the camera takes a single frame when the shutter button is fully depressed, then ends the tracking.
By the way, it is perfectly normal for the hybrid AF to continuously hunt in the viewfinder during focus tracking (in AF-C mode). Don’t be irritated by the live view image changing between in focus and not in focus. It’s all about the results.
As an alternative to Single Point and Zone AF, you can also use Wide/Tracking AF in concert with AF-C to track a moving subject. This mode enables real 3D tracking, meaning the camera isn’t merely tracking a subject’s changing distance to the camera (z-axis), but also its left/right (x-axis) und up/down (y-axis) movements within the image frame.
Here’s how it works:
- Set the focus mode selector switch to AF-C and make sure that High Performance mode is on. Also make sure that the shutter type is set to the mechanical shutter (MS) in the shooting menu.
- Set the camera to Wide/Tracking AF and select the slower of the two burst modes (set the DRIVE dial menu to CL). That way, 3D tracking will be available for the entire image frame, but it will only track objects using CDAF. If you set the DRIVE dial to CH, tracking will use the much faster PDAF, but will be limited to the smaller PDAF-enabled central area.
- Select one of the up to 91 available tracking AF points. The point you select will serve as a starting point for your tracking action, so position it in a way that suits your composition.
- To identify your target, make sure that the selected AF point covers the object you want to track and half-press the shutter button. While you keep the shutter button half-pressed, the camera will use pattern recognition to automatically follow the object as it moves around the frame (or as you move the camera around) with a “cloud” of small green AF frames.
- Fully depress the shutter button and keep it pressed to take pictures at the selected burst rate.
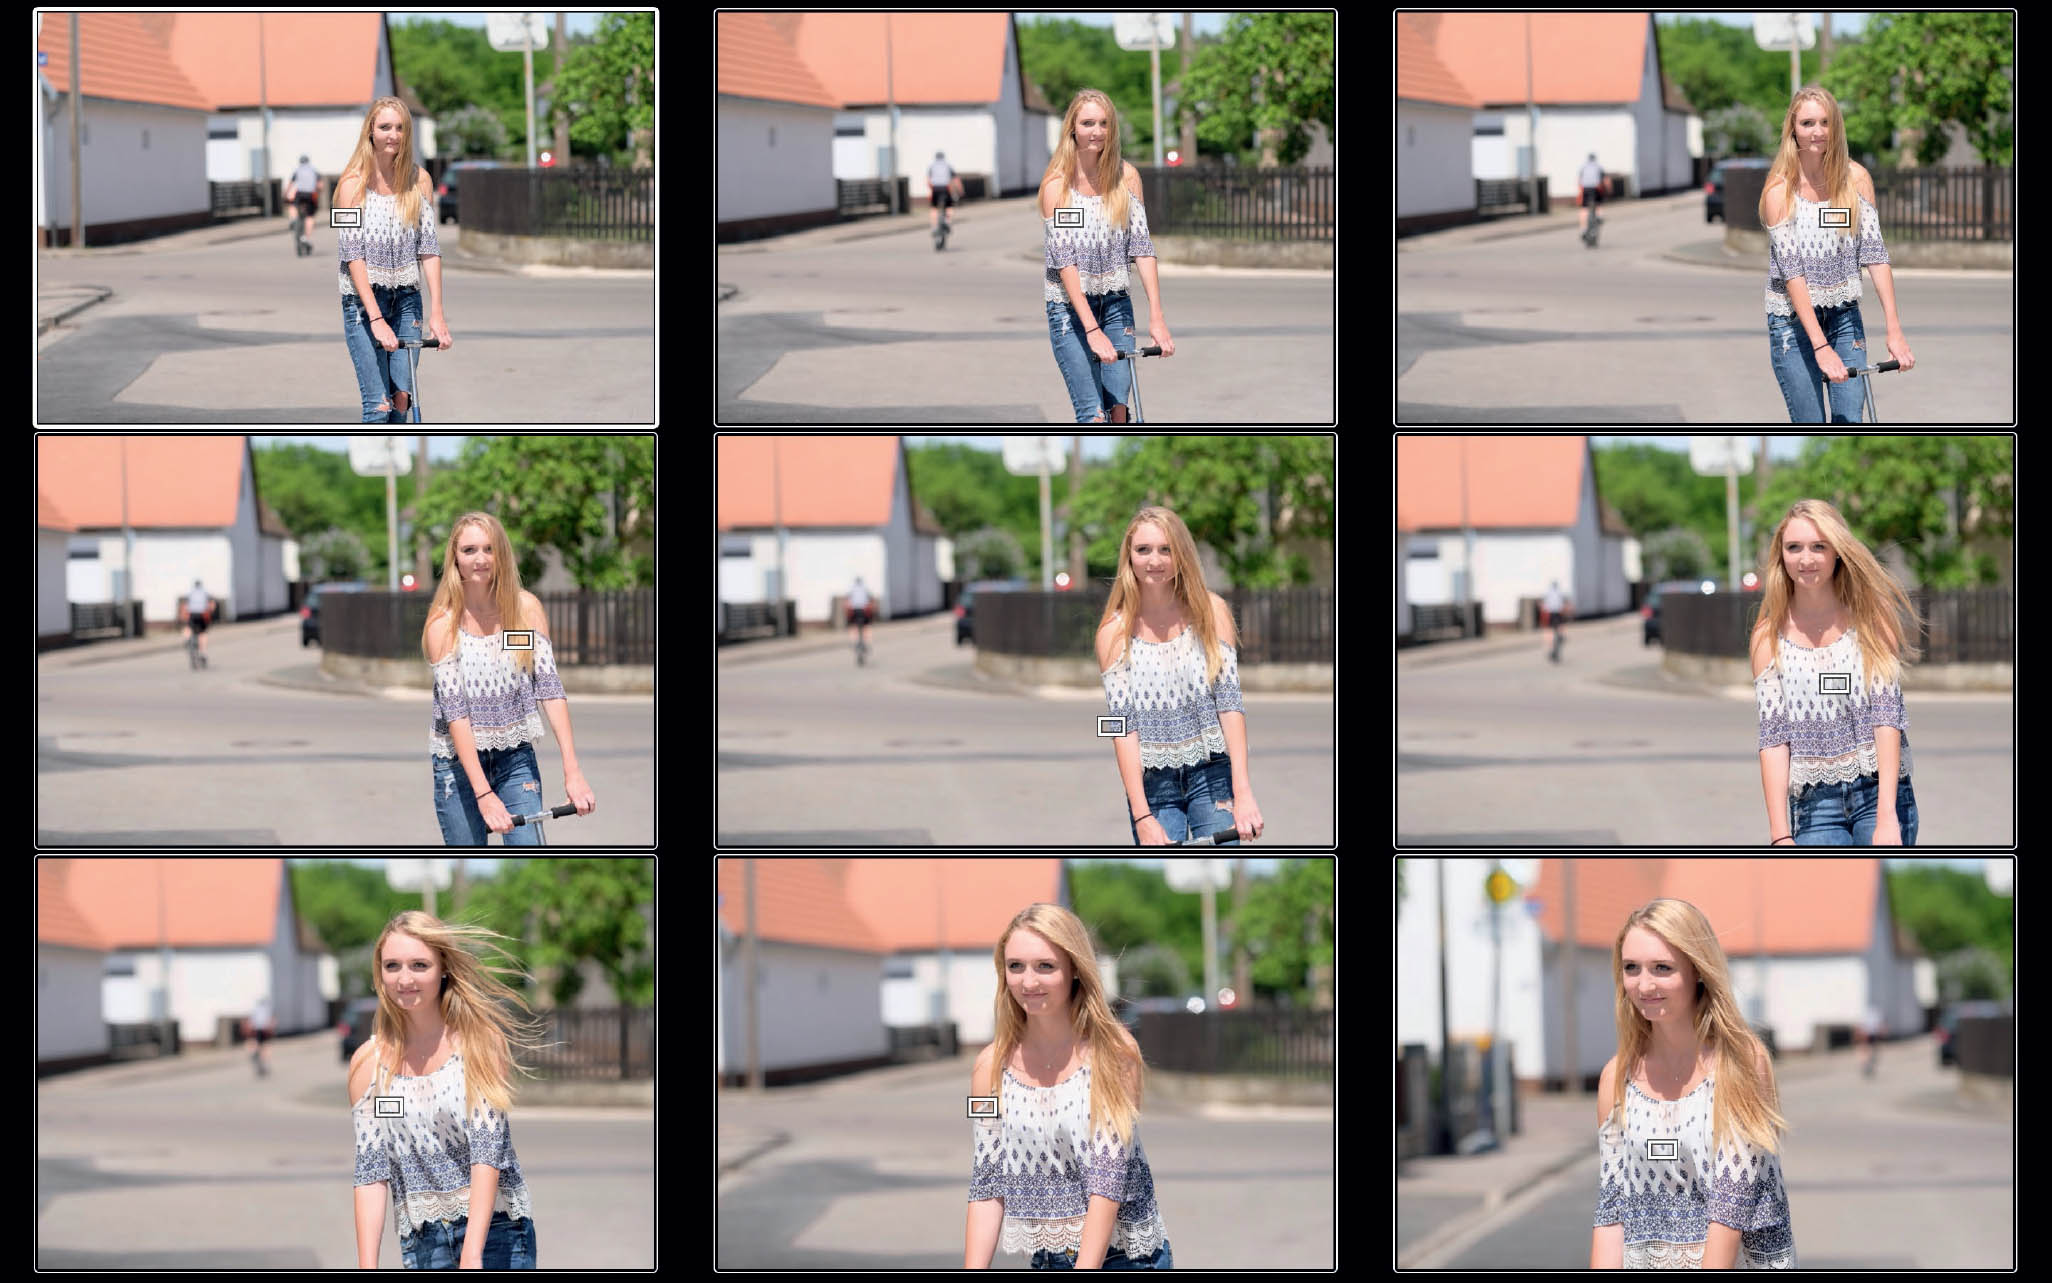
Fig. 60: AF-C in concert with WIDE/TRACKING and burst mode can track a subject in 3-dimensional space. To accomplish this, the X-T20 is using pattern recognition to follow the designated subject as it moves.
Using AF-C Custom settings |
Your X-T20 features three parameters that allow you to customize the AF-C for a specific task or application:
- Tracking Sensitivity (TS) specifies whether the camera should switch its focus to a different subject or retain its focus to wait for the subject to reappear. This control is useful when the subject you are tracking disappears behind an obstacle or goes out of the frame, or when a second object at a substantially different distance from the subject comes into the frame. Selecting 0 makes the camera switch its focus immediately, while choosing 1–4 progressively lengthens the time it will retain focus. Technically speaking, tracking sensitivity 0 will not predict an autofocus target’s position when it’s temporarily lost or obscured by something else. Tracking sensitivity settings of 1, 2, 3, and 4 will predict a lost or obscured target’s position for another 0.4 seconds, 0.7 seconds, 1.0 second, and 1.3 seconds, respectively, before the AF-C looks for a new tracking target.
- Speed Tracking Sensitivity (STS) controls the camera’s tracking characteristics based on changes to the subject’s speed. Selecting 0 (constant speed), the camera expects a steady movement when it predicts the subject’s distance. Select 1 or 2, and the camera takes speed changes more and more into account when it’s predicting subject movement, making it suitable for accelerating or decelerating targets like rapidly accelerating and decelerating race cars.
- Zone Area Switching (ZAS) is available only in the Zone AF mode and specifies which part of the selected focusing zone should be given focusing priority. CENTER maintains focus in the center of the zone. FRONT switches the focus to the closest subject in the zone, which is great for capturing new targets that suddenly move into a zone. AUTO tracks the subject you first focused on.
Unlike the X-T2, the X-T20 does not let you set these parameters directly and independently (at least, not with the initial firmware; so this may change for the better). However, you can set them indirectly by choosing from several presets that cover typical AF-C shooting scenarios. Select AF/MF SETTING > AF-C CUSTOM SETTINGS, then pick one of the following available sets:
- SET 1: STANDARD SETTING FOR MULTI-PURPOSE is the default setting and is our general AF-C setting. It’s a great choice for situations where you don’t have a clear understanding of how a specific custom setting could improve the AF-C performance. Its parameter settings are TS 2, STS 0, and ZAS AUTO.
- SET 2: IGNORE OBSTACLES & CONTINUE TO TRACK SUBJECT keeps the focus on a subject even when it’s temporarily going out of the frame or is obscured by obstacles. This can be useful for following a specific target with the camera and ensuring that the target isn’t lost when it’s temporarily obscured by people, trees and other obstacles that pass through the line of sight. Its parameter settings are TS 3, STS 0, and ZAS CENTER.
- SET 3: FOR ACCELERATING / DECELERATING SUBJECT is your typical racetrack mode. It takes changing relative speeds of subjects moving towards the camera into account. Whenever you have targets that rapidly accelerate or decelerate, this mode can be useful, especially in concert with XF lenses featuring high-speed linear autofocus motors. Its parameter settings are TS 2, STS 2, and ZAS AUTO.
- SET 4: FOR SUDDENLY APPEARING SUBJECT allows the camera to instantly focus on a subject that comes into the focusing area, with priority given to objects closest to the camera. It is ideal for subjects that suddenly appear in the focusing frame. Its parameter settings are TS 0, STS 1, and ZAS FRONT.
- SET 5: FOR ERRATICALY MOVING & ACCEL. / DECEL. SUBJECT is suitable for subjects that are moving at varying speeds in different directions, coming in and out of the focusing area. It is perfect for shooting field sports like soccer. Its parameter settings are TS 3, STS 2, and ZAS AUTO.
Focus priority vs. release priority |
The autofocus in your X-T20 will always try to focus on a subject before the camera takes the shot. In this context, release priority vs. focus priority only refers to how the camera is behaving when the AF fails to lock on a target:
- Set AF/MF SETTING > RELEASE/FOCUS PRIORITY > AF-S PRIORITY SELECTION > FOCUS to stop the camera from taking a picture when the autofocus (AF-S) cannot lock onto a target (red AF warning).
- Set AF/MF SETTING > RELEASE/FOCUS PRIORITY > AF-C PRIORITY SELECTION > FOCUS to make sure that the X-T20 only takes pictures in AF-C mode (particularly in concert with burst mode) when the autofocus can lock onto something.
Basically, selecting focus priority for AF-S and AF-C reduces the number of out-of-focus pictures on your memory card.
By default, the camera is set to release priority, following the motto, “better a misfocused shot than no image at all.” Since I am no friend of misfocused shots, my X-T20 is set to focus priority for both AF-S and AF-C.
Please note that when AF+MF is active in AF-S mode, the camera will always use AF-S Release Priority.