2.5 WHITE BALANCE AND JPEG PARAMETERS
A great feature of all X-series cameras is their ability to set white balance [43] and JPEG parameters before you take a shot and after, using the built-in RAW converter. This gives you full control over the JPEGs that are generated in the camera.
It’s not necessary to anticipate and set the perfect settings for each shot in advance because you can generate different JPEG versions of a shot with the internal RAW converter. For example, you could create a version with bold Velvia colors, or a black-and-white version with strong contrast and minimal noise reduction. As long as you have access to the RAW file, you can change all JPEG parameters after the fact and generate as many different-looking JPEGs as you want.
Using the built-in RAW converter in the playback menu is quite easy because it offers the same functions that are available in shooting mode (in the IMAGE QUALITY SETTING menu).

The only relevant differences affect the first two items in this list:
- Exposure corrections made before you take a picture can affect aperture, shutter speed, and ISO. Push/pull processing after you have taken a picture only affects the ISO amplification. Changing the ISO via push/pull processing also doesn’t change the ISO value in the EXIF data [44] of the JPEGs. Push/Pull processing in the internal RAW converter is the same as moving the exposure slider in external RAW conversion software, such as Lightroom, Silkypix, or Capture One.
- Before you take an image, you can select four different dynamic range options: AUTO, DR100%, DR200%, or DR400%. DR200% exposes the RAW file one stop lower than normal; DR400% exposes it two stops lower. DR-Auto automatically selects either DR100% or DR200%. After you have taken an image, you can still select different DR settings in the internal RAW converter. However, you can only reduce the DR, not increase it. If you are working on a RAW file that was recorded with DR400%, you can reprocess it to create JPEGs with DR400%, DR200%, or DR100%. A DR200% RAW file can be reprocessed with DR200% or DR100%, but not DR400%. A DR100% RAW file can only be reprocessed with DR100%.
The correct white balance ensures that white or gray areas of an image appear white or gray (without color tints) regardless of the light conditions. At the same time, the results are usually not supposed to look clinically neutral. The X100F masters this task quite well, so you can rely on the Auto white balance setting to get it right most of the time.
However, “most of the time” is not “all the time.” There are instances when the white balance is off, or when you want it to be off. For example, you may want to emphasize a sunset with a warmer white balance. In such cases, it makes perfect sense to manually set the white balance in advance.
The X100F offers a variety of options to manually set the white balance:
- Seven white balance presets for typical situations, such as sunny weather (Fine), cloudy skies (Shade), or tungsten light (Incandescent)
- A Kelvin option to manually set the color temperature
- Custom white balance that actually meters a white or neutral surface (like a white wall) under the current light conditions. This way, the camera can adjust the white balance to make the surface appear neutral.


Fig. 52: Two versions of the same shot, processed with different white balance settings. The image above shows the WB Auto setting without further corrections; the image below shows the same shot after a manual white balance adjustment in Adobe Lightroom. While white balance can also be adjusted with the camera’s built-in RAW converter, extensive changes like this one are easier to accomplish with external RAW conversion software.
Custom white balance: a little effort can go a long way |
This useful function is only available before you take a shot, because you are metering the white balance of the actual scene. Custom white balance allows you to calibrate the camera’s white balance toward a specific object that you want to appear neutral in the final image.
Here we go:
- Select IMAGE QUALITY SETTING > WHITE BALANCE > CUSTOM(1–3) and press the RIGHT SELECTOR KEY (right arrow).
- Point the camera toward a surface that you want to use as a neutral reference, for example a white wall or a gray card [45]. Make sure that the surface is large enough to be fully covered by the white balance metering frame in the viewfinder. Come closer to your subject or zoom in if you need to.
- Fully press the shutter button to meter and set the new custom white balance. The live view will change accordingly and simulate the adjusted color temperature. If you are happy with the result, confirm it by pressing the OK button.
You can use the same procedure with a firing flash unit. In this case, the custom white balance will meter the mix of flash light and surrounding light that hits your neutral reference surface.
Don’t worry! You are under no obligation to use the custom white balance later during RAW conversion. It’s simply one of many options, and you can always adjust it later as you please. For example, you can use the built-in RAW converter with a manual KELVIN setting or one of seven white balance presets (FINE, SHADE, FLUORESCENT LIGHT 1–3, INCANDESCENT, and UNDERWATER). You can even use AUTO white balance anytime later because the camera will always save its automatic white balance metering for later use in the internal RAW converter.

Fig. 53: A custom white balance setting was used to take this shot. The wall behind the subject served as a neutral reference.
Infrared photography |
Since the X100F features a weak IR-blocking filter in front of its sensor, it’s quite suitable for infrared photography. You’ll need an infrared filter in front of your lens, typically of the R72 kind, which is available from Hoya and other filter vendors. This filter blocks all light wavelengths except infrared, making sure only infrared light reaches the sensor.
To minimize the resulting red tint in the live view (and JPEGs), set the color temperature to the minimum of 2500 Kelvin. You can also select one of the eight different black-and-white film simulation modes to completely eliminate colors in the viewfinder (and JPEGs).
Since the R72 filter blocks a large amount of light, it’s useful to shoot with a tripod.
Changing color tints with WB SHIFT |
WB SHIFT offers the opportunity to correct (or introduce) color tint in any shot. You can adjust the color tint as an add-on to every white balance setting—either before you take a shot or in the built-in RAW converter.
You can set a different white balance shift for each of the X100F’s white balance options (Auto, Kelvin, the seven presets, and the three Custom white balance settings). You can do this by changing the tint between green and red on the X-axis and between yellow and blue on the Y-axis of the display that automatically appears when you select one of the twelve white balance options.
I recommend a neutral setting here to avoid confusion. As mentioned before, there’s a different white balance shift setting for each of the white balance options, meaning the camera can store twelve different white balance shift settings at once. This makes it easy to forget a previously set correction, which is why I recommend introducing white balance shift during RAW conversion. Here’s where you can actually see, for example, that the skin tones in a portrait may require an adjustment.


Fig. 54: WB SHIFT in action: The example above shows a straight-out-of-camera image (SOOC JPEG) with the AUTO white balance settings. Below, you can see the same image, again straight out of camera and with AUTO white balance, but with an additional WB SHIFT of BLUE +3 and RED −3 to make it look cooler than the original.
Important: WB Shift is only available for in-camera JPEGs from the built-in RAW converter (SOOC JPEGs). When you process a RAW file externally with Adobe Lightroom or similar software, your WB Shift settings will be disregarded.
Film simulations: it’s all about the look |
The importance of film simulations for the overall look of a JPEG is often underestimated. Film simulations influence color grading, color saturation, dynamic range, and contrast in the resulting JPEGs. Picking a film simulation is always my first step when I’m adjusting JPEG parameters. As with all JPEG parameters, film simulations have no effect on the actual RAW file (the digital negative). Instead, they only affect the JPEGs that are generated in the camera (the digital prints). The X100F offers six different color film simulations, eight black-and-white modes, and one sepia option:
- PROVIA is the standard, all-purpose setting of your X100F. The name reminds us of Fuji’s popular Provia slide film.
- ASTIA is another color slide film derivate with softer highlights and pleasing skin tones. It’s often used for portraits, but can also work with landscape shots that feature a lot of vegetation. A special treat of this film simulation is its bluish shadows.
- VELVIA is a very contrast-heavy, color-saturated derivate of the legendary Fuji Velvia slide film. It’s mostly used for landscape and nature shots and is definitely not the best choice for portrait work.
- CLASSIC CHROME reminds us of the golden era of LIFE magazine documentary color photography. The distinctive look of Classic Chrome is equally suitable for landscapes and portraits.

Fig. 55: The distinctive look of CLASSIC CHROME has earned it much popularity in a very short time.
- PRO NEG. HI is derived from a negative film that was specifically made for portraits. It delivers accurate and pleasing skin tones with nice contrast, adding some punch to the image.
- PRO NEG. STD is the most neutral film simulation of the X100F. Featuring flat contrast, subdued colors, and high dynamic range, it can look dull at first, but the JPEGs are usable for further post-processing. Fuji recommends this film simulation for studio portraits in a flash setup.

Fig. 56: Antagonists: PRO NEG. STD and VELVIA illustrate the spectrum of Fuji’s different film simulation modes. On the left you can see the PRO NEG. STD version of a shot, and on the right, its VELVIA cousin.
- MONOCHROME is Fuji’s standard black-and-white conversion. Black-and-white photography depends on different gray levels being assigned to different colors. In order to increase the contrast, many photographers combine MONOCHROME with increased SHADOW TONE and HIGHLIGHT TONE settings. Additionally, they decrease noise reduction to reveal more detail and display more noise, which gives the appearance of film grain.
- MONOCHROME+Ye FILTER adds a digital yellow filter to the black-and-white conversion. This typically results in a slight increase of contrast because yellow parts of the color images will be represented by brighter gray tones.
- MONOCHROME+R FILTER adds a red filter to the black-and-white conversion. This means that skin tones will become brighter, which will camouflage reddish skin impurities. Conversely, blue skies will be darkened, adding contrast between clouds and the sky.
- MONOCHROME+G FILTER adds a green filter to the black-and-white conversion. This filter will add texture to skin tones and can potentially emphasize impurities.
- SEPIA results in a sepia-toned monochrome JPEG for an antique touch.
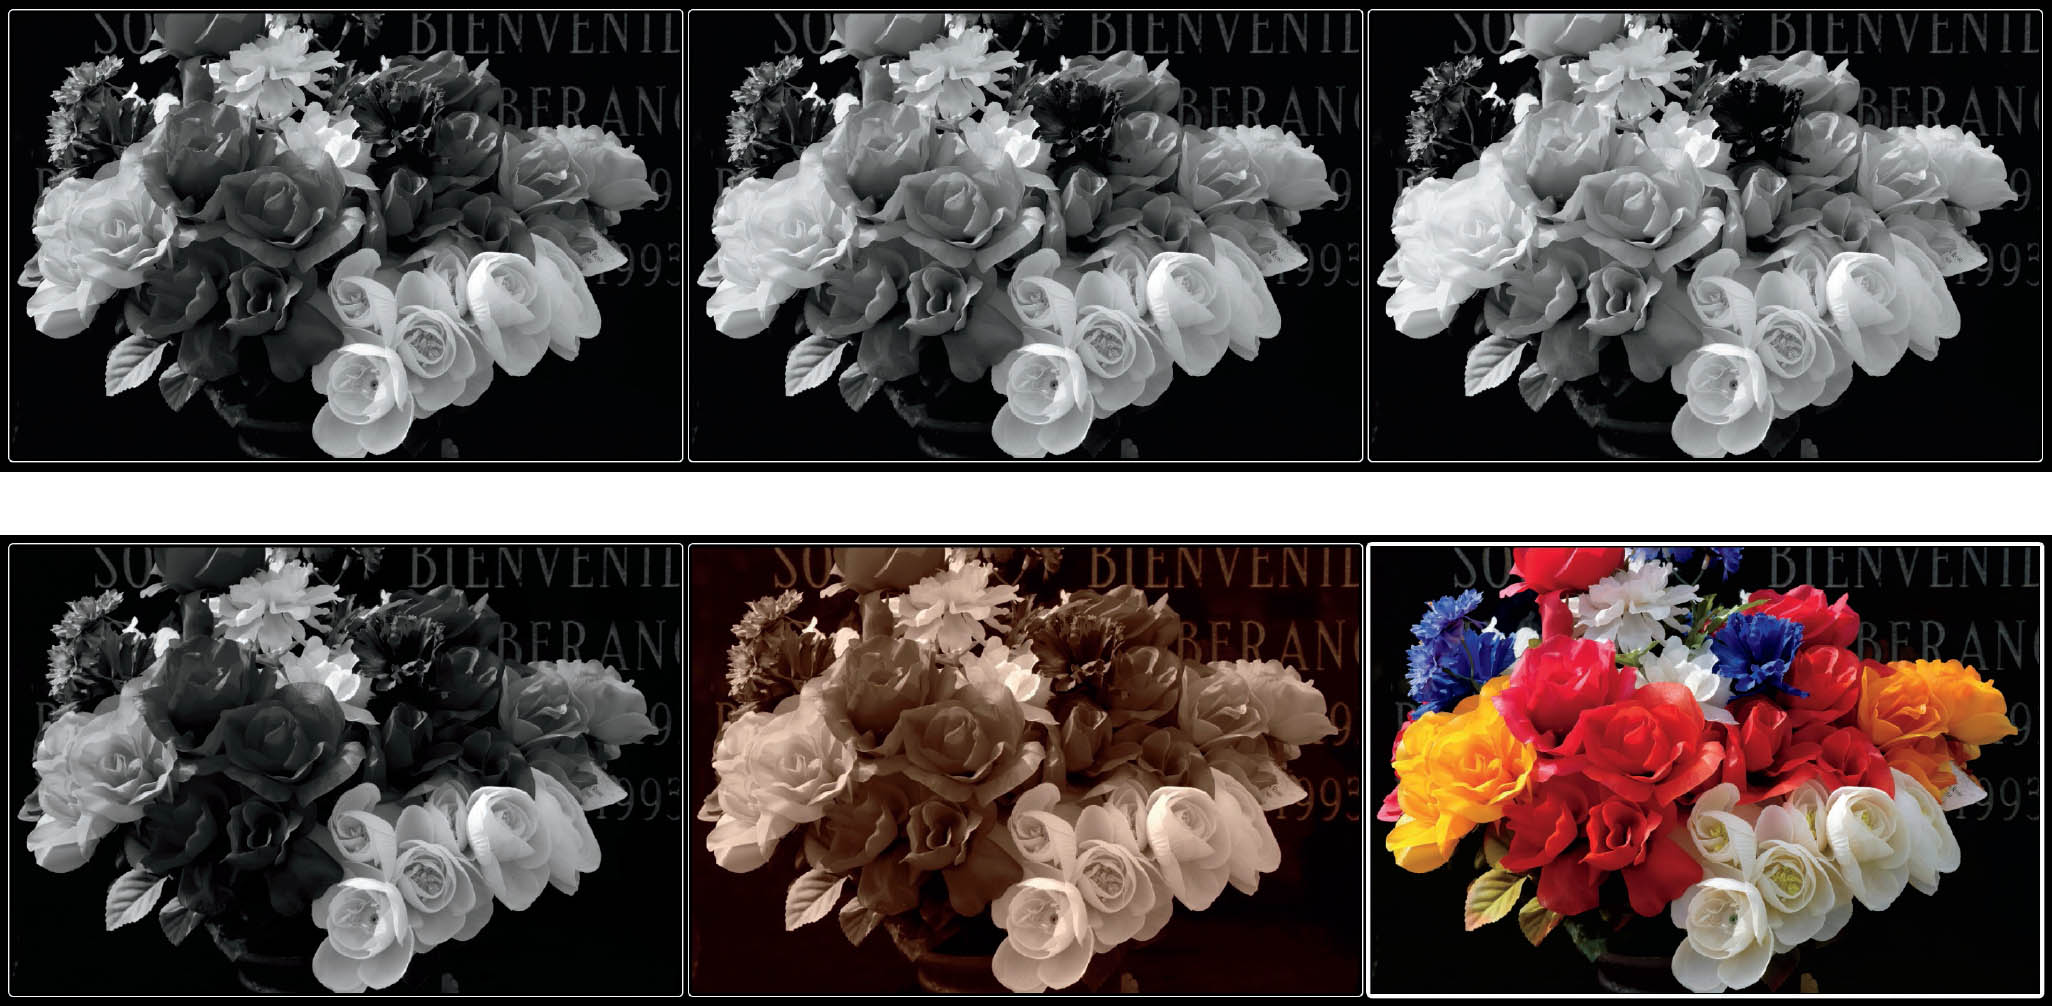
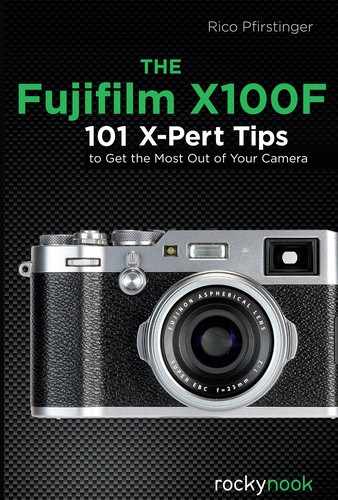
Fig. 57: Comparing B&W options: From left to right, first row: unfiltered black and white, yellow filter, and red filter. Second row: green filter, sepia, and the original shot in color.
- ACROS is Fuji’s latest black-and-white film simulation and a great alternative to the regular MONOCHROME settings. ACROS is also available in four versions (no filter, or with either a yellow, red, or green filter). It reminds us of Fujifilm’s analog film of the same name and offers a particularly cinematic look. This is partly because ACROS includes an ISO-dependent analog film grain simulation that transforms regular noise into analog-looking film grain. This special “noise shaping” is only available in the camera’s built-in processor and can’t be replicated with external RAW converters. The less noise reduction (NR) you apply with ACROS, the more organic-looking film grain you will get.
The best way to learn about film simulations is to use and compare the different options. The easiest way to do so is with the camera’s internal RAW converter. Take the RAW file of a shot and process it with all available film simulations, then import the JPEGs into your computer and compare them on your monitor.

Fig. 58: Even at ISO 25600, the noise shaping of the ACROS film simulation delivers a natural-looking result with high resolution and fine details.

Fig. 59: ACROS offers ISO-dependent analog film grain simulation based on innovative noise shaping. At base-ISO 200 (and with noise reduction set to –4), there’s already a subtle difference between ACROS (left image) and the regular MONOCHROME film simulation (right image).
Using the Grain Effect |
Fujifilm is all about great film simulations with an organic look, so adding “analog film grain” to a digital image can be useful to achieve a more natural look with enhanced micro contrast.
The X100F’s JPEG engine offers two GRAIN EFFECT options: WEAK and STRONG. Unlike ACROS, these options don’t transform noise into analog-looking film grain; they simply add a layer of randomized, simulated film grain to the image. It’s an ISO-independent add-on effect that can be used with all film simulations.
For this reason, I do not recommend using GRAIN EFFECT in concert with the ACROS film simulations—it would mix the different grain effects. After all, ACROS already brings its own ISO- and NR-dependent grain to the table.
Fig. 60: GRAIN EFFECT adds natural-looking analog grain to all film simulations, providing more texture and micro contrast for an organic look. These zoomed-in samples show the same ISO 800 image without grain effect and minimal noise reduction (upper left); with a WEAK grain effect and minimal noise reduction (upper right); and with a STRONG grain effect and minimal noise reduction (center below).
The processor of the X100F is able to make noise look nice, so adding artificial grain may not be necessary for shots that were taken with ISO settings of 800 or higher. Instead, reduce the NOISE REDUCTION to −4 to preserve as much noise (and detail) as possible and allow the camera to do its magic.
Contrast settings: working with highlights and shadows |
A useful feature of the X-series is its ability to independently set the contrast [46] for dark and bright parts of a JPEG image using the HIGHLIGHT TONE and SHADOW TONE settings. These settings can also be used to extend or reduce a JPEG’s dynamic range by lifting dark shadows or darkening bright highlights. To increase the overall contrast of a shot, you can increase both parameters in tandem by choosing a setting on the plus side (+1 to +4). To reduce the overall contrast, pick a negative setting for both parameters (−1 to −2).
It’s worth mentioning that increased contrast also enhances the impression of image sharpness and color saturation. This is important because it shows you that JPEG parameters always work in concert with each other.

Fig. 61: Comparing SHADOW TONE settings: The image on the left shows a SHADOW TONE +2 version; the image on the right shows the same RAW file processed with SHADOW TONE –2. As you can see, the shadows and midtones in the image on the right are lifted up by the reduction of the JPEG’s shadow contrast, while the highlights remain untouched.
Skin tones: smooth or with texture? |
The smoothness of surfaces (such as skin tones) at high ISO settings is best controlled by reducing NOISE REDUCTION. To reveal more detail and achieve less skin smoothening, you can decrease NR to −2 or lower.
If this still doesn’t meet your demands, you can switch to an external RAW converter to turn RAW files into JPEGs or TIFFs. Current versions of Adobe Lightroom/ACR and Iridient Developer offer similar versions of the camera’s internal film simulation modes. This means you can replicate the famous Fuji Colors and enjoy more control over many processing parameters.
Please note that RAW files recorded with extended DR settings (DR200%, DR400%) may require additional processing when you use external RAW converters. You’ll have to tone-map the image and manually recover blown highlights using suitable exposure slider settings. In Lightroom and Adobe Camera Raw, you can combine the sliders for exposure, highlights, shadows, whites, and blacks to get the job done. In Iridient Developer, things are much simpler because this RAW converter offers a single Highlight Recovery slider with results that very much resemble the JPEGs from Fujifilm’s internal DR function.
Color saturation |
After picking a suitable film simulation mode, you still might want to change the color saturation [47] of an image. You can do so with the COLOR setting.
Too much color saturation can obscure texture and details. For example, VELVIA is a very saturated film mode that may sometimes require a reduction in color saturation.

Fig. 62: Color saturation: The left image shows a PROVIA version with COLOR –4; the right image shows the same RAW file processed with COLOR +4.
Choosing a color space: sRGB or Adobe RGB? |
A color space [48] is a way of organizing available colors. Your X100F offers two options: sRGB [49] and Adobe RGB [50]. Both color spaces contain the same number of colors, but not the same colors—their gamuts [51] are different.
Adobe RGB covers a larger gamut than sRGB because its colors are optimized for CMYK printing. On the other hand, sRGB is optimized for computer monitors and all kinds of high-resolution displays, such as HDTVs, smartphones, and tablets. Since Adobe RGB encompasses a wider gamut than sRGB, the gaps between neighboring colors and tones are wider because both color spaces contain the same number of colors. Adobe RGB must spread this number over its larger gamut. This larger gamut (compared to standard sRGB) is why Adobe RGB is also known as an extended color space.
Users often misunderstand and assume that “extended” means “better.” It does not. The additional colors in Adobe RGB are only useful if you intend to print images with a commercial CMYK printer. This requires a calibrated workflow and a wide-gamut monitor that can display the Adobe RGB gamut, but most computer monitors are only capable of displaying the sRGB gamut. Using Adobe RGB on such a monitor would be like working with closed eyes because you wouldn’t be able to see many of the colors you are using.
For most users (including me), sRGB is the best choice of color space. Images rendered in this color space can be viewed, processed, and printed on a wide variety of devices without unpleasant surprises. In any case, you should calibrate your computer monitor with hardware like Spyder. Uncalibrated screens will not give you an accurate representation of the colors in your images.
Using custom settings (usage profiles) |
As you know, the X100F offers seven custom settings (or usage profiles) that can hold full sets of camera settings for quick access. The available settings are:
- Dynamic range
- Film simulation
- Grain effect
- White balance
- Highlight tone
- Shadow tone
- Color
- Sharpness
- Noise reduction
I’m sure you have noticed that these are the usual JPEG parameters with the addition of dynamic range.
The seven available custom settings (C1 to C7) or usage profiles aren’t camera modes. They are storage spaces for seven sets of settings than can be quickly retrieved (usually via the Quick menu) to replace the currently active camera settings. Custom settings are mere shortcuts, a simple time-saver that allows you to quickly change several of your camera’s current settings at once instead of changing parameters one by one.
The best way to use custom settings is via the Quick menu:
- Pull up the Quick menu by pressing the Q button and select one of the seven available custom settings (C1 to C7).
- At this point, you can make changes to individual items of the retrieved parameter set using the Quick menu. Once you change a parameter, it is marked with a red dot.
- When you are happy with your settings and changes, you can make them your new current settings by pressing the OK button or by half-pressing the shutter button. In the upper-left section of the Quick menu, the currently active settings are always marked with the word BASE. You’ll also see the custom setting that was last retrieved; for example, C1.
What kind of custom settings may be useful? Here are a few suggestions:
- Make sure to save your favorite all-purpose default settings in one of the seven user profiles (such as C1). This enables you to quickly revert to your default settings.
- RAW shooters can use a RAW shooter profile with dynamic range set to DR100%, HIGHLIGHT TONE −2, SHADOW TONE −2, and PRO NEG. STD film simulation.
- You could create profiles for black-and-white or infrared shooting. For example, a black-and-white profile could contain one of the eight B&W film simulations, minimal noise reduction, and additional highlight and shadow contrast.
To quickly edit custom settings, pull up the Quick menu, then press and hold the Q button again until the editing menu appears.
Note: With firmware 2.00 [52] (December 2017), your X100F can also save and restore full camera configurations that include all settings. Sadly, this cannot be performed in-camera on the memory card, but only with the free FUJIFILM X Acquire software and a USB cable connection to your Mac or PC.
Working with the built-in RAW converter |
The RAW converter in your X100F serves two main purposes:
- You can create different versions of a shot; for example, a colorful Velvia version and a gritty black-and-white version of the same image. Not sure what’s best or what you want? Quickly create multiple versions with different film simulations and varying JPEG parameters, then sort them out later at home on your calibrated computer screen.
- You can improve your JPEGs after the fact. Since it’s hard (if not impossible) to guess and set the perfect JPEG settings for each shot in advance, it’s more convenient to adjust these parameters after the fact when you have time to look at your results. There’s a good chance that you may be happy with many of your images. If not, you can easily make adjustments to things like white balance, color saturation, contrast settings, sharpness, or noise reduction. You can also adjust the exposure and try different film simulations.
Here are a few things you can accomplish with the built-in RAW converter:
- Use PUSH/PULL processing to brighten (push) underexposed shots or darken (pull) overexposed images.
- Use the contrast settings (SHADOW TONE and HIGHLIGHT TONE) to selectively adjust the contrast of dark or bright parts of your image. It’s perfectly adequate to combine these functions with PUSH/PULL processing. To generate JPEGs with maximum dynamic range for further post-processing on your computer, it may be useful to set both contrast parameters (shadows and highlights) to −2 and use a neutral film simulation like PRO NEG. STD.
- Adjust the color saturation of your JPEGs with the COLOR parameter. Reducing the color saturation can recover texture when one or more of the color channels appear oversaturated.
- Use SHARPNESS and NOISE REDUCTION in opposition with each other: increase sharpness while diminishing noise reduction to obtain more texture in high-ISO shots.
- Adjust the white balance using one of the presets or a Kelvin value to make your shot look warmer or cooler. Use WB SHIFT to correct or introduce a color tint.
- Picked the wrong color space? No problem! Just reprocess the shot with the right color space.
To process RAW files in your X100F that aren’t stored on an SD card, you have to copy them back to a card and place them in the appropriate directory. If you are using a freshly formatted card, make sure to take at least one shot in order to create the X100F’s directory structure.
The directory where you must place your RAW files is located in a folder called DCIM. It’s named “xxx_FUJI,” with “xxx” being a 3-digit number that reflects the overall number of shots you have already taken. An example would be 104_FUJI.
Please remember that file transfers to the camera aren’t available via USB, so make sure to insert the SD card directly into your computer or use a card reader.
By the way, your X100F cannot process RAW files from other camera models, including other X-series models. However, you can process RAW files from other X100F cameras. In this case, your camera will display a parcel symbol indicating that the RAW file was created with a different X100F.

Fig. 63: The built-in RAW converter in action: The left image shows the scene as it was recorded with the camera’s default settings. On the right, you can see the same shot processed with ACROS+Red Filter and maximum contrast (SHADOW TONE +4 and HIGHLIGHT TONE +4).
Note: In concert with firmware 2.00 for the X100F, Fujifilm has announced Windows and macOS based versions of X RAW STUDIO [53]. This software connects via USB to your X100F and allows you to comfortably control the camera’s built-in RAW converter from your Mac or PC.
Comparing RAW converters |
So far, we have talked a lot about the X100F’s built-in RAW converter. It’s the perfect tool to create JPEGs. It’s a JPEG shooter’s paradise! It’s also super-easy, because the built-in RAW converter utilizes the same functions and parameters available in the shooting menu. That’s no surprise, because the built-in RAW converter is the JPEG engine of the camera! If you are a JPEG shooter, ignoring the internal converter that turns RAW files to in-camera JPEGs means overlooking the aspects of the camera that make the X100F so special. That’s why even diehard JPEG fans should shoot with FINE+RAW. You need the RAW files to feed the engine that generates JPEGs with the colors, tonality, and overall look that you like from your Fuji camera.
What about the other half—diehard RAW shooters who don’t care much about JPEGs, Fuji colors, or in-camera conversion? Those guys (I tend to be one of them from time to time) require an external RAW converter to process the RAW files on a computer. The results are often saved as uncompressed 16-bit TIFF files of more than 100MB each. Such files can be further processed in Photoshop and similar applications.
In this tip, I’ll compare how certain popular external RAW processors handle specific features of the X100F:
- RAW File Converter EX came free with your camera. This software is based on an older version of the Japanese Silkypix [54] RAW processor that is currently available in version 8. If you want to use all the features of this software, you should upgrade to the latest version of Silkypix. As a Fujifilm camera user, you are eligible for an upgrade discount in many territories. Please note that the current RAW File Converter EX version 2 also supports Fujifilm’s film simulation modes. This software is available as a free download [55].
- The most popular RAW converter is Adobe Lightroom [56]. Its processing module is also available in Photoshop as Adobe Camera Raw. Please note that in October 2017, Lightroom’s name was changed to Lightroom Classic CC. In the context of this book, “Adobe Lightroom” refers to “Lightroom 6” or “Lightroom Classic CC.” It does not refer to the new “Lightroom CC,” which is geared toward cloud storage and mobile devices and currently only offers a limited feature set.
- Capture One Pro is similar to Lightroom and deeply rooted in the professional community. It’s made by PhaseOne [57], the same folks who are building medium format cameras and digital camera backs.
- A great RAW processor for macOS users is Iridient Developer from Iridient Digital [58]. Like Lightroom/ACR, this converter features profiles that match Fuji’s built-in film simulation modes. There’s also Iridient X-Transformer for macOS and Windows, which can be launched from a plug-in in Lightroom. It converts Fujifilm RAF files into pre-demosaiced DNG files that can be processed in Lightroom, thus combining the strengths and benefits of Iridident Developer and Lightroom.
- Photo Ninja from PictureCode [59] is another fine option. Like Iridient Developer, it can extract a great amount of sharpness and detail from Fuji’s X-Trans RAWs. It also contains a module for adaptive tone-mapping and features a special algorithm to restore blown highlights.
Which RAW converter is right for you? I don’t know! But I do know that you can download free trial versions of all mentioned programs to find out for yourself. That said, it can be helpful to make a quick comparison that tells you how well specific Fuji features are supported by each software.
Those features are:
- Original Fujifilm film simulations
- Exposures taken with extended DR settings (DR200%, DR400%)
- Digital lens corrections (distortion, vignetting, etc.)
Let’s have a look . . .
FUJIFILM FILM SIMULATIONS
Provia, Astia, Velvia, Classic Chrome, Pro Neg. Hi, and Pro Neg. Std make up the color backbone of the X100F. Together, they constitute the Fuji Colors. However, the makers of external third-party RAW converters often have their own ideas about the look of Fuji RAWs. Your mileage may vary, as they say.
- The built-in RAW converter is the benchmark reference for external RAW converters when it comes to emulating Fuji Colors.
- RAW File Converter EX and Silkypix feature a healthy amount of film emulations, but they all look different from Fuji’s film modes. However, the new version 2 of the free RAW File Converter EX software does support Fuji’s own film simulation modes for the X100F, and these film simulations are also available in the commercially sold Silkypix 8.
- Adobe Lightroom and Adobe Camera Raw feature camera profiles that closely emulate Fuji’s film simulation modes—as long as you are shooting in DR100% mode.
- Capture One Pro doesn’t officially support Fuji’s film modes, but it offers users the opportunity to create their own profiles. A few users have taken up the challenge, so you may find free film-mode profiles in Fuji-related camera forums and blogs.
- Iridient Developer offers support for Fuji’s film simulation modes, but hasn’t yet provided new profiles that are optimized for the X-Trans III sensor. However, even the older simulation files work with the X100F. If you use Iridient X-Transformer as a Lightroom plug-in, you have access to Lightroom’s own Fujifilm profiles, which closely match the color and gradation of the camera’s built-in film simulations.
- Photo Ninja doesn’t support Fuji’s film modes.
EXTENDED DYNAMIC RANGE (DR200%, DR400%)
Using the DR function results in RAW files that are initially exposed 1 EV (DR200%) or 2 EV (DR400%) darker in order to protect critical highlights. The darker exposure is compensated during RAW conversion by a partial ISO push of the same amount that only affects shadows and midtones.
- The built-in RAW converter is the benchmark here, since it fully automates the tone-mapping process of partially pushing the shadows and midtones back to where they belong.
- Silkypix and RAW File Converter EX are smart citizens, too: they recognize RAW files with DR200% and DR400%, and they push them up by 1 or 2 EV, then automatically recover the blown highlights by adjusting the highlight recovery slider accordingly. That said, the results don’t necessarily look exactly like the JPEGs from the camera.
- Lightroom and Adobe Camera Raw are also smart enough to recognize RAWs with extended DR settings, and they automatically push the RAWs up 1 or 2 EVs when the images are opened with the software. However, recovering the highlights isn’t an automated process; it’s the user’s job. Sadly, this can become challenging because Lightroom’s five exposure-related sliders work in a different way than Fuji’s tone-mapping. There was also a persistent Lightroom bug that didn’t perform the push with images that were taken with DR200% in DR-Auto mode. Luckily, this bug was addressed with the release of Lightroom Classic CC and its new process version 4.
- Capture One Pro works just like Lightroom and applies a push of 1 or 2 EVs to RAWs that were recorded with a DR200% or DR400% setting. There’s also a slider to recover highlights that may have disappeared during this push, but the results look different from Fuji’s own DR tone-mapping.
- Iridient Developer operates like Capture One, automatically pushing RAW files that were recorded with a DR200% or DR400% setting. There’s also a Highlight Recovery slider to restore highlights that may have vanished, and here’s the good news: the results very much resemble the look from the camera’s internal RAW converter. Well done! Iridient X-Transformer relies on Lightroom to recover highlights.
- Photo Ninja uses its own powerful adaptive tone-mapping module, and hence doesn’t really bother emulating Fuji’s simple tone-mapping. There are several sliders to adjust a RAW file’s exposure during processing.
DIGITAL LENS CORRECTIONS
Digital lens corrections affect three areas: devignetting, distortion correction, and the removal of chromatic aberrations (CAs). The information to perform such corrections is stored in the metadata of each RAW file. Every RAW converter can potentially read and use this metadata to apply appropriate image corrections. However, not all programs are able to do so.
- The built-in RAW converter supports all types of lens correction, including the camera’s Lens Modulation Optimizer (LMO), which isn’t available in external RAW converters.
- Silkypix and RAW File Converter EX can read and process the RAW metadata for distortion correction, devignetting, and CAs. All corrections are automatically applied and can’t be controlled by the user.
- Lightroom and Adobe Camera Raw can also process lens-correction metadata and automatically apply the respective corrections in the background. It’s currently not possible to control or stop the application of these lens corrections. That said, Lightoom offers an additional correction profile for the X100F lens on top of the metadata-based digital lens corrections. With the additional profile, distortion and vignetting can be further corrected or even over-corrected.
- Capture One Pro can also process lens-correction metadata. Unlike Lightroom and Silkypix, it allows the user to control the intensity of the corrections or switch them off altogether.
- Iridient Developer can use lens-correction metadata, too. Like Capture One, it also provides control over the extent of the corrections. In a similar fashion, Iridient X-Trans-former offers checkboxes to switch off any of the three metadata-based lens correction parameters. This means that Iridient X-Transformer, when used as a Lightroom plug-in, can serve as a way around Lightroom’s current inability to disregard RAW metadata-based lens corrections.
- Photo Ninja ignores all lens-correction metadata. Instead, the software asks the user to provide suitable profiles or to manually correct distortion, vignetting, and CAs.
Automatic lens metadata corrections can look a bit different depending on the RAW converter because each converter tends to interpret the data differently.
Displaying EXIF metadata |
Digital cameras save information about every recorded image in the EXIF [44] data of each RAW or JPEG file. This data can be useful to RAW converters and cataloging software, but it can also be useful to you to help you understand how an image was exposed.
EXIF data consists of information about exposure parameters, camera settings, date and time, focal length, AF settings, white balance, JPEG parameters, DR mode, digital lens correction data, serial numbers of cameras and lenses, etc. Many of these data points are saved in an area called “maker notes,” which contains information on camera features that are specific to a certain brand (like Fujifilm). ExifTool can read the EXIF data and is also able to make sense of maker notes. ExifTool is rarely stand-alone. Instead, you can get it as part of other image utilities, such as ExifTool GUI for Windows or GraphicConverter for Mac OS users.

Fig. 64: EXIF data of an X100F shot in GraphicConverter: There’s a vast amount of information about every image, including brand-specific Fujifilm maker notes.