
4. Hangouts
Google+ attempts to replicate your real-life social networks with circles. But how can it replicate one of the best aspects of having friends—impromptu hanging out—on the Internet? Google+ has a feature that tries to do just that, cleverly named hangouts.
Hangouts are basically videoconferences that you can start from Google+. Invite people or circles, and folks can join your hangout and shoot the breeze. You can even watch YouTube videos together!
The Lowdown on Hangouts
A few things to know about hangouts:
• Hangouts require the Google voice and video plug-in to work. Download it here: www.google.com/chat/video.
• Each hangout can have a maximum ten participants.
• At 90 minutes, Google+ checks in to make sure that your hangout is still happening. If no one responds, the hangout ends automatically.
• Your computer must have a webcam and a microphone attached to it to audio/video chat.
Now that the ground rules of hangouts have ben established, the rest of this chapter is devoted to showing you how to start and join hangouts for yourself.
Google+ recently added hangouts with extras. These hangouts offer different features and will be covered in one of the digital updates to this book (see the introduction).
Starting a Hangout
Starting a hangout is very simple:
1. Log in to Google+.
2. Click the green Start a Hangout button in the third column of your stream page (Figure 4.1).
Figure 4.1. The Start a Hangout button.

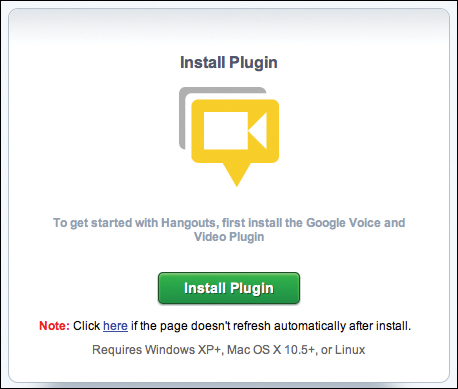
3. If you don’t have the Google voice and video plug-in installed, you’ll be prompted to install it (Figure 4.2); click the Install Plugin button, and follow the onscreen instructions.
Figure 4.2. Hangouts require the Google voice and video plug-in. If you don’t have it installed, you’ll see this prompt.
After you install the plug-in, you may have to click Start a Hangout again to restart your hangout.
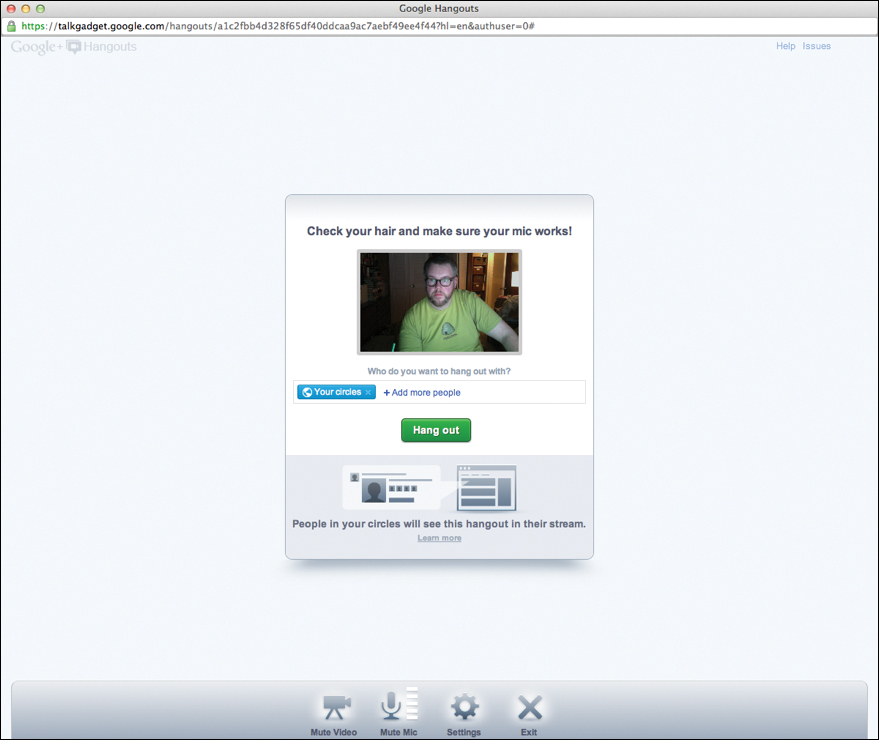
Clicking the Start a Hangout button with the plug-in installed opens the Google Hangouts window (Figure 4.3). In the middle of the screen is video from your computer’s webcam. As the screen suggests, take this opportunity to make sure that your face can be seen and that your hair is in order.
Figure 4.3. Before you start a hangout, you have a chance to make sure that your video and audio are OK.
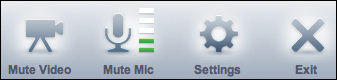
4. Familiarize yourself with the buttons along the bottom of the window (Figure 4.4 on the next page):
• Mute Video. This button mutes your video for the rest of the hangout participants.
• Mute Mic. The Mute Mic button serves double duty. Click it, and your microphone is muted so that no one can hear what you’re saying. When your mic isn’t muted, though, your sound level is displayed. The more green bars appear, the louder you are. If no green bars appear, make sure that the Google Hangouts window is using the correct source for your mic (see “Adjusting hangout settings” later in this chapter).
• Settings. As you might expect, click this button to see your hangout’s settings.
• Exit. End your hangout by clicking this button.
Figure 4.4. These four buttons appear before participants join your hangout (and afterward as well).
5. To start your hangout, invite some people to hang out with you.
You can select some of your circles or individual people. By default, Your Circles is selected (refer to Figure 4.3), which means that anyone who is in one of your circles will be able to join this hangout.
6. Click the green Hang Out button.
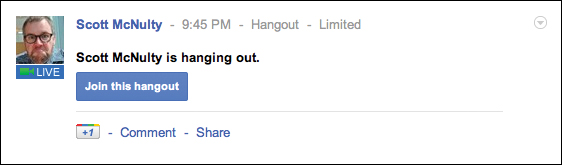
Your hangout is posted to your stream and the streams of the people you invited (Figure 4.5). Anyone who wants to hang out with you just clicks the Join This Hangout button.
Figure 4.5. A notice of your hangout is posted to the stream to alert the people you invited to join you.
Hanging Out
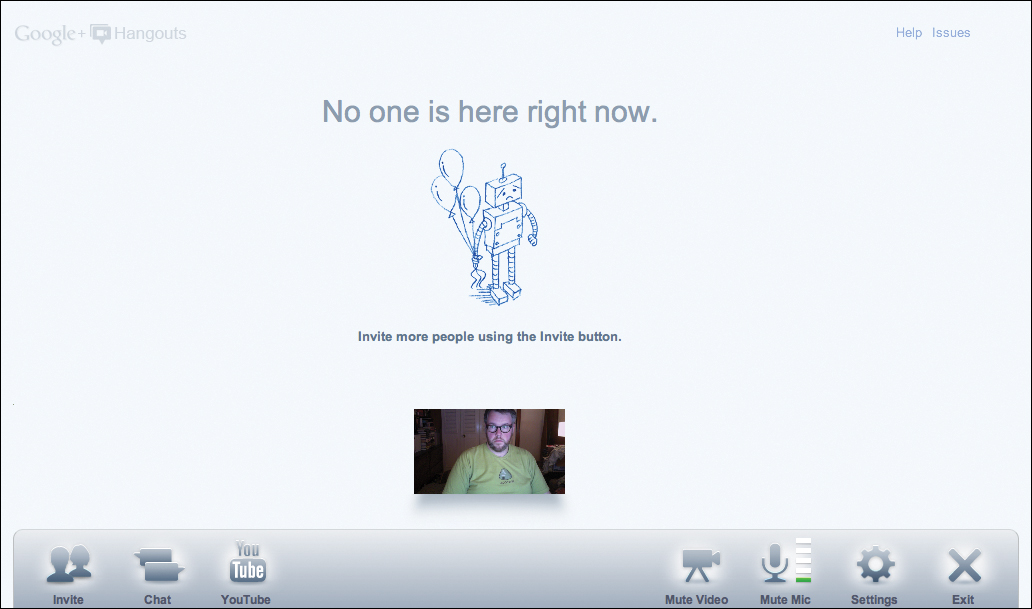
Your hangout is started, and chances are that no one has joined you just yet, so the hangout window displays only your webcam video and the image of a sad, lonely robot to really drive home the point that you’re alone (Figure 4.6). (Thanks, Google+!)
Figure 4.6. The sad robot reminds you that you’re all alone in your hangout.
When people start joining your hangout, however, their video feeds are displayed in a line toward the bottom of the window (Figure 4.7). The main video window displays the participant who’s sending the most noise through his or her microphone at the moment.
Figure 4.7. Hanging out with some friends. Participants are shown at the bottom, and whoever is talking is shown in the center.

You can override this automatic switching for yourself simply by clicking the person whose video feed you want to appear in the main area. That video thumbnail is outlined in green, and that person’s video is displayed in the center. Clicking someone else puts him or her in the center. Click a person twice to revert to automatic switching.
Using hangout options
While you’re in an active hangout, whether it has ten people in it or one, three new buttons appear at the bottom of the screen (Figure 4.8):
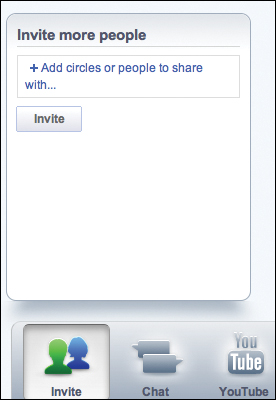
• Invite. You may want to invite more people to your hangout to get the party started. Click the Invite button, and you can invite more people/circles to your hangout just by clicking the Add Circles or People to Share With link and selecting them (Figure 4.9). Click the Invite button, and your hangout adds the new invitees.
Figure 4.8. These buttons appear when people join you in your hangout.

Figure 4.9. Invite people to a hangout by clicking the Invite button.
Keep in mind that everyone in the hangout—not just the person who started the hangout—can invite people to join in.
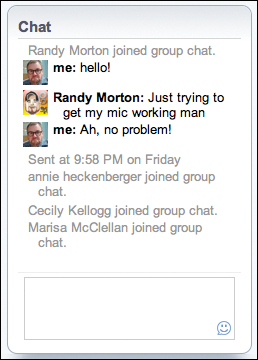
• Chat. In addition to having audio chat, you can click this button to open a text chat (Figure 4.10). The chat is also used to record when people join or leave your hangout.
Figure 4.10. Hangout chat works like any other chat you’ve ever used. Hangout alerts, such as people joining and leaving, are also displayed here.
• YouTube. Anyone in the hangout can click the YouTube button to bring up YouTube search. Find a video you want to watch, and click Play (Figure 4.11). The rest of the people in the hangout get an alert telling them that you’re watching a YouTube video and asking whether they want to join in (Figure 4.12).
Figure 4.11. Everyone in a hangout can watch the same YouTube video.
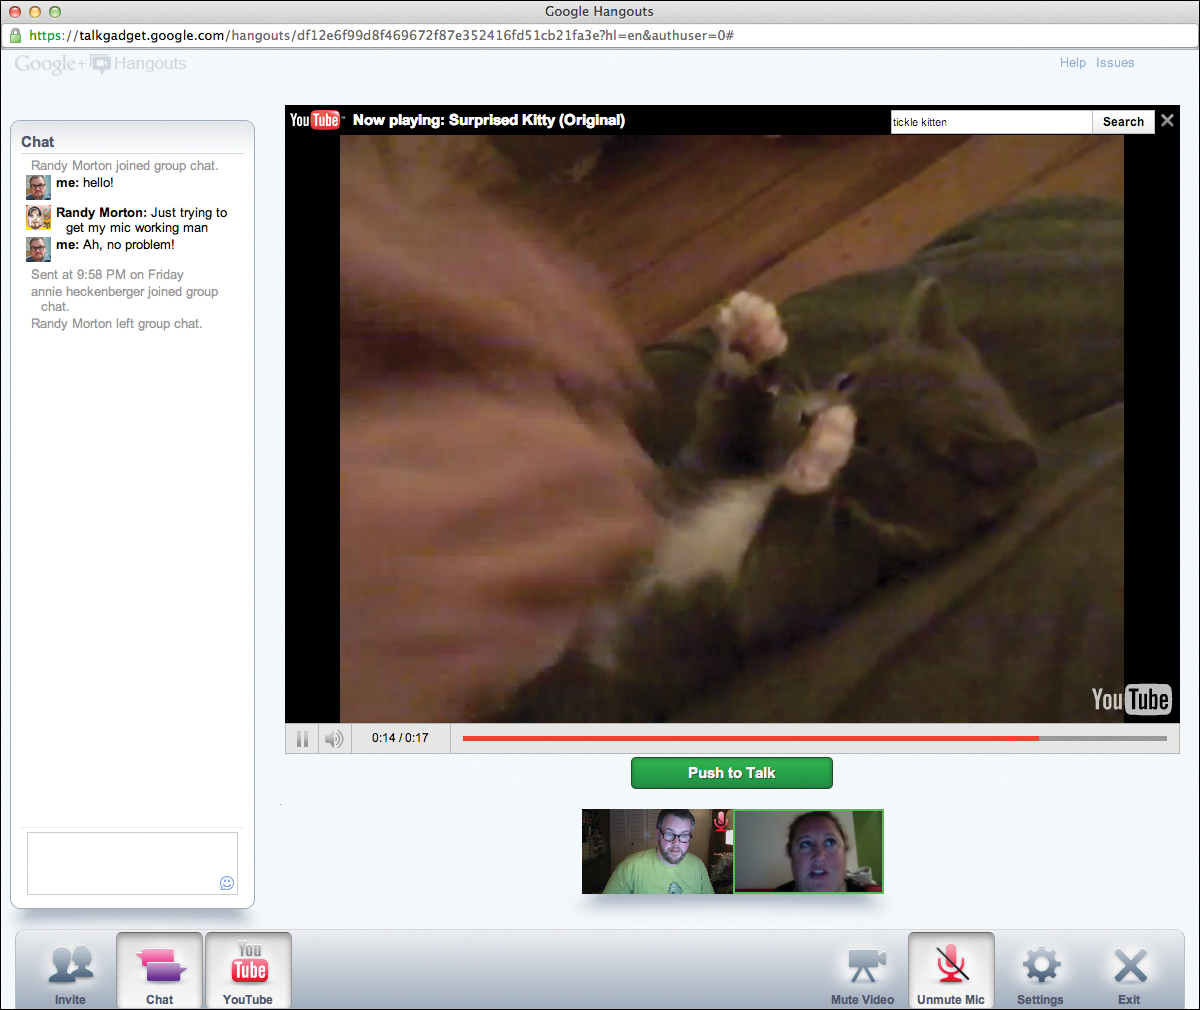
Figure 4.12. When someone starts to watch a YouTube video in a hangout, the rest of the participants are alerted so that they can join in (or not).

When you join in on watching a YouTube video, your microphone is automatically muted so that people can hear the video. If you want to talk, click the green Push to Talk button (refer to Figure 4.11), and everyone will hear what you have to say. This is a great way to pretend that you’re on Mystery Science Theater 3000 with your friends from across the country.
If at any point you want to stop watching YouTube videos, just click the YouTube button again, and you return to the normal hangout interface.
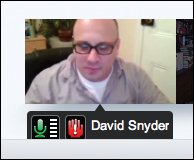
As you’re hanging out, you can mute the other participates, though only at your end. Hover your mouse over a person’s video, and some icons appear (Figure 4.13 on the next page). If you click the green mic/volume-control icon, that person’s audio is muted for you.
Figure 4.13. Hovering over someone’s video allows you to mute that person or report abusive behavior.
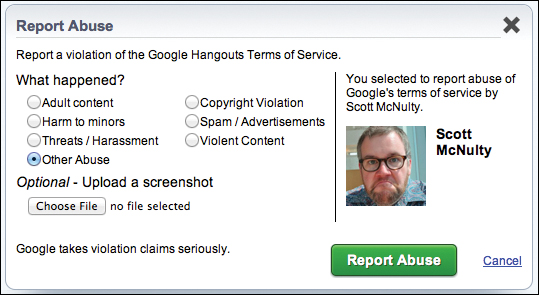
The red hand icon is for flagging inappropriate behavior in your hangout. Clicking it brings up the Report Abuse screen (Figure 4.14). You can pick a reason from the list, and you can even upload a screen shot of the issue (if you took one) to further your case. Click the green Report Abuse button when you’re ready, or click Cancel if you clicked the icon by accident.
Figure 4.14. Choose the reason why you’re reporting someone for abuse. You can even include a screen shot. (Just so you know, I didn’t do any of those things.)
Adjusting hangout settings
At any time during a hangout, you can click the Settings button to make several adjustments (Figure 4.15). The video from your camera is displayed on the right side of the Settings screen. Next to your video are a couple of things to help you troubleshoot your audio. At the top is a microphone level meter. Talk a bit, and if the level goes up and down, your microphone is working. To test your speakers, click the Play the Test Sound link. If you can hear the test tone, you’ll be able to hear the other participants in the hangout.
Figure 4.15. Hangout settings include choosing audio and video sources.
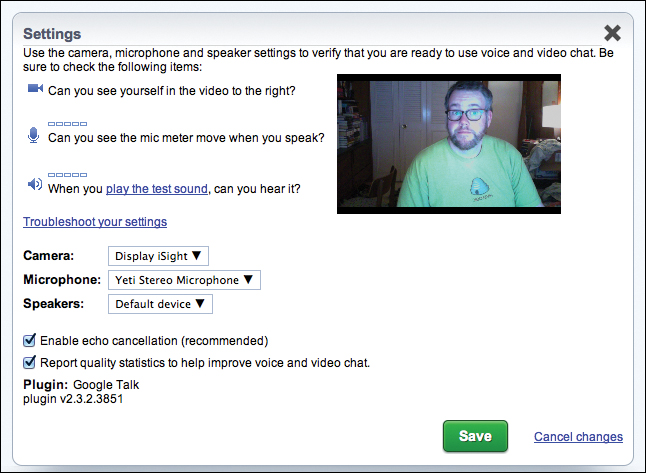
There are also three drop-down menus that let you adjust your camera, microphone, and speakers. If you have more than one microphone (such as a laptop with a USB microphone), all of them will be listed in the Microphone menu. Choose the one you want to use, or leave the menu set to Default Device, and the hangout will use whatever microphone you have your operating system set to use by default.
You can toggle two check boxes:
• Enable Echo Cancellation. This setting cancels any echoes that may crop up when you have a microphone close to speakers (the usual computer setup).
• Report Quality Statistics. The Google+ team is continually tweaking the way that hangouts encode video and audio to further enhance results. If you leave this box checked, you share statistics about the video/audio of your hangout with Google, and Google will use these statistics to make hangouts even better.
Click the green Save button to apply any changes you made in your settings.
Ending a hangout
Ending a hangout is simple: Just click the Exit button in the bottom-right corner of the hangout window. Anyone who joined the hangout can exit whenever he likes, and the hangout will continue. When the hangout owner (the person who started the hangout) clicks Exit, though, the hangout ends for all the participants.
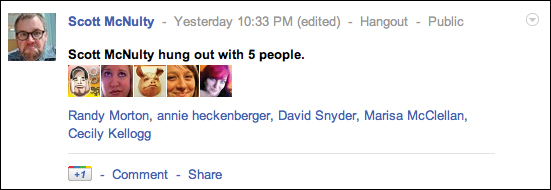
When the hangout ends, the hangout post that appeared in the stream is updated to reflect that fact (Figure 4.16). All the people who were in the hangout are listed in the post as well, with links back to their profiles.
Figure 4.16. When your hangout ends, the hangout stream post is updated with a list of the participants.
Starting a Hangout from YouTube
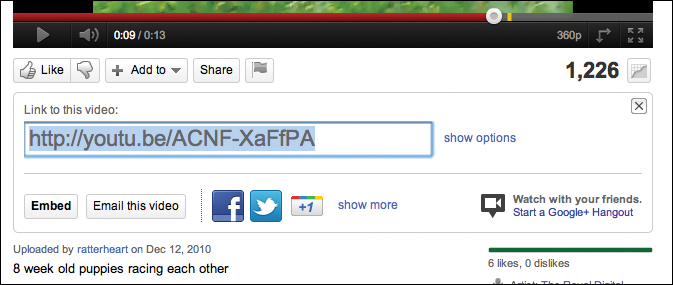
1. Go to a YouTube video.
For this example, use http://youtu.be/ACNF-XaFfPA.
2. Click the Share button directly below the video.
In the resulting screen, you see the direct link to the video, an Embed button, and a couple of icons for posting this video to a variety of social networks. All the way to the right of the sharing section are the Hangout icon and a link that reads Start a Google+ Hangout (Figure 4.17).
Figure 4.17. Start a Google+ hangout right from a YouTube video by clicking this link.
3. Click the hangout link.
Now you’re starting a hangout just like you would on Google+.