
Overview
By the end of this chapter, you will be able to use functional programming concepts such as pure functions, immutability, composition, and currying; use higher-order functions such as filter, map, and reduce; apply techniques such as cloning objects to reduce side effects in your code; and demonstrate strategies for reducing imperative logic and for loops in your code.
Introduction
In the previous chapter, we talked about how JavaScript is a multi-paradigm programming language. It's possible to write code with procedural, object-oriented, and functional design patterns. In this chapter, we'll look closely at the functional programming design pattern.
Functional programming is a programming paradigm that has become popular in the last few years, though most JavaScript developers were unfamiliar with it before then.
JavaScript is not a purely functional language like some others, such as Haskell, Scheme, and Clojure. However, JavaScript has support for functional structures and techniques if you choose to use them. It is worthwhile becoming familiar with its concepts and gaining a working knowledge of how to use them.
Functional programming has a set of features. Among others, here are some of the important ones:
- Pure functions
- Immutability and avoiding shared state, mutable data, and side effects
- Declarative rather than imperative
- Higher-order functions
- Function composition and piping
- Currying functions
- Reduces the use of traditional flow control structures such as for, while, and even if
These concepts will be covered over the course of this chapter. If implemented correctly, functional programming can result in code that is more predictable, less error-prone, and easier to test compared to other programming methods.
Pure Functions
Pure functions are one of the pillars of functional programming. A function is pure if it always returns the same result when it's given the same parameters. It also cannot depend on or modify variables or state outside of the function's scope.
A simple example of an impure function is as follows:
var positionX = 10;
function moveRight(numSlots) {
positionX += numSlots;
}
moveRight(5);
You can plainly see how the function is manipulating a value outside of its scope in the positionX global variable. A pure function should only use the arguments that have been passed in for its logic, and should not directly modify them. Another issue is that the function doesn't actually return a value.
Consider the following code. Can you see why it would not be considered a pure function?
var positionX = 10;
function moveRight(numSlots) {
return positionX + numSlots;
}
positionX = moveRight(5);
Though the function only reads the global variable value and does not manipulate the variable directly, it is still not pure. To see why think about what happens if you call the function multiple times with the value 5 for the numSlots parameter:
- The first time, the result is 15 (since positionX is 10 and 10 + 5 = 15)
- The second time, the result would be 20
- The third time, the result would be 25
In other words, there is a different result for each invocation. For the function to be pure, the result would have had to resolve to the exact same value for the given parameter value, that is, 5. Also, consider how difficult it would be to write tests for this function since the result is not predictable.
The correct way of making this function pure is as follows:
var positionX = 10;
function moveRight(x, numSlots) {
return x + numSlots;
}
positionX = moveRight(positionX, 5);
In this version, all the data that the function uses in its logic is passed in as arguments, and it does not refer to any data outside of the function's scope. It will also always have the same result for a set of given parameters:
- If x=10 and numSlots=5, the result will always be 15.
- If x=15 and numSlots=5, the result will always be 20.
- If x=20 and numSlots=5, the result will always be 25.
The predictability of the result makes the code quality higher, makes it easier to reason about the function, and makes it easier to write tests. It also makes the code maintainable and less risky if the function ever needs to be refactored.
Side Effects
An important concept in functional programming that is closely related to pure functions is reducing side effects. A side effect is when a function performs some action, either directly or indirectly, that is not strictly for the purpose of the function or its return value.
Examples of side effects are actions such as showing an alert box, writing to a file, triggering a service call on the network, or making changes to the DOM. (Actually, when we manipulated the global variable in the impure function example in the previous section, we were also creating a type of side effect known as the shared state.)
Note
It is not possible or desirable to create programs that have no side effects whatsoever. After all, what good is the program if you can't see the output in some way? However, functional programmers aim to create pure functions most of the time and isolate the functions and parts of the code that require output or side effects. Keeping such code separate helps you understand your software better for debugging, to create better tests, and to ease future maintenance and extensions.
Immutability
Another concept in functional programming is to prefer immutable values and objects over mutable ones as much as possible. In short, immutable objects are those whose values cannot change once they are created, even if those objects are used. Going forward, we will perform a few exercises to demonstrate how certain objects such as strings and numbers are immutable, whereas arrays are not. We will begin with the immutability of strings in the following exercise.
Exercise 14.01: Immutable Values and Objects – Strings
In this exercise, we will demonstrate how strings are immutable. Let's get started:
- In the Google Chrome browser, go to Developer Tools (go to the menu with the three dots at the upper-right of the screen | More Tools | Developer Tools, or just hit the F12 key).
- JavaScript has several built-in immutable objects, such as strings. Create two constants, string1 and string2, and assign the variable so that string2 is a substring of string1:
const string1 = "Hello, World!";
const string2 = string1.substring(7, 12);
- Display both strings. Type the following into the console:
console.log(`string1: ${string1}`);
console.log(`string2: ${string2}`);
- This code results in the following output:

Figure 14.1: Output of strings
From this, you can see that the execution of substring() on string1 did not change the value of string1 in any way, demonstrating that the string is immutable. It actually results in a new string consisting of the characters of the partial string between the given indices. This result is then set as the value of the string2 variable.
Exercise 14.02: Immutable Values and Objects – Numbers
Primitives such as numbers are also immutable. In this exercise, we will perform an operation on a number to demonstrate immutability in numbers.
- Create two constants, number1 and number2, and assign them numeric values such that number2 is half of the value of number1:
const number1 = 500;
const number2 = number1 / 2;
- Display both number objects. Type the following into the console:
console.log(`number1: ${number1}`);
console.log(`number2: ${number2}`);
- This code results in the following output:

Figure 14.2: Output of numbers
We can see that performing a calculation with number1 and setting the result to a new variable does not affect the original variable.
Exercise 14.03: Mutability – Arrays
So far, we have looked at immutable objects. From this point on, we will look at examples of objects that do not have this immutability. In this exercise, we'll create an array and assign its values to another array, and then we'll modify its value to demonstrate how arrays are mutable.
- Create and define array1 so that it has three value elements, namely, 'one', 'two', and 'three':
const array1 = ['one', 'two', 'three'];
- Create another array, array2, with the value equal to array1:
const array2 = array1;
- Now, append another element, 'four', to array2:
array2.push('four');
- Display both outputs in the console, like so:
console.log(`array1: ${array1}`);
console.log(`array2: ${array2}`);
This code results in the following output:

Figure 14.3: Output of arrays
Here, we assigned the array2 variable to the same array as array1, and then appended another element to array2 (the value 'four'). It may surprise you that array1 is affected and gets the element added to it as well, unlike the other examples so far. This is because when the assignment is made to array2, it does not create a new array. Rather, it assigns only a reference that points to the original array, that is, array1. Manipulating either array would affect both of the variables as they are in fact the same array.
Exercise 14.04: Mutability – Objects
In this exercise, we will assign values to properties in an object to demonstrate mutability in objects.
- Create an object, actor1, with the properties name and show. Assign the value Sheldon and BB Theory to these properties:
const actor1 = {
name: 'Sheldon',
show: 'BB Theory'
};
- Now, create another variable, actor2, and assign it to the same object as actor1. Then, also add a new property to actor2 called name
const actor2 = actor1;
actor2.name = 'Leonard';
- Type the following into the console:
console.log("actor1:", actor1);
console.log("actor2:", actor2);
- This code results in the following output:
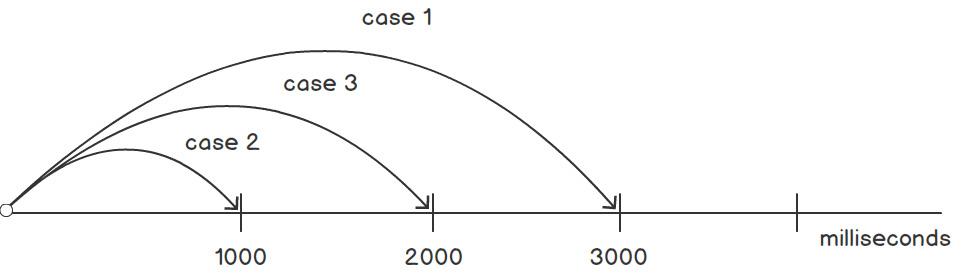
Figure 14.4: Output for objects
As you can see, both the objects in the actor1 and actor2 variables end up being exactly the same. The name property is not only in actor2, as you might expect. This is once again because actor2 is only a reference to actor1, and is not its own object.
Another point is worth mentioning as well. In all these examples, the variables were defined as constants using the const keyword. However, as we have seen in the last two examples, we were able to make changes to the object and the compiler did not complain. This shows that the const keyword is not equivalent to saying the value is immutable!
All const means is that the compiler prevents you from being able to reassign the variable to a new object. It does not restrict you from changing the properties of the assigned object or adding array elements, though.
The next section will show you some strategies regarding how to handle mutable objects effectively.
Cloning Objects and Arrays
In the previous exercise, you saw how arrays and objects are mutable. What if you need to make modifications, though? How can you do this in a safe manner that avoids side effects?
First, there's a simple technique for arrays. If you are just adding an element to the array, you can use Array.prototype.concat rather than Array.prototype.push. The difference is that concat returns a new array copy with the element added, whereas push modifies the original array.
We can see this in the following code. Here, array1 and array2 are now, in fact, distinct objects:
const array1 = ['one', 'two', 'three'];
const array2 = array1.concat('four');
console.log(`array1: ${array1}`); // output: array1: one,two,three
console.log(`array2: ${array2}`); // output: array2: one,two,three,four
The output of the preceding code would be as follows:
array1: one,two,three
and
array2: one,two,three,four
For other array modifications or to manipulate objects, you would usually need to clone the array or object and operate on the clone. How do you make clones, you ask? Here's a neat trick: in newer JavaScript versions (since ECMAScript 2018), the spread syntax works for both arrays and objects. Using the spread syntax, you can do the following:
// Arrays
const array1 = ['one', 'two', 'three'];
const array2 = [...array1];
array2[0] = 'four';
console.log(`array1: ${array1}`); // output: array1: one,two,three
console.log(`array2: ${array2}`); // output: array2: four,two,three
// Objects
const actor1 = {
name: 'Sheldon',
show: 'BB Theory'
};
const actor2 = {...actor1};
actor2.name = 'Leonard';
//the output for variable actor1 will be displayed.
console.log("actor1:", actor1);
The output of const actor1 will be as follows:
// output: actor1: { name: "Sheldon", show: "BB Theory" }
//the output for variable actor2 will be displayed.
console.log("actor2:", actor2);
The output of const actor2 will be as follows:
// output: actor2: { name: "Leonard", show: "BB Theory" }
Notice that there are three consecutive dots in [...array1] and {...actor1}. These dots are known as spread operators. Using the spread syntax in this fashion effectively clones the array, or key-value pairs in the case of an object.
There is one caveat, though. This method only makes a shallow copy, which means only the top-level elements or properties are copied. Beyond the top level, only references are created. What this means is that, for example, multi-dimensional arrays or nested objects are not copied.
If a deep copy is required, one popular method is to convert the object into a JSON string and parse it right back, similar to the following code. This works for both objects and arrays:
let object2 = JSON.parse(JSON.stringify(object1));
The deep copy method also has the added benefit of working on older versions of JavaScript.
Sample Data for Examples and Exercises
Before we go further, we need to introduce a scenario with sample data. In the upcoming sections, the following data will be used in the examples and exercises:
const runners = [
{name: "Courtney", gender: "F", age: 21, timeSeconds: 1505},
{name: "Lelisa", gender: "M", age: 24, timeSeconds: 1370},
{name: "Anthony", gender: "M", age: 32, timeSeconds: 1538},
{name: "Halina", gender: "F", age: 33, timeSeconds: 1576},
{name: "Nilani ", gender: "F", age: 27, timeSeconds: 1601},
{name: "Laferne", gender: "F", age: 35, timeSeconds: 1572},
{name: "Jerome", gender: "M", age: 22, timeSeconds: 1384},
{name: "Yipeng", gender: "M", age: 29, timeSeconds: 1347},
{name: "Jyothi", gender: "F", age: 39, timeSeconds: 1462},
{name: "Chetan", gender: "M", age: 36, timeSeconds: 1597},
{name: "Giuseppe", gender: "M", age: 38, timeSeconds: 1570},
{name: "Oksana", gender: "F", age: 23, timeSeconds: 1617}
];
This is an array of objects that represents the results of runners in a 5 km race. The name, sex, age, and time are indicated for each runner in object fields. Time is recorded in seconds, allowing for easy minutes/seconds and pace calculations.
We will also define three helper functions to display the data. They will use some concepts that you may not be familiar with yet, particularly, arrow function notation and the Array.prototype.map method. But don't worry – these concepts will be covered in upcoming sections and they will become clear soon.
The purpose of our first helper function is to format seconds into MM:SS:
const minsSecs = timeSeconds =>
Math.floor(timeSeconds / 60) + ":" +
Math.round(timeSeconds % 60).toString().padStart(2, '0');
Let's understand the code in detail:
- The minsSecs variable defines an arrow function with a timeSeconds input parameter.
- For the minutes portion, the Math.floor() method removes the decimal part of the minutes when dividing seconds by 60, resulting in just a whole number integer.
- For the seconds portion, the Math.round() method returns the number rounded to the nearest integer. (Note that we only wish to round fractional seconds. For the minute portion, it would not be correct to round.)
- The String.prototype.padStart method pads the seconds value with a leading 0 if the value is less than 10. The seconds themselves are calculated using the remainder operator, %, which returns any remainder value in the division.
Our second helper function creates a string that prints the fields of the runner object in custom formats:
const printRunner = runner =>
[`Name: ${runner.name}`,
`gender: ${runner.gender}`,
`age: ${runner.age}`,
`time: ${minsSecs(runner.timeSeconds)}`
].join(' ');
Let's understand the code in detail:
- Once again, arrow function syntax is used. The function is named printRunner and has a runner input parameter.
- An array of formatted strings is created, one for each field in the runner object.
- Lastly, all the string elements are joined together with a tab character separator by calling Array.prototype.join(' '), resulting in nice columns when printed.
The final helper function prints all the runners:
const printRunners = (runners, listType) =>
`List of ${listType} (total ${runners.length}): ` +
runners.map(printRunner).join(' ');
Let's go through the different parts of the above code in detail:
- The function is called printRunners and takes two parameters: an array of runners, and listType, which is a description of what type of list is being printed. It returns a string.
- Array.prototype.map is used to form the runner details for printing.
- In short, the Array.prototype.map method iterates over every array element executes a callback function on them and results in a new array with the transformed values of each element. We'll explain how this works in detail later.
- But for now, the Array.prototype.map call here calls the printRunner function specified previously on each array element to get the formatted strings. Since the printRunner function only takes one parameter, in this case, it is not necessary to explicitly specify the parameter, since it is implied.
- The strings are then joined together with a newline character by calling Array.prototype.join(' ').
To print all the runners to the console, invoke it like this:
console.log(printRunners(runners, "all runners"));
The output will look like this:

Figure 14.5: Sample output of all the runners in the console
Higher-Order Functions
Functions in JavaScript are first-class citizens. This means they can be passed as parameter values to other functions, or even assigned to a variable. This is one of the main characteristics that make JavaScript well-suited to the functional style of programming.
Higher-order functions are functions that operate on other functions. They can do this in one of three ways:
- If the function takes another function as an argument
- If the function returns another function as its result
- In both of these ways
In the previous chapters, we've already seen several higher-order functions, perhaps without you even realizing it. Remember the callback functions that get executed in response to DOM events, or the callbacks in Chapter 10, Accessing External Resources, which were called once the AJAX response was ready? These are all examples of higher-order functions since these functions are parameters that are passed into other functions.
The following sections will introduce three higher-order functions that are commonly used in functional programming: Array.prototype.filter, Array.prototype.map, and Array.prototype.reduce.
The Array.prototype.filter Method
The first function we will look at is the Array.prototype.filter method, which is simple. Given an existing array, filter() creates a new array with elements that fall under the specified criteria.
The syntax is as follows:
var newArray = array.filter(function(item) {
return condition;
});
The callback function is called for each element of the array in turn. If the condition passes and the function returns true, the element is added to the new array. If the function returns false, the element is skipped and will not be added.
Note that the return value is a new array. The original array is not impacted at all by this operation. In other words, it is not the case that items are filtered out and removed from the original array if they don't pass the condition. Rather, a new array is created with the elements that pass the test.
The reason for creating a new array rather than modifying the existing one is due to the fundamental principles of functional programming you learned about earlier: immutability and avoiding side effects.
We will look at some examples of how Array.prototype.filter is used in the following section.
A Refresher
Before we look at these examples, though, it is prudent for us to take a step back and review basic JavaScript function syntax and arrow function notation. This will ensure that you have a good grounding for what's to come. We will do this review by showing you different ways that the filtering function can be specified for Array.prototype.filter.
Say we wanted to filter the array of runners (presented earlier in this chapter) for only female runners. The most straightforward filtering function looks like this:
function femaleFilter(runner) {
if (runner.gender === "F") {
return true;
}
return false;
}
This filtering function would be called from another function that actually invokes filter() with the following code:
const getFemaleRunners = runners => runners.filter(femaleFilter);
To make the function self-contained, it takes the runners array as a parameter. It is not good practice to require runners to be a global variable.
Note that we only pass in the name of the filtering function, femaleFilter, as the argument, and not with parentheses, like femaleFilter(). We do not want the function to be executed right away, which is what would happen if there were parentheses. Rather, when a function is passed by name without parentheses, you are passing the function object itself. The filter method is a higher-order function that takes a callback function as its input, which requires the actual function object.
The results of this filtering can be displayed with the following code:
console.log(
printRunners(getFemaleRunners(runners), "female runners"));
// output:
// → List of female runners (total 6):
// → Name: Courtney gender: F age: 21 time: 25:05
// → Name: Halina gender: F age: 33 time: 26:16
// → Name: Nilani gender: F age: 27 time: 26:41
// → Name: Laferne gender: F age: 35 time: 26:12
// → Name: Jyothi gender: F age: 38 time: 24:22
// → Name: Oksana gender: F age: 23 time: 26:57
Note
This code should be used to display the results of the following examples as well. The same results are expected for each example.
We've done pretty well so far, but we could do better. As an alternative, the filtering function could be specified directly inline:
const getFemaleRunners = runners => runners.filter(
function(runner) {
if (runner.gender === "F") {
return true;
}
return false;
}
);
We can simplify this a bit more if we change the filtering test to a Boolean expression rather than explicitly returning true or false in an if statement:
const getFemaleRunners = runners => runners.filter(
function(runner) {
return runner.gender === "F";
}
);
In newer versions of JavaScript, since ES6, this function can also be expressed more concisely using an arrow function expression:
const getFemaleRunners = runners => runners.filter(runner => {
return runner.gender === "F";
});
Finally, note that this function has only one argument and a single return statement in its body. This allows us to make the code even more concise with the following one-liner, which omits the open/close brackets and the return keyword:
const getFemaleRunners = runners =>
runners.filter(runner => runner.gender === "F");
If desired, the filtering function can also be split into its own function and stored in a variable, since functions are first-class objects in JavaScript:
const femaleFilter = runner => runner.gender === "F";
const getFemaleRunners = runners => runners.filter(femaleFilter);
Eliminating for Loops
The Array.prototype.filter function is a great demonstration of powerful functional programming techniques that are used to eliminate looping code, particularly the for loop. To get a feel of the potential pitfalls of the traditional for loop, consider the equivalent imperative code to filter female runners:
var femaleRunners = [];
for (var i = 0; i < runners.length; i++) {
if (runners[i].gender == "F") {
femaleRunners.push(runners[i]);
}
}
Compare this to the one-liner we saw in the previous section, which does the same thing:
const femaleRunners = runners.filter(runner => runner.gender === "F");
The imperative looping code requires the use of the looping variable, i. This introduces mutation of the state into our code and is a potential source of bugs. Even though, in this case, it is a local state, it is best to avoid the state in all situations when possible. At some point in the future, there is a risk that a variable will change for an unknown reason, producing an issue that's difficult to debug.
With the functional equivalent, it is easier to see at a glance what the code does, is easier to test, and has more opportunity for potential reuse. It has no indentation, no loops, and the code is more concise and expressive.
This also demonstrates how functional code is most often declarative rather than imperative. It specifies "what to do" (declarative) rather than the steps and flow of "how to do it" (imperative). In this example, the functional code simply says, "filter the array elements passed in the runners parameter where gender is female". Compare this to imperative code that requires multiple variables, statements, loops, and so on, which describes "how" rather than "what."
In the upcoming sections, we will look at other array methods that eliminate loops as well, such as Array.prototype.map and Array.prototype.reduce.
The Array.prototype.map Method
The array map() method is used when you want to transform array elements. It applies a function to every element of the calling array and builds a new array consisting of the returned values. The new array will have the same length as the input array, but each element's contents will be transformed (mapped) into something else.
Say you wanted to calculate the average pace per mile of each runner of the 5 km race. Our dataset provides a timeSeconds field, which is the total amount of time in seconds the runner needs to complete the full distance. There are also 3.1 miles in 5 kilometers. Therefore, to get the pace per mile, you would divide the number of seconds by 3.1.
We can calculate the pace for all runners with the following code:
const getPaces = runners => runners.map(runner => runner.timeSeconds / 3.1);
const paces = getPaces(runners);
This code results in a new array with elements that have the pace value of the corresponding runner at the same index of the input array. In other words, the value of paces[0] corresponds to the runner in runner[0], the value of paces[1] corresponds to the runner in runner[1], and so on.
The pace results can be printed to the console as follows:
paces.forEach(pace => console.log(minsSecs(pace)));
// output:
// → 8:05
// → 7:22
// → 8:16
// → 8:27
// ...
Exercise 14.05: Another Way of Using Array.prototype.map
The results from the previous section in regards to mapping to an array of single-valued elements are useful as-is for some contexts, such as if you intend to subsequently calculate the sum or average of the values. This is okay when you just require the raw numbers and context isn't important. But what if you need more values or context for each element, such as the name of the runner that achieved the pace? This exercise shows another way we can use Array.prototype.map to achieve different results using the original dataset; for example, to get the calculated pace of each runner.
- In the Google Chrome browser, go to Developer Tools (go to the menu with the three dots at the upper-right of the screen | More Tools | Developer Tools, or just hit the F12 key):

Figure 14.6: Developer Tools in the Google Chrome browser
- In the console, paste in the sample runner data (beginning with const runners = [...]) from the Sample Data for Examples section of this chapter:
const runners = [
{name: "Courtney", gender: "F", age: 21, timeSeconds: 1505},
{name: "Lelisa", gender: "M", age: 24, timeSeconds: 1370},
{name: "Anthony", gender: "M", age: 32, timeSeconds: 1538},
{name: "Halina", gender: "F", age: 33, timeSeconds: 1576},
{name: "Nilani ", gender: "F", age: 27, timeSeconds: 1601},
{name: "Laferne", gender: "F", age: 35, timeSeconds: 1572},
{name: "Jerome", gender: "M", age: 22, timeSeconds: 1384},
{name: "Yipeng", gender: "M", age: 29, timeSeconds: 1347},
{name: "Jyothi", gender: "F", age: 39, timeSeconds: 1462},
{name: "Chetan", gender: "M", age: 36, timeSeconds: 1597},
{name: "Giuseppe", gender: "M", age: 38, timeSeconds: 1570},
{name: "Oksana", gender: "F", age: 23, timeSeconds: 1617}
];
- In the console, paste in the code for the minsSecs() helper function, also from the Sample Data for Examples section of this chapter:
const minsSecs = timeSeconds =>
Math.floor(timeSeconds / 60) + ":" +
Math.round(timeSeconds % 60).toString().padStart(2, '0');
- Type the following code into the console:
const getPacesWithNames = runners => runners.map(runner =>
({name: runner.name, pace: runner.timeSeconds / 3.1}));
const pacesWithNames = getPacesWithNames(runners);
This code shows a simple way of adding context to the array elements: rather than returning just a single value from the mapping function, an object with multiple fields can be returned instead that includes as many fields as desired. In this case, the object has the name and pace fields for each array element.
- We can see the output by using the following code:
// print each value
pacesWithNames.forEach(paceObj =>
console.log(`name: ${paceObj.name} pace: ${minsSecs(paceObj.pace)}`));
After running the preceding commands, your console log should look like the one shown in the following screenshot. Notice the list of names and paces at the bottom:

Figure 14.7: Output of the name and pace fields
You'll notice that we have all the same runners from the original data but without gender, age, or times in seconds. We've also added a new value called pace, which we created with the getPacesWithNames function.
What if you want your array to contain elements with all the original fields and append an additional pace field? - We could use the spread operator you learned about earlier. Type the following into the console:
const addPacesToRunners = runners => runners.map(runner =>
({...runner, pace: runner.timeSeconds / 3.1}));
- The ...runner spread syntax effectively clones all the key-value pairs in the object, adds them to the new mapped value, and displays the output. Add and run the addPacesToRunners function to your console.
Note
Copies will be made of the fields. As before, we do not want to just modify the original object so that we can add the new field either, as this has the potential for side effects.
- The following code runs the function and displays the results in the console:
const pacesWithAllFields = addPacesToRunners(runners);
pacesWithAllFields.forEach(paceObj => console.log(paceObj));
Once you run the forEach() function to iterate over the elements of the pacesWithAllFields, you should get a list of runners with all the original data, but in addition, there will be a new field for the average pace:

Figure 14.8: Results of addPacesToRunners with the pace field appended
Note
Do not use the spread technique if you expect your code to run in older browsers. Use alternatives such as Object.assign() to clone your fields. Here's how addPacesToRunners could be coded for older environments:
const addPacesToRunners = runners => runners.map(runner =>
Object.assign({}, runner, {pace: runner.timeSeconds / 3.1}));
Alternatively, transpilers such as Babel support the spread syntax, even in older browsers.
In this exercise, we looked at using the Array.prototype.map method and how we can use functional programming design patterns to combine functions to create complex results. We used addPacesToRunners in combination with minsSecs and pacesWithNames to print the pace of each runner in addition to the data from the original set. Importantly, we added the additional data value of pace without modifying the original dataset. Using the techniques in this exercise thus allows you to retain context when mapping values.
In the next section, we will learn about another array method, reduce, which allows us to take a set of values from an array and compute them into a single value.
The Array.prototype.reduce method
Similar to map(), the array reduce() method operates on every element of an array. It is used when you need to compute a single value from them.
A simple example of this is if you need the sum of a collection of numbers:
const sum = [2, 4, 6, 8, 10].reduce((total, current) => total + current, 0);
console.log(sum);
The output of the preceding function will be as follows:
// output:
// → 10
Here, the reduce() method takes two parameters: a combining function and a start value (0, in this case). It causes the combining function to be called repeatedly with each array element in turn, as it does in a for loop. For each invocation, the present element is passed as the current value, along with the total value so far (sometimes referred to as the accumulator).
The first time the combining function is invoked, total is the start value (0) and current is the first number in the array (2). The addition, that is, total + current, results in the value of 2.
The second time the combining function is invoked, total is the result of the previous invocation (2) and current is the second number in the array (4). The addition, that is, total + current, results in 6.
This process is repeated for the remaining elements in the array until there are no elements remaining to process. Here is a simple table that shows the values at each invocation:

Figure 14.9: Invocation value and their result
Here is another visualization of this reduction process that may help you see it more clearly:

Figure 14.10: A depiction of the reduction process
Going back to using our runners dataset, here's how you can use reduce() to compute the average pace of all runners. But first, recall the code from the previous section that used map() to calculate the pace for each runner and returned the results in a new array:
const getPaces = runners => runners.map(runner => runner.timeSeconds / 3.1);
const paces = getPaces(runners);
We can use these paces to calculate the average with reduce():
const getAvgPace = paces => paces.reduce(
(total, currentPace) => total + currentPace, 0) / paces.length;
console.log(minsSecs(getAvgPace(paces)));
The output of the reduce() function will be as follows:
// output:
// → 8:08
First, in reduce(), we calculate the sum of all pace values using a similar technique as when we summed up the array of numbers. But there's one additional step. Rather than returning the sum, we divide it by the length of the array before returning the result.
Exercise 14.06: Grouping with Array.prototype.reduce
What if you wanted to calculate the average pace of all runners grouped by gender? We can do this with reduce(), but it is a bit more involved than the previous example. In this exercise, we'll implement one approach to grouping.
Unlike when we calculated the average of straight numbers, for group averages, we'll need to do this in two steps: first, gather the sum and count of each gender, and then calculate the averages in a second step.
The following outlines the approach for the summing and counting step:
- Use an empty object ({}) as our starting value.
- When cycling through the array elements, get the group sum and count stats calculated so far for the gender of the current element. (If there are no stats for gender yet, create an empty group with sum and count set to 0.)
- Add the pace of the current element to the group sum.
- Increase the count of the group by 1.
Here are the steps to do this:
- In the Google Chrome browser, go to Developer Tools (go to the menu with the three dots at the upper-right of the screen | More Tools | Developer Tools, or just hit the F12 key).
- In the console, paste in the sample runner data (beginning with const runners = [...]) from the Sample Data for Examples section of this chapter.
- In the console, paste in the code for the minsSecs() helper function, which is also from the Sample Data for Examples section of this chapter.
- We will make use of the pacesWithAllFields value from the example in the Array.prototype.map() section, which creates a new array with a calculated pace field added to each element. Type the following into the console:
const addPacesToRunners = runners => runners.map(runner =>
({...runner, pace: runner.timeSeconds / 3.1}));
const pacesWithAllFields = addPacesToRunners(runners);
- The following is the code for this first summing and counting step, which we outlined previously:
const groupSumPaceByGender = runners => runners.reduce((groups, runner) => {
const gender = runner.gender;
groups[gender] = groups[gender] || {pace: 0, count: 0};
groups[gender].pace += runner.pace;
groups[gender].count += 1;
return groups;
}, {});
const sumPacesByGender = groupSumPaceByGender(pacesWithAllFields);
- At this point, the object that results from sumPacesByGender will have two keys that represent the gender values, that is, "M" and "F". The value for each is also an object, in which there are pace and count fields that contain the calculated stats for gender corresponding to the key.
- Displaying such objects in the JavaScript console is a bit clunky and unwieldy. A trick is in order: we'll convert the object into formatted JSON text and display that instead. Type the following code into the console:
console.log(JSON.stringify(sumPacesByGender,null,4));
This will output the JSON with a 4-space indentation:
// output:
// → {
// → "F": {
// → "pace": 3010.645161290322,
// → "count": 6
// → },
// → "M": {
// → "pace": 2840.6451612903224,
// → "count": 6
// → }
// → }
- Now that we have the sums and counts for each group determined, we can proceed to the second step and calculate the average of each group. We can do this by using Object.keys() to get an array with the keys of the object (that have the values "M" and "F") and then call Array.prototype.map() with a function to calculate the average for each gender. Type the following into the console:
const calcAvgPaceByGender = sumPacesByGender =>
Object.keys(sumPacesByGender).map(gender => {
const group = sumPacesByGender[gender];
return {gender: gender, avgPace: group.pace / group.count};
}
);
const avgPaceByGender = calcAvgPaceByGender(sumPacesByGender);
- Let's write the code to display the output:
console.log("Average pace by gender:");
avgPaceByGender.forEach(entry => console.log(
`gender: ${entry.gender} average pace: ${minsSecs(entry.avgPace)}`));
- The output should be displayed as follows:

Figure 14.11: Grouping the result of gender pace with Array.prototype.reduce
This output allowed us to take a large number of data points and "reduce" them to a smaller amount of results in an efficient manner.
In this exercise, we looked at using the Array.prototype.reduce method for grouping. As in the previous exercise, we combined several functions to create a more complex result, without modifying the original dataset. First, we added the pace value for each entry in the set using addPacesToRunners, then we created a group sum for each gender with groupSumPaceByGender, and finally, we used calcAvgPaceByGender to get a value for the average pace for both males and females in the race.
In the next section, we'll talk about the concept of composition. We've used composition several times already in this chapter, that is, each time we combined smaller functions to create a larger process. However, we haven't looked at the concept specifically and spoken of its importance in the functional paradigm. We'll also look at the pipe() and compose() functions, which make combining functions in this way easier and more readable.
Composition with compose() and pipe()
In the previous exercise, we saw that starting from the runners array, we required three different functions to calculate the average pace for each gender:
- addPacesToRunners: This is used to calculate the pace per mile.
- groupSumPaceByGender: This is used to sum the pace of each gender.
- calcAvgPaceByGender: This is used to calculate the average pace for each gender.
Each function required the result of the one before it as input in order to do its job. Basically, it did the following, though it may not have been apparent up to this point:
const result1 = addPacesToRunners(runners);
const result2 = groupSumPaceByGender(result1);
const avg = calcAvgPaceByGender(result2);
This is equivalent to the following, that is, using nested functions and removing the intermediate variables:
const avg =
calcAvgPaceByGender(groupSumPaceByGender(addPacesToRunners(runners)));
This is the idea of composition: that multiple simple functions are combined to build a more complex function. The result of each function is passed along to the next one.
We can create high-order functions called compose and pipe to achieve function composition in a more general manner, though. Putting aside the actual implementation for a moment, let's see how the functions would be used. With compose, the preceding nested functions would be written as follows:
const avgWithComposition =
compose(calcAvgPaceByGender, groupSumPaceByGender, addPacesToRunners);
This function would be used as follows:
const avgResult = avgWithComposition(runners);
avgResult.forEach(entry => console.log(
`gender: ${entry.gender} average pace: ${minsSecs(entry.avgPace)}`));
The output of the function would be as follows:
// output:
// → gender: F average pace: 8:22
// → gender: M average pace: 7:53
Note that, perhaps counter-intuitively, the functions in compose are actually called in reverse order from how they are given in the parameter list, that is, right to left. So, the addPacesToRunners method is first invoked with the runners argument (even though it is the last function in the given list), then the results are passed to groupSumPaceByGender, and finally, those results are passed to calcAvgPaceByGender.
Many people find this function call order unnatural, though it is consistent with the order we called our nested functions above. The pipe function is similar to compose, but functions are composed in the opposite direction, left-to-right rather than the right-to-left. The pipe approach is more consistent with linear thinking: first, do A, then B, then C, and the functions to do A, B and C would be given in that order.
With pipe, the equivalent code would be:
const avgWithPipe =
pipe(addPacesToRunners, groupSumPaceByGender, calcAvgPaceByGender);
const resultPipe = avgWithPipe(runners);
resultPipe.forEach(entry => console.log(
`gender: ${entry.gender} average pace: ${minsSecs(entry.avgPace)}`));
// output:
// → gender: F average pace: 8:22
// → gender: M average pace: 7:53
Implementation of compose() and pipe()
Now, let's look at one way we could actually implement these functions. The implementations are similar, but we'll start with pipe first as it is a bit easier to understand.
It turns out to be a pretty straightforward implementation when using Array.prototype.reduce:
function pipe(...fns) {
return input => fns.reduce((prev, fn) => fn(prev), input);
}
The pipe function takes one or more functions passed in as parameters, which are converted into an array of functions with the spread operator, that is, ...fns. Then, we apply reduce to the function array, starting by invoking the first function, fn, with the input argument passed in as prev. On the next invocation, the result of the first function is passed (as prev) and used as the parameter when calling the next function in the array. The rest of the functions in the array are processed in a similar fashion, with the result value of the final function returned.
Note that this function can be simplified a bit by using full fat-arrow notation:
const pipe = (...fns) => input => fns.reduce((prev, fn) => fn(prev), input);
As far as compose is concerned, recall that it is almost the same as pipe except that the order of functions is processed from right to left rather than left to right. Consequently, the implementation of compose is also basically the same, but rather than using Array.prototype.reduce, the sister function, Array.prototype.reduceRight, is utilized instead. The reduceRight function processes the array in reverse order from reduce and operates on the last element of the array first, then operates on the second to last element, and so on.
Here's the implementation of compose:
const compose = (...fns) => input =>
fns.reduceRight((prev, fn) => fn(prev), input);
Currying Functions
Currying is taking a function with multiple arguments and breaking it down into one or more additional functions that take just one argument and eventually resolve to a value. The initial function call does not take all the arguments but returns a function whose input is the remaining arguments and whose output is the intended result for all the arguments.
That was a mouthful, so let's look at an example. Say you have a simple sum function:
function sum(a, b) {
return a + b;
}
Let's express this as a curried function in arrow notation:
const sum = a => b => a + b;
Notice that we have two levels of functions here, and each function takes one parameter. The first function takes one parameter, a, and returns another function, which takes the second parameter, b.
Note
If you are having trouble seeing the two function levels, here's an equivalent that may help:
function sum(a) {
return function(b) {
return a + b;
};
};
You can also write it in arrow notation:
const sum = a => function(b) {
return a + b;
};
To invoke this curried sum function with multiple arguments, you would need to use the following rather awkward syntax:
let result = sum(3)(5); // 8
This indicates to first call sum with the parameter value 3, then call the function that is returned with the parameter 5.
But most often, you wouldn't invoke curried functions this way, and here's where the real utility of currying will become apparent. Typically, the functions will be called one at a time, which allows us to create intermediate functions that "remember" the parameter that's passed to it.
For example, we can create the following intermediate functions:
const incrementByOne = sum(1);
const addThree = sum(3);
let result1 = incrementByOne(3); // result1 = 4, equivalent to calling sum(1)(3)
let result2 = addThree(5); // result2 = 8, equivalent to calling sum(3)(5)
Both the intermediate functions remember their parameter: incrementByOne holds onto the parameter value of 1 (as in sum(1)) and addThree remembers 3. These functions are also referred to as partially applied since the a parameter was applied to them, but the actual result is not known until the returned function is invoked with the b parameter. (Note that partial application is not quite the same as a curried function, though, as partial applications can hold on to multiple parameters, whereas curried functions always take only one argument.)
These are essentially new functions that could be potentially reused multiple times. They are also good candidates for compose or pipe, as these functions have only one parameter.
Exercise 14.07: More Uses for Composition and Curried Functions
In this exercise, you will further explore currying and composition. Most notably, you will see how you can create curried versions of common functions such as Array.prototype.map and Array.prototype.filter to compose other functions. In functional programming, common functions often need to be restructured so that they can be used as a building block for processing data in a chain of functions.
The exercise will once again use the runners dataset. You will create a function to scan the data and return the age of the oldest female runner. The challenge is to do this using composition with compose or pipe, thereby feeding the results of one function into the next one in the pipeline.
The basic outline of what we need to do is as follows:
- Create a function to filter the data just for female runners
- Create a function to map that data to just get the age of each runner
- Create a function that uses Math.max() to get the highest age value
- Compose the functions we've created so far and call them in sequence to get the final result
The following steps show you how we do this in detail:
- Open the Chrome menu at the top-right of your browser window, then select Tools | Developer Tools.
- Go to the console and paste in the sample runner data (beginning with const runners = [...]) from the Sample Data for Examples section of this chapter.
- First, create a curried version of Array.prototype.filter. Type the following into the console:
const filter = fx => arr => arr.filter(fx);
- Here, fx is the filtering function and arr is the array that is to be filtered. Note the ordering of the parameters, where the filtering function will be passed in before the array. This allows us to process the data itself as the last step.
- Similar to filter, you will need to create a curried version of Array.prototype.map. Type the following into the console:
const map = fx => arr => arr.map(fx);
Here, fx is the function to be called to map each array element, and arr is the array itself that is to be mapped to something else.
- The next function we need to restructure is Math.max(), which returns the highest number of the parameters passed in. Type the following into the console:
const max = arr => Math.max(...arr);
Here, arr is the array of numbers on which to find the max value. By default, Math.max() does not take an array as a parameter. However, by making use of the spread operator, that is, ...arr, the individual array elements will be passed in as a series of parameters to Math.max() rather than as an array.
- Type in the implementation of the compose function:
const compose = (...fns) => input =>
fns.reduceRight((prev, fn) => fn(prev), input);
- You are ready for our first attempt at composing these functions together. Type the following into the console:
const oldestFemaleRunner1 = compose(
max,
map(runner => runner.age),
filter(runner => runner.gender === "F")
);
Remember that, with compose, the order of operations is from bottom to top. First, we have a filter function that picks out the female runners with the runner.gender === "F" expression. Next, we have a map function that plucks the age property from the female runners we resolved in the previous filter function and creates a new array with just the age values. Finally, max is called to obtain the oldest age from these values.
- We now have all the functions composed, but we still haven't actually run the array data through them to obtain the result. To do so, type the following into the console:
const result1 = oldestFemaleRunner1(runners);
Now print the result:
console.log("Result of oldestFemaleRunner1 is ", result1);
You will get an output stating that the oldest female runner is 39:
// → output: Result of oldestFemaleRunner1 is 39
- This works, but there is a slight improvement that can be made for the femaleFilter portion. Why not make it into a reusable function? We can do this like so:
const femaleFilter = filter(runner => runner.gender === "F");
Recall that filter was a curried function with two layers of parameters (fx and arr). Here, we are calling filter with the first parameter, fx, which results in a partially applied function. This femaleFilter function can now be used in any context, not just here.
Test the function by applying femaleFilter to compose the following:
const oldestFemaleRunner2 = compose(
max,
map(runner => runner.age),
femaleFilter
);
const result2 = oldestFemaleRunner2(runners);
console.log("Result of oldestFemaleRunner2 is ", result2);
You will get an output stating that the oldest female runner is 39 when using the filter function, which is as follows:
// → output: Result of oldestFemaleRunner2 is 39
- Some people find the bottom-to-top order of processing confusing and unintuitive. Luckily, we have the pipe function, which functions the same as compose but in a top-to-bottom order. First, type in the implementation of the pipe function itself:
const pipe = (...fns) => input => fns.reduce((prev, fn) => fn(prev), input);
- Here is the equivalent using pipe:
const oldestFemaleRunner3 = pipe(
femaleFilter,
map(runner => runner.age),
max
);
const result3 = oldestFemaleRunner3(runners);
console.log("Result of oldestFemaleRunner3 is ", result3);
- You will get the same output, that is, stating that the oldest female runner is 39 when using the pipe function, as follows:
// → output: Result of oldestFemaleRunner3 is 39
In this exercise, we looked at composition and currying in more detail and how these can be used in tandem to complement each other. We used the curried version of filter to pass a filter for the runner's gender, passed the results to a map function to get only the age value, and finally used Math.max to find the highest value from the array of age values. While the previous exercise involved some aspects of combining simple functions into a more complex process, in this exercise, we actually used compose to create a new function that combined the subfunctions. This allows the new function, oldestFemaleRunner1, to be used by others without them having to consider the underlying subfunctions.
In the next section, we'll learn about recursive functions – another vital aspect of functional programming that is somewhat limited in the JavaScript programming language due to the lack of something called tail-call optimization, which is present in other functional programming languages.
Function Recursion
Another technique of functional programming involves functions calling themselves recursively. This generally means you start with a big problem and break it down into multiple instances of the same problem, but in smaller chunks each time the function is called.
One common example of recursion is a function to reverse the characters of a string, reverse(str). Think about how you can state this problem in terms of itself. Let's say you have a string, "abcd", and want to reverse it to "dcba". Recognize that "dcba" can be restated as follows:
reverse("bcd") + "a"
In other words, you are taking the input string and breaking it down into a smaller problem by taking off the first character and making a recursive call with the remaining characters of the string. This may be easier to see in the following code:
function reverse(str) {
if (str.length == 1) return str;
return reverse(str.slice(1)) + str[0];
}
reverse("abcd"); // => output: "dcba"
Let's break this down:
- The if condition of str.length == 1 is the base case. When the input has exactly one character, there is nothing left to reverse, so the solution is just the character itself.
- Otherwise, use String.slice() with an index of 1 to get a new string minus the first character of the input. Use this as the input to make the recursive call to reverse().
- Return the result of the recursive call, plus the first character of the string (str[0]).
Here's the step-by-step progression of calls:
reverse("abcd") => reverse("bcd") + "a"
reverse("bcd") => reverse("cd") + "b"
reverse("cd") => reverse("d") + "c"
reverse("d") => "d"
It is important to realize that these function calls are nested on the internal execution stack. Once the base case of one character is reached, the recursion finally has an actual return value, which causes the stack to "unwind." When this happens, the innermost function returns a value, then the function before it, and so on in reverse order until execution propagates back to the first call. This results in the return values of "d" for the innermost function, followed by "dc", "dcb", and finally our expected result: "dcba".
Recursion could be useful as another technique for avoiding code that requires the mutation of state and looping. As a matter of fact, it is possible to code recursive implementations of almost any loop, and some purely functional programming languages have a preference for recursion. However, current JavaScript engines are not optimized for recursion, which puts a damper on this and limits its usefulness. It is too easy to write code that would result in slow performance and excessive memory consumption. (Future enhancements that would mitigate these problems have been proposed, but until then, you need to be very careful if you are considering using recursion in your programs.)
Exercise 14.08: Creating a Deck of Cards Using reduce()
We've looked at the basic elements of functional programming in JavaScript and a few data processing examples with runner data. But dealing with data doesn't have to be all number crunching – it can actually be fun. Take, for instance, a deck of cards, which in a way is simply a set of data values ordered in some way. In this exercise, we're going to create a deck of cards by combining four functions: suits, rankNames, and createOrderedDeck.
- Create a function called suits and another called rankNames to describe the suits and values of a deck of playing cards. Rather than being arrays, they are functions that return arrays:
const suits =
() => [
{ suit: "hearts", symbol: '♥' }, // symbol: '♥'
{ suit: 'diamonds', symbol: '♦' }, // symbol: '♦'
{ suit: 'spades', symbol: '♠' }, // symbol: '♠'
{ suit: 'clubs', symbol: '♣' } // symbol: '♣'
];
const rankNames =
() => ['A', '2', '3', '4', '5', '6', '7', '8', '9', '10', 'J', 'Q','K'];
- Create a function called ranks that takes the rankNames array as input and returns each rank mapped as a key-value pair.
const ranks =
rankNames => rankNames.map(rankName => ({ rank: rankName }));
- Create a function called createOrderedDeck that takes suits and rank as input and returns all the possible combinations (for example, every card in the deck):
const createOrderedDeck =
(suits, ranks) => suits.reduce(
(deck, suit) => {
const cards = ranks.map(rank => ({ ...rank, ...suit }));
return deck.concat(cards);
}, []);
We use Array.prototype.reduce with an empty array [] as the initial value. We then "iterate" over the suits, and use Array.prototype.map over the ranks to combine the suits and ranks by using the spread operator (...). The Array.prototype.concat() method then adds the new cards to the resulting array. Once the "nested loop" is complete, we end up with 52 unique cards with all the combinations of suits and ranks.
- Next, we'll create an instance of a deck of cards by creating a variable from the result of createOrderedDeck and our suits and ranks functions:
const orderedDeck = createOrderedDeck(suits(), ranks(rankNames()));
- To demonstrate what has been done so far, open up the Google Chrome browser, go to Developer Tools, and then paste in the preceding steps. After you've done that, type in orderedDeck. You should get an array like the one shown in the following screenshot. Try clicking on some of the items to look at the contained cards:

Figure 14.12: List of a deck of cards using the reduce function.png
In this exercise, we looked at the reduce function we learned about earlier in the chapter and applied it to the situation of creating a deck of cards. We'll build on this in the next exercise to create a function that shuffles a deck randomly, in a way that would make it useful for games.
Exercise 14.09: Using the pipe Method to Create a Card Shuffling Function
Now that we have an ordered deck of cards, we'll look at how we can shuffle it. Of course, as with all functional code, we'll do this without modifying any existing variables.
- Continuing in the same console as the previous exercise, define the pipe and map functions we discussed earlier. We won't use compose here, but you should get into the habit of defining these three functions for each program when writing functional code as you'll be using them a lot:
const compose =
(...fns) => input => fns.reduceRight((prev, fn) => fn(prev), input);
const pipe =
(...fns) => input => fns.reduce((prev, fn) => fn(prev), input);
const map = fx => arr => arr.map(fx);
The addRandom function adds a field called random to each element. Note how the random number itself is obtained from a separate randomizer method. This is to keep the addRandom function as pure as possible, and isolate the code that has side-effects.
- Create a randomizer variable, followed by an addRandom curry function:
const randomizer =
Math.random;
const addRandom =
randomizer => deck => deck.map(card => ({
random: randomizer(),
card
}));
- Create a sortByRandom function that sorts an input deck randomly:
const sortByRandom =
deck => [...deck].sort((a, b) => a.random - b.random);
This function sorts the cards by the added random field. The spread operator (...) is used to clone the array before sorting it, rather than sorting the original array.
- Create a shuffle function that takes a deck and a randomizer value (the randomizer can be changed later if there is a need for a more random value, as would be the case in real casino games). We then use pipe to create a function that combines addRandom (to specify our randomizer), sortByRandom, and a map function. Finally, we'll execute the doShuffle function we just created and use our deck of cards as the input:
const shuffle =
(deck, randomizer) => {
const doShuffle = pipe(
addRandom(randomizer),
sortByRandom,
map(card => card.card)
);
return doShuffle(deck);
};
The purpose of the curried map function is to remove the random field that was added earlier and just preserve the original fields related to the card itself.
- Open up the Google Chrome Developer Tools session from the previous exercise. If you don't have it saved, you'll need to input the code from the previous exercise. At that point, input the preceding four code snippets from this exercise. With that, execute the shuffle function with shuffle(orderedDeck, randomizer) and then explore the returned object by clicking it and observing that the cards are shuffled, as shown in the following screenshot:

Figure 14.13: List of a deck of cards using the reduce function.png
We can see the shuffled lists of cards as using the pipe and map functions. We can now go ahead and use these functions to work on the Blackjack card game.
Blackjack
For the remainder of this chapter, we will be using what we've learned about functional programming to write an implementation of a simple variant of the card game Blackjack.
Unlike regular Blackjack, though, our game only has one player. The player can draw as many cards as they want (hit), as long as the total value does not exceed 21.
The total is the sum of the values of the cards in the player's hand. Cards have the following values:
- Numeric cards have their face value (for example, a 6 of hearts has a value of 6)
- A Jack, Queen, or King has a value of 10
- For simplicity, the Ace is worth 1 (unlike regular Blackjack, where it has a value of either 1 or 11)
If the total value exceeds 21, the hand has gone bust and the game is over.
Mapping Card Values to Cards
The two previous exercises will be very useful in the final assignment, where you'll be implementing a Blackjack game. Feel free to use those code snippets directly. Of course, it won't be sufficient to know just the cards' names – you'll also want to know the value of each card. The map function we previously explored will come in very handy for this. Enhance the ranks currying function from Exercise 8: Creating a Deck of Cards Using reduce to convert rankNames into both rank and value fields:
const ranks =
rankNames => rankNames.map(
(rank, index) => ({ rank, value: Math.min(10, index + 1) }));
This function takes advantage of the index passed in as the optional second parameter in the mapping function. The rank "A" is at index 0, so the value resolves as 1 (since the formula is index + 1). The rank "2" is at index 1, so the value would resolve to 2 (since index + 1 = 2). Same applies to the rest of the numbers, the value would resolve to the same as the number. Once we get to "J" and above, though, the value resolves to 10 due to Math.min().
Now, enter orderedDeck and explore the object that is returned. You'll notice that all the items now have a value, and the value for the face suits (J, Q, K) are all 10:

Figure 14.14: Ordered list of a deck of cards using the order function
With the functions we've now covered relating to cards using the basics of functional programming, that is, map, reduce, compose, and pipe, you will have a strong foundation for building your own card games.
Activity 14.01: Blackjack Card Functions
The aim of this activity is to get you to create some of the functions that are needed to code a Blackjack game with what you learned about functional programming. You will not be coding the whole game, just some of the core functions related to card logic.
In the GitHub project, you'll find a pre-built HTML file start.html with some CSS in it that you should use as a starting point.
The high-level steps for the activity are as follows:
- Open the starting point HTML/CSS file called blackjack/start.html.
- Add or implement the functions for creating a deck of cards using suits, rank names, and values.
- Write implementations for the core functional programming methods, that is, pipe, compose, and map.
- Add functions for drawing a card, getting the sum of a player's cards, checking whether a hand is over 21 points, and checking whether the game is over (the player stayed or went bust).
- Add a function for updating the card display and card images.
- Add a function for updating the status display, which tells the user the sum of their hand.
- Add the play, hit, and stay handler functions for the different actions a user can take.
- Finally, add any impure functions you may need, such as helpers for getting an element by ID or class.
- Add a function for setting the state, as well as a function to trigger the game itself.
With these steps done, you should now be able to open the HTML file in a browser and have a running version of the game, as shown in the following screenshot:

Figure 14.15: Screenshot of the Blackjack game
Note
The solution to this activity can be found on page 758.
Admittedly, this implementation of Blackjack is not very playable and won't win awards for visual design. However, it is a great demonstration of functional programming. See if you can use this code as a basis to implement your own full two-player version of the game.
Managing Blackjack Game State
This game only requires a small amount of state: namely, the player's hand, the game deck, and if the player has selected to stay (and not ask for another card). This state management is isolated to the following code:
const createState = (dom) => {
let _state;
const getState = () => [..._state];
const setState =
(hand, gameDeck, stay = false) => {
_state = [hand, gameDeck];
updateCardDisplay(dom, hand);
updateStatusDisplay(dom, hand, stay);
};
return { getState, setState };
}
Notice the return statement at the end. Only the two methods getState and setState end up being exposed to the caller, but the _state variable remains safe in the closure and acts as the equivalent of a "private" field in object-oriented programming. In addition:
- To isolate the code that produces side-effects as much as possible, there is a separate parameter dom that has references to other functions that actually do DOM manipulation.
- The getState function returns a clone of the state fields (using the spread operator ...), not the actual values in the fields
- When setState is called, two other functions updateCardDisplay and updateStatusDisplay are called (presented soon) to update the respective portions of the display to correspond to the new state. These functions are designed to dynamically regenerate all the HTML related to the state values each time the state changes. his way there is no additional state needed in the display logic itself. (Popular web frameworks like Angular and React update displays in much the same way, though with some optimizations for the sake of performance).
The state is created at the start of the game:
startGame(createState(dom));
Blackjack Game Logic Flow
The startGame function itself registers three event handling functions to respond to the three buttons the user may click: New Game, Hit or Stay:
const startGame = (state) => {
byId("playBtn").addEventListener("click", playHandler(randomizer, state));
byId("hitBtn").addEventListener("click", hitHandler(state));
byId("stayBtn").addEventListener("click", stayHandler(state));
}
The playHandler function looks like this:
const playHandler = (randomizer, { getState, setState }) => () => {
const orderedDeck = createOrderedDeck(suits(), ranks(rankNames()));
let gameDeck = shuffle(orderedDeck, randomizer);
[hand, gameDeck] = draw(gameDeck, 2);
setState(hand, gameDeck);
};
First the deck is created and shuffled to create the full game deck. Two cards are then drawn from the game deck as the hand. The hand and remaining game deck (minus the two cards drawn) are saved by calling setState (which indirectly also triggers the screen to display the cards).
The hitHandler function follows a similar pattern:
const hitHandler = ({ getState, setState }) => () => {
[hand, gameDeck] = getState();
[card, gameDeck] = draw(gameDeck, 1);
setState(hand.concat(card), gameDeck);
};
The current hand and game deck is retrieved by calling getState. Then one card is drawn from the game deck. This card is added to the hand and saved by calling setState (which once again indirectly also triggers the screen to display the cards).
The stayHandler is simpler. It doesn't make any state modifications besides calling setState with true in the last parameter, indicating the player has stayed:
const stayHandler = ({ getState, setState }) => () => {
[hand, gameDeck] = getState();
setState(hand, gameDeck, true);
};
Blackjack Game Display Functions
The updateCardDisplay function is the following:
const updateCardDisplay =
({ updateHTML }, hand) => {
const cardHtml = hand.map((card, index) =>
`<div class="card ${card.suit}"
style="top: -${index * 120}px;
left: ${index * 100}px;">
<div class="top rank">${card.rank}</div>
<div class="bigsuit">${card.symbol}</div>
<div class="bottom rank">${card.rank}</div>
</div>`);
updateHTML("cards", cardHtml.join(""));
};
The HTML for each card in the hand is determined in this function using Array.prototype.map and joined together at the end to make one string. The calculations for the styles top and left take advantage of the optional index parameter of the mapping function to allow the cards to have a staggered effect. Different CSS classes top, rank, bigsuit and bottom position and size the different parts of the card. The suit name itself is also a CSS class to apply the correct color for the suit (black or red).
The other function related to display, updateStatusDisplay, is implemented as follows:
const updateStatusDisplay =
({ updateStyle, updateHTML }, hand, stay) => {
const total = sumCards(hand);
updateHTML("totalSpan", total);
const bust = isBust(total);
const gameover = isGameOver(bust, stay);
showOrHide(updateStyle, "playBtn", !gameover);
showOrHide(updateStyle, "hitBtn", gameover);
showOrHide(updateStyle, "stayBtn", gameover);
let statusMsg = gameover ?
"Game over. Press New Game button to start again." :
"Select Hit or Stay";
statusMsg = bust ? "You went bust!!! " + statusMsg : statusMsg;
updateHTML("statusMsg", statusMsg);
};
This function does several things:
- Calculates the total value of the cards and displays it
- Determines if the game is over by calling isBust and isGameOver. (If a hand is in play, the New Game button should not be visible. If the game is over or not active, the Hit and Stay buttons should not be visible. See Figure 14.16.)
- Shows or hides the different buttons depending on if the game is over or not
- Changes the status message depending on if the game is over or not

Figure 14.16: The Hit and Stay buttons are visible when the game is active
Effectively, this function actually drives much of the game flow, as the UI elements available to the user are set within it.
Blackjack Code Listing
The previous sections covered the most important parts of the code. The full code listing for the game is linked as follows:
For simplicity, all the code is contained within one file, including all the CSS styles and JavaScript supporting functions. In a real-world application, though, you should consider splitting up the files.
Summary
In this chapter, you got a taste of functional programming. It is quite different from other programming paradigms such as imperative and object-oriented approaches, and it takes a while to get used to. But when properly applied, it is a very powerful way of structuring programs so that they're more declarative, correct, testable, and have fewer errors.
Even if you don't use pure functional programming in your projects, there are many useful techniques that can be used on their own. This is especially true for the map, reduce, and filter array methods, which can have many applications.
This chapter also only used functionality that's available in native JavaScript. But note that there are also a number of popular libraries available to assist with functional programming. These libraries facilitate practical functional programming concerns such as immutability, side-effect-free functions, composition, and automatic currying.
The topics we covered in this chapter will help you bolster the skills you need to pursue a programming project in the functional style.
In the next chapter, you will take a deeper look at asynchronous coding, including the history of asynchronous callbacks, generators, promises, and async/await. This will complete your journey through modern JavaScript development, priming you with all you need to create great-looking software.