Taking a screenshot of an identified locator
ID, class, and name locators
tagName locator
linkText and partialLinkText locators
CSS and XPath locators
JavaScript locators
Web pages are written in HyperText Markup Language (HTML for short). Cascading Style Sheets (CSS) beautify those pages. JavaScript brings the pages to life by giving them functionality. Any web page is a mix of those three foundational technologies. Note that Angular is not considered a substitute for XML/HTML. It is a development framework that gives more control over how data is dynamically manipulated and presented to the user on a web page. Applications and web pages built on Angular must use other technologies. Hence, you should know which operation should be applied to which element to interact or perform a function on it. And for that to happen, it is necessary to uniquely identify the element first. Since Angular offers enhancements to the DOM, there are some Angular-specific elements that are more easily located by Protractor than any other test framework’s locator strategies.
I hope you now understand that good locator strategies are the foundation of any automation project. With the help of a good locator strategy, you can uniquely identify the element with which you need to interact with among numerous other elements present on a web page. A good test script needs a uniquely identifiable element that remains unchanged throughout the developmental increments of the product to make the test script robust. Let’s now look at some locator strategies.
Tag Name
Let’s take a slight detour to learn how to take a screenshot of a located element. The ability to take screenshots lets you accurately validate your results after successfully identifying elements.
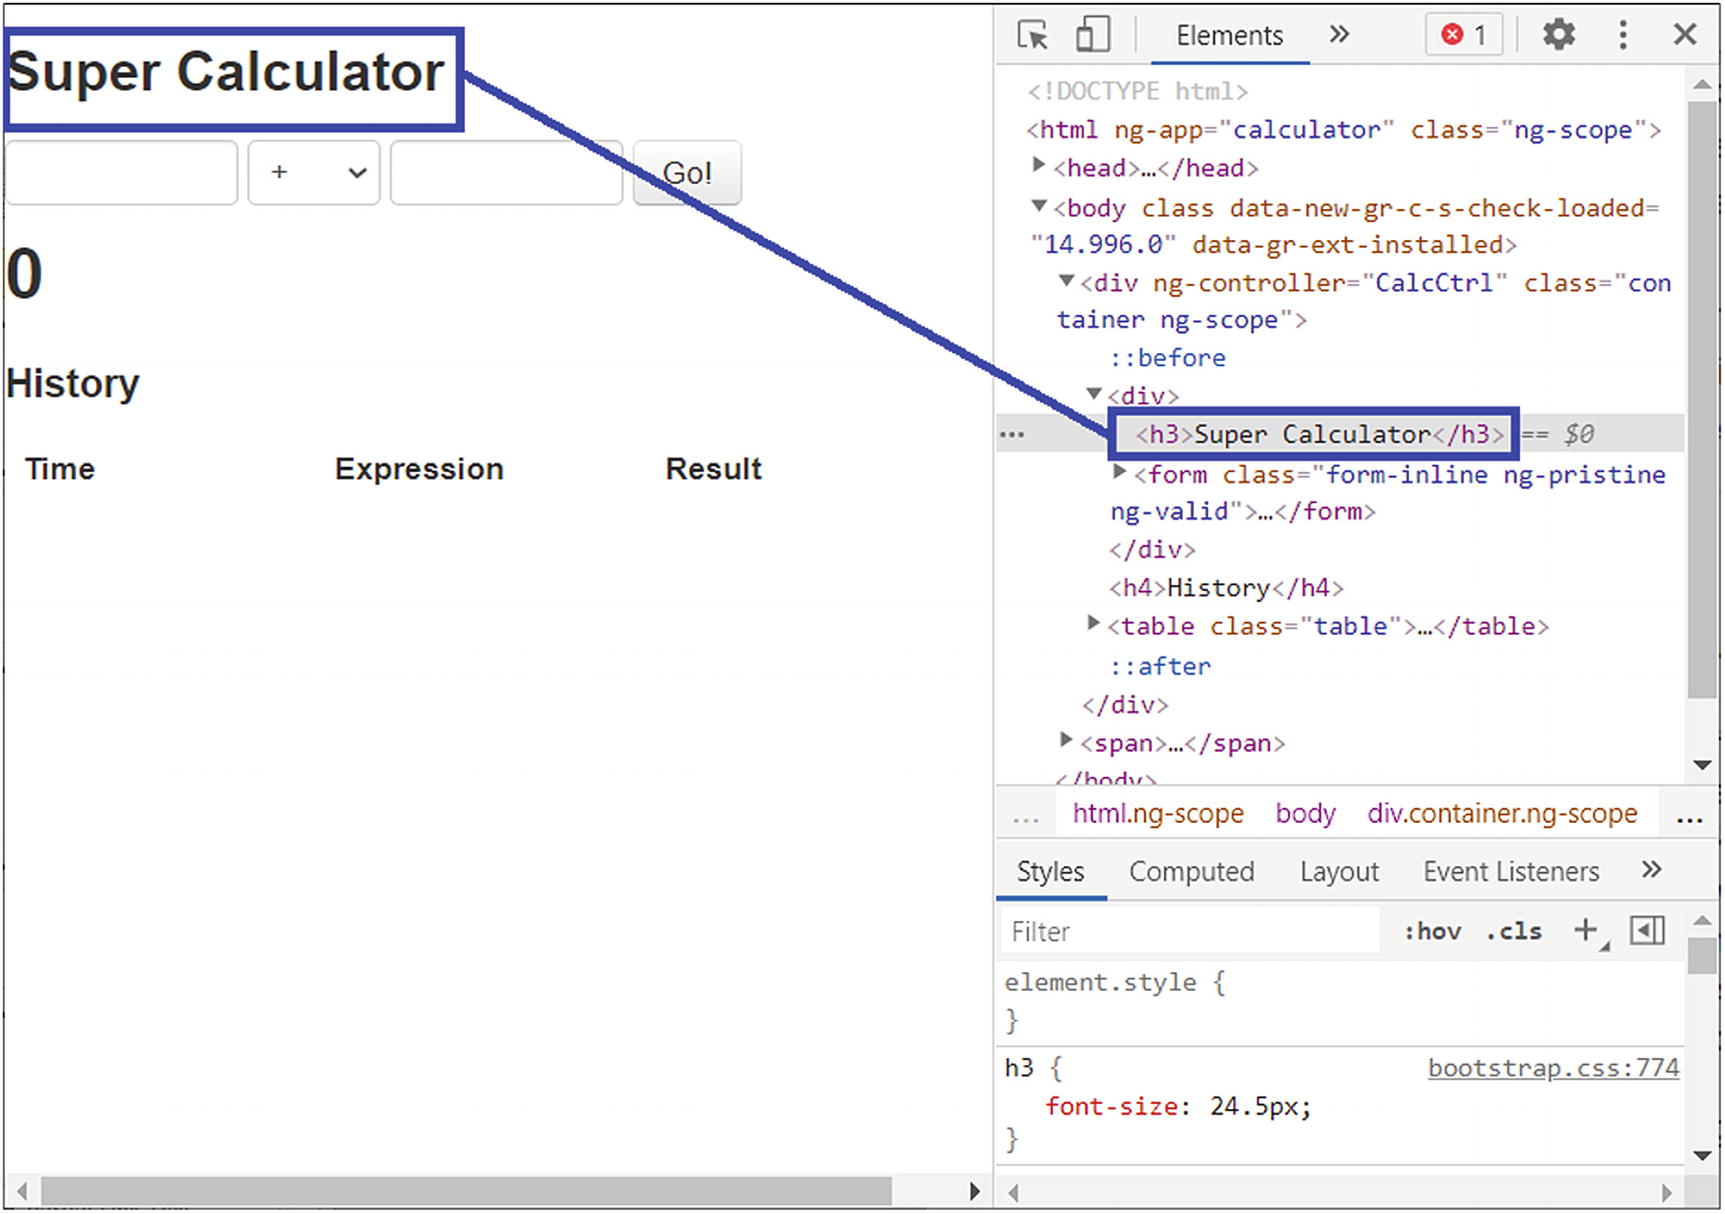
Angular web page at http://juliemr.github.io/protractor-demo/
If you open any web page in your browser and glance at the DOM, you find elements that do not have attributes like ID, class, or name readily available—these include elements like the <h1> tag, <td> tag, or <tr> tag. In these cases, you can use a tagName locator strategy. I captured the <h3> tag in Figure 2-1 because it’s the only <h3> tag on the entire web site DOM, so I was guaranteed to get a unique element (i.e., heading 3).
Locating the element is not enough. You must also validate that the located element is correct and what you intended. Hence, let’s capture its screenshot. First, create a folder named screenshot in your project’s root directory. Then add the code in Listing 2-1 to the spec.js file inside the describe block.
Syntax
Locate an Element by Its Tagname and Capturing Its Screenshot
The first part of Listing 2-1 locates the element by its tag name and stores it in a heading variable. It then captures a screenshot by using Protractor’s browser takeScreenshot API, which uses the Node.js file system (fs) library. This library interacts with your computer’s file system by creating read and write streams to upload and download files to and from your computer to Node.js. Do not forget to “require” the fs library by adding it to the first line of code.
Output

Screenshot of h3 tag content saved on hard disk
Syntax to Find Elements: Traditional Java Selenium vs. Protractor API
Java Selenium | Protractor Customization |
|---|---|
driver.findElement(By.LocatorStrategy("LocatorValue")); | element(by.LocatorStrategy("LocatorValue"); |
driver.findElements(By.LocatorStrategy("LocatorValue")); | element.all(by.LocatorStrategy("LocatorValue"); |
Depending on your Internet or CPU speed, the screenshot may not be captured, come out blurry, or be blank. To help with this, you can add a 10-second delay to the execution with browser.sleep(10000) just before taking the screenshot. This also gives you more time to slow down and observe the automated execution.
Next, let’s look at other Selenium WebDriver inherited locator strategies in Protractor.
IDs
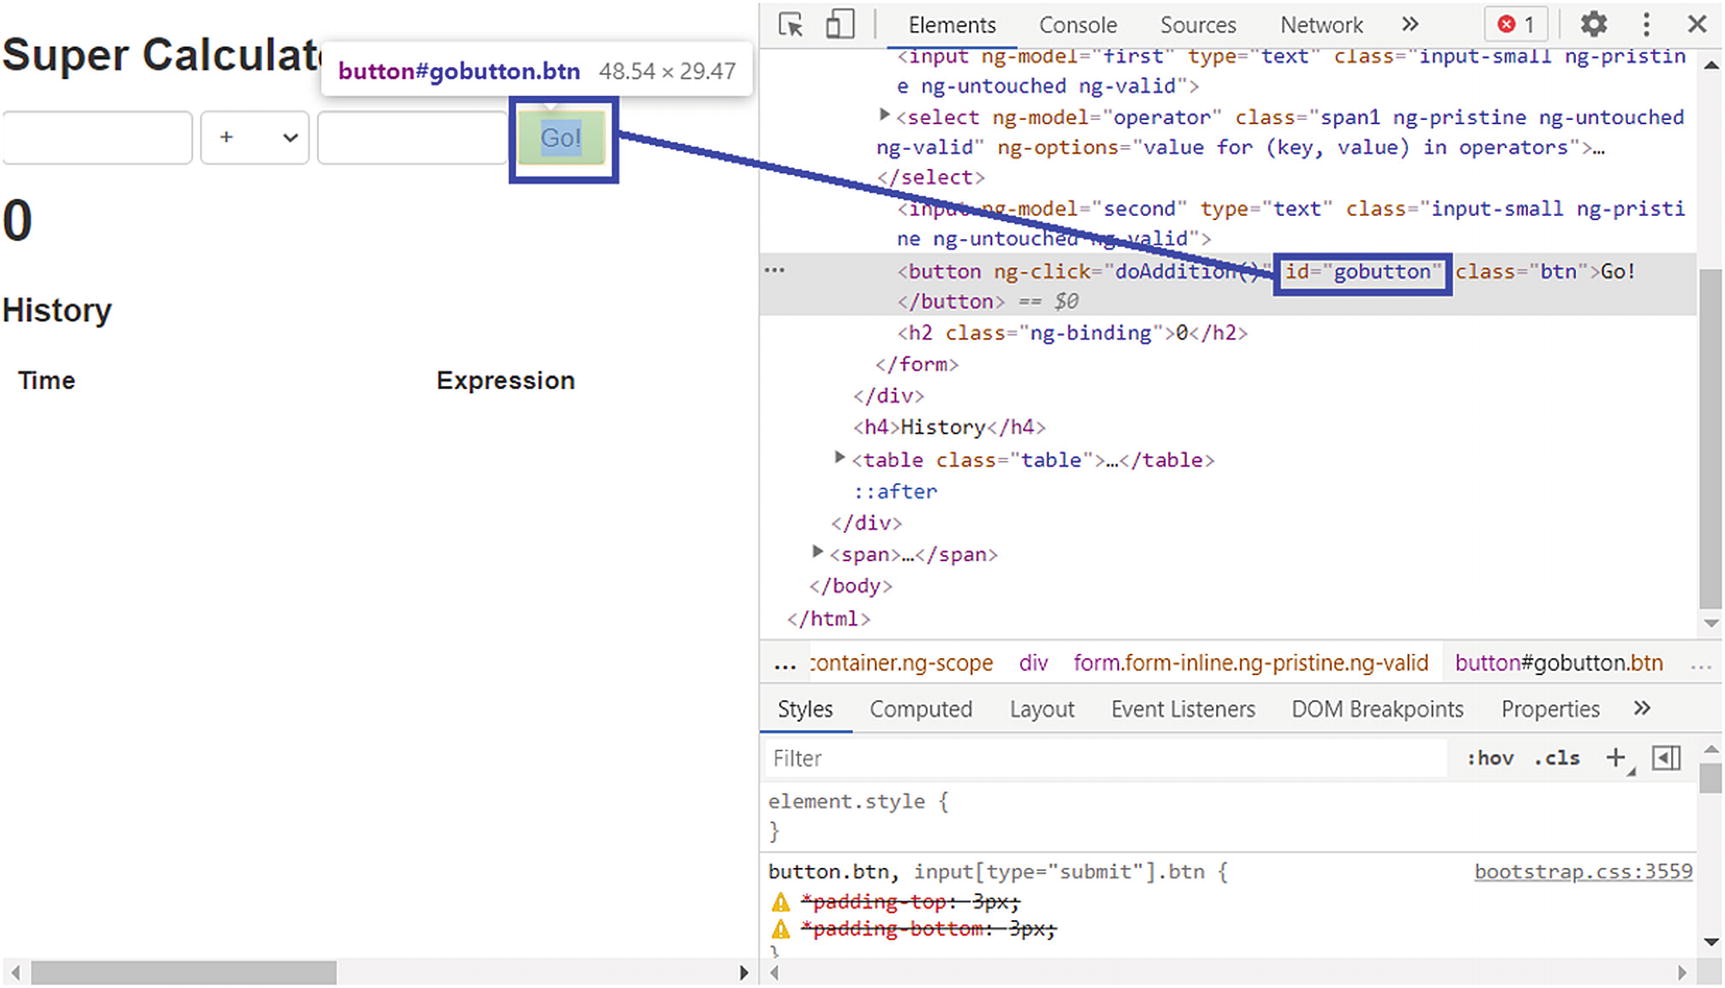
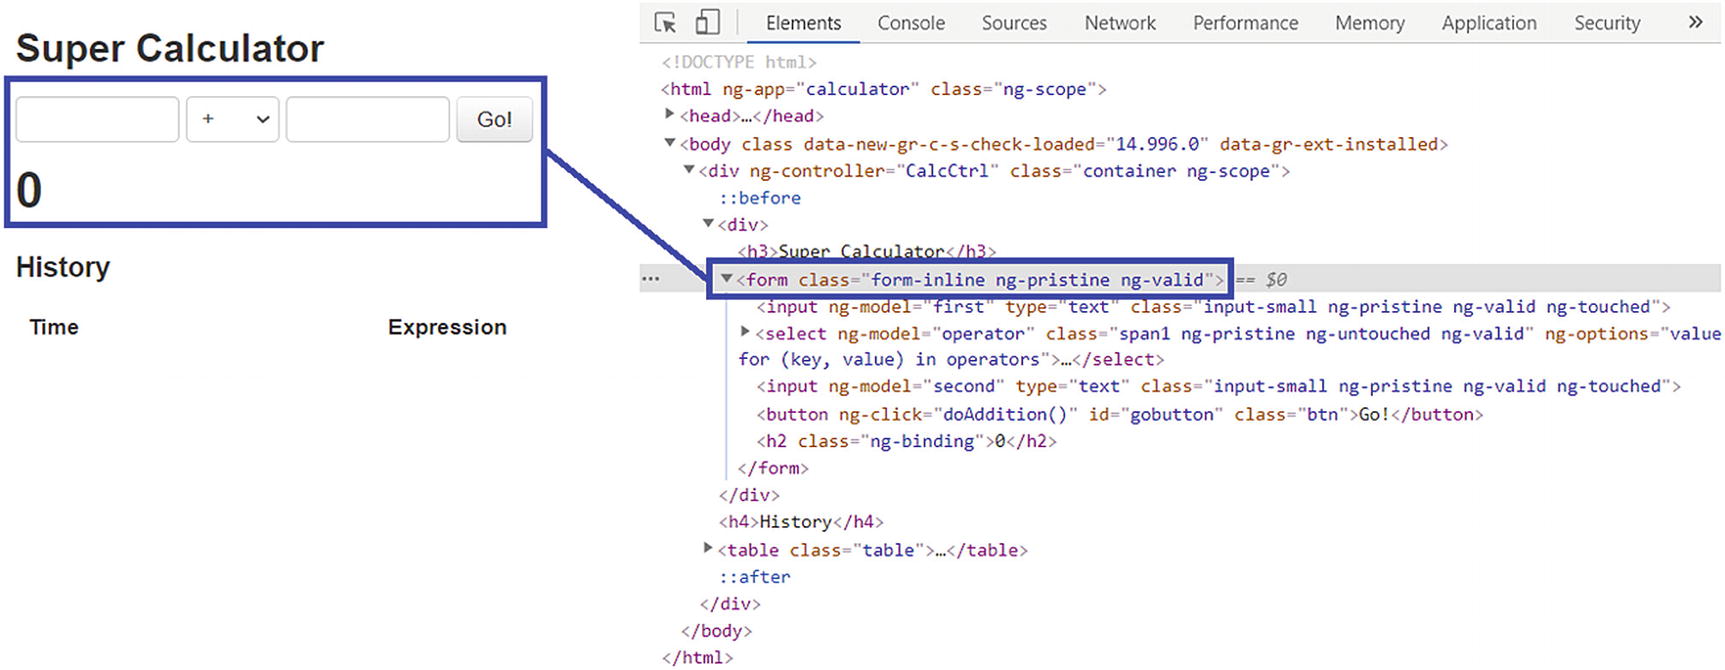
Locating button by its ID
Syntax
Finding an Element by ID
Output

Screenshot of Go! button on the right VS Code window using id locator strategy
className
Figure 2-3 shows that the Go! HTML element that forms the Go button has another attribute. It is a class attribute with the value “btn”. The className selector selects elements with a specific class attribute. Multiple elements in the HTML are grouped as a class to achieve consistency in formatting. Figure 2-3 is almost the same as Figure 2-2; the one difference is the className locator strategy is used in Listing 2-3 instead of the ID locator strategy. Figure 2-5 shows that since the screenshot was saved, it implies that the element was first successfully located through the className selector. The screenshot functionality is an example; however, you can do anything with this element once it is located, such as get its text, send its text, or click it. You see other useful implementations in upcoming sections.
Syntax
Finding an Element by Class
Output

Screenshot of Go! button on the right VS Code window using className locator strategy
Name Attribute
You can only find the name attribute with following elements: <a>, <applet>, <button>, <form>, <frame>, <iframe>, <img>, <input>, <map>, <meta>, <object>, <param>, <select>, and <textarea>. You cannot find this attribute with <span> or <div>.

Microsoft login page built on Angular as one of its techstacks
Syntax
Finding an Element by Its Name Attribute
Output

Screenshot of element using name locator strategy
Link Text
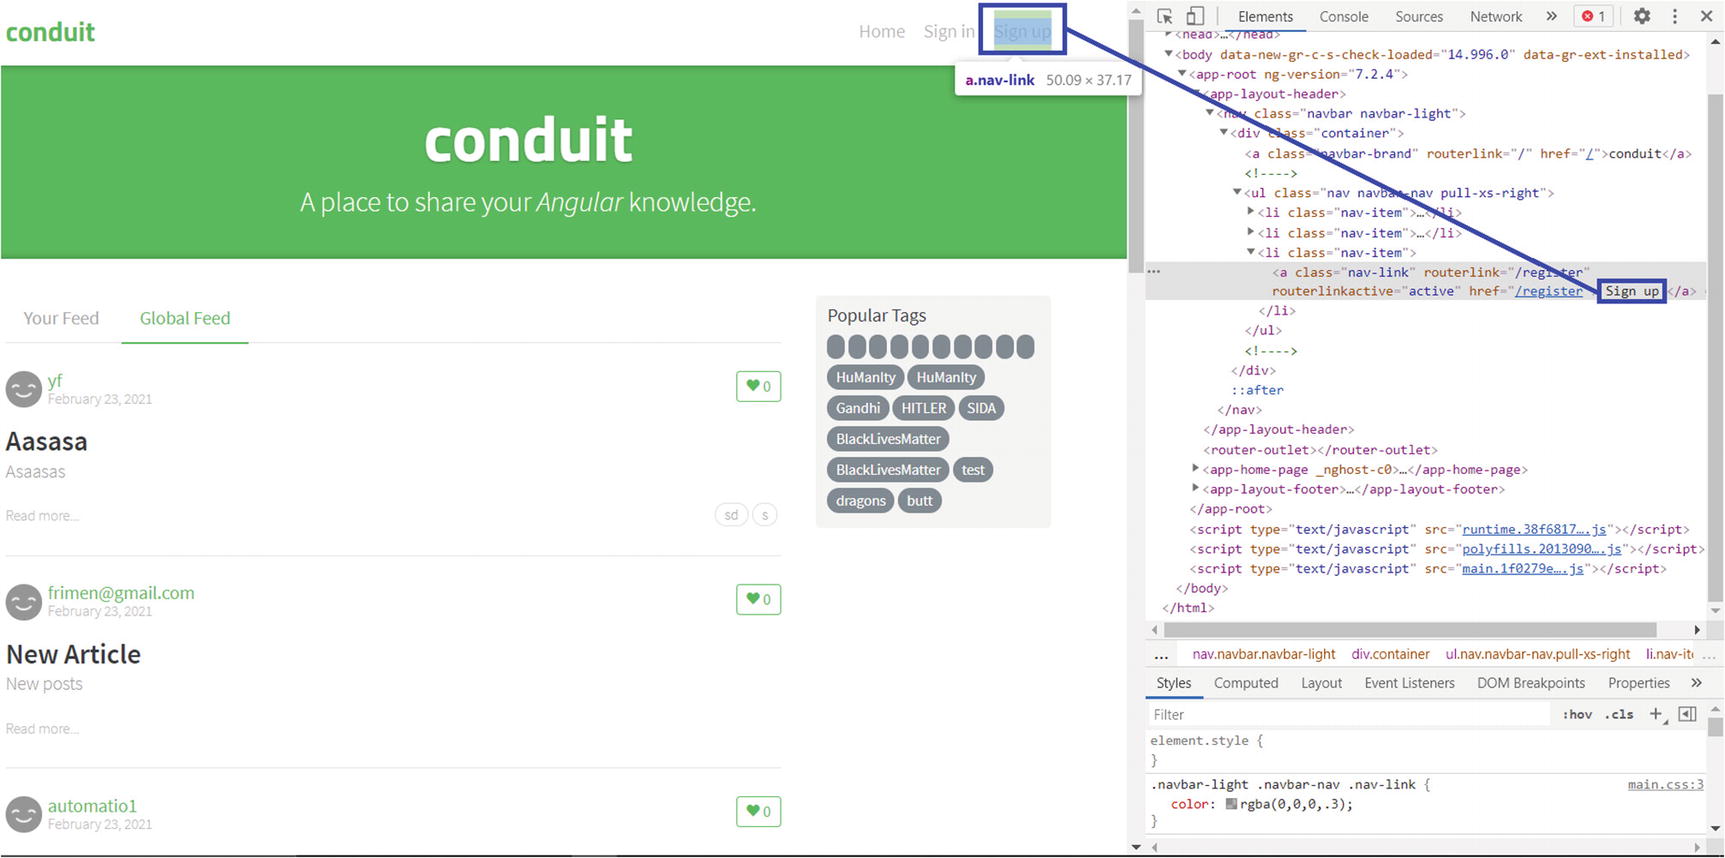
Locating the element with its text Sign up
Syntax
Finding an Element Using Link Text
Output

The output here is a link identified by LinkText locator
Note
Listing 2-5 will make more sense in the real-world applications once you use the click operation on an element in the upcoming chapters.
If two links have the same text, this method only accesses the first one when you use element(by.linkText) instead of element.all(by.linkText). To avoid confusion, bear this in mind when using link text as your locator strategy. It is advisable to use a different locator strategy for a more robust test script in scenarios like this.
Partial Link Text

Locating the element with its partial text i.e only Global
Syntax
Finding an Element Using Partial Link Text
Output
Global feed is captured as output
Note
If the developers ever need/tech businesses to rename an element, the partialLinkText locator remains unimpacted by the change. To avoid common mistakes, use either partialLinkText or linkText for testing. Keep in mind that both are case-sensitive.
CSS Selector
Form element
Syntax
Creating CSS Using Syntax
Output

Form element and everything inside it is captured as output
Note
On rare occasions when dealing with shadow elements, you can use the by.deepCss('value') locator.
XPath
XPath is short for XML Path Language, which navigates through the DOM of a web page. Developers use either CSS selectors or XPath locator strategies. It depends on which one is more familiar and comfortable or the strategy used by the organization for test automation.
Syntax
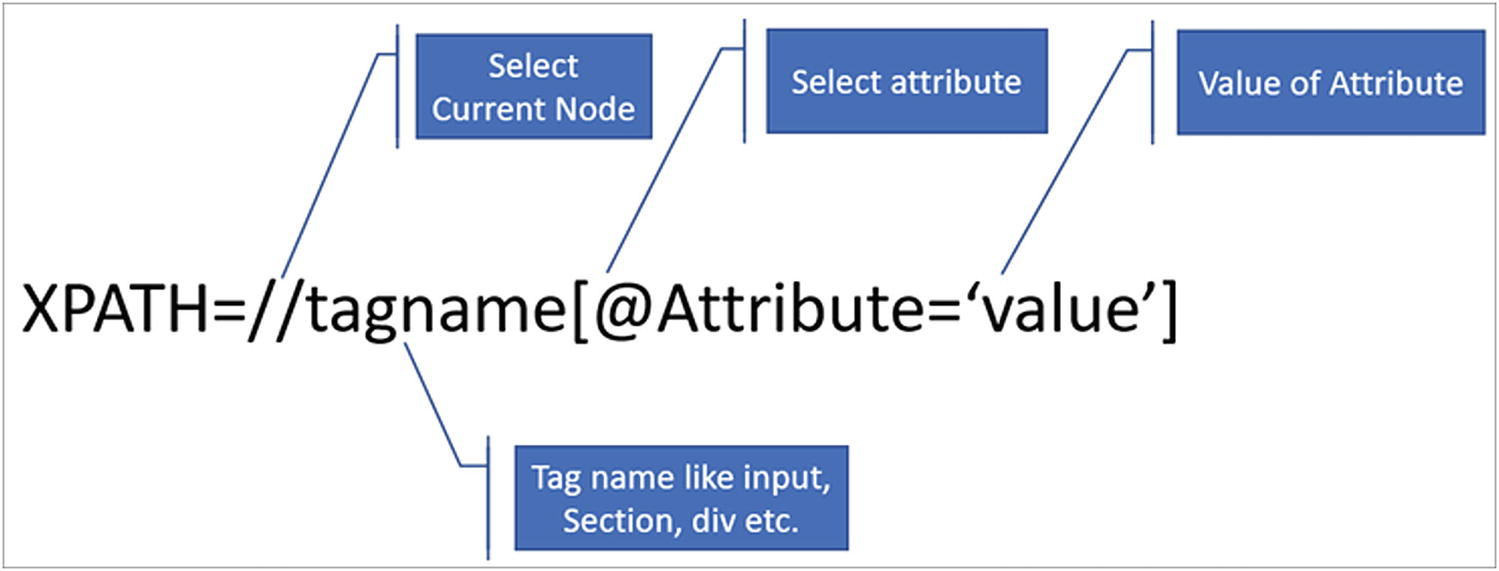
XPath syntax
Finding an Element Through XPath
Output

Go! button identified by XPath
Note
These days, CSS selectors are given preference over XPath because they are considered to be faster in the long run, especially if there are thousands of test scripts to run in a continuous integration environment. This is debatable. So as a best practice, you can ask the developers to add an ID to elements as much as possible, so you don’t have to rely on XPath and CSS selectors all the time.
Go to www.w3schools.com/xml/xpath_syntax.asp for more information on how to use XPath.
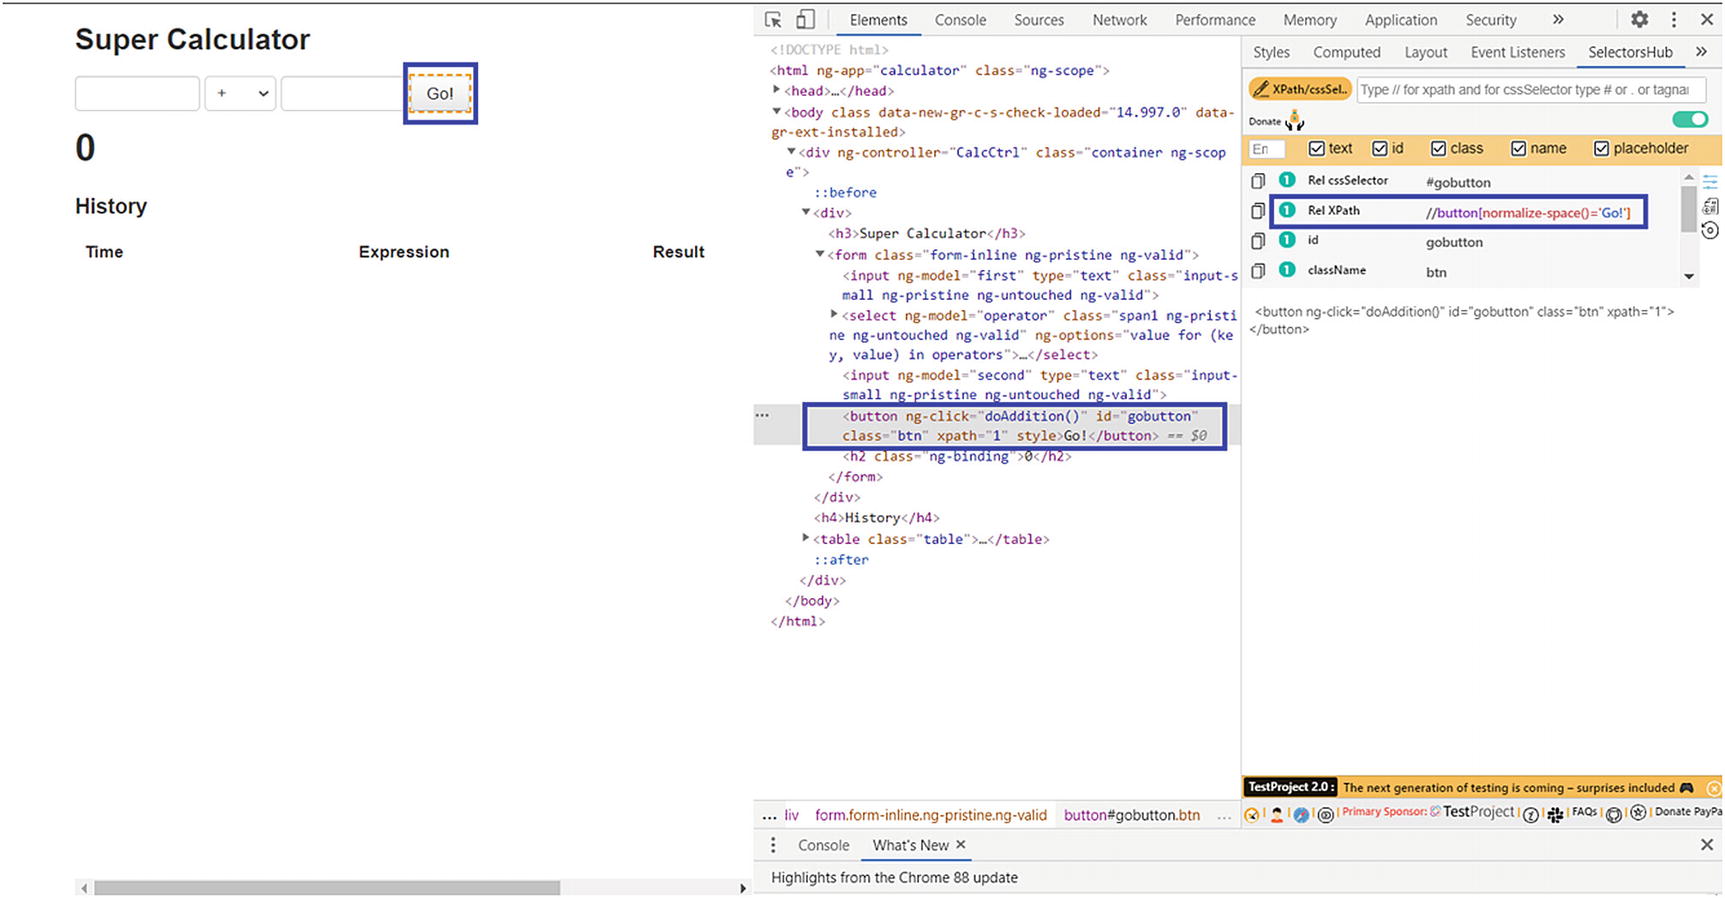
SelectorsHub add-on window in Chrome developer tool
JS Function
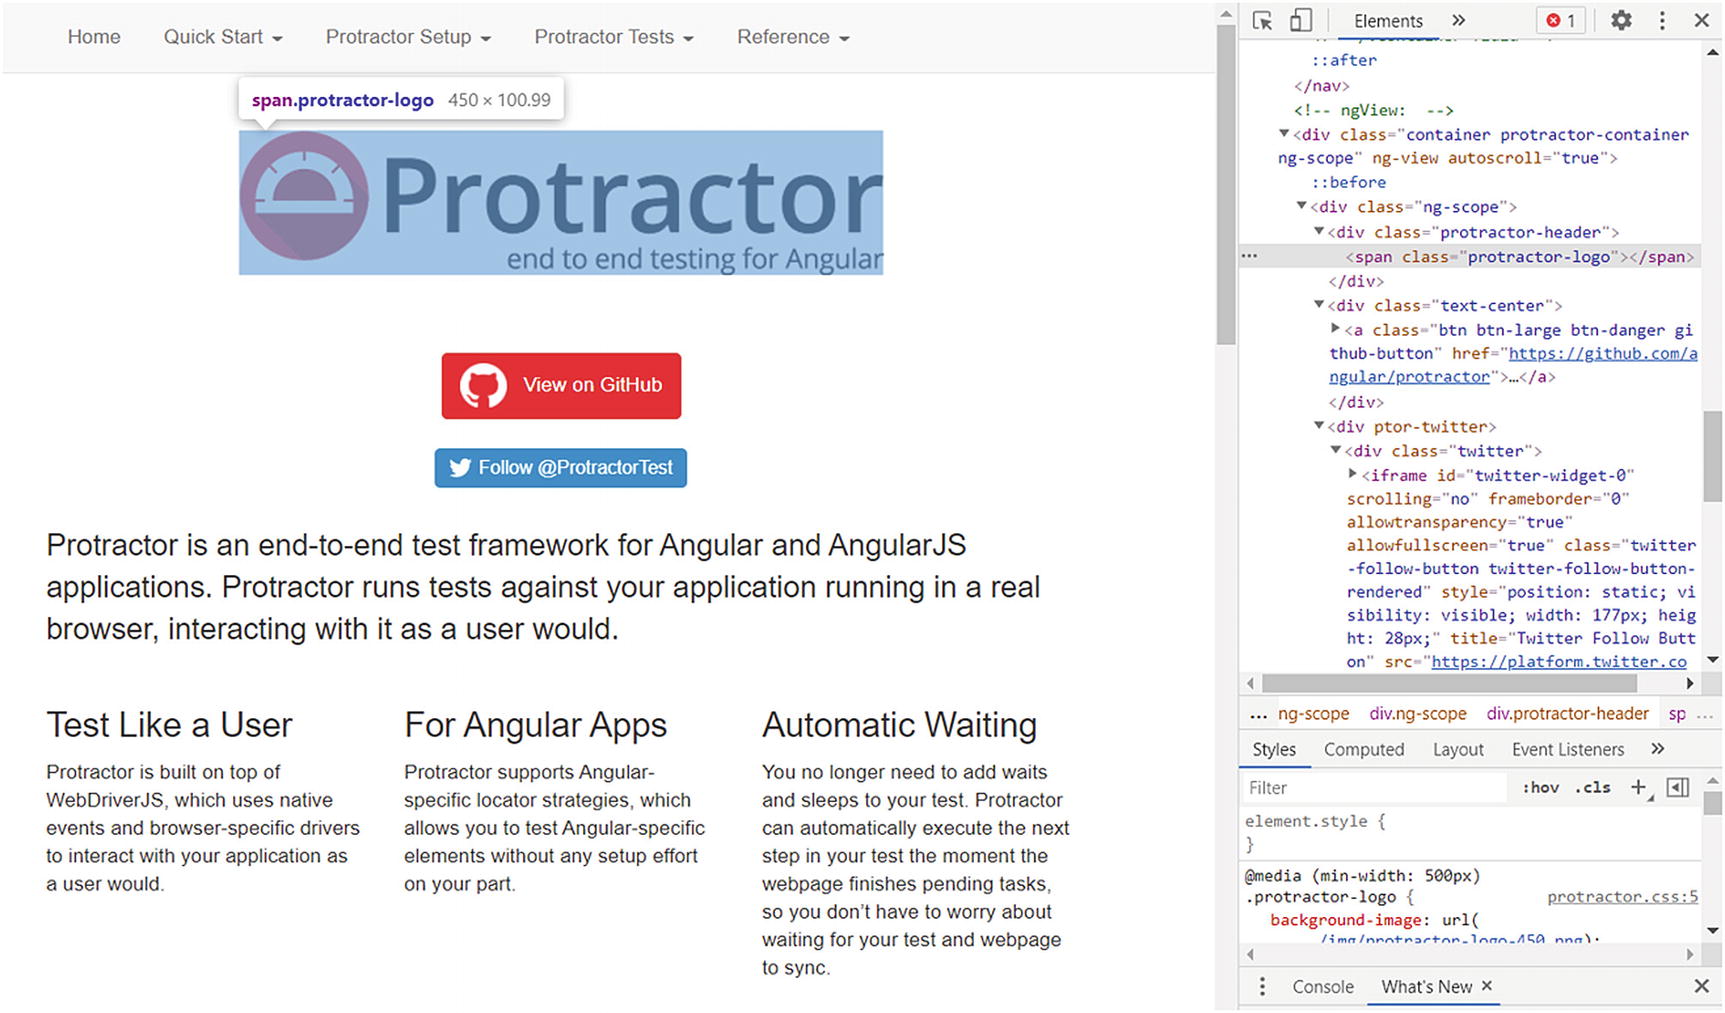
Protractor logo from www.protractortest.org
Syntax
Finding an Element Through JavaScript
Output

Protractor logo captured by JS document query locator
The difference between WebDriver commands and JavaScript commands is when WebDriver does a click, it attempts as best as it can to simulate what happens when a real user uses the browser. Suppose the first element is a login <button> and the second element is transparent and completely covers the first element. When you tell WebDriver to click the first element, it simulates the click, but the second element (i.e., <div>) receives the click first. Why? Because the <div> element completely covers <button>, and if a user were to click <button>, then <div> would get the click event first. Whether or not the <button> element would eventually get the click event depends on how that transparent <div> handles the event. In this case, WebDriver’s behavior is the same as when a real user tries to click a <button> element.
JavaScript’s button.click() method does not reproduce what happens when a real user clicks <button>. JavaScript sends the click event directly to the <button> element, and the transparent <div> element doesn’t get in its way.
You should make an informed decision on which option you choose as your locator strategy.
Summary
This concludes the discussion of non-Angular locator strategies. In this chapter, you learned different strategies inherited from the Selenium API to uniquely locate elements. The next chapter looks we look at additional locator strategies provided by Protractor to specifically handle Angular elements on a web page.