
8. Rip and Store: Your Movies and Shows On Demand
In This Chapter
![]() Netflix and similar streaming services
Netflix and similar streaming services
![]() Purchasing digital movies and TV shows
Purchasing digital movies and TV shows
![]() Ripping DVD and Blu-ray discs
Ripping DVD and Blu-ray discs
![]() The legal mumbo-jumbo
The legal mumbo-jumbo
In Chapter 7, “Convert Your Collections: Reducing Book and Magazine Clutter,” I told you that one of the most common requests I get concerning my Ultimate iPad was about converting books and magazines so they could be read on a tablet. The other most common question I get also has to do with a conversion process and viewing something on a tablet, and it involves movies and television shows that one owns on DVD or Blu-ray discs.
If you’re not familiar with subscription services such as Netflix and Hulu that allow you to watch movies and TV shows on most any Internet-connected device, you will be by the time you finish this chapter. These services offer up thousands of titles when you want them, turning your iPad into a great source for video entertainment, whether you’re on a couch, a boat, a plane, or even at a ballgame.
But your iPad isn’t just limited to watching the movies and TV shows that these subscription services offer. Not every TV show and movie is available over the Internet, and many iPad owners already have their own movie and TV show collections that exist on DVD and/or Blu-ray discs. You’re also going to learn in this chapter what’s involved in converting a library you already own into digital files that can be viewed not just on your iPad, but other devices as well.
You’ve seen how easy it is to get your books and magazines converted for viewing on your Ultimate iPad, so now let’s take a look at what’s involved in viewing movies and television shows on your tablet.
Streaming Subscription Services
A number of services offer up movies, TV shows, how-to videos, sporting events, and much more to your iPad. Some are free (such as YouTube), and others are not (such as Netflix). What most of these video services offer to you on your iPad is called “streaming video.” And if they charge you a monthly or yearly fee (as opposed to a per-video charge), then you’re talking about a subscription service.
When it comes to watching video on your iPad, the term “streaming video” simply means that the file isn’t loaded (or being loaded) on your tablet, but is instead hosted elsewhere (similar to a cloud service like Dropbox) and is being downloaded via an Internet connection in real time. You can pause, rewind, and even fast forward, but all your iPad is doing is continually downloading bits of the video at a time (instead of downloading the entire video, for example, before you can view it). The parts of the video file that have downloaded are put on the screen and then forgotten; the file continues to download as it plays so there’s no interruption (hopefully), and you end up with a continuous movie, for example. One key benefit here is that streaming video doesn’t use up your iPad’s valuable internal storage space.
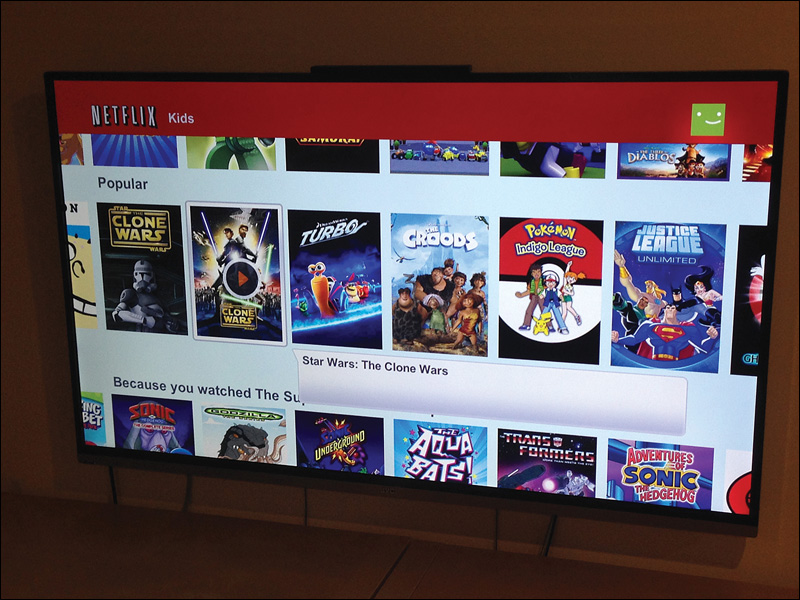
One of the most popular services out there right now for viewing movies and TV shows is Netflix. Netflix works on just about every operating system and device you can imagine—phones, tablets, and computers can all have the Netflix app installed. Even televisions and video game consoles come preloaded with the app, as you can see in Figure 8.1. (Can you tell I have children?)
When you subscribe to Netflix (currently $8 per month for digital streaming or $16 per month for streaming and DVDs in the mail), you choose to either receive DVDs in the mail or to access streaming movies through your high-speed Internet (DSL or cable, for example).
Note
Dial-up Internet doesn’t offer the download speeds necessary to view streaming movies; if you attempt to do this, you’ll end up watching 10 seconds of a movie and then the movie will pause for 10–30 seconds before the next 10 seconds of the movie plays and then pauses again...over and over. Streaming services such as Netflix absolutely require high-speed Internet.
The focus of this section is on the streaming service offered by Netflix, not the disc delivery service. When you sign up with Netflix and install the Netflix app on your iPad, you’re presented with an almost overwhelming collection of movies and TV shows, all displayed with an icon on a virtual shelf, as shown in Figure 8.2.
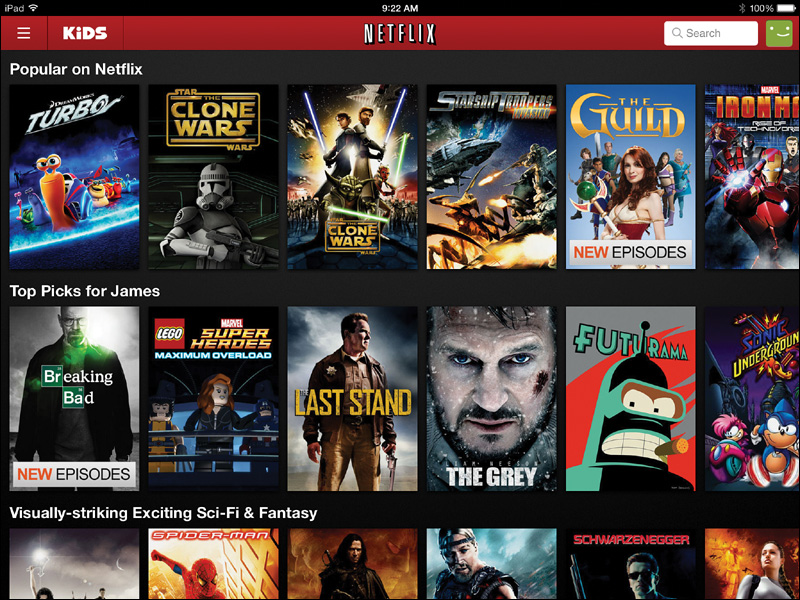
All that’s required to view a movie is to tap its icon and then tap the Play button that appears on that movie’s information screen. For TV shows, you can scroll through the various seasons and episode numbers/titles and tap the Play button to play a specific episode, as shown in Figure 8.3.

Caution
There’s a toggle button labeled “KIDS” in the Netflix app that lets you flip over to displaying only kid-friendly movies and TV shows. Unfortunately, there’s currently no way to lock this feature or to put a password on the adult account to prevent a child from opening the app and viewing inappropriate content.
Netflix offers you the ability to search using the Search tool in the upper-right corner of the screen, and the service offers up recommendations based on any movies or TV shows you have watched. The service even saves your viewing progress, so if you need to stop halfway through a movie, when you return to that movie in Netflix later, you can pick right up where you left off.
Netflix isn’t the only subscription service in town, however. Other popular services include Hulu Plus (Hulu Plus offers HD streaming as well as support on streaming devices; regular Hulu can only be viewed from a computer) and Amazon Prime, both paid services that can be streamed on a range of mobile devices. You’ll want to do some investigations to see which service is best for you (almost all of them offer a free trial period) and compare prices and movie/TV offerings. If you choose to subscribe to Netflix or other service, you’ll be able to enjoy a seemingly endless supply of movies and TV shows all from your Ultimate iPad.
Digital Movies and TV Shows for Sale
Although services like Netflix are great, they aren’t comprehensive. There are tons of movies and TV shows that Netflix doesn’t offer. Fortunately, today’s movie and TV fans have the ability to purchase or rent their entertainment from a variety of sources.
Apple’s own iTunes, for example, sells and rents movies and TV shows that are downloaded as digital files to a computer and can be displayed on an iPad with the Video app shown running in Figure 8.4.
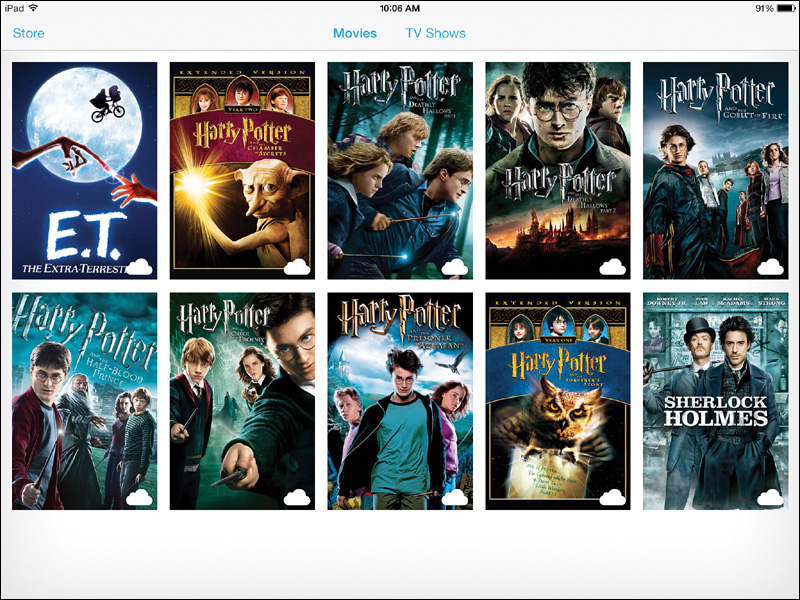
As you can see in Figure 8.4, these movies are stored “in the cloud” on Apple’s hardware until you wish to view one—the small cloud icon in the lower-right corner of each movie icon indicates that the movie is not currently stored on the iPad’s own internal storage. Although movies purchased from iTunes can be streamed to save storage space, users can also choose to download a movie directly to the iPad. This is useful for those times when you want to watch a movie but suspect there will be no Internet access (such as on an airplane).
Tip
When you purchase a TV show or movie from iTunes, you are given a choice between a high-definition version and a standard version (if you purchase the Hi-Def version, however, you are allowed to download the standard version for mobile devices). The lo-def version takes up less storage space, so keep that in mind if you’re low on iPad storage space or wish to download a small number of movies.
Apple’s iTunes offers movies and TV shows for purchase (including individual episodes of a TV show or an entire season), but it’s always best to shop around when buying digital content. If you’re serious about converting over to digital content, however, keep in mind that buying movies from a variety of sources does mean you’ll be watching those items from a variety of apps as well. A TV show season or episode purchased from Apple can only be watched with an Apple app such as iTunes or Videos. Likewise, a movie purchased on Amazon.com can only be watched with the Amazon Instant Video app. And, in most instances, those files are of a proprietary format that’s not suitable for watching on any other video players.
Buying your video content in digital format is a great way to have access to your favorite movies and shows without stealing shelf space to store all those disc cases. As with digital books and magazines, you can immediately reduce the amount of DVDs and Blu-ray discs you have in your home or office by purchasing movies and shows already in digital format.
But what are Ultimate iPad owners to do if they already have a collection (small or large) of existing movies and TV shows in DVD and/or Blu-ray format? If they wish to watch these on their iPads, must they purchase the items again in a digital format? Maybe not....
Converting DVD/Blu-ray Discs
Prior to being able to purchase digital movies and TV shows online or subscribe to a service like Netflix, fans of certain movies and TV shows would have to rent or purchase a disc (DVD or Blu-ray) if they wished to watch a favorite movie or show that was no longer in the theaters or broadcast on TV.
Movies and TV shows have been available on DVD for years, and many iPad owners are likely to have small or large collections of DVDs that they enjoy watching from the comfort of their favorite couch or chair. And that’s the problem with DVDs (and the newer Blu-ray discs)—they require a disc player connected to a TV to enjoy.
The iPad doesn’t come with a built-in disc player (thankfully); it doesn’t even have a USB port for plugging in an external DVD/Blu-ray drive. So iPad owners are forced to buy digital movies (or rent them) online or subscribe to a streaming service. Or are they?
For many years now, DVD and Blu-ray owners have been performing an action called “ripping” on their movie and TV show collections. Ripping is taking a disc’s content and converting it to a digital file (or files) that can then be viewed on a computer, tablet, phone, or any other device that can play one of the few popular file types that exist—MOV, MP4, and MPEG.
How is a disc ripped? The ripping is done with special software that can examine the disc, find the main content plus other stuff (such as behind-the-scenes extras as well as the previews/advertisements that play when you insert a disc into a player), and allow you to select what content is converted and what format will be used.
There are plenty of applications out there, and many of them cost anywhere from $10 to $100, but you really don’t have to spend money. There are a handful of free applications you’ll see in this chapter that can get you started on ripping your digital movies and TV shows and converting them to a format you can watch on your iPad (or anywhere else you wish). Not all the software is required, however, so depending on your computer’s operating system (Windows or Mac) and the type of disc (DVD or Blu-ray), you’ll want to collect any or all of the following and install them on your computer of choice:
![]() DVDShrink 3.2 (http://dvdshrink.org)—This is absolutely required for Windows, but not for Macs. The DVD-ripping software is no longer supported, so 3.2 is the last version ever released—but it’s still available as a free download. Also, you should be aware that some DVDs just won’t work with DVDShrink 3.2—in those instances, you may have to resort to a paid DVD-ripping application.
DVDShrink 3.2 (http://dvdshrink.org)—This is absolutely required for Windows, but not for Macs. The DVD-ripping software is no longer supported, so 3.2 is the last version ever released—but it’s still available as a free download. Also, you should be aware that some DVDs just won’t work with DVDShrink 3.2—in those instances, you may have to resort to a paid DVD-ripping application.
![]() HandBrake (http://handbrake.fr)—Handbrake will take the ripped files from DVDShrink 3.2 and convert them into a format suitable for viewing on the iPad. Mac owners can skip DVDShrink 3.2 and go straight to Handbrake. At the time of this writing, Handbrake 0.9.9 is the current version for Mac (OS X 10.6 and later) and Windows (XP and later).
HandBrake (http://handbrake.fr)—Handbrake will take the ripped files from DVDShrink 3.2 and convert them into a format suitable for viewing on the iPad. Mac owners can skip DVDShrink 3.2 and go straight to Handbrake. At the time of this writing, Handbrake 0.9.9 is the current version for Mac (OS X 10.6 and later) and Windows (XP and later).
![]() MakeMKV (http://makemkv.com)—MakeMKV is an application for ripping Blu-ray discs. It is currently a beta application and is a free download as it’s being developed. Eventually, however, MakeMKV will become a paid application. (MakeMKV can rip DVDs as well, but I’ve found DVDShrink 3.2 to be a more stable and reliable application for ripping DVDs on Windows.)
MakeMKV (http://makemkv.com)—MakeMKV is an application for ripping Blu-ray discs. It is currently a beta application and is a free download as it’s being developed. Eventually, however, MakeMKV will become a paid application. (MakeMKV can rip DVDs as well, but I’ve found DVDShrink 3.2 to be a more stable and reliable application for ripping DVDs on Windows.)
Next you’ll find a walkthrough for ripping a DVD with DVDShrink 3.2 and ripping a Blu-ray with MakeMKV. Following the ripping walkthroughs, you’ll also find an example of converting the ripped files into an iPad-compatible file with HandBrake.
Ripping with DVDShrink 3.2
On a Windows computer, insert a DVD movie; if the movie attempts to auto-play, stop it and close down the video player. Open the DVDShrink 3.2 application, click the Re-Author button, and you’ll see a screen similar to the one in Figure 8.5.
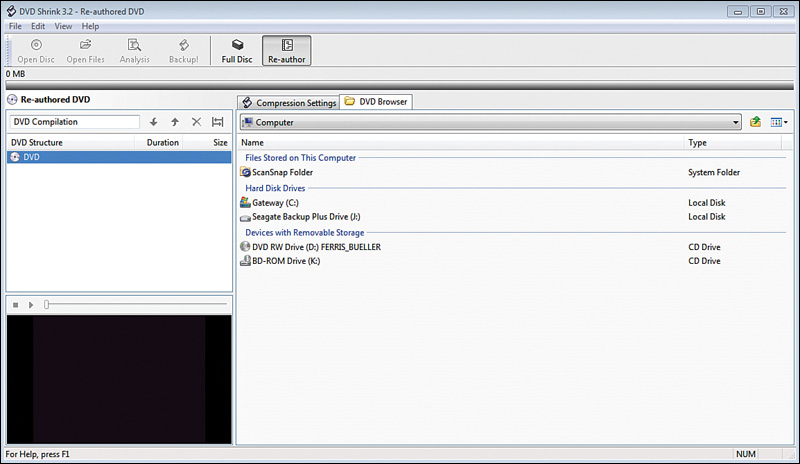
Double-click the drive letter that corresponds to your DVD drive. (In Figure 8.5, it is the D: drive.) The software will open the disc and attempt to identify the main movie (typically the longest continuous bit of video on a disc). Figure 8.6 shows that it has identified the main movie and it’s 1 hour and 42 minutes in length.

For TV shows, you’ll often find a listing of almost identical-length titles that should correspond to the number of episodes found on a disc. (For example, a 24-episode television show split over four DVDs will most likely have six episodes per disc.)
You’ll want to perform the following steps once per movie or once per episode. (If you perform these steps for all episodes on a disc, the final file containing the episodes will be quite large and continuous—six one-hour episodes, for example, would create one six-hour long video.)
1. Drag the title you wish to rip from the right side to the left side into the section labeled DVD Structure. When this is done, the software will scan the file, as shown in the analysis stage in Figure 8.7.
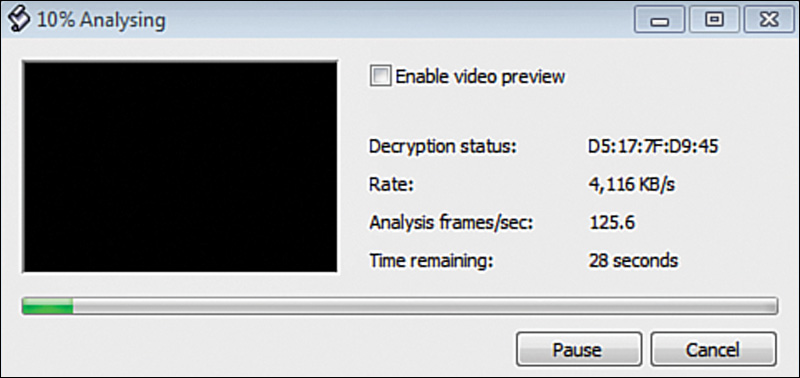
After the title (main movie or an episode) is analyzed, it will appear in the DVD Structure listing, as shown in Figure 8.8.
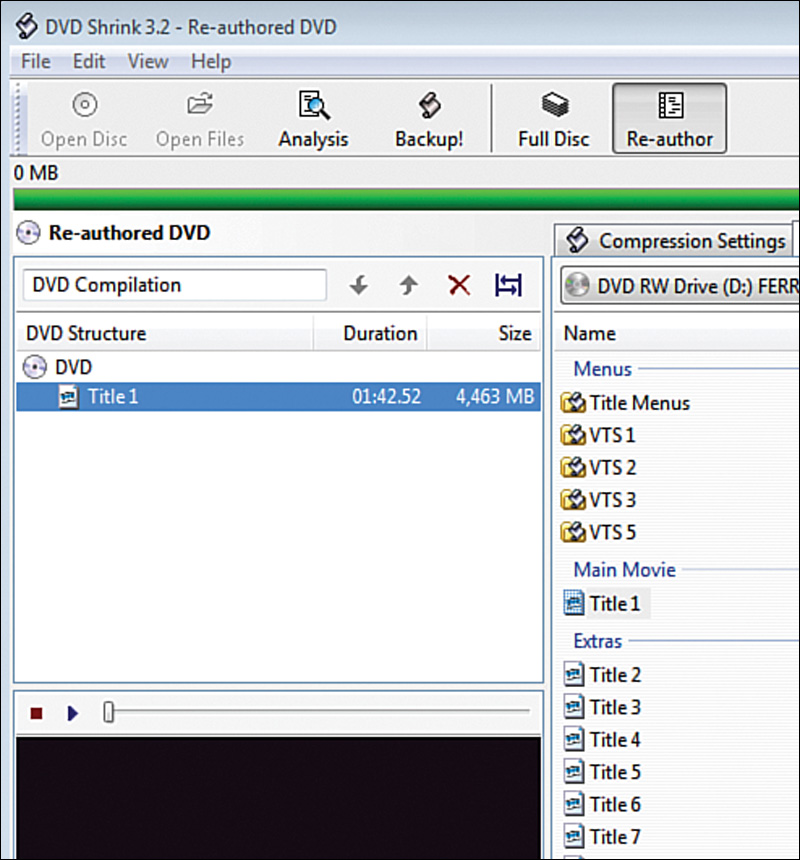
2. For a movie rip, this is the only analysis that must be performed. For a TV show, you can drag additional titles (episodes) to the left, one at a time. All titles listed in the DVD Structure section of DVDShrink 3.2 will be lumped together into the final video that you will watch on your iPad.
3. Click the Backup! button and a screen will appear like the one in Figure 8.9. This is where you will specify a folder on your computer’s hard drive to hold the ripped files. Feel free to create a folder with the movie or TV episode name/number. Use the Browse button to locate that folder and make absolutely certain the “Create VIDEO_TS and AUDIO_TS subfolders” check box is checked.

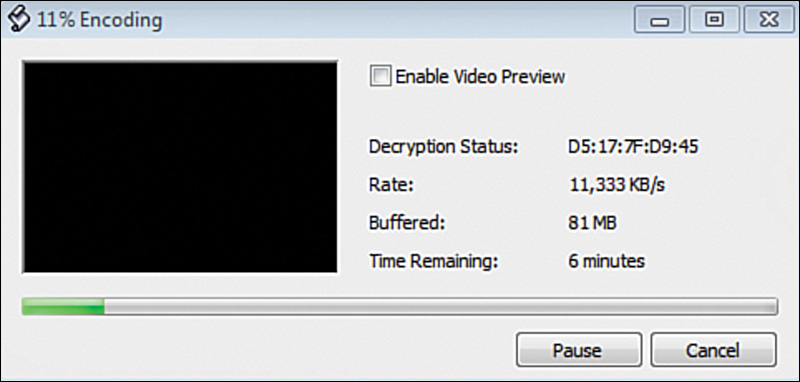
Click the OK button and the selected movie or episode(s) will begin to be ripped. This can take anywhere from a minute or less for short TV episodes to 10–20 minutes for lengthy movies. You’ll see a screen like the one in Figure 8.10 that will provide you a progress bar on the ripping (Encoding) process.
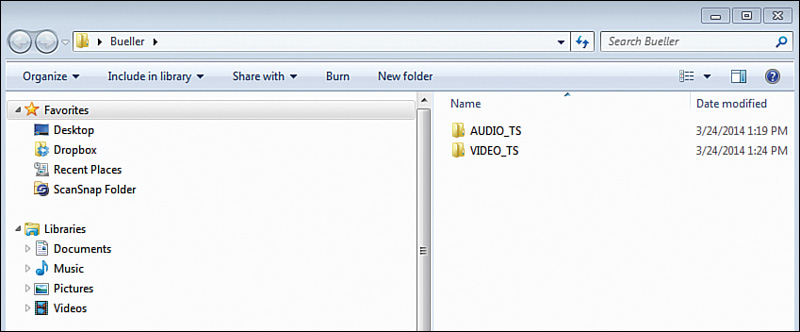
When the ripping process is done, open the folder you specified in Figure 8.9 and you should see two folders—VIDEO_TS and AUDIO_TS—as shown in Figure 8.11.
You can return to DVDShrink 3.2 and rip more TV episodes or movies, but be sure to create a custom folder to hold the special folders for each movie or episode.
Your next step is going to be to use HandBrake to take the two folders (and their contents) and create the final movie file that you’ll be able to view on your iPad. Feel free to jump ahead to the “Converting with HandBrake” section or continue reading to see the steps involved in ripping a Blu-ray disc.
Ripping with MakeMKV
Blu-ray discs not only hold much larger files (because the video they hold is a much higher resolution than that of a DVD), but they’re completely different from DVDs in how they hold and organize content. For this reason, you’ll need MakeMKV (or a paid Blu-ray ripping software application) to create a file that HandBrake will be able to use to create an iPad-compatible movie.
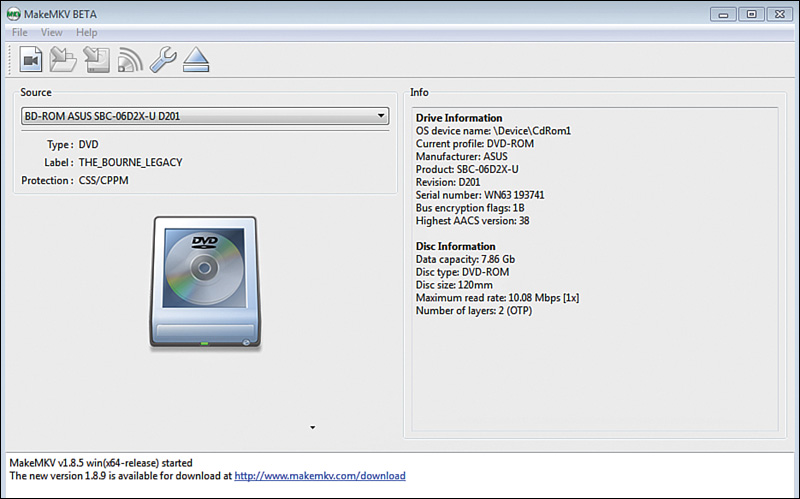
Insert a Blu-ray movie or TV show disc into a Blu-ray drive and close down the movie if it attempts to autoplay. Open up the MakeMKV application and you should see your movie listed, as shown in Figure 8.12.
Tip
Blu-ray discs will not work on a DVD drive in your computer—fortunately Blu-ray drives can be purchased for around $30–$40 and plug into a USB port on your computer. (DVDs will, however, work just fine in a Blu-ray player.)
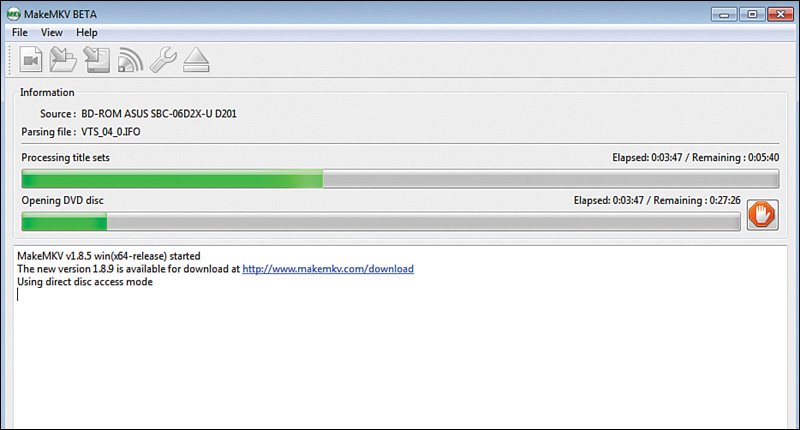
As with DVDShrink 3.2, you’ll want to create a folder on your computer to hold the ripped files as MakeMKV processes the disc. Create this folder first and then click the big disc icon shown in Figure 8.12. MakeMKV will begin scanning the Blu-ray disc to look for the movie or episodes, as shown in Figure 8.13. This can take a couple of minutes, so be patient.
When the scan is done, you’ll see a list of Titles like the one in Figure 8.14.
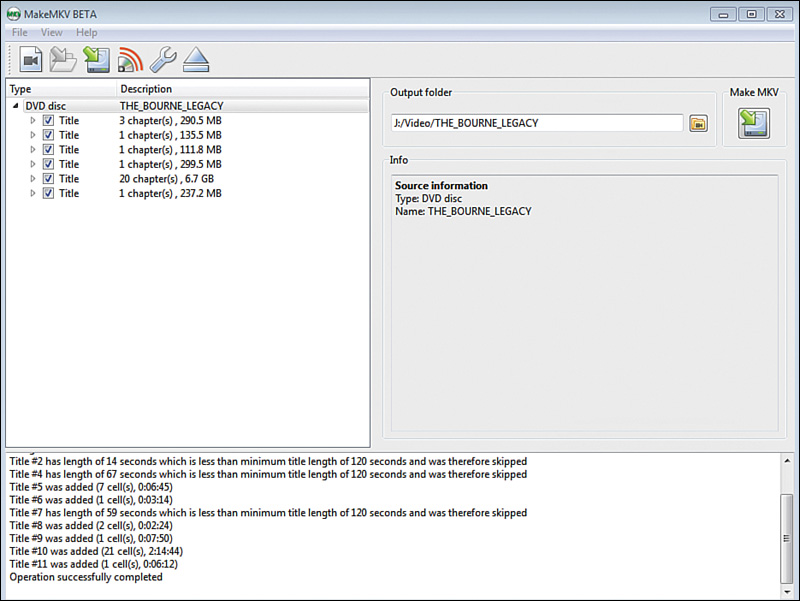
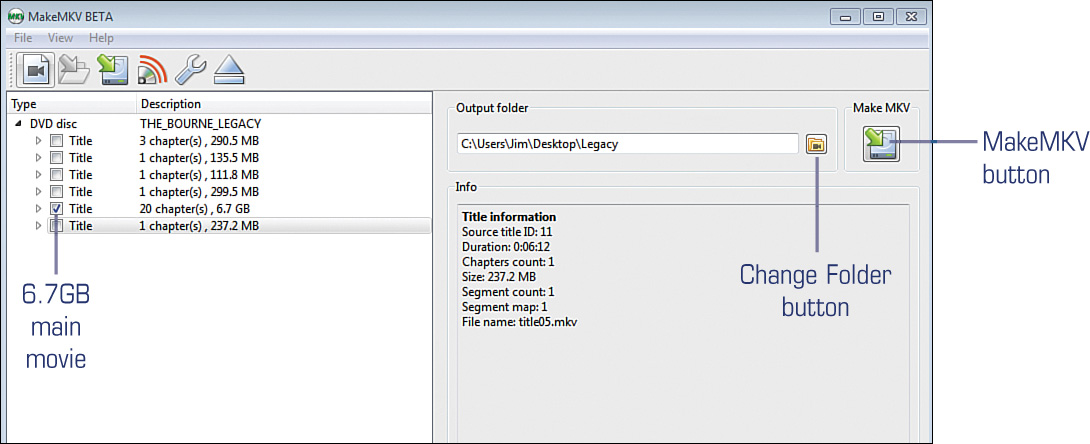
For movies, the one you’re most likely going to be using will also tend to be the largest. In the case of the Titles shown in Figure 8.14, uncheck all but the fifth check box down the list, which holds the 6.7GB main movie. (The remaining items are the extra “exclusives” that frequently come on a disc with behind-the-scene interviews, director commentary, and so on—leave them checked if you like to include these features in the final movie conversion.)
Next, click the Change Folder button shown in Figure 8.15, browse to the custom folder you made to hold the ripped movie’s files, and then click the MakeMKV button.
Ripping a Blu-ray typically takes a lot longer than ripping a standard DVD. This two-hour movie took about 32 minutes to finish, so be prepared to wait a bit.
When it’s done, however, you’ll end up with a folder that holds the special .MKV file like the one in Figure 8.16.
And that’s how you rip a Blu-ray. But you’re only halfway done with the process. Next, you’ll learn how HandBrake takes the special folders created by DVDShrink 3.2 and the special .MKV file created by MakeMKV and uses them to create a custom video file that will play on your Ultimate iPad.
Note
Both DVDShrink 3.2 and MakeMKV have additional features I’ve not covered in this chapter. You’ll want to consult the help files and/or the websites devoted to these two applications if you have additional questions or wish to learn about more advanced features.
Converting with HandBrake
Now that you have either a DVD or Blu-ray ripped, it’s time to take the ripped files and do something useful with them. You’ll use the HandBrake application to take either the VIDEO_TS and AUDIO_TS folders (and files inside) created by DVDShrink 3.2 or the .MKV file created by MakeMKV and create a special file that can be saved to any hard drive or cloud service (such as Dropbox or Pogoplug) and viewed on your iPad.
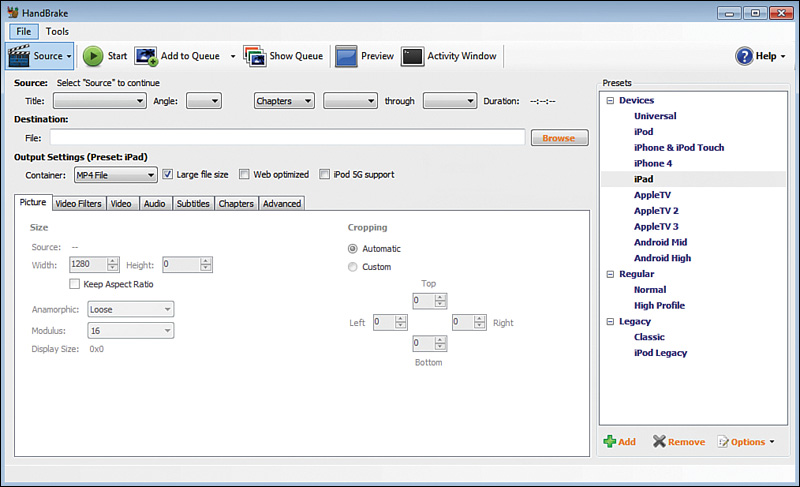
To get started, after downloading the HandBrake app, open it and you’ll see a screen like the one in Figure 8.17.
The HandBrake app has dozens and dozens of features and special abilities that I cannot cover in this chapter. You’ll want to consult the Help menu for many more features than I’ll be showing you here. For purposes of this chapter, I’m only going to show you how to convert movies specifically for viewing on iPad. What this means is that the movie or TV show will be formatted for the iPad’s screen and resolution—watching it on a mobile phone or a larger TV might not provide the highest resolution you’re used to viewing.
Tip
If you want to rip movies and have them saved in a viewing format to match their original resolution and video quality, you’re going to want to invest in a lot of hard drive storage or a lot of cloud storage. HandBrake can definitely save your videos in their original format, but one or two movies will be enough to use up all your iPad’s internal storage.
To begin with, look on the right side of the screen shown in Figure 8.17 and make certain the iPad option is selected. If it isn’t, click it. (If you don’t see it, click the Add button and select it from the list that appears.)
After the iPad option is selected, click the Source button in the upper-left corner of HandBrake and you’ll see a small list of options appear, as shown in Figure 8.18.
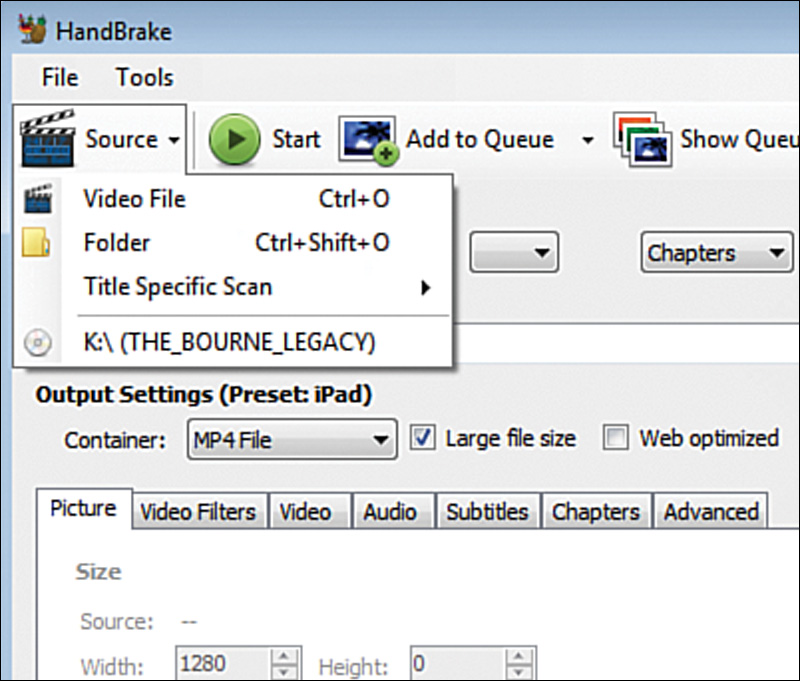
If you’ll remember back at the beginning of the chapter, I told you that Mac users wouldn’t need to use DVDShrink 3.2 to rip DVDs—that’s because HandBrake can access a Mac’s DVD drive directly and create the iPad-compatible video file directly from the DVD. That’s the option shown at the bottom of the pop-up menu in Figure 8.18. You would select that option to avoid creating the VIDEO_TS and AUDIO_TS folders created by DVDShrink 3.2.
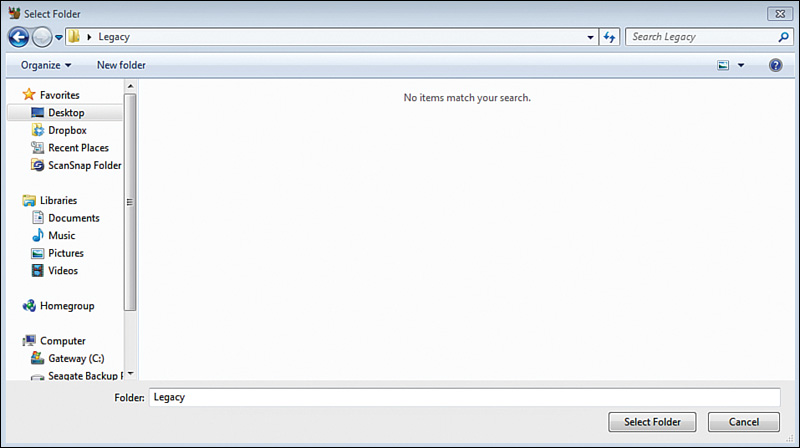
Click the Folder option in the drop-down menu and browse to the folder you created with DVDShrink 3.2 or MakeMKV and then click the Select Folder button shown in Figure 8.19. You do not have to click either the AUDIO_TS or VIDEO_TS folder—you just need to be able to see them before clicking the Select Folder button.

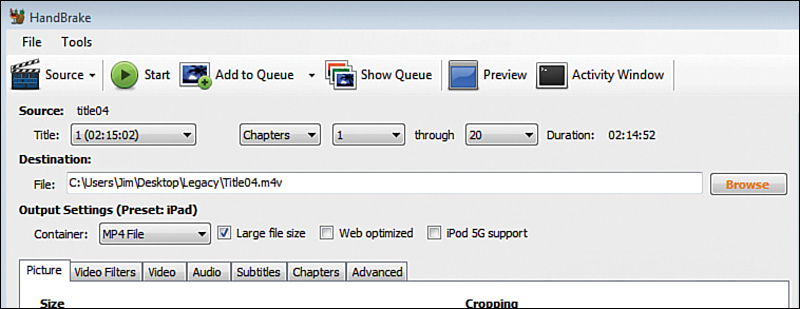
The movie or TV episode will appear in the Source listing along with the length of the video. Below that, in the Destination section, click the Browse button and select the same folder that contains the VIDEO_TS and AUDIO_TS folders, as shown in Figure 8.20.
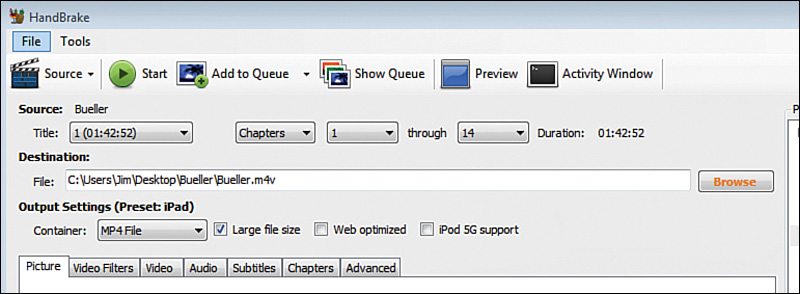
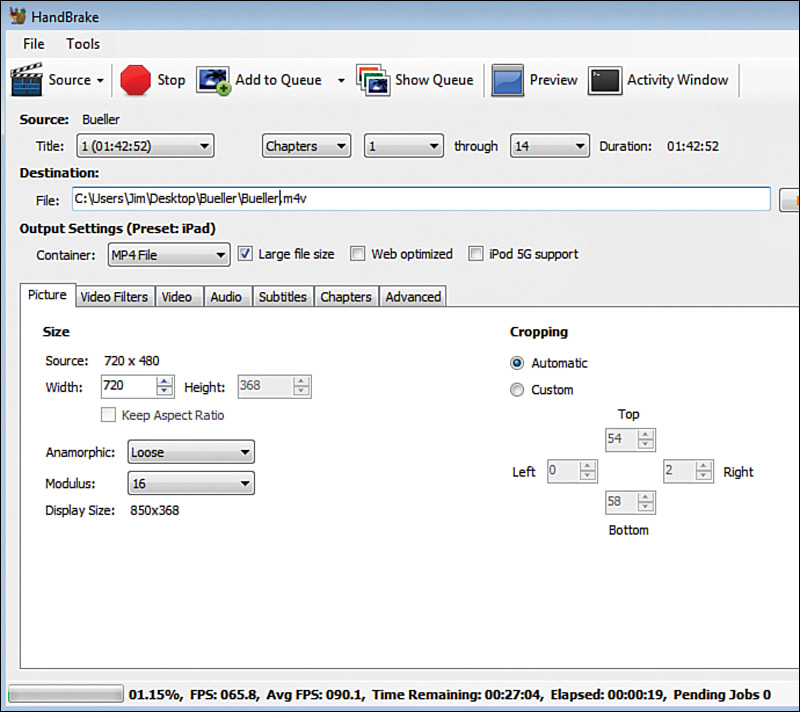
Confirm that the MP4 file type is selected in the Output Settings section (below the Destination section) and then click the Start button. The converting process begins, as shown in Figure 8.21, with a progress bar near the bottom of the screen. This can take anywhere from five minutes for short, 30-minute long TV episodes, to an hour or more for 2+ hour-long movies.
For your MakeMKV Blu-ray rip, you’ll perform the same basic steps, but when selecting the Folder option from the Source menu, browse to the folder holding the .MKV file. Don’t panic when you don’t see the file listed, as shown in Figure 8.22.
Simply click the Select Folder option and you’ll see a screen similar to the one in Figure 8.20. Click the Browse button for the Destination section and select the same folder containing the .MKV file. Confirm the Output Settings section is set to an MP4 File, as shown in Figure 8.23, and click the Start button.
Once again, you wait. The Blu-ray conversion tends to take about 1.5–2 times as long as a DVD conversion, so you have some time to go do other things while the conversion completes.
When the conversions are completed, you can delete the AUDIO_TS and VIDEO_TS folders or the .MKV file—they’re not needed anymore. What’s left over is an .MP4 file that can be placed in Dropbox or a Pogoplug-connected hard drive or even copied to your iPad directly with iTunes or the GoodReader app.
And that’s how you convert a DVD or Blu-ray disc to a digital file that can be viewed on your Ultimate iPad. Enjoy!
The Legal Stuff
In the last chapter, I told you that the law is a bit vague right now when it comes to scanning books and magazines for your own personal use. That’s not the case when it comes to your DVD and Blu-ray discs, unfortunately.
Thanks to the Digital Millennium Copyright Act (DMCA) Act. 17 U.S.C. 1201, it is currently illegal for owners of DVDs and Blu-rays that contain DRM (Digital Rights Management, also known as encryption or copy-protection) to use any method to change that content to another format (called format shifting). You can read much more detail about DMCA by visiting http://en.wikipedia.org/wiki/DMCA.
What this means is that it’s illegal to take a DVD or Blu-ray that you legitimately own (you paid money, got a receipt, and walked out of the store with a physical item in your hands—namely, the case holding the DVD or Blu-ray) and use any kind of software (such as DVDShrink or MakeMKV) to break through a copy-protection scheme that is implemented on the disc for the sole purpose of preventing a bad guy from duplicating and selling a copy of it for profit. The law doesn’t care that you have no intention of duplicating with the purpose of selling it. The law doesn’t care that all you want to do is make a digital copy for viewing on your iPad. And the law doesn’t care that you still own the original disc and can prove that you purchased it legally.
In a nutshell, everything I’ve shown you in this chapter is probably illegal for 99.9% of the DVDs and Blu-ray discs that you own; almost all discs have been sold with some sort of copy-protection. It doesn’t matter that the copy-protection is often weak and easily circumvented, either—the responsibility is not placed on the sellers of DVDs and Blu-ray discs to develop stronger encryption if they wish to prevent bootleggers from selling illegal copies. Consumers are caught between a rock and a hard place when it comes to the decision to convert their legally owned discs into a format they can enjoy somewhere other than on their television.
So why have I included the steps for ripping discs in this chapter? First, not all discs are copy-protected; you could use these steps to convert DVD/Blu-ray discs that contain public/non-private items such as tax-payer funded content or any disc that lacks encryption protection. Second, this Act is revisited every three years, and the last revision was in 2012. A number of organizations such as the Electronic Frontier Foundation (www.eff.org) are trying to lobby for changes to the Act to allow consumers to rip DVDs and Blu-ray discs for personal use, so while ripping is currently considered illegal, it may not be so in 2015 if a number of consumer rights organizations get their way.
Yes, ripping is illegal, but the ripping software still exists. People rip their movies every day. Why aren’t the media companies going after all the people out there who are ripping their legally owned discs and storing the files on their own hard drives for viewing on a TV or mobile device? I don’t know, but I suspect that even these media companies recognize that it’s a bit over-reaching to tell someone they can’t convert a legally owned disc for their own use. Certainly they’re watching websites that traffic in the illegal trade and download of music and movies and television shows, but if you’re ripping your movies and not giving them away or sharing them over the Internet, you’re probably small fish to the these companies. (It probably also doesn’t hurt that there’s really no way for the media companies to know you’ve ripped your movies and are viewing them in the privacy of your own home or on your tablet unless you’re also sharing them illegally.)
Still, ripping is illegal. My recommendation for now is to adhere to the DMCA and refrain from ripping until the law is changed. It would be nice if there existed a way to trade in your discs for a digital copy, but so far that solution isn’t available (probably because the media companies would much rather you buy a movie or TV show again, generating more revenue).