
Specifying a New Syntax
Let’s get back to mpc#GetPlaylist now. We have an odd problem when coming up with a syntax for our playlist’s text. We need to separate titles and names, but we also need to be able to tell which is which. To do that, we’ll need to use more specific delimiting characters—titles and names can contain the space character, so we can’t use that.
Here’s our solution: For each track in the playlist, we’ll append a couple of characters of the item type’s name, along with our trusty @ character, to the beginning and ending of each item. If mpc gives us Jim Cole as the artist our playlist will include that as follows:
| | @arJim Colear@ |
We’ll add two new functions to do this; one will encode track items in this syntax, and one will decode the syntax. Here they are; add them, and then we’ll go over them:
| vsyntax/mpc/autoload/mpc.vim | |
| | function! mpc#EncodeSong(item) |
| | let item = split(a:item, " @") |
| | let song = {'position': item[0], |
| | 'artist': '@ar' . item[1] . 'ar@', |
| | 'album': '@al' . item[2] . 'al@', |
| | 'title': '@ti' . item[3] . 'ti@'} |
| | return song |
| | endfunction |
| | |
| | function! mpc#DecodeSong(item) |
| | let line_items = split(substitute(a:item, ' {2,}', ' ', 'g'), ' @') |
| | let song = {'position': line_items[0], |
| | 'artist': line_items[1][2:-4], |
| | 'album': line_items[2][2:-4], |
| | 'title': line_items[3][2:-4]} |
| | return song |
| | endfunction |
First, mpc#EncodeSong splits an item by the @ separator that we use when we get the playlist from mpc. It returns a Dictionary, with entries for each of the items that make up a track.
Then in mpc#DecodeSong, we take a different approach. In this function we’re dealing with items that mpc#GetPlaylist has formatted as tracks, and they’ll all have different amounts of padding between them. So we use substitute to replace all occurrences of two or more spaces with a single space, and then we split the result on the @ between each item. We return the result as a Dictionary.
Now we need to use these functions in mpc#GetPlaylist before we return the playlist text. In that function, change the highlighted lines:
| vsyntax.1/mpc/autoload/mpc.vim | |
| | function! mpc#GetPlaylist() |
| | let command = "mpc --format '%position% @%artist% @%album% @%title%' playlist" |
| | let [results, playlist] = [split(system(command), '
'), []] |
| | let maxLengths = {'position': [], 'artist': [], 'album': []} |
| | |
| | for item in results |
* | call add(playlist, mpc#EncodeSong(item)) |
* | endfor |
* | |
* | for track in playlist |
* | call add(maxLengths['position'], len(track.position)) |
* | call add(maxLengths['artist'], len(track.artist)) |
* | call add(maxLengths['album'], len(track.album)) |
| | endfor |
| | |
| | call sort(maxLengths.position, "LargestNumber") |
| | call sort(maxLengths.artist, "LargestNumber") |
| | call sort(maxLengths.album, "LargestNumber") |
| | |
* | for track in playlist |
* | if(maxLengths.position[-1] + 1 > len(track.position)) |
* | let track.position = repeat(' ', |
* | maxLengths.position[-1] - len(track.position)) |
* | . track.position |
* | endif |
* | let track.position .= ' ' |
* | let track.artist .= repeat(' ', |
* | maxLengths['artist'][-1] + 2 - len(track.artist)) |
* | let track.album .= repeat(' ', |
* | maxLengths['album'][-1] + 2 - len(track.album)) |
* | endfor |
| | |
| | return playlist |
| | endfunction |
This looks more complicated than it is. Let’s go through it.
At the beginning, we used to create a List for each track, using split on each item of the results from mpc. Now we instead call mpc#EncodeSong on those items. This is how we populate the playlist.
Next, we add the items’ lengths, via len, from each track in the playlist to the right List in maxLengths. We sort each List using LargestNumber.
In our last loop, we pad each of the items in each track. This uses maxLengths and the repeat function that we saw before.
To wrap this up, we need to write the :syntax and :highlight commands that will tell Vim what these items are and how to highlight them. Open the syntax file we created earlier, syntax/mpdv.vim. Add the following commands:
| vsyntax.1/mpc/syntax/mpdv.vim | |
| | syntax region mpdArtist matchgroup=mpdArtistSyn start=/@ar/ end=/ar@/ concealends |
| | syntax region mpdAlbum matchgroup=mpdAlbumSyn start=/@al/ end=/al@/ concealends |
| | syntax region mpdTitle matchgroup=mpdTitleSyn start=/@ti/ end=/ti@/ concealends |
| | |
| | highlight default mpdArtist ctermbg=234 ctermfg=lightgreen |
| | guibg=#1c1c1c guifg=#5fff87 |
| | highlight default mpdAlbum ctermbg=234 ctermfg=lightblue |
| | guibg=#1c1c1c guifg=#5fd7ff |
| | highlight default mpdTitle ctermbg=234 ctermfg=lightmagenta |
| | guibg=#1c1c1c guifg=#ffafff |
We’re defining three groups: one each for artist, album, and title. In each group, we set the matchgroup groups and start and end regular-expression patterns, we set concealends. The key bit in each of these commands is of course the name of the syntax group, which comes right after the region keyword: the artist gets the group mpdArtist, album becomes mpdAlbum, and title is mpdTitle.
Now turn your attention to the final three lines: the :highlight commands. These syntax groups don’t really fall into any category of programming-language constructs, so rather than linking them to the conventional highlight groups, we highlight the syntax groups directly. But notice the argument with which we’re starting each :highlight command. When we include the default argument in a :highlight command, that command becomes the default way to highlight the group; in other words, it can be overwritten. If a user liked our colors overall but wanted the artist column to be displayed in red, he could add this line to his .vimrc:
| | highlight mpdArtist ctermfg=red guifg=#FF0000 |
And Vim would ignore our choice of color in favor of this.
The last step before we can see our highlighting in action is for us to go to the filetype file and make sure that Vim handles this syntax correctly. Open ftplugin/mpdv.vim and add these lines below the buftype and statusline settings:
| vsyntax.1/mpc/ftplugin/mpdv.vim | |
| | setlocal conceallevel=3 |
| | setlocal concealcursor=nvic |
This sets conceallevel to hide our regions’ start and end patterns. We also set concealcursor so that it won’t show the patterns in any of the four major modes: normal, visual, insert, and command. Remember that those patterns are in the groups that we put as the matchgroup of the regions. Because we set concealends on those regions, the pattern groups will now be hidden, and all we’ll see will be the groups that each of those regions contains.
At long last, it’s time to try this out. Open Vim and run :call OpenMPC() again. You should see the beautifully highlighted playlist, as shown in Figure 1, The highlighted playlist.
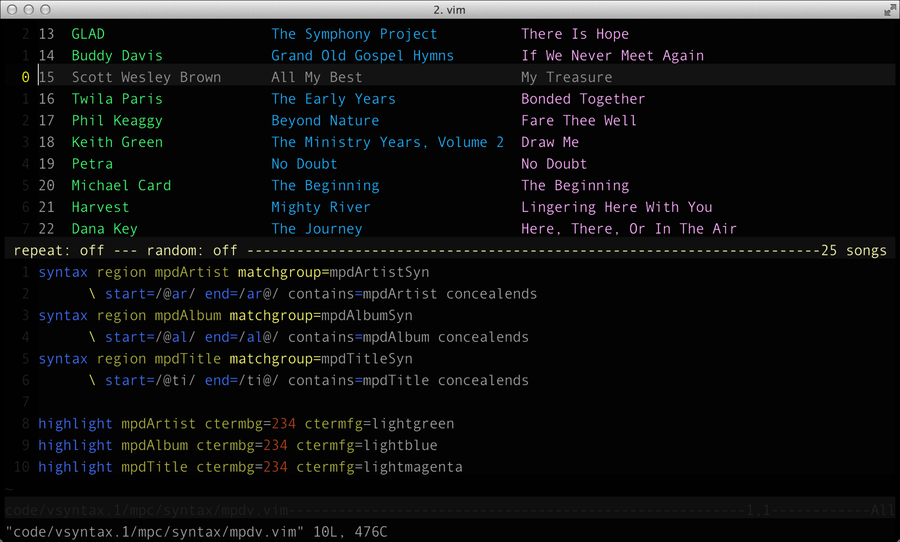
Figure 1. The highlighted playlist
We now have our playlist interface close to finished. You also know a bit more about syntax and color scheme files than you did at the start of the chapter—but you’ve gone long enough calling all of your plugin’s functions by hand via the Vim command line. In the next chapter you’ll learn about writing Vim commands and how you can add your own mappings that call those commands.