
Chapter Eight. Imaginary Player: Working with Playlists

![]()
Hey, it’s not easy finding a song with the word “playlist” in it. Or a movie. Or a TV show. So, after doing some searching, I got as close as I was going to get with the song “Imaginary Player” by Jay-Z. Now, in the iTunes Store, there are two different versions of this song—one with the Explicit lyrics warning and one with the Clean label. Normally, I just go with the Clean version, because I’m a wholesome, family man myself. (However, one time I actually got “burned” when downloading the Clean version of a song. It was the song “1985” by Bowling for Soup. My wife heard the song on Radio Disney, told me about it, and when I found it in the iTunes Store, it had both Explicit and Clean versions, so of course I downloaded the Clean version for my son’s playlist on my iPod. However, Apple’s definition of Clean is obviously different than Radio Disney’s. For example, in the Radio Disney version of the song, the second verse goes: “She was gonna be an actress. She was gonna be a star. She was gonna shake it, on the hood of Whitesnake’s car.” The “shake it” part’s a little suggestive, but it’s certainly not explicit. However, in the Clean version I downloaded, instead it says: “She was gonna shake her ass, on the hood of Whitesnake’s car.” Unsuspecting, I played it in front of my son, only once mind you, but of course he’s memorized that line verbatim. Kids!) Anyway, this chapter isn’t about the explicit version of either Jay-Z’s or Bowling for Soup’s song, but if it were, I’d probably sell a lot more books.
Putting Your Songs in Your Order
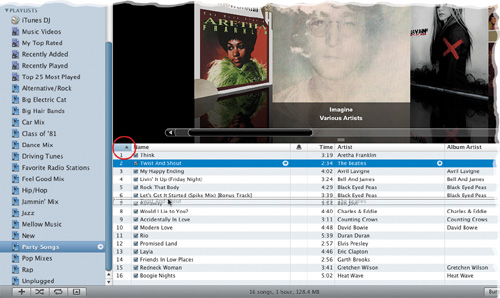
There are a number of different ways to have iTunes automatically sort the songs in one of your playlists (e.g., alphabetically by Name or Artist, by Genre, Rating, etc.), but what if you want to arrange the songs manually? You can do this by simply dragging the songs into the order you want, but this can only be done within playlists, not in your main Music Library. Also, to sort manually, you have to click in the very first column header from the left to make it the active column (it’s called the Track Number column); otherwise, if another column (like Artist) is highlighted, the songs will already be auto-sorted, right? Right! So click in the far-left column, and begin sorting. One last thing: if you have the Shuffle option turned on (the second button from the left at the bottom left of the window), it won’t let you manually sort. So if you’re in a playlist, and you’ve got the first column highlighted, and you still can’t sort, it’s probably because Shuffle is turned on. Turn it off by clicking on the Shuffle button, and you’re in business.
iTip: Finding Songs for Your Playlists Made Easy
Let’s say you’re creating a playlist of just classical songs. Rather than scrolling up and down through your entire Music Library searching for classical music, instead just click on the Genre column header, and it will re-sort your library by genre (press Command-J [PC: Ctrl-J] and turn on the Genre checkbox, if it’s not one of your column headers). Now just scroll down until you see a bunch of songs with the Classical genre, then select them all and drag them over into your Classical playlist.
Deleting Songs (and Playlists)
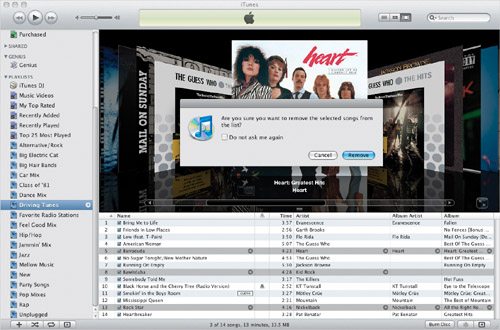
Just click on a song (or Command-click [PC: Ctrl-Click] on multiple songs) in a playlist and then hit the Delete key on your keyboard (this only removes the song[s] from this playlist—it doesn’t erase it from your Music Library). You delete playlists the same way: just click on the playlist you want to delete (in the list of playlists) and hit the Delete key (again, this just deletes the playlist—not the songs from your Music Library). Also, if you’ve got a song in one of your playlists that you don’t want to delete, but you don’t want to hear it right now, you can temporarily skip over it by turning off the checkbox that appears directly before the song’s name (only checked songs will be played). To hear it again, just turn the checkbox back on.
iTip: Open a Playlist in a Separate Window
When you click on a playlist, it appears in the main iTunes window, replacing whatever was there before (like perhaps your Music Library). If you’d like a playlist to open in its own separate floating window (leaving your main window still open and untouched), instead of clicking on your playlist, just double-click on its icon or to the right of its name in the Source list.
Rearranging Your Column Order
If you’re not happy with the default order of the columns (for example, if you’d prefer that the Album column was the fourth column, right after the Artist column), you can change them. Just click-and-hold on the Album column’s header and drag it, until it appears right where you want it (you’ll see a “ghost” image of your column as you move it, so it’s pretty simple to move it where you want it). Moving columns, though, is specific to where you move them—if you move them in your Music Library, you’ll only see the changes there, so when you click on a playlist, it’ll show the default layout. But, now that you know how it’s done, you can arrange the columns in any order you want (except for the Track Number column, which appears with playlists, and Name column—those are stuck there permanently).
iTip: Don’t Like How iTunes Is Sorting Your Songs? Try This Trick
You can give your songs a hidden name or artist name, just for sorting purposes (their real name will appear as always in iTunes, but now it’ll be sorted the way you want). For example, if you sort your Music Library or playlist by Artist, and you have a song by 50 Cent, it won’t wind up alphabetically under “F,” instead it’ll wind up at the bottom of your list. So, give it a hidden sorting name by clicking on the song, then pressing Command-I (PC: Ctrl-I), and clicking on the Sorting tab. The left side of the dialog shows what you see in iTunes, but the right side is what iTunes actually uses when sorting. So, in the Sort Artist field, you’d type in “Fiddy Cent” and click OK. Now 50 Cent will appear sorted under “F.”
Combining Two Playlists into One
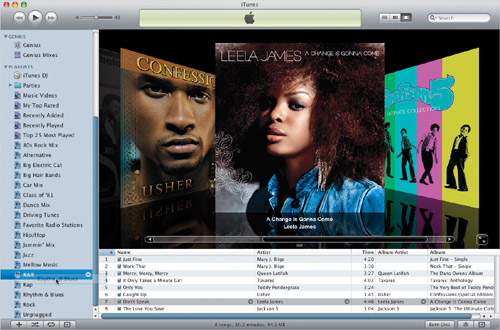
If you realize that you have two similar playlists (like one called R&B and one called Rhythm & Blues), you can combine them into one playlist by simply clicking-and-dragging one playlist onto another playlist, right within the Source list. Now, it’s important to note that dragging the Rhythm & Blues playlist onto the R&B playlist creates a combined playlist (copying one playlist into another, which by the way, will cause any songs that were in both lists to appear twice, so you’ll want to click the Skip button when iTunes asks you what you want to do with the duplicates). But, iTunes doesn’t erase the Rhythm & Blues playlist. It’s still there, if you want to delete it (just Right-click on it and choose Delete).
iTip: Printing Out Your Playlist
If you’d like a printed list of the contents of one (or more) of your playlists (hey, don’t laugh—this is handy if your hard drive crashes and you haven’t backed up in a while...or ever), just Right-click on the playlist that you want to print, and choose Export Song List. A Save dialog appears, so choose where you want to save the file on your hard disk, then click Save. iTunes exports your playlist as a tab-delimited text file, which you can open with a spreadsheet or database program, like Microsoft Excel, FileMaker Pro, etc., and then print it out.
How Rating Your Songs Helps

Even though you probably like all the songs you’ve imported into iTunes (or you wouldn’t have imported them, right?), there are some songs in your Music Library that you like better than others. Well, if you give your songs a rating (using the one- to five-star rating system), iTunes will automatically add your top-rated songs into the My Top Rated smart playlist (which appears near the top of the Playlists list in the Source list). That way, anytime you want to hear just your favorite songs, there’s already a playlist for them, and it updates live as you rate new songs (that’s the beauty of smart playlists. For more on them, see the next couple of pages and check out the bonus chapter on the book’s companion website at www.kelbytraining.com/books/ipod6). To rate a song, turn on the Rating column in your iTunes window (press Command-J [PC: Ctrl-J] and turn on the Rating checkbox), then just click directly on the song, and you’ll see five little gray dots in the Rating column. Click-and-drag your cursor over these dots (from left to right), and as you do, a star appears over each dot (so to make it a five-star song, you’d drag over all five dots). To remove a star, drag back over it to the left (it’s easier than it sounds). Note: On a Mac, you can rate the song that’s currently playing in iTunes from the Dock by clicking-and-holding on the iTunes Dock icon and choosing your rating from the Rating submenu; on a PC, click on the down-facing triangle at the bottom right of the iTunes toolbar in the Taskbar, go under My Rating, and click on the stars.
Have iTunes Make Smart Playlists for You
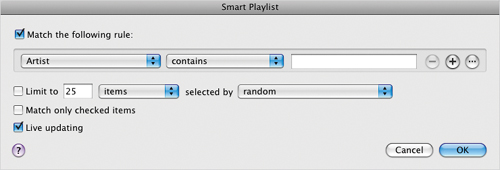
You can have iTunes make playlists for you, automatically, based on whatever criteria you’d like. For example, you could have it make a playlist of just songs you haven’t heard in three months, or an instant playlist of songs that are 120 beats per minute or faster, or a playlist of nothing but songs you’ve rated as one-star (so you can hear them and decide if you even want these songs just taking up space on your computer). These automated playlists are called “smart playlists” and you create them by choosing New Smart Playlist from the File menu (or by pressing-and-holding the Option [PC: Alt] key and clicking the Create a Playlist button at the bottom left of iTunes). This brings up the Smart Playlist dialog you see above, where you get to choose from loads of different criteria options. When you create a smart playlist, it’s added to the top of the list under Playlists in the Source list, and you can tell by the icon that it’s a smart playlist (it’s purple and has a little gear icon). Anytime you want to change the criteria for a smart playlist, just Right-click on it and choose Edit Smart Playlist. To add another line of criteria to your smart playlist, click the + (plus sign) button to the right of the last line of criteria (to take a line away, click the − [minus sign] button). If you want to add a subcategory to your criteria, then click the little ... (ellipsis) button, and a subcategory appears below that line, which is tied to criteria above it. Also, I always keep the Live Updating checkbox turned on, so that if I add a new song, or change the rating of a song, etc., those changes are automatically reflected in the playlist (as if somebody is monitoring and updating your playlist for you. Sweet!).
A Smart Playlist Idea for Short Trips
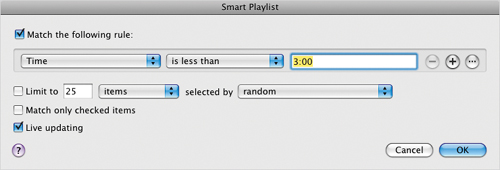
Just to give you an idea of the simple power of smart playlists, here’s a really easy smart playlist idea: If you only live 10 minutes from your job (lucky you), you probably don’t want to listen to one long song all the way to work, right? So why not create a smart playlist of just short songs? Here’s how: Option-click (PC: Alt-click) on the Create a Playlist button to create a smart playlist. When the dialog appears, from the first pop-up menu, choose Time; from the second pop-up menu, choose Is Less Than; and in the text field, enter “3:00.” Now, when you play this smart playlist on your iPod on the way to work, you’ll hear around three full songs, and you’ll be at least one-third of the way through the fourth. Want another smart playlist idea? How about this one: Want to hear the same songs you heard exactly one week ago? Well, when you create your smart playlist, in the first pop-up menu, choose Last Played; in the second menu, choose Is; and in the text field, enter the date exactly one week ago today. By the way, you might as well name this smart playlist “Déjà Vu.”
iTip: I Put of Bunch of Smart Playlist Ideas Together for You!
I put some other really simple smart playlist ideas online for you to check out (it’s a PDF in the same format, look, and feel as what you see here). You can find it on the book’s companion website at www.kelbytraining.com/books/ipod6 (see, I care!).
Cutting Clutter with Playlist Folders
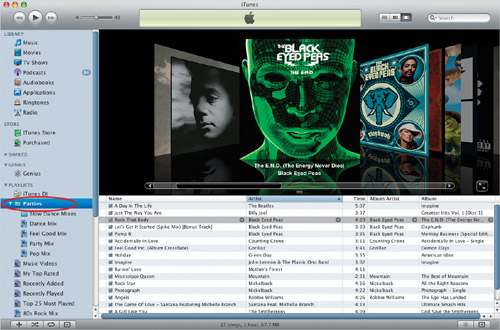
It’s fairly easy to get sucked into “playlist mania” and before you know it, you have 600 playlists—one for every mood, every occasion, every genre, every band, every possible road trip, every...well, you get the idea. Anyway, if you need to bring some sanity to your playlist collection, you can create a playlist folder to organize all your playlists that share a common theme (with subfolders inside). For example, you could have a folder named “Parties” and inside that you could store all the playlists you use at parties (your Rave mix, Burning Man mix, Impromptu Vegas Hotel Room Party mix, Limo Party mix, etc.). That way, they’re all tucked away in just one folder. If you want to see them all individually again, just expand the folder (as shown above). To create a playlist folder, just go under the File menu and choose New Playlist Folder. The new folder will appear under Playlists in the Source list (highlighted and ready for you to name), so you can easily drag-and-drop related playlists right into this folder. Once you’ve put multiple playlists into one folder, you can then “play the folder” and it will just play the playlists in that folder.
iTip: Another Way to Create Playlists
You can also create playlists by first selecting the songs in your Music Library you want in a playlist (Command-click on them on a Mac; Ctrl-click on a PC), then going under the File menu and choosing New Playlist from Selection. Those songs will now appear in a new playlist in the Source list (it’ll be highlighted, ready for you to name).
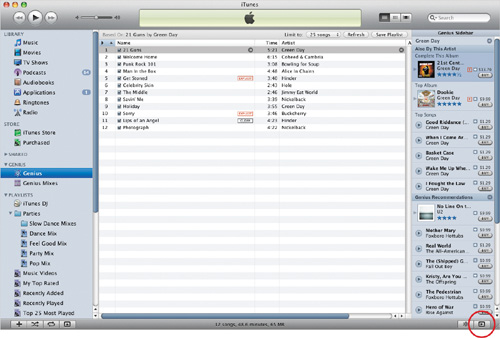
Create a Genius Playlist in iTunes
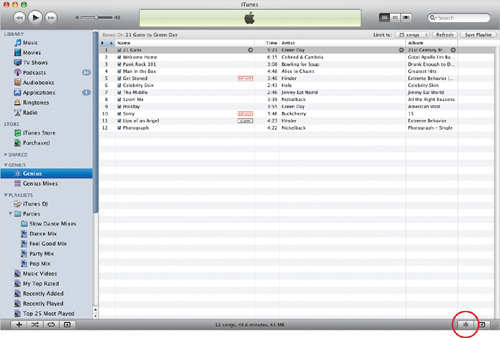
The Genius feature automatically builds playlists for you based on the type of music you already listen to. For example, let’s say you like the song “21 Guns” from Green Day. To have iTunes create a Genius playlist of other songs from your Music Library that are kind of that same style, first click on “21 Guns,” then click the Genius button in the bottom-right corner of iTunes (shown circled here in red. If this is your first time using Genius, you’ll need to click on Genius in the Source list and then click on Turn on Genius and log into your iTunes account). That’s it—it looks through your Music Library, analyzes what you have, and puts together a mix based on you liking “21 Guns.” What’s scary about all this is it does a pretty darn good job (so much so, that a lot of people are absolutely hooked on Genius playlists now, because it’s just fun seeing what it comes up with). If you don’t like the first set of results, just click the Refresh button near the top-right corner (you’ll also find controls there for choosing how many songs you want to include in your Genius playlist, and if you like a particular playlist it came up with, just click the Save Playlist button, and it’ll convert it into a playlist for you).
iTip: Making a Smart Playlist Regular
Have you fallen in love with the current content of one of your smart playlists? Then have iTunes make a regular playlist from your smart playlist (that way, it doesn’t auto-update anymore). Here’s how: just click-and-drag your smart playlist up to the word “PLAYLISTS” in the Source list and when you release your mouse button, a new regular playlist will be created in the Source list with the contents of your smart playlist.
Let Genius Find Songs You Don’t Own (Yet)
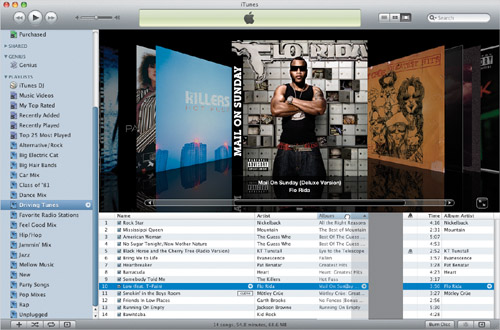
The iTunes Store has its own version of Genius playlists, but instead of choosing similar songs from your existing Music Library, it uses a research database of actual iTunes users to determine other songs you don’t own that you’d probably like (in other words, if you like this one, you’ll probably like...this one!). This feature is off by default, so to turn it on, click the Show/Hide Genius Sidebar button (the little left-facing arrow) in the very bottom-right corner. This adds a column to the far-right side of iTunes (seen above). At the top are other songs and albums from that same artist you clicked on that are available in the iTunes Store, then below that are Genius recommendations from the iTunes Store based on your current song. What I like about this is you can hear a 30-second preview of any song in this sidebar (by clicking on the little round Play button that appears before the song’s name), and you can even buy the song and download it—all without actually going to the Store itself. Plus, like the regular Genius feature, it does an amazingly good job of finding songs you don’t already own that you probably would like (I’ve found loads of great songs I either didn’t know about, or had forgotten about, which is why those little 30-second previews are so valuable). Also, if you don’t like their Genius recommendations, just click the Genius button (the one with the little atom in the bottom-right corner), and it’ll generate a new list you might like better. To hide this Genius sidebar, just click the Show/Hide Genius Sidebar button again.
Genius Mixes Do All the Work for You
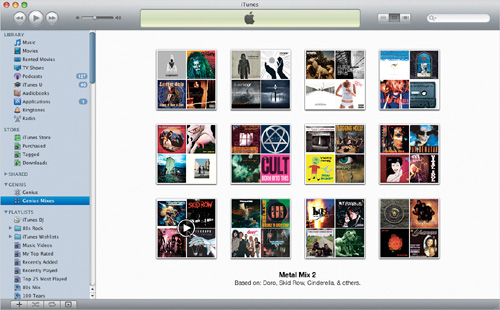
On the previous pages, you learned about Genius playlists (where you click on a song, and then the Genius feature puts together a playlist of similar songs), but there’s something you might like better, partially because it doesn’t require any input from you whatsoever. This feature scans your Music Library and builds a bunch of different Genius mixes based on what it finds, putting similar songs together in their own mixes (it’s kind of building little radio stations based on your own musical tastes). All you have to do is turn Genius on by clicking on Genius in the Source list, then clicking on the Turn on Genius button and logging into your iTunes account. If Genius is already on, go under the Store menu and choose Update Genius. Now, Genius Mixes will appear under Genius in the Source list. Click on it, and it displays sets of album covers that give you a sample of what’s inside each mix. To see what the name of the mix is (and the names of some of the artists it’s based on), move your cursor over the cover art and that information appears right below it. When your cursor is over the cover art, a little Play button appears in the center. To hear that mix, just click on it. To skip to the next song in the mix, press the Right Arrow key on your keyboard (to jump back, press the Left Arrow key). This is another one of those things you just have to try for yourself. My guess is you’ll love it.
Using iTunes as Your Party DJ
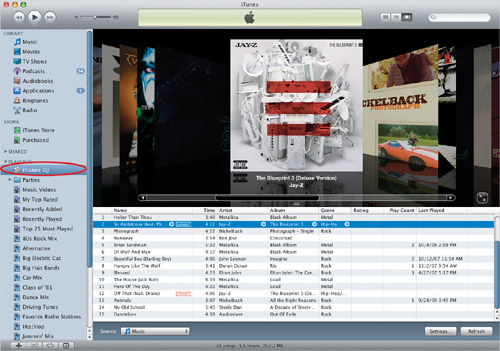
This tip is way better than it sounds at first. There’s a feature called the iTunes DJ, which automatically creates a party music playlist (based on some criteria you get to choose). But then it adds songs to this playlist automatically all night long, so the music at your party doesn’t stop. That’s fairly cool by itself, but on the next page I’m going to show you something that can make your iTunes DJ the talk of the entire party. First, let’s get the iTunes DJ set up: Click once on iTunes DJ (it’s the first thing listed under Playlists in the Source list) and it picks 15 songs from your Music Library to start your party. If you don’t like the songs it chose, click the Refresh button in the bottom-right corner and it’ll pick 15 other songs. If you want it to pull songs from a particular playlist (like a playlist you put together earlier of great party songs), you can choose that playlist from the Source pop-up menu at the bottom left of the main window. To the immediate left of the Refresh button is the Settings button. Click on that to choose things like how many of the already played songs still appear in the list, and to change the number of upcoming songs from the default 15-song queue to more (or less). If you want to make sure just your best songs in that playlist get played the most, turn on the Play Higher Rated Songs More Often checkbox. Now just double-click on the first song in the list, and your iTunes DJ will make sure the party music doesn’t stop. Turn the page to take things up a big notch.
Letting Your Party Guests Control the Music
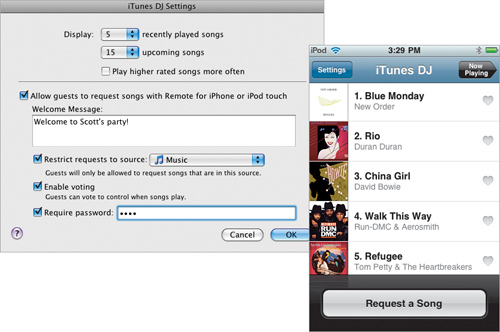
Here’s where the iTunes DJ gets really cool: if any of your party guests have an iPod touch or an iPhone, they can use Apple’s free Remote app to request songs, and even add songs to the iTunes DJ mix, without interrupting you from serving martinis. To turn on this feature, after you click on iTunes DJ in the Source list, click on the Settings button (at the bottom right), and turn on the Allow Guests to Request Songs with Remote for iPhone or iPod touch checkbox. You can also include a welcome message or instructions on how to request/add songs (just include whatever you want in the Welcome Message field), and you can choose whether guests can request songs from your entire Music Library or just a specific playlist (so, for example, if you’re having a disco-themed party, you can make sure they only choose songs from your Disco playlist). Guests can also vote on which song already in the queue will play next, and you can add a password, so the neighbor next door doesn’t start requesting Bay City Rollers songs (not that there would actually be any on your iPod, right?). Once this is set up the way you want it, when guests go to their iPhone/iPod touch and choose to request a song from their Remote app, they’ll get to choose one from your playlist (or Music Library if you choose), and then that song becomes the next song to play. This is just one of those things that you have to have your party guests try, and they’ll be talking about it for days (oh yeah, and that tasty rumaki).