
The previous chapters looked at how to expose services using Traefik over HTTP, TCP, and UDP connections. They also dove into the special traffic management features provided by Traefik. Until now, you have only worked with plain unencrypted traffic—HTTP or TCP. However, for any serious production usage, you need to expose the endpoints securely over TLS. In this chapter, you look at the capabilities that Traefik provides for encrypting and decrypting network traffic.
TLS termination with Traefik
TLS forwarding to backend services
For TLS termination at Traefik, we use Let’s Encrypt to provision the TLS certificate automatically for a service running in a public cloud. Traefik and Let’s Encrypt together make this complex process fairly trivial.
Quick Overview of TLS
The common use case of TLS encryption is to protect HTTP traffic. This means all API and web traffic is secured against man-in-the-middle attacks and other forms of network snooping. Instead of exposing plain HTTP traffic, we instead route the packets over HTTPS. This means the underlying channel over which the packets are transferred is encrypted.
A primary need for such security is to protect sensitive data, starting with username/password you may use to authenticate access to a protected resource. You should never transmit any secret over a plain HTTP connection as it can easily be intercepted by network sniffing software.
TLS traffic is encrypted when it leaves the source and is then decrypted at the destination end. The decryption part is what we refer to as TLS termination. This encryption and decryption are typically carried out much below the application layer (OSI or TCP/IP terms).
Most application layer code never needs to worry about the finer details of TLS, apart from specifying the appropriate configurations. Since implementing encryption protocols is not for the faint-hearted and should not be taken up lightly, most programming languages and platforms come with standard libraries that have been battle-tested and implemented by experts in cryptography.
Although we are touching on many parts of working with TLS in Traefik, an in-depth discussion of TLS is beyond this book’s scope. Its core is based on standard cryptographic primitives, specifically public-key cryptography, which is a specialized field. The walkthrough covers the practical aspects of working with TLS, which involve acquiring valid TLS certificates from a certificate authority and using them in the client-server configurations. We do not cover advanced network security practices or DNS, although we do brush past them. We encourage you to delve further into these areas to fine-tune configurations according to their use cases.
Broadly speaking, clients who connect to a server with TLS enabled can validate its authenticity. They do this by validating the server’s TLS certificate with the certificate authority (or CA), which signed and issued the server’s certificate. This server certificate contains the server’s public key, which sets up an encrypted channel between the client and the server. This helps to guard against man-in-the-middle and other attacks. The CA is typically a trusted third-party public body, and most browsers already have these configured automatically. There is often a private CA for large private enterprise networks to issue certificates for internal Intranet sites, and this private CA is automatically trusted on the enterprise managed devices.
There is an extension to this mechanism to verify the client’s identity to the server; this is achieved via client certificates typically issued by the same CA, validated on the server end. We are not covering this approach in this chapter, although Traefik has support for it.
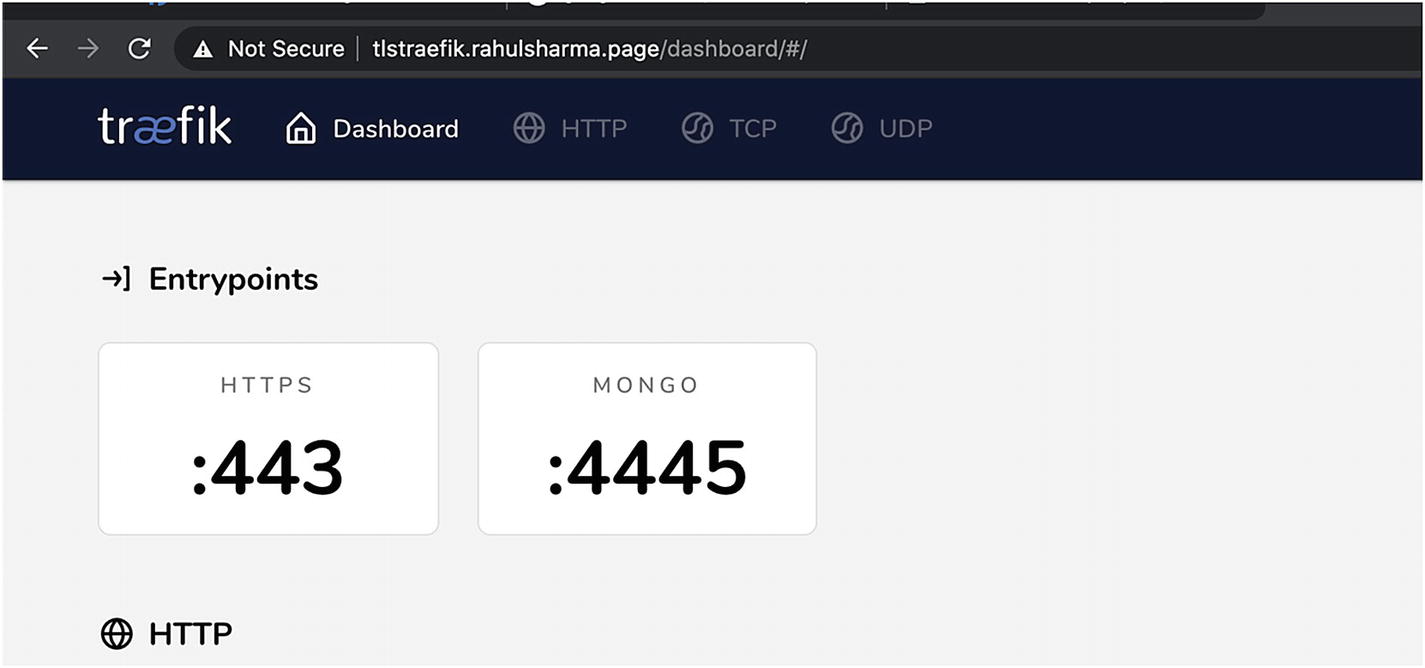
Conventionally, the default port for HTTP traffic is 80, and HTTPS is 443, although various platforms and applications serve TCP and HTTP/HTTPS traffic on whatever ports they choose to. Ports 8080 and 8443, for instance, are very popular alternatives to expose HTTP and HTTPS traffic, respectively. (They are non-restricted ports, however that discussion is beyond the scope of this book.) Most Internet-facing servers, however, expose the standard ports 80 and 443. Until now, we have primarily exposed Traefik entrypoints on 8080, 80, or other custom ports for HTTP and TCP. The Traefik dashboard was exposed over HTTP 8080 or 80 in an insecure mode without authentication, which is not recommended for the production usage.
While TLS widely protects HTTP traffic on the web, we use it to secure plain TCP connections. We could easily expose HTTPS to one of the sample HTTP APIs covered in previous chapters. We feel TLS over simple TCP better exhibits the advanced TLS capabilities of Traefik. As part of exposing TCP ports over TLS, we also cover some HTTPS traffic.
TLS Termination at Traefik
Enable TLS on the MongoDB server, so TLS is terminated at the MongoDB server level. This requires Traefik to pass the encrypted traffic through. Or,
MongoDB still serves plain TCP traffic; however, we enable TLS on the Traefik entrypoint to expose the MongoDB connection. TLS is then terminated at the Traefik entrypoint, which then passes the decrypted traffic to the backend MongoDB port.
Although the first option seems more favorable and secure, this is usually not a feasible approach in practice. Since Traefik typically acts as a load balancer or reverse proxy, it usually load balances your requests across multiple backend instances. This was covered in the last chapter.
Typically, you have multiple cluster nodes or service instances (for databases and APIs, respectively) being exposed behind a single route. In this scenario, any client expects a consistent endpoint to be exposed to whatever service they are connecting to. For security reasons, TLS certificates are closely coupled to the server domain host where they are deployed. If we did TLS termination at the individual instance level, then we need additional certificates or reuse the same certificate on each replica instance. To the consumer, it is apparent that the client is connecting to a different host each time. This is not very desirable.
In actual production, we always use Traefik for TLS termination and then route the packets from Traefik to the backend (MongoDB in the current example) over a simple TCP connection. This is not as big a security risk as it might seem because the internal traffic is in a closed network—typically your own VPC/VLAN. For scenarios with shared infrastructure, there is always the advanced practice of initiating a new internal TLS connection from your edge gateway to the backend service; we are not covering that.
Exposing MongoDB Route on TLS
This section runs a MongoDB instance on a cloud VM by a public cloud provider. You can use a managed database offering. You are free to use any other database if you adjust for the correct ports and use the appropriate client for that database. To keep things simple, we run both the MongoDB instance and Traefik on the same cloud VM so Traefik can securely connect to MongoDB running on the localhost without any other complexity.
For this example, we are running a single DigitalOcean droplet (or VM) running Ubuntu 18. However, the concepts are the same for any other cloud VM, such as an AWS EC2 instance. Setting up a DigitalOcean or AWS instance is beyond the scope of this book; however, it is easy to do. Once the VM is set up, Traefik can be easily installed using the instructions in Chapter 1.
Install and Set Permissions for Traefik
You may wonder why we chose a cloud deployment. The reason is that we need a public DNS name for Traefik to acquire a valid TLS certificate. We set up a separate subdomain to point to the DigitalOcean droplet and added an A record in the DNS provider to point to its IP address (again, this discussion is beyond the scope of this book). You can try Traefik’s TLS support locally, but you need manually provisioned or self-signed certificates. You would also miss how easy Traefik makes the entire process. The TLS configuration for manually acquired certificates is simple; we are providing it here for reference. This is the same for both valid public domain certificates and local self-signed test certificates.
Route Configuration for MongoDB TCP over TLS: Manual Certificates
We also provide the certificate paths in a separate section. This is a dynamic configuration, which means we can add new certificates at runtime. These can only be defined via FileProvider. The correct certificate is used at runtime based on the domain matched. If you don’t provide your own certificates, or don’t provide one for a matching domain, Traefik generates and uses its default self-signed certificate. It is possible to override this default certificate as well. Manual certificate generation is beyond the scope of this chapter. For local testing, a tool such as the one at https://mkcert.dev/ can be useful. In the preceding configuration, you can connect to MongoDB over a secure TCP+TLS connection.
Route Configuration for MongoDB TCP over TLS
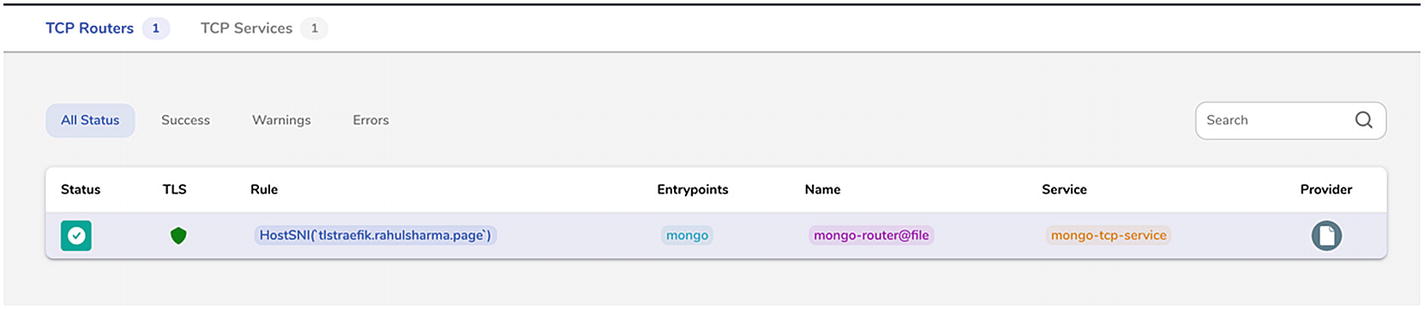
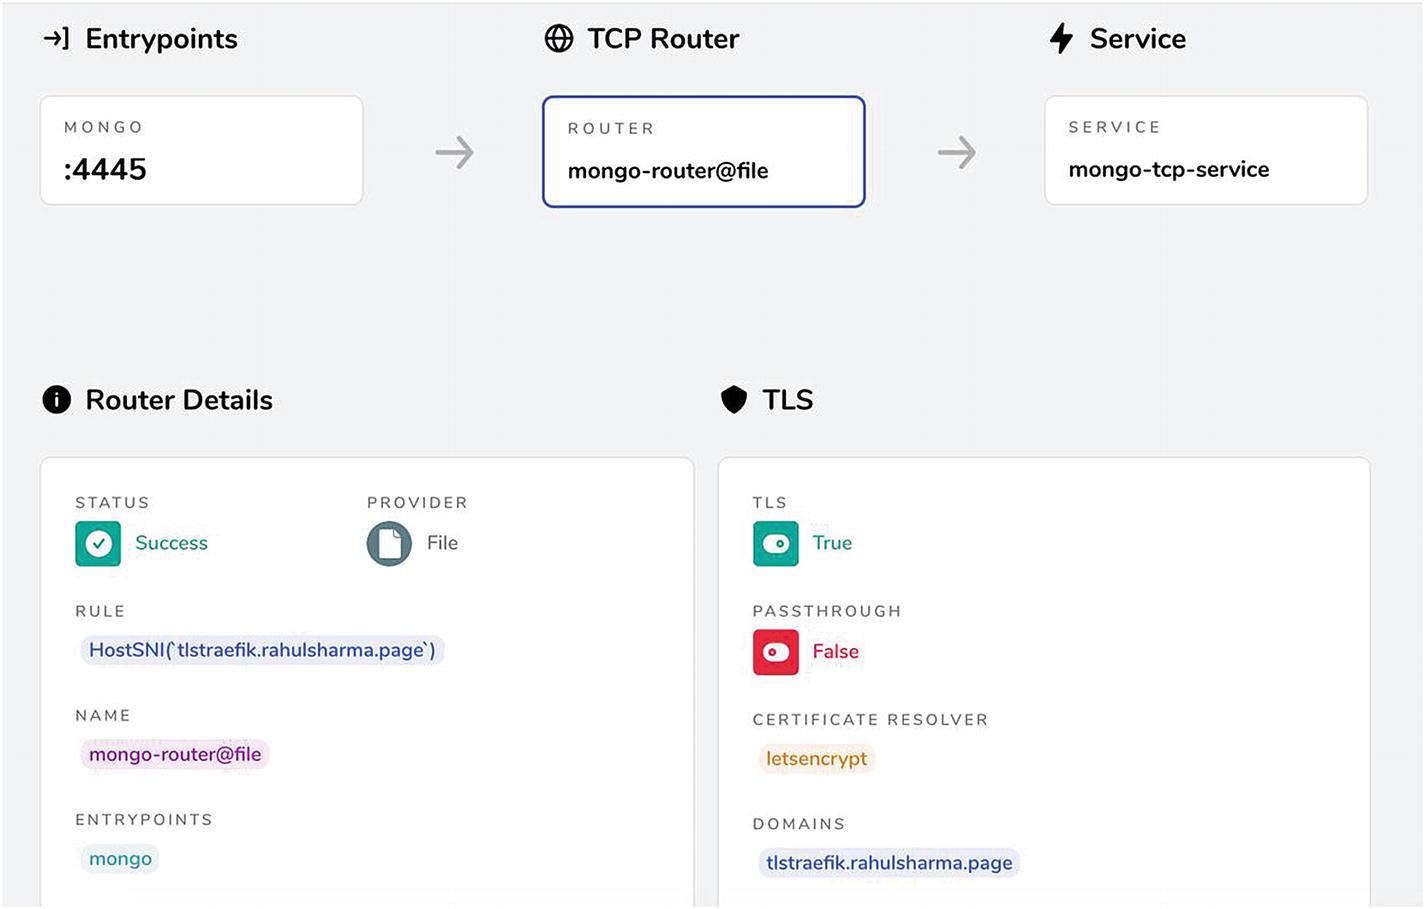
Most of these pieces are already known to us. We looked at the HostSNI attribute . In previous examples, we set it to match all possible hostnames (*). While this approach may be fine for unencrypted traffic, it is not feasible with TLS. It matches the actual domain name where the services are running, and the server certificate validates the same. tlstraefik.rahulsharma.page is the public DNS name pointing to the IP address of the DigitalOcean droplet. There is also a certresolver attribute set to letsencrypt , which automates the provisioning of a TLS certificate from Let’s Encrypt on the first request to this endpoint.
Let’s Encrypt Automatic Certificate Provisioning
Acquiring TLS certificates is typically a multistep process. There are good utilities on all platforms which help you generate the necessary pieces. For how ubiquitous TLS certificates are, certificate generation is a complex procedure with many attributes to be set, and if some configuration is wrong, you need to start over. The usual steps are to generate a certificate signing request (CSR) for the server certificate and submit it to a CA for signing. The CA signs and returns a valid certificate that can be used. Different CAs have different pricing models, and certificate features and websites are free to pick and choose which ones they want to go with. This has traditionally been a manual process, with some automated parts.
The big disruption in this space was brought about by a non-profit called Let’s Encrypt (https://letsencrypt.org). Let’s Encrypt has issued free TLS certificates (over a billion of them) for over 225 million websites. It does this by automating the entire process via programmatic APIs, so no manual intervention is required.
Let’s Encrypt ships several official and third-party clients, making the certificate provisioning process trivial for end users. It achieves this automation by leveraging the ACME standard (https://tools.ietf.org/html/rfc8555), which stands for Automatic Certificate Management Environment. We do not dive deeper into this, but it entirely automates the work of acquiring and managing certificates from an ACME-compliant CA. Mostly, all you must do is start up your HTTPS server, and the rest is taken care of. If someone is considering setting up a website that requires TLS certificates, Let’s Encrypt is the way to go .
Let’s Encrypt only provisions certificates for public Internet-facing sites. This means your endpoints need to be reachable by a public domain name for Let’s Encrypt to provision a TLS certificate. For private or internal APIs, certificates need to be provisioned from other CAs. This has an impact on the examples, which have been running on a local system so far.
Provisioning TLS Certificates for Public TCP Endpoints
To automatically provision a TLS certificate from Let’s Encrypt, we need to expose the MongoDB port on the public Internet.
Obviously, you should never actually expose your database port on the Internet as a practice. There have been many news reports about unsecured MongoDB connections exposed on the open Internet and targeted by hackers, resulting in compromised data. We are using a blank DB for a short while for the example, so it should be fine. We are also protecting MongoDB with proper access credentials, and the port is only accessible through Traefik. One point to note here is that we also set up cloud firewall rules on a VM to only inbound traffic on ports 80, 443, and 4445. All other inbound traffic from the Internet is blocked.
As seen in Listing 4-2, we expose the Mongo TCP endpoint on the tlstraefik.rahulsharma.page domain. tlstraefik here is the subdomain on which the TLS route is matched. The certificate issued by Let’s Encrypt is issued for the same subdomain. There is support for additional domain entries, which request additional SNI (Server Name Indication) hostnames that support multiple domains and TLS certificates on the same IP and port. We are not going to dive deeply into this.
Traefik first checks the domain entries and then the HostSNI value to figure out domains for which TLS certificates are automatically requested. Both are not needed here; we only included them for reference. This is more useful with wildcard certificates, which are not covered here.
The certresolver attribute is referenced. It is defined in the static configuration along with the entrypoint. We need to define a TLS entrypoint and the certificate resolvers, which is currently mostly Let’s Encrypt.
Entrypoint and Certificate Resolver
If you’re new to Let’s Encrypt and experimenting with configurations in a test environment to figure out your TLS settings, it makes more sense to use the URL of the Let’s Encrypt staging endpoint, which is used in Listing 4-4. This does not provide a usable TLS certificate. The CA to sign the certificate is fake, and most browsers reject the resultant certificate. Let’s Encrypt allows you to download the dummy CA certificate (fakelerootx1.pem) and validates your generated server certificate against it. This allows you to test out the overall integration before moving to production with a valid certificate.
Second, the tlsChallenge attribute is of interest. To validate that the third-party requesting a server certificate has ownership of the host machine, Let’s Encrypt supports various automated challenges. The standard ones are the HTTP-01 challenge and the DNS-01 challenge. Both are suitable for different types of use cases. However, there is a special challenge for TLS terminating reverse proxies, which is the role Traefik is playing here, known as the TLS-ALPN-01 challenge. More information is beyond the scope of this book. This challenge type is trivial to configure in Traefik, so it is used here.
TLS entrypoints
Mongo Client Simple Connection
Mongo Client TLS Connection
Mongo Client TLS Connection
Mongo Client Valid TLS Certificate
There are two subtle points to note here. First, Traefik saves the acquired certificate in a file named acme.json by default. You saw this filename configured in Listing 4-4. We can add a custom file name or location if required. If you switch from staging to production URL, you also need to remove this file or use some other location; otherwise, Traefik uses the already saved certificate by default.
Second, while TLS termination may be tied closely to the entrypoint port (4445 in this case), TLS configuration is driven by the dynamic router configuration. What this boils down to is that Traefik does not send a certificate generation request to Let’s Encrypt until it is configured for a particular route. Consequently, it is completely feasible for different certificates to be generated for the same entrypoint to serve different routes.
Secure Traefik Dashboard over TLS
Entrypoint and Route Config for Secure Dashboard
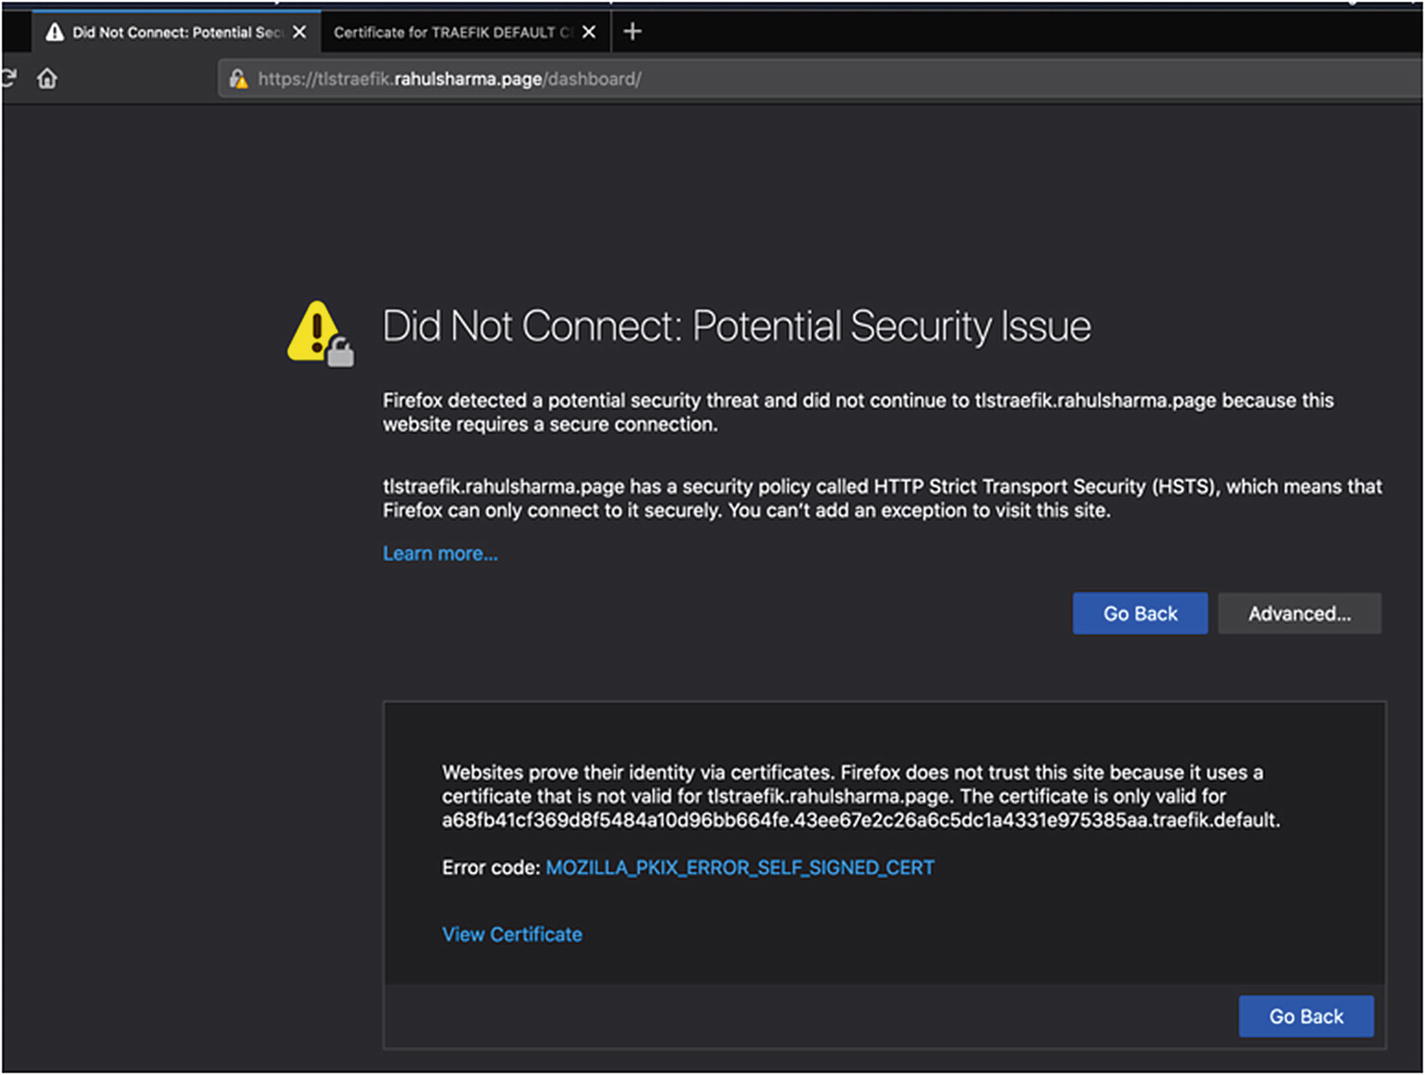
Self-signed Traefik certificate error
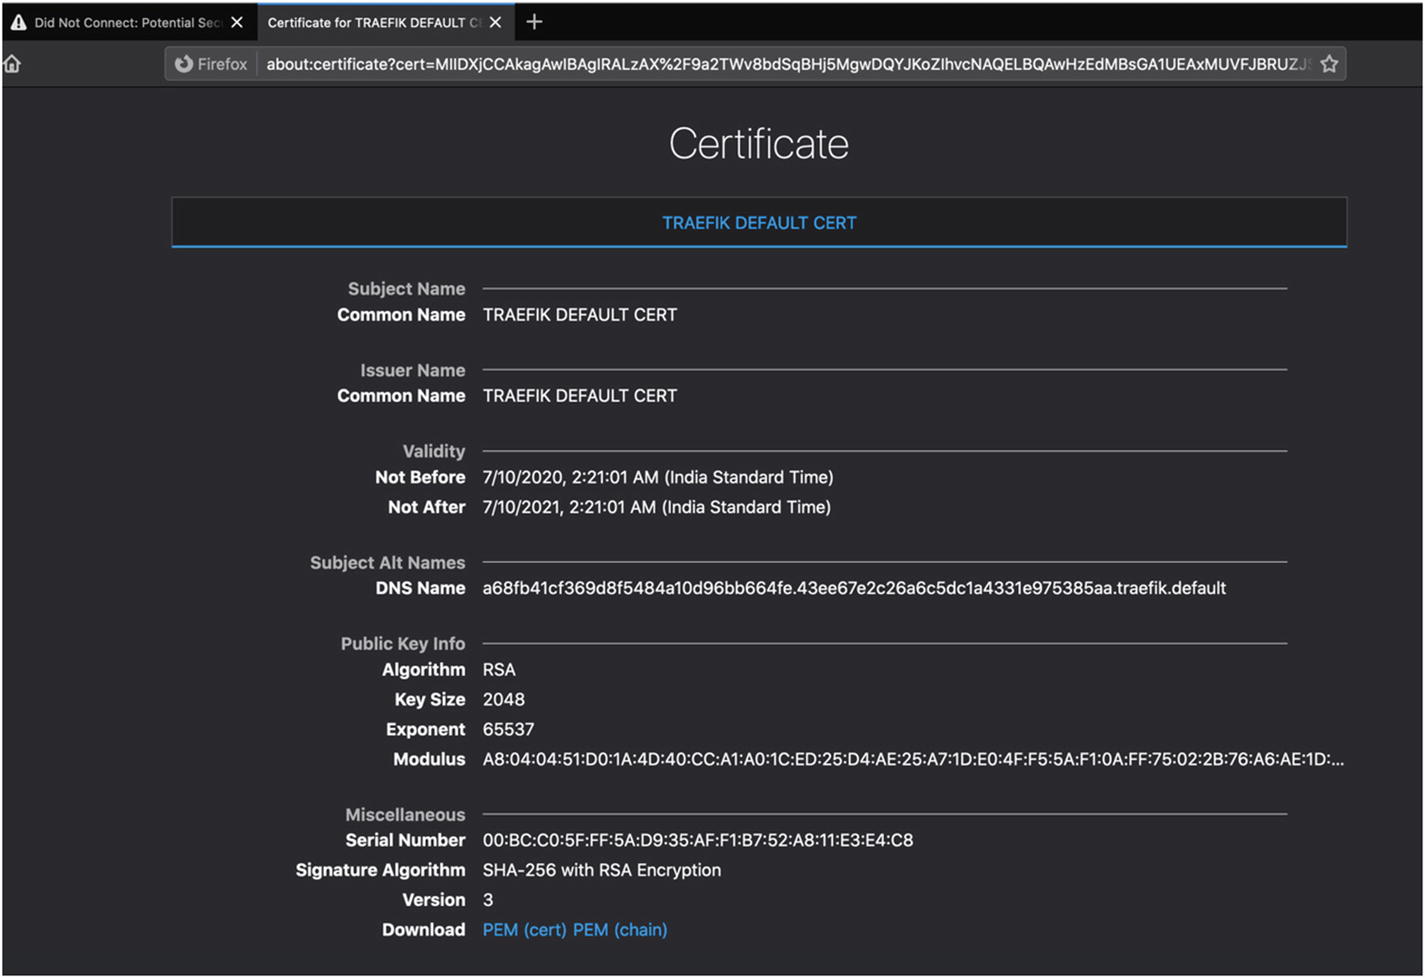
Self-signed Traefik certificate details
Multiple Lets Encrypt Resolvers
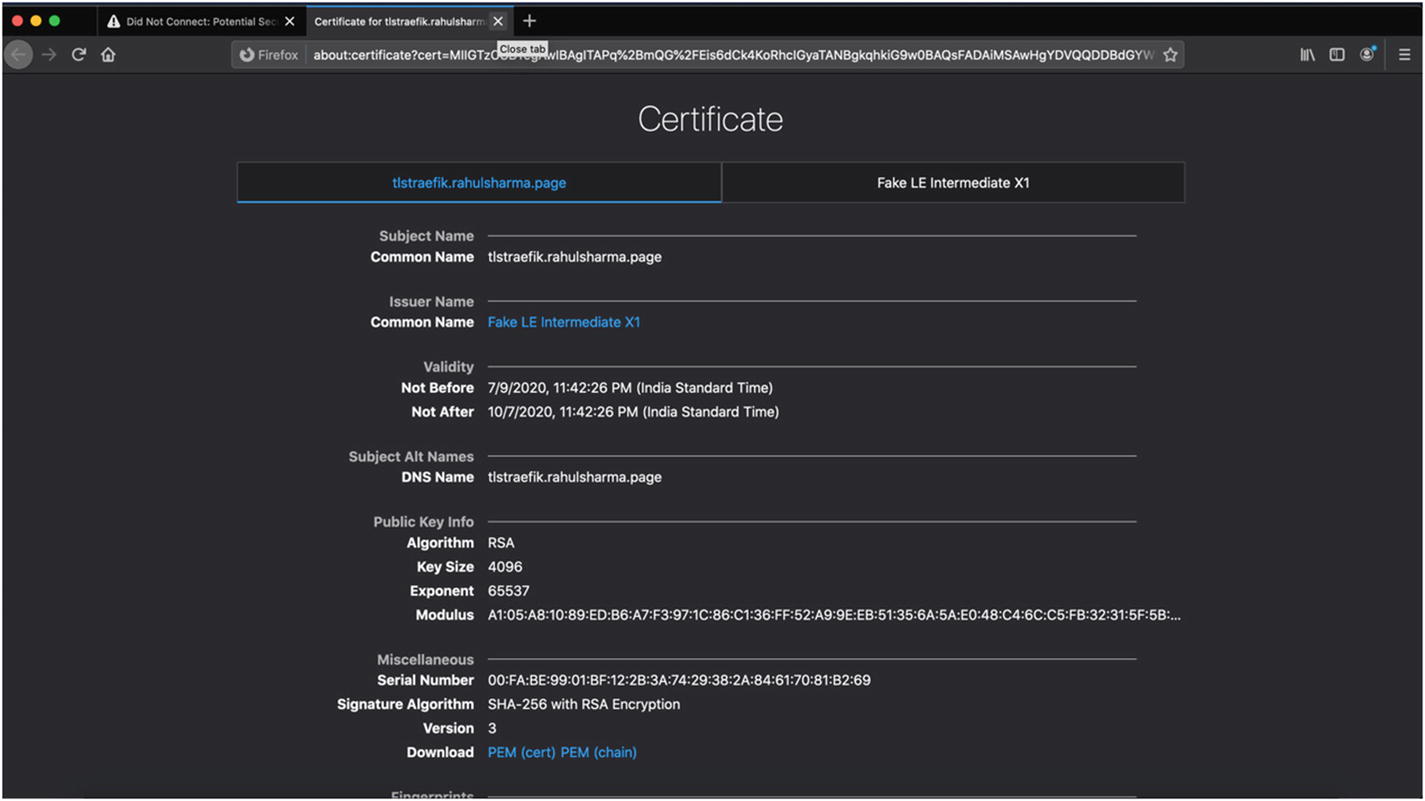
Let’s Encrypt staging certificate details
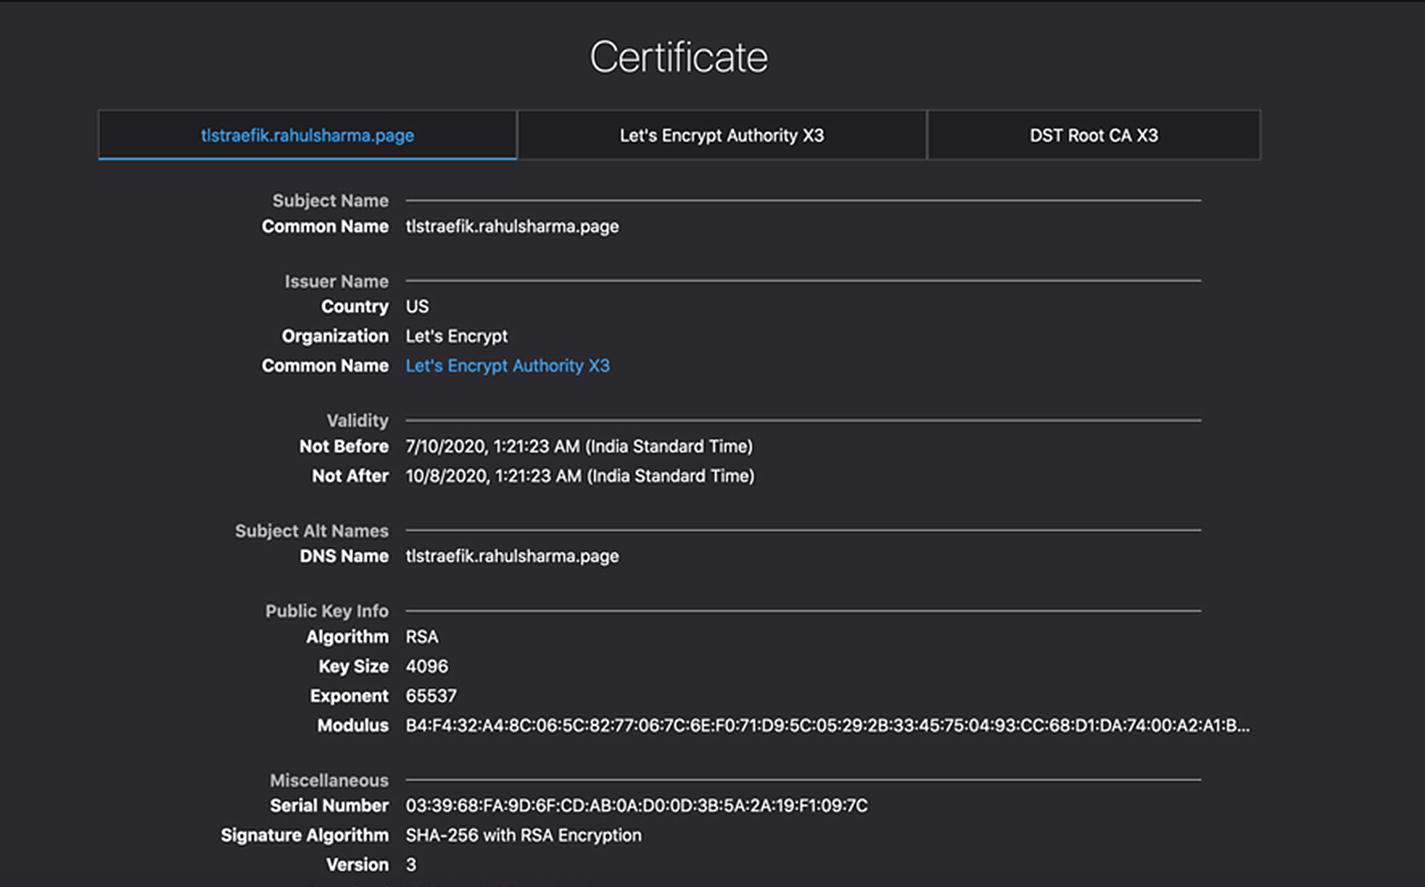
Let’s Encrypt valid certificate details
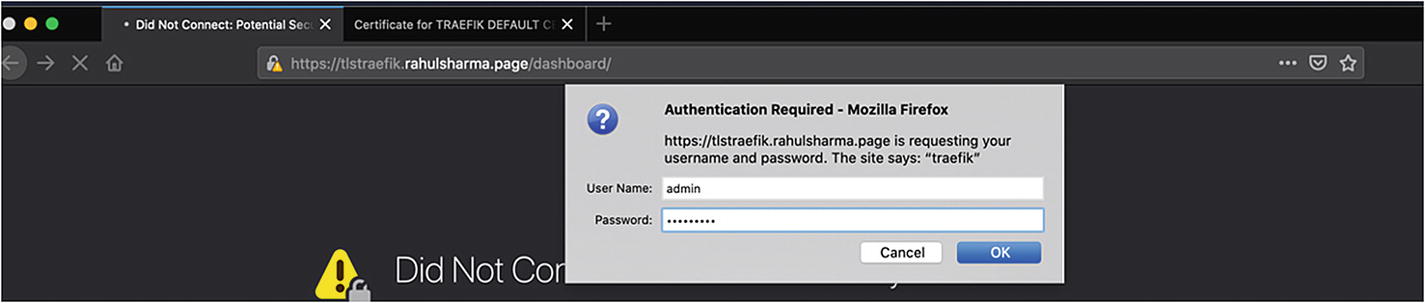
Basic authentication for dashboard
Traefik for TLS Forwarding
Sample MongoDB TLS Configuration in /etc/mongod.conf
As before, you are free to choose any other target such as another cloud managed database, the procedure to connect is different. You can try this locally as well; you need self-signed server certificates and your own CA certificate. A deeper discussion of this is beyond the scope of this section; however, OpenSSL is a good utility available on all major platforms to generate TLS certificates.
Route Configuration for TLS Forwarding
Connect Mongo over TLS
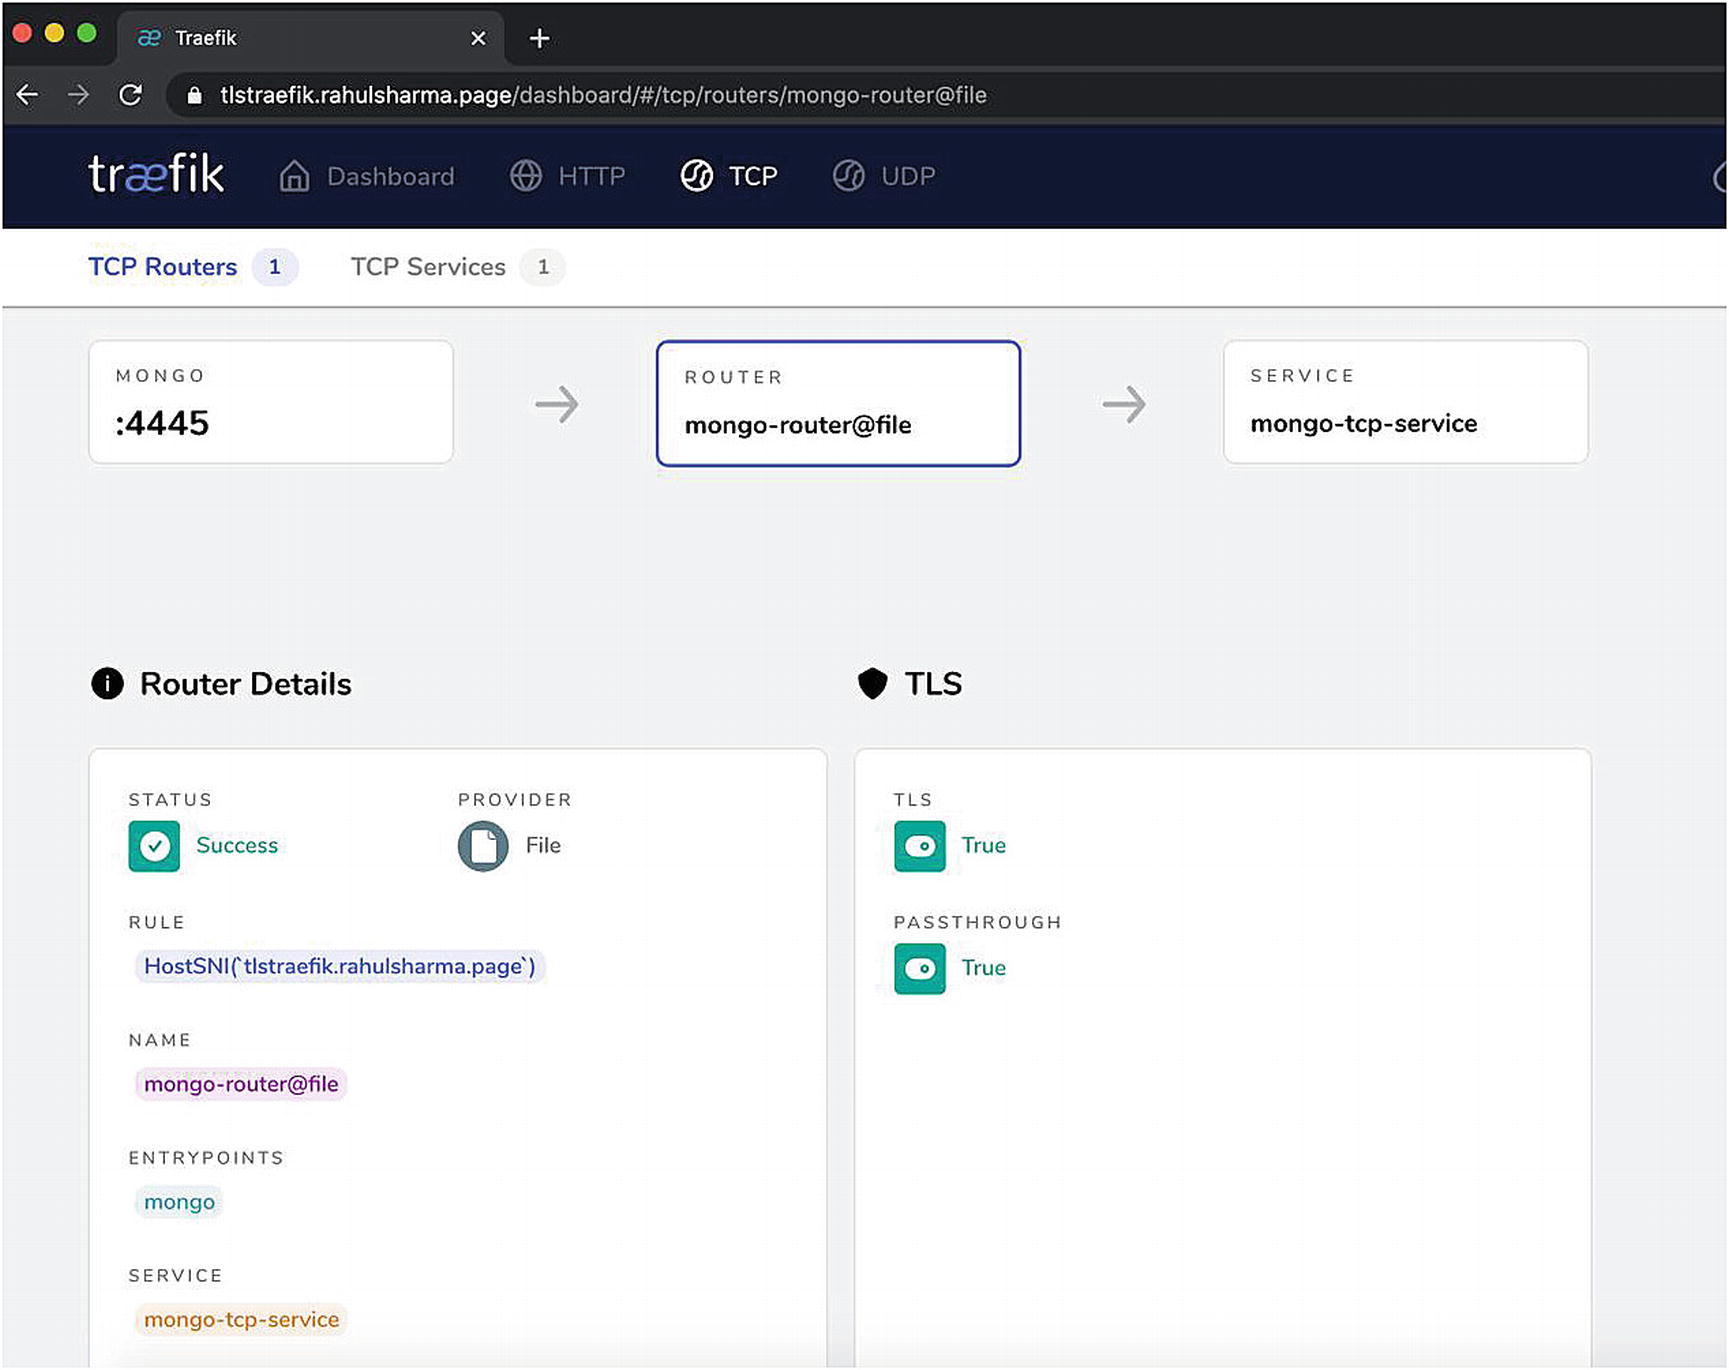
Traefik router with TLS passthrough
For the client application, there is no real change in behavior. With that, we wrap up this section and this chapter. For further deep dive, we encourage you to delve into the different TLS configuration options available in the Traefik documentation on their own.
Summary
In this chapter, you took a quick, surface-level dip into the deep domain of setting up TLS certificates to protect your network traffic. We understand that some of you may feel overwhelmed by all the subjects we rushed through. We have barely scratched the surface of the ecosystem of TLS certificates. However, we feel that we have exhibited how easy Traefik makes this in conjunction with Let’s Encrypt, especially for a public DNS domain. Indeed, you may find that it is easier to provision a valid TLS certificate for Traefik endpoints from Let’s Encrypt than it is to generate your self-signed or valid TLS certificates. If you are more interested in TLS, we encourage you to explore it.
We have not mentioned that certificates acquired through Let’s Encrypt renew every 90 days for security. In the traditional IT landscape, certificate renewal is a tedious manual process that must be tracked by people. As a result, it is done less often with long-running TLS certificates being used. With the Traefik/Let’s Encrypt integration, this is automatically handled out of the box without any manual intervention needed. Let’s Encrypt will send out automatic advance reminders on the email address you registered with.
In the next chapter, you take a deeper look at the vast array of easy options available in Traefik for operational concerns. Traefik makes it very easy to gather runtime metrics and integrates out of the box with many standard monitoring frameworks.