
Chapter 6. Audit Logging
A log is a record of activities or a record of changes to the data in an object, such as a table. Logs can be implemented and used for many purposes. SQL Server implements database logs that are used to maintain database integrity and consistency, improve performance, and help you identify problems. Examples of such logs are transactional logs, cache logs, and disk logs. Some of these logs are accessible, but none of them is really designed to be useful in an auditing situation.
If you have a critical database and you want to keep an accurate record of user activity against that database, you can implement a system of audit logs. That’s what the recipes in this chapter address. An audit log allows you to track the changes that users make to a table. You can find out who did what and when. Audit logs also allow you to track other activity in a system. If implemented correctly, you can even use an audit log to view a snapshot of a table’s data as of a specific point in time.
Audit Logs
In this chapter, we’ll show you how to implement an audit log that can be used to track changes to the data in a table or that can be used to track a user’s activities at a higher level. Before you begin, there are several things that you need to think about. These include:
Your objectives for the log
Whether you want to log row-level changes or higher-level activities
Whether you want to implement the log as a database table or as an operating-system file
The storage unit that you want to use
Whether you want to implement a local or global log
By nature, logs are sequential. Whether you are using a table or a flat file to implement your log, you need to ensure that new log records are always appended onto the end of the log. That way, your log reflects a true journal of the activity that took place — one that shows events in their correct order. It’s essential to prevent log records from being edited or deleted and to prevent log records from being inserted out of sequence.
In addition to recipes for implementing an audit log, this chapter also includes recipes demonstrating additional techniques that you can use to extend the functionality of the logs that you create. You will find recipes for improving performance where large log tables are involved, recipes for supporting multiple-languages, and recipes for simulating server push.
Your Objectives for an Audit Log
When you design an audit log, you need to think about your objectives. Generally, an audit log should include sufficient information to provide an accurate and timely reconstruction of past events. Specific goals for the data in a log often include the following:
Reconstructing past events
Tracking user activity
Detecting damaging behavior
Analyzing problems
Event reconstruction is one of the most important goals for an audit log. You need to be able to determine when any given change occurred. Without that basic capability, none of the other goals will fall into place. In addition to knowing what changes occurred and when, it’s often useful to know who made them. Recording the source of the changes allows you to track user activity and to watch for potentially damaging behavior. Do you have a user who is browsing payroll records just for the fun of it? The right kind of audit log will help you detect that. Logs can also be used for problem analysis. Should data become damaged, you can look at the log to determine when the problem first occurred and what program or user was responsible.
For all these reasons, audit-log records usually have two main components:
A snapshot of the data being inserted, updated, or deleted
Control information such as the time of day, the user involved, possibly the specific user program involved, and so forth
Access to audit-log information needs to be easy and consistent. The tougher it is to get at your log data, the less likely you will be to use it, and, consequently, having the log will be less beneficial. You also need to be very careful when designing and implementing audit-log functionality. Test things to be sure they work. Audit logs are sometimes put into place in a rush, without being thought out. The result is that problems with audit-log implementations may be detected only when an attempt is made to use the logs to resolve a problem. By then, it’s too late.
Row-Level Versus Activity Logging
There are two fundamentally different approaches that you can take to audit logging. You can audit at the row level, or you can audit at the activity level. What’s the difference? Row-level logs contain records for Data Manipulation Language (DML) events such as inserts, updates, and deletes. These events have meaning to the database, but not necessarily to the users. Activity-level logs record information about events, such as the shipment of an order, that have meaning to a user.
Row-level logs contain a detailed record of every INSERT, UPDATE, or DELETE operation on a table. Each time a row is added, changed, or deleted, a copy of that row is placed in the log along with a timestamp and perhaps some other information. If a single user operation results in several SQL statements being executed, the log will contain a record for each of those statements, but it may not be possible to look at the statements and derive the specific user action that initiated them.
As an example, consider the procedure used to record the shipment of an order in a hypothetical database. Orders, of course, may contain several items. For each item in the order, you must update the inventory table to reflect the quantity shipped. You also need to update the order record to indicate that the shipment occurred. Finally, you need to generate a shipment register record for the shipment itself. Figure 6-1 shows the log entries that you might expect to see if row-level logging were used. As you can see, row-level logging generates detailed logs showing each SQL statement executed against a set of tables.
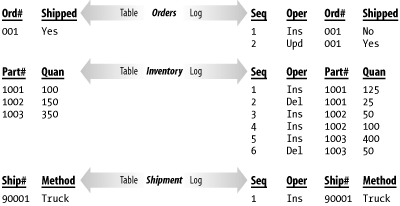
The advantage of row-level logging is that the level of detail is good enough to reconstruct a view of the data of any point in time that you desire. You can view the data the way it appeared yesterday or the way it appeared a week ago. One disadvantage is in the amount of log data that is generated. You have to somehow manage, and periodically purge, all that data. Another disadvantage is that it becomes difficult to get a high-level view of activities. What if all you wanted to do was to generate a report of shipments and receipts as they occurred throughout the day?
Let’s look at the same example again, this time from the standpoint of logging activities, and not the details of each change to a database row. The user-level activity that we are talking about is the shipping of an order, so that’s the event that we will log. Figure 6-2 shows the activity-level log entries that you might expect to see. Activity-level logging generates a log of activities, each of which may represent the execution of several DML statements.
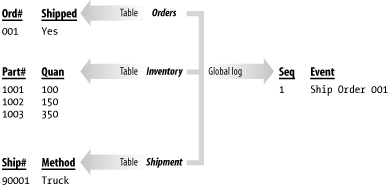
With activity-level logging, each shipped order results in just one log entry. Reading and understanding an activity-level log is much easier than reading and understanding a row-level log — at least as far as understanding high-level events is concerned — but activity-level logs are often more difficult to implement. Row-level logs can be implemented at the database level using triggers, while activity-level logs must be explicitly programmed into your application programs.
There is an important functional difference between row- and activity-level logs. Row-level logs contain all the information necessary to recreate past situations, whereas activity-level logs often contain little more than the names of the operations that were performed. If you need to reconstruct data as of some point in the past, then you need to implement row-level logs. If you need to know which operations occurred and when at a high level, you can use activity-level logs.
Database Tables Versus Operating System Files
Another consideration when designing an audit-log system is whether you want to store your log in an operating-system file or in a database table. External files are usually used for system logs and are often ASCII files that can be manipulated using tools such as grep and Perl. Operating-system files are not very useful when you’re auditing for business purposes, because you can’t query and manipulate the data in a file the way you can with the data in a table.
Audit logs for business purposes are most useful when they are implemented using standard database tables. You can query the logs and generate reports using any number of SQL-based query and reporting tools on the market. You can also easily write SQL SELECT statements to reconstruct snapshots of the data in a point in time or to retrieve particular records of interest. Since this is a SQL cookbook, the recipes in this chapter all deal with table-based audit logs.
Storage Units
The storage unit for an audit log is the record, and, for purposes of this book, a record represents a row in an audit table. Log records have two components: a body and a descriptor. These are illustrated in Figure 6-3.
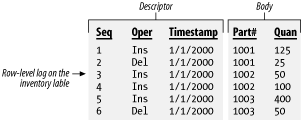
The body of the log record contains the operational data stored for auditing purposes. For row-level logs, the body consists of a copy of the row that was inserted, updated, or deleted. For activity-level logs, the body contains a description of the event that triggered the log entry.
The descriptor stores additional information that is necessary to reconstruct the sequence of events and interpret the log. This information includes such things as timestamps, sequential log numbers, usernames, process IDs, program names, DML operation names, and so forth. At the very least, a descriptor needs to include information, such as a timestamp or a sequence number, that can be used to place events in their proper order.
Global Versus Local Logs
A global log is one where all the log entries are funneled to one central table. A local log is one where each table being audited has a second log table associated with it. Row-level logs are almost always implemented as local logs. Typically, each table being audited has a different set of columns, making it difficult to record all changes in one table. A local log is used instead, and each local log ends up being an extended replicas of the main table. In other words, they contain all the columns from the main table, plus additional columns for the log’s descriptor.
Activity-level logging, on the other hand, can easily be implemented with one global table. The key issue with activity-based logging is to record the events that take place and perhaps some key information about each. You also, of course, need to record descriptor information, such as a timestamp or a sequence number. To use a global table for an audit log, you need to develop a structure that will handle all event types. This usually ends up being a series of string-based columns that store user-friendly messages.
The Warehouse Example
You have a warehouse system that stores the current quantity on hand of each product in stock. Those values change in real time throughout the day as products are shipped in or out of the shop.
Your stock record, which has been simplified for this example, looks like this:
CREATE TABLE Stock(
   ProductId CHAR(40),
   Qty INTEGER
   PRIMARY KEY(ProductId)
)
Recipes in this chapter are based on this example.
Row-Level Logging
Problem
You must implement a row-level log for a database table. With respect to our example, you wish to log changes to data in the Stock table so that you can review such changes at a later date. You need an auditing system that will allow you to track all the changes on each product.
Solution
As a basis for implementing this row-level log, you’ll create a log table that mirrors the structure of your Stock table. The name of this table will be StockLog. All of the columns that make up the Stock table will be replicated in the StockLog table and will make up the operational portion of the log record. In addition, the StockLog table will contain some additional columns to indicate the time and type of operation that occurred. These additional columns will make up the log record’s descriptor. Triggers will then be used to automatically log activity occurring on the Stock table.
The following CREATE TABLE statement creates the StockLog table:
CREATE TABLE StockLog(
ProductID CHAR(40),
Qty INTEGER,
Type CHAR(1) CHECK (type IN ('D','E','I','N')),
UserId VARCHAR(40),
EventTime DATETIME,
LogId INTEGER IDENTITY,
EventId UNIQUEIDENTIFIER
PRIMARY KEY(LogId)
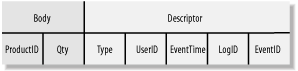
)Each record contains a body and a descriptor. The body is usually a copy of the original record structure, and the descriptor holds additional information needed to identify specific events. Figure 6-4 highlights the structure of the StockLog record.
Once the StockLog table has been created, you can create the triggers that will record the activity on the Stock table. Three triggers are needed: one to record inserts in the log, one to record updates, and one to record deletes. You can use the following CREATE TRIGGER statements to create these triggers:
CREATE TRIGGER InsertStock
ON Stock
FOR INSERT
AS
BEGIN
   INSERT INTO StockLog
      (ProductId, Qty, Type, EventID, UserId, EventTime)
      SELECT i.ProductId, i.Qty, 'I', NEWID(  ),
         CURRENT_USER, CURRENT_TIMESTAMP
      FROM inserted I
END
GO

CREATE TRIGGER DeleteStock
ON Stock
FOR DELETE
AS
BEGIN
   INSERT INTO StockLog
      (ProductId, Qty, Type, EventID, UserId, EventTime)
      SELECT d.ProductId, d.Qty, 'D',NEWID(  ),
         CURRENT_USER, CURRENT_TIMESTAMP
      FROM deleted d
END
GO

CREATE TRIGGER UpdateStock
ON Stock
FOR UPDATE
AS
BEGIN

   DECLARE @ProductId CHAR(40)
   DECLARE @dQty INTEGER
   DECLARE @iQty INTEGER
   DECLARE @guid UNIQUEIDENTIFIER

   DECLARE UpdateStockLog CURSOR
      FOR SELECT d.ProductID,d.Qty,i.Qty
             FROM deleted d, inserted i
             WHERE d.ProductId=i.ProductId
   OPEN UpdateStockLog

   FETCH NEXT FROM UpdateStockLog
   INTO @ProductId, @dQty, @iQty

   WHILE (@@FETCH_STATUS=0) BEGIN
      SELECT @guid=NEWID(  )
      INSERT INTO StockLog
         (ProductID, Qty, Type, EventID, UserID, EventTime)
         VALUES(@productID,@dQty,'E', @guid,
            CURRENT_USER,CURRENT_TIMESTAMP)
       INSERT INTO StockLog
         (ProductID, Qty, Type, EventID, UserID, EventTime)
         VALUES(@productID,@iQty,'N', @guid,
            CURRENT_USER,CURRENT_TIMESTAMP)

      FETCH NEXT FROM UpdateStockLog
      INTO @ProductId, @dQty, @iQty
   END

   CLOSE UpdateStockLog
   DEALLOCATE UpdateStockLog
END
GO
Discussion
This solution records activity in the Stock table by inserting records into the StockLog table. The idea is to include all the columns from the Stock table in the log, together with some additional columns to identify the user, the type of action taken, and the time the action was taken.
Tip
Some servers support mechanisms at the system level that are similar to the one shown here. These are sometimes referred to as journaling mechanisms. If these are available in your environment, you may want to use those native mechanisms instead of implementing an audit log using triggers. Either way, this example is useful because it will help you to understand the logic behind such mechanisms and the problems that might occur when using them.
Log table structure
The StockLog table contains five columns not in the original Stock table. These columns have the following purposes:
- Type
Records the type of operation. The type code will be one of the following:
-
D Marks a record that was deleted from the Stock table.
-
I Marks a new record that was inserted into the Stock table.
-
E Marks the before version of a Stock table record that was updated.
-
N Marks the after version of a Stock table record that was updated.
-
- UserID
Records the name of the user who performed the operation that was logged.
- EventTime
Records the time at which an operation occurred.
- LogId
Serves to identify each log record uniquely. Since this ID number is sequential, it also serves as a basis for correctly ordering the log records.
- EventId
Stores event identification. This is primarily used with update actions where two log records are used to represent one event. In such a case, both log entries will be given the same value for this column. Linking the before and after versions of an updated record facilitates future analysis of the log.
In the triggers created for this recipe, the CURRENT_TIMESTAMP and CURRENT_USERfunctions are used to populate the EventTime and UserId columns. Not all database servers use the same names for these functions, but all database servers implement this type of functionality. If you are using a database other than SQL Server, you may need to make minor changes to the example code for it to run in your environment.
The LogId column is incremented sequentially by virtue of its being declared using the IDENTITY keyword when the StockLog table was created. Again, different databases have different mechanisms for implementing sequentially increasing primary keys. Oracle, for example, requires that you use a stored sequence. Use a mechanism appropriate for your environment.
Log triggers
The three triggers used to maintain the log correspond to the three SQL statements — INSERT, DELETE, and UPDATE — that can be used to change the data in a table. For INSERT and DELETE statements, the triggers simply need to make a copy of the row being inserted or deleted and log it together with the user ID, timestamp, operation code, and log sequence number. For example, if you inserted two records and then deleted one, your log might look as follows:
ProductID  Qty  Type UserId  EventTime                LogId
---------- ---- ---- ------- ------------------------ ------
Bananas    100  I    Jenny   2000-06-27 22:41:41.150  1
Apples     40   I    Teena   2000-06-27 22:41:41.177  2
Apples     40   D    Teena   2000-06-27 22:41:41.183  3
The update trigger is a bit more complex than the other two, because
it needs to deal with two versions of the row being updated — the
original version and the modified version. One way to think of an
update is as a combination of a delete followed by an insert. The
deleted row represents the original version of the row, while the
inserted row represents the new version. Our
update trigger records the execution of an UPDATE statement in terms
of those two steps. The deletion of the original row is marked using
the type code E. That is immediately followed by
an insert marked using the type code N. The codes
E and N are used to
differentiate update events from real delete and insert events. The
following example shows the log records that would be generated as a
result of a change in the quantity of bananas in the warehouse:
ProductID  Qty  Type UserId  EventTime                LogId
---------- ---- ---- ------- ------------------------ ------
Bananas    100  E    Jenny   2000-06-27 22:44:13.060  4
Bananas    200  N    Jenny   2000-06-27 22:44:13.060  5
With updates, two log entries are generated for one event. Special attention needs to be given to be sure that you can come back later and link up the two rows in question for any given update operation. In this recipe, we use the EventId column to record a unique identifier for each event. The EventId column was declared with the UNIQUEIDENTIFIER type — a special type reserved by SQL Server for system-generated unique identifiers. Each log trigger makes a call to the NEWID( ) function to retrieve a unique identifier for each event. This identifier is stored in the EventId column in all log records generated as a result of the event.
Tip
While values in columns of type UNIQUEIDENTIFIER are guaranteed unique, they are not guaranteed to be sequential. To ensure the sequential nature of the log, an IDENTITY column (LogID in this case) must be used.
The update trigger joins are inserted and deleted on their respective ProductId values. The deleted table holds the before versions of all rows being updated, while the inserted table holds the after versions of those same rows. The join on ProductId serves to match each before row with its corresponding after row. This approach, while efficient, requires that updates to a row’s primary key values (ProductId in this case) never occur.
In SQL Server, triggers are executed just once in response to a triggering statement. SQL, however, allows you to modify many rows with one statement. To generate a unique event ID for each row being updated by an UPDATE statement, the UpdateStock trigger uses a cursor to iterate through each of the affected rows. A new event ID is generated each time through the loop, and this event ID is recorded in the log entries for the row being processed.
With a log such as the StockLog table, it is possible to play back events in the order in which they occur. The table is essentially a journal of events created sequentially and classified by type. Thus, it is possible to restore the table to the way it was at any point in time, and it is also possible to track the activity of each individual user.
Tip
While the solution shown in this recipe allows you to track, insert, update, and delete an activity, it does not allow you to track query an activity — triggers are not available on SELECT statements. If you need to record queries in an audit log, you can restrict table access to a stored procedure, force all database users to query through that procedure, and then have the stored procedure record those queries in a log.
Reporting Log Events
Problem
You need a human-readable report of the activity on the Stock table. You want the report to show activity in the correct order, and you want to see only one row on the report for each update operation. A row-level log table, such as the StockLog table from the previous recipe, records events in the order in which they occur. You can easily generate reports of these events.
Solution
Based on the Stock table, you can use the following query to generate a human readable report of the audit log in the StockLog table:
SELECT
   MAX(UserID) AS UserID,
   MAX(
      CASE
        WHEN Type='D' THEN 'Deleted'
        WHEN Type='I' THEN 'Inserted'
        ELSE 'Updated'  END) AS Type,
   MAX(ProductID) AS ProductID,
   MAX(CASE
         WHEN Type!='N' THEN Qty
         ELSE null END) AS Qty1,
   MAX(CASE
         WHEN Type='N' THEN Qty
         ELSE null END) AS Qty2,
   MAX(EventTime) EventTime
FROM StockLog
GROUP BY EventId
ORDER BY max(LogId)
Tip
When you execute this query, you may receive the following message: “Warning: Null value eliminated from aggregate.” This is nothing to worry about. The message is informing you that some of the values summarized using MAX were NULL. This is, in fact, the intended use, since we are explicitly setting the qty values in some rows to NULL to ignore them.
As an example of how this query functions, let’s assume that the following SQL statements had been executed against the stock table. Each INSERT and DELETE statement would have generated one log entry, while the UPDATE statement would have generated two.
INSERT INTO Stock(ProductID,Qty)
      VALUES('Banana',10)
INSERT INTO Stock(ProductID,Qty)
      VALUES('Apple',20)
INSERT INTO Stock(ProductID,Qty)
      VALUES('Orange',30)
UPDATE STOCK SET Qty=2
      WHERE ProductID='Banana'
DELETE FROM Stock
      WHERE ProductID='Banana'
Given the operations shown here, the query in this recipe will produce the following results:
UserID  Type     ProductID  Qty1  Qty2  EventTime
------- -------- ---------- ----- ----- ---------------------------
Max     Inserted Banana     10    NULL  2000-06-27 22:51:30.017
Justin  Inserted Apple      20    NULL  2000-06-27 22:51:30.023
Joshua  Inserted Orange     30    NULL  2000-06-27 22:51:30.027
Ryan    Updated  Banana     10    2     2000-06-27 22:51:30.027
Gerard  Deleted  Banana     2     NULL  2000-06-27 22:51:30.030
This report is more readable than what you would get were you simply to query the raw data from the audit-log table, and it can be easily understood by users. Of course, the query shown in this recipe can easily be adapted to narrow down the results to just the data needed to answer specific questions. For example, you might want to report on the activity of a single user, or you might want to report on a single product.
Discussion
There are four key things to notice about the query in this recipe:
The first CASE statement translates the type codes.
CASE statements divide quantity values into two columns.
The grouping functions combine updates into one row.
The ORDER BY clause sorts the activity by LogId.
The CASE statements in this query translate the one-letter type codes to words that will have meaning to the person reading the report. Thus, D is translated to Deleted, I to Inserted, and so forth.
You’ll notice that this query returns two quantity
columns. This is done to report both the old and new quantities for
an update operation. The first quantity column, named Qty1, will
contain the quantities for any operation with a type code not equal
to N. This includes insert and delete operations.
It also includes the original quantity (type code
E) from an update operation. The following CASE
statement, embedded in the query, sets the value for this column:
MAX(CASE WHEN Type!='N' THEN Qty
      ELSE null END) AS qty1
If the type is not equal to N, the qty1 column
returns the quantity; otherwise, it returns a NULL value. A similar
CASE statement is used to place the quantity value into the Qty2
column whenever it is not placed in the Qty1 column. In other words,
the second quantity column takes on the quantity from type
N log records. These represent the updated values
from update operations.
The effects of the CASE statements are fairly obvious. The use of
grouping functions to convert two update-related log records into one
output record is not so obvious, and it deserves some extra
explanation. The following example illustrates the output that this
query would generate were the grouping functions not used. The two
records in the example are types N and
E, which means they were generated as the result
of an UPDATE statement.
UserID  Type     ProductID  Qty1  Qty2  EventTime
------- -------- ---------- ----- ----- ---------------------------
Ryan    Updated  Banana     10    NULL  2000-06-27 22:51:30.027
Ryan    Updated  Banana     NULL  2     2000-06-27 22:51:30.027
Notice that the CASE statement has translated the type codes
N and E both to the word
Updated. The result is that all columns in both rows are identical
except for the Qty1 and Qty2 columns. You can combine these two rows
by using the SQL GROUP BY clause. Group the two rows based on the
EventID, and simply take the maximum value of each column. In the
case of the UserID, Type, and ProductID columns, both vales are the
same, so applying the MAX function returns just one occurrence of
each value. In the case of Qty1 and Qty2, applying the MAX function
returns the numbers, eliminating the NULLs. That’s
because numbers are always higher than NULLs. The resulting single
row would be:
UserID  Type     ProductID  Qty1  Qty2  EventTime
------- -------- ---------- ----- ----- ---------------------------
Ryan    Updated  Banana     10    2     2000-06-27 22:51:30.027
The use of grouping in this particular example to combine the two log entries from an update operation into one row on the report depends on two things. Each operation must have a unique EventId, and update operations must not have changed any values other than the quantity for a product. As long as each insert and delete operation has a unique EventId, the log entries for those operations will never be grouped with any others. Similarly, as long as each update record only represents a change in quantity, the other columns in the log entries will be identical, and the log entries will be successfully combined into one record for the report.
Tip
The query used in this section to report on the log is designed under the assumption that updates do not change the primary key for a row — in this case, the ProductID. If changing the primary key is a possibility, you will need to treat the primary-key columns in the same manner as the Qty column was treated.
Generating Current Snapshots
Problem
You have an audit log from which you need to generate a current snapshot of the table on which the log is based. In other words, you want to generate the original table from the log.
Solution
The following query can be executed against the StockLog table to regenerate the data in the Stock table:
SELECT ProductID, Qty
FROM StockLog
WHERE LogId IN
   (SELECT
      (SELECT (CASE WHEN MAX(Type)!='D'
         THEN MAX(s.LogID)
         ELSE 0 END)
      FROM StockLog s1
      WHERE s.ProductID=s1.ProductID
         AND s1.LogID=MAX(s.LogID))
   FROM StockLog s
   GROUP BY ProductID)
The generated result is as follows:
ProductID  Qty
---------- ----
Apple      20
Orange     30
...
Discussion
Another use for a row-level audit-log table, such as the StockLogtable, is to regenerate the data for the table being logged. For example, you might want to do this if you had accidentally deleted the main table.
The query shown in this recipe lists the ProductID and Qty columns
for the most recent version of each row in the Stock table.
Information for deleted records, where the log type code is a
D, is not returned by the query. To explain the
logic behind this query, it’s best to look at the
subquery separately. To begin with, the following pseudocode captures
the essence of the function of the main query:
SELECT ProductID, Qty
FROM StockLog
WHERE LogID IN [most recent valid log entry
                for each product, excluding deleted rows]
In the query that returns the most recent log entries for each product, a subquery is used to return the LogID of the most recent log entry for each product that doesn’t represent a delete operation. The code to exclude the deleted rows is highlighted in the following example:
SELECT ProductID, Qty
FROM StockLog
WHERE LogId IN
   (SELECT
      (SELECT (CASE WHEN MAX(Type)!='D'
         THEN MAX(s.LogID)
         ELSE 0 END)
      FROM StockLog s1
      WHERE s.ProductID=s1.ProductID
         AND s1.LogID=MAX(s.LogID))
   FROM StockLog s
   GROUP BY ProductID)
For each group — remember that each group represents one product — this subquery finds the most recent log entry. The most recent log entry is determined by looking at the LogID column. If the event is not a delete event, we include its LogID identifier in the result set. If the event is a delete event, a 0 is returned instead of the LogID value. When the StockLog table was first created, the LogID column was defined using the IDENTITY keyword. That means it begins with 1 and increments by 1. Since no log record has an ID of 0, our snapshot query will not return any data for log records representing deletes.
Since we are generating a snapshot, GROUP BY is used to find only the last event for each product. See the highlighted code in the following example. All those products that were deleted from the Stock table have their last events marked by a LogId of 0. Only the ones with valid, nonzero, LogIds are used to generate the snapshot:
SELECT ProductID, Qty FROM StockLog WHERE LogId IN(SELECT(SELECT (CASE WHEN MAX(Type)!='D' THEN MAX(s.LogID) ELSE 0 END) FROM StockLog s1 WHERE s.ProductID=s1.ProductID AND s1.LogID=MAX(s.LogID))FROM StockLog s GROUP BY ProductID)
The list of LogId values generated by the subquery is used by the main query as a basis for selecting the most recent ProductID and Qty value for each product.
The query in this recipe is quite complex and may take a long time to execute. Because of that, it is not suitable for use in reports that run frequently. For occasional reporting, however, this can be quite useful.
Generating Time-Restricted Snapshots
Problem
You want to generate a snapshot of a table with the rows as they appeared at a specific point in time in the past.
Solution
A time-restricted snapshot is one that returns a view of the table as of a given moment in time. The StockLog audit log can be used to build a time-restricted snapshot of the Stock table.
This solution builds on the previous recipe for building a snapshot of the table as it currently exists. The difference is that we are now restricting the results based on the timestamp in the EventTime column. The @TIME variable in this recipe represents the point in time that you want the snapshot to represent.
SELECT ProductID, Qty
FROM StockLog
WHERE logID IN
   (SELECT
      (SELECT (CASE WHEN MAX(Type)!='D'
         THEN MAX(s.LogID)
         ELSE 0 END)
      FROM StockLog s1
      WHERE s.ProductID=s1.ProductID
         AND s1.LogID=MAX(s.LogID))
   FROM StockLog s
   WHERE s.EventTime <= @TIME
   GROUP BY ProductID)
Discussion
As you can see, this code is an extension of the current snapshot solution shown previously. That solution has been extended to include one additional restriction in the WHERE clause that limits the results to the most current data as of the date represented by the @TIME variable. Log records generated after the time in question are ignored. The resulting snapshot represents the data in the Stock table at the exact moment specified by @TIME.
Tip
You need to set the @TIME variable to a valid date and time prior to executing this query. Alternatively, you can replace @TIME with a constant representing a valid date/time value.
The query in this recipe uses s.EventTime <=
@TIME to capture all events up to and including the time in
question. If you only want to consider events that occurred prior to
the specified time, use the less than (<) operator.
Undoing Table Changes
Problem
You want to implement an undo mechanism for a table that allows you to undo the most recent action. You can use a row-level audit log as the basis for an undo mechanism.
Solution
The following stored procedure retrieves the most recent log record, which is the one with the highest LogID value, and reverses the action that caused that log record to be generated in the first place.
CREATE PROCEDURE UndoLog
AS
   DECLARE @ProductID CHAR(40)
   DECLARE @Qty INTEGER
   DECLARE @Type CHAR(1)

   SELECT
      @ProductID=ProductID,
      @Qty=Qty,
      @Type=Type
   FROM StockLog
   WHERE LogId=(SELECT MAX(LogId)
      FROM StockLog) AND Type!='N'

   IF @type='D'
      INSERT INTO Stock(ProductID,Qty)
         VALUES(@productID,@qty)

   IF @type='I'
      DELETE FROM Stock WHERE ProductID=@productID

   IF @type='E'
      UPDATE Stock SET Qty=@qty
         WHERE ProductID=@productID
Following is a snapshot of the log after the first three inserts:
ProductID  Qty
---------- ----
Banana     10
Apple      20
Orange     30
Discussion
The first thing this procedure does is to identify the most recent
event recorded in the StockLog table. This is done by the SELECT
query, which identifies the most recently generated log record, and
then retrieves the stock data from that record. In the case of an
update event, the type E record will be retrieved.
Type N records are specifically excluded. The type
E record can be used to undo the effects of an
UPDATE statement, because it represents the before image of the stock
record that was changed.
With the data retrieved, it is fairly simple to restore the original
state of the row in question: execute a statement opposite to the one
that was initially executed. For an INSERT
statement, the opposite action is to
execute a DELETE statement and vice versa. For an UPDATE statement,
the opposite action is to update the row involved and set the columns
back to their original values. To do this, use the before image
contained in the type E log entry for an UPDATE
statement.
The undo action resembles the use of the ROLLBACK statement to abort a transaction. The important differences, however, are that the action of the UndoLog procedure is, itself, logged in the audit log and that the action of the UndoLog procedure is more controllable. The undo procedure in this recipe only reverses the most recent event, but you have the ability to customize it to do more than that.
Minimizing Audit-Log Space Consumption
Problem
You are going to implement an audit log, but you need a way to minimize space consumption so that the resulting log uses disk space as efficiently as possible. It’s still important to be able to construct an accurate snapshot of the base table as it appeared at any give point in time.
Solution
The log recipe shown earlier in this chapter implemented a log that contained a complete snapshot of a row for every operation performed on that row. While simple to implement and to query, the result is a log that contains a great deal of redundant information where update and delete operations are concerned. To minimize the space used by a row-level log, you can design it such that a column value is recorded only when it is changed. Thus, a change to one column in a row does not cause an entirely new copy of that row to be written to the log. Instead, only the before and after versions of the modified column are recorded in the log. Similarly, with deletes, only the delete action needs to be recorded.
For purposes of this recipe, assume that the Stock table to be audited can be created using the following statement:
CREATE TABLE Stock(
   ProductId CHAR(40),
   Qty INTEGER,
   Price INTEGER,
   PRIMARY KEY(ProductId)
)
Given this table, the solution requires that a log table is created and that triggers are created to record changes to the data in the Stock table’s audit log.
Step 1: Create the audit table
Create an audit table that stores the audit data for the base table. The following statement creates a table named StockLog that can be used to log changes made to the table named Stock:
CREATE TABLE StockLog(
   ProductId CHAR(40) NOT NULL,
   Qty INTEGER NULL,
   Price INTEGER NULL,
   EventTime DATETIME NOT NULL,
   DeleteFlag CHAR(1) NULL,
   LogId INTEGER IDENTITY
)
As you can see, the audit table has a similar structure to the Stock table’s, with the following exceptions:
One additional column is included to store the timestamp (the date and time of the event).
One column is included to represent DELETE events.
LogId column is added to uniquely identify events and support sequencing order between them.
All columns, except for the timestamp and primary-key columns, are explicitly allowed to be null.
Step 2: Implement the audit triggers
This set of triggers records all insert, update, and delete activity in the StockLog table, but the approach is slightly different from the previous audit-log recipe in this chapter. This time, column values are not recorded for deletes, and only modified columns are recorded with update log entries. Pay special attention to the CASE statements in the updateStock trigger as you read the code.
CREATE TRIGGER insertStock
ON Stock
FOR INSERT
AS
BEGIN
   INSERT INTO StockLog
      (ProductId, Qty, Price, DeleteFlag, EventTime)
      SELECT i.ProductId, i.Qty, i.Price, null, CURRENT_TIMESTAMP
      FROM inserted I
END
GO

CREATE TRIGGER deleteStock
ON Stock
FOR DELETE
AS
BEGIN
   INSERT INTO StockLog
      (ProductId, Qty, Price, DeleteFlag, EventTime)
      SELECT d.ProductId, null, null, 'D', CURRENT_TIMESTAMP
      FROM deleted d
END
GO

CREATE TRIGGER updateStock
ON Stock
FOR UPDATE
AS
BEGIN
      INSERT INTO stockLog
      (ProductId, Qty, Price, DeleteFlag, EventTime)
      SELECT d.productId,
        (CASE WHEN d.Qty!=i.Qty THEN i.Qty ELSE NULL END),
        (CASE WHEN d.Price!=i.Price THEN i.Price ELSE NULL END),
        null, CURRENT_TIMESTAMP
      FROM deleted d,inserted I
      WHERE d.ProductId=i.ProductId

END
GO
Discussion
Space can often become an issue if all details are to be stored in a log. This technique demonstrates how to store the information with minimum space consumption.
The concept underlying the solution shown here is that column values are only recorded in the log table when they change. An INSERT operation is the only operation where the log record will contain a complete copy of a row. For UPDATE operations, the log will only contain the new values for the columns that were changed and the value of the row’s primary key. All columns not changed by an UPDATE statement are left set to NULL in the log record to avoid storing data redundantly. In this way, space consumption is minimized. Deletes are a bit different. Each log record has a delete flag in its descriptor. When a row is deleted, the delete flag is set in the corresponding log’s record.
Consider, for example, the following DML statements:
INSERT INTO Stock(ProductID, Qty, Price)
   VALUES ('Bananas', 10, 112)

INSERT INTO Stock(ProductID, Qty, Price)
   VALUES ('Apples', 20, 223)

UPDATE Stock
   SET Qty=25
   WHERE ProductID='Apples'

UPDATE Stock
   SET Qty=30
   WHERE ProductId='Apples'

DELETE FROM Stock
   WHERE ProductId='Bananas'
The audit-log entries generated by these statements would be as follows:
SELECT LogId, ProductId, Qty, Price, DeleteFlag, EventTime
FROM  stockLog

GO

LogId   ProductId  Qty   Price  DeleteFlag EventTime
------  ---------- ----- ------ ---------- ------------------------
1       Bananas    10    112    NULL       2000-06-27 23:01:25.943
2       Apples     20    223    NULL       2000-06-27 23:01:25.950
3       Apples     25    NULL   NULL       2000-06-27 23:01:25.970
4       Apples     30    NULL   NULL       2000-06-27 23:01:25.970
5       Bananas    NULL  NULL   D          2000-06-27 23:01:25.993
The first two DML statements were INSERT statements, and,
consequently, the log entries each contain a complete copy of the
data being inserted. The next two DML statements, however, were
UPDATE statements. Both of these updated only one column, and the log
entries reflect that fact by setting the other columns to NULL. The
final log entry represents a deletion of the Bananas record. The
D in the DeleteFlag column indicates that the
record was deleted. No other information need be recorded;
consequently, both the Qty and Price columns have been set to NULL.
Most database systems optimize the storage of NULLS such that the
amount of space used for that purpose is negligible.
Snapshot generation
Generating a snapshot of the Stock table is more difficult when the log records changes to a single column than it is when each log record contains a complete copy of the row being changed. In the case of the audit log described in this recipe, you can use the following SELECTstatement to generate a snapshot of the base table as of a specific time. The @TIME variable in the example represents the “as of” time used for the snapshot generation. For testing purposes, you can replace it with CURRENT_TIMESTAMP to return the current snapshot.
SELECT t.ProductId,
   Qty=(SELECT TOP 1 tQ.Qty FROM StockLog tQ
      WHERE tQ.Qty IS NOT NULL
         AND tQ.ProductId=t.ProductId
         AND tQ.EventTime <= @TIME
      ORDER BY tQ.LogId DESC),
   Price=(SELECT TOP 1 tP.Price FROM StockLog tP
      WHERE tP.Price IS NOT NULL
         AND tP.ProductId=t.ProductId
         AND tP.EventTime <= @TIME
      ORDER BY tP.LogId DESC)
FROM StockLog t
WHERE  t.EventTime<=@TIME
GROUP BY t.ProductId
HAVING NOT EXISTS(SELECT * FROM StockLog
   WHERE productID=t.productID
   AND logID=MAX(t.logID) AND DeleteFlag='D')
This SELECT statement contains a number of subqueries: one for each column in the Stock table to retrieve the most recent values for those columns and one at the end to eliminate all deleted rows from the report. Each subquery retrieves the most recent value of a column with respect to the date specified by the @TIME variable. The one exception is that the primary key column does not require a subquery because we are assuming that the primary key does not change.
To get the most recent value for a column, we execute a subquery. The subquery ignores rows where the column is NULL. The subquery sorts the rows in descending order by LogId and returns the topmost value, which is the most recent value of the column. The subquery respects the time you pass (@TIME) and will ignore values set later than that time. The following example shows the subquery used to return the most recent value for column Qty:
SELECT TOP 1 tQ.Qty FROM StockLog tQ
WHERE tQ.Qty IS NOT NULL
   AND tQ.ProductId=t.ProductId
   AND tQ.EventTime <= @TIME
ORDER BY tQ.LogId DESC
This same subquery is used for each column in the table, except for the columns in the record descriptor.
The WHERE clause in the main query limits the scope of the selection to the rows that were inserted before or on the date and at the time represented by @TIME. The ProductId column is then used to group the result set. Grouping is done because we are interested only in one instance (a snapshot) of each row in the original table.
Deleted records
The HAVING clause in the query eliminates Stock records that have been deleted, so that they don’t appear in the snapshot. The HAVING clause looks like this:
HAVING NOT EXISTS(SELECT * FROM StockLog
   WHERE productID=t.productID
   AND logID=MAX(t.logID) AND DeleteFlag='D')
The subquery in the HAVING clause checks to see if the most recent log entry for a Stock record represents a delete. If it does, then that Stock record is not returned as part of the snapshot.
Dealing with NULL values
If the Stock table includes some columns that are allowed to be NULL, the solution shown in this recipe will not work properly. That’s because the query to generate a snapshot has no way to know whether a NULL value in a particular column represents a NULL column value or if it just means that there has been no change for that column.
One possible way to deal with NULL values is to use a second column as a flag to indicate whether the first is a null. This flag column can be a BIT type if the database implementation allows it, or it can be a character type such as a CHAR(1). A BIT type allows for TRUE and FALSE values. The StockLog table is extended with the columns representing the NULL values:
CREATE TABLE StockLog(
   ProductId char(40) NOT NULL,
   Qty INTEGER NULL,
   Price INTEGER NULL,
   IsEmptyPrice BIT,
   IsEmptyQty BIT,
   EventTime DATETIME NOT NULL,
   DeleteFlag CHAR(1) NULL,
   LogId INTEGER IDENTITY
)
Assuming that you implemented a flag column named IsEmptyQty and that you used 1 to represent a NULL value, and 0 otherwise, the subquery in the snapshot query would need to use a WHERE clause, such as the one shown here:
SELECT t.ProductId,
   Qty=(SELECT TOP 1 tQ.Qty FROM StockLog tQ
      WHERE tQ.IsEmptyQty=0
         AND tQ.ProductId=t.ProductId
         AND tQ.EventTime <= @TIME
      ORDER BY tQ.LogId DESC ),
   Price=(SELECT TOP 1 tP.Price FROM StockLog tP
      WHERE tP.IsEmptyPrice=0
         AND tP.ProductId=t.ProductId
         AND tP.EventTime <= @TIME
      ORDER BY tp.LogId DESC)
FROM StockLog t
WHERE  EventTime<=@TIME
GROUP BY t.ProductId
HAVING NOT EXISTS(SELECT * FROM StockLog
   WHERE productID=t.productID
   AND logID=MAX(t.logID) AND DeleteFlag='D')
This solution requires only minimal changes to the SELECT statement used to generate snapshots. It also doesn’t consume much space in an implementation where the DBMS supports the BIT datatype. Sybase and MS SQL Server both support BIT types. The storage of such BIT types is optimized by combining all the BIT columns in a row together into as few bytes as possible. If there are 8 bit columns, they will consume just 1 byte per row.
Online Account Balancing
Problem
You need to create an account-balancing solution, where accounts can be debited or credited with different products. Each credit or debit will be recorded in a history table. Your system then needs to generate the current position, or balance, of an account based on its debit/credit history.
Solution
The code shown in this recipe is actually a part of an online portfolio tracking system for a brokerage application. The idea is to use the accounting principle of credits and debits to record each event affecting an account. These credits and debits can then be summarized to list the portfolio. The portfolio is the list of products in an account.
The following table, named StockRecord, can be used to store events in the system. Each account can have multiple products in its portfolio. An important column in this table is the ValidDate column. Each event has a validity date that states the date from which the position is valid. For example, if a trade is made with a settlement period of five days, it means that even if we bought the product today, it will not be available and shown in the portfolio until five days from now. All such events should be taken into consideration when building an account balance for a particular date.
CREATE TABLE StockRecord (
   RecordId INTEGER IDENTITY,
   AccountId INTEGER NOT NULL,
   ProductId VARCHAR(40),
   Qty NUMERIC(20,4) NULL,
   Type CHAR(1) NOT NULL
      CHECK(Type in ('C','D','O','L','B')),
   ValidDate DATETIME,
   PRIMARY KEY(RecordID)
)
The type column contains a type code indicating the type of transaction that occurred. Table 6-1 describes the meaning of the various type codes used in this application.
|
Code |
Type |
Description |
|
C |
Credit |
Signifies that a quantity of product was added to an account. |
|
D |
Debit |
Signifies that a quantity of product was removed from the account. |
|
O |
Opening position |
Records an account’s opening position for a specific product. All events for the product recorded prior to this event are no longer valid for the purpose of calculating the current position. |
|
L |
Credit-line limit |
Records the amount of a product that can be borrowed and is available for trading. |
|
B |
Blocked |
Records the quantity of a product that is blocked and not available for trading. |
The following is a representative example of the data that you would see in the StockRecord table:
RecordId  AccountId  ProductId  Qty       Type  ValidDate
--------- ---------- ---------- --------- ----- ---------------------------
1         3          IBM        20.0000   O     2000-07-02 07:30:09.000
2         3          CFT        40.0000   O     2000-07-03 07:30:21.000
3         3          MSFT       10.0000   C     2000-07-02 10:30:39.000
4         3          MSFT       10.0000   D     2000-07-02 10:45:54.000
5         3          MSFT       25.0000   C     2000-07-02 12:11:15.000
6         3          MSFT       15.0000   C     2000-07-02 12:41:22.000
7         3          MSFT       10.0000   B     2000-07-03 09:00:00.000
8         3          USD        1000.0000 L     2000-07-03 09:00:00.000
...
These results could be interpreted as follows: at 7:30 the account was opened, and 20 shares of IBM and 40 shares of CFT were put in as the opening balance. The client then bought, and later sold, MSFT stock at 10:30 and 10:45, respectively. At 12:11, the client bought 25 shares of MSFT. After half an hour, the client bought additional shares of MSFT. During the day, the client arranged a line of credit, which will be available on the following day. 10 shares of MSFT were used as a collateral.
With the StockRecord table created, and with the codes in Table 6-1 being used to record transactions, you can use the following query to generate the current portfolio for the accounts in the system:
SELECT
   AccountID,
   ProductID,
   (SUM(CASE WHEN Type='C' OR Type='L' OR Type='O'
         THEN Qty ELSE 0 END)-
      SUM(CASE WHEN Type='D' OR Type='B'
         THEN Qty ELSE 0 END)) Total,
    SUM(CASE WHEN Type='B'
      THEN Qty ELSE 0 END) Blocked,
   MAX(s.ValidDate) ValidDate
FROM StockRecord s
WHERE s.ValidDate BETWEEN
      ISNULL((SELECT MAX(st.ValidDate)
              FROM StockRecord st
              WHERE st.AccountID=s.AccountID AND
                    st.ProductID=s.ProductID AND
                    st.Type='O'),'1900-1-1')
                AND CURRENT_TIMESTAMP
GROUP BY s.AccountID, s.ProductID
Given the StockRecord rows displayed in the example, you would obtain the following position report when you executed the current position query:
AccountID  ProductID  Total      Blocked  ValidDate
---------- ---------- ---------- -------- ---------------------------
3          CFT        40.0000    .0000    2000-07-02 07:30:21.000
3          IBM        20.0000    .0000    2000-07-03 07:30:09.000
3          MSFT       40.0000    10.0000  2000-07-02 09:00:00.000
3          USD        1000.0000  .0000    2000-07-03 09:00:00.000
...
This position report includes all changes to the account up until the time of the query. It excludes all changes that become valid subsequent to the time at which the query was executed. Since the line of credit doesn’t become valid until tomorrow, it is not reflected in the current position. Likewise, the blockage of 10 shares of Microsoft stock to be used as collateral is not reflected in the current position.
Discussion
This recipe illustrates one way to extend the basic concepts of an auditing mechanism to give your systems some additional flexibility. It allows users to have access to their history of transactions, and it also allows them to generate their current portfolios based on that history. The biggest advantage of such a system is that you have a direct relationship between the event-based views and the cumulative views of an account’s portfolio. Every change in the stock record is immediately reflected in the portfolio view of an account.
The logic behind this solution is actually derived from audit-logging mechanisms explained earlier in this chapter. The query groups the current portfolio’s events by the ProductID and AccountID columns. This is logical since we want to report on each product in each account. The following GROUP BY clause accomplishes this:
GROUP BY s.accountID, s.productID
The query also limits the scope of the event records that it looks at to those that fall between the date of a product’s opening position and the current date. If there is no opening position available for a product, the query defaults the opening-position date to January 1, 1900.
Tip
The default opening-position date needs to be set early enough to ensure that all transactions for a product are captured. If you expect to enter transactions for dates prior to January 1, 1900, then use an earlier date as your default.
The WHERE clause highlighted in the following example shows the logic that restricts event records to those that fall between the opening position date and the current date:
WHERE s.ValidDate BETWEEN
      ISNULL((SELECT MAX(st.ValidDate)
              FROM StockRecord st
              WHERE st.AccountID=s.AccountID AND
                    st.ProductID=s.ProductID AND
                    st.Type='O'),'1900-1-1')
                AND CURRENT_TIMESTAMP
Once the date limits are set and the correct records have been returned, the query sums all events that add quantities to the balance for a product and deducts from that the sum of all events that remove quantities from a product’s balance. The result is the amount of each product in an account that is currently available for trading. The following code performs these computations:
(SUM(CASE WHEN Type='C' OR Type='L' OR Type='O'
         THEN Qty ELSE 0 END)-
      SUM(CASE WHEN Type='D' OR Type='B'
         THEN Qty ELSE 0 END)) Total,
    SUM(CASE WHEN Type='B'
      THEN Qty ELSE 0 END) Blocked
As you can see, blocking entries (Type='B') remove
product from an account. Line of credit entries
(Type='L'), on the other hand, as well as opening
position entries (Type='O'), add product to an
account.
Just for fun now, consider the following query. Unlike the previous query to display the current account positions, the following query returns the transaction history together with running totals for each of the products involved. This is a great tool for a trader to investigate scenarios and to anticipate when an account will have the funds or product to close a trade.
SELECT
   AccountID,
   ProductID,
   (SELECT SUM(CASE WHEN Type='C' OR Type='L' OR
         Type='O' THEN Qty ELSE 0 END)-
      SUM(CASE WHEN Type='D' OR Type='M' OR Type='B'
         THEN Qty ELSE 0 END)
   FROM StockRecord s1
   WHERE  s1.ValidDate >=
      isnull((SELECT MAX(st.ValidDate)
      FROM StockRecord st
      WHERE st.AccountID=s.AccountID AND
         st.ProductID=s.ProductID AND
         st.Type='O'),'1900-1-1') AND
         s1.ValidDate<=MAX(s.ValidDate)AND
         s1.AccountID=s.AccountID AND
         s1.ProductID=s.ProductID) Available,
      CONVERT(CHAR(10),s.ValidDate,102) ValidDate
   FROM StockRecord s
   GROUP BY s.accountID, s.productID,
      CONVERT(CHAR(10),s.ValidDate,102)
   HAVING MAX(s.validDate) >=
      ISNULL((SELECT MAX(st.validDate)
            FROM StockRecord st WHERE
            st.accountID=s.accountID AND
            st.productID=s.productID AND
            st.type='O'),'1900-1-1')
Although at first glance this query looks a bit scary, it works very similarly to the current portfolio query given earlier in the recipe. You could obtain a similar result by running the current portfolio query against the StockRecord table for each date on which a position changed. With this query, however, you can obtain a complete historical record in one step.
Finally, you could report the transaction history with a running total for each product using the second query shown in this recipe. The output from that query would look like this:
AccountID  ProductID  Available  ValidDate
---------- ---------- ---------- ----------
3          CFT        40         2000.07.02
3          IBM        20         2000.07.02
3          MSFT       40         2000.07.02
3          MSFT       30         2000.07.03
3          USD        1000       2000.07.03
From this result, you can see that on the July 2, there was a change in the balance of shares for CFT, IBM, and MSFT. Changes planned for the next day affect MSFT and the line of credit. The amount of available MSFT stock drops to 30 because 10 shares are being used as collateral and the line of credit increases to $1,000.
Activity-Level Logging
Problem
You want to implement a global logging mechanism that can be used by an application to record arbitrary events. Instead of each event representing a change to a specific database row, each of these events will represent some high-level action taken by a user.
Solution
To create a global logging mechanism for use in tracking high-level activities, perform the following steps:
Create a global log table to log the events.
Create an event master table to define events and to associate each of them with a severity level.
Create a global severity-limit variable to hold the current severity-limit setting.
Create a procedure that can be used to log an event.
Step 1: Create a global log table
The first step is to create a global log table to record events as they occur. The log table should not be linked to any one base table. Instead, it should be flexible enough to record events involving any table, or set of tables, in the database. The following table shows one possible implementation of a log table for recording activities:
CREATE TABLE EventLog (
   EventId INTEGER IDENTITY,
   CodeId INTEGER NOT NULL,
   IdPointer VARCHAR(40) NULL,
   IdPointerType CHAR(1) NULL,
   EventMessage VARCHAR(255) NULL,
   PRIMARY KEY(EventId)
)
The EventLog table’s IdPointer and IdPointerType
columns are used to generically point to an important row in a table
being modified by the activity being logged. The IdPointer column is
used to record primary key values, while the IdPointerType column
identifies the table containing the row corresponding to the given
primary key. For example, if you want an event-log entry to point to
an order record, you would insert the order ID value into the
IdPointer column and an 'O' into the IdPointerType
column. On the other hand, if you want to associate an event with an
invoice, you would store the invoice ID into the IdPointer column and
an 'I' into the IdPointerType column.
Step 2: Create an event master table
The next step is create an event master table that defines all possible events that can be logged. The EventLogMaster table shown in the following example represents one possible implementation that you can use:
CREATE TABLE EventLogMaster (
   CodeID INTEGER NOT NULL,
   MessageText VARCHAR(255),
   Severity INTEGER,
   LangId CHAR(1),
   PRIMARY KEY(codeID,langID)
)
This particular event master table allows you to define event messages in more than one language. The LangId column identifies the language used for the message text and it forms part of the table’s primary key. The Severity column stores the security level associated with an event. As you’ll see later, the code in this recipe allows you to limit the recording of events by severity level.
Step 3: Create a global severity-limit variable
Your next task is to implement a mechanism allowing you to globally define the minimum severity level that you are interested in logging. Only events with a severity level equal to or higher than the one you define will be logged to the EventLog table.
If your database system supports global variables, use them. Declare a global variable, and set it to whatever severity level you wish. By adjusting this severity level up and down, you can dynamically control the level of detail recorded in your EventLog table. This can be an invaluable debugging aid. If your database system doesn’t support global variables, you can use a small table to record the current severity-limit setting. This is the solution used in the code for this particular recipe. For example:
CREATE TABLE GlobalVariables(
   VarName VARCHAR(10),
   VarValue INT)

INSERT INTO GlobalVariables (VarName, VarValue) VALUES ('Severity',3)
This table contains rows that you can think of as corresponding to global variables. The VarName column identifies a global variable name, and the VarValue column contains the value for that variable. In this case, the global variable name is “Severity,” and the value has been set to 3.
Step 4: Create a stored procedure to log events
Finally, you need to create a stored procedure that you can use to log an event. Call the procedure whenever you want to record an event. The procedure created by this recipe is named EventMessage. It allows you to pass several values as parameters. Values that you can pass to the procedure include: the error-message identifier, a pointer to a database row together with a code identifying the type of row, and an arbitrary event message. The @EventMessage parameter stores the event message, which is a generic ASCII string you build that contains data specific to a particular event. Here is the code for the EventMessage procedure:
CREATE PROCEDURE EventMessage
   @CodeID INTEGER,
   @IdPointer VARCHAR(40)=null,
   @IdPointerType VARCHAR(1)=null,
   @EventMessage VARCHAR(255) = null

AS
   DECLARE @Severity INTEGER
   DECLARE @SevPerm INTEGER

   SELECT
      @Severity=MAX(Severity)
   FROM EventLogMaster
   WHERE CodeID=@CodeID

   SELECT
      @SevPerm=VarValue
   FROM GlobalVariables
   WHERE VarName='Severity'

   IF @Severity>=@SevPerm
      INSERT INTO EventLog(CodeId, IdPointer,
         IdPointerType, EventMessage)
      VALUES(@CodeID, @IdPointer, @IdPointerType,
         @EventMessage)
Once you create the EventMessage procedure, you can invoke it from key locations in your application code. Events will then be logged as allowed by the current severity-level setting.
Discussion
The solution in this recipe uses a global list of possible event messages that are identified by an ID number. This ID number corresponds to the CodeID column in the EventLogMaster table. Each message has a severity level indicating its importance. When an error or important event is detected, your code can call the EventMessage procedure and pass in the appropriate CodeID value. The event will then be logged, as long as the severity level permits it.
If the event relates to a row in a table, that row can be identified by passing in the row’s primary key using the @IdPointer variable. You would also need to identify the table by passing in an appropriate table code via the @IdPointerType parameter. This general framework allows you to reference different tables from the same log.
You also have the option of recording a specific message for each event. This message is passed to the procedure via the @EventMessage parameter and will be stored in the EventMessage column of the EventLog table. You can build the message using string concatenation to hold whatever values you believe are relevant for each particular event.
The EventLogMaster and EventLog tables can easily be extended to include system information such as a timestamp, the CURRENT_USER, or a detailed explanation of the cause for an event. The basic framework shown here provides you with a great deal of flexibility.
Defining severity levels
The current severity level is checked in the EventMessage procedure every time it is called. If the severity limit for a message is less than the current global severity level, this indicates that the message should be logged, and the EventMessage procedure will then record the event in the EventLog table. Messages with severity limits above the current global security level are not logged. This is useful for debugging purposes, because you can enable or disable the logging of certain events just by changing the global severity level. You could, for example, set the global severity level to a high value for normal operations. This would prevent any events from being logged. Then, if a user reported problems, you could decrease the global severity level, thereby dynamically enabling logging of the events needed to resolve the user’s problem.
The number and type of severity levels can vary for each system that you design. Some systems use eight or more severity levels, some use fewer. Table 6-2 shows one possible severity-level classification scheme that you might use.
|
Severity |
Level |
Description |
|
0 |
Debug |
An event logged only for debugging purposes. |
|
1 |
Regular |
A regular event. |
|
2 |
Notice |
A regular, but significant event. |
|
3 |
Warning |
A warning event, indicating a possible problem. |
|
4 |
Error |
An error event representing an error that the system is designed to handle gracefully. |
|
5 |
Critical |
An error event that the system is not designed to handle and that, therefore, represents a critical error. |
In a development environment, you may want to have the debug level enabled, so that you can get the maximum amount of detail for use in resolving bugs. In a production environment, on the other hand, you may want to log only warning or higher events.
Extending error messages
With support of the string-manipulation functions, it is possible to create generic event messages that combine several values in a user-friendly manner. For example, assume that you have defined a message that records the purchase of a product. The generic message text in the EventLogMaster table might be “Purchase of product” or something similar. To record a purchase, and to record along with it the number and type of objects purchased, you could invoke the EventMessage procedure as follows:
EventMessage 456,'T357','O','Bananas 10'
In this example, the procedure was called for message number 456, which indicates that product was purchased. The next two parameters identify order #T357 as the record affected by this event. The last parameter indicates that order #T357 was for the purchase of 10 bananas.
Reporting
To report on the activity log described in this recipe, you need to join the EventLog and EventLogMaster tables together. The EventLog table records the specific events that occurred, while the EventLogMaster table records the text messages corresponding to those events. Remember that the language ID needs to be part of your query. For example:
SELECT EventId, MessageText, EventMessage
FROM EventLog l JOIN EventLogMaster m
ON l.CodeId=m.CodeID
WHERE LangId='E'
A possible extension of this activity-logging technique is changing
the message-text format to allow inline message expansion. Instead of
“Purchase of product,” the message
text for event ID 3 could be defined as: 'Purchase of %2
%1'. If your server supports regular-expression evaluation,
or even simple search and replace, you can substitute the name and
quantity of the product purchased for the %2 and
%1 placeholders.
Tip
An activity log, such as the one described here, cannot easily be used to reconstruct a snapshot of a table as of a specific point in time, because it does not record each and every SQL statement that modifies the data in the table.
Another possible query that you might want to implement for a log like this is one that scans for important messages with high severity levels. By running such a query periodically, you can identify important events that might otherwise remain unnoticed, allowing you to correct problems before they become critical.
Partitioning Large Log Tables
Problem
Log tables are usually very large in that they contain a large number of rows. However, only the most recent events are usually accessed on a frequent basis. You want to create a structure that will take advantage of this fact, allowing the more recent records to be queried in an efficient manner.
Solution
Divide your log table into two tables. They should both have the same structure. One table will hold the most recent events — for example, the current month’s data, and the other table will hold everything else. The table with the most recent data can be referred to as the current log, while the other table is referred to as the archive log. You can then combine the data from the two tables into one row set using the following query:
SELECT p1, p2, p3 ... pn FROM log_work
UNION
SELECT p1,p2,p3 ... pn FROM  log_archive
Discussion
With this kind of a structure, the current log will always be relatively short compared to the archive log. This is good for insert operations, especially if you choose not to index the table. New log entries are always written to the current log table, and the fewer the indices to maintain, the better your performance will be. Because it’s relatively small, you may still be able to get decent query performance from the current log table even without an index. The archive log table, on the other hand, should be indexed since it’s relatively large.
This combined structure is very efficient for many types of operations, but it requires additional work on the part of your programmers, who must develop regular batch procedures that periodically move older log records from the current log table to the archive table. Still, when performance is the critical goal, this solution can be very beneficial.
The UNION query can be nicely encapsulated into a UNION view. Then you have a view that behaves as a single table even though the underlying implementation uses two tables. Unfortunately, not all database vendors implement UNION views. If you are not using MS SQL Server, you’ll have to check your database server’s documentation to see if the UNION view option is available to you.
Server Push
Problem
You want to implement a code-based server-push replication mechanism with your SQL database server to notify client applications that an event has occurred. For example, you may wish to update a help-desk supervisor’s screen each time a new help-desk call arrives. Your goal is to have an external system notified of significant activities or events as they occur.
Solution
This solution shows you how to simulate a server-push mechanism by repeatedly polling from the client at regular intervals. To start with, you need to have a table on the server to which you can log the activities that you want pushed. The following Event table will be used in this recipe:
CREATE TABLE Event (
   EventId INTEGER IDENTITY,
   Code INTEGER,
   EventTime DATETIME,
   PRIMARY KEY(EventId)
)
This Event table logs events that are generated within the system. Different event codes would be used for different types of events. For each logged event, a timestamp is also recorded in the Event table. The event-log entries are generated by the software operating on the database, perhaps through the use of a stored procedure. See Section 6.10 recipe for an example.
The idea in this recipe is to simulate server push with a client-pull mechanism. To do this, you have to create an external program that repeats one query indefinitely. This query repeatedly polls the database for new log entries, and the client program can then initiate appropriate actions in response to those entries. The following pseudocode illustrates the process that must occur in the client software:
init @mark
REPEAT
   SELECT Code,EventId FROM event
      WHERE @mark < EventId
      ORDER BY EventId
   store read rows into internal structure
   FOR EACH row in the structure
      initiate the action for the event
      @mark:=id
   END FOR
UNTIL forever
The variable @mark in this example is an internal client variable that holds the ID of the log entry most recently read from the event table. Each time a log record is read, the @mark variable is updated. The polling query uses @mark to ensure that only new log entries are retrieved. Only log entries with ID numbers greater than @mark are retrieved.
Discussion
The solution opens up a wide variety of possibilities and allows programmers to give an active role to their database systems. Rather than being limited to serving requests as they come in from clients, the database can now be the initiator of an event or of a process.
Newer database systems have built-in support for both push and pull replication mechanisms; however, these mechanisms are usually not portable across vendor platforms. The solution presented here is portable and provides the flexibility of integrating SQL-based systems with external systems. A stored database procedure can now initiate an action in a system external to the database. You may, for example, use a stored procedure to trigger pager notification to the DBA or system operator when a significant event occurs.
Ticketing
Here ticketing refers to the practice of assigning unique identifiers to each request made by the user of a system. A help-desk system, for example, might create a trouble ticket each time a user calls with a problem, and each trouble ticket would have a unique number to identify it.
Proper use of the @mark variable is critical when implementing polling code such as that shown in this recipe. First, you need to make sure that @mark is properly initialized. You need to decide what records you want the client to pull after it is started. Do you want the client to pull all log records that are available? Do you want to pull only those records logged after the client starts? Do you want the client to catch up with any records that might have been missed when the client was not running?
Initializing @mark to 0 each time you start the client will result in the client reading all existing log records each time it starts. It’s unlikely that you’ll want that behavior. A more reasonable approach is to have the client poll for new events that occur after the client starts. You can do that by using a query to grab the highest log ID number from the event table, such as the following:
SELECT @mark=MAX(EventId)
FROM Event
By initializing @mark like this each time you start your client, you ensure that you will see only new log entries. That’s because those new entries will have IDs greater than the maximum value at the time the client starts.
If it is important that your client program processes all event records, even those posted during periods when the client wasn’t running, you can add a column to the event table that allows you to flag rows that have been processed. Then, you can poll for those rows that haven’t yet been processed.
In such cases, you have to initialize @mark variable to the smallest Id that still hasn’t been sent:
SELECT @mark=MIN(EventId)
FROM Event
WHERE Sent=FALSE
Assuming that your flag column is named Sent, and that it is a Boolean column, the following pseudocode illustrates the process to follow:
init @mark
REPEAT
   SELECT Code,EventId FROM Event
      WHERE @mark < EventId and Sent=FALSE
      ORDER BY EventId
   store read rows into internal structure
   FOR EACH row in the structure
      BEGIN TRAN
         initiate the action for the event
         UPDATE Event SET Sent=TRUE
            WHERE Id=@id
            @mark:=@id
      END TRAN
   END FOR
UNTIL forever
Newly inserted rows will have the Sent column set to FALSE because they have not yet been processed by the client. Your client query can key off that to ensure that it only brings back unprocessed rows. You can also use the sent column to your advantage when you initialize the @mark variable. You just set @mark to the ID number of the earliest log record that hasn’t yet been processed. For example:
SELECT @mark=MIN(EventId)
FROM Event
WHERE Sent=FALSE
The solution shown here ensures that each event is pushed only once. However, it does require additional UPDATE statements, which result in the use of server-side processing capacity. As with anything else, you have to look at the tradeoffs and decide if the technique makes sense for a given situation.
Polling as an alternative to triggers
This solution can also be viewed as an alternative to database triggers. Many database systems support triggers, but when built-in triggers are used, an action is initiated every time a row is added, deleted, or modified. Depending on what the trigger does, this can place a significant burden on the server, especially in times of peak activity. The time required for trigger execution can also add significantly to the time needed to execute a DDL statement.
Rather than use triggers, a client program can be configured to poll the server once per second (or some other acceptable time period) for a list of changes that have occurred since the previous poll. The client can then initiate appropriate actions. This results in a slight delay between the time a change is made and the proper events are triggered, but it also moves much of the work into the background where it won’t affect the performance of the DML statements making the change.
Let’s say that we have a small ticketing server, which stores quotes from a stock exchange. We want to use a server-push mechanism to send quotes to the user’s screen, but if we use internal triggering, every new quote will end up being sent to, and displayed on, the user’s screen. If activity peaks, and the volume of quotes reaches into the hundreds per second, the user will be overwhelmed with information. A better solution might be to have the client polled once per second and only retrieve the most recent quote for each ticker symbol. A query, such as the following, might be used for this purpose:
SELECT Symbol,
      MAX(CASE WHEN EventId=MAX(EventId)
         THEN Quote ELSE
         NULL END) quote
FROM Quote
WHERE @mark<EventId
GROUP BY Symbol
The query returns the last known quote for each symbol so long as that quote has been logged with an ID greater than that held in the @mark variable. The use of @mark saves us from having to retrieve the same quote more than once. Only new quotes since the previous poll need be retrieved.
Client stability
The polling solution described in this recipe brings additional flexibility to the table, but it also carries with it some potential reliability problems. When you separate the triggering mechanism from the server, you introduce another potential point of failure. If the client software fails, or if the connection between the client and the server is lost, you lose the whole push mechanism.
Think carefully about whether it pays off to introduce such a solution or not. Sometimes there is no other choice, and sometimes it is simply handier than other possible solutions. We can not overstress the importance of having proper error checking embedded in the code of the client. You may also want to implement a secondary service that periodically pings the client to check on performance and availability.
Support for multiple tables
All the code in this recipe has dealt with polling only one event table. You can easily add support for multiple tables by extending the same logic to those tables. You do not even need to add additional clients to poll more tables. One client can be written that periodically executes several SELECT queries against several different event tables. You do, however, need to guard against asking one client to handle too much work.