Chapter 10. Security
Deploying Trino at scale, discussed in Chapter 5, is an important step toward production usage. In this chapter, you learn more about securing Trino itself as well as the underlying data.
In a typical Trino cluster deployment and use, you can consider securing several aspects:
-
Transport from user client to the Trino coordinator
-
Transport within the Trino cluster, between coordinator and workers
-
Transport between the Trino cluster and each data source, configured per catalog
-
Access to specific data within each data source
In Figure 10-1, you can see how the different network connections of Trino need to be secured. The connection to your client—for example, Trino CLI or an application using the JDBC driver—needs to be secured. The traffic within the cluster needs to be secured. And the connections with all the different data sources need to be secured.
Let’s explore these needs in more detail in the following sections, starting with authenticating to Trino as a user.

Figure 10-1. Network connections of Trino usage to secure
Authentication
Authentication is the process of proving an identity to a system. Authentication is essential to any secure system. A variety of authentication methods are supported by computer systems, including Kerberos, password with Lightweight Directory Access Protocol (LDAP), and certificate authentication. It is up to each system to support the particular authentication method. In Trino, clients commonly authenticate to the Trino cluster via one of following methods:
-
Password via LDAP—see details that follow
-
Certificates—see “Certificate Authentication”
-
Kerberos—see “Kerberos”
By default, no authentication is configured in Trino. Anyone who can access the coordinator can connect and therefore issue queries and perform other operations. In this chapter, you learn details about LDAP and certificate authentication mechanisms, since they are the most commonly used.
However, authentication is just one piece. Once the principal is authenticated,
they are assigned the privileges that determine what the user is able to do.
What you can do is referred to as authorization and is governed by the
SystemAccessControl and ConnectorAccessControl. We describe this in more
detail in “Authorization”. For now, let’s assume that once
authenticated, the user can perform any action. By default, this is true for
accessing anything at the system level, such as querying the system catalog.
Password and LDAP Authentication
Password authentication is an authentication method you probably use every day. By providing a username and password to the system, you are proving who you say you are by providing something you know. Trino supports this basic form of authentication by using its password authenticator. The password authenticator receives the username and password credentials from the client, validates them, and creates a principal. The password authenticator is designed to support custom password authenticators deployed as a plug-in in Trino.
Currently, password authentication supported by Trino uses the LDAP authenticator, and therefore an LDAP service.
Note
Password file authentication is a less commonly used, simple, and supported authentication mechanism.
LDAP stands for Lightweight Directory Access Protocol, an industry-standard application protocol for accessing and managing information in a directory server. The data model in the directory server is a hierarchical data structure that stores identity information. We won’t elaborate on too many more details about what LDAP is or how it works. If you are interested in learning more, there is plenty of information available in books or on the web.
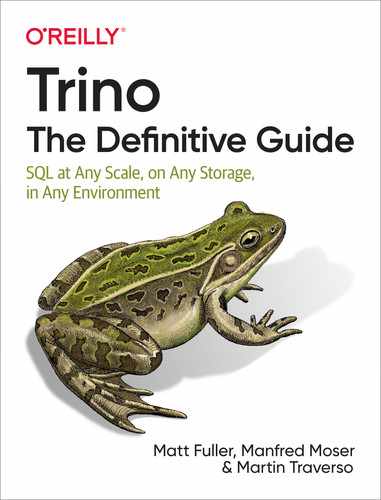
When using the LDAP authenticator, a user passes a username and password to the Trino coordinator. This can be done from the CLI, JDBC driver, or any other client that supports passing the username and password. The coordinator then validates these credentials with an external LDAP service and creates the principal from the username. You can see a visualization of this flow in Figure 10-2. To enable LDAP authentication with Trino, you need to add to the config.properties file on the Trino coordinator:
http-server.authentication.type=PASSWORD
By setting the authentication type to PASSWORD, we are telling the Trino
coordinator to use the password authenticator to authenticate.
In addition, you need to configure the LDAP service with the additional file password-authenticator.properties in the etc directory:
password-authenticator.name=ldapldap.url=ldaps://ldap-server:636ldap.user-bind-pattern=${USER}@example.com
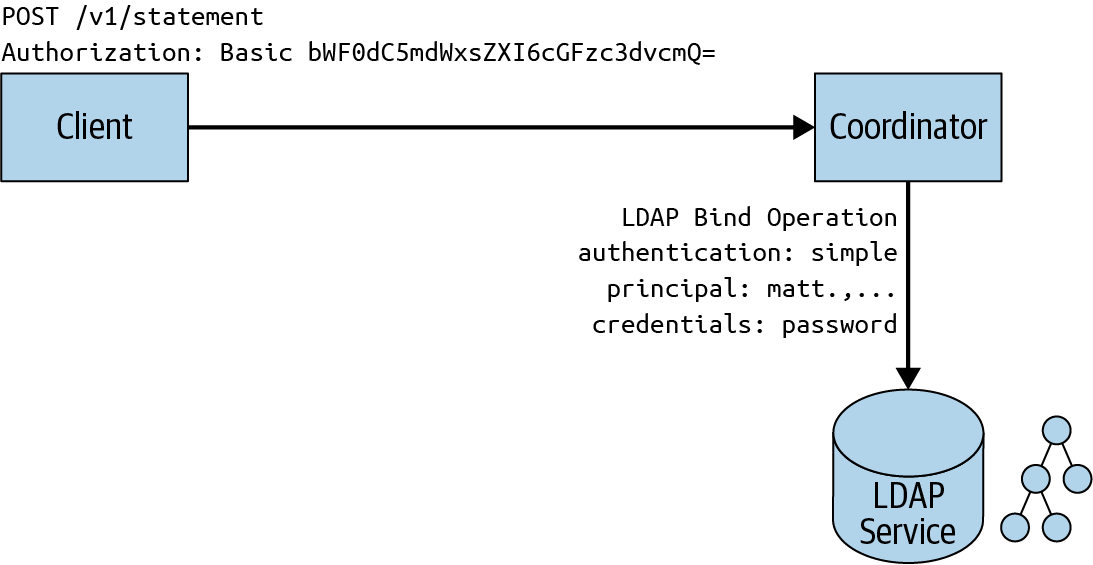
Figure 10-2. LDAP authentication to Trino using an external LDAP service
The password-authenticator.name specifies to use the LDAP plug-in for the
password authenticator. The following lines configure the LDAP server URL and
the pattern to locate the user record. The preceding bind pattern is an example
usage with Active Directory. Other LDAP servers or configurations define a user ID (UID):
ldap.user-bind-pattern=uid=${USER},OU=people,DC=example,DC=com
In LDAP, several operation types interact with the LDAP directory, such as add, delete, modify, search, and bind. Bind is the operation used to authenticate clients to the directory server and is what Trino uses for supporting LDAP authentication. In order to bind, you need to supply identification and proof of identity such as a password. LDAP allows for different types of authentication, but user identity, also known as the distinguished name, and password is the main supported method by Trino for LDAP authentication.
A secondary method, which was recently added, is to authenticate and authorize with a LDAP service user. Check the Trino documentation for configuration tips.
Note
Trino requires using secure LDAP, which is referred to as LDAPS. Therefore, you need to
make sure you have TLS enabled on your LDAP server. In addition, ensure that
the URL for the ldap-url property uses ldaps:// and not ldap://. Because this
communication occurs over TLS, you need to import the LDAP server TLS
certificate to the truststore used by the Trino coordinator. Or if the LDAP
server is using a certificate signed by a certificate authority (CA), you need
to make sure that the CA chain is in the truststore.
To securely use the LDAP authenticator, you also need to configure HTTPS access to the Trino coordinator. This ensures that the password sent from the client is not in clear text over an unsecure network. We discuss this setup in “Encryption”.
Once the LDAP configuration is in place, you can test it with the Trino CLI:
trino --user matt --password
Specifying --password causes the CLI to prompt you to enter the password. When
you configure the LDAP password authenticator, you have set the user bind
pattern.
When the username and password are passed to the Trino coordinator from the
client, the CLI in our example, Trino replaces this username in the bind pattern and sends this as a security principal, and the password as the security credentials, as part of the bind request for LDAP. In our example, the principal used to match the distinguished name in the directory structure is
uid=matt,OU=people,DC=example,DC=com. Each entry in the LDAP directory may consist of multiple attributes. One such attribute is userPassword, which
the bind operation uses to match the password sent.
Trino can further restrict access based on group memberships. You learn more about the importance of groups in the following authorization sections. By using groups, you can assign privileges to a group, so the users in that group inherit all the privileges of that group rather than having to manage privileges individually. Say, for example, you want to allow only people in the engineering group to authenticate with Trino. In our example, we want users matt and maria to be able to authenticate to Trino, but not user jane.
To further restrict users based on group membership, Trino allows you to specify additional properties in the password-authenticator.properties file.
ldap.user-base-dn=OU=people,DC=example,DC=com
ldap.group-auth-pattern=(&(objectClass=inetOrgPerson)(uid=${USER})(memberof=CN=developers,OU=groups,DC=example,DC=com))
In our example, the preceding filter restricts users from the base distinguished
name and allows only users who belong to the developers group in LDAP. If
user jane tries to authenticate, the bind operation succeeds since jane is a
valid user, but the user is filtered out of the results because she does not
belong to the developers group.
Authorization
In the previous section you learned about authentication, or proving to Trino who you are. However, in an environment with many users and sensitive data, you do not want any user who can authenticate to access any data.
To restrict access, you need to configure authorization of what a user can do. Let’s first examine the SQL model in Trino in terms of what access controls exist. Then you learn how to control access to Trino at the system and connector level.
System Access Control
System access control enforces authorization at the global Trino level and allows you to configure access for catalogs and rules for the principals used.
Lower-level rights and restrictions within a catalog have to be configured with connector access control; see “Connector Access Control”.
As you learned in the authentication section, security principals are the entity used to authenticate to Trino. The principal may be an individual user or a service account. Trino also separates the principal for authentication from the user who is running queries. For example, multiple users may share a principal for authenticating, but run queries as themselves. By default, Trino allows any principal who can authenticate to run queries as anyone else:
$ trino --krb5-principal [email protected] --user bobThis is generally not what you would want to run in a real environment, since it
potentially elevates the access granted to one user, bob, beyond his
authorization. Changing this default behavior requires additional configuration.
Trino supports a set of built-in system access control configurations.
By default, Trino allows any authenticated user to do anything. This is the least secure and not recommended when deploying in a production environment. While it is the default, you can set it explicitly by creating access-control.properties within the etc directory.
access-control.name=allow-all
Read-only authorization is slightly more secure in that it allows only any
operation that is reading data or metadata. This includes SELECT queries, but
not CREATE, INSERT, or DELETE queries:
access-control.name=read-only
Tip
Using this method to set access control to read-only is a very fast, simple, and effective way to reduce risk from Trino usage to the underlying data. At the same time, read access is completely suitable to analysis usage, and you can easily create a dedicated Trino cluster with read-only access to allow anybody in your company access to a large amount of data for analysis, troubleshooting, or simply exploration or learning more about Trino.
To configure system access control beyond simple allow-all or read-only, you
can use a file-based approach. This allows you to specify access control rules for
catalog access by users and what users a principal can identify as. These rules
are specified in a file that you maintain.
When using file-based system access control, all access to catalogs is denied unless there is a matching rule for a user that explicitly gives them permission. You can enable this in the access-control.properties file in the etc configuration directory:
access-control.name=filesecurity.config-file=etc/rules.json
The security.config-file property specifies the location of the file
containing the rules. It must be a JSON file using the format detailed in the following code.
Best practice is to keep it in the same directory as all other configuration files:
{"catalogs":[{"user":"admin","catalog":"system","allow":true},{"catalog":"hive","allow":true},{"user":"alice","catalog":"postgresql","allow":true}{"catalog":"system","allow":false}]}
Rules are examined in order, and the first rule that matches is used. In this
example, the admin user is allowed access to the system catalog, whereas all
other users are denied because of the last rule. We mentioned earlier that all
catalog access is denied by default unless there is a matching rule. The
exception is that all users have access to the system catalog by default.
The example file also grants access to the hive catalog for all users, but only
the user alice is granted access to the postgresql catalog.
Note
System access controls are very useful for restricting access. However, they can be used to configure access only at the catalog level. More fine-grained access cannot be configured with it.
As we mentioned earlier, authenticated principal can run queries as any user by default. This is generally not desirable, as it allows users to potentially access data as someone else. If the connector has implemented a connector access control, it means that a user can authenticate with a principal and pretend to be another user to access data they should not have access to. Therefore, it is important to enforce an appropriate matching between the principal and the user running the queries.
Let’s say we want to set the username to that of the LDAP principal:
{"catalogs":[{"allow":"all"}],"principals":[{"principal":"(.*)","principal_to_user":"$1","allow":"all"}]}
This can be further extended to enforce the user to use exactly their Kerberos principal name. In addition, we can match the username to a group principal that may be shared:
"principals":[{"principal":"([^/]+)/?.*@example.com","principal_to_user":"$1","allow":"all"},{"principal":"[email protected]","user":"alice|bob","allow":"all"}]
Therefore, if you want a different behavior, you must override the rule; in
this case, the users bob and alice can use the principal [email protected]
as well as their own principals, [email protected] and [email protected].
Connector Access Control
Recall the set of objects Trino exposes in order to query data. A catalog is the configured instance of a connector. A catalog may consist of a set of namespaces called schemas. And, finally, the schemas contain a collection of tables with columns using specific data types and rows of data. With connector access control, Trino allows you to configure fine-grained rights within a catalog.
Trino supports the SQL standard GRANT to grant privileges on tables and views
to a user or role, and also to grant user membership to a role. Today, Trino
supports a subset of privileges defined by the SQL standard. In Trino, you can
grant the following privileges to a table or view:
SELECTINSERTDELETE
Note
As of this writing, only the Hive connector supports roles and
grants. Because this depends on the connector implementation, each connector
needs to implement the ConnectorAccessControl to support this SQL standard
functionality.
Let’s look at an example:
GRANT SELECT on hive.ontime.flights TO matt;
The user running this query is granting to user matt the
SELECT privilege on table flights that is in the ontime schema of the
hive catalog.
Optionally, you can specify the WITH GRANT OPTION that allows the grantee
matt to grant the same privileges to others. You can also specify more than
one privilege by separating commas or by specifying ALL PRIVILEGES to grant
SELECT, INSERT, and DELETE to the object:
GRANTSELECT,DELETEonhive.ontime.flightsTOmattWITHGRANTOPTION;
Note
To grant privileges, you must possess the same privileges and the GRANT
OPTION. Or you must be an owner of the table or view, or member of the role that
owns the table or view. At the time of this writing, there is no way in
Trino to alter the owner of the object, so that must be done by the underlying
data source. For example, you can run the following SQL statement:
ALTERSCHEMAontimeSETOWNERUSERmatt;
A role consists of a collection of privileges that can be assigned to a user or another role. This makes administering privileges for many users easier. By using roles, you avoid the need to assign privileges directly to users. Instead, you assign the privileges to a role, and then users are assigned to that role and inherit those privileges. Users can also be assigned multiple roles. Using roles to manage privileges is generally the best practice.
Let’s reuse our example of the flights table and use roles:
CREATEROLEadmin;GRANTSELECT,DELETEonhive.ontime.flightsTOadmin;GRANTadminTOUSERmatt,martin;
Now let’s say you wish to remove privileges from a user. Instead of having to remove all the privileges on an object granted to a user, you can simply remove the role assignment from the user:
REVOKEadminFROMUSERmatt;
In addition to removing users from a role, you can also remove privileges from a role so that all users with the role no longer have that privilege:
REVOKEDELETEonhive.ontime.flightsFROMadmin;
In this example, we revoked the DELETE privileges on the flights table from
the admin role. However, the admin role and its members still have the
SELECT privilege.
Users may belong to multiple roles, and those roles may have distinct or an
intersection of privileges. When a user runs a query, Trino examines the
privileges that the user has either assigned directly or through the roles. If
you wish to use only the privileges of a single role you belong to, you can use
the SET ROLE command. For example, say you belong to both an admin role and
the developer role, but you want to be using only the privileges assigned to the
developer role:
SETROLEdeveloper;
You can also set the role to ALL so that Trino examines your privileges for
every role you belong to. Or you can set it to NONE.
Encryption
Encryption is a process of transforming data from a readable form to an unreadable form, which is then used in transport or for storage, also called at rest. At the receiver end, only authorized users are able to transform data back to a readable form. This prevents any malicious attacker who intercepts the data from being able to read it. Trino uses standard cryptographic techniques to encrypt data in motion and at rest, and you can see a comparison between the plain text and the encrypted version in Table 10-1.
| Plain text | Encrypted text |
|---|---|
SSN: 123-45-6789 |
5oMgKBe38tSs0pl/Rg7lITExIWtCITEzIfSVydAHF8Gux1cpnCg= |
Encrypted data in motion includes the following data transfers and is displayed in Figure 10-3:
-
Between the client, such as a JDBC client or the Trino CLI, and the Trino coordinator (at left in the figure)
-
Within the Trino cluster, between the coordinator and workers (center)
-
From the data sources, configured in the catalogs, to the workers and the coordinator in the cluster (at right)

Figure 10-3. Encryption options for data in transit
Encryption of data at rest includes the following locations and is displayed in Figure 10-4:
-
Data sources, so outside the Trino cluster (right)
-
Storage on the workers and/or coordinator used for the spilling to disk functionality, so inside the Trino cluster (left)

Figure 10-4. Encryption options for data at rest
Each of these can be configured in Trino independently. S3 is used as an example for a connected data source.
These different encryption usages can be combined. For example, you can configure Trino to encrypt client-to-coordinator communication and intercluster communication, but leave data at rest unencrypted and therefore not secured. Or you may choose to configure Trino only for encrypted client-to-coordinator communication.
While each combination is possible to configure, some combinations do not make much sense. For example, configuring only intercluster communication but leaving client-to-coordinator communication unencrypted does not make sense because it leaves any data accessed by queries from a Trino client open to attacks.
As you’ve learned, external and internal communication in Trino happens exclusively over HTTP. To secure communication between the client and coordinator and intercluster communication, Trino can be configured to use Transport Layer Security (TLS) on top of HTTP, referred to as HTTPS. TLS is a cryptographic protocol for encrypting data over a network, and HTTPS uses TLS to secure the HTTP protocol.
Note
TLS is the successor to Secure Sockets Layer (SSL), and sometimes the terms are used interchangeably. SSL is an older protocol with known vulnerabilities and is considered insecure. Because of the prominence and name recognition of SSL, when someone refers to SSL, they often are referring to TLS.
You are probably familiar with HTTPS from visiting websites because most sites use HTTPS now. For example, if you are logged into your online bank account, HTTPS is used to encrypt data between the web server and your web browser. On modern web browsers, you typically see the padlock icon in the address line, indicating the data transfer is secured and the server you are connected to is identical to the one identified in the certificate.
Encrypting Trino Client-to-Coordinator Communication
It’s important to secure the traffic between the client and Trino for two reasons. First, if you are using LDAP authentication, the password is in clear text. And with Kerberos authentication, the SPNEGO token can be intercepted as well. Additionally, any data returned from queries is in plain text.
Understanding the lower-level details of the TLS handshake for encryption algorithms is not crucial to understanding how Trino encrypts network traffic. But it is important to understand more about certificates, since you need to create and configure certificates for use by Trino. Figure 10-5 depicts communications between a client web browser and web server secured over HTTPS. This is exactly how HTTPS communication is used between the Trino coordinator and a Trino client such as the Trino Web UI, the Trino CLI, or the JDBC driver, displayed in Figure 10-6.
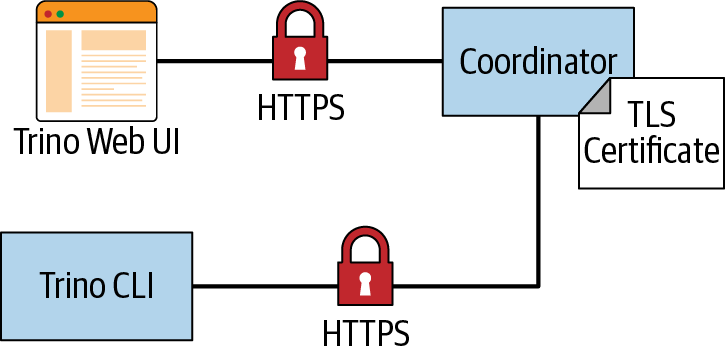
Figure 10-6. Secured communication over HTTP between Trino clients and the Trino coordinator
A TLS certificate relies on public-key (asymmetric) cryptography using key pairs:
-
A public key, which is available to anyone
-
A private key, which is kept private by the owner
Anyone can use the public key to encrypt messages that can be decrypted only by those who have the private key. Therefore, any message encrypted with the public key should be secret, as long as only the owner of the key pair does not share or have its private key stolen. A TLS certificate contains information such as the domain the certificate was issued for, the person or company it was issued to, the public key, and several other items. This information is then hashed and encrypted using a private key. The process of signing the certificate creates the signature to include in the certificate.
These certificates are often signed by a trusted certificate authority such as DigiCert or GlobalSign. These authorities verify that the person requesting a certificate to be issued is who they say they are and that they own the domain as stated in the certificate. The certificate is signed by the authority’s private key, for which their public keys are made widely available and typically installed by default on most operating systems and web browsers.
The process of signing the certificate is important during the TLS handshake to verify authenticity. The client uses the public key of the pair to decrypt the signature and compare to the content in the certificate to make sure it was not tampered with.
Now that you understand the basics of TLS, let’s look at how we can encrypt data between the Trino clients and coordinator. To enable HTTPS on the Trino coordinator, you need to set additional properties in the config.properties file (see Table 10-2).
| Property | Description |
|---|---|
http-server.https.enabled |
Set this to true to enable HTTPS for Trino. Defaults to false. |
http-server.http.enabled |
Set this to false to disable HTTP for Trino. Defaults to true. |
http-server.https.port |
Specify the HTTPS port to use. 8443 is a common default port for HTTPS for Java application servers. |
http-server.https.keystore.path |
Specify the path to the Java keystore file that stores the private key and certificate used by Trino for TLS. |
http-server.https.keystore.key |
Specify the Java keystore password Trino needs to access the keystore. |
Note
Even though you are configuring Trino to use HTTPS, by default HTTP is still enabled as well. Enabling HTTPS does not disable HTTP. If you wish to disable HTTP access, this needs to be configured. However, you may want to keep HTTP enabled until you have completed configuring the secured Trino environment. Testing how or if something works over HTTP may be a good way to debug an issue if you run into complications during configurations.
Take, for example, the following lines to add to your config.properties:
http-server.https.enabled=truehttp-server.https.port=8443http-server.https.keystore.path=/etc/trino/trino_keystore.jkshttp-server.https.keystore.key=slickpassword
Remember to restart the Trino coordinator after you update the properties file.
Creating Java Keystores and Java Truststores
The Java keytool, a command-line tool for creating and managing keystores
and truststores, is available as part of any Java Development Kit (JDK) installation. Let’s go
over a simple example for creating a Java keystore and truststore. For
simplicity, we use self-signed certificates.
Let’s first create the keystore to be used by the Trino coordinator. The
following keytool command creates a public/private key pair and wraps the
public key in a certificate that is self-signed:
$keytool -genkeypair-alias trino_server-dnameCN=*.example.com-validity10000-keyalg RSA -keysize2048-keystore keystore.jks-keypass password -storepass password
The generated keystore.jks file needs to be used on the server and specified
in the http-server.https.keystore.path property. Similar usage applies for the
storepass password in the http-server.https.keystore.key property.
In this example, you are using a wildcard certificate. We
specify the common name (CN) to be *.example.com. This certificate can be
shared by all the nodes on the Trino cluster, assuming they use the same domain;
this certificate works with coordinator.example.com,
worker1.example.com, worker2.example.com, and so on. The disadvantage to
this approach is that any node under the example.com domain can use the certificate.
You can limit the subdomains by using a subject alternative name
(SubjectAltName), where you list the subdomains. This allows you to create a
single certificate to be shared by a limited, specific list of hosts. An
alternative approach is to create a certificate for each node, requiring you to
explicitly define the full domain for each. This adds an administrative burden
and makes it challenging when scaling a Trino cluster, as the new nodes require
certificates bound to the full domain.
When connecting a client to the coordinator, the coordinator sends its certificate to the client to verify its authenticity. A truststore is used to verify the authenticity by containing the coordinator certificate if self-signed, or a certificate chain if signed by a CA. Later, we discuss how to use a certificate chain of a CA. Because the keystore also contains the certificate, you could simply copy the keystore to the client machine and use that as the truststore. However, that is not secure, as the keystore also contains the private key that we want to keep secret. To create a custom truststore, you need to export the certificate from the keystore and import it into a truststore.
First, on the coordinator where your keystore was created, you export the certificate:
$keytool --exportcert-alias trino_server-file trino_server.cer-keystore keystore.jks-storepass password
This command creates a trino_server.cer certificate file. As a next step, you use that file to create the truststore:
$keytool --importcert-alias trino_server-file trino_server.cer-keystore truststore.jks-storepass password
Since the certificate is self-signed, this keytool command prompts you to
confirm that you want to trust this certificate. Simply type yes and the
truststore.jks is created. Now you can safely distribute this truststore to
any machine from which you use a client to connect the coordinator.
Now that we have the coordinator enabled with HTTPS using a keystore and we’ve created a truststore for the clients, we can securely connect to Trino such that the communication between the client and coordinator is encrypted. Here is an example using the Trino CLI:
$trino --server https://trino-coordinator.example.com:8443--truststore-path ~/truststore.jks--truststore-password password
Encrypting Communication Within the Trino Cluster
Next let’s look at how to secure the communication between the workers, and the workers and the coordinator, all within the Trino cluster, by using HTTP over TLS again as shown in Figure 10-7.
While the client-to-coordinator communication may be over an untrusted network, the Trino cluster is generally deployed on a more secure network, making secured intercluster communication more optional. However, if you’re concerned about a malicious attacker being able to get onto the network of the cluster, communication can be encrypted.
As with securing client-to-coordinator communication, cluster internal communication also relies on the same keystore. This keystore you created on the coordinator must be distributed to all worker nodes.
Figure 10-7. Secured communication over HTTPS between nodes in the Trino cluster
The same method of performing the TLS handshake to establish trust between the client and server, and create an encrypted channel, works for the intercluster communication. Communication in the cluster is bidirectional, meaning a node may act as a client sending the HTTPS request to another node, or a node can act as a server when it receives the request and presents the certificate to the client for verification. Because each node can act as both client and server for different connections, it needs a keystore that contains both the private key and the public key wrapped in the certificate.
All nodes need to enable HTTPS in config.properties, including for internal communication:
http-server.https.enabled=truehttp-server.https.port=8443internal-communication.https.required=truediscovery.uri=https://coordinator.example.com:8443internal-communication.https.keystore.path=/etc/trino/trino_keystore.jksinternal-communication.https.keystore.key=slickpassword
Remember to restart the workers after you update the properties file. Now you have entirely secured the internal and external communication and secured it against eavesdroppers on the network trying to intercept data from Trino.
Certificate Authority Versus Self-Signed Certificates
When you try out Trino for the first time and work to get it configured securely, it’s easiest to use a self-signed certificate. In practice, however, it may not be allowed in your organization as they are much less secure and susceptible to attacks in certain situations. Therefore, you may use a certificate that was digitally signed by a CA.
Once you have created the keystore, you need to create a certificate signing request (CSR) to send to the CA to get the keystore signed. The CA verifies you are who you say you are and issues you a certificate signed by them. The certificate is then imported into your keystore. This CA signed certificate is presented to the client instead of the original self-signed one.
An interesting aspect is related to the use of the Java truststore. Java provides a default truststore that may contain the CA already. In this case, the certificate presented to the client can be verified by the default truststore. Using the Java default truststore can be cumbersome because it may not contain the CA. Or perhaps your organization has its own internal CA for issuing organizational certifications to employees and services. So if you’re using a CA, it is still recommended that you create your own truststore for Trino to use. However, you can import the CA certificate chain instead of the actual certificates being used for Trino. A certificate chain is a list of two or more TLS certificates, where each certificate in the chain is signed by the next one in the chain. At the top of the chain is the root certificate, and this is always self-signed by the CA itself. It is used to sign the downstream certificates known as intermediate certificates. When you are issued a certificate for Trino, it is signed by an intermediate certificate, which is the first one in the chain. The advantage to this is that, if there are multiple certificates for multiple Trino clusters or if certificates are reissued, you don’t need to reimport them into your truststore each time. This reduces the need for the CA to reissue an intermediate or root certificate.
The scenario in Figure 10-8 shows the use of a certificate issued by a CA. The truststore contains only the intermediate and root certificates of the CA. The TLS certificate from the Trino coordinator is verified using this certificate chain in the client truststore.

Figure 10-8. Trino using a certificate issued by a CA
Let’s say you had your Trino certificate signed by a CA. In order for the client to trust it, we need to create a truststore containing the intermediate and root certificates. As in the earlier example in which we imported the Trino self-signed certificate, you perform the same import of the CA certificate chain:
$keytool --importcert-alias trino_server-file root-ca.cer-keystore truststore.jks-storepass password
After the root CA certificate is imported, you continue to import all necessary intermediate certificate from the chain:
$keytool --importcert-alias trino_server-file intermediate-ca.cer-keystore truststore.jks-storepass password
Note that there may be more than a single intermediate certificate and that we’re using a single one here for simplicity.
Certificate Authentication
Now that you’ve learned about TLS, certificates, and the related usage of the Java
keytool, you can have a look at using these tools
for authenticating clients connecting to Trino with TLS. This certificate
authentication is displayed in Figure 10-9.
As part of the TLS handshake, the server provides the client a certificate so that the client can authenticate the server. Mutual TLS means that the client, as a part of the handshake, provides a certificate to the server to be authenticated. The server verifies the certificate in the same way you have seen the client verify the certificate. The server requires a truststore that contains the CA chain, or the self-signed certificate for verification.
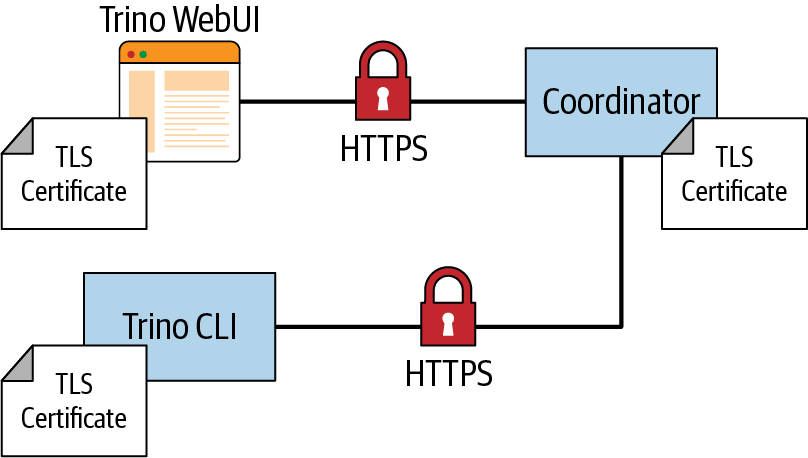
Figure 10-9. Certificate authentication for Trino clients
To configure the Trino coordinator for mutual TLS authentication, you need to add some properties to the config.properties file on the coordinator. Let’s look at a complete configuration:
http-server.http.enabled=falsehttp-server.https.enabled=truehttp-server.https.port=8443http-server.https.keystore.path=/etc/trino/trino_keystore.jkshttp-server.https.keystore.key=slickpasswordhttp-server.https.truststore.path=/etc/trino/trino_truststore.jkshttp-server.https.truststore.key=slickpasswordnode.internal-address-source=FQDNinternal-communication.https.required=trueinternal-communication.https.keystore.path=/etc/trino/trino_keystore.jksinternal-communication.https.keystore.key=slickpasswordhttp-server.authentication.type=CERTIFICATE
The property http-server.authentication indicates the type of authentication
to use. In this case, Trino is using CERTIFICATE authentication. This causes
the Trino coordinator to use the full TLS handshake for mutual authentication.
In particular, the server-side coordinator sends a certificate request
message as part of the full TLS handshake to the client to provide the signed
certificate for verification. In addition, you need to configure the truststore
on the coordinator in order to verify the certificate presented by the client.
Let’s use our command to connect with the CLI to Trino:
$trino --server https://trino-coordinator.example.com:8443--truststore-path ~/truststore.jks--truststore-password password --user matt trino> SELECT * FROM system.runtime.nodes;Error runningcommand: Authentication failed: Unauthorized
You’ll find that authentication failed, because the client does not use the keystore that has the certificate to provide the client certificate to the coordinator for mutual authentication.
You need to modify your command to include a keystore. Note that this keystore is different from the keystore on the cluster. This keystore specifically contains the key pair for the client. Let’s first create our keystore on the client side:
$keytool -genkeypair-alias trino_server-dnameCN=matt-validity10000-keyalg RSA -keysize2048-keystore client-keystore.jks-keypass password -storepass password
In this example, you see that we set the CN to user matt. In this case, it’s
more than likely that this is a self-signed certificate or that an organization has its
own internal CA. Let’s specify the client keystore in the CLI command:
$trino --server https://trino-coordinator.example.com:8443--truststore-path ~/truststore.jks--truststore-password password --keystore-path ~/client-keystore.jks--keystore-password password --user matt
trino> SELECT * FROM system.runtime.nodes;Query failed: Access Denied: Authenticated user AuthenticatedUser[username=CN=matt,principal=CN=matt]cannot become user matt
Now that we have authenticated, authorization is failing. Recall that authentication proves who you are, and authorization controls what you can do.
In the case of certificate authentication, Trino extracts the subject
distinguished name from the X.509 certificate. This value is used as the
principal to compare to the username. The username defaults to the operating
system username unless it is specified explicitly using the --user
option in the CLI. In this case, the user matt is compared to the distinguished
common name in the certificate CN=matt. One workaround is to simply pass the
option to the CLI as --user CN=matt. Alternatively, you can leverage the built-in
file-based system access control you learned about earlier for some
customization.
First, you need to create a file in the Trino installation directory etc/access-control.properties, on the Trino coordinator.
access-control.name=filesecurity.config-file=/etc/trino/rules.json
Next we need to create the rules.json file on the coordinator as the
path location specified in the access-control.properties file and define the
mapping from principal to user to include CN=:
{"catalogs":[{"allow":true}],"principals":[{"principal":"CN=(.*)","principal_to_user":"$1","allow":true}]}
We are matching a principal regex with a capturing group. We then use that
capturing group to map the principal to the user. In our example, the regex matches
CN=matt, where matt is part of the capturing group to map to the user. Once
you create these files and restart the coordinator, both the certificate
authentication and authorization of that subject principal to the user work:
SELECT*FROMsystem.runtime.nodes;-[RECORD1]+--------------------------------------------------------node_id|i-0779df73d79748087http_uri|https://coordinator.example.com:8443node_version|312coordinator|truestate|active-[RECORD2]+--------------------------------------------------------node_id|i-0d3fba6fcba08ddfehttp_uri|https://worker-1.example.com:8443node_version|312coordinator|falsestate|active
Kerberos
The network authentication protocol Kerberos is widely used. Support for Kerberos in Trino is especially critical for users of Trino, who are using the Hive connector (see “Hive Connector for Distributed Storage Data Sources”), since Kerberos is a commonly used authentication mechanism with HDFS and Hive.
Note
The Kerberos documentation can be a useful resource for learning about the protocol and the related concepts and terms. In this section, we assume that you are sufficiently familiar with these aspects or that you have gone off and read some of the documentation and other resources available.
Trino supports clients to authenticate to the coordinator by using the Kerberos authentication mechanism. The Hive connector can authenticate with a Hadoop cluster that uses Kerberos authentication.
Similar to LDAP, Kerberos is an authentication protocol, and a principal can be authenticated using a username and password or a keytab file.
Prerequisites
Kerberos needs to be configured on the Trino coordinator, which needs to be able to connect to the Kerberos key distribution center (KDC). The KDC is responsible for authenticating principals and issues session keys that can be used with Kerberos-enabled services. KDCs typically use TCP/IP port 88.
Using MIT Kerberos, you need to have a [realms] section in the
/etc/krb5.conf configuration file.
Kerberos Client Authentication
To enable Kerberos authentication with Trino, you need to add details to the config.properties file on the Trino coordinator. You need to change the authentication type, configure the location of the keytab file, and specify the user name of the Kerberos service account to use:
http-server.authentication.type=KERBEROShttp.server.authentication.krb5.service-name=trinohttp.server.authentication.krb5.keytab=/etc/trino/trino.keytab
No changes to the worker configuration are required. The worker nodes continue to connect to the coordinator over unauthenticated HTTP.
To connect to this kerberized Trino cluster, a user needs to set up their keytab file, their principal, and their krb5.conf configuration file on the client and then use the relevant parameters for the Trino CLI or the properties for a JDBC connection. You can find all the details including a small wrapper script in the Trino documentation.
Cluster Internal Kerberos
If you want to secure the cluster internal communication, the Kerberos authentication must be enabled on workers, and internal communication needs to be changed to use SSL/TLS; see “Encrypting Communication Within the Trino Cluster”. This requires specifying valid Kerberos credentials for the internal communication.
Trino itself, as well as any users connecting to Trino with Kerberos, need a
Kerberos principal. You need to create these users in Kerberos by using kadmin.
In addition, the Trino coordinator needs a keytab file.
When using Kerberos authentication, client access to the Trino coordinator should use HTTPS; see “Encrypting Trino Client-to-Coordinator Communication”.
You can optionally set the Kerberos hostname for the coordinator, if you want Trino to use this value in the host part of the Kerberos principal instead of the machine’s hostname. You can also specify an alternate location of the Kerberos configuration file krb5.conf, different from the default /etc/krb5.conf:
http.server.authentication.krb5.principal-hostname=trino.example.comhttp.authentication.krb5.config=/etc/trino/krb5.conf
For securing cluster internal communication with Kerberos, you need to specify valid Kerberos credentials for the internal communication and enable it:
internal-communication.kerberos.enabled=true
Make sure that you’ve also set up Kerberos on the worker nodes. The Kerberos principal for internal communication is built from
http.server.authentication.krb5.service-name after appending it with the host
name of the node where Trino is running and the default realm from the
Kerberos configuration.
Data Source Access and Configuration for Security
Another aspect of securing the data available to Trino users is visible in Figure 10-10. Each catalog configured in Trino includes the connection string as well as the user credentials used to connect to the data source. Different connectors and target data source systems allow different access configurations.
A user first authenticates to the coordinator. The Trino connector issues requests to the data sources, which typically require authentication as well.

Figure 10-10. Data source security configuration impacting data for users
Authentication from the connectors to the data sources are dependent on the connector implementation. In many connector implementations, Trino authenticates as a service user. Therefore, for any user who runs a query using such a connector, the query is executed in the underlying system as that service user.
For example, if the user credentials to the target data source do not include the rights to perform any write operations, you effectively restrict all Trino users to read-only operations and queries. Similarly, if the user does not have access rights to a specific schema, database, or even table, Trino usage has the same restrictions.
To provide a more fine-grained access control, you can create several service users with different permissions. You can then have multiple catalog configurations with the same connector to the same data source, but using different service users.
Similar to using different service users, you can also create catalogs with different connections strings. For example, the PostgreSQL connection string includes a database name, which means you can create different catalogs to separate access to these databases running on the same PostgreSQL server. The MS SQL Server connections string allows an optional configuration of a database.
Details such as connection strings, user credentials, and other aspects are discussed in Chapter 6.
Beyond the schema and database level, you can even push access rights and data content configuration all the way down to the database itself. For example, if you want to limit access to certain columns in a table or certain rows in a table, you can limit access to the source tables and instead create views with the desired content. These are then available in Trino like traditional tables and therefore implement your security. The extreme case of this scenario is the creation of a separate database or data warehouse using ETL tools, including even Trino itself. These target databases with the desired data can then be configured for access in Trino with separate catalogs as well.
If you end up having multiple catalogs defined on your Trino deployment using some of the preceding logic, and you want to allow access to these catalogs to specific users, you can take advantage of the system access control discussed in “System Access Control”.
A relatively new feature available in some connectors from Trino, as well as some commercially available connectors, is end-user impersonation. This allows the end-user credentials in the Trino CLI or other tools to be passed through all the way to the data source. The access rights in Trino then reflect the configured access rights in the database.
One common example of data source security configuration is the use of Kerberos with HDFS and therefore with the Hive connector; see “Hive Connector for Distributed Storage Data Sources”. Let’s look at the details now.
Kerberos Authentication with the Hive Connector
After learning about Kerberos configuration and data source security in general earlier, let’s now look at the combination of Kerberos, HDFS/Hive, and the Hive connector.
By default, no authentication is enabled for Hive connector use. However, the connector does support Kerberos authentication. All you need to do is configure the connector to work with two services on the Hadoop cluster:
-
The Hive metastore Thrift service
-
The Hadoop Distributed File System (HDFS)
Note
If your krb5.conf location is different from /etc/krb5.conf, you must set it
explicitly using the java.security.krb5.conf JVM property in the jvm.config file:
-Djava.security.krb5.conf=/example/path/krb5.conf
Hive Metastore Thrift Service Authentication
In a kerberized Hadoop cluster, Trino connects to the Hive metastore Thrift service by using Simple Authentication and Security Layer (SASL) and authenticates by using Kerberos. You can easily enable Kerberos authentication for the metastore service in your catalog properties file:
hive.metastore.authentication.type=KERBEROShive.metastore.service.principal=hive/[email protected]hive.metastore.client.principal=[email protected]hive.metastore.client.keytab=/etc/trino/hive.keytab
This setting activates the use of Kerberos for the authentication to HMS. It also configures the Kerberos principal and keytab file location that Trino uses when connecting to the metastore service. The keytab file must be distributed to every node in the cluster.
Note
hive.metastore.service.principal can use the _HOST placeholder in the value.
When connecting to the HMS, the Hive connector substitutes this with the hostname
of the metastore server it is connecting to. This is useful if the metastore
runs on multiple hosts. Similarly, hive.metastore.client.principal can have the
_HOST placeholder in its value. When connecting to the HMS, the Hive
connector substitutes this with the hostname of the worker node Trino is
running on. This is useful if each worker node has its own Kerberos principal.
Trino connects as the Kerberos principal specified by the property
hive.metastore.client.principal and authenticates this principal by using the keytab specified by the hive.metastore.client.keytab property. It verifies
that the identity of the metastore matches hive.metastore.service.principal.
Warning
The principal specified by hive.metastore.client.principal must have
sufficient privileges to remove files and directories within the
hive/warehouse directory. Without this access, only the metadata is removed,
and the data itself continues to consume disk space. This occurs because the HMS is responsible for deleting the internal table data.
When the metastore is configured to use Kerberos authentication, all HDFS
operations performed by the metastore are impersonated. Errors deleting data are
silently ignored.
HDFS Authentication
Enabling Kerberos authentication to HDFS is similar to metastore
authentication, with the following properties in your connectors properties
file. When the authentication type is KERBEROS, Trino accesses HDFS as the
principal specified by the hive.hdfs.trino.principal property. Trino
authenticates this principal by using the keytab specified by the
hive.hdfs.trino.keytab property:
hive.hdfs.authentication.type=KERBEROShive.hdfs.trino.principal=[email protected]hive.hdfs.trino.keytab=/etc/trino/hdfs.keytab
Cluster Separation
Another large-scale security option is the complete separation of the data sources and configured catalogs by using them on separate Trino clusters. This separation can make sense in various scenarios:
-
Isolating read-only operations from ETL and other write operation use cases
-
Hosting clusters on completely different infrastructure because of regulatory requirements for the data; for example, web traffic data as compared to heavily regulated data such as medical or financial or personal data
This separation of clusters can allow you to optimize the cluster configuration for the different use cases and data, or locate the clusters closer to the data. Both situations can achieve considerable performance as well as cost advantages, while at the same time satisfying security needs.
Conclusion
Now you can feel safe about your data and the access Trino provides to it. You know about the many options you have to secure Trino access and the exposed data. This is a critical part of running Trino and has to be augmented by other activities such as monitoring, discussed in Chapter 12.
But first you need to learn about numerous tools to use with Trino to achieve some amazingly powerful results. Check it out in our next chapter, Chapter 11.