Have you ever worked on a large document on your computer? When I was at university, I frequently had to write long documents. This was back when computers still had a 3 ½-inch floppy drive, which should give you some idea how long ago we’re talking. I was forever worried that the computer would corrupt my document.
To get around this, I would duplicate the document before making changes. When I’d finished writing the document, I’d usually have 10 or 20 different versions of the file, with names like “Document Copy 11” or “Latest New Document.”
This was the student version control of the time. Version control is very similar to my story. It keeps track of the changes in documents and allows you to go back and retrieve a previous version of a file. Version control can also store the contents of a whole directory of files. In this chapter, we’ll look at version control today.
Version Control at a Glance
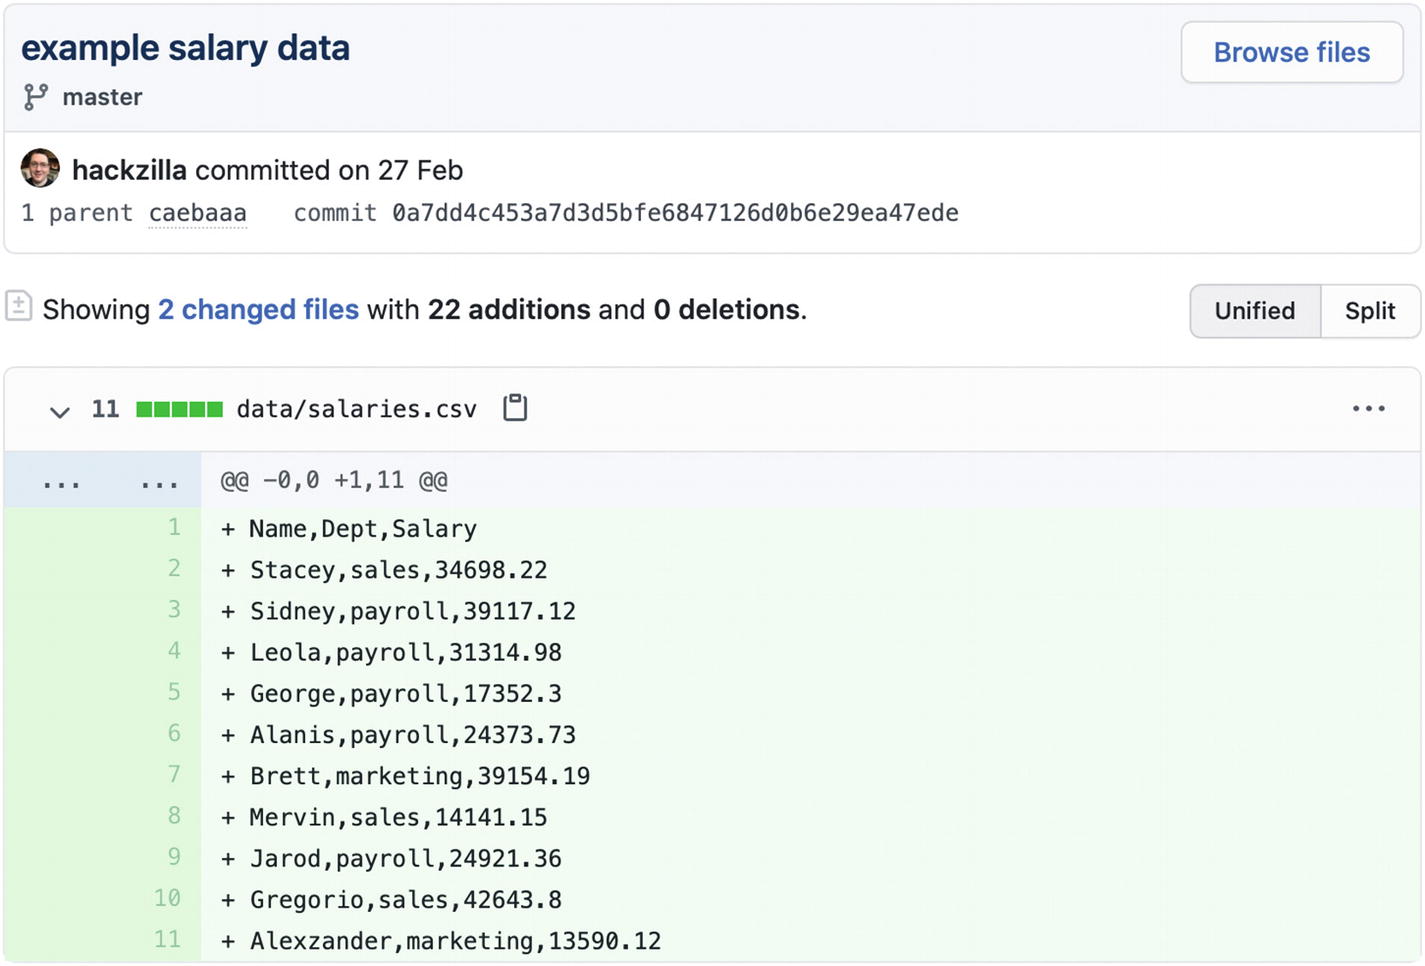
Each new version that is stored in a repository is called a commit. A commit will contain the file differences, as well as who committed them, when they happened, a description of the changes, and a reference to the parent commit, as shown in Figure 7-1.
Figure 7-1
An example of a git commit
With all this information, git will then create an identifier for the commit, which can be referenced at a later date. This identifier is referred to as a commit hash. A group of files that are managed by version control are referred to as a repository.
You can browse the commits in a repository and revert any files to a previous commit. This is true even if you deleted the file, as long as it was previously committed. The version control system that I use on a daily basis is called git. There are other version control systems in use on the Internet at the moment and, according to Wikipedia, the most popular hosted version control system is Github.com, which uses git.
Version control has helped save the day for me many times. It’s helped me answer questions like these:
Who deleted that file?
Who made this change ?
What changes were made to this feature?
Version control also allows you to take the current project and create a branch of it. In this branch, you can make all the changes you wanted. Eventually, you might want to merge the changes back into the master branch. Version control can help you do that.
Getting Started
You’ve interacted with git already, because Brew uses git to keep track of all the updates. When Brew says it is updating, it is downloading information from a git repository.
All the applications and commands that we’ve been using will have originally been checked out by Brew, using the version control repository.
You might not have noticed, but when you downloaded the random-files directory from GitHub.com, you were actually downloading it from a git repository. To be fair, it was downloaded as a zip, but the files are hosted in a version control system. If you want to see the repository, you can access it from https://github.com/hackzilla/random-files.
There are a few terms that GitHub uses in the interface that are worth defining, and they are explained in Table 7-1.
Table 7-1
GitHub Terms
Commits
Individual code changes.
Issues
Bug reports and feature requests.
Pull requests
Commits that contain bug fixes or features. They have yet to be integrated into the master branch.
Releases
Packaged versions of the application.
Getting started using a website like GitHub is easy, but the point of this book is about doing things in Terminal to help you get a better understanding of how things work. It is worth knowing how to do it from Terminal as well.
Getting started is easy, as macOS includes the git client, so there is nothing to install.
Cloning Repositories
The good thing about git is it is really good at collaborating with others. Originally git was seen as a distributed version control system, which meant it was designed to collaborate with your friends and colleagues. Over time, companies created the hosted git repository model, where everyone sends and receives updates. They offer both private and public repositories, whereby private is where you want to limit access to certain people or organizations.
If you created a public repository, everyone will be able to read from it, but only select people will be able to write to it. My repository for random-files can be seen in Figure 7-2; it’s is a public repository that is hosted on GitHub.
If you wanted to download this repo, you could use the Download ZIP option, which is effectively what you did at the beginning of Chapter 3. Or you could grab this URL from the Clone or Download option, as shown in Figure 7-3.
Figure 7-3
The Clone or Download button on a GitHub repository
With the URL from Figure 7-3, you can download the repository, which not only includes the files, but the history as well. The command I will be using is git clone.
Git will create a folder with the same name as the repo, and you can see this in the output as Cloning into 'random-files'. This is now an exact copy of the repository. The URL you cloned will now be known as the remoterepository.
Branches
All repositories have at least one branch, which is called master. The random-files repository only has this one branch, but we can create more.
Let’s create a branch called my-branch.
% git checkout -b my-branch
Switched to a new branch 'my-branch'
The -b argument tells git checkout to create the new branch. You can switch freely between the branches using the git checkout command.
% git checkout master
Switched to branch 'master'
Your branch is up to date with 'origin/master'.
When you see 'origin/master', this refers to the master branch of origin. Origin is just a label for the remote, which means that origin/master is the remote master branch.
The HEAD Branch
The HEAD is a special branch. It is a pointer to the commit that you are working with. You can think of the HEAD as your working directory in git.
Tags
Tags are labels that point to specific commits. Imagine you are working on a project where you release different versions. Without tags, you would have all your commits in the master, but no way to know which commit applied to which released version.
Tags allow you to specify which commit matches which release. They can be published for all to see. This is how the composer knows which version of the source code to download.
Updating the Repository
When you clone a repository, you are getting everything stored at that moment in time. When the owner of the repository makes additional commits, you will not automatically receive them.
The server that you get your repository from is called the remote in git. The git commands we run will need to be run when we are inside of the repository.
% cd random-files
Fetch
The git fetch command will check the remote server and compare the log with what it has stored locally. If there are no changes, then git fetch will exit without displaying anything.
% git fetch
Let’s check a repository that I haven’t updated in a while and you will see the difference.
Resolving deltas: 100% (1815/1815), completed with 34 local objects.
From github.com:hackzilla/TicketBundle
7d19a08..2c13f7f master -> origin/master
* [new branch] 3.x -> origin/3.x
* [new tag] 3.3.0 -> 3.3.0
* [new tag] 3.3.1 -> 3.3.1
At this point, git is now aware of new changes, but will not have made any changes to the files on your drive, or updated you to the latest commit. The HEAD will remain pointing to the same commit, the one before the fetch.
Status
After you fetch and make git aware of the latest commits, you need to see what has changed. This is where git status comes in.
git status will tell you where you are in relation to the remote repository. When we look at my out-of-date TicketBundle repository, we see it is 525 commits behind.
% git status
On branch master
Your branch is behind 'origin/master' by 525 commits, and can be fast-forwarded.
(use "git pull" to update your local branch)
nothing to commit, working tree clean
However, when we look at the random-files repository, we see that I am up to date and there is nothing new.
% git status
On branch master
Your branch is up to date with 'origin/master'.
nothing to commit, working tree clean
In both cases, git status told me there was “nothing to commit.” This is letting you know that there are no file differences between what is stored in git and on your local filesystem. This will depend on which commit your HEAD is pointing to.
If you have made changes to the contents of the random-files repository, then git status will tell you about them. I am going to create a new file and edit the Readme.md to illustrate new and modified files.
% touch new-file
% nano Readme.md
% git status
On branch master
Your branch is up to date with 'origin/master'.
Changes not staged for commit:
(use "git add <file>..." to update what will be committed)
(use "git restore <file>..." to discard changes in working directory)
modified: Readme.md
Untracked files:
(use "git add <file>..." to include in what will be committed)
new-file
no changes added to commit (use "git add" and/or "git commit -a")
I will discuss what to do about changes later.
Pulling
You’ve seen how to make git aware of changes and how to see how many commits behind you are. What you need to do now is bring the latest changes into the repository. This is where git pull comes in.
When you use git pull, you can limit it to download a single branch or everything. There are reasons for wanting to do both.
You will likely want to download everything for repositories you own, but a public repository that has many thousands of commits on many different branches will likely be more than you need.
To pull in the changes from just a remote branch, which will update and set the HEAD to the most recent commit, use the following:
% git pull origin master
Alternatively, you can pull down everything by omitting the origin master. This will do everything that pulling a specific branch will do, but will also store all the changes in the other branches.
% git pull
Your First Repository
It’s time to create your first repository, or repo for short. First, you need to create a folder that the git repo will live in; this is also where you will store all your files that you want to be versioned.
% mkdir "my life's work"
% cd "my life's work"
Now that you have the folder and you are inside, you can use git to convert this folder into a repo.
% git init
Initialized empty Git repository in /Users/danielplatt/my life's work/.git/
Everything that makes this folder a git repo is in that .git folder. We can see if there are any commits, by using git log.
% git log
fatal: your current branch 'master' does not have any commits yet
First, we need some files.
% touch "Great Essay" "First Symphony"
These are just empty files, but they will help to illustrate the point. We can use git status to check on the state of our git repository. status can help us identify which changes have not yet been committed to the repo.
% git status
On branch master
No commits yet
Untracked files:
(use "git add <file>..." to include in what will be committed)
First Symphony
Great Essay
nothing added to commit but untracked files present (use "git add" to track)
We can see that git status knows about the two files that we created and is calling them untracked files. An untracked file is a file that has never been saved to this git repo.
When you start a commit, you load the changes into a staging area. Once you are happy with all the changes in the staging area, you tell git to commit them.
Adding Files to a Repository
Adding files to the staging area is straightforward.
% git add "Great Essay"
% git add "First Symphony"
You could have easily added everything by using a wildcard or by specifying the current directory with a dot.
% git add .
The git add command won't produce any output, but you can see what it has done by issuing another status.
% git status
On branch master
Your branch is up to date with 'origin/master'.
Changes to be committed:
(use "git restore --staged <file>..." to unstage)
new file: Great Essay
new file: First Symphony
Removing Files from a Repository
If you accidentally added a file that you didn't want to commit, you can remove it.
% git rm "First Symphony"
error: the following file has changes staged in the index:
First Symphony
(use --cached to keep the file, or -f to force removal)
When you tell git to remove a file, it will want to know whether you want to just remove it from the staging environment, or completely from the filesystem. Use --cached to remove it from the staging environment, and -f to remove it from the filesystem.
% git rm --cached "First Symphony"
rm 'First Symphony'
We should have the file called "Great Essay" staged for committing and "First Symphony" should still exist and be untracked.
Let's run git status and check.
% git status
On branch master
No commits yet
Changes to be committed:
(use "git rm --cached <file>..." to unstage)
new file: Great Essay
Untracked files:
(use "git add <file>..." to include in what will be committed)
First Symphony
Committing to a Repository
We can now commit this change to the repo. The simplest way to commit into git is using git commit with the -m option to specify a message for the log.
Note
If you just run git commit, you will be taken to the default editor, with the ability to leave a much longer commit message. If you haven’t changed the $EDITOR variable, the default editor will be vi.
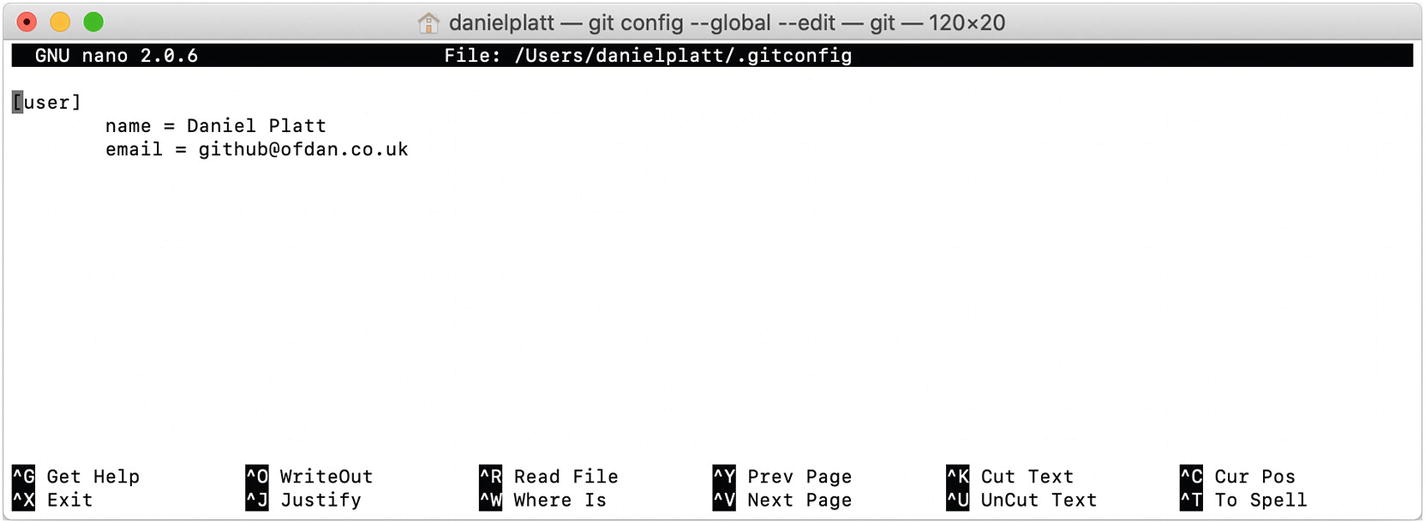
When we run the command to edit the git config, we will be launching the default text editor, which I changed to nano in Chapter 2. Remember that what you enter will be freely available for all to see.
% git config --global --edit
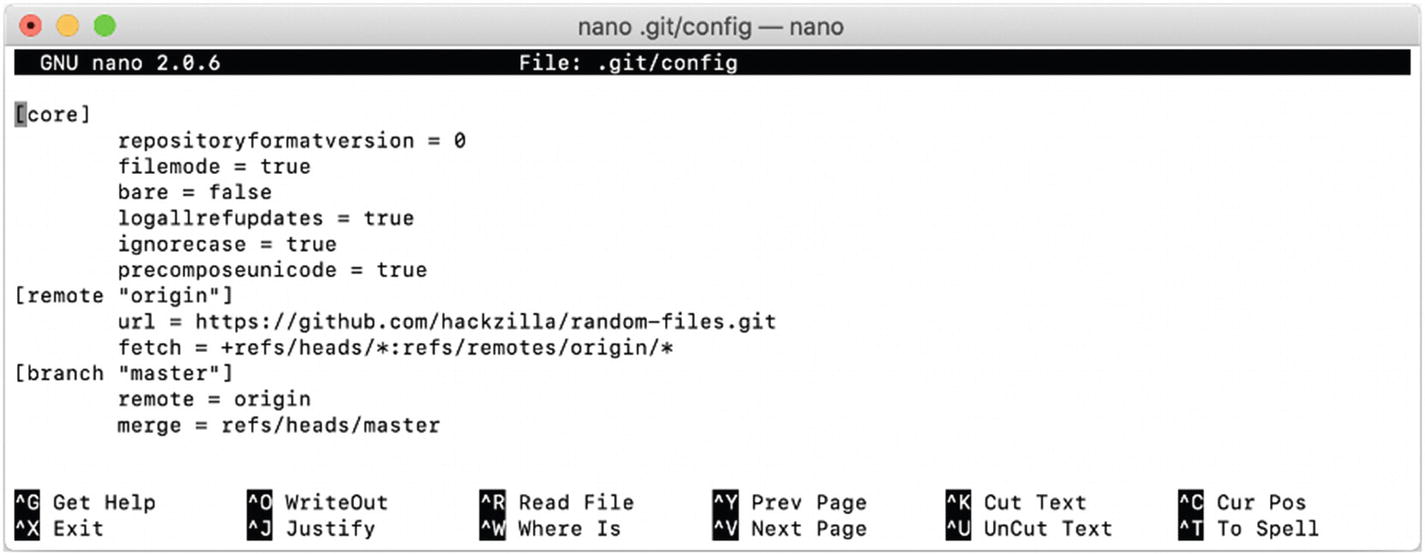
The contents of this file are shown in Figure 7-4.
Figure 7-4
Editing the .gitconfig in nano
You need to update .gitconfig with your name and email address as it will appear in the git logs. This is something that you need to do only once, as this information is saved in your user account inside ~/.gitconfig.
Amending a Commit
If you need to change your user details, you will want to amend the previous commit. This will bring up the text editor and allow you to change the previous commit message.
% git commit --amend --reset-author
[master 80f762e] My first commit
1 file changed, 0 insertions(+), 0 deletions(-)
create mode 100644 Great Essay
Repository Log
You should now be able to see this change reflected when you run gitlog.
When in the git log, you can use the Up and Down arrows keys to move around. When you are done, press q to quit.
Publishing Your Repository
Git repositories are a great way to keep track of changes in a directory full of files. They are even better when shared with others.
You could zip up the directory and give it to other people. However, there is a better way. It involves having a company host your git repo for you, so that you and others can share the same commits.
The top three companies that provide hosting for git repos are:
They all offer free public and private repos hosting.
Note
The restriction is how many people you can share private repos with.
I use GitHub in the following examples.
Signing Up
The first thing you will need to do is create an account with GitHub. You can see the signup form in Figure 7-5.
Figure 7-5
GitHub signup form
Once you have verified your email address, you will be able to proceed.
Creating a Repository
After you are verified, GitHub will show you a screen that allows you to create a repository. It will look like Figure 7-6 or Figure 7-7.
Figure 7-6
First sign in to GitHub
Figure 7-7
Your account homepage
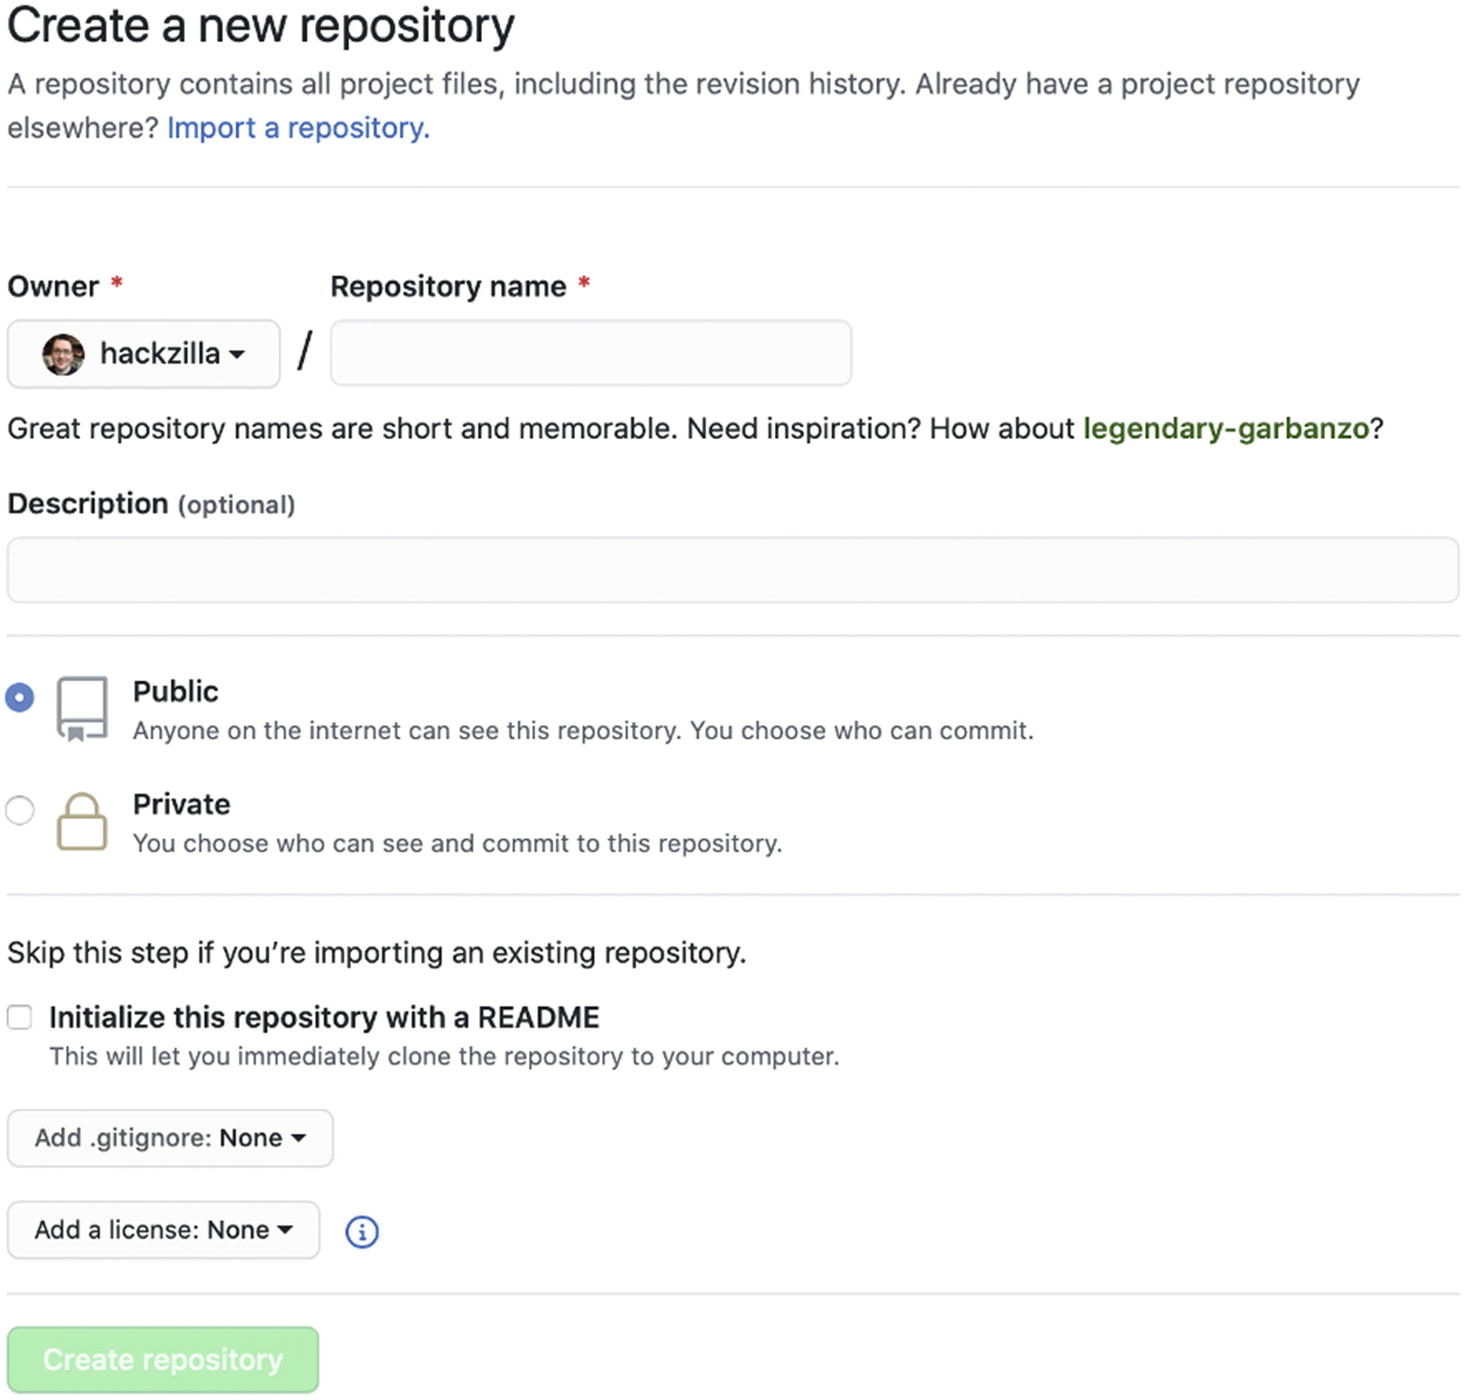
Whichever screen you see, click Create Repository and you will be taken to a page that looks like Figure 7-8. This screen allows you to specify the name of the repository and the visibility. If you are unsure whether to make your repo public or private, choose private. When you are happy with your choices, click Create Repository.
Figure 7-8
Creating a new repository
Authentication
Before you can use this hosted repository with your local repository, you need to be able to prove who you are.
There are two different ways to authenticate yourself and it depends on which version of the repository URL you choose. You can see the choice in Figure 7-9 where there is a selector between HTTPS and SSH. The SSH URL will start with git@ and the HTTPS URL will start with https://.
Figure 7-9
New repository quick setup
Personally, I always try to use the SSH URL when I can, but this isn’t always possible, so I cover both. Whichever you choose to set up, and it is possible to set up both, you need to go into your GitHub account settings, as shown in Figure 7-10.
Figure 7-10
The Settings menu for your account in GitHub
SSH
When you are in your account settings, you will need to select SSH and GPG Keys. If you haven’t used this before, you will find this section empty, as shown in Figure 7-11.
Figure 7-11
SSH keys section in GitHub
SSH keys
If you have never used SSH before, you will need to generate your own SSH key. It is always worth checking before you do, in case an application has done this on your behalf.
The files you are looking for are named id_rsa and id_rsa.pub. These files will live in ~/.ssh. If these files exist, you can skip the next part where we generate your SSH keys. Otherwise, you risk overwriting your existing ones.
SSH keys are known as a key pair, because there is a private key and a public key. The idea is that you can encrypt a piece of information with the private key and only the public key can decrypt it. The reverse is also true—you can encrypt a piece of information with the public key and only be able to decrypt it with the private key.
You can freely give the public key to anyone and everyone, but you should never reveal your private key to anyone. This is the basis of how the remote connection, or SSH connection, works.
However, both the client and the server have their own key pairs.
Generating an SSH Key
As my account doesn’t have any issue keys, I will be able to generate a pair for this account. Generating an SSH key is easy with ssh-keygen. If you want to keep your private key extra secure, you can provide ssh-keygen with a passphrase that must be provided every time you use it.
% ssh-keygen
Generating public/private rsa key pair.
Enter file in which to save the key (/Users/danielplatt/.ssh/id_rsa):
Enter passphrase (empty for no passphrase):
Enter same passphrase again:
Your identification has been saved in /Users/danielplatt/.ssh/id_rsa.
Your public key has been saved in /Users/danielplatt/.ssh/id_rsa.pub.
We now have an SSH key pair, which we can provide to GitHub to use for authentication. In SSH Keys, click New SSH Key, as was shown previously in Figure 7-11. I will paste the contents of id_rsa.pub into the key field, as shown in Figure 7-12. The title field is for your reference; if you don't provide anything, GitHub will use the label at the end of the key, in my case, it’s [email protected].
After you add the key, it will be displayed in SSH Keys, as shown in Figure 7-13. If you ever lose your private key, or someone else gets access to it, you should delete it from your GitHub account.
Figure 7-13
My public key on GitHub
That is all you need to do in order to authenticate with GitHub. The easiest way to test that everything is working correctly is to try to connect to GitHub using SSH.
Hi hackzilla! You've successfully authenticated, but GitHub does not provide shell access.
Connection to github.com closed.
If you need to authenticate more than one computer or user, you can follow the same steps and add extra SSH keys.
HTTPS
The alternative authentication is to use HTTPS. The username and password can be the same as you use to log in to GitHub. However, I wouldn’t recommend it, as git will save the details for subsequent login attempts.
You see, whatever you enter in the username and password will be stored somewhere on your computer in order for git to be able to use them the next time.
Personal Access Tokens
Alternatively to using your password, you can create a personal access token that can be used in its place. Like SSH keys, you create more than one. This is useful if you need to use your details on multiple computers or users or keep track of which tokens are still being used.
To create an access token, you need to head to your account settings, like you did in Figure 7-11, and choose Developer Settings from the menu.
When you are in the Developer Settings, select Personal Access Tokens from the menu, as shown in Figure 7-14.
Figure 7-14
Personal Access Tokens page in GitHub
Now that you are in the Personal Access Tokens section, you can create a new token, as shown in Figure 7-15. There are many different permissions that you can assign to this token, but I have found that you only need to assign the repo permission for full control of private repos. It is worth giving the token a meaningful note, as this will be the only thing to remind you what this token is for. When you are done, click the Generate Token button.
Figure 7-15
Creating a new personal access token in GitHub
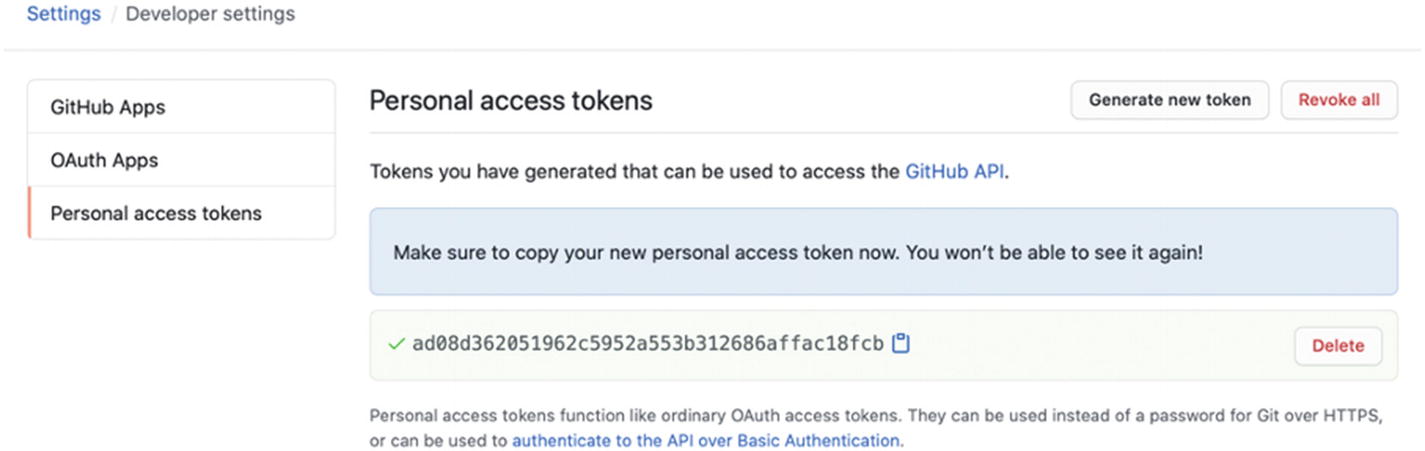
After the page loads, you will be shown the screen in Figure 7-16. This is the only time that GitHub will show you the token, so you must copy down the token before you leave this page. If you do lose the token, you can delete and recreate it.
Figure 7-16
The new personal access token in GitHub
This token can be used in place of your GitHub password when authenticating with git on Terminal.
Removing Saved Details
If you find yourself accidentally deleting your token or changing your account password, GitHub will no longer authenticate correctly. You will need to remove your current login credentials.
git on macOS stores the login credentials inside keychain, as shown in Figure 7-17.
Figure 7-17
Git credentials stored inside Keychain
An alternative is to use git to remove these details for you. When you run this erase command, you will not be returned to the shell prompt. The command is waiting for you to tell it what to remove. You need to type in which host to remove and which protocol.
% git credential-osxkeychain erase
host=github.com
protocol=https
<RETURN>
There is no output to that command. However, the next time you try to clone a HTTPS repo, you will be prompted for login credentials.
Uploading to the Repository
When you created the repository, you were taken to a page that looks like Figure 7-18.
Figure 7-18
A new repository in GitHub without any commits
There are two sets of instructions. The first is to create a new repo, and the second is to upload an existing repo. As I have a repo I want to upload, I will follow the second set of instructions.
Branch 'master' set up to track remote branch 'master' from 'origin'.
The git remote command is linking GitHub and your repository and git push is telling git to upload it. The -u option tells git to track this remote branch. This tracking process tells you how many commits your branch is behind. Now that I have pushed once, I can shorten the command to just git push.
% git push
Everything up-to-date
When you check back on the GitHub repo, you will see your commit, as shown in Figure 7-19.
Figure 7-19
The git repo with a single commit that I uploaded
In this setup, you have read and write access to your repo, and everyone else only has read access, as I chose a public repository. If you want the repo to be private, you can change the preference in Settings. It's at the bottom of the options tab, as shown in Figure 7-20. GitHub will make certain you want to delete the repository by asking you to type the repo name and enter your password.
Figure 7-20
The danger zone of a repository
This setup is typical of an open source project. You wouldn't want just anybody changing your project without your permission, as this could lead to security and quality issues.
If you did want to give another user full control to commit to your repository, you can add them as a collaborator to your repository. However, this should only be done with people whom you trust completely. The section to add collaborators is shown in Figure 7-21.
Figure 7-21
Inviting a user to collaborate on your repository
The way around allowing other people to commit to your repository is to vet their submits first. The way we do that is with pull requests, which we will cover in the “Forking the Repository” section.
Making Commits in GitHub
You can make changes directly to a repository inside of GitHub, but this will work only if you are the owner or a collaborator.
Creating/Uploading Files
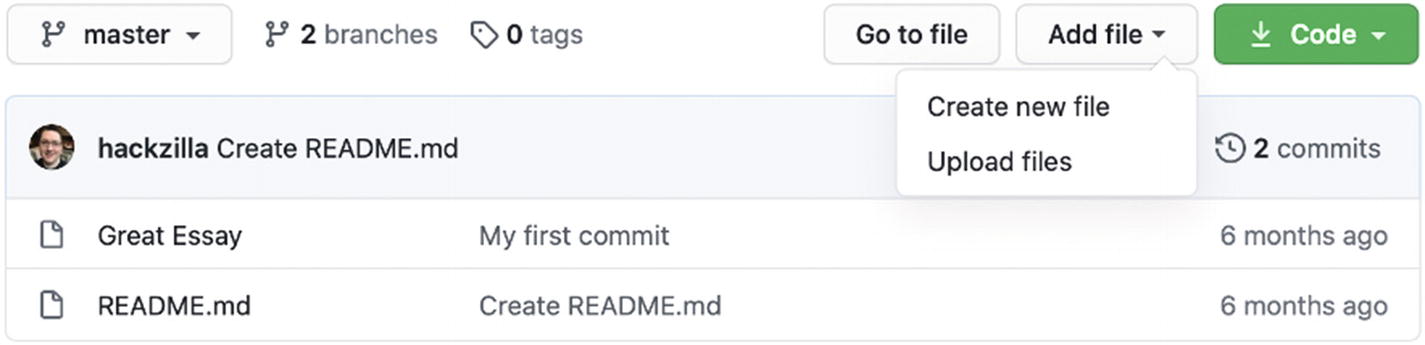
I can make commits directly to the repository from within GitHub, by creating uploads or uploading files, as shown in Figure 7-22.
Figure 7-22
The menu to upload or create a new file
If you don't have a README.md file, GitHub will offer to create this file for you, as shown in Figure 7-23.
Figure 7-23
GitHub offering to create a README file
When you add a new file to GitHub, you will see the commit form, as shown in Figure 7-24.
Figure 7-24
Creating a new commit in GitHub
I’ll stick with committing directly to the master branch for the moment and will cover pull requests later in this chapter. After I commit the new file, I see the new file, as shown in Figure 7-25.
Figure 7-25
My new commit in GitHub
Editing Files
Editing files in git is similar to creating them. If you want to add content to new-file, you simply click on the filename, which takes you to the screen shown in Figure 7-26.
Figure 7-26
Viewing a file in GitHub
If you look closely at the image, you will see a pencil icon in the bottom left, as shown in Figure 7-27. When you click this edit button, you will be taken to a page that looks very similar to the Add File page.
Figure 7-27
Close-up of the file editing and delete buttons
Deleting Files
I can also delete files from my repository on GitHub, using the delete icon, which is shown in Figure 7-27. Delete works exactly the same as edit, whereby you need to commit the deletion.
Forking the Repository
Earlier in this chapter, in the section called “Cloning a Repository,” I downloaded the random-files repository.
I would like you to do this, as it will be a good example of making a change to another person's repository.
I would like you to go into the random-files directory and make a commit to the repository.
% cd random-files
% touch my-change
% git add my-change
% git commit -m "Making a change to the repo"
When I do a git status, I can see that I have one commit that is ready to push.
% git status
On branch master
Your branch is ahead of 'origin/master' by 1 commit.
(use "git push" to publish your local commits)
nothing to commit, working tree clean
However, using git push, you will find that you cannot push to my repository.
% git push
ERROR: Permission to hackzilla/random-files.git denied to <another user>.
fatal: Could not read from remote repository.
Please make sure you have the correct access rights
and the repository exists.
This is because you are neither the owner nor a collaborator of the repo. The way around this is to fork the original repo, which is to take a complete copy of the original repo and push your changes to that. A repository can be copied by clicking the Fork button, as shown in Figure 7-28.
Figure 7-28
Different buttons available for a repository
Depending on the size of the repository, the forking could take a few minutes, but hopefully will only be a few seconds, as shown in Figure 7-29.
Figure 7-29
Forking the random files repository
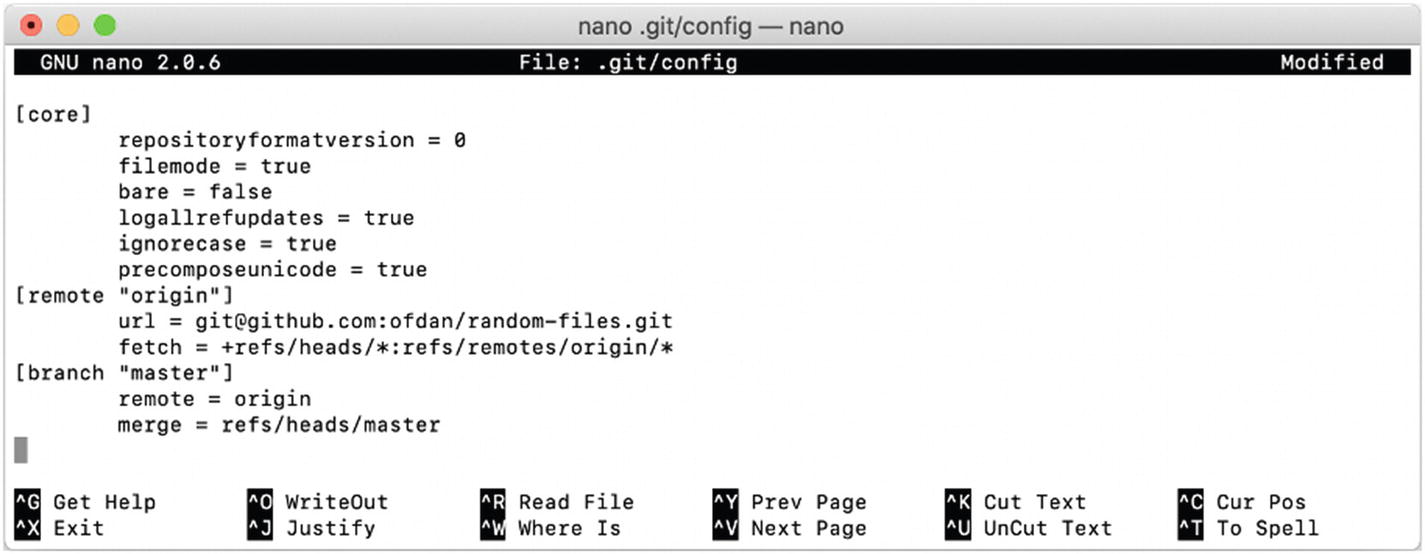
Changing the Remote
I now have a new repo, but I still need to change the current repo to point to the forked repo. We could download it again, but that would take time and would lose any new commits. We need to change the origin of the repo to this new repo.
Grab the new URL from Clone or Download. I am going to use the ssh URL rather than the HTTPS URL.
Now you can push your changes. At the next refresh, you'll see your new commit on GitHub.
Pull Requests
Imagine if you had made a fix to my original repo in your fork. How can you let me know about it? The best way is to create a pull request. The best place to make the change is in a new branch in your fork.
Wherever you made the change, when you go into GitHub, it will ask if you would like to create a pull request, as shown in Figure 7-32.
Figure 7-32
GitHub asking if you would like to create a pull request
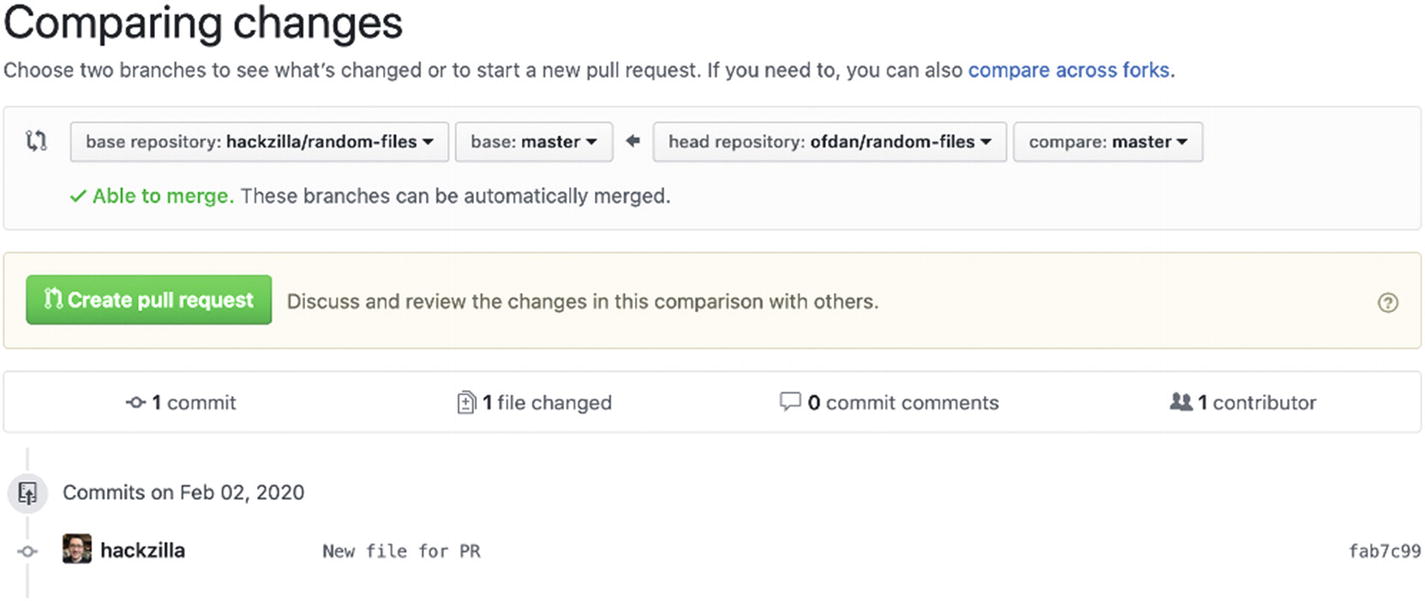
When you create your pull request (PR), you are asked to confirm which branches and which repos to merge, as shown in Figure 7-33.
Figure 7-33
GitHub asking for confirmation of which branches and repos to merge
When you are happy with your pull request, you create it. It will then show up for the owner of the other repo. The owner can then decide whether to accept your commits. This is a good way to offer your changes back to the original repo and the community.
I recommend you get a git application that allows you to visually see what your git repo looks like on your Mac. My recommendation is to use a GUI application, either Source Tree (free) or Git Tower (paid).
In this chapter, we looked at version control and at git. You created your first repository and were able to upload it to GitHub. You also looked at how you can fork another repository and suggest commits using the pull request feature.