
In This Chapter
The basics of Web development
A look at the LAMP stack
Reference material for the Web developer
An interesting thing about Twitter application development is you can interact with the API in any language and on any platform. Windows clients, iPhone applications, and Android apps use different programming languages and still interact with the Twitter API in similar ways.
In this book, I use a typical LAMP (Linux, Apache, MySQL, and PHP) stack to demonstrate the Twitter API. I use the Web platform as a teaching tool because it has become prevalent, multiplatform, and Twitter itself is a Web app. I use a LAMP stack because it is a widely adopted development platform and all the components are open source and free.
Tip
If you're already an expert LAMP user, you can skip to Chapter 3.
If Web programming isn't your native language, read this chapter. However, this isn't a definitive LAMP resource. The topics in this chapter could easily fill several books on their own. My aim here is to show you enough to get you through the rest of the book.
If you've done Web development work before, you're probably familiar with HTML and CSS. HTML (Hypertext Markup Language) is the language of the Web. Web browsers interpret the semantics of the HTML elements, called tags, and render a human readable page for the visitor. CSS (Cascading Style Sheets) is the markup language that tells the browser how the HTML elements are to be styled and displayed. In the early days of the Web, HTML often contained both the content of the Web page and information on how the page was to be styled. Developers would often inappropriately use HTML tables to structure page elements, and the HTML specification included tags that defined display style such as "font" and "bold." These tags have since been deprecated. The modern practice is to separate content from style.
There are several reasons to separate content from style.
Style changes are simple. For example, using external CSS you can change style elements site wide, like font size and background color.
HTML code is easier to read with the style elements removed. This makes maintenance easier.
File sizes are decreased, which increases the speed of your Web site.
Coding to Web standards increases the likelihood your site will render correctly in a wide variety of Web browsers.
The order of your content can be structured logically like a document because you can rearrange elements aesthetically using CSS. This means in cases where aesthetics are irrelevant, such as screen readers for the blind, and search engine spiders, your Web page will still be readable.
The organization that writes the standards on HTML, CSS, XML, and numerous other Internet protocols is the W3C (World Wide Web Consortium). This organization is made up of organizations that have a stake in Web standards. Some obvious examples are companies that build Web browsers, such as Microsoft, Mozilla, and Apple. Without the W3C there would be numerous proprietary versions of HTML and developers would be forced to develop to the most popular browsers.
The W3C writes specification documents on how each version of HTML is to function. With each new version of HTML comes a new specification document. Web browsers are supposed to render your HTML based on the specification document, called a doctype, which you choose and declare in your HTML. So if you declare your page HTML 4.01, the browser should render your page based on HTML 4.01 rules. Current doctypes include
HTML 2.0
HTML 3.2
HTML 4.01
Frameset
Transitional
Strict
XHTML 1.0
Frameset
Transitional
Strict
XHTML 1.1
Unless your target audience is known to run legacy browsers, use either HTML 4.01 Strict or XHTML 1.0 Strict.
Note
The "strict" doctype of HTML 4.01 and XHTML 1.0 removes many deprecated tags and creates a more future proof document than transitional or frameset doctypes. These later two doctypes include some deprecated tags to make the transition for older Web sites easier.
XHTML (Extensible Hypertext Markup Language) is an HTML specification that is designed to make HTML more like a semantic collection of data, similar to XML. It relies on CSS to define the page's design. The key difference between HTML and XHTML is that XHTML must be valid XML. The rules for HTML are much more lenient in this regard.
Here are some rules to make your HTML valid XHTML:
The root element must be html and must contain an xmlns attribute that defines the XHTML namespace.
You must always close XHTML tags including empty elements like the break and image tag. A closed break tag looks like this: <br />
All XHTML tags must be lowercase.
All XHTML tag attributes must have a value. You cannot shorten an attribute such as
readonly. That attribute must appear as:readonly="readonly".All XHTML tag attributes must be surrounded by quotes.
Here is an example of a short valid XHTML document:
<!DOCTYPE html
     PUBLIC "-//W3C//DTD XHTML 1.0 Strict//EN"
     "http://www.w3.org/TR/xhtml1/DTD/xhtml1-strict.dtd">
<html xmlns="http://www.w3.org/1999/xhtml" xml:lang="en" >
   <head>
      <title>Example XHTML Document</title>
   </head>
   <body>
      <p>Tags must be lowercase and closed,<br />
         including singleton tags like the break tag.</p>
   </body>
</html>
HTML documents contain two main sections: the head and the body.
The head occurs at the top of the file and is denoted by the <head> tag. It contains non-visual information about the page, and usually contains these tags:
title: Denotes the name of the Web page. This usually appears at the top of the browser window, and is used in bookmark labels and search engine results.
link: The link tag is used to link other resources to this Web page. Examples include external CSS files and favicons (the tiny 16 × 16 icon that is displayed in your bookmarks and browser address bar).
meta: The meta tag is used to define ancillary information about a Webpage, such as keywords, a short description, or copyright information.
style: Used to embed document wide CSS code directly in the head section.
script: Both embedded and external JavaScript code make use of the script tag.
The body of the HTML document, denoted by the <body> tag, is where the content of the page resides. All content tags can be categorized into two groups: block-level elements and inline elements.
By default, block-level elements occur on a new line. Block-level elements may contain nested block-level tags and inline tags. Examples include
Headings: Heading tags are used to separate a document by topics and sub-topics. Example:
<h1>Animals</h1>
         <h2>Domestic</h2>
            <h3>Dogs</h3>
            <h3>Cats</h3>
Paragraphs: Paragraph tags are naturally used to define a paragraph.
<p>This is a paragraph.</p>
Unordered lists: Used for bulleted lists.
<ul>
         <li>eggs</li>
         <li>bacon</li>
         <li>milk</li>
      </ul>
Tables: Used for tabular data, tables contain other block-level elements to define the header row <th>, a row <tr>, and a column <td>.
<table>
         <th>
            <td>Name</td>
            <td>Number</td>
         </th>
         <tr>
            <td>Dusty</td>
            <td>555-2368</td>
         </tr>
         <tr>
            <td>Jenny</td>
            <td>867-5309</td>
         </tr>
      </table>
Forms: Forms are used to send user input data back to the hosting server. Forms are vital part of HTML and are necessary for nearly all ecommerce and Web applications, including Twitter. While the form tag is a block-level element, the field tags are inline elements.
<form name="input" action="login.php" method="post">
         Username: <input type="text" name="username" />
         Password: <input type="password" name="password">
         <input type="submit" value="Submit" />
      </form>
DIVs: The div tag is a generic block-level element. It is used primarily to wrap sections of your document in logical blocks, so they can be easily manipulated and styled with CSS.
<div id="footer">
         <p>Copyright 2011</p>
      </div>
In contrast to block-level elements, inline elements may only contain other inline tags. Examples include
Anchor links: Anchor tags make the World Wide Web a Web. Links to external sites and internal pages weave a Web of information and connects the Web. The anchor tag contains an important element called "target" that tells the browser to open the link in a new or the current window. By default the link will open in the current window. You can specify target="_blank" to have a link open in a new window.
<a href="http://twitter.com" target="_blank">Twitter</a>
Images: Image tags display images. They contain several important attributes including alt, title, height, and width. The alt attribute is short for alternative text; it's used to provide text description of the image. The title attribute is the text that will appear in a browser tooltip when your cursor is hovering over the image. Naturally. the height and width attributes define the images height and width. By defining an image's height and width, the browser doesn't have to wait for the image to finish download to correct render the elements around the image. You can also use height and width to force an image's size. However, this doesn't alter its file size.
<img src="http://twitter.com/logo.gif" alt="Twitter
       Logo" title="Twitter" height="100" width="80"
       />
Strong: The strong tag is used to denote a word or phrase as important. Its default behavior is to bold the word or phrase. However, using CSS you may style the important text however you wish.
Please do <strong>not</strong> delete these files.
Line break: Browsers ignore line breaks in HTML markup. To tell the browser you want a new line, you must use a
<br />tag.<p>The White House<br /> 1600 Pennsylvania Avenue NW<br /> Washington, DC 20500</p>
You can style HTML with CSS in three different ways:
Inline: You can use the style attribute on any HTML tag to add style to an element. It looks like this:
<p style="margin:10px">Hello Twitter!</p>
This is a poor method for styling your page, because your style only applies to the element it's on. So if you want all your paragraphs to have a margin of 10px, you have to add this style to every paragraph tag. This also means that if you want to change the design, you have to update every tag.
Embedded: You can embed your style in the head section of your HTML page by placing your CSS in between the style tags, like this:
<!DOCTYPE html
           PUBLIC "-//W3C//DTD XHTML 1.0 Strict//EN"
           "http://www.w3.org/TR/xhtml1/DTD/xhtml1-strict.dtd">
      <html xmlns="http://www.w3.org/1999/xhtml" xml:lang="en" >
         <head>
            <title>Example XHTML Document</title>
            <style type="text/css">
               p { margin: 20px; }
            </style>
         </head>
         <body>
            <p>Hello Twitter!</p>
         </body>
      </html>
Tip
Embedding your CSS centralizes your style elements. If you want to make a style change, you only have to change it once at the top of the page.
External File: The best option is to create an external CSS file with all your styles in it and link to it from your HTML file, like this:
<!DOCTYPE html
           PUBLIC "-//W3C//DTD XHTML 1.0 Strict//EN"
           "http://www.w3.org/TR/xhtml1/DTD/xhtml1-strict.dtd">
      <html xmlns="http://www.w3.org/1999/xhtml" xml:lang="en" >
         <head>
            <title>Example XHTML Document</title>
      <link rel="stylesheet" type="text/css" href="test.css" />
   </head>
   <body>
      <p>Hello Twitter!</p>
   </body>
</html>
Using an external CSS file is the best way to style your Web site. The external file can be applied to multiple Web pages, centralizing the design for your entire site. This also decreases your Web site's download size, because the user doesn't have to download redundant style data.
If these three methods are applied to the same element at the same time, the inline CSS takes precedence over the embedded CSS, which takes precedence over the external CSS file.
When styling your CSS, you use selectors to specify what HTML attributes you want to style. There are four main CSS selectors you should know for this book:
Type selectors: Type selectors use the HTML tag name to identify what tags you want to style. For example, to give all the paragraphs on your Web site a margin of 10px, you would do this:
p { margin:10px;}Class selectors: You can add a class attribute to any HTML tag and select elements with a particular class name using a dot followed by the class name. For example, you might want to add a class called e-mail to all link tags that link to an e-mail address. To select and style all those e-mail links, you would do this:
.email { color:red; }ID selectors: You can give any HTML element an ID attribute. However, the ID you give the element must be unique to the page. You can't have duplicate IDs on the same page. To select an element based on its ID you use a pound sign like this:
#navigation { margin-top:20px; }Descendant selectors: You can select elements nested inside of other elements by using a descendant selector. For example, if you wanted to select all the links inside of a div tag with and ID called "footer" you would do this:
#footer a { color:red; }
These are the primary CSS selectors you need to have a firm grasp on.
Note
When dealing with CSS selectors, you need to consider the nature of cascading style sheets. Cascading styles work by applying the styles of the most general selector first, then overwriting those styles with more specific selectors. The order of which the rules are encountered by the browser is irrelevant. To give you an example, a general selector could be a style applied to all paragraphs like this:
p { margin:10px; color: red;}A more specific selector might pick a specific paragraph with an ID of "intro" like this:
p #intro { color:blue; }In this example, the 1st CSS rule will give all your paragraphs a 10px margin and red text. The specific "intro" paragraph will have a 10px margin like all the other paragraphs. However, because we have a second rule that styles the "intro" paragraph specifically, that style will make the "intro" paragraph text blue instead of red.
Here are the most basic CSS styles you will encounter regularly in the wild.
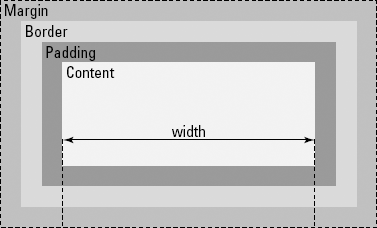
The box model is an HTML element's margin, border, padding, height, and width. Look at Figure 2-1 for an illustration of each one of these spaces. The most common units of measurement to adjust spacing are px for pixels and em for em-length. Em-length is defined as the width of the letter "m" in your currently selected font.
You can specify the side of the box you want to apply your margin, or padding, by using the indicators top, right, bottom, or left, seen in Listing 2-1.
If you just apply one measurement, it's applied to all sides of the box. You can also use shorthand by putting the measurements in the order of top, right, bottom, left, as seen in Listing 2-2.
You can set the border's width, style, and color. Like the margin and padding, it can be applied to specific sides using the indicators top, right, bottom, left, or it can be applied to all sides at once.
Listing 2-3 shows an example of how to set the border CSS.
Setting the height and width of an element is straightforward. See Listing 2-4.
You can alter fonts by changing their size, font-family, weight, style, and color. You can change the alignment of your text by using the text-align style. Possible alignments include left, right, center, and justify. Listing 2-5 shows an example of how to decorate your fonts.
The floating style is used to position an element to the left or right on the surrounding elements. It's commonly used to position images in text, but can also be used to layout other page elements. See the example in Listing 2-6.
The display style can be used to change a block level HTML element into an inline element, and vice versa, but the main reason you need to know about the display style is because it can hide elements if you set the property to none. This is useful for dynamic JavaScript elements and can make a Web page feel truly interactive. See Listing 2-7.
You can alter the background image or color on any element using background styles. The example in Listing 2-8 sets the background color to white, and positions a non-repeating background image in the top left-corner.
XML (Extensible Markup Language) and JSON (JavaScript Object Notation) are types of textual data formatting. By formatting textual data in a standard format, the data can be easily exchanged and parsed. This is particularly useful for Web site data exchange through Web services and APIs, such as Twitter's API. When you make a request to Twitter, they respond by returning XML or JSON data, depending on which data format you requested. You can then parse that data and go merrily on your programming way.
If you're writing a JavaScript application, JSON is the data format for you. Using JSON, you can take the response from the Twitter API and access natively like an object. You can see an example JSON response from Twitter in Listing 2-9.
Example 2.9. Example JSON Object
{"trends":[{"name":"#amazonfail","url":"http://search.twitter.com/
               search?q=%23amazonfail"},... truncated ...],"as_of":"Mon, 13 Apr
               2009 20:48:29 +0000"}
XML is a popular data formatting choice because it has been around for a while. XHTML is a type of XML. It is made up of tags, elements, and attributes. Due to the establishment of XML, most program languages either have native parsers or open source libraries with XML parsers that you can use to easily extract data out of an XML file. You can see an example XML response in Listing 2-10.
Example 2.10. Example XML Object
<?xml version="1.0" encoding="UTF-8"?>
<status>
   <created_at>Tue Apr 07 22:52:51 +0000 2009</created_at>
   <id>1472669360</id>
   <text>At least I can get your humor through tweets. RT @abdur: I don't mean
              this in a bad way, but genetically speaking you're a cul-de-sac.</
              text>
   <source><a href="http://www.tweetdeck.com/">TweetDeck</a></source>
   <truncated>false</truncated>
   <in_reply_to_status_id></in_reply_to_status_id>
   <in_reply_to_user_id></in_reply_to_user_id>
   <favorited>false</favorited>
   <in_reply_to_screen_name></in_reply_to_screen_name>
   <geo/>
</status>PHP is an open-source server side programming language. It is used to dynamically create Web pages on the fly. With a language like PHP, you can create a custom experience for every viewer.
The examples in this book are written for PHP version 5 and newer. PHP is so prevalent on the Web that most Web hosting companies come with PHP preinstalled. If you don't already have a favorite Web hosting company to try the PHP examples in this book on, I recommend Nearly Free Speech (http://nearlyfreespeech.net).
PHP is a rich language with a huge library of built-in functionality. In this chapter, I cover the essentials you need to understand the Twitter API examples in this book, including
Conditional Statements
Loops
Functions
Arrays
cURL
PHP DOMDocument Class
PHP JSON Functions
Tip
The first thing you need to know about PHP is the echo command. Echo simply prints a string to the screen, as seen in Listing 2-11.
The next thing you need to know about PHP is its comments syntax. I use comments in example code throughout this book to help you understand what is going on in the code. Example of PHP comments syntax can be seen in Listing 2-12.
Example 2.12. PHP Comments Syntax
<?php

 echo "This will be printed";

 // This will not

 # Nor will this

 /*
 This also won't print,
 and is useful for commenting out multiple lines.
 */

?>
Conditional statements are programming statements that perform different actions depending on whether a specified condition is true or false. Conditional statements are a common structure across most programming languages.
The conditional statement used most often in this book is the if-then-else statement. It works just like the name implies: if a condition is true, then perform a task. Else perform a different task. The code for an if-then-else statement in PHP looks like Listing 2-13.
Example 2.13. If-Then-Else
<?php

 if($x == 1)
 {
    echo "x equals 1";
 }
 else
 {
   echo "x does not equal 1";
 }

?>
To determine whether a condition is true or false, a comparison operator is used. PHP comparison operators you need to know for this book include
= = equal to
Example: (1 = = 2) returns false
!= not equal to
Example: (1 != 2) returns true
< less than
Example: (1 < 2)" returns true
> greater than
Example: (1 > 2)" returns false
<= less than or equal to
Example: (1 <= 2) returns true
>= greater than or equal to
Example: (1 >= 2) returns false
You can test for multiple conditions using logical operators. Logical operators you need to know for this book include
&& and
Example: ($x && $y) return TRUE if $x and $Y are both TRUE.
|| or
Example: ($x || $y) return TRUE if either $x or $Y are TRUE.
! not
Example: (!$x) return TRUE if $x is not TRUE.
Another conditional statement that is used in this book is the elseif part. You can use one or more elseif parts in an if-then-else to combine multiple statements. The first statement that is found to be true is executed. The other statements are ignored, including the final else statement. Listing 2-14 shows an example if-then-else statement with an elseif part.
There are occasions in any programming language when you need to repeat a task until a certain condition is met. For these scenarios, it is appropriate to use a loop. For the examples in this book I use two types of PHP loops:
foreach
do while
Foreach loops iterate over every element inside of an array, starting with the first element. Foreach only works on arrays, and will produce an error if you try using it on anything other than an array.
You can use a foreach loop one of two ways. The first way, shown in Listing 2-15, iterates over the given array and assigns the value of the current element to a variable I named $value.
The second way to use a foreach is to assign the current elements value to a variable, and also assign that element's key value to a variable. This is helpful for arrays with key value pairs. Listing 2-16 shows an example of how to assign the key value as well as the elements value.
Do-while loops work by "doing" something over and over "while" a condition remains true. As soon as that condition is no longer true, the do-while loop stops. A do-while loop will always run at least once. Listing 2-17 shows an example of a do-while loop counting to 10.
Note
Listing 2-17 uses the shorthand $x++. Placing two pluses behind a variable is the functional equivalent of writing $x = $x + 1.
Another common programming structure in PHP and the examples in this book, is a function. Functions are chunks of code that can be referenced and reused. The purpose of functions is to reduce code duplication and make code more readable. Functions can also take input in the form of parameters and return a value as output. An example of a function with parameters and a return value is show in Listing 2-18.
An array is a collection of data stored in memory. Each element in an array contains a key identifier and a value.
The value can be any type, including an integer, string, object, or even another array.
The key must be either an integer or a string.
If no key is specified, PHP will assign the key:
If no integer key currently exists, PHP assigns a key of 0.
If there are already integer keys, PHP assigns the next higher integer key.
Listing 2-19 shows an example of how to create an array with keys and values.
Example 2.19. Creating an Array
<?php

 $exampleArray = array("publisher" => "Wiley", true);
 echo $exampleArray [0]; // 1
 echo $exampleArray ["publisher"]; // Wiley

 ?>
To create an empty array, you would write: $myArray = array();
To add a value to the end of the array, write: $myArray[] = $x;
Tip
PHP includes numerous functions that allow you to work with and manipulate arrays and their contents. The online PHP manual includes a list of all the array functions (http://php.net/manual/en/function.array.php). For the purpose of the examples in this book, you need to be familiar with the following array functions:
array_intersect: Takes two arrays, compares the contents of each array, and returns a new array of the duplicate content.
Example: $mutualFollows = array_intersect($friendsIds, $followersIds);
array_diff: Compares the contents of two array and returns a new array with the elements that exist in the first array, but don't exist in the second array.
Example: $notFollowingYouBack = array_diff($following, $followers);
array_merge: Combines two arrays into one new array:
If string keys are duplicated, the later key value is assigned.
If numeric keys are duplicated, the keys are reassigned in numerical order.
Example: $newArray = array_merge($array1, $array2);
array_values: Discards an array's keys and returns a new array with the original array's values but with numerical keys.
Tip
This is useful if you want to merge arrays with duplicate keys.
Example: $newArray = array_values($array1);
count: Returns the amount of elements in the array.
Example: $length = count($myArray);
ksort: Sorts the array by the name of the key.
Example: ksort($myArray);
cURL stands for client for URLs. It is an open source software project that consists of two products:
libcurl
curl
Libcurl is a multi-platform C-based URL transfer library. It supports numerous protocols, and runs on every platform from Linux to Windows. PHP has functions built in to support libcurl, making it super easy to interact with the Twitter API over HTTP.
Curl is a client-side command line tool used to interact with the libcurl library. With the curl client, you can play with the Twitter API via a basic command line. To get started, you need to know a few basic case-sensitive command line options, including
- u: The username and password to use.
- d: The data to send in a post request.
- k: Turn off SSH certificate verification.
Listings 2-20 and 2-21 are some examples of how to interact with the Twitter API using the curl command line client.
Example 2.21. Post a Tweet
curl -u username:password -k -d "status=Testing curl." https://twitter.com/
               statuses/update.xml
To interact with libcurl using PHP, you need the help of a few built-in functions. The functions you need to know for this book include
curl_init: Create the object to interact with libcurl.
curl_setopt: Sets the options for the connection, such as post data, URL, and authentication.
curl_exec: Executes the connection and returns to remote servers response.
curl_getinfo: Use to get information on the last request, such as transfer speed, and header data.
curl_close: Closes the connection to the remote server and frees system resources.
To set the curl_setopt function, there are a few predefined constants you need to know.
CURLOPT_URL: The URL you are requesting.
CURLOPT_USERAGENT: A string that will identify your requests to hosting server.
CURLOPT_RETURNTRANSFER: A Boolean that, when set to TRUE or 1, returns the response of the request as a string return value of the curl_exec function.
CURLOPT_POST: A Boolean that indicates the request is a HTTP POST.
CURLOPT_POSTFIELDS: The fields you want to include in a HTTP POST request.
CURLOPT_SSL_VERIFYPEER: A Boolean on whether you want to verify a SSH certificate.
CURLOPT_USERPWD: The username and password for an authenticated request.
Put all these pieces together, and you see the example in Listing 2-22 that posts to your Twitter stream.
Example 2.22. Post a Tweet
$url = "https://api.twitter.com/1/statuses/update.xml";

 $curlHandle = curl_init();

 curl_setopt($curlHandle, CURLOPT_URL, "$url");
 curl_setopt($curlHandle, CURLOPT_USERAGENT, "Twitter App Development For
                Dummies: Example");
 curl_setopt($curlHandle, CURLOPT_POST, 1);
 curl_setopt($curlHandle, CURLOPT_RETURNTRANSFER, 1);
 curl_setopt($curlHandle, CURLOPT_SSL_VERIFYPEER, false);
 curl_setopt($curlHandle, CURLOPT_POSTFIELDS, "status=test");
 curl_setopt($curlHandle, CURLOPT_USERPWD, "$username:$password");

 $apiResponse = curl_exec($curlHandle);
 $info = curl_getinfo($curlHandle);

 curl_close($curlHandle);
PHP provides a class to parse any standard DOM (Document Object Model) markup. XML fits this category, so you can use PHP's DOMDocument class to parse the XML results from the Twitter API.
To get started, create a new DOMDocument object and then call its loadXML class, as seen in Listing 2-23. The loadXML class loads an XML document from a string.
Note
cURL's curl_exec method returns the response from Twitter in a string. When requesting XML from Twitter, you simply load that response string into the DOMDocument object using the loadXML method.
Now that your DOMDocument is loaded with your XML data, you can parse the data using the getElementsByTagName method. This method returns a class called DOMNodeList. It's essentially a list of all the nodes the method found. See Listing 2-24.
You can evaluate a collection of tags by using the nodeValue property and a foreach loop. Listing 2-25 shows an example of how to do this.
Example 2.25. Loop through a DOMNodeList Object
$screenNameNodes = $xml->getElementsByTagName("screen_name");

 foreach($screenNameNodes as $screenNameNode)
 {
    $screenName = $screenNameNode->nodeValue;
    echo $screenName;

 }
If you know that your DOMNodeList only contains one node, you can go straight to that node using the item method, and print its value. See Listing 2-26.
Example 2.26. Go Straight to the First Node in a DOMNodeList Object
$errorMessage = $errors->item(0)->nodeValue;
You can check the amount of nodes found by reading the public property length on the DOMNodeList object. If the length is greater than 1, you have found the tag (or tags) you're looking for.
Tip
I often use the length attribute in the API example to check when any error tgs were found in the returned XML. If so, I print them; else, I continue on.
Listing 2-27 shows an example of this.
The json_decode function, included in PHP version 5 and greater, takes a string of JSON formatted data and returns an object of that data.
In this book, I use the json_decode function to parse Twitter API search results.
An example of how this function works can be seen in Listing 2-28.
MySQL is an open source relational database server and structured query language (SQL). It is a common fixture in Web development and is found as an optional add-on on most Web hosting companies.
Relational databases are collections of related tables that store data in fields. To interact with the databases you use the MySQL query language. You will need to know a few basic MySQL commands for this book, including
select: Use to query the database.
create: Create a new table.
insert: Insert a new row into a table.
update: Update the values in a database.
delete: Delete a row.
The select query is probably the most common MySQL command. It is used to query data in the database. It also uses some common MySQL clauses that you will recognize in other MySQL commands. These common clauses are
from: Specifies the table you want to query.
join: Allows you to include the data from another table with your query, by joining the two tables on a common row identifier, such as an id field.
where: Limit the results of the query to data that meets the conditions specified in the where clause.
group by: Group data by common fields.
having: Use to limit data after it has grouped by the conditions specified in the having clause.
order by: Sort the data by a column or multiple columns.
limit: Use to limit the row count to a specific number. Useful for getting a sample of an extremely large result set.
Tip
To use the select query, you must specify the fields you want to return, and the database and table you want to query. You can return all the fields in the table by using an asterisk *. To start, select the database you want to work with the command:
use databaseName;
Once you select your database, you can run a simple select query, as seen in Listing 2-29, to return all the rows in a table.
If you have data stored in two different tables, it might be necessary to join those tables based on a common id field. An example of this is seen in Listing 2-30.
Example 2.30. A SQL Select Query Using a Join
select *
 from tableName t1
 join tableName2 t2 on t1.id = t2.id;
In Listing 2-31, I show you the proper syntax for a where, order by, and limit clause. In this query, I get the ten products that are lowest in stock.
Example 2.31. A Select Query Using a Where, Order By, and Limit Clause
select productName, quantityInStock
 from tableName
 where quantityInStock < 100
 order by quantityInStock
 limit 0, 10;
Listing 2-32 is an example of a group by and having clause. The count(*) statement returns the amount of rows.
Example 2.32. Group By and Having
select year, count(*)
 from tableName
 group by year
 having count(*) > 5;
To create a new table in MySQL, use the create statement. When you create a new table, you must specify the field names, their data type, whether they are allowed to contain a NULL value, whether they should be indexed for quick searching, and whether they should be indexed as the primary key. The primary key exists for unique row identifiers, and is perfectly suitable for ids that join tables together. Create keys for fields that you want indexed for quick searching, but are not unique row identifiers. Listing 2-33 shows an example of a create statement.
Example 2.33. A Create Statement
create table 'exampleTable' (
   exampleTableId int(6) not null,
   firstName varchar(60) not null,
   lastName varchar(60) not null,
   dateOfBirth timestamp not null,
   cellPhoneNumber default null
) engine=innodb default charset=utf-8;
Inserting a new row into a table requires the use of the insert statement, as seen in Listing 2-34.
Example 2.34. An Insert Statement
insert into exampleTable (column1, column2)
 values (value1, value2);
To update the data in a table, use the update statement as seen in Listing 2-35. Use the where clause you can limit the field updates to one particular row or a set of rows.
Example 2.35. An Update Statement
update exampleTable
 set column1 = bacon, column2 = eggs
 where meal == 'breakfast';
The delete statement can be used to delete rows, tables, and even databases. In Listing 2-36, I delete a few rows from a table whose ids are less than 10.