
Thinking back to my senior high school days, I knew nothing about version control tools. The best thing I could do was to create a daily archive of my code on a USB disk. And yes I did lose one!
Nowadays, with the boom of version control tools like Git and the availabilities of multiple free services like GitHub and Visual Studio Team Services, managing code with version control tools has become a daily basis for every developer.
As the most popular version control tool, Git has already been playing an important role in your work or personal projects. In this section, we'll talk about popular practices of using Git in a team.
Note
Check out this quick tutorial at: https://try.github.io/.
Version control plays an important a role and it does not only influence the source code management process but also shapes the entire workflow of product development and delivery. Thus a successful branching model becomes a serious choice.
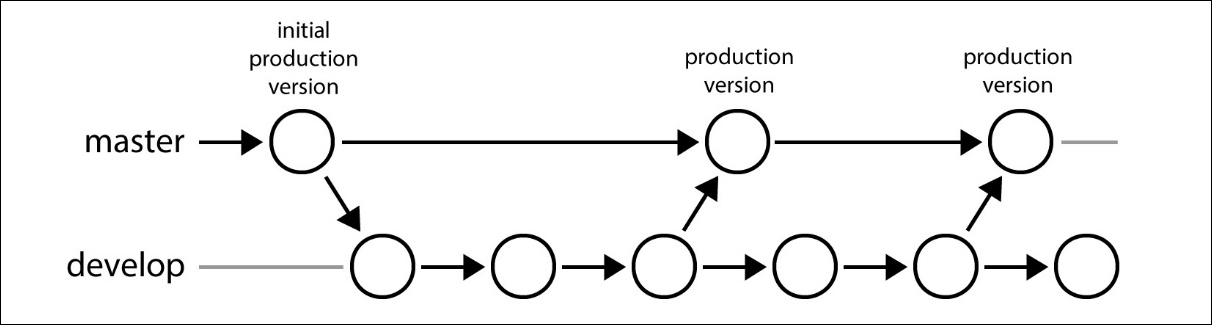
Git flow is a collection of Git extensions that provides high-level repository operations for a branching model raised by Vincent Driessen. The name Git flow usually refers to the branching model as well.
In this branching model, there are two main branches: master and develop, as well as three different types of supporting branches: feature, hotfix , and release.
With the help of Git flow extensions, we can easily apply this branching model without having to remember and type detailed sequences of commands. To install, please check out the installation guide of Git flow at: https://github.com/nvie/gitflow/wiki/Installation.
Before we can use Git flow to create and merge branches, we'll need to make an initialization:
$ git flow init -d
This will create master and develop branches (if not present) and save Git flow-related configuration to the local repository.
The branching model defines two main branches: master and develop. Those two branches exist in the lifetime of the current repository:
- Branch master: The HEAD of
masterbranch should always contain production-ready source code. It means that no daily development is done onmasterbranch in this branching model, and only commits that are fully tested and can be performed with a fast-forward should be merged into this branch. - Branch develop: The HEAD of
developbranch should contain delivered development source code. Changes todevelopbranch will finally be merged intomaster, but usually not directly. We'll come to that later when we talk aboutreleasebranches.
There are three types of supporting branches in the branching model of Git flow: feature, hotfix, and release. What they roughly do has already been suggested by their names, and we'll have more details to follow.
A feature branch has only direct interactions with the develop branch, which means it checks out from a develop branch and merges back to a develop branch. The feature branches might be the simplest type of branches out of the three.
To create a feature branch with Git flow, simply execute the following command:
$ git flow feature start <feature-name>
Now Git flow will automatically checkout a new branch named after feature/<feature-name>, and you are ready to start development and commit changes occasionally.
After completing feature development, Git flow can automatically merge things back to the develop branch by the following command:
$ git flow feature finish <feature-name>
A feature branch is usually started by the developer who is assigned to the development of that very feature and is merged by the developer him or herself, or the owners of the develop branch (for example, if code review is required).
In a single iteration of a product, after finishing the development of features, we usually need a stage for fully testing everything, fixing bugs, and actually getting it ready to be released. And work for this stage will be done on release branches.
Unlike feature branches, a repository usually has only one active release branch at a time, and it is usually created by the owner of the repository. When the development branch is reaching a state of release and a thorough test is about to begin, we can then create a release branch using the following command:
$ git flow release start <version>
From now on, bug fixes that are going to be released in this iteration should be merged or committed to branch release/<version> and changes to the current release branch can be merged back to the develop branch anytime.
If the test goes well and important bugs have been fixed, we can then finish this release and put it online:
$ git flow release finish <version>
After executing this command, Git flow will merge the current release branch to both master and develop branches. So in a standard Git flow branching model, the develop branch will not be merged into the master directly, though after finishing a release, the content on develop and master branches could be identical (if no more changes are made to the develop branch during the releasing stage).
Unfortunately, there's a phenomenon in the world of developers: bugs are always harder to find before the code goes live. After releasing, if serious bugs were found, we would have to use hotfixes to make things right.
A hotfix branch works kind of like a release branch but lasts shorter (because you would probably want it merged as soon as possible). Unlike feature branches being checked out from develop branch, a hotfix branch is checked out from master. And after getting things done, it should be merged back to both master and develop branches, just like a release branch does.
To create a hotfix branch, similarly you can execute the following command:
$ git flow hotfix start <hotfix-name>
And to finish, execute the following command:
$ git flow hotfix finish <hotfix-name>
The most valuable idea in Git flow beside the branching model itself is, in my opinion, the clear outline of one iteration. You may not need to follow every step mentioned thus far to use Git flow, but just make it fit your work. For example, for small features that can be done in a single commit, you might not actually need a feature branch. But conversely, Git flow might not bring much value if the iteration itself gets chaotic.
Code review could be a very important joint of team cooperation. It ensures acceptable quality of the code itself and helps newcomers correct their misunderstanding of the project and accumulate experiences rapidly without taking a wrong path.
If you have tried to contribute code to open-source projects on GitHub, you must be familiar with pull requests or PR. There are actually tools or IDEs with code reviewing workflow built-in. But with GitHub and other self-hosted services like GitLab, we can get it done smoothly without relying on specific tools.
Restrictions on accessing specific branches like master and develop are not technically necessary. But without those restrictions, developers can easily skip code reviewing because they are just able to do so. In services provided by the Visual Studio Team Foundation Server, we may add a custom check in policy to force code review. But in lighter services like GitHub and GitLab, it might be harder to have similar functionality.
The easiest way might be to have developers who are more qualified and familiar with the current project have the permissions for writing the develop branch, and restrict code reviewing in this group verbally. For other developers working on this project, pull requests are now forced for getting changes they merged.
A great thing about those popular Git services is that the reviewer and maybe other colleagues of yours may comment on your pull requests or even specific lines of code to raise their concerns or suggestions. And accordingly, you can make modifications to the active pull request and make things a little bit closer to perfect.
Furthermore, references between issues and pull requests are shown in the conversation. This along with the comments and modification records makes the context of current pull requests clear and traceable.
Ideally, we would expect every commit we make to pass tests and code linting. But because we are human, we can easily forget about running tests before committing changes. And then, if we have already set up continuous integration (we'll come to that shortly) of this project, pushing the changes would make it red. And if your colleague has set up a CI light with an alarm, you would make it flash and sound out.
To avoid breaking the build constantly, you might want to add a pre-commit hook to your local repository.
Git provides varieties of hooks corresponding to specific phases of an operation or an event. After initializing a Git repository, Git will create hook samples under the directory .git/hooks.
Now let's create the file pre-commit under the directory .git/hooks with the following content:
#!/bin/sh
npm run test
And now Git will run tests before every commit of changes.
Adding hooks manually to the local repository could be trivial, but luckily we have npm packages like pre-commit that will add pre-commit hooks automatically when it's installed (as you usually might need to run npm install anyway).
To use the pre-commit package, just install it as a development dependency:
$ npm install pre-commit --save-dev
It will read your package.json and execute npm scripts listed with the field pre-commit or precommit:
{
  ..
  "script": {
    "test": "istanbul cover ..."
  },
  "pre-commit": ["test"]
}
Note
At the time of writing, npm package pre-commit uses symbolic links to create Git hook, which requires administrator privileges on Windows. But failing to create a symbolic link won't stop the npm install command from completing. So if you are using Windows, you probably might want to ensure pre-commit is properly installed.