
Chapter 1. The goal of unit testing
This chapter covers
- The state of unit testing
- The goal of unit testing
- Consequences of having a bad test suite
- Using coverage metrics to measure test suite quality
- Attributes of a successful test suite
Learning unit testing doesn’t stop at mastering the technical bits of it, such as your favorite test framework, mocking library, and so on. There’s much more to unit testing than the act of writing tests. You always have to strive to achieve the best return on the time you invest in unit testing, minimizing the effort you put into tests and maximizing the benefits they provide. Achieving both things isn’t an easy task.
It’s fascinating to watch projects that have achieved this balance: they grow effortlessly, don’t require much maintenance, and can quickly adapt to their customers’ ever-changing needs. It’s equally frustrating to see projects that failed to do so. Despite all the effort and an impressive number of unit tests, such projects drag on slowly, with lots of bugs and upkeep costs.
That’s the difference between various unit testing techniques. Some yield great outcomes and help maintain software quality. Others don’t: they result in tests that don’t contribute much, break often, and require a lot of maintenance in general.
What you learn in this book will help you differentiate between good and bad unit testing techniques. You’ll learn how to do a cost-benefit analysis of your tests and apply proper testing techniques in your particular situation. You’ll also learn how to avoid common anti-patterns—patterns that may make sense at first but lead to trouble down the road.
But let’s start with the basics. This chapter gives a quick overview of the state of unit testing in the software industry, describes the goal behind writing and maintaining tests, and provides you with the idea of what makes a test suite successful.
1.1. The current state of unit testing
For the past two decades, there’s been a push toward adopting unit testing. The push has been so successful that unit testing is now considered mandatory in most companies. Most programmers practice unit testing and understand its importance. There’s no longer any dispute as to whether you should do it. Unless you’re working on a throwaway project, the answer is, yes, you do.
When it comes to enterprise application development, almost every project includes at least some unit tests. A significant percentage of such projects go far beyond that: they achieve good code coverage with lots and lots of unit and integration tests. The ratio between the production code and the test code could be anywhere between 1:1 and 1:3 (for each line of production code, there are one to three lines of test code). Sometimes, this ratio goes much higher than that, to a whopping 1:10.
But as with all new technologies, unit testing continues to evolve. The discussion has shifted from “Should we write unit tests?” to “What does it mean to write good unit tests?” This is where the main confusion still lies.
You can see the results of this confusion in software projects. Many projects have automated tests; they may even have a lot of them. But the existence of those tests often doesn’t provide the results the developers hope for. It can still take programmers a lot of effort to make progress in such projects. New features take forever to implement, new bugs constantly appear in the already implemented and accepted functionality, and the unit tests that are supposed to help don’t seem to mitigate this situation at all. They can even make it worse.
It’s a horrible situation for anyone to be in—and it’s the result of having unit tests that don’t do their job properly. The difference between good and bad tests is not merely a matter of taste or personal preference, it’s a matter of succeeding or failing at this critical project you’re working on.
It’s hard to overestimate the importance of the discussion of what makes a good unit test. Still, this discussion isn’t occurring much in the software development industry today. You’ll find a few articles and conference talks online, but I’ve yet to see any comprehensive material on this topic.
The situation in books isn’t any better; most of them focus on the basics of unit testing but don’t go much beyond that. Don’t get me wrong. There’s a lot of value in such books, especially when you are just starting out with unit testing. However, the learning doesn’t end with the basics. There’s a next level: not just writing tests, but doing unit testing in a way that provides you with the best return on your efforts. When you reach this point, most books pretty much leave you to your own devices to figure out how to get to that next level.
This book takes you there. It teaches a precise, scientific definition of the ideal unit test. You’ll see how this definition can be applied to practical, real-world examples. My hope is that this book will help you understand why your particular project may have gone sideways despite having a good number of tests, and how to correct its course for the better.
You’ll get the most value out of this book if you work in enterprise application development, but the core ideas are applicable to any software project.
An enterprise application is an application that aims at automating or assisting an organization’s inner processes. It can take many forms, but usually the characteristics of an enterprise software are
- High business logic complexity
- Long project lifespan
- Moderate amounts of data
- Low or moderate performance requirements
1.2. The goal of unit testing
Before taking a deep dive into the topic of unit testing, let’s step back and consider the goal that unit testing helps you to achieve. It’s often said that unit testing practices lead to a better design. And it’s true: the necessity to write unit tests for a code base normally leads to a better design. But that’s not the main goal of unit testing; it’s merely a pleasant side effect.
The ability to unit test a piece of code is a nice litmus test, but it only works in one direction. It’s a good negative indicator—it points out poor-quality code with relatively high accuracy. If you find that code is hard to unit test, it’s a strong sign that the code needs improvement. The poor quality usually manifests itself in tight coupling, which means different pieces of production code are not decoupled from each other enough, and it’s hard to test them separately.
Unfortunately, the ability to unit test a piece of code is a bad positive indicator. The fact that you can easily unit test your code base doesn’t necessarily mean it’s of good quality. The project can be a disaster even when it exhibits a high degree of decoupling.
What is the goal of unit testing, then? The goal is to enable sustainable growth of the software project. The term sustainable is key. It’s quite easy to grow a project, especially when you start from scratch. It’s much harder to sustain this growth over time.
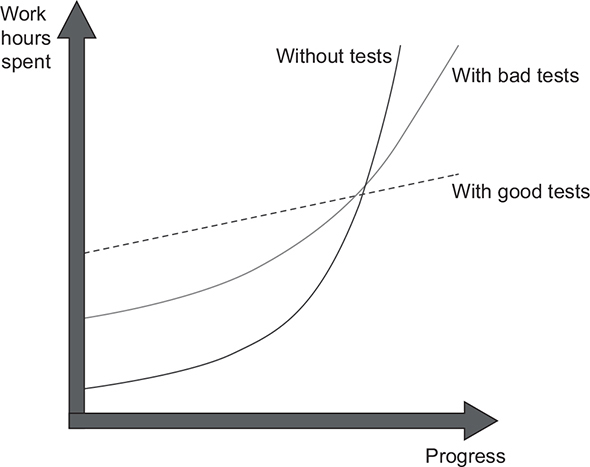
Figure 1.1 shows the growth dynamic of a typical project without tests. You start off quickly because there’s nothing dragging you down. No bad architectural decisions have been made yet, and there isn’t any existing code to worry about. As time goes by, however, you have to put in more and more hours to make the same amount of progress you showed at the beginning. Eventually, the development speed slows down significantly, sometimes even to the point where you can’t make any progress whatsoever.
Figure 1.1. The difference in growth dynamics between projects with and without tests. A project without tests has a head start but quickly slows down to the point that it’s hard to make any progress.

This phenomenon of quickly decreasing development speed is also known as software entropy. Entropy (the amount of disorder in a system) is a mathematical and scientific concept that can also apply to software systems. (If you’re interested in the math and science of entropy, look up the second law of thermodynamics.)
In software, entropy manifests in the form of code that tends to deteriorate. Each time you change something in a code base, the amount of disorder in it, or entropy, increases. If left without proper care, such as constant cleaning and refactoring, the system becomes increasingly complex and disorganized. Fixing one bug introduces more bugs, and modifying one part of the software breaks several others—it’s like a domino effect. Eventually, the code base becomes unreliable. And worst of all, it’s hard to bring it back to stability.
Tests help overturn this tendency. They act as a safety net—a tool that provides insurance against a vast majority of regressions. Tests help make sure the existing functionality works, even after you introduce new features or refactor the code to better fit new requirements.
Definition
A regression is when a feature stops working as intended after a certain event (usually, a code modification). The terms regression and software bug are synonyms and can be used interchangeably.
The downside here is that tests require initial—sometimes significant—effort. But they pay for themselves in the long run by helping the project to grow in the later stages. Software development without the help of tests that constantly verify the code base simply doesn’t scale.
Sustainability and scalability are the keys. They allow you to maintain development speed in the long run.
1.2.1. What makes a good or bad test?
Although unit testing helps maintain project growth, it’s not enough to just write tests. Badly written tests still result in the same picture.
As shown in figure 1.2, bad tests do help to slow down code deterioration at the beginning: the decline in development speed is less prominent compared to the situation with no tests at all. But nothing really changes in the grand scheme of things. It might take longer for such a project to enter the stagnation phase, but stagnation is still inevitable.
Figure 1.2. The difference in growth dynamics between projects with good and bad tests. A project with badly written tests exhibits the properties of a project with good tests at the beginning, but it eventually falls into the stagnation phase.
Remember, not all tests are created equal. Some of them are valuable and contribute a lot to overall software quality. Others don’t. They raise false alarms, don’t help you catch regression errors, and are slow and difficult to maintain. It’s easy to fall into the trap of writing unit tests for the sake of unit testing without a clear picture of whether it helps the project.
You can’t achieve the goal of unit testing by just throwing more tests at the project. You need to consider both the test’s value and its upkeep cost. The cost component is determined by the amount of time spent on various activities:
- Refactoring the test when you refactor the underlying code
- Running the test on each code change
- Dealing with false alarms raised by the test
- Spending time reading the test when you’re trying to understand how the underlying code behaves
It’s easy to create tests whose net value is close to zero or even is negative due to high maintenance costs. To enable sustainable project growth, you have to exclusively focus on high-quality tests—those are the only type of tests that are worth keeping in the test suite.
People often think production code and test code are different. Tests are assumed to be an addition to production code and have no cost of ownership. By extension, people often believe that the more tests, the better. This isn’t the case. Code is a liability, not an asset. The more code you introduce, the more you extend the surface area for potential bugs in your software, and the higher the project’s upkeep cost. It’s always better to solve problems with as little code as possible.
Tests are code, too. You should view them as the part of your code base that aims at solving a particular problem: ensuring the application’s correctness. Unit tests, just like any other code, are also vulnerable to bugs and require maintenance.
It’s crucial to learn how to differentiate between good and bad unit tests. I cover this topic in chapter 4.
1.3. Using coverage metrics to measure test suite quality
In this section, I talk about the two most popular coverage metrics—code coverage and branch coverage—how to calculate them, how they’re used, and problems with them. I’ll show why it’s detrimental for programmers to aim at a particular coverage number and why you can’t just rely on coverage metrics to determine the quality of your test suite.
Definition
A coverage metric shows how much source code a test suite executes, from none to 100%.
There are different types of coverage metrics, and they’re often used to assess the quality of a test suite. The common belief is that the higher the coverage number, the better.
Unfortunately, it’s not that simple, and coverage metrics, while providing valuable feedback, can’t be used to effectively measure the quality of a test suite. It’s the same situation as with the ability to unit test the code: coverage metrics are a good negative indicator but a bad positive one.
If a metric shows that there’s too little coverage in your code base—say, only 10%—that’s a good indication that you are not testing enough. But the reverse isn’t true: even 100% coverage isn’t a guarantee that you have a good-quality test suite. A test suite that provides high coverage can still be of poor quality.
I already touched on why this is so—you can’t just throw random tests at your project with the hope those tests will improve the situation. But let’s discuss this problem in detail with respect to the code coverage metric.
1.3.1. Understanding the code coverage metric
The first and most-used coverage metric is code coverage, also known as test coverage; see figure 1.3. This metric shows the ratio of the number of code lines executed by at least one test and the total number of lines in the production code base.
Figure 1.3. The code coverage (test coverage) metric is calculated as the ratio between the number of code lines executed by the test suite and the total number of lines in the production code base.
![]()
Let’s see an example to better understand how this works. Listing 1.1 shows an IsStringLong method and a test that covers it. The method determines whether a string provided to it as an input parameter is long (here, the definition of long is any string with the length greater than five characters). The test exercises the method using "abc" and checks that this string is not considered long.
Listing 1.1. A sample method partially covered by a test
public static bool IsStringLong(string input)
{                                   1
     if (input.Length > 5)          1
         return true;               2

    return false;                   1
 }                                  1

public void Test()
{
    bool result = IsStringLong("abc");
    Assert.Equal(false, result);
}
It’s easy to calculate the code coverage here. The total number of lines in the method is five (curly braces count, too). The number of lines executed by the test is four—the test goes through all the code lines except for the return true; statement. This gives us 4/5 = 0.8 = 80% code coverage.
Now, what if I refactor the method and inline the unnecessary if statement, like this?
public static bool IsStringLong(string input)
{
    return input.Length > 5;
}

public void Test()
{
    bool result = IsStringLong("abc");
    Assert.Equal(false, result);
}
Does the code coverage number change? Yes, it does. Because the test now exercises all three lines of code (the return statement plus two curly braces), the code coverage increases to 100%.
But did I improve the test suite with this refactoring? Of course not. I just shuffled the code inside the method. The test still verifies the same number of possible outcomes.
This simple example shows how easy it is to game the coverage numbers. The more compact your code is, the better the test coverage metric becomes, because it only accounts for the raw line numbers. At the same time, squashing more code into less space doesn’t (and shouldn’t) change the value of the test suite or the maintainability of the underlying code base.
1.3.2. Understanding the branch coverage metric
Another coverage metric is called branch coverage. Branch coverage provides more precise results than code coverage because it helps cope with code coverage’s shortcomings. Instead of using the raw number of code lines, this metric focuses on control structures, such as if and switch statements. It shows how many of such control structures are traversed by at least one test in the suite, as shown in figure 1.4.
Figure 1.4. The branch metric is calculated as the ratio of the number of code branches exercised by the test suite and the total number of branches in the production code base.

To calculate the branch coverage metric, you need to sum up all possible branches in your code base and see how many of them are visited by tests. Let’s take our previous example again:
public static bool IsStringLong(string input)
{
    return input.Length > 5;
}

public void Test()
{
    bool result = IsStringLong("abc");
    Assert.Equal(false, result);
}
There are two branches in the IsStringLong method: one for the situation when the length of the string argument is greater than five characters, and the other one when it’s not. The test covers only one of these branches, so the branch coverage metric is 1/2 = 0.5 = 50%. And it doesn’t matter how we represent the code under test—whether we use an if statement as before or use the shorter notation. The branch coverage metric only accounts for the number of branches; it doesn’t take into consideration how many lines of code it took to implement those branches.
Figure 1.5 shows a helpful way to visualize this metric. You can represent all possible paths the code under test can take as a graph and see how many of them have been traversed. IsStringLong has two such paths, and the test exercises only one of them.
Figure 1.5. The method IsStringLong represented as a graph of possible code paths. Test covers only one of the two code paths, thus providing 50% branch coverage.

1.3.3. Problems with coverage metrics
Although the branch coverage metric yields better results than code coverage, you still can’t rely on either of them to determine the quality of your test suite, for two reasons:
- You can’t guarantee that the test verifies all the possible outcomes of the system under test.
- No coverage metric can take into account code paths in external libraries.
Let’s look more closely at each of these reasons.
You can’t guarantee that the test verifies all the possible outcomes
For the code paths to be actually tested and not just exercised, your unit tests must have appropriate assertions. In other words, you need to check that the outcome the system under test produces is the exact outcome you expect it to produce. Moreover, this outcome may have several components; and for the coverage metrics to be meaningful, you need to verify all of them.
The next listing shows another version of the IsStringLong method. It records the last result into a public WasLastStringLong property.
Listing 1.2. Version of IsStringLong that records the last result
public static bool WasLastStringLong { get; private set; }

public static bool IsStringLong(string input)
{
    bool result = input.Length > 5;
    WasLastStringLong = result;           1
    return result;                        2
}

public void Test()
{
    bool result = IsStringLong("abc");
    Assert.Equal(false, result);          3
}
- 1 First outcome
- 2 Second outcome
- 3 The test verifies only the second outcome.
The IsStringLong method now has two outcomes: an explicit one, which is encoded by the return value; and an implicit one, which is the new value of the property. And in spite of not verifying the second, implicit outcome, the coverage metrics would still show the same results: 100% for the code coverage and 50% for the branch coverage. As you can see, the coverage metrics don’t guarantee that the underlying code is tested, only that it has been executed at some point.
An extreme version of this situation with partially tested outcomes is assertion-free testing, which is when you write tests that don’t have any assertion statements in them whatsoever. Here’s an example of assertion-free testing.
Listing 1.3. A test with no assertions always passes.
public void Test()
{
    bool result1 = IsStringLong("abc");      1
    bool result2 = IsStringLong("abcdef");   2
}
- 1 Returns true
- 2 Returns false
This test has both code and branch coverage metrics showing 100%. But at the same time, it is completely useless because it doesn’t verify anything.
The concept of assertion-free testing might look like a dumb idea, but it does happen in the wild.
Years ago, I worked on a project where management imposed a strict requirement of having 100% code coverage for every project under development. This initiative had noble intentions. It was during the time when unit testing wasn’t as prevalent as it is today. Few people in the organization practiced it, and even fewer did unit testing consistently.
A group of developers had gone to a conference where many talks were devoted to unit testing. After returning, they decided to put their new knowledge into practice. Upper management supported them, and the great conversion to better programming techniques began. Internal presentations were given. New tools were installed. And, more importantly, a new company-wide rule was imposed: all development teams had to focus on writing tests exclusively until they reached the 100% code coverage mark. After they reached this goal, any code check-in that lowered the metric had to be rejected by the build systems.
As you might guess, this didn’t play out well. Crushed by this severe limitation, developers started to seek ways to game the system. Naturally, many of them came to the same realization: if you wrap all tests with try/catch blocks and don’t introduce any assertions in them, those tests are guaranteed to pass. People started to mindlessly create tests for the sake of meeting the mandatory 100% coverage requirement. Needless to say, those tests didn’t add any value to the projects. Moreover, they damaged the projects because of all the effort and time they steered away from productive activities, and because of the upkeep costs required to maintain the tests moving forward.
Eventually, the requirement was lowered to 90% and then to 80%; after some period of time, it was retracted altogether (for the better!).
But let’s say that you thoroughly verify each outcome of the code under test. Does this, in combination with the branch coverage metric, provide a reliable mechanism, which you can use to determine the quality of your test suite? Unfortunately, no.
No coverage metric can take into account code paths in external libraries
The second problem with all coverage metrics is that they don’t take into account code paths that external libraries go through when the system under test calls methods on them. Let’s take the following example:
public static int Parse(string input)
{
    return int.Parse(input);
}

public void Test()
{
    int result = Parse("5");
    Assert.Equal(5, result);
}
The branch coverage metric shows 100%, and the test verifies all components of the method’s outcome. It has a single such component anyway—the return value. At the same time, this test is nowhere near being exhaustive. It doesn’t take into account the code paths the .NET Framework’s int.Parse method may go through. And there are quite a number of code paths, even in this simple method, as you can see in figure 1.6.
Figure 1.6. Hidden code paths of external libraries. Coverage metrics have no way to see how many of them there are and how many of them your tests exercise.

The built-in integer type has plenty of branches that are hidden from the test and that might lead to different results, should you change the method’s input parameter. Here are just a few possible arguments that can’t be transformed into an integer:
- Null value
- An empty string
- “Not an int”
- A string that’s too large
You can fall into numerous edge cases, and there’s no way to see if your tests account for all of them.
This is not to say that coverage metrics should take into account code paths in external libraries (they shouldn’t), but rather to show you that you can’t rely on those metrics to see how good or bad your unit tests are. Coverage metrics can’t possibly tell whether your tests are exhaustive; nor can they say if you have enough tests.
1.3.4. Aiming at a particular coverage number
At this point, I hope you can see that relying on coverage metrics to determine the quality of your test suite is not enough. It can also lead to dangerous territory if you start making a specific coverage number a target, be it 100%, 90%, or even a moderate 70%. The best way to view a coverage metric is as an indicator, not a goal in and of itself.
Think of a patient in a hospital. Their high temperature might indicate a fever and is a helpful observation. But the hospital shouldn’t make the proper temperature of this patient a goal to target by any means necessary. Otherwise, the hospital might end up with the quick and “efficient” solution of installing an air conditioner next to the patient and regulating their temperature by adjusting the amount of cold air flowing onto their skin. Of course, this approach doesn’t make any sense.
Likewise, targeting a specific coverage number creates a perverse incentive that goes against the goal of unit testing. Instead of focusing on testing the things that matter, people start to seek ways to attain this artificial target. Proper unit testing is difficult enough already. Imposing a mandatory coverage number only distracts developers from being mindful about what they test, and makes proper unit testing even harder to achieve.
Tip
It’s good to have a high level of coverage in core parts of your system. It’s bad to make this high level a requirement. The difference is subtle but critical.
Let me repeat myself: coverage metrics are a good negative indicator, but a bad positive one. Low coverage numbers—say, below 60%—are a certain sign of trouble. They mean there’s a lot of untested code in your code base. But high numbers don’t mean anything. Thus, measuring the code coverage should be only a first step on the way to a quality test suite.
1.4. What makes a successful test suite?
I’ve spent most of this chapter discussing improper ways to measure the quality of a test suite: using coverage metrics. What about a proper way? How should you measure your test suite’s quality? The only reliable way is to evaluate each test in the suite individually, one by one. Of course, you don’t have to evaluate all of them at once; that could be quite a large undertaking and require significant upfront effort. You can perform this evaluation gradually. The point is that there’s no automated way to see how good your test suite is. You have to apply your personal judgment.
Let’s look at a broader picture of what makes a test suite successful as a whole. (We’ll dive into the specifics of differentiating between good and bad tests in chapter 4.) A successful test suite has the following properties:
- It’s integrated into the development cycle.
- It targets only the most important parts of your code base.
- It provides maximum value with minimum maintenance costs.
1.4.1. It’s integrated into the development cycle
The only point in having automated tests is if you constantly use them. All tests should be integrated into the development cycle. Ideally, you should execute them on every code change, even the smallest one.
1.4.2. It targets only the most important parts of your code base
Just as all tests are not created equal, not all parts of your code base are worth the same attention in terms of unit testing. The value the tests provide is not only in how those tests themselves are structured, but also in the code they verify.
It’s important to direct your unit testing efforts to the most critical parts of the system and verify the others only briefly or indirectly. In most applications, the most important part is the part that contains business logic—the domain model.[1] Testing business logic gives you the best return on your time investment.
See Domain-Driven Design: Tackling Complexity in the Heart of Software by Eric Evans (Addison-Wesley, 2003).
All other parts can be divided into three categories:
- Infrastructure code
- External services and dependencies, such as the database and third-party systems
- Code that glues everything together
Some of these other parts may still need thorough unit testing, though. For example, the infrastructure code may contain complex and important algorithms, so it would make sense to cover them with a lot of tests, too. But in general, most of your attention should be spent on the domain model.
Some of your tests, such as integration tests, can go beyond the domain model and verify how the system works as a whole, including the noncritical parts of the code base. And that’s fine. But the focus should remain on the domain model.
Note that in order to follow this guideline, you should isolate the domain model from the non-essential parts of the code base. You have to keep the domain model separated from all other application concerns so you can focus your unit testing efforts on that domain model exclusively. We talk about all this in detail in part 2 of the book.
1.4.3. It provides maximum value with minimum maintenance costs
The most difficult part of unit testing is achieving maximum value with minimum maintenance costs. That’s the main focus of this book.
It’s not enough to incorporate tests into a build system, and it’s not enough to maintain high test coverage of the domain model. It’s also crucial to keep in the suite only the tests whose value exceeds their upkeep costs by a good margin.
This last attribute can be divided in two:
- Recognizing a valuable test (and, by extension, a test of low value)
- Writing a valuable test
Although these skills may seem similar, they’re different by nature. To recognize a test of high value, you need a frame of reference. On the other hand, writing a valuable test requires you to also know code design techniques. Unit tests and the underlying code are highly intertwined, and it’s impossible to create valuable tests without putting significant effort into the code base they cover.
You can view it as the difference between recognizing a good song and being able to compose one. The amount of effort required to become a composer is asymmetrically larger than the effort required to differentiate between good and bad music. The same is true for unit tests. Writing a new test requires more effort than examining an existing one, mostly because you don’t write tests in a vacuum: you have to take into account the underlying code. And so although I focus on unit tests, I also devote a significant portion of this book to discussing code design.
1.5. What you will learn in this book
This book teaches a frame of reference that you can use to analyze any test in your test suite. This frame of reference is foundational. After learning it, you’ll be able to look at many of your tests in a new light and see which of them contribute to the project and which must be refactored or gotten rid of altogether.
After setting this stage (chapter 4), the book analyzes the existing unit testing techniques and practices (chapters 4–6, and part of 7). It doesn’t matter whether you’re familiar with those techniques and practices. If you are familiar with them, you’ll see them from a new angle. Most likely, you already get them at the intuitive level. This book can help you articulate why the techniques and best practices you’ve been using all along are so helpful.
Don’t underestimate this skill. The ability to clearly communicate your ideas to colleagues is priceless. A software developer—even a great one—rarely gets full credit for a design decision if they can’t explain why, exactly, that decision was made. This book can help you transform your knowledge from the realm of the unconscious to something you are able to talk about with anyone.
If you don’t have much experience with unit testing techniques and best practices, you’ll learn a lot. In addition to the frame of reference that you can use to analyze any test in a test suite, the book teaches
- How to refactor the test suite along with the production code it covers
- How to apply different styles of unit testing
- Using integration tests to verify the behavior of the system as a whole
- Identifying and avoiding anti-patterns in unit tests
In addition to unit tests, this book covers the entire topic of automated testing, so you’ll also learn about integration and end-to-end tests.
I use C# and .NET in my code samples, but you don’t have to be a C# professional to read this book; C# is just the language that I happen to work with the most. All the concepts I talk about are non-language-specific and can be applied to any other object-oriented language, such as Java or C++.
Summary
- Code tends to deteriorate. Each time you change something in a code base, the amount of disorder in it, or entropy, increases. Without proper care, such as constant cleaning and refactoring, the system becomes increasingly complex and disorganized. Tests help overturn this tendency. They act as a safety net—a tool that provides insurance against the vast majority of regressions.
- It’s important to write unit tests. It’s equally important to write good unit tests. The end result for projects with bad tests or no tests is the same: either stagnation or a lot of regressions with every new release.
- The goal of unit testing is to enable sustainable growth of the software project. A good unit test suite helps avoid the stagnation phase and maintain the development pace over time. With such a suite, you’re confident that your changes won’t lead to regressions. This, in turn, makes it easier to refactor the code or add new features.
- All tests are not created equal. Each test has a cost and a benefit component, and you need to carefully weigh one against the other. Keep only tests of positive net value in the suite, and get rid of all others. Both the application code and the test code are liabilities, not assets.
- The ability to unit test code is a good litmus test, but it only works in one direction. It’s a good negative indicator (if you can’t unit test the code, it’s of poor quality) but a bad positive one (the ability to unit test the code doesn’t guarantee its quality).
- Likewise, coverage metrics are a good negative indicator but a bad positive one. Low coverage numbers are a certain sign of trouble, but a high coverage number doesn’t automatically mean your test suite is of high quality.
- Branch coverage provides better insight into the completeness of the test suite but still can’t indicate whether the suite is good enough. It doesn’t take into account the presence of assertions, and it can’t account for code paths in third-party libraries that your code base uses.
- Imposing a particular coverage number creates a perverse incentive. It’s good to have a high level of coverage in core parts of your system, but it’s bad to make this high level a requirement.
- A successful test suite exhibits the following attributes:
- It is integrated into the development cycle.
- It targets only the most important parts of your code base.
- It provides maximum value with minimum maintenance costs.
- The only way to achieve the goal of unit testing (that is, enabling sustainable project growth) is to
- Learn how to differentiate between a good and a bad test.
- Be able to refactor a test to make it more valuable.