
Hour 14. Character Controllers
What You’ll Learn in This Hour:
• The basics of Unity’s character controller
• How to create scripts for a character controller
• How to build a simple custom character controller
This hour you will learn all about the character controller components in Unity. You will start by learning about the basics of the character controller. You will learn what it is and how it functions. From there you will how to write scripts to manipulate to utilize the abilities of the character controller. You will finish the chapter by building your own character controller from scratch.
Note: Why Learn About Controllers?
You might be wondering why you need to learn about character controllers when Unity provides two very robust controllers already (the First Person Controller and the Third Person Controller). While it is true that those two controllers are very powerful, there are plenty of situations where they won’t suffice. What if you wanted to make a controller for a 2D game? What if you wanted a controller that calculated gravity differently? It is important to understand the fundamental workings of the controller so that you can build specific solutions for your projects.
The Character Controller
So far you have seen many ways to interact with an object in a scene. You have explored ways to move them manually via scripts. You have also seen physical interactions with rigidbodies. Normally, these are acceptable ways to get movement in your game. If you are looking for more realistic and consistent gameplay, however, then you will need something a little more powerful. What you need is a character controller (often called just a controller). The character controller is a specialized component that allows you a strong level of control over a game object without rigidbody physics. That is to say, a character controller will allow you to move an object along the ground and be constrained by walls and steep hills without pushing objects or being pushed by objects. At its heart, the character controller is a capsule collider with some additional functionality that will be examined later this hour.
Adding a Character Controller
The character controller itself is a component and can be applied to any game object. While the term “character” generally implies a player, it can be used to control all moving entities in a scene (players, enemies, cars, etc.). To apply a character controller to an object, simply select the object and then click “Component->Physics->Character Controller”. A character controller should now appear under the object in the inspector view.
Note: Collider Quarrel
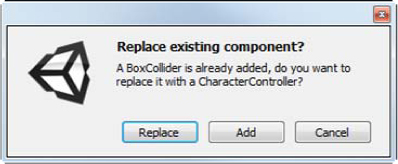
Since a character controller has its own capsule collider, you may get a warning message when you attempt to add it to an object that already has a collider (see Figure 14.1). You have the option to cancel the character controller, replace the existing collider with the new capsule one, or keep both on the object. The effect you wish to have will determine which option you choose. Generally speaking, if you are using your character controller for normal movement, you will want to replace the existing collider with the capsule collider.
Figure 14.1. Message when adding controller to object with collider.
Caution: Character Controllers and Rigidbodies
As character controllers and rigidbodies are both components, they can both be added to the same object. This however, is not a good idea. Both the controller and the rigidbody will attempt to control the movement of the object in their own specific way. This can cause strange behaviors in the objects. A good general rule is to pick one or the other. Only use both if you are trying to accomplish a specific goal and know what you are doing.
Character Controller Properties
The character controller has two sets of properties. There are the properties which are used via the inspector view in the Unity editor (covered here), and there are the properties which are accessed via scripting (covered later). Figure 14.2 illustrates the different properties of the character controller component.
Figure 14.2. The character controller component.
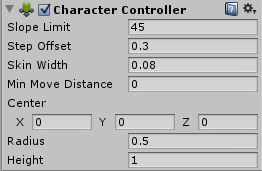
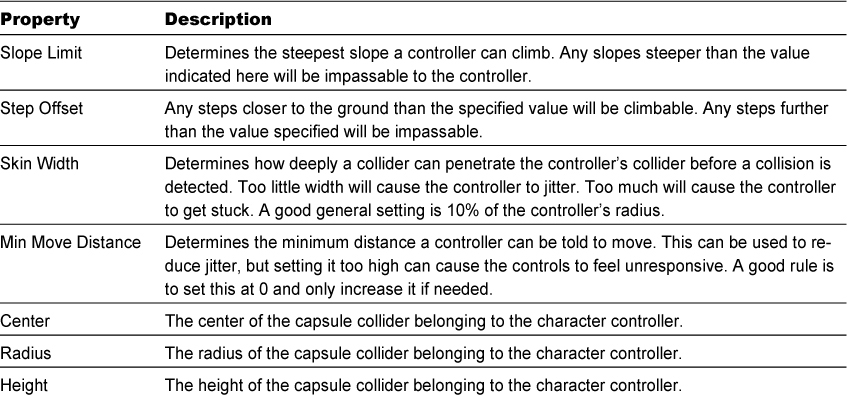
Table 14.1 lists all of the properties of the character controller and describes what they do.
Table 14.1. Character Controller Properties
Scripting for Character Controllers
You may have noticed earlier that simply placing a controller on a game object didn’t have much of an effect. In fact, if you had created a scene with any falling or moving items you would have seen that they would collide with the object containing the controller, but the controller would not be moved by them. Most of the power of the character controller exists in scripting. It is worth noting that the character controller simply provides the foundations of control. Actual implementation is entirely up to you. This means that you will have to do a little more work to make your controllers, but the result can be much more powerful, custom tailored, and refined.
Controller Scripting
As mentioned before this hour, the character controller has a series of properties (variables) that are accessible through scripting that really give it a lot of power. Before you can work with the controller in code, however, you have to acquire a reference to it:
CharacterController controller;
void Start () {
controller = GetComponent<CharacterController>();
}
This bit of code will create a CharacterController variable. Then, in the Start() method, it will find the controller reference and save it to the variable. From that point on you will be able to use it in code. Table 14.2 lists the character controller scripting variables and their descriptions.
Table 14.2. Character Controller Scripting Variables

Note: Common Functionality
The character controller component is a descendant of the collider component. We say the character controller “inherits” from the collider. Therefore, the controller has access to all of the scripting capabilities that also belong to a collider. This section of the book, however, only covers the items that are unique to the character controller. It is just worth noting the relationship between controllers and colliders in case you notice some extra functionality in the code and wonder where it comes from.
Along with a set of variables, the character controller also provides you with two new methods: SimpleMove() and Move(). These methods use the idea of motion to move an object around. This means that the objects aren’t placed, nor are they pushed. They also aren’t translated. The effect is instead based off of the actual input controls setup in the Input Manager. The result is that the movement of the controller has a little bit of buildup and sliding to it. This makes it feel more realistic.
bool SimpleMove(Vector3 movement)
SimpleMove(), as its name implies, is a simple way to move an object around. This method reads in a Vector3 variable containing how much the object should move along each axis. The method returns a Boolean value indicating whether or not the object is grounded (touching the ground). Internally the method applies gravity to the object automatically. As a result, the SimpleMove() method ignores any movement in the y axis that you give it. The result is that you cannot use your own gravity, nor can you apply any jumping or flying with SimpleMove(). If you would like to have those, you will need to use Move() instead. Another thing to note is that SimpleMove() calculates move distances differently than Move(). Therefore the amount that you will need to move an object with SimpleMove() is different than the amount you would need to move and object with Move() to go the same distance.
CollisionFlags Move(Vector3 movement)
Like SimpleMove(), Move() is responsible for moving an object around the scene. It takes in a Vector3 containing the amount of movement you would like along each axis. Move() returns a CollisionFlags variable (covered later) containing any collisions that occurred during the move. The Move() method does not apply any gravity so you will have to calculate and apply that yourself.
Tip: Controlling “Slide”
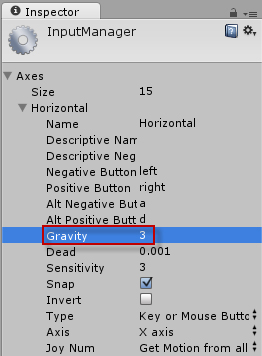
Movement with a character controller can contain some amount of “slide”. That is, the object doesn’t stop immediately when a key is pressed. Instead the object slows down to a halt over time. You can increase or decrease the amount of slide an object has by changing the “Gravity” property for the input axis in the Input Manager (see Figure 14.3). To open the Input Manager click “Edit->Project Settings->Input”.
Figure 14.3. The gravity setting of the Input Manager.
CollisionFlags
The CollisionFlags variable type is a complex variable that contains information about how collision occurred with a character controller. The variable is a “bitmask” which means that the data is stored within the binary code itself. All that this means for you is that there is a different way to extract the information you need from it. A CollisionFlags variable can either be a value or contain a value. The difference is that if the flags are a certain value, all other values are excluded. Conversely, a CollisionFlags variable can contain many different values. This will make more sense with an example.
Suppose you wanted to determine if a variable was only colliding with an object below it. You would write:
if (controller.collisionFlags == CollisionFlags.Below)
print("This is only colliding with an object below");
If the above is true, you know that the object cannot be colliding in any other direction. If you wanted to determine if the object was colliding along the bottom, but could also be colliding in another direction, you would write:
if (controller.collisionFlags & CollisionFlags.Below)
print("This is colliding with an object below. Could be colliding elsewhere.");
The difference between the two is that in the first code sample, the value was “Below” and in the second it simply contained “Below”. Obviously, a CollisionFlags variable can only be “None” and not just contain it. It isn’t possible for a collider to not be colliding and still also be colliding in a direction. The CollisionFlags variable type can contains values of: “None”, “Sides”, “Above”, and / or “Below”. Those are written out like this:
CollisionFlags.None
CollisionFlags.Above
CollisionFlags.Sides
CollisionFlags.Below
Using these flags, you can determine exactly how an object is colliding with your controller.
Colliding
The character controller automatically handles collision when moving, but sometimes you want a finer level of control. That is why the controller calls the method OnControllerColliderHit() whenever a collision is detected. Using this method you can write your own custom collision effects (like pushing an object). To detect collisions, you will need to add the following code to your script:
void OnControllerColliderHit(ControllerColliderHit hit) {
//your collision code goes here
}
Once you have added this method to your code, you can put whatever collision code you want inside. The parameter “hit” will contain information about the object that collided with the controller. A practical look at this method will be given later this hour.
Building a Controller
Now that you have learned about the Character Controller component and seen how to work with it, you can begin to build your own controllers. It is important to note that no two controllers are exactly the same. They are designed in such a way that they are easy to custom make to your exact needs. Therefore, the controller presented in this section of the text is not the way to make a controller. It is simply a way to make a controller.
There are many different controllers that could be presented here in this book. The type you will be making is a controller meant for 2D platformer style game like Super Mario Bros. The completed project and controller script can be found in the book assets for Chapter 14 named “Hour14_Controller”.
Initial Setup
Before actually diving into the scripting of a custom controller, you will want to set up a scene to try the various aspects out. This scene will be simple enough; containing a ground, a single platform, and a character to move about.
1. Create a new project or scene. Add a directional light, two cubes, and a capsule.
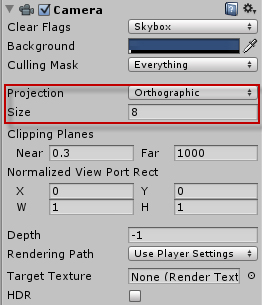
2. Since this is a 2D scene, you will want to set your camera up correctly. With the camera selected, change the “Projection” property to Orthographic and the “Size” property to 3 in the inspector (see Figure 14.4). Change the position of the camera to be (0, 2.4, -10).
Figure 14.4. The camera properties.
3. Place one of the cubes at (0, 0, -5) with a scale of (20, .5, 2). This will act as the floor. Place the other cube at (3, 3, -5) with a scale of (3, .5, 1).
4. Place the capsule at (0, 2, -5). Add a Character Controller to the capsule (click “Component->Physics->Character Controller”). When prompted, go ahead and replace the existing collider with the new one.
5. Add a “Scripts” folder to your scene. Add a script to the folder named “ControllerScript”. Attach the script to your capsule. This will be the object controlled by the character controller. Modify the controller script to contain the following:
CharacterController controller;
void Start () {
controller = GetComponent<CharacterController>();
}
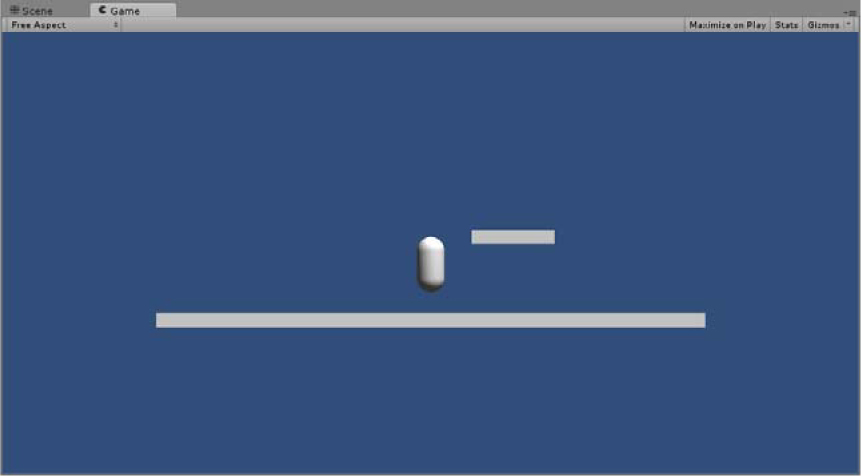
If you run the scene you will see something similar to Figure 14.5. Now that the scene is set up, you can begin working through the various functionalities.
Figure 14.5. The finished scene.
Movement
Now that the scene is finished, you will want to add the most basic function to your capsule: movement. To move your object will want to calculate the movement vector and call the Move() method. It is also a good idea (but not required) to store the movement speed you want in a variable so that it is easily changed. Finally, you will want to store your movement information is a Vector3. This isn’t needed yet, but will be required later when the y axis starts being used.
public float speed = 5.0f;
Vector3 movement = Vector3.zero;
void Update () {
movement.x = Input.GetAxis("Horizontal") * speed;
controller.Move(movement * Time.deltaTime);
}
The above code first declares a speed variable that will be used to control how fast the object can move. Next it declares a Vector3 variable called “movement” which will be used to store the movement information from frame to frame. Then, inside the Update() method the variable named “movement” is given a value of the horizontal movement axis (left / right arrows or “A”/”S” keys) times the speed. Notice how there is no y or z axis value given. Since this is a 2D controller there is no z axis movement and y axis is handled differently. Finally, the Move() method is called and the movement variable is multiplied by “Time.deltaTime”. This multiplication is done to make sure the scene runs exactly the same on any computer regardless of the frame rate.
Run the scene and notice how you can move the capsule back and forth now. You should notice that the capsule is stopped by the platform. You should also notice that the capsule is just floating in the air. There is no gravity applied (yet).
Gravity
The next thing you will want to add to your controller is gravity. There are two ways to handle gravity. You can either use the built in value for gravity or you can specify your own value. Applying the built in value for gravity will make everything fall at the same rate. You may, however, want to use your own value if you want a character to fall differently (think of a parachute). You can apply gravity by adding the following code:
movement.x = Input.GetAxis("Horizontal") * speed;
if(controller.isGrounded == false)
movement.y += Physics.gravity.y * Time.deltaTime;
controller.Move(movement * Time.deltaTime);
The first and last lines of code above were covered previously. They were left in as a point of reference. Since gravity doesn’t always need to be applied, an IF statement is used to determine if the character is not grounded. If it is determined that the character is not currently colliding on the bottom, then the y component of the scene’s current gravity is applied to the movement vector. This way, when the Move() method is called, the object moves left and right, but it is also affected by gravity.
Run your scene to see this in action. You will notice that the capsule immediately falls and stops once it hits the ground. If you run the capsule off of the side of the platform you can see it fall out of the scene.
Jumping
A platformer game wouldn’t be much fun if you couldn’t jump from platform to platform. Jumping is a little more complex than moving and falling. You will need to keep track of how high the character can jump. You will also want to make sure that the character can only jump once at a time (otherwise they would be flying).
public float jumpSpeed = 8.0f;
void Update() {
//movement and gravity code
if (Input.GetButton("Jump") && controller.isGrounded == true)
movement.y = jumpSpeed;
controller.Move(movement * Time.deltaTime);
}
Again, more code was given that was already covered. It is placed there simply as a point of reference. The first bit on code declares a new float variable “jumpSpeed” which dictates how high the character can jump. Then, inside the Update() method, an IF statement is used to make sure that the character can only jump if the key is pressed and if the character is currently on the ground.
Run the scene and try it out. See if you can jump the capsule onto the second platform. Notice how you have control over the capsule while it is in the air. That was a specific design choice and could be changed if need be in future projects.
Pushing Objects
One final bit of functionality you will want to add is the ability to push objects around in your scene. Doing so required the OnControllerColliderHit() method mentioned earlier. The code for this functionality looks like this:
public float pushPower = 2.0f;
void OnControllerColliderHit(ControllerColliderHit hit) {
Rigidbody body = hit.collider.attachedRigidbody;
if (body == null || body.isKinematic)
return;
if (hit.moveDirection.y < -0.3f)
return;
Vector3 pushDir = new Vector3(hit.moveDirection.x, 0f, 0f);
body.velocity = pushDir * pushPower;
}
Be sure to add this code to the class, but outside of any other method. The first line of code creates a variable that determines how hard the controller can push another object. Then, inside the OnControllerColliderHit() method you have your “pushing” code. In the method you get a reference to the rigidbody of the collided object. If the rigidbody doesn’t exist or is kinematic, the method exits. From there, you check the direction of the collision to make sure you aren’t pushing objects below the controller. Once all of that checks out, you calculate the direction of the push and then add the direction, multiplied by the power, to the hit object’s velocity.
Before trying this out, add a sphere to your scene. Position the sphere at (1.5, 1, -5). Be sure to add a rigidbody component to the sphere as well. Once that is done, run the scene. Notice how the capsule can now move the sphere around. Try pushing the sphere back and forth along the platform.
Full Code Listing
The full code for the controller script is listed below. Some code has been rearranged from its original listing for sake of organization:
using UnityEngine;
using System.Collections;
public class ControllerScript : MonoBehaviour {
CharacterController controller;
Vector3 movement = Vector3.zero;
public float speed = 6.0f;
public float jumpSpeed = 8.0f;
public float pushPower = 2.0f;
void Start () {
controller = GetComponent<CharacterController>();
}
void Update() {
movement.x = Input.GetAxis("Horizontal") * speed;
if(controller.isGrounded == false)
movement.y += Physics.gravity.y * Time.deltaTime;
if (Input.GetButton("Jump") && controller.isGrounded == true)
movement.y = jumpSpeed;
controller.Move(movement * Time.deltaTime);
}
void OnControllerColliderHit(ControllerColliderHit hit) {
Rigidbody body = hit.collider.attachedRigidbody;
if (body == null || body.isKinematic)
return;
if (hit.moveDirection.y < -0.3f)
return;
Vector3 pushDir = new Vector3(hit.moveDirection.x, 0f, 0f);
body.velocity = pushDir * pushPower;
}
}
Summary
This hour you learned all about Unity’s character controller. You started by examining the basics of the character controller as well as the component properties. From there you learned to work with the controller via scripting. You learned about the controller’s variables, methods, and collision. Finally, you wrote a custom 2D character controller specifically aimed at a platforming style game.
Q&A
Q. How many character controller types are there?
A. There is only a single character controller component. The number of ways you can use it, however, is virtually limitless. The character controller is made in such a way that it enables you to custom tailor it to any situation.
Q. Which is better to use: Rigibodies or Character Controllers?
A. This is an important question. The answer depends on what you hope to achieve. If you are looking to utilize Unity’s physics functionality, then the rigidbody is the way to go. If you would like to custom write more specific behaviors for your characters, then the character controller is paramount.
Workshop
Take some time to work through the questions here to ensure you have a firm grasp on the material.
Quiz
1. What shape collider is provided by a character controller?
2. Which property determines how far a collider can penetrate a controller before a collision is detected?
3. This variable type contains information about the direction collisions are occurring?
4. Which method moves a controller while still allowing y axis movement like jumping?
Answers
1. A capsule collider.
2. The Skin Width property.
3. The CollisionFlags variable type.
4. The Move() method.
Exercise
This exercise is more of a trial of scripting than anything else. Your challenge is to change the controller script provided for you this hour to contain the following functionality. Like always, if you get stuck and need help, the completed project can be found in the book assets for Hour 14 named “Hour14_Exercise”.
• Change the controller so that the player can only change movement direction while they are grounded. Currently the player can change direction midair.
• Allow the player to sprint (move faster) while holding the shift key.
• Allow the player to double jump. A double jump is where the player can jump and then jump again (only once) while in the air.