
Hour 21. Mobile Development
What You’ll Learn in This Hour:
• How to prepare for mobile development
• How to use a devices accelerometer
• How to use a devices touch display
Mobile devices such as phone and tablets are becoming very common gaming devices. This Hour you will be learning about mobile development with Unity for Android and iOS devices. You will begin by looking at the requirements for mobile development. From there, you will learn how to accept special inputs from a devices accelerometer. Finally, you will learn about touch interface input.
Note: Requirements
This hour covers the development for mobile devices specifically. As such, if you do not have a mobile device (iOS or Android) you will not be able to follow along with any of the hands on exercises. Don’t worry though, the reading should still make sense and you will still be able to make games on mobile devices. You just won’t be able to play them!
Preparing for Mobile
Unity makes developing games for mobile devices very easy. As of Unity version 4.1, the mobile plugins are even free! You will even be happy to know that developing for mobile platforms is almost identical to developing for other platforms. This means you can build a game once and deploy it everywhere. There is no longer any reason why you can’t build your games for every major platform. This level of cross-platform capability is unprecedented. Before you can begin working with mobile devices in Unity, however, you need to get your computer set up and configured to do it.
Note: Multitudes of Devices
There are many different types of mobile devices. At the time of writing, Apple has three devices (iPod, iPad, and iPhone) and Android has an untold number of phones and tablets. Each of these devices has slightly different hardware and steps to configure them correctly. As such, this text will simply attempt to guide you through the installing process. It would be impossible to write an exact guide that would work for everyone. In fact, there are several guides that already exist made by Unity, Apple, and Android (Google) that explain the process better than this text could. You will be referred to them when needed.
Setting Up Your Environment
Before even opening Unity to make a game, you will need to set up your development environment. The specifics of this differ depending on your target device and what you are trying to do, but the general steps are:
1. Install the SDK of the device you are targeting.
2. Ensure that your computer recognizes and can work with your device (only important if you want to test on the device).
3. Tell Unity where to find the SDK (Required for Android only).
If these steps seem a bit cryptic to you, don’t worry. There are plenty of resources available to assist you with these steps. The best place to start is with Unity’s own documentation. You can access Unity’s documentation by going to:
This site contains the living document of everything that is Unity. By default, it only shows items related to desktop development. You will need to enable the documentation for Android and iOS. You should see an Android and iOS icon with a red ‘X’ (see Figure 21.1).
Figure 21.1. The disabled mobile icons.

Clicking on either of these items will put a green check mark on them and enable that documentation (see Figure 21.2). As you can see in Figure 21.2, the Unity documentation has guides to assist you in setting up both the iOS and Android environments. These documents are updated as the steps to set the environment changes. Once you have completed the steps to configure your development environment for your target environment, or if you’re not planning on following along with a device, continue on to the next section.
The Unity Remote
The most basic way to test your games on a device is to build your projects, put the resulting files on the device, and then run it. This can be a very cumbersome system and one you’re sure to tire of quickly. Another way to test your games would be to build the project and then run it through an iOS or Android emulator. Again, this requires quite a few steps and involves configuring and running an emulator. These systems can be useful if you are doing extensive testing on advanced things like performance and rendering. For basic testing, however, there is a much better way. That way is the Unity Remote.
The Unity Remote is an app you can download from your mobile devices application store that enables you to test your applications out on your mobile device while it is running in the Unity editor. In a nutshell, this means that you can experience your game running on a device in real time alongside development and use the device to send device inputs back to your game. More information on the Unity Remote can be found here:
http://docs.unity3d.com/Documentation/Manual/unity-remote.html
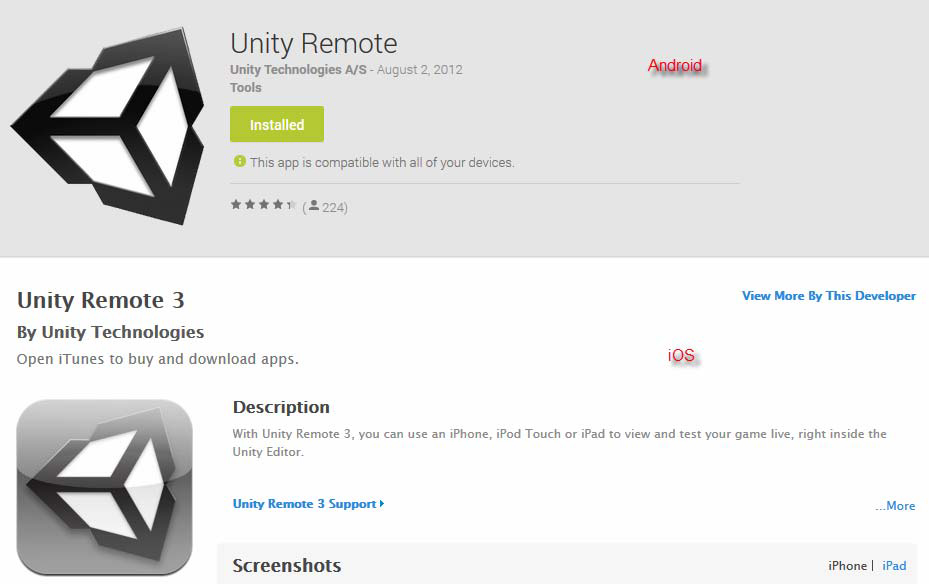
To find the Unity Remote application, search for the term “Unity Remote” in your devices application store. From there, you can download and install it just like any other application (see Figure 21.3).
Figure 21.3. The different application stores.
Once installed, the Unity Remote will act as both a display for your game but also a controller. You will be able to send click, accelerometer information, and multi-touch input back to Unity.
Accelerometers
Most modern mobile devices come with a built-in accelerometer. An accelerometer relays information about the physical orientation of the device. It is able to tell if the device is moving, tilted, or flat. It is also capable of detecting these things in all three axes. Figure 21.4 shows a mobile device’s accelerometer axes and how they are oriented. This is called a “portrait” orientation.
Figure 21.4. Accelerometer axes.
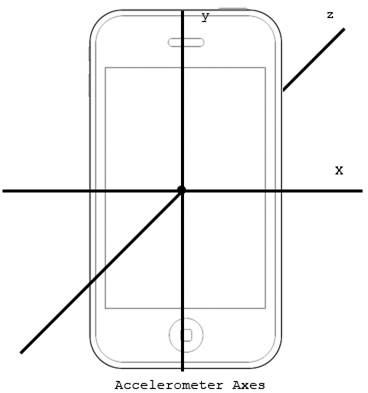
As you can see in the above image, the default axes of a device align with the 3D axes in Unity while the device is being held upright directly in front of you. If you turn the device to use it in a different orientation, you will need to convert the accelerometer data to the correct axis.
Designing for the Accelerometer
There are a few things you need to keep in mind when designing a game to use a mobile devices accelerometer. The first is that you can only every reliably use two of the accelerometer’s axes at any given time. The reason for this is that no matter the orientation of the device, one axis will always be actively engaged by gravity. Consider the orientation of the device in Figure 21.4 above. You can see that while the x and z axes can be manipulated by tilting the device, the y axis is currently reading negative values (gravity is pulling it down). If you were to turn the phone so that it rested flat on a surface, face up, you would only be able to use the x and y axes. In that case, the z axis would be actively engaged.
Another thing to consider when designing for an accelerometer is that the input is not extremely accurate. Mobile devices do not read from their accelerometers at a set interval, and often has to approximate values. The result is the inputs read from an accelerometer can be jerky and uneven. It is worth noting that the amount of inaccuracy is very small. It exists nonetheless and therefore should be noted.
Using the Accelerometer
Reading accelerometer input is done via scripts just like any other form of user input. All you need to do is read from the Vector3 variable named “acceleration” which is a part of the object “Input”. Therefore, you could access the x, y, and z axis data by writing:
Input.acceleration.x;
Input.acceleration.y;
Input.acceleration.z;
Using these values, you can manipulate your game objects accordingly.
Note: Axis Mismatch
When using accelerometer information in conjunction with the Unity Remote, you might notice that the axes aren’t lining up with the way they were described in the “Accelerometers” section above. This is because the Unity Remote assumes you will be working in “landscape” orientation (holding your device sideways so that the longer edge is parallel to the ground) and translates the axes for you. Therefore, when using the Unity Remote, the x axis runs along the long edge of your device and the y axis runs along the short edge. It may seem strange, but chances are you were going to use your device like that anyway. This saves you a step!
Multi Touch Input
Mobile devices tend to be controlled largely by touch capacity screens. These screens are capable of detecting when and where you touch them. They usually also have the ability to track multiple touches at a time. The exact number of touches varies based on the device.
Touching the screen doesn’t just give the device a simple touch location. In fact, there is quite a bit of information stored about each individual touch. In Unity, each screen touch is stored in a “Touch” variable. This means that every time you touch a screen, a Touch variable will be generated. That Touch variable will exist as long as your finger remains on the screen. If you drag your finger along the screen, the Touch variable tracks that. These “Touch” variables are stored together in a collection called “touches” which is a part of the “Input” object. If there is currently nothing touching the screen, than this collection of “Touches” will be empty. To access this collection, you could type:
Input.touches;
Using that collection, you could iterate through each touch variable to process its data. Doing so would look something like this:
foreach(Touch touch in Input.touches)
{
//Do something
}
As mentioned before, each touch contains more information that the simple screen data where the touch occurred. Table 21.1 contains all of the properties of the Touch variable type.
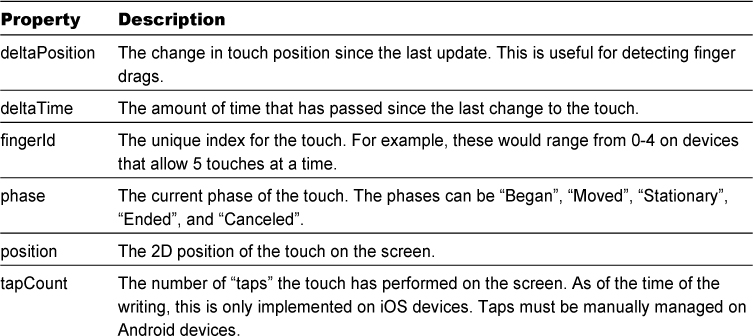
Each of these properties is useful for managing complex interactions between the user and game objects.
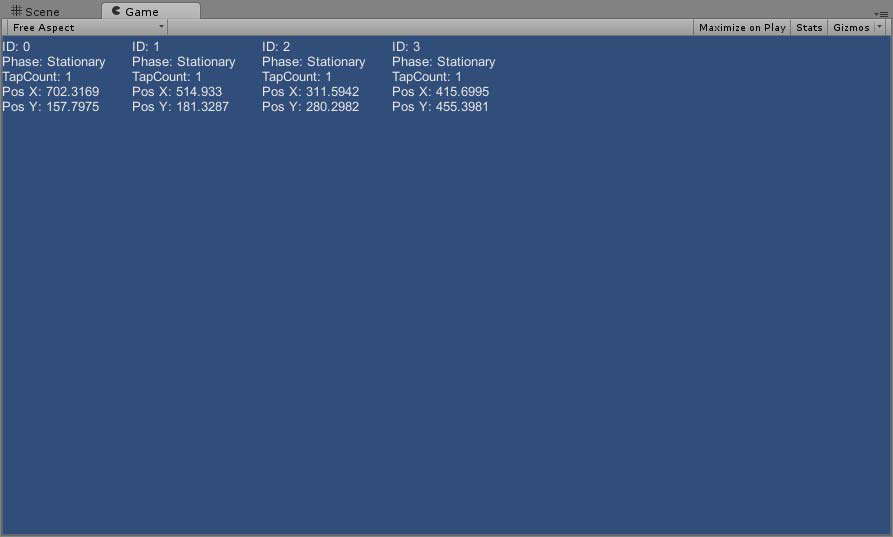
In this exercise you will be tracking finger touches and outputting their data to the screen. Obviously, in order to complete this exercise you will need a configured and attached mobile device with multi touch support.
1. Create a new project or scene.
2. Create a new script called “TouchScript” and attach it to the main camera. Put the following code in the script:
void OnGUI()
{
foreach(Touch touch in Input.touches)
{
string message = "";
message += "ID: " + touch.fingerId + "
";
message += "Phase: " + touch.phase.ToString() + "
";
message += "TapCount: " + touch.tapCount + "
";
message += "Pos X: " + touch.position.x + "
";
message += "Pos Y: " + touch.position.y + "
";
int num = touch.fingerId;
GUI.Label(new Rect(0 + 130 * num, 0, 120, 100), message);
}
}
3. Ensure your mobile device is plugged in to your computer. Run the scene. Touch the screen with your finger and notice the information that appears (see Figure 21.5). Move your finger and see how the data changes. Now touch with more fingers simultaneously. Move them about and take them off of the screen randomly. See how it tracks each touch independently. How many touches can you get on your screen at a time?
Figure 21.5. Touch output on the screen.
Caution: Do As I Say, Not As I Do!
In the above exercise, you created an OnGUI() method that collected information about the various touches on the screen. The part of the code where the string “message” is being built with the touch data is a big “No-No”. You should never perform processing in an OnGUI() method as it can greatly reduce efficiencies in your project. This was just the easiest way to build the example without unneeded complexity and for demonstration purposes only. Always keep update code where it belongs: in Update().
Summary
This hour you learned about using Unity to develop games with mobile devices in mind. You started by learning how to configure your development environment to work with Android and iOS. From there, you worked hands-on with a devices accelerometer. You finishes the hour up by experimenting with Unity’s touch tracking system.
Q&A
Q. Can I really build a game once and deploy it to all major platforms, mobile included?
A. Absolutely! The only thing to consider is that mobile devices generally don’t have as much processing power as desktops. Therefore, you may experience some performance issues if your game has a lot of heavy processing or effects. Focus will need to be spent to ensure your game is running efficiently if you plan to also deploy it on mobile platforms.
Q. What are the differences between iOS and Android devices?
A. From a Unity point of view, there isn’t much deferent between these two operating systems. They are both treated as mobile devices. Be aware though that there are some hardware differences and that can affect your games.
Workshop
Take some time to work through the questions here to ensure you have a firm grasp on the material.
Quiz
1. What tool allows you to send live device input data to Unity while it is running a scene?
2. How many axes on the accelerometer can you realistically use at a time?
3. How many touches can a device have at once?
Answers
1. The Unity Remote.
2. Two axes. The third will always be engaged by gravity depending on how you are holding the device.
3. It depends entirely on the device. If a device doesn’t have multi touch then it can only have a single touch at a time. If it does have multi touch, then it can have many.
Exercise
In this exercise you will have the opportunity to move objects about a scene based on touch input from a mobile device. Obviously, in order to complete this exercise you will need a configured and attached mobile device with multi touch support. If you do not have that then you can still read along to get the basic ideas. The completed exercise can be found in the book assets for Hour 21 named “Hour21_Exercise”.
1. Create a new project or scene. Add a directional light to the scene.
2. Add three cubes to the scene and name them “Cube1”, “Cube2”, and “Cube3”. Position them at (-3, 1, -5), (0, 1, -5), and (3, 1, -5) respectively.
3. Create a new folder named “Scripts”. Create a new script called “InputScript” in the “Scripts” folder and attach it to the three cubes.
4. Add the following code to the Update() method of the script:
foreach(Touch touch in Input.touches)
{
if(touch.fingerId == 0 && gameObject.name == "Cube1")
transform.Translate(touch.deltaPosition.x * .05F, touch.deltaPosition.y * .05F, 0F);
if(touch.fingerId == 1 && gameObject.name == "Cube2")
transform.Translate(touch.deltaPosition.x * .05F, touch.deltaPosition.y * .05F, 0F);
if(touch.fingerId == 2 && gameObject.name == "Cube3")
transform.Translate(touch.deltaPosition.x * .05F, touch.deltaPosition.y * .05F, 0F);
}
5. Run the scene and touch the screen with up to three fingers. Notice how you can move the three cubes independently. Also notice how lifting one finger does not cause the other fingers to lose their cubes or their place.